headlamp BMW X5 XDRIVE 48I 2009 E70 Owner's Manual
[x] Cancel search | Manufacturer: BMW, Model Year: 2009, Model line: X5 XDRIVE 48I, Model: BMW X5 XDRIVE 48I 2009 E70Pages: 317, PDF Size: 9.56 MB
Page 12 of 317
Cockpit
10
Cockpit
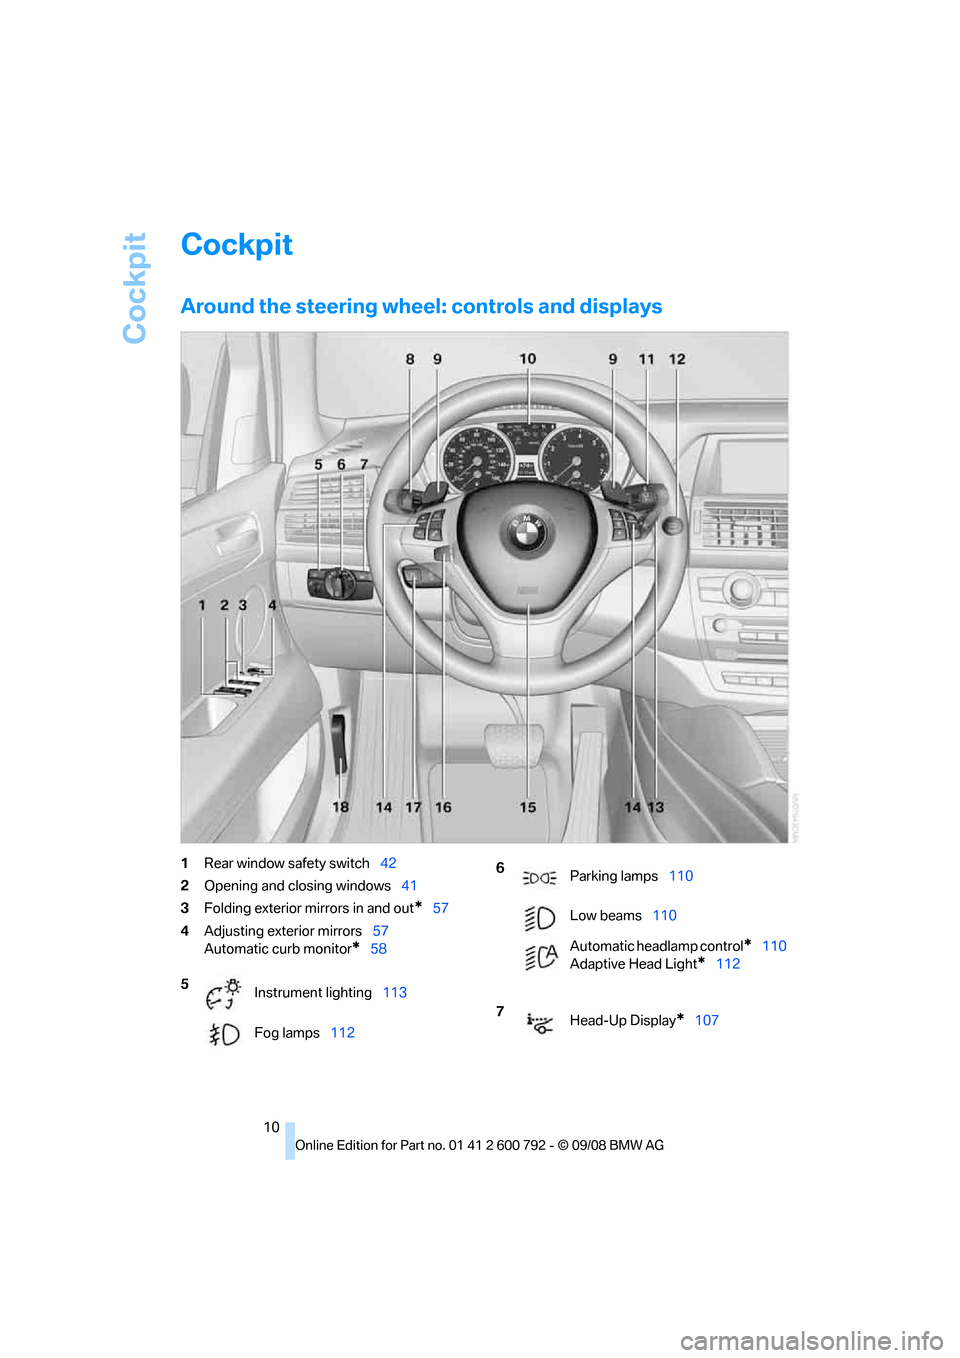
Around the steering wheel: controls and displays
1Rear window safety switch 42
2 Opening and closing windows 41
3 Folding exterior mirrors in and out
*57
4 Adjusting exterior mirrors 57
Automatic curb monitor
*58
5 Instrument lighting 113
Fog lamps 112
6
Parking lamps 110
Low beams 110
Automatic headlamp control
*110
Adaptive Head Light
*112
7 Head-Up Display
*107
Page 13 of 317
At a glance
11Reference
Controls
Driving tips
Communications
Navigation
Entertainment
Mobility
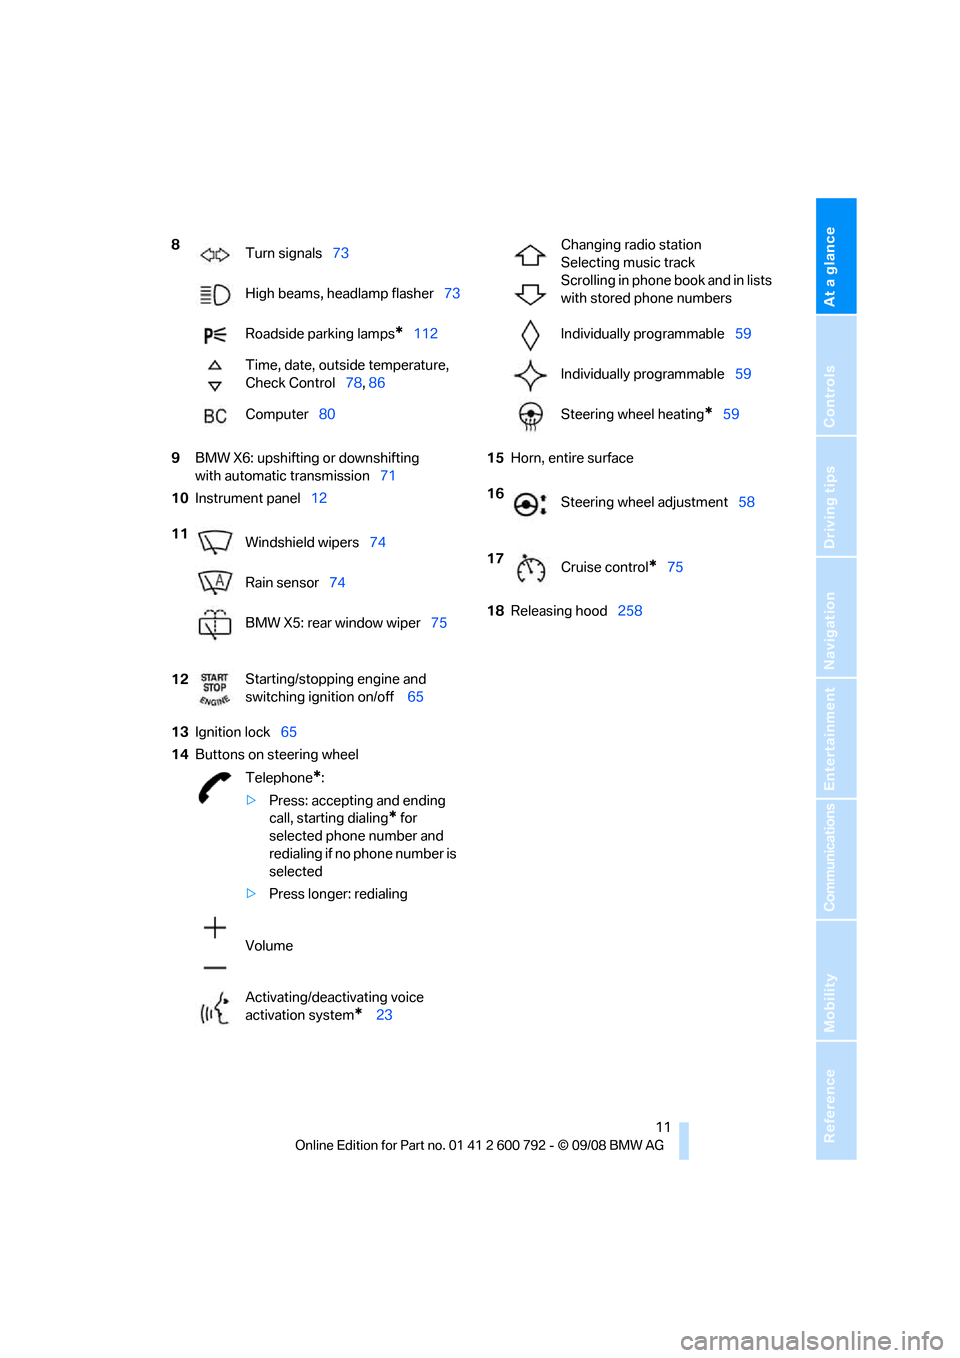
9BMW X6: upshifting or downshifting
with automatic transmission 71
10 Instrument panel 12
13 Ignition lock 65
14 Buttons on steering wheel 15
Horn, entire surface
18 Releasing hood 258
8
Turn signals 73
High beams, headlamp flasher 73
Roadside parking lamps
*112
Time, date, outside temperature,
Check Control 78, 86
Computer 80
11 Windshield wipers 74
Rain sensor 74
BMW X5: rear window wiper 75
12 Starting/stopping engine and
switching ignition on/off
65
Telephone
*:
> Press: accepting and ending
call, starting dialing
* for
selected phone number and
redialing if no phone number is
selected
> Press longer: redialing
Volume
Activating/deactivating voice
activation system
* 23
Changing radio station
Selecting music track
Scrolling in phone book and in lists
with stored phone numbers
Individually programmable 59
Individually programmable 59
Steering wheel heating
*59
16 Steering wheel adjustment 58
17 Cruise control
*75
Page 15 of 317
At a glance
13Reference
Controls
Driving tips
Communications
Navigation
Entertainment
Mobility
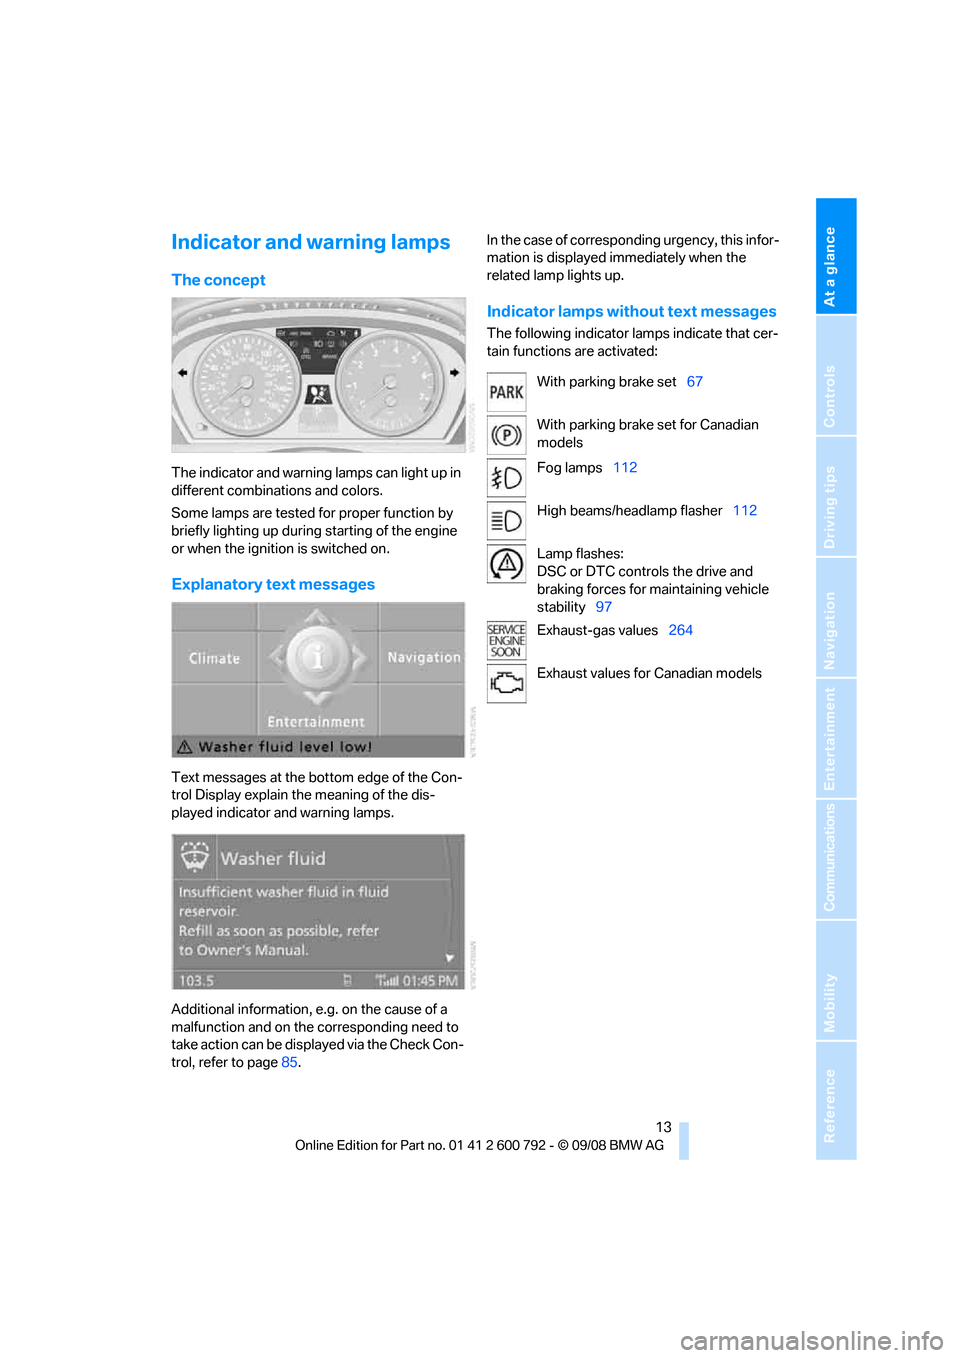
Indicator and warning lamps
The concept
The indicator and warning lamps can light up in
different combinations and colors.
Some lamps are tested for proper function by
briefly lighting up during starting of the engine
or when the ignition is switched on.
Explanatory text messages
Text messages at the bottom edge of the Con-
trol Display explain the meaning of the dis-
played indicator and warning lamps.
Additional information, e.g. on the cause of a
malfunction and on the corresponding need to
take action can be disp layed via the Check Con-
trol, refer to page 85. In the case of corresponding urgency, this infor-
mation is displayed immediately when the
related lamp lights up.
Indicator lamps without text messages
The following indicator la
mps indicate that cer-
tain functions are activated:
With parking brake set 67
With parking brake set for Canadian
models
Fog lamps 112
High beams/headlamp flasher 112
Lamp flashes:
DSC or DTC controls the drive and
braking forces for maintaining vehicle
stability 97
Exhaust-gas values 264
Exhaust values fo r Canadian models
Page 75 of 317
Controls
73Reference
At a glance
Driving tips
Communications
Navigation
Entertainment
Mobility
Locking
1.Pull out the releasing tool.
The transmission lock is engaged again.
2. If necessary, insert the lock
* and lock it.
3. Close the cover in th e bottom of the cup
holder and lay in the mat again.
4. Close the cover of the cup holder and stow
the releasing tool.
Information on jump starting and towing, from
page 280.
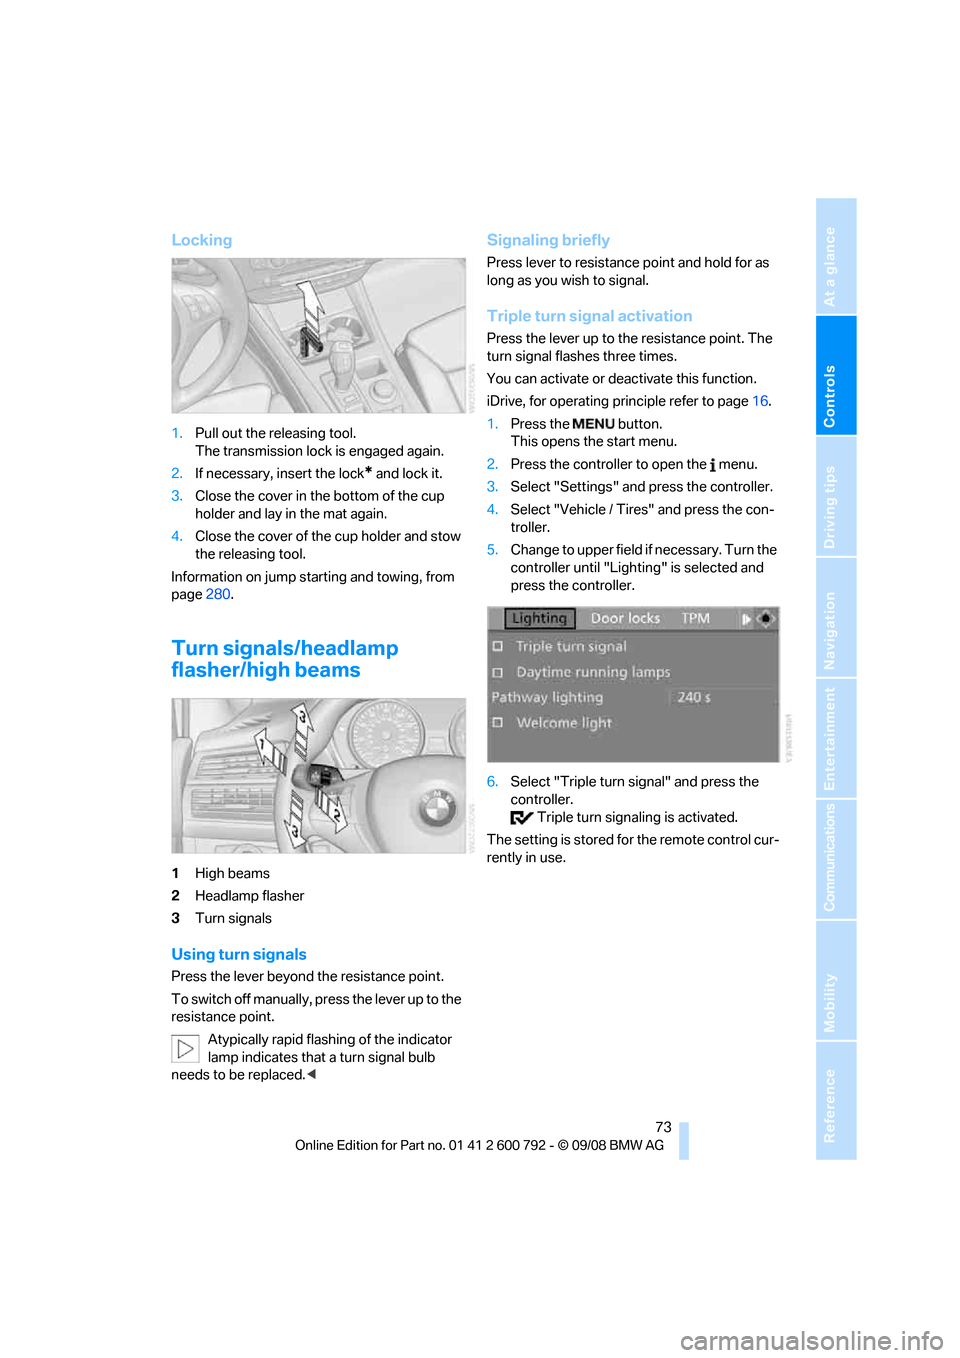
Turn signals/headlamp
flasher/high beams
1High beams
2 Headlamp flasher
3 Turn signals
Using turn signals
Press the lever beyond the resistance point.
To switch off manually, pr ess the lever up to the
resistance point.
Atypically rapid flashi ng of the indicator
lamp indicates that a turn signal bulb
needs to be replaced. <
Signaling briefly
Press lever to resistance point and hold for as
long as you wish to signal.
Triple turn signal activation
Press the lever up to the resistance point. The
turn signal flashes three times.
You can activate or deac tivate this function.
iDrive, for operating pr inciple refer to page16.
1. Press the button.
This opens the start menu.
2. Press the controller to open the menu.
3. Select "Settings" and press the controller.
4. Select "Vehicle / Tire s" and press the con-
troller.
5. Change to upper field if necessary. Turn the
controller until "Lighting" is selected and
press the controller.
6. Select "Triple turn signal" and press the
controller.
Triple turn sign aling is activated.
The setting is stored for the remote control cur-
rently in use.
Page 76 of 317
Driving
74
Washer/wiper system
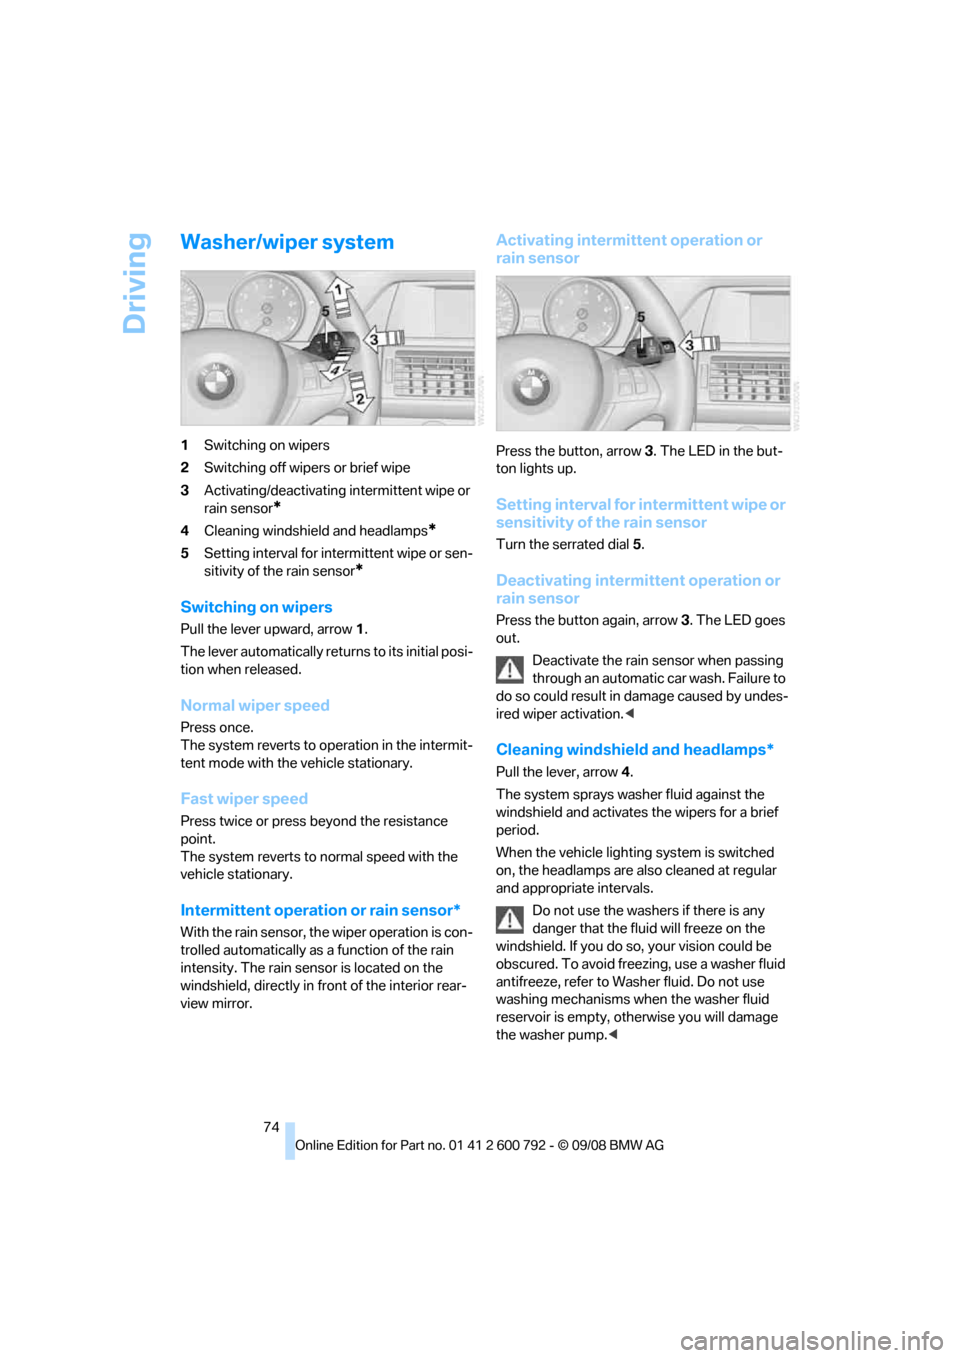
1Switching on wipers
2 Switching off wipers or brief wipe
3 Activating/deactivating intermittent wipe or
rain sensor
*
4Cleaning windshield and headlamps*
5Setting interval for inte rmittent wipe or sen-
sitivity of the rain sensor
*
Switching on wipers
Pull the lever upward, arrow 1.
The lever automatically retu rns to its initial posi-
tion when released.
Normal wiper speed
Press once.
The system reverts to op eration in the intermit-
tent mode with the vehicle stationary.
Fast wiper speed
Press twice or press beyond the resistance
point.
The system reverts to normal speed with the
vehicle stationary.
Intermittent operation or rain sensor*
With the rain sensor, th e wiper operation is con-
trolled automatically as a function of the rain
intensity. The rain sensor is located on the
windshield, directly in fr ont of the interior rear-
view mirror.
Activating intermittent operation or
rain sensor
Press the button, arrow 3. The LED in the but-
ton lights up.
Setting interval for intermittent wipe or
sensitivity of the rain sensor
Turn the serrated dial 5.
Deactivating intermittent operation or
rain sensor
Press the button again, arrow 3. The LED goes
out.
Deactivate the rain sensor when passing
through an automatic car wash. Failure to
do so could result in damage caused by undes-
ired wiper activation. <
Cleaning windshield and headlamps*
Pull the lever, arrow4.
The system sprays washer fluid against the
windshield and ac tivates the wipers for a brief
period.
When the vehicle lighting system is switched
on, the headlamps are also cleaned at regular
and appropriate intervals.
Do not use the washers if there is any
danger that the fluid will freeze on the
windshield. If you do so, your vision could be
obscured. To avoid freezing, use a washer fluid
antifreeze, refer to Wash er fluid. Do not use
washing mechanisms when the washer fluid
reservoir is empty, ot herwise you will damage
the washer pump.<
Page 112 of 317
Lamps
110
Lamps
Parking lamps/low beams
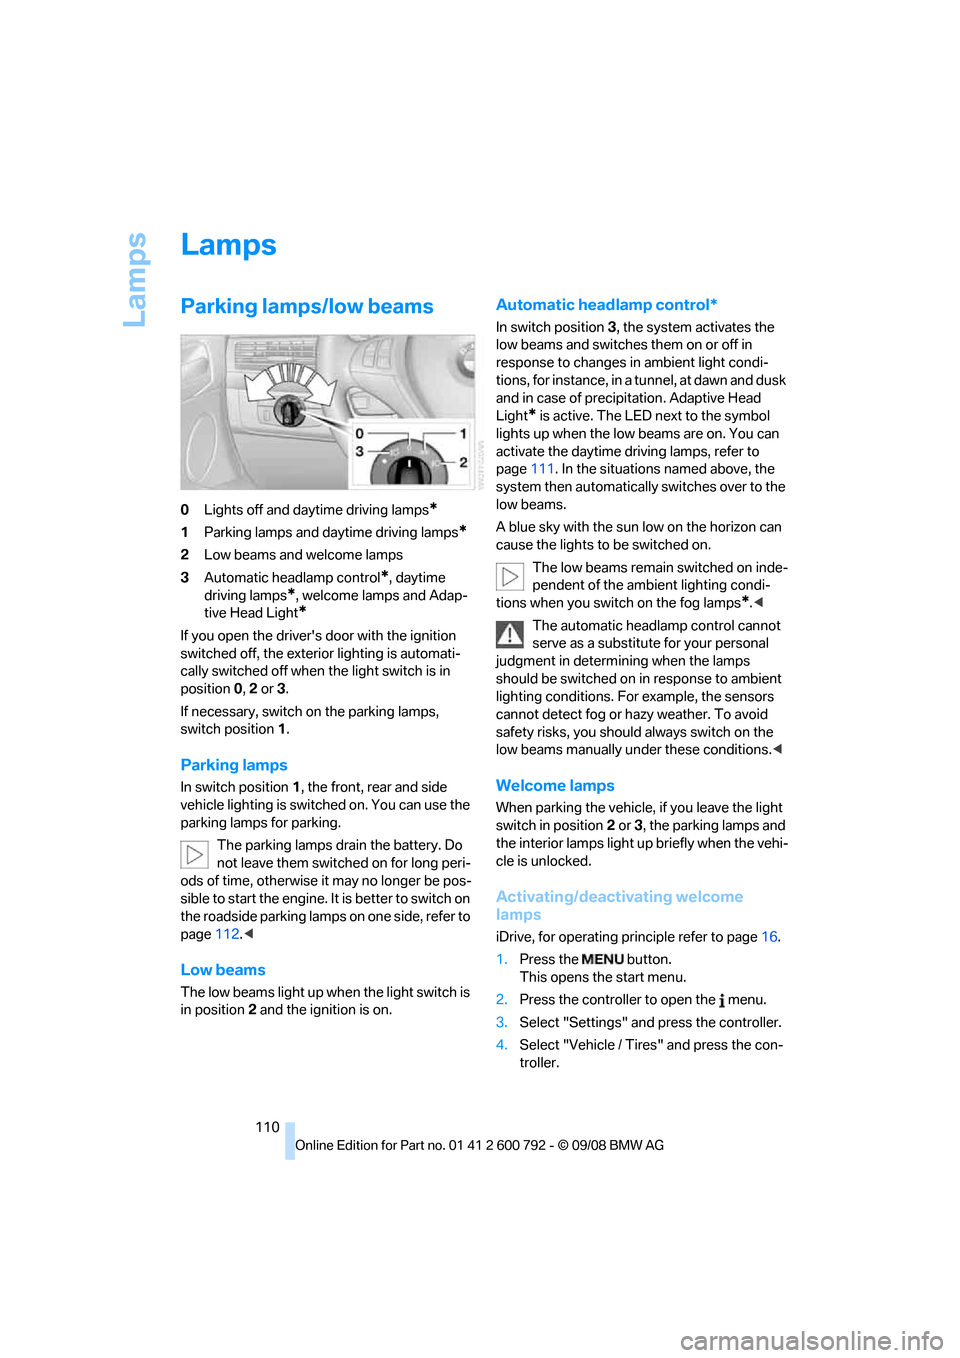
0Lights off and daytime driving lamps*
1Parking lamps and daytime driving lamps*
2Low beams and welcome lamps
3 Automatic head lamp control
*, daytime
driving lamps
*, welcome lamps and Adap-
tive Head Light
*
If you open the driver's door with the ignition
switched off, the exteri or lighting is automati-
cally switched off when the light switch is in
position 0, 2 or 3.
If necessary, switch on the parking lamps,
switch position 1.
Parking lamps
In switch position 1, the front, rear and side
vehicle lighting is switch ed on. You can use the
parking lamps for parking.
The parking lamps drain the battery. Do
not leave them switched on for long peri-
ods of time, otherwise it may no longer be pos-
sible to start the engine. It is better to switch on
the roadside parking lamp s on one side, refer to
page 112.<
Low beams
The low beams light up wh en the light switch is
in position 2 and the ignition is on.
Automatic headlamp control*
In switch position 3, the system activates the
low beams and switches them on or off in
response to changes in ambient light condi-
tions, for instance, in a tunnel, at dawn and dusk
and in case of precipitation. Adaptive Head
Light
* is active. The LED next to the symbol
lights up when the low beams are on. You can
activate the daytime driving lamps, refer to
page 111. In the situations named above, the
system then automatically switches over to the
low beams.
A blue sky with the sun low on the horizon can
cause the lights to be switched on.
The low beams remain switched on inde-
pendent of the ambient lighting condi-
tions when you switch on the fog lamps
*. <
The automatic headla mp control cannot
serve as a substitute for your personal
judgment in determin ing when the lamps
should be switched on in response to ambient
lighting conditions. For example, the sensors
cannot detect fog or hazy weather. To avoid
safety risks, you should always switch on the
low beams manually un der these conditions.<
Welcome lamps
When parking the vehicle, if you leave the light
switch in position2 or 3, the parking lamps and
the interior lamps light up briefly when the vehi-
cle is unlocked.
Activating/deactivating welcome
lamps
iDrive, for operating pr inciple refer to page16.
1. Press the button.
This opens the start menu.
2. Press the controller to open the menu.
3. Select "Settings" an d press the controller.
4. Select "Vehicle / Tire s" and press the con-
troller.
Page 113 of 317
Controls
111Reference
At a glance
Driving tips
Communications
Navigation
Entertainment
Mobility
5.Change to upper field if necessary. Turn the
controller until "Lighting" is selected and
press the controller.
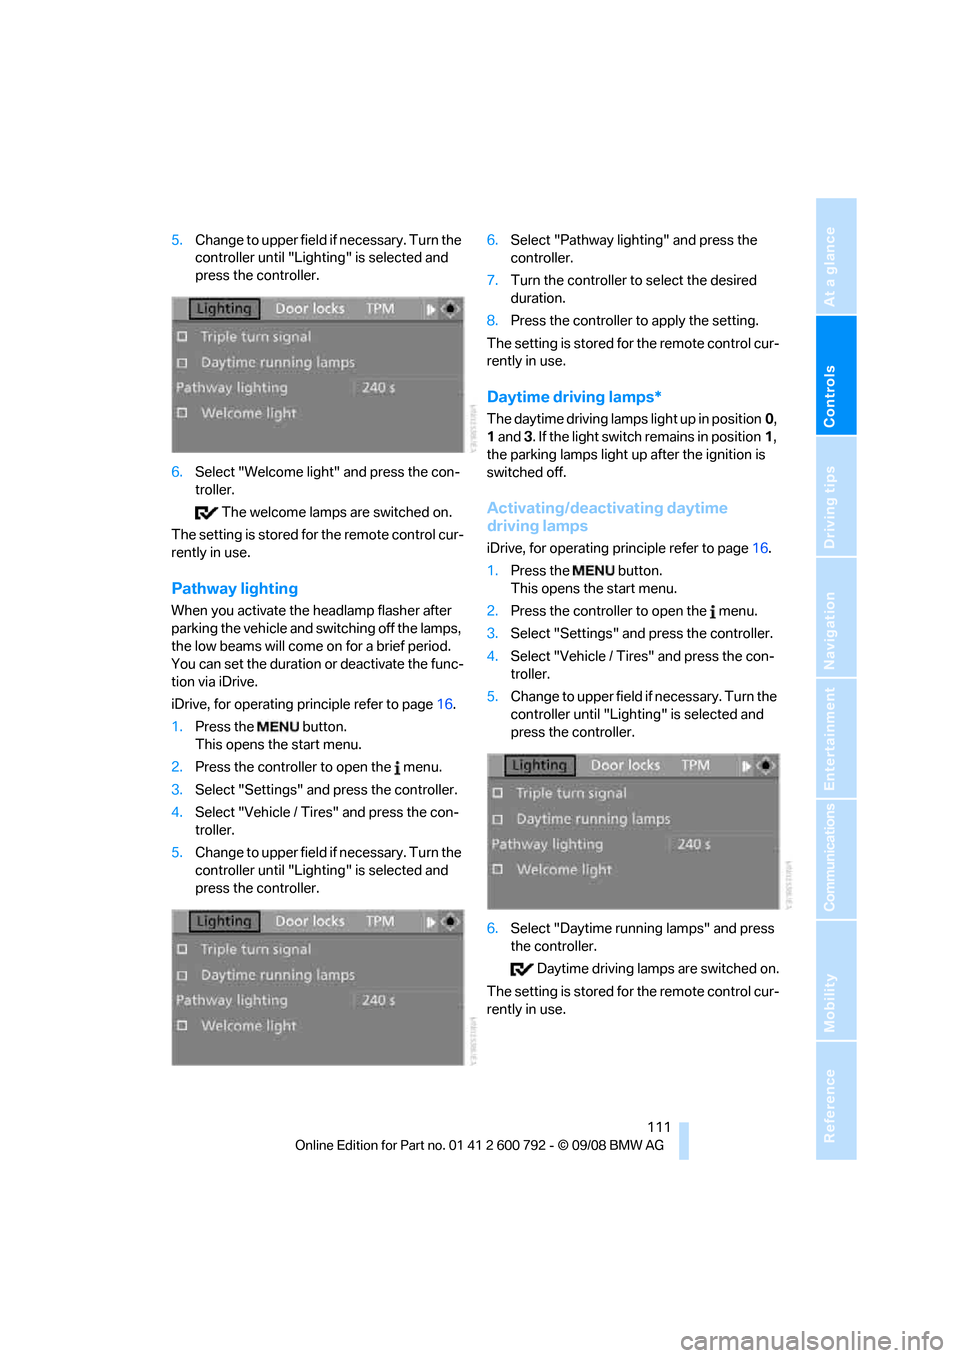
6. Select "Welcome light" and press the con-
troller.
The welcome lamps are switched on.
The setting is stored for the remote control cur-
rently in use.
Pathway lighting
When you activate the headlamp flasher after
parking the vehicle and sw itching off the lamps,
the low beams will come on for a brief period.
You can set the duration or deactivate the func-
tion via iDrive.
iDrive, for operating principle refer to page 16.
1. Press the button.
This opens the start menu.
2. Press the controller to open the menu.
3. Select "Settings" and press the controller.
4. Select "Vehicle / Tire s" and press the con-
troller.
5. Change to upper field if necessary. Turn the
controller until "Lighting" is selected and
press the controller. 6.
Select "Pathway lighting" and press the
controller.
7. Turn the controller to select the desired
duration.
8. Press the controller to apply the setting.
The setting is stored for the remote control cur-
rently in use.
Daytime driving lamps*
The daytime driving lamps light up in position 0,
1 and 3. If the light switch remains in position 1,
the parking lamps light up after the ignition is
switched off.
Activating/deactivating daytime
driving lamps
iDrive, for operating pr inciple refer to page16.
1. Press the button.
This opens the start menu.
2. Press the controller to open the menu.
3. Select "Settings" and press the controller.
4. Select "Vehicle / Tire s" and press the con-
troller.
5. Change to upper field if necessary. Turn the
controller until "Lighting" is selected and
press the controller.
6. Select "Daytime runn ing lamps" and press
the controller.
Daytime driving lamps are switched on.
The setting is stored for the remote control cur-
rently in use.
Page 114 of 317
Lamps
112
Adaptive Head Light*
The concept
Adaptive Head Light is a variable headlamp
control system that enables better illumination
of the road surface. Depending on the steering
angle and other parameters, the light from the
headlamp follows the course of the road.
In tight curves, e.g. serp entines, or when turn-
ing, one of the two front fog lamps is also
switched on up to a speed of approx. 45 mph/
70 km/h. This provides improved illumination of
the area inside the curve.
Activating Adapti ve Head Light
With the ignition switched on, turn the light
switch to position 3, refer to page 110.
The turning lamps are au tomatically switched
on depending on the steering angle or the use
of turn signals.
To avoid blinding oncoming traffic, the Adaptive
Head Light directs light towards the front pas-
senger side when the vehicle is at a standstill.
When driving in reverse, both turning lamps are
active.
High beams/
roadside parking lamps
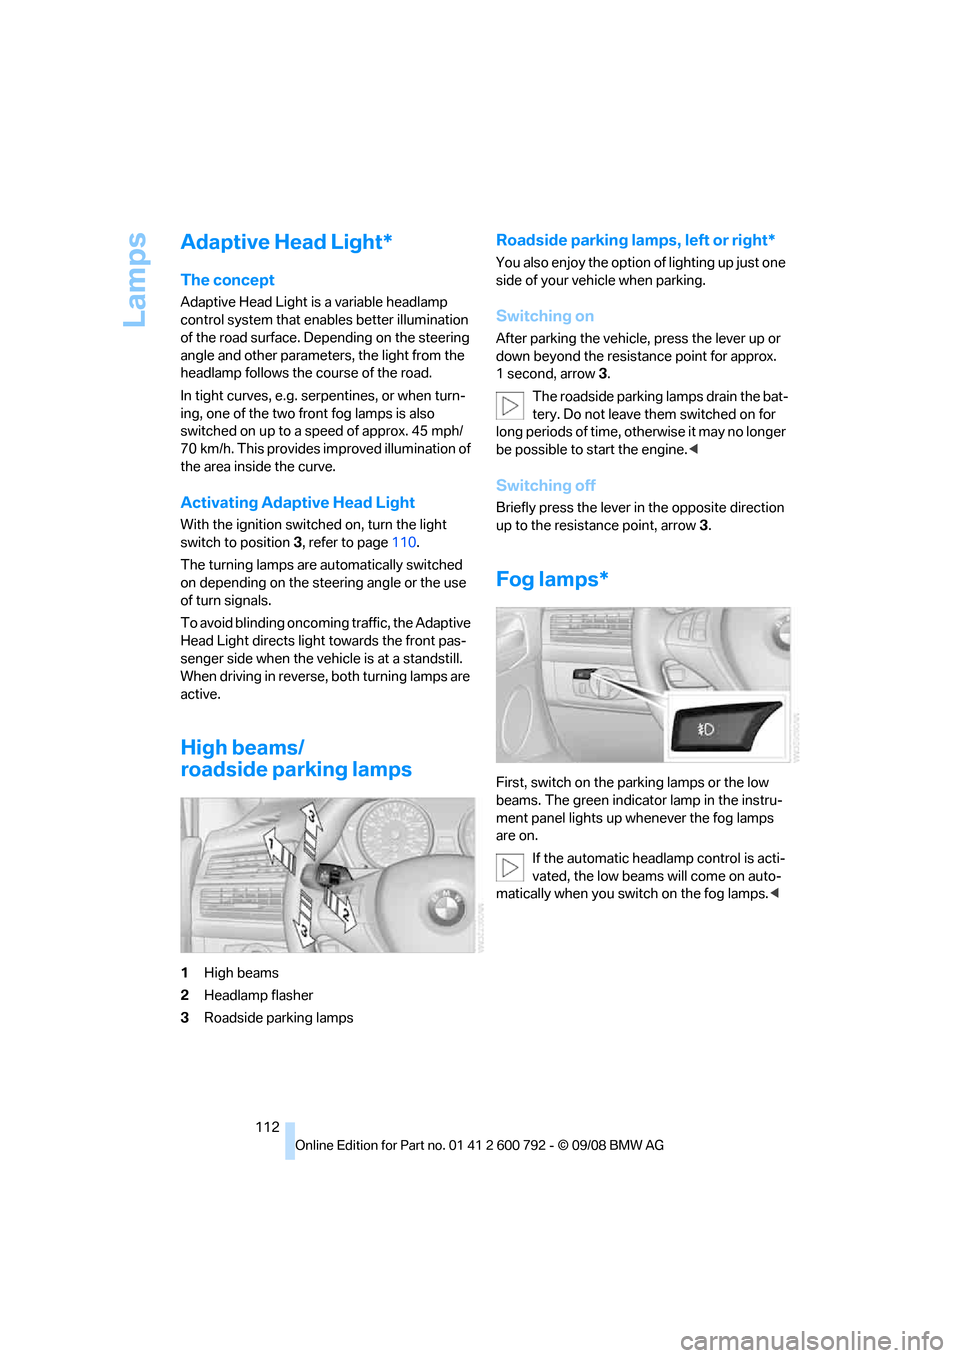
1 High beams
2 Headlamp flasher
3 Roadside parking lamps
Roadside parking lamps, left or right*
You also enjoy the option of lighting up just one
side of your vehicle when parking.
Switching on
After parking the vehicle, press the lever up or
down beyond the resist ance point for approx.
1second, arrow 3.
The roadside parking lamps drain the bat-
tery. Do not leave th em switched on for
long periods of time, otherwise it may no longer
be possible to start the engine. <
Switching off
Briefly press the lever in the opposite direction
up to the resistance point, arrow 3.
Fog lamps*
First, switch on the parking lamps or the low
beams. The green indicator lamp in the instru-
ment panel lights up whenever the fog lamps
are on.
If the automatic headlamp control is acti-
vated, the low beams will come on auto-
matically when you switch on the fog lamps. <
Page 261 of 317
Mobility
259Reference
At a glance
Controls
Driving tips
Communications
Navigation
Entertainment
Engine compartment
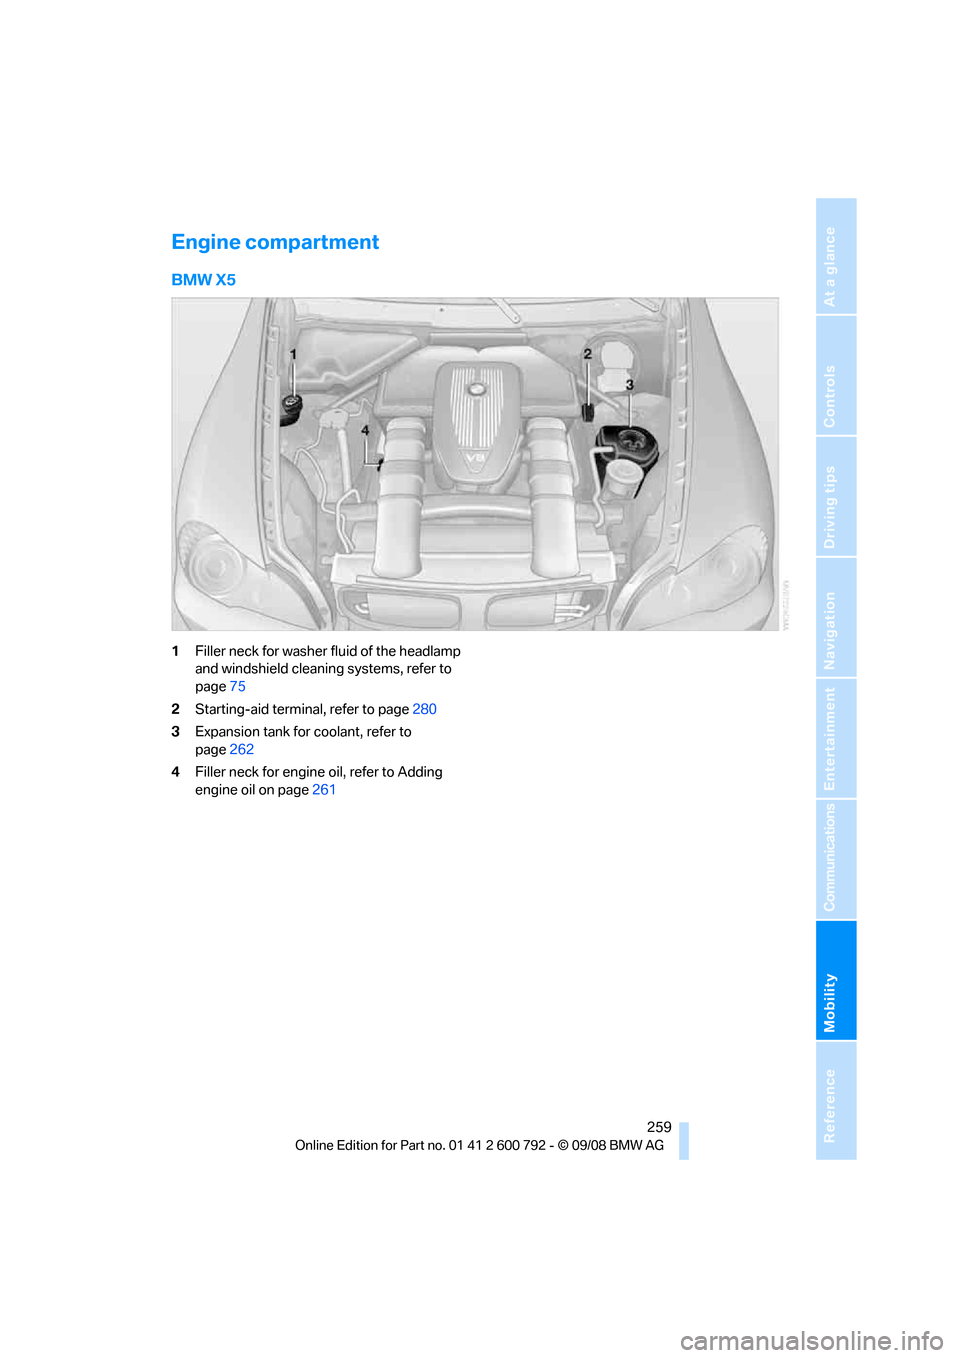
BMW X5
1Filler neck for washer fluid of the headlamp
and windshield cleaning systems, refer to
page 75
2 Starting-aid terminal, refer to page 280
3 Expansion tank for coolant, refer to
page 262
4 Filler neck for engine oil, refer to Adding
engine oil on page 261
Page 262 of 317
Under the hood
260
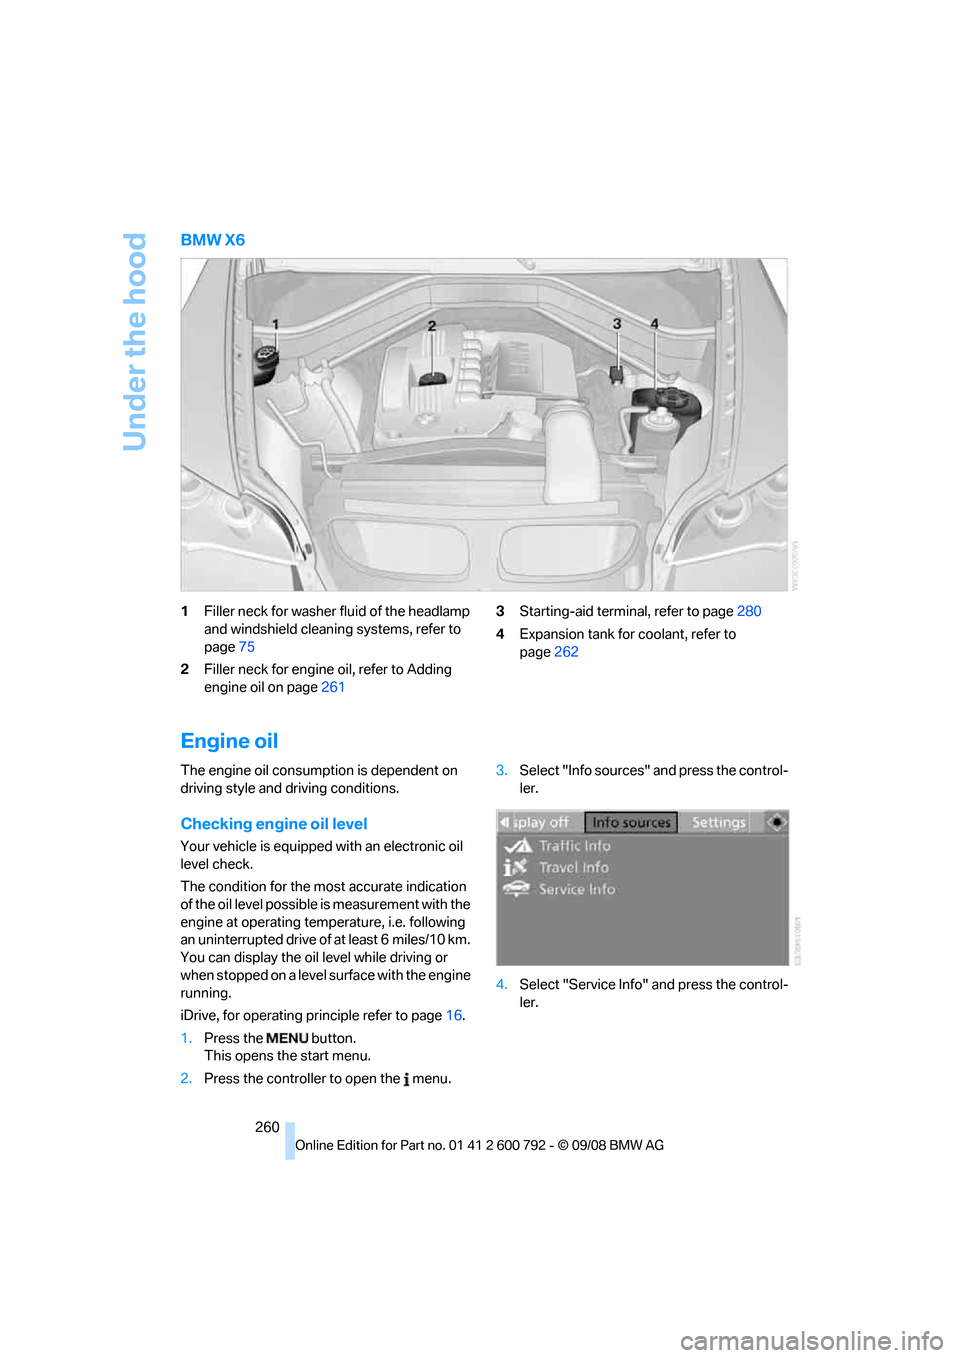
BMW X6
1Filler neck for washer fluid of the headlamp
and windshield cleaning systems, refer to
page 75
2 Filler neck for engine oil, refer to Adding
engine oil on page 261 3
Starting-aid termin al, refer to page280
4 Expansion tank for coolant, refer to
page 262
Engine oil
The engine oil consumption is dependent on
driving style and driving conditions.
Checking engine oil level
Your vehicle is equipped with an electronic oil
level check.
The condition for the most accurate indication
of the oil level possible is measurement with the
engine at operating temperature, i.e. following
an uninterrupted drive of at least 6 miles/10 km.
You can display the oil level while driving or
when stopped on a level surface with the engine
running.
iDrive, for operating pr inciple refer to page16.
1. Press the button.
This opens the start menu.
2. Press the controller to open the menu. 3.
Select "Info sources" and press the control-
ler.
4. Select "Service Info" and press the control-
ler.