sensor BMW X5 XDRIVE 48I 2009 E70 Owner's Manual
[x] Cancel search | Manufacturer: BMW, Model Year: 2009, Model line: X5 XDRIVE 48I, Model: BMW X5 XDRIVE 48I 2009 E70Pages: 317, PDF Size: 9.56 MB
Page 13 of 317
At a glance
11Reference
Controls
Driving tips
Communications
Navigation
Entertainment
Mobility
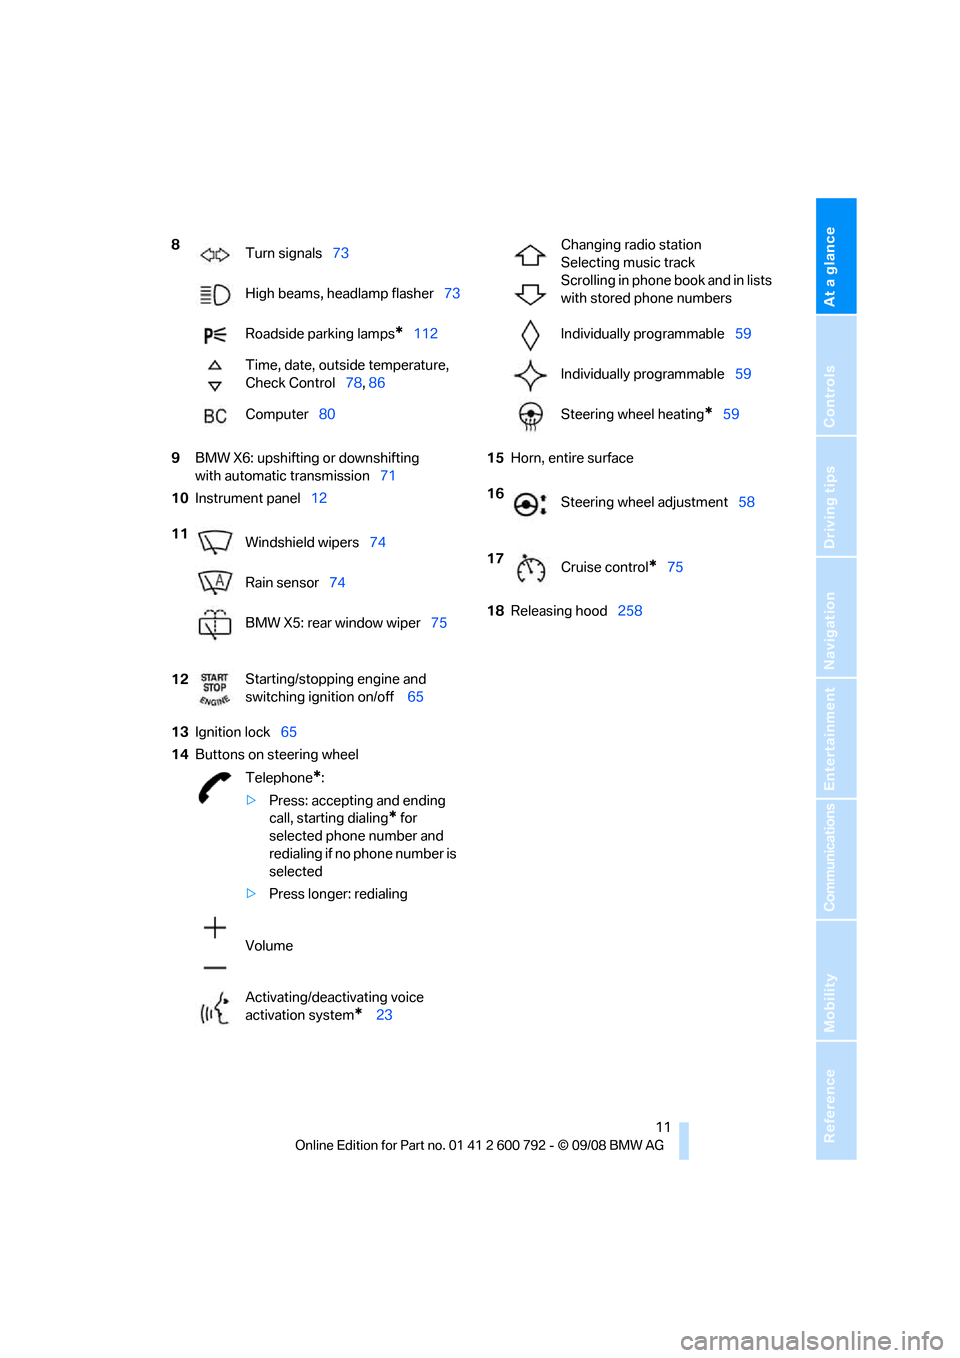
9BMW X6: upshifting or downshifting
with automatic transmission 71
10 Instrument panel 12
13 Ignition lock 65
14 Buttons on steering wheel 15
Horn, entire surface
18 Releasing hood 258
8
Turn signals 73
High beams, headlamp flasher 73
Roadside parking lamps
*112
Time, date, outside temperature,
Check Control 78, 86
Computer 80
11 Windshield wipers 74
Rain sensor 74
BMW X5: rear window wiper 75
12 Starting/stopping engine and
switching ignition on/off
65
Telephone
*:
> Press: accepting and ending
call, starting dialing
* for
selected phone number and
redialing if no phone number is
selected
> Press longer: redialing
Volume
Activating/deactivating voice
activation system
* 23
Changing radio station
Selecting music track
Scrolling in phone book and in lists
with stored phone numbers
Individually programmable 59
Individually programmable 59
Steering wheel heating
*59
16 Steering wheel adjustment 58
17 Cruise control
*75
Page 40 of 317
Opening and closing
38
To stop the opening process:
>
Press the button on the outside of the lift-
gate.
> Press and hold the bu tton on the remote
control.
> Press the button on the inside of the lift-
gate.
> Press the button on the center console
again.
The opening process is interrupted if you
set the vehicle in motion. <
Closing liftgate
Make sure that the closing path of the lift-
gate is clear, otherwise injuries may
result. <
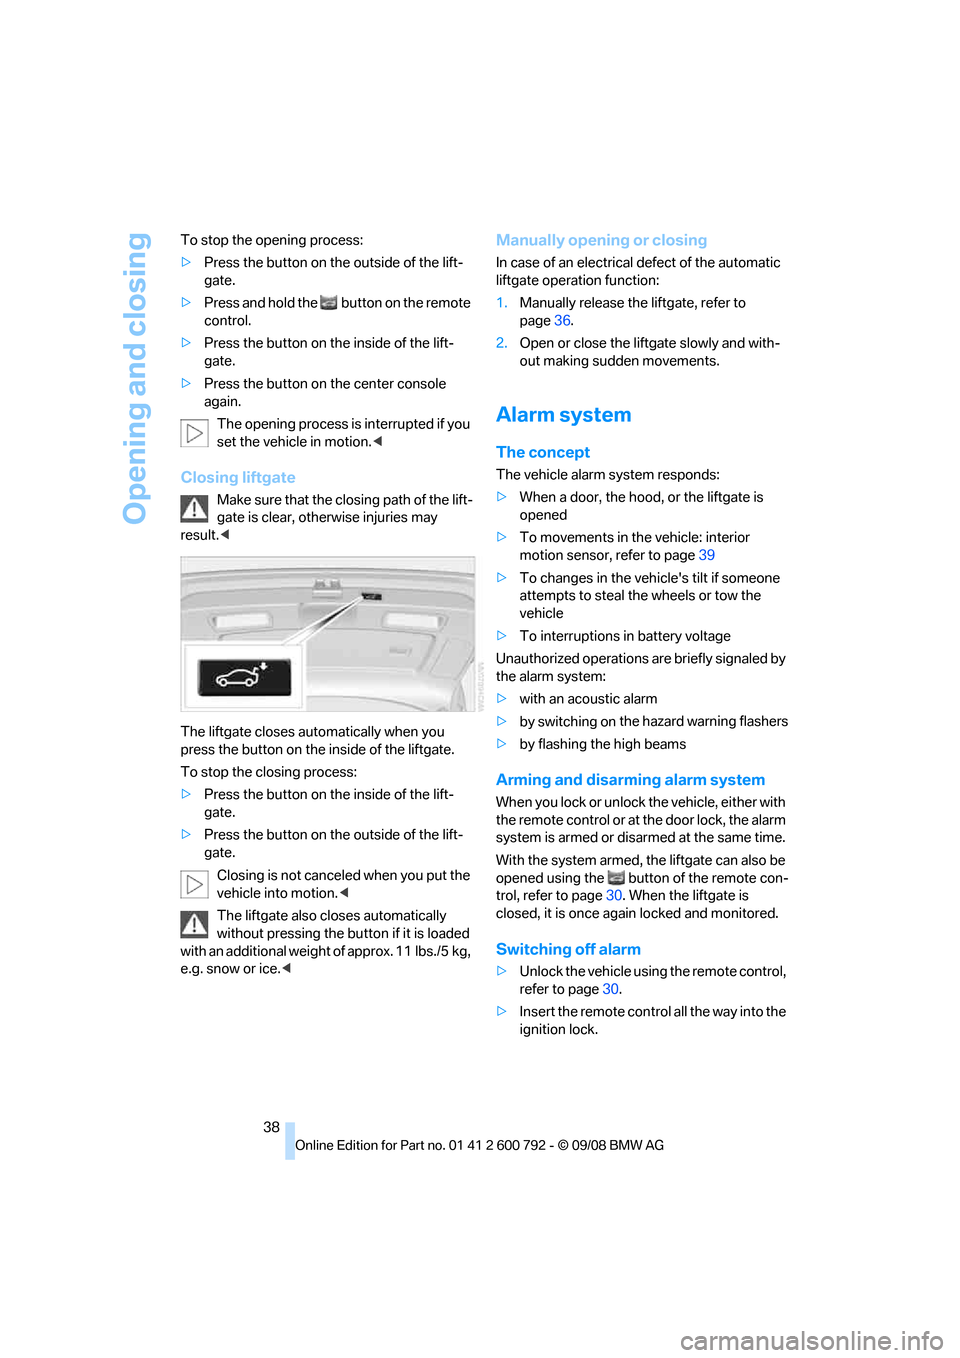
The liftgate closes automatically when you
press the button on the inside of the liftgate.
To stop the closing process:
> Press the button on the inside of the lift-
gate.
> Press the button on the outside of the lift-
gate.
Closing is not canceled when you put the
vehicle into motion. <
The liftgate also cl oses automatically
without pressing the bu tton if it is loaded
with an additional weight of approx. 11 lbs./5 kg,
e.g. snow or ice.<
Manually opening or closing
In case of an electrical defect of the automatic
liftgate operation function:
1. Manually rele ase the liftgate, refer to
page 36.
2. Open or close the liftgate slowly and with-
out making sudden movements.
Alarm system
The concept
The vehicle alarm system responds:
>When a door, the hood, or the liftgate is
opened
> To movements in the vehicle: interior
motion sensor, refer to page 39
> To changes in the vehicle's tilt if someone
attempts to steal th e wheels or tow the
vehicle
> To interruptions in battery voltage
Unauthorized operations are briefly signaled by
the alarm system:
> with an acoustic alarm
> by switching on
the hazard warning flashers
> by flashing the high beams
Arming and disarming alarm system
When you lock or unlock the vehicle, either with
the remote control or at the door lock, the alarm
system is armed or disarmed at the same time.
With the system armed, the liftgate can also be
opened using the button of the remote con-
trol, refer to page 30. When the liftgate is
closed, it is once again locked and monitored.
Switching off alarm
> Unlock the vehicle using the remote control,
refer to page 30.
> Insert the remote contro l all the way into the
ignition lock.
Page 41 of 317
Controls
39Reference
At a glance
Driving tips
Communications
Navigation
Entertainment
Mobility
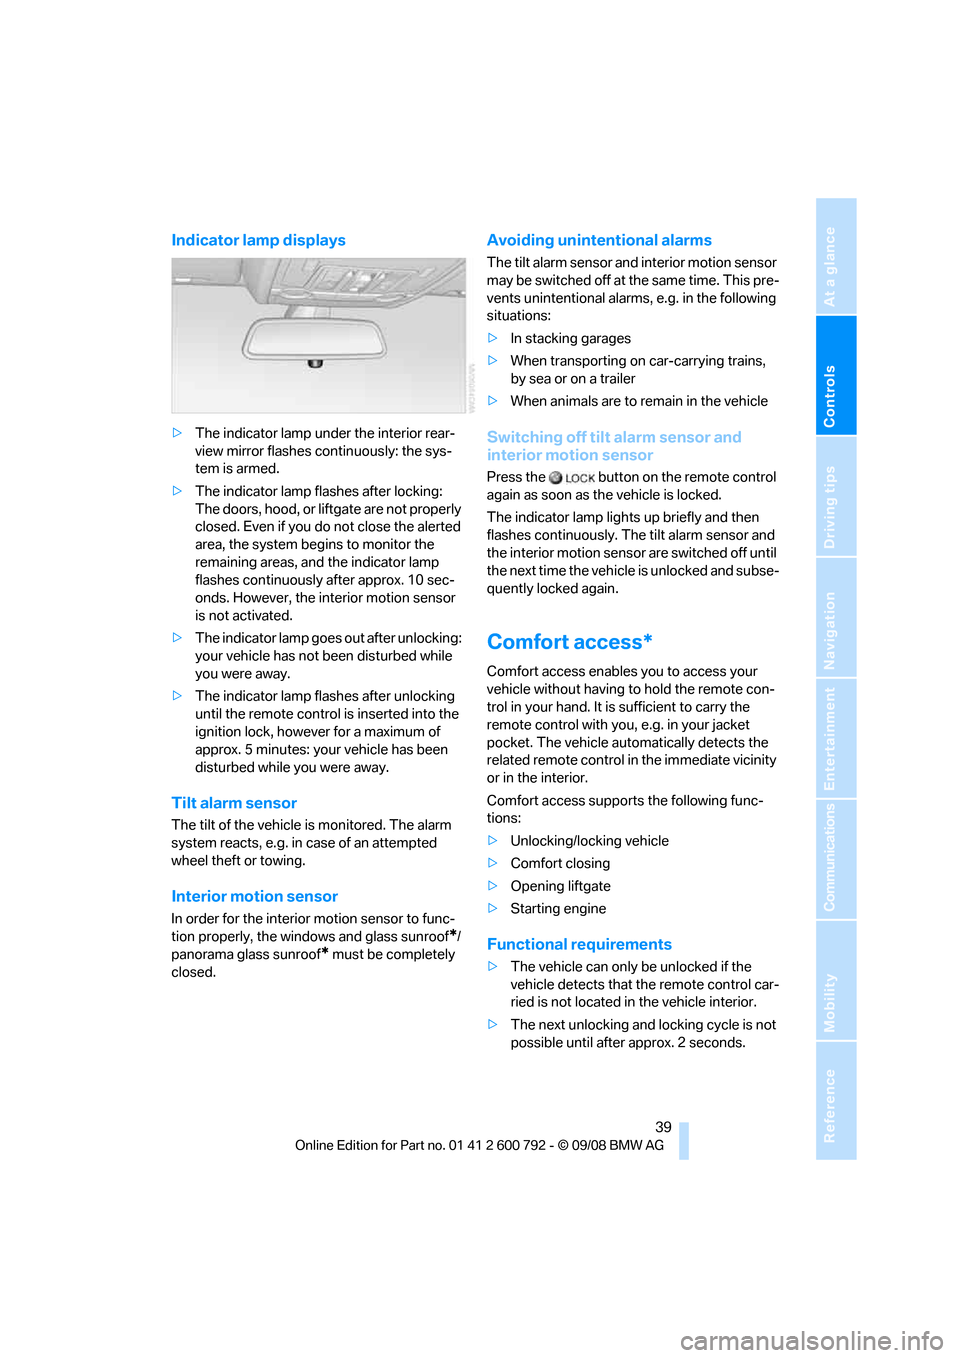
Indicator lamp displays
>The indicator lamp under the interior rear-
view mirror flashes continuously: the sys-
tem is armed.
> The indicator lamp flashes after locking:
The doors, hood, or liftgate are not properly
closed. Even if you do not close the alerted
area, the system begins to monitor the
remaining areas, and the indicator lamp
flashes continuously after approx. 10 sec-
onds. However, the interior motion sensor
is not activated.
> The indicator lamp goes out after unlocking:
your vehicle has not been disturbed while
you were away.
> The indicator lamp flashes after unlocking
until the remote control is inserted into the
ignition lock, however for a maximum of
approx. 5 minutes: your vehicle has been
disturbed while you were away.
Tilt alarm sensor
The tilt of the vehicle is monitored. The alarm
system reacts, e.g. in case of an attempted
wheel theft or towing.
Interior motion sensor
In order for the interior motion sensor to func-
tion properly, the windows and glass sunroof
*/
panorama glass sunroof
* must be completely
closed.
Avoiding unintentional alarms
The tilt alarm sensor and interior motion sensor
may be switched off at the same time. This pre-
vents unintentional alarms, e.g. in the following
situations:
> In stacking garages
> When transporting on car-carrying trains,
by sea or on a trailer
> When animals are to remain in the vehicle
Switching off tilt alarm sensor and
interior motion sensor
Press the button on the remote control
again as soon as the vehicle is locked.
The indicator lamp light s up briefly and then
flashes continuously. The tilt alarm sensor and
the interior motion sensor are switched off until
the next time the vehicle is unlocked and subse-
quently locked again.
Comfort access*
Comfort access enables you to access your
vehicle without having to hold the remote con-
trol in your hand. It is sufficient to carry the
remote control with you, e.g. in your jacket
pocket. The vehicle auto matically detects the
related remote control in the immediate vicinity
or in the interior.
Comfort access supports the following func-
tions:
> Unlocking/locking vehicle
> Comfort closing
> Opening liftgate
> Starting engine
Functional requirements
>The vehicle can only be unlocked if the
vehicle detects that th e remote control car-
ried is not located in the vehicle interior.
> The next unlocking and locking cycle is not
possible until after approx. 2 seconds.
Page 76 of 317
Driving
74
Washer/wiper system
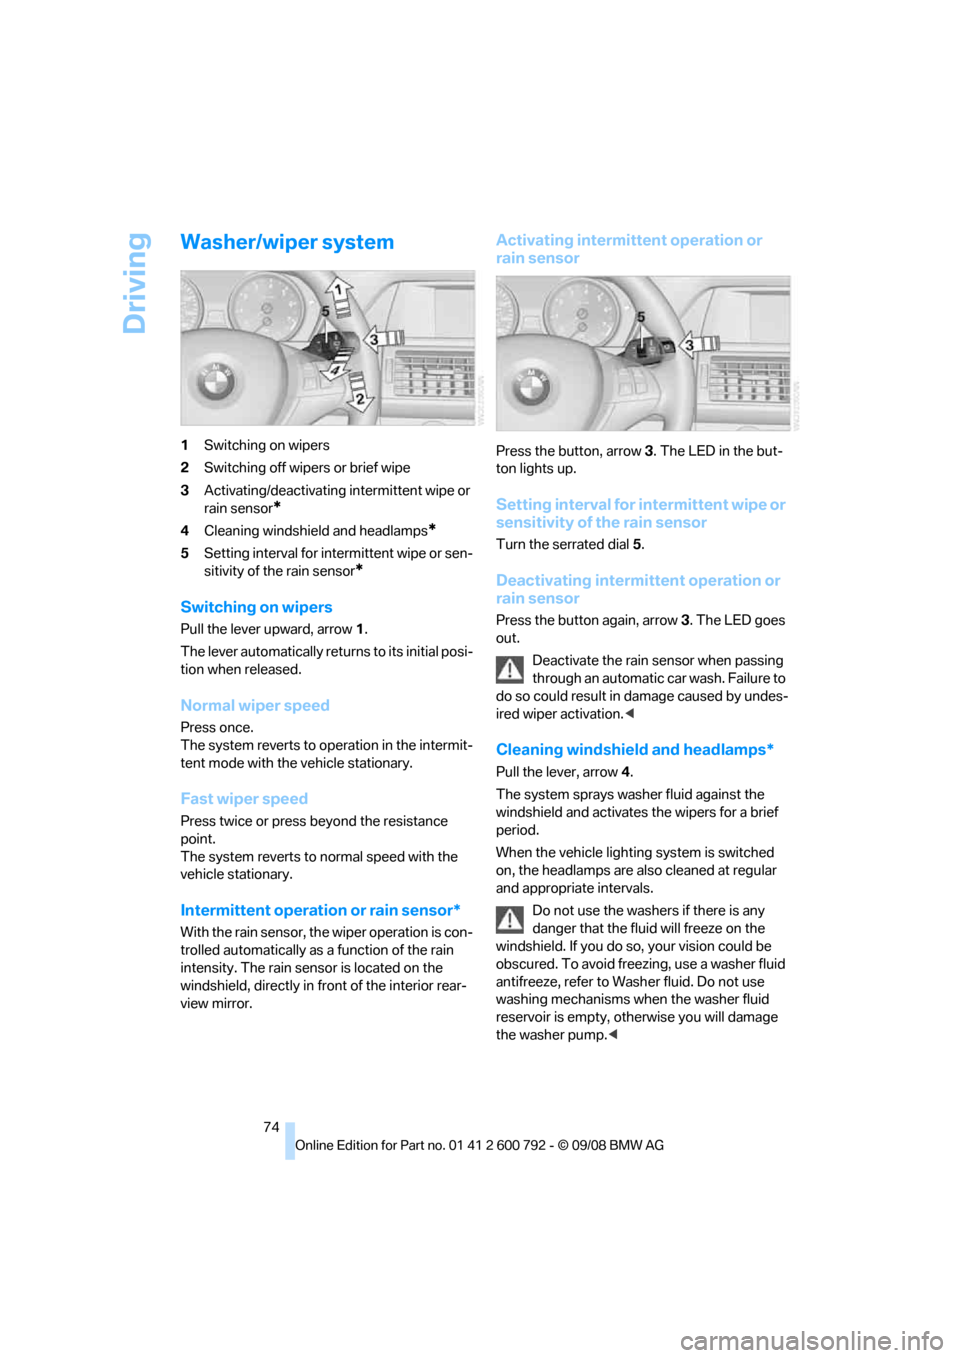
1Switching on wipers
2 Switching off wipers or brief wipe
3 Activating/deactivating intermittent wipe or
rain sensor
*
4Cleaning windshield and headlamps*
5Setting interval for inte rmittent wipe or sen-
sitivity of the rain sensor
*
Switching on wipers
Pull the lever upward, arrow 1.
The lever automatically retu rns to its initial posi-
tion when released.
Normal wiper speed
Press once.
The system reverts to op eration in the intermit-
tent mode with the vehicle stationary.
Fast wiper speed
Press twice or press beyond the resistance
point.
The system reverts to normal speed with the
vehicle stationary.
Intermittent operation or rain sensor*
With the rain sensor, th e wiper operation is con-
trolled automatically as a function of the rain
intensity. The rain sensor is located on the
windshield, directly in fr ont of the interior rear-
view mirror.
Activating intermittent operation or
rain sensor
Press the button, arrow 3. The LED in the but-
ton lights up.
Setting interval for intermittent wipe or
sensitivity of the rain sensor
Turn the serrated dial 5.
Deactivating intermittent operation or
rain sensor
Press the button again, arrow 3. The LED goes
out.
Deactivate the rain sensor when passing
through an automatic car wash. Failure to
do so could result in damage caused by undes-
ired wiper activation. <
Cleaning windshield and headlamps*
Pull the lever, arrow4.
The system sprays washer fluid against the
windshield and ac tivates the wipers for a brief
period.
When the vehicle lighting system is switched
on, the headlamps are also cleaned at regular
and appropriate intervals.
Do not use the washers if there is any
danger that the fluid will freeze on the
windshield. If you do so, your vision could be
obscured. To avoid freezing, use a washer fluid
antifreeze, refer to Wash er fluid. Do not use
washing mechanisms when the washer fluid
reservoir is empty, ot herwise you will damage
the washer pump.<
Page 93 of 317
Controls
91Reference
At a glance
Driving tips
Communications
Navigation
Entertainment
Mobility
Technology for comfort, convenience and
safety
PDC Park Distance Control*
The concept
The PDC assists you when you are parking.
Acoustic signals and an optical displays
alert
you to the approach of an object in front of
* or
behind your vehicle. To measure the distance,
there are four ultrasonic sensors in each
bumper. The range of these sensors is approx.
7 ft/2 m. But an acoustic warning only sounds at
approx. 24 in/60 cm for the sensors at the
front
* and at the two rear corners and at approx.
5 ft/1,50 m for the middle sensors at the rear.
PDC is a parking aid that can indicate
objects when they are approached
slowly, as is usually th e case when parking.
Avoid approaching an obje ct a t h i g h s p e e d , o t h -
erwise the physical circumstances would mean
that the system warning was too late. <
Automatic activation
Whenever the engine is running or the ignition
i s o n , e a c h t i m e y o u m o v e the selector lever into
position R, the PDC syst em is activated after
approx. 1 second.
Wait this short period before driving off.
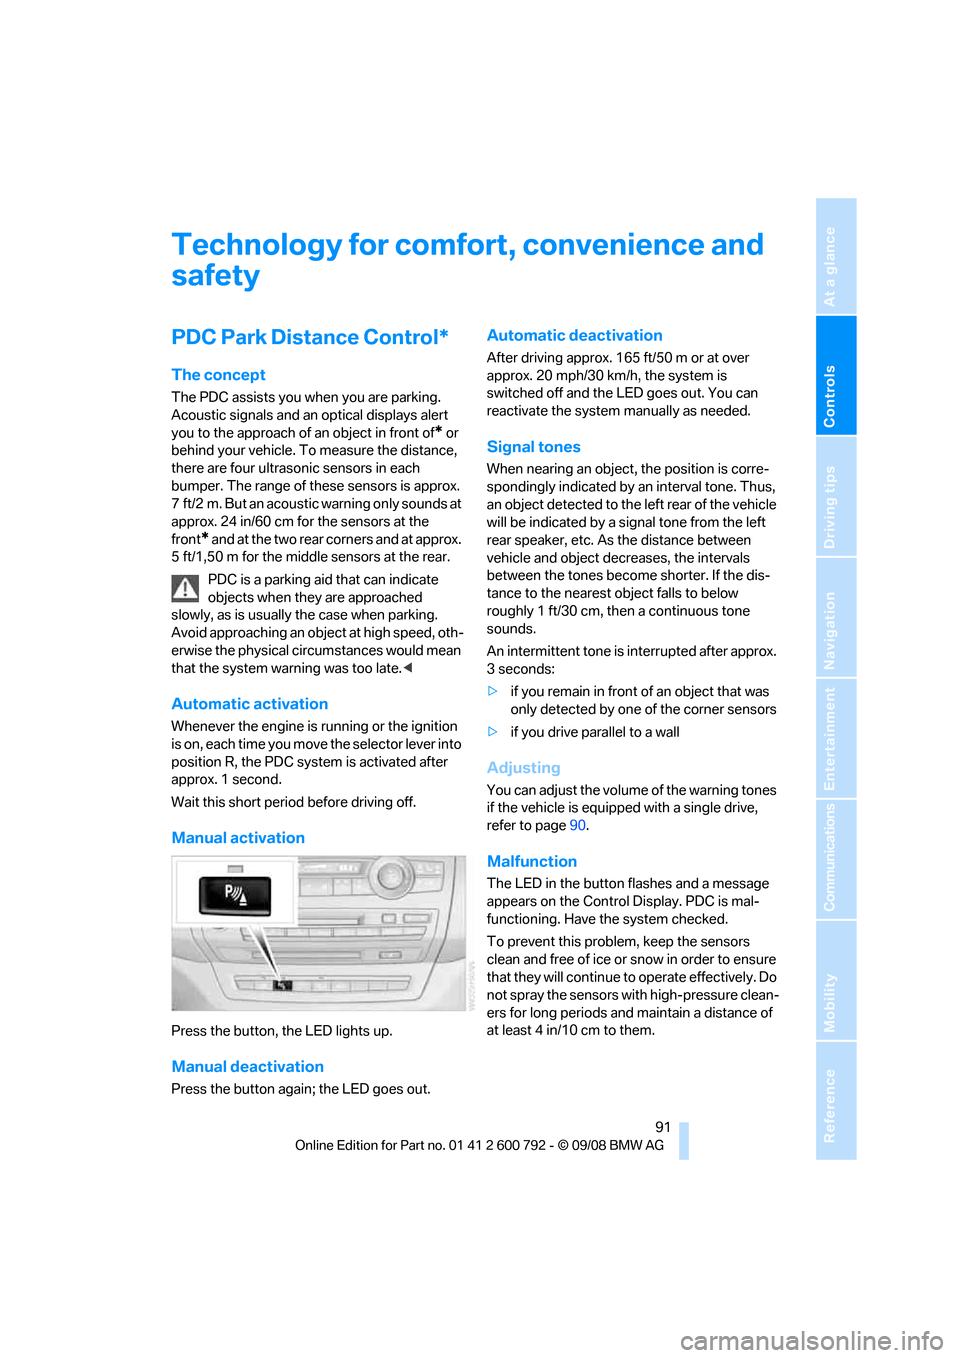
Manual activation
Press the button, the LED lights up.
Manual deactivation
Press the button again; the LED goes out.
Automatic deactivation
After driving approx. 165 ft/50 m or at over
approx. 20 mph/30 km/h, the system is
switched off and the LED goes out. You can
reactivate the system manually as needed.
Signal tones
When nearing an object, the position is corre-
spondingly indicated by an interval tone. Thus,
an object detected to the left rear of the vehicle
will be indicated by a sign al tone from the left
rear speaker, etc. As the distance between
vehicle and object decreases, the intervals
between the tones become shorter. If the dis-
tance to the nearest ob ject falls to below
roughly 1 ft/30 cm, then a continuous tone
sounds.
An intermittent tone is interrupted after approx.
3seconds:
> if you remain in front of an object that was
only detected by one of the corner sensors
> if you drive parallel to a wall
Adjusting
You can adjust the volume of the warning tones
if the vehicle is equipped with a single drive,
refer to page 90.
Malfunction
The LED in the button flashes and a message
appears on the Control Display. PDC is mal-
functioning. Have the system checked.
To prevent this problem, keep the sensors
clean and free of ice or snow in order to ensure
that they will continue to operate effectively. Do
not spray the sensors with high-pressure clean-
ers for long periods and maintain a distance of
at least 4 in/10 cm to them.
Page 94 of 317
Technology for comfort, convenience and safety
92
PDC with visual warning
You can also have the system show distances
to objects on the Control Display. Objects that
are farther away are already shown there before
a signal tone sounds.
The setting is stored for the remote control cur-
rently in use.
If the vehicle is equipped with a rear view cam-
era, refer to Displays on page 95.
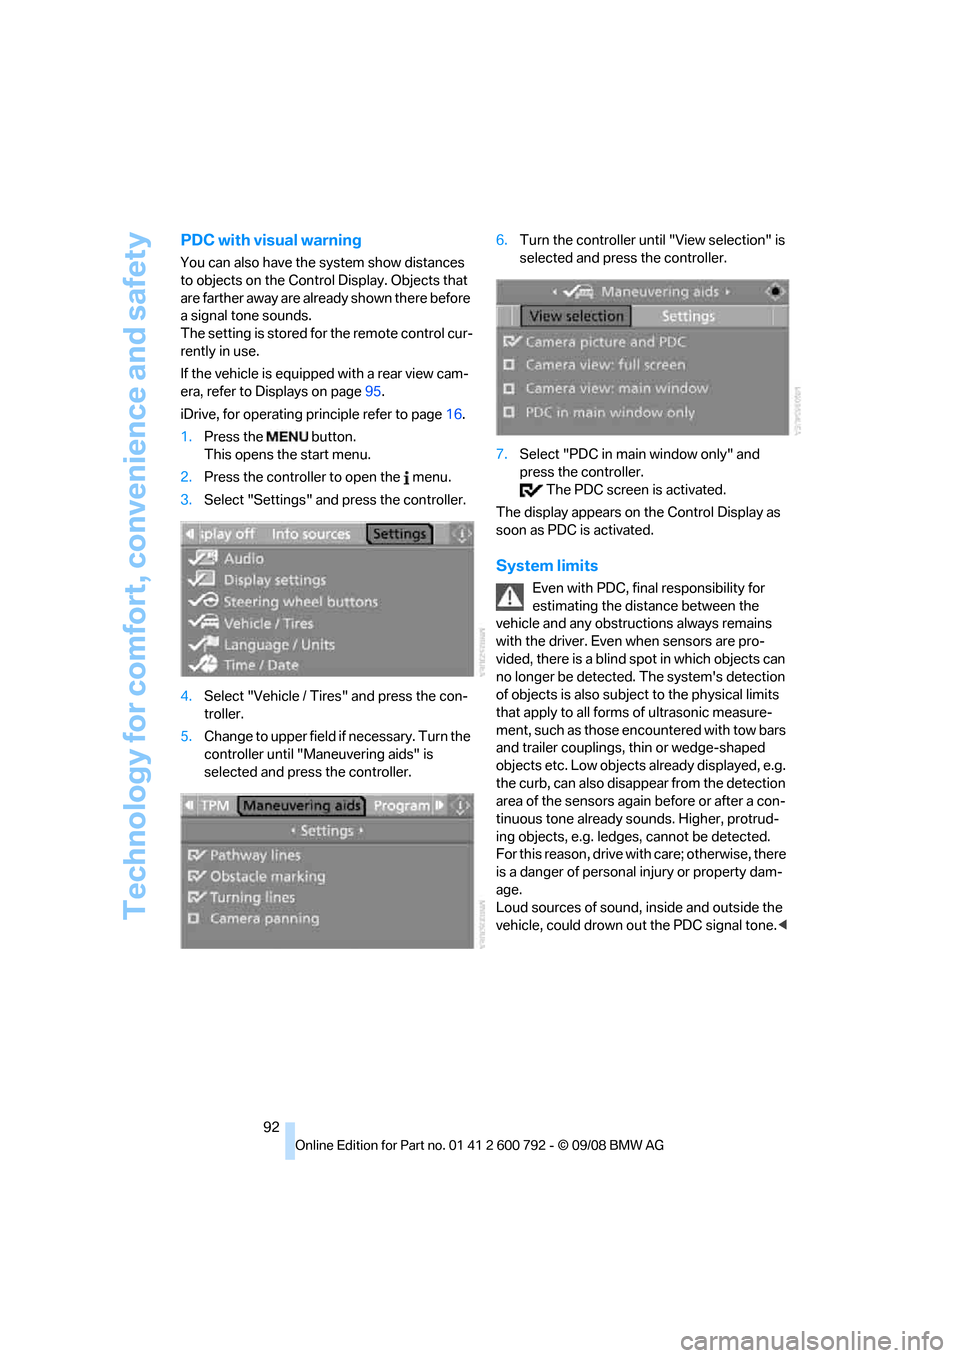
iDrive, for operating pr inciple refer to page16.
1. Press the button.
This opens the start menu.
2. Press the controller to open the menu.
3. Select "Settings" and press the controller.
4. Select "Vehicle / Tire s" and press the con-
troller.
5. Change to upper field if necessary. Turn the
controller until "Maneuvering aids" is
selected and press the controller. 6.
Turn the controller until "View selection" is
selected and press the controller.
7. Select "PDC in main window only" and
press the controller.
The PDC screen is activated.
The display appears on the Control Display as
soon as PDC is activated.
System limits
Even with PDC, final responsibility for
estimating the distance between the
vehicle and any obstructions always remains
with the driver. Even when sensors are pro-
vided, there is a blind sp ot in which objects can
no longer be detected. The system's detection
of objects is also subjec t to the physical limits
that apply to all forms of ultrasonic measure-
ment, such as those encountered with tow bars
and trailer couplings, th in or wedge-shaped
objects etc. Low objects already displayed, e.g.
the curb, can also disappear from the detection
area of the sensors again before or after a con-
tinuous tone already sounds. Higher, protrud-
ing objects, e.g. ledg es, cannot be detected.
For this reason, drive with care; otherwise, there
is a danger of personal injury or property dam-
age.
Loud sources of sound, inside and outside the
vehicle, could drown ou t the PDC signal tone.<
Page 112 of 317
Lamps
110
Lamps
Parking lamps/low beams
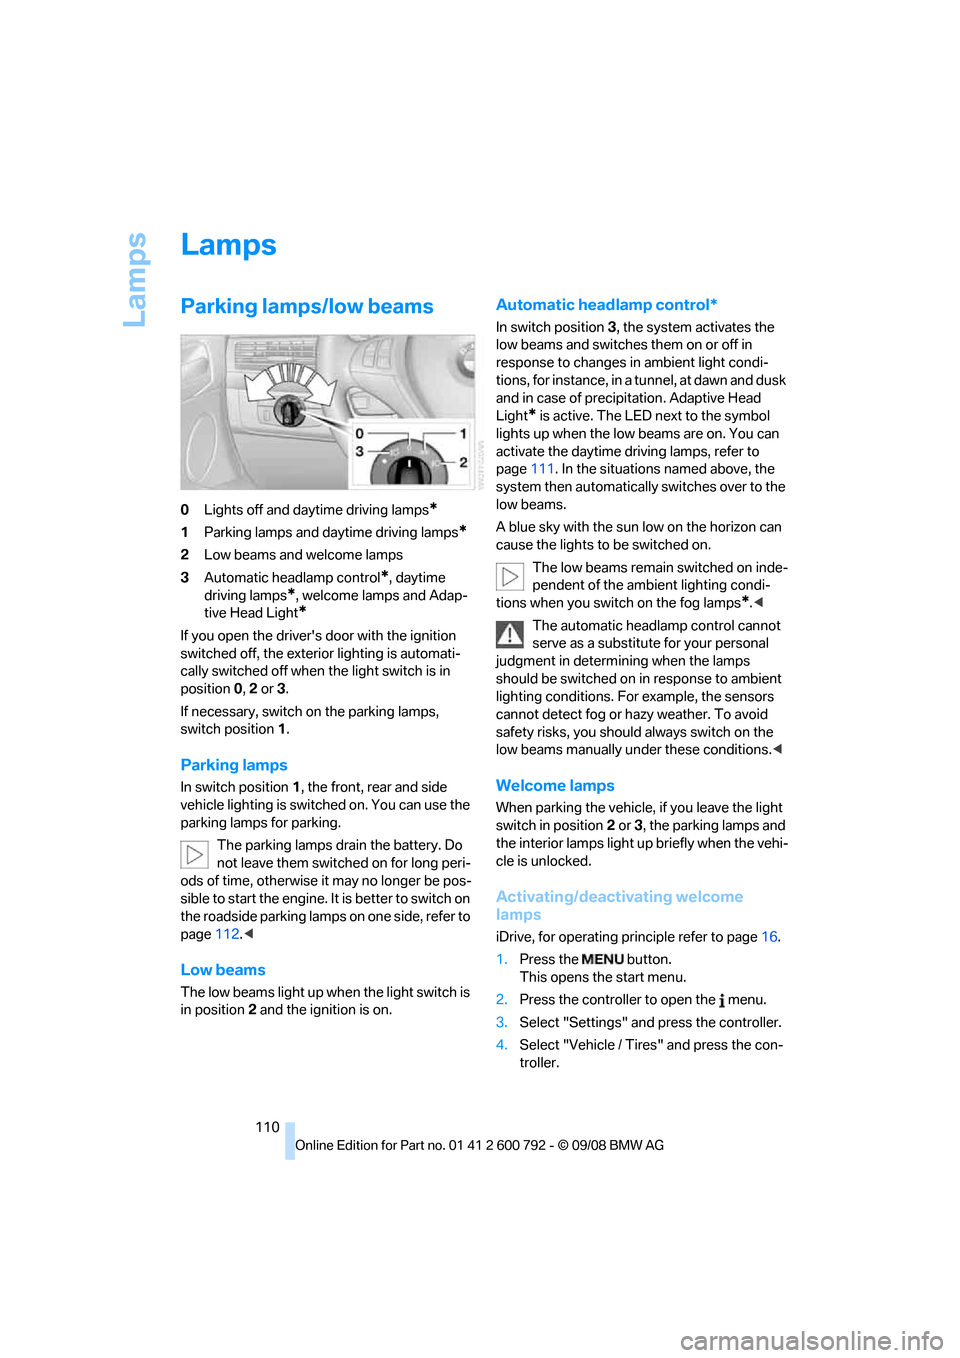
0Lights off and daytime driving lamps*
1Parking lamps and daytime driving lamps*
2Low beams and welcome lamps
3 Automatic head lamp control
*, daytime
driving lamps
*, welcome lamps and Adap-
tive Head Light
*
If you open the driver's door with the ignition
switched off, the exteri or lighting is automati-
cally switched off when the light switch is in
position 0, 2 or 3.
If necessary, switch on the parking lamps,
switch position 1.
Parking lamps
In switch position 1, the front, rear and side
vehicle lighting is switch ed on. You can use the
parking lamps for parking.
The parking lamps drain the battery. Do
not leave them switched on for long peri-
ods of time, otherwise it may no longer be pos-
sible to start the engine. It is better to switch on
the roadside parking lamp s on one side, refer to
page 112.<
Low beams
The low beams light up wh en the light switch is
in position 2 and the ignition is on.
Automatic headlamp control*
In switch position 3, the system activates the
low beams and switches them on or off in
response to changes in ambient light condi-
tions, for instance, in a tunnel, at dawn and dusk
and in case of precipitation. Adaptive Head
Light
* is active. The LED next to the symbol
lights up when the low beams are on. You can
activate the daytime driving lamps, refer to
page 111. In the situations named above, the
system then automatically switches over to the
low beams.
A blue sky with the sun low on the horizon can
cause the lights to be switched on.
The low beams remain switched on inde-
pendent of the ambient lighting condi-
tions when you switch on the fog lamps
*. <
The automatic headla mp control cannot
serve as a substitute for your personal
judgment in determin ing when the lamps
should be switched on in response to ambient
lighting conditions. For example, the sensors
cannot detect fog or hazy weather. To avoid
safety risks, you should always switch on the
low beams manually un der these conditions.<
Welcome lamps
When parking the vehicle, if you leave the light
switch in position2 or 3, the parking lamps and
the interior lamps light up briefly when the vehi-
cle is unlocked.
Activating/deactivating welcome
lamps
iDrive, for operating pr inciple refer to page16.
1. Press the button.
This opens the start menu.
2. Press the controller to open the menu.
3. Select "Settings" an d press the controller.
4. Select "Vehicle / Tire s" and press the con-
troller.
Page 117 of 317
Controls
115Reference
At a glance
Driving tips
Communications
Navigation
Entertainment
Mobility
Automatic climate control with 2-zone control
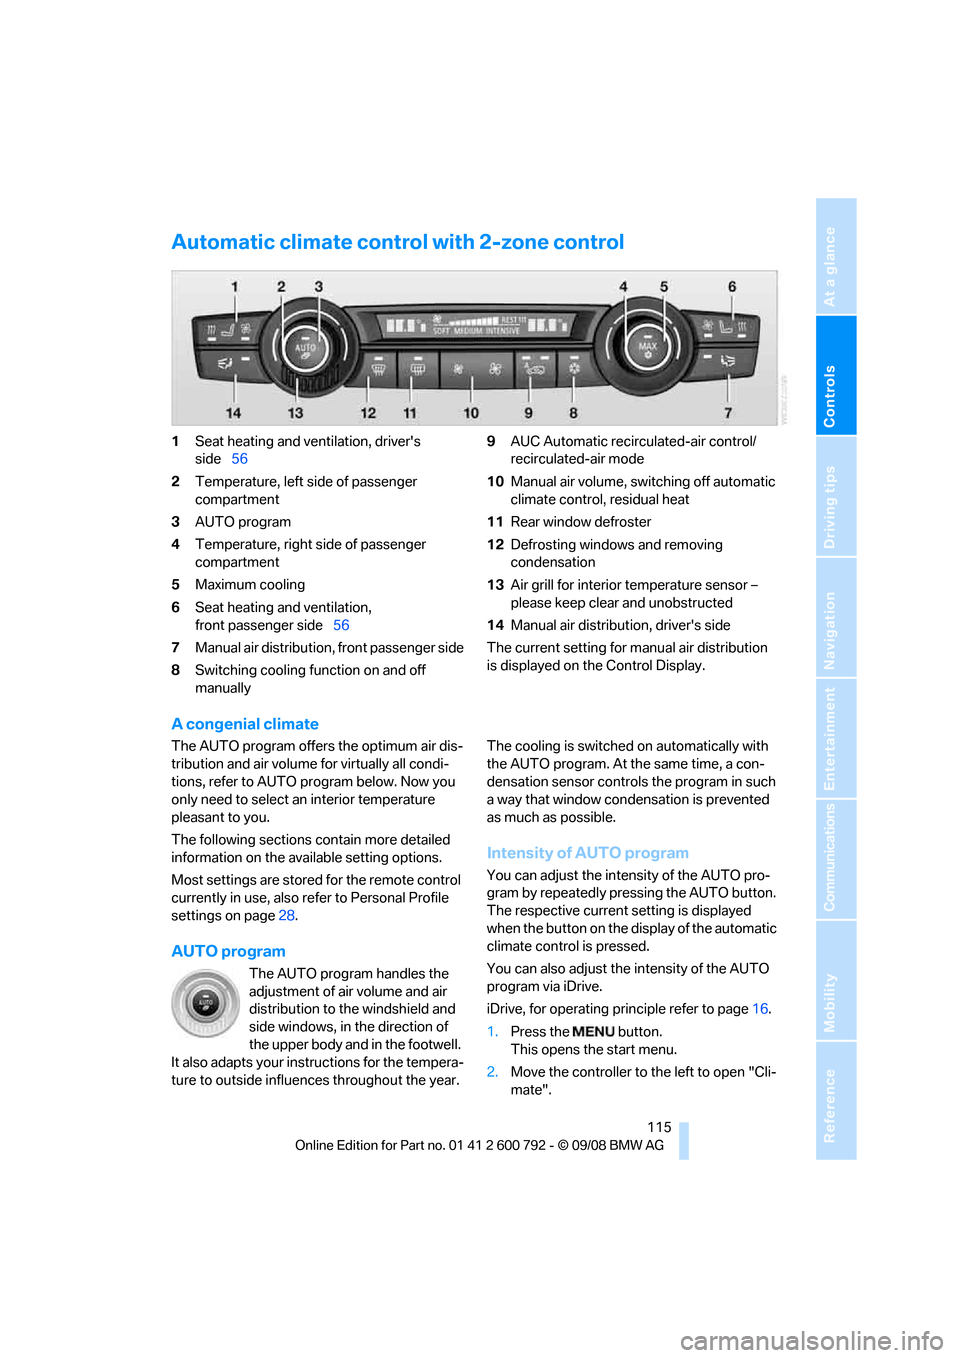
1Seat heating and ventilation, driver's
side 56
2 Temperature, left side of passenger
compartment
3 AUTO program
4 Temperature, right side of passenger
compartment
5 Maximum cooling
6 Seat heating
and ventilation,
front passenger side 56
7 Manual air distribution, front passenger side
8 Switching cooling function on and off
manually 9
AUC Automatic recirculated-air control/
recirculated-air mode
10 Manual air volume, sw itching off automatic
climate control, residual heat
11 Rear window defroster
12 Defrosting windows and removing
condensation
13 Air grill for interior temperature sensor –
please keep clear and unobstructed
14 Manual air distribution, driver's side
The current setting for manual air distribution
is displayed on the Control Display.
A congenial climate
The AUTO program offers the optimum air dis-
tribution and air volume for virtually all condi-
tions, refer to AUTO pr ogram below. Now you
only need to select an interior temperature
pleasant to you.
The following sections contain more detailed
information on the available setting options.
Most settings are stored for the remote control
currently in use, also re fer to Personal Profile
settings on page 28.
AUTO program
The AUTO program handles the
adjustment of air volume and air
distribution to the windshield and
side windows, in the direction of
the upper body and in the footwell.
It also adapts your inst ructions for the tempera-
ture to outside influenc es throughout the year. The cooling is switched
on automatically with
the AUTO program. At the same time, a con-
densation sensor controls the program in such
a way that window condensation is prevented
as much as possible.
Intensity of AUTO program
You can adjust the intensity of the AUTO pro-
gram by repeatedly pr essing the AUTO button.
The respective current setting is displayed
when the button on the display of the automatic
climate control is pressed.
You can also adjust the intensity of the AUTO
program via iDrive.
iDrive, for operating pr inciple refer to page16.
1. Press the button.
This opens the start menu.
2. Move the controller to the left to open "Cli-
mate".
Page 119 of 317
Controls
117Reference
At a glance
Driving tips
Communications
Navigation
Entertainment
Mobility
>Individual program
Selecting program
Press the button repeatedly until
the desired program is shown on
the Control Display.
Adjusting air distribution individually –
individual program
The settings are stored in this program.
iDrive, for operating principle refer to page 16.
1. Press the button.
This opens the start menu.
2. Move the controller to the left to open "Cli-
mate".
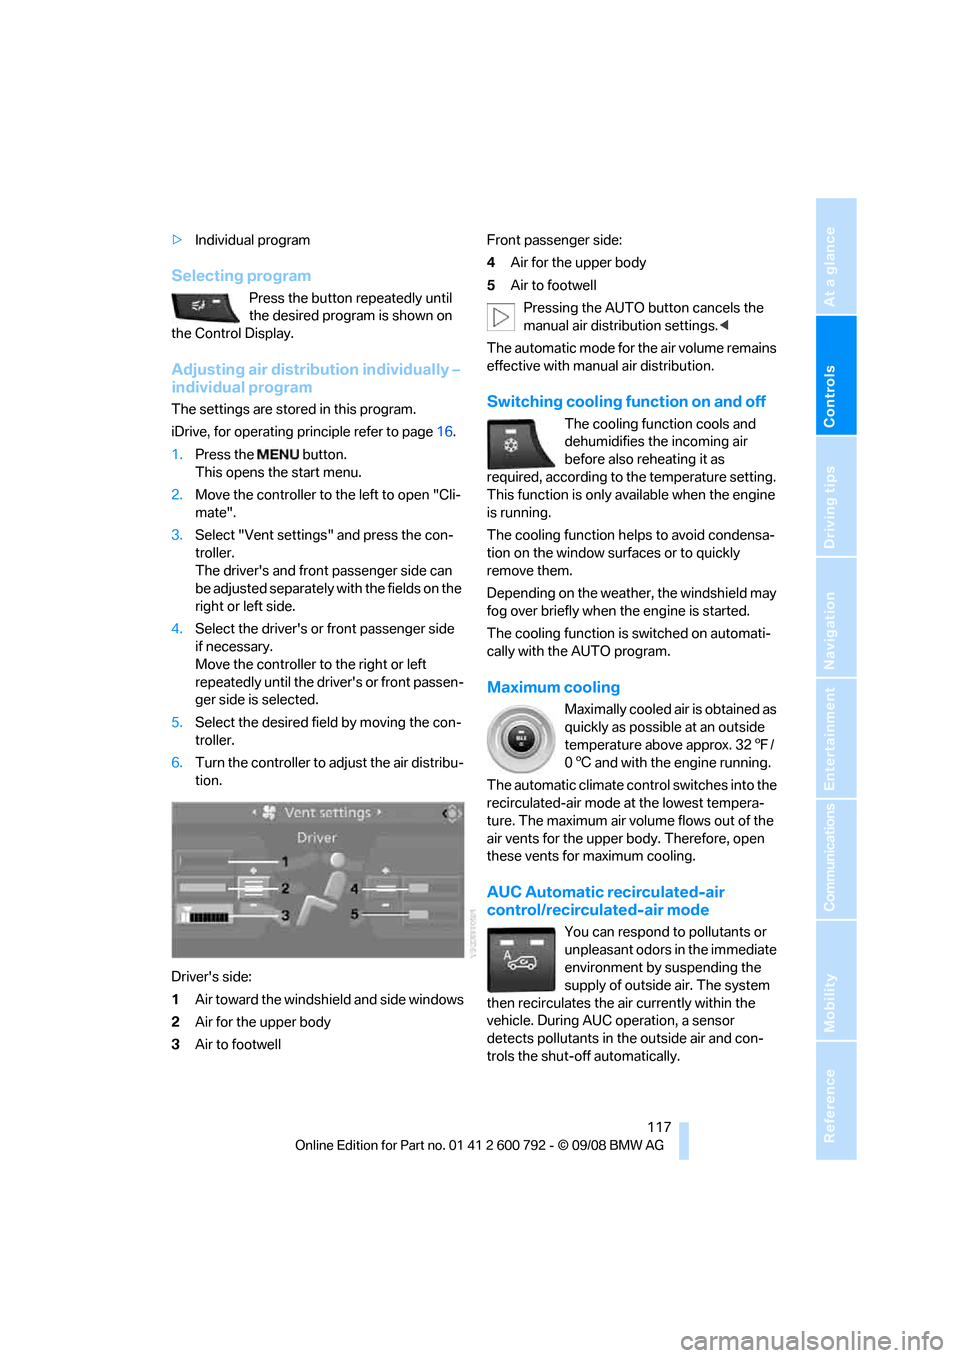
3. Select "Vent settings" and press the con-
troller.
The driver's and front passenger side can
be adjusted separately with the fields on the
right or left side.
4. Select the driver's or front passenger side
if necessary.
Move the controller to the right or left
repeatedly until the driver's or front passen-
ger side is selected.
5. Select the desired field by moving the con-
troller.
6. Turn the controller to ad just the air distribu-
tion.
Driver's side:
1 Air toward the windshield and side windows
2 Air for the upper body
3 Air to footwell Front passenger side:
4
Air for the upper body
5 Air to footwell
Pressing the AUTO button cancels the
manual air distribution settings. <
The automatic mode for the air volume remains
effective with manual air distribution.Switching cooling function on and off
The cooling function cools and
dehumidifies the incoming air
before also reheating it as
required, according to the temperature setting.
This function is only available when the engine
is running.
The cooling function helps to avoid condensa-
tion on the window surfaces or to quickly
remove them.
Depending on the weathe r, the windshield may
fog over briefly when the engine is started.
The cooling function is switched on automati-
cally with the AUTO program.
Maximum cooling
Maximally cooled air is obtained as
quickly as possible at an outside
temperature above approx. 32 7/
0 6 and with the engine running.
The automatic climate cont rol switches into the
recirculated-air mode at the lowest tempera-
ture. The maximum air volume flows out of the
air vents for the upper body. Therefore, open
these vents for maximum cooling.
AUC Automatic re circulated-air
control/recirculated-air mode
You can respond to pollutants or
unpleasant odors in the immediate
environment by suspending the
supply of outside air. The system
then recirculates the air currently within the
vehicle. During AUC operation, a sensor
detects pollutants in the outside air and con-
trols the shut-off automatically.
Page 265 of 317
Mobility
263Reference
At a glance
Controls
Driving tips
Communications
Navigation
Entertainment
Maintenance
BMW maintenance system
The BMW maintenance system supports the
preservation of the traffic and operating safety
of your BMW. The service schedule also
includes operations related to the vehicle's
comfort and convenience features, such as
replacement of the filters for the inside air.
The ultimate objective is to ensure economical
maintenance by providing the ideal service for
your vehicle.
Should the day come when you decide to sell
your BMW, a complete dealer service history
will prove to be an asset of inestimable value.
CBS Condition Based Service
Sensors and special algo rithms take the differ-
ent driving conditions of your BMW into
account. Condition Based Service uses this to
determine the current and future service
requirements. By letting you define a service
and maintenance regimen that reflects your
own individual requirements, the system builds
the basis for trouble-free driving.
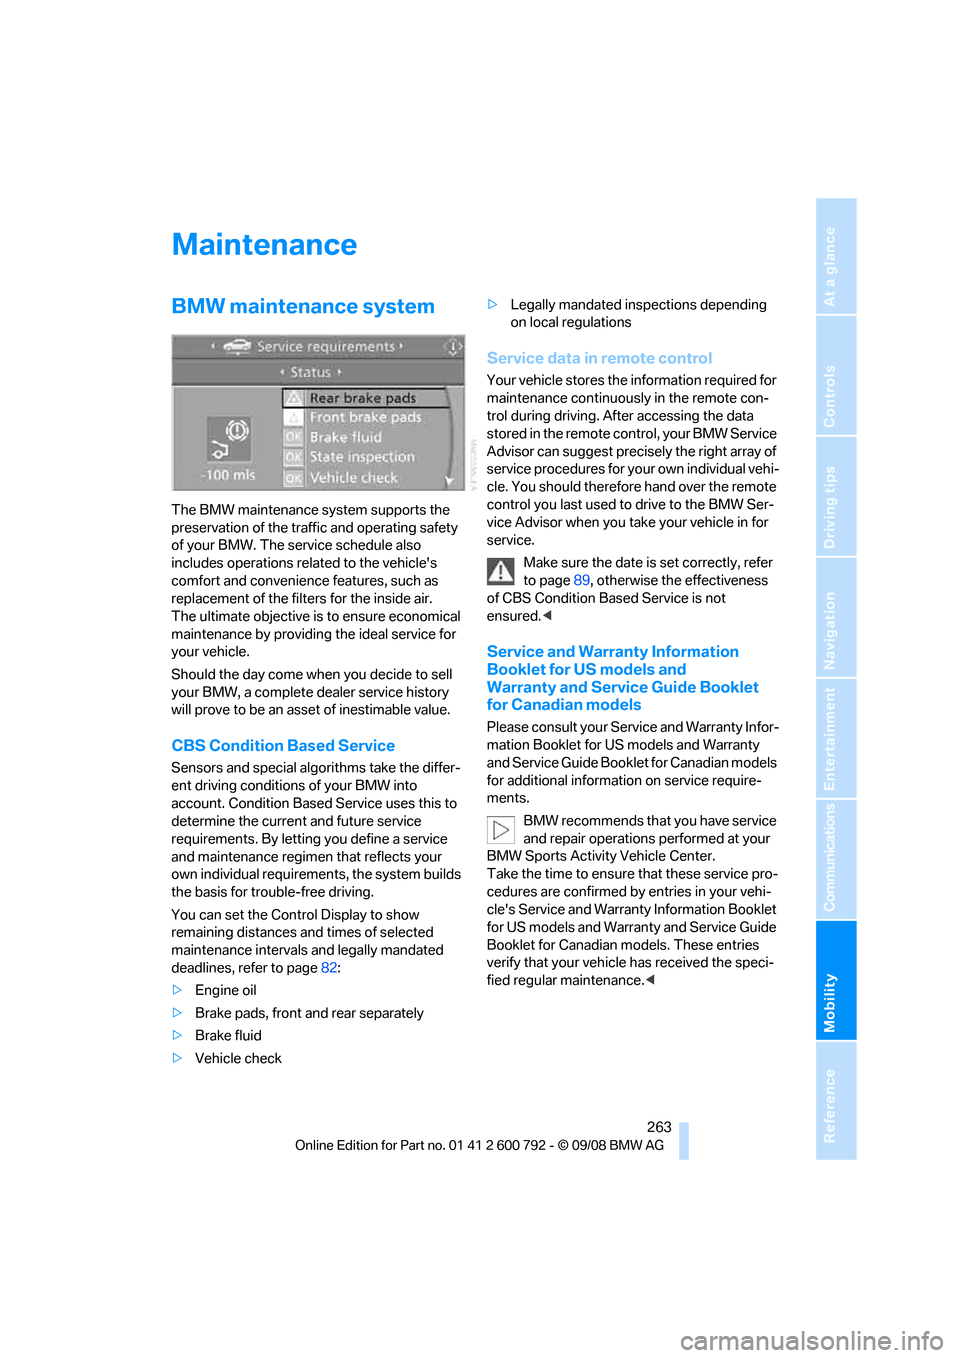
You can set the Contro l Display to show
remaining distances and times of selected
maintenance intervals and legally mandated
deadlines, refer to page 82:
> Engine oil
> Brake pads, front and rear separately
> Brake fluid
> Vehicle check >
Legally mandated inspections depending
on local regulations
Service data in remote control
Your vehicle stores the information required for
maintenance continuously in the remote con-
trol during driving. After accessing the data
stored in the remote co ntrol, your BMW Service
Advisor can suggest precisely the right array of
service procedures for yo ur own individual vehi-
cle. You should therefore hand over the remote
control you last used to drive to the BMW Ser-
vice Advisor when you take your vehicle in for
service.
Make sure the date is set correctly, refer
to page 89, otherwise the effectiveness
of CBS Condition Based Service is not
ensured. <
Service and Warranty Information
Booklet for US models and
Warranty and Service Guide Booklet
for Canadian models
Please consult your Service and Warranty Infor-
mation Booklet for US models and Warranty
and Service Guide Booklet for Canadian models
for additional information on service require-
ments.
BMW recommends that you have service
and repair operations performed at your
BMW Sports Activity Vehicle Center.
Take the time to ensure that these service pro-
cedures are confirmed by entries in your vehi-
cle's Service and Warranty Information Booklet
for US models and Warranty and Service Guide
Booklet for Canadian models. These entries
verify that your vehicle has received the speci-
fied regular maintenance.<