BMW X5 XDRIVE35D 2011 Owners Manual
Manufacturer: BMW, Model Year: 2011, Model line: X5 XDRIVE35D, Model: BMW X5 XDRIVE35D 2011Pages: 312, PDF Size: 8.91 MB
Page 271 of 312
Mobility
269Reference
At a glance
Controls
Driving tips
Communications
Navigation
Entertainment
it from extending to its full support height and
reduce its load-carrying capacity.
To avoid serious or fatal injury: never lie under
the vehicle, and never start the engine while it is
supported by the jack.<
What you will need
To avoid rattling noises later on, note the posi-
tions of the tools before removing them, then
return them to their initial positions after com-
pleting work.
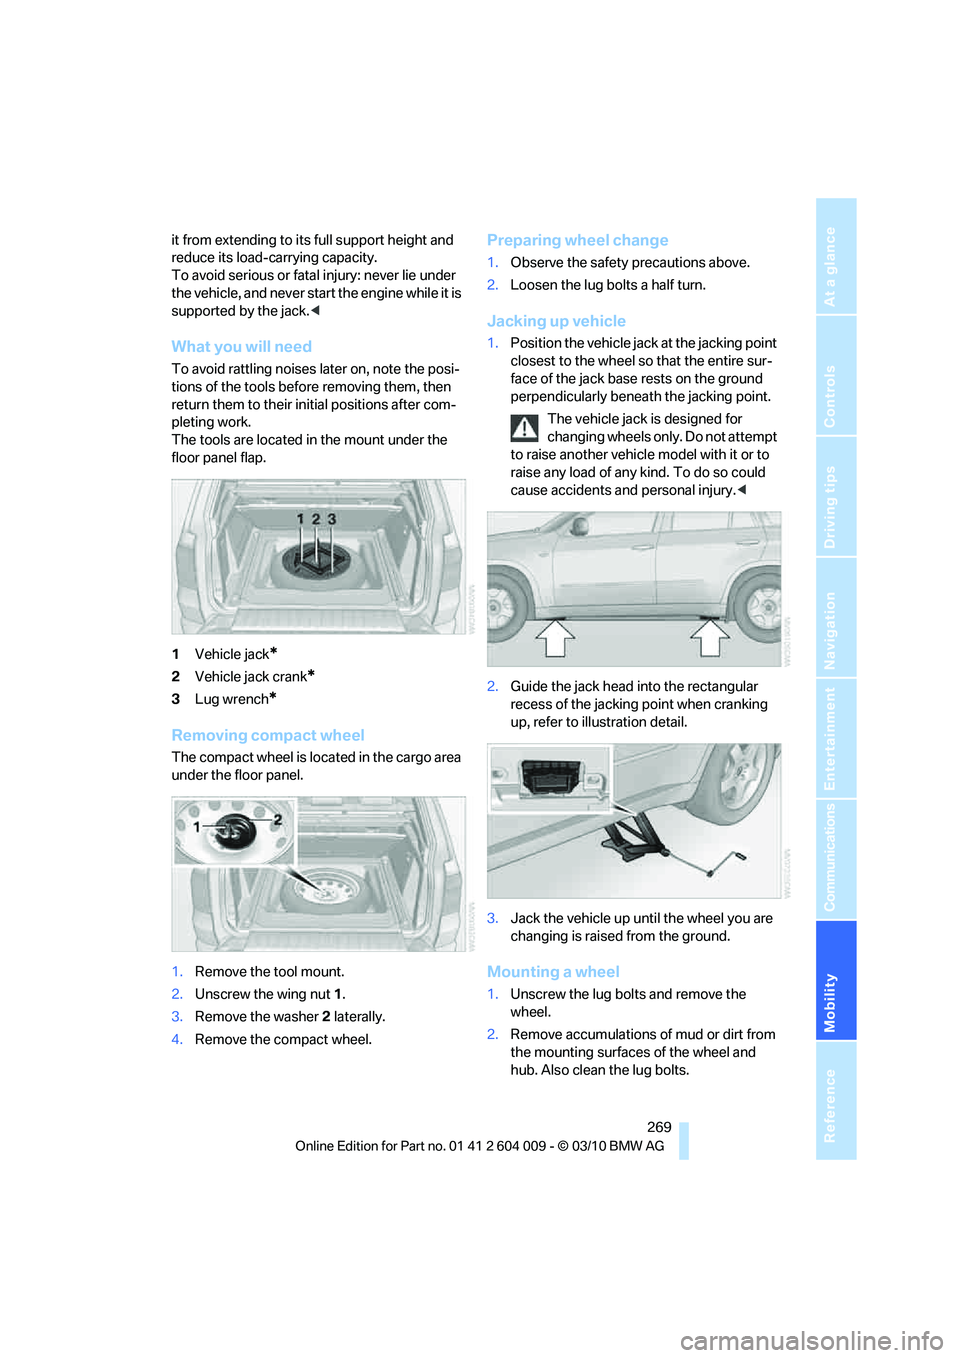
The tools are located in the mount under the
floor panel flap.
1Vehicle jack
*
2Vehicle jack crank*
3Lug wrench*
Removing compact wheel
The compact wheel is located in the cargo area
under the floor panel.
1.Remove the tool mount.
2.Unscrew the wing nut 1.
3.Remove the washer 2 laterally.
4.Remove the compact wheel.
Preparing wheel change
1.Observe the safety precautions above.
2.Loosen the lug bolts a half turn.
Jacking up vehicle
1.Position the vehicle jack at the jacking point
closest to the wheel so that the entire sur-
face of the jack base rests on the ground
perpendicularly beneath the jacking point.
The vehicle jack is designed for
changing wheels only. Do not attempt
to raise another vehicle model with it or to
raise any load of any kind. To do so could
cause accidents and personal injury.<
2.Guide the jack head into the rectangular
recess of the jacking point when cranking
up, refer to illustration detail.
3.Jack the vehicle up until the wheel you are
changing is raised from the ground.
Mounting a wheel
1.Unscrew the lug bolts and remove the
wheel.
2.Remove accumulations of mud or dirt from
the mounting surfaces of the wheel and
hub. Also clean the lug bolts.
Page 272 of 312
Replacing components
270 3.Position the new wheel or compact wheel.
Secure the wheel by screwing at least two
lug bolts into opposite bolt holes.
When you mount wheels other than Genu-
ine BMW light-alloy wheels, different lug
bolts may also be required.
4.Screw in the remaining lug bolts. Tighten all
the bolts securely in a diagonal pattern.
5.Lower the vehicle and remove the jack from
beneath the vehicle.
After mounting
1.Tighten the lug bolts in a diagonal pattern.
To ensure safety, always have the
lug bolts checked with a calibrated
torque wrench as soon as possible to
ensure that they are tightened to the speci-
fied torque. Otherwise, incorrectly tight-
ened lug bolts are a hidden safety risk. The
tightening torque is 101 lb ft/140 Nm.<
2.Stow the defective wheel in the cargo area.
The defective wheel cannot be stored
under the floor panel flap due to its
size.<
3.Check and correct the tire inflation pressure
at the earliest opportunity.
Protect valve stems with valve screw
caps against dirt and contamination.
Dirt in valve stems is a frequent source of
gradual air loss.<
4.Initialize the Flat Tire Monitor, refer to
page100, or reset the Tire Pressure Moni-
tor, refer to page102.
5.Replace the damaged tire as soon as possi-
ble and have the new wheel/tire balanced.
Driving with compact wheel
Drive reservedly and do not exceed a
speed of 50 mph/80 km/h. Otherwise,
changes in the driving characteristics could
result, for example reduced track stability on
braking, extended braking distance, and altered
self-steering characteristics in the limit range.
In conjunction with winter tires, these charac-
teristics are more pronounced.
their original size as quickly as possible. Failure
to do so is a safety risk.<
Vehicle battery
Battery care
The battery is 100 % maintenance-free, i.e., the
electrolyte will last for the life of the battery
when the vehicle is operated in a temperate cli-
mate. Your BMW Sports Activity Vehicle Center
will be glad to advise in all matters concerning
the battery.
Replacing battery
Only use vehicle batteries that have been
approved for your vehicle by the manu-
facturer; otherwise, the vehicle could be dam-
aged and systems or functions may not be fully
available.<
After a battery replacement, have the battery
registered on the vehicle by your BMW Sports
Activity Vehicle Center to ensure that all com-
fort functions are fully available.
Charging battery
Only charge the battery in the vehicle via the
terminals in the engine compartment with the
engine switched off. Connections, refer to
Jump starting on page274.
Disposal
Have old batteries disposed of following
replacement at your BMW Sports Activity
Vehicle Center or bring them to a recycling cen-
ter. Maintain the battery in an upright position
for transport and storage. Always restrain the
battery to prevent it from tipping over during
transport.<
Power failure
Following a temporary power failure, e.g. due to
a discharged battery, the use of some equip-
ment will be restricted, requiring its reinitializa-
Page 273 of 312
Mobility
271Reference
At a glance
Controls
Driving tips
Communications
Navigation
Entertainment
tion. In the same way, individual settings are lost
and must be updated again:
>Seat, mirror and steering wheel memory
The positions must be stored again, refer to
page44.
>Time and Date
The values must be updated again, refer to
pages85, 85.
>Radio
Radio stations must be stored again, refer
to page171.
>Navigation system
You must wait until the system becomes
functional again, refer to page165.
>Glass sunroof/panoramic glass sunroof
It may only be possible to raise the glass
sunroof/panoramic glass sunroof. The sys-
tem must be initialized, refer to page41.
>Digital compass
The system must be calibrated, refer to
page126.
>Active steering
The system automatically initializes for a
short time as you drive. During this time, the
system is deactivated, refer to page106.
>xDrive
The system automatically initializes as you
drive. During this time, indicator lamps light
up. If the lamps do not disappear during the
current trip, have the system checked.
Before removing the vehicle from stor-
age, consult your BMW Sports Activity
Vehicle Center.<
Fuses
Never attempt to repair a blown fuse and
do not replace a defective fuse with a sub-
stitute of another color or amperage rating, as
this could lead to a circuit overload, ultimately
resulting in a fire in the vehicle.<
A pair of plastic tweezers and instructions for
fuse allocation is stored with the fuses in the
cargo area.Spare fuses can be obtained from your BMW
Sports Activity Vehicle.
In interior
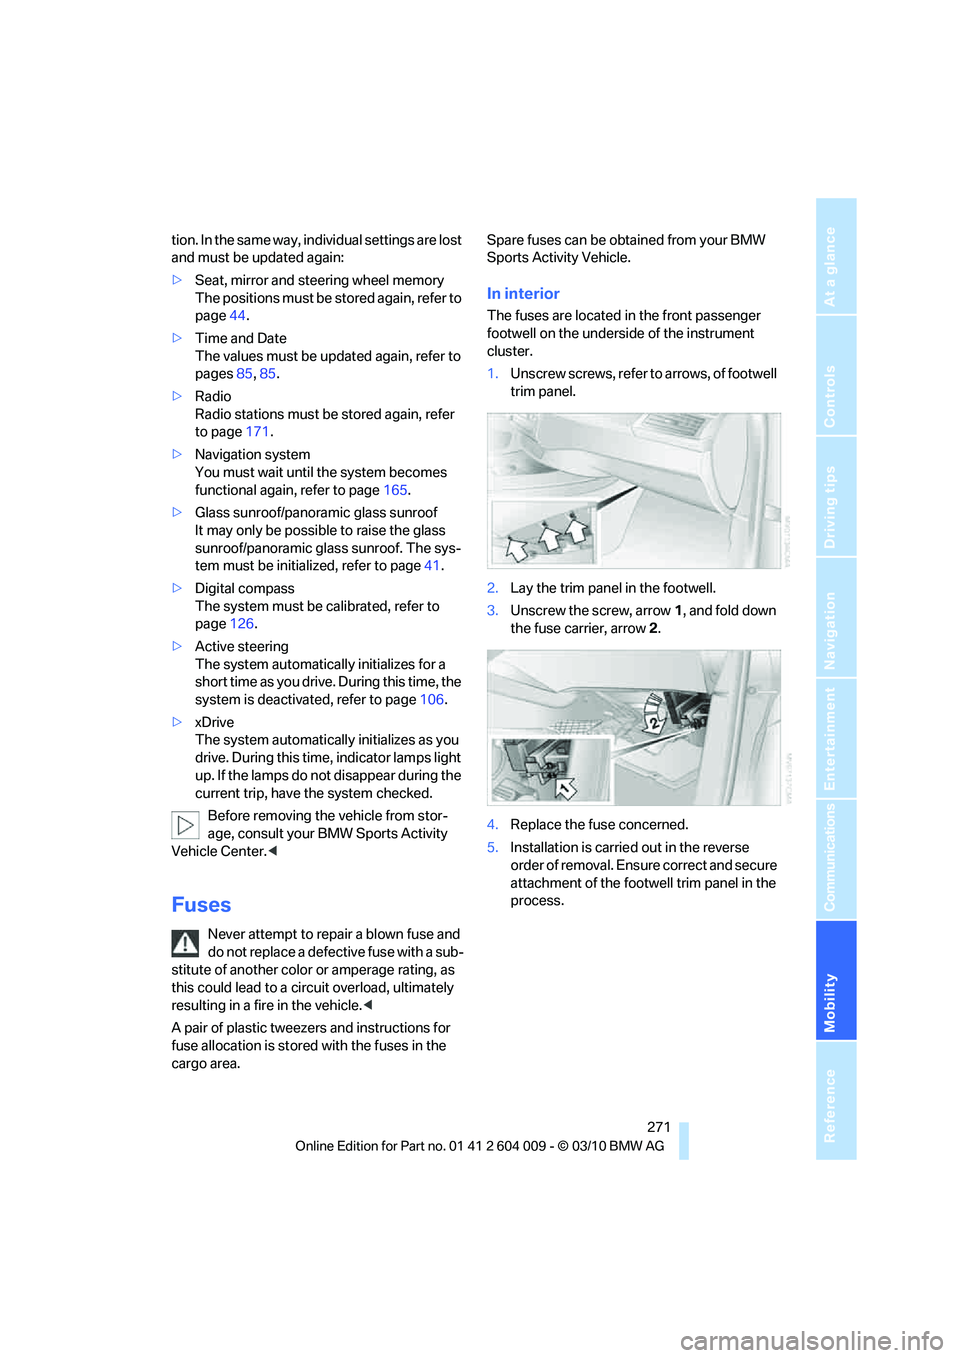
The fuses are located in the front passenger
footwell on the underside of the instrument
cluster.
1.Unscrew screws, refer to arrows, of footwell
trim panel.
2.Lay the trim panel in the footwell.
3.Unscrew the screw, arrow1, and fold down
the fuse carrier, arrow2.
4.Replace the fuse concerned.
5.Installation is carried out in the reverse
order of removal. Ensure correct and secure
attachment of the footwell trim panel in the
process.
Page 274 of 312
Replacing components
272
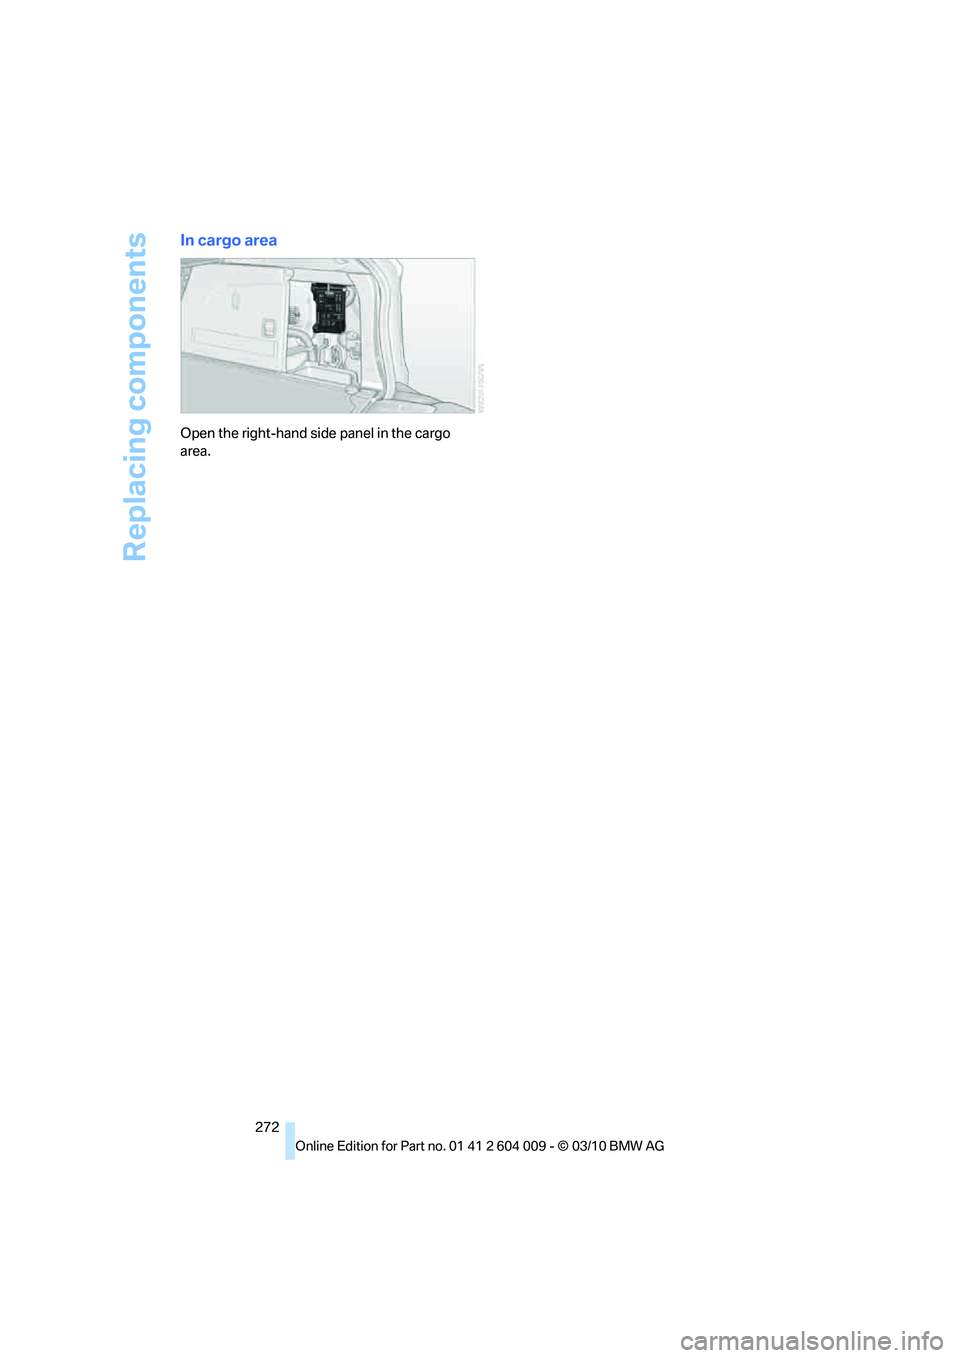
In cargo area
Open the right-hand side panel in the cargo
area.
Page 275 of 312
Mobility
273Reference
At a glance
Controls
Driving tips
Communications
Navigation
Entertainment
Giving and receiving assistance
Emergency request
Conditions for an emergency request:
>Full preparation package mobile phone.
With this equipment, an emergency request
is still possible when no mobile phone is
paired in the vehicle.
>BMW Assist is activated.
Activating BMW Assist, refer to page228.
>Radio readiness is switched on.
>The BMW Assist system is logged in on a
wireless communications network.
>The emergency request system is opera-
ble.
When the contract of participation with BMW
Assist expires, the BMW Assist system can be
deactivated by a BMW Sports Activity Vehicle
Center without having to visit a workshop. Once
the BMW Assist system has been deactivated,
emergency requests are not possible. The
BMW Assist system be reactivated by a BMW
Sports Activity Vehicle Center after signing a
new contract.
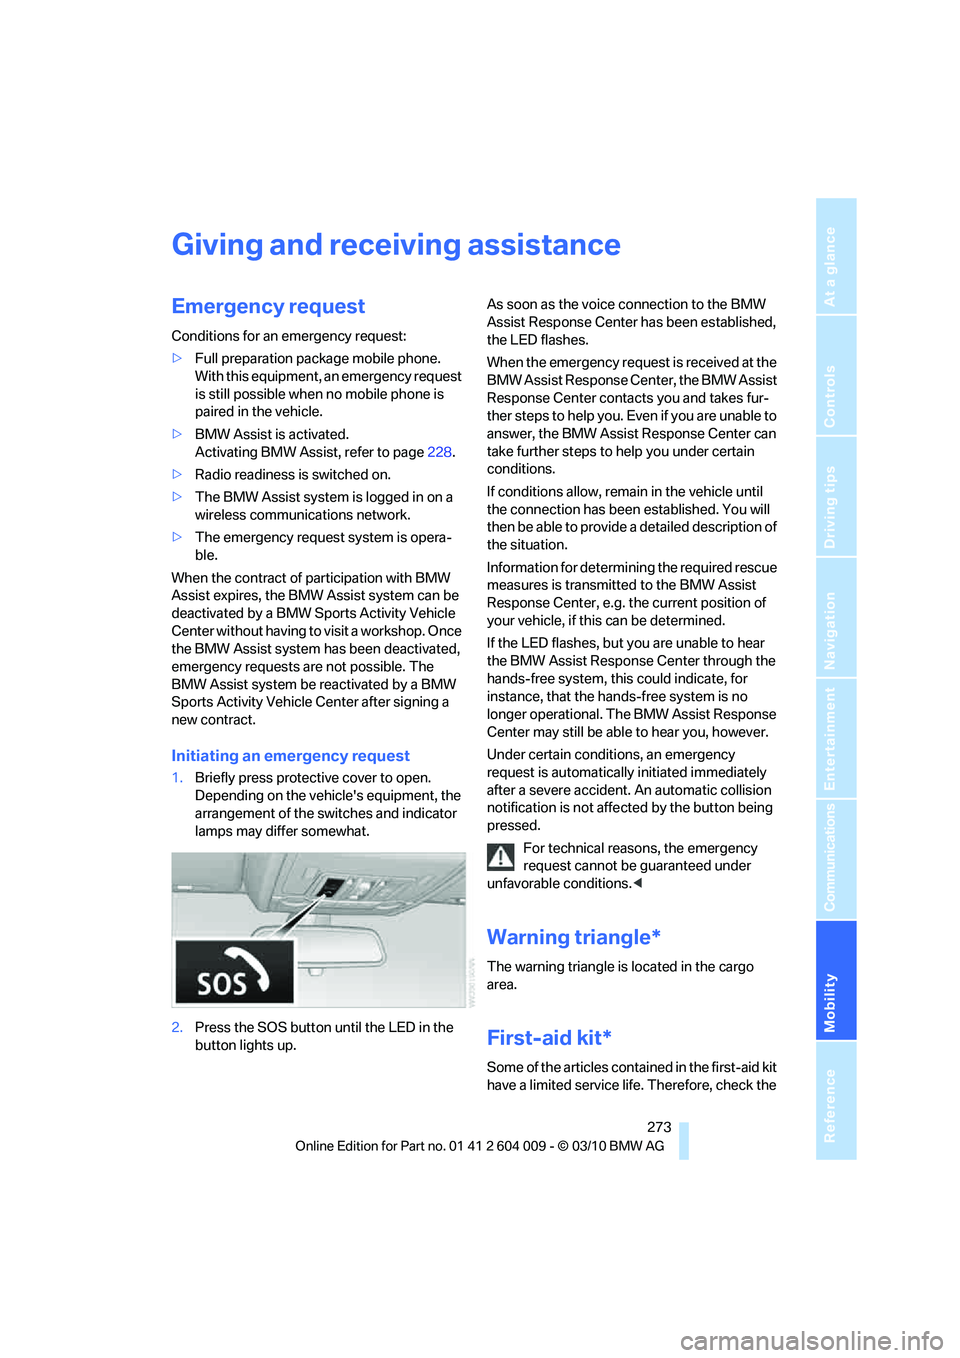
Initiating an emergency request
1.Briefly press protective cover to open.
Depending on the vehicle's equipment, the
arrangement of the switches and indicator
lamps may differ somewhat.
2.Press the SOS button until the LED in the
button lights up.As soon as the voice connection to the BMW
Assist Response Center has been established,
the LED flashes.
When the emergency request is received at the
BMW Assist Response Center, the BMW Assist
Response Center contacts you and takes fur-
ther steps to help you. Even if you are unable to
answer, the BMW Assist Response Center can
take further steps to help you under certain
conditions.
If conditions allow, remain in the vehicle until
the connection has been established. You will
then be able to provide a detailed description of
the situation.
Information for determining the required rescue
measures is transmitted to the BMW Assist
Response Center, e.g. the current position of
your vehicle, if this can be determined.
If the LED flashes, but you are unable to hear
the BMW Assist Response Center through the
hands-free system, this could indicate, for
instance, that the hands-free system is no
longer operational. The BMW Assist Response
Center may still be able to hear you, however.
Under certain conditions, an emergency
request is automatically initiated immediately
after a severe accident. An automatic collision
notification is not affected by the button being
pressed.
For technical reasons, the emergency
request cannot be guaranteed under
unfavorable conditions.<
Warning triangle*
The warning triangle is located in the cargo
area.
First-aid kit*
Some of the articles contained in the first-aid kit
have a limited service life. Therefore, check the
Page 276 of 312
Giving and receiving assistance
274 expiration dates of the contents regularly and
replace the contents concerned in good time if
necessary.
The first-aid kit is stored in the cargo area,
depending on the vehicle's equipment,
>On the right in a storage tray or
>Behind the left side panel
Roadside Assistance*
Roadside Assistance can be reached around
the clock in many countries. You can obtain
assistance there in the event of a vehicle break-
down.
The phone numbers of Roadside Assistance
can be found in the Contact brochure.
With BMW Assist or BMW TeleService, you can
contact BMW Roadside Assistance directly via
iDrive to request assistance in the event of a
breakdown, refer to page227.
Jump starting
When your battery is discharged, you can use
two jumper cables to start your BMW with
power from the battery in a second vehicle. You
can also use the same method to help start
another vehicle. Use only jumper cables with
fully-insulated clamp handles.
To avoid the risk of potentially fatal injury,
always avoid all contact with electrical
components while the engine is running. Care-
fully adhere to the following sequence, both to
prevent damage to one or both vehicles, and to
guard against possible personal injuries.<
Preparation
1.Check whether the battery of the other
vehicle has a voltage of 12 Volts and
approximately the same capacitance in Ah.
This information can be found on the bat-
tery.
2.Switch off the engine of the assisting vehi-
cle.3.Switch off any electrical systems and com-
ponents in both vehicles.
There must not be any contact between
the bodies of the two vehicles, otherwise
there is a danger of shorting.<
Connecting jumper cables
To avoid personal injury from sparks, fol-
low this sequence when connecting
jumper cables.<
On your BMW the so-called starting-aid termi-
nal in the engine compartment acts as the bat-
tery positive terminal, also refer to the engine
compartment overview on page252. The cover
cap is marked with +.
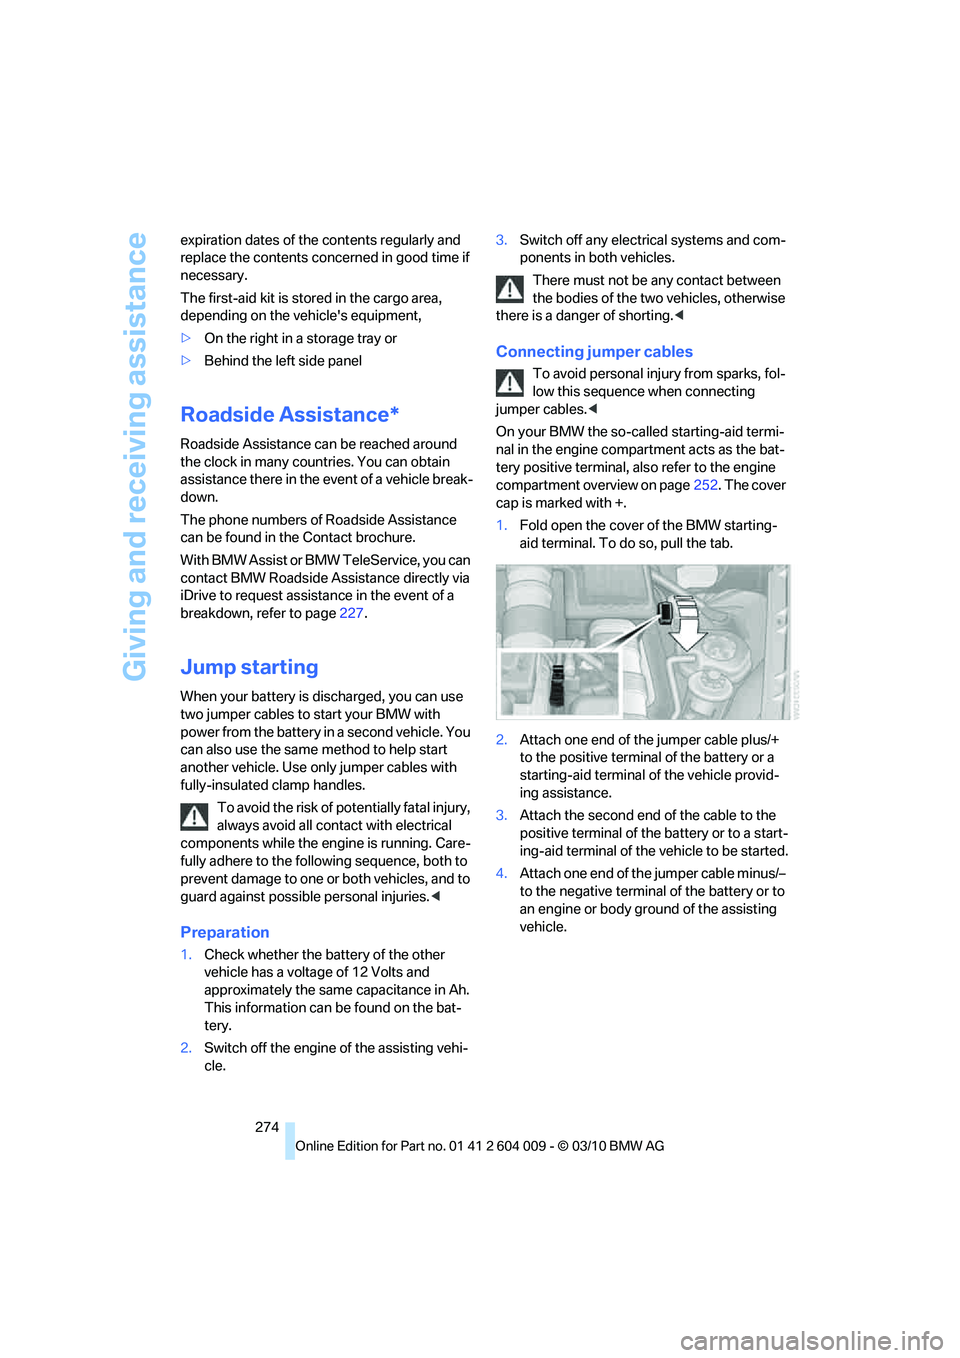
1.Fold open the cover of the BMW starting-
aid terminal. To do so, pull the tab.
2.Attach one end of the jumper cable plus/+
to the positive terminal of the battery or a
starting-aid terminal of the vehicle provid-
ing assistance.
3.Attach the second end of the cable to the
positive terminal of the battery or to a start-
ing-aid terminal of the vehicle to be started.
4.Attach one end of the jumper cable minus/–
to the negative terminal of the battery or to
an engine or body ground of the assisting
vehicle.
Page 277 of 312
Mobility
275Reference
At a glance
Controls
Driving tips
Communications
Navigation
Entertainment
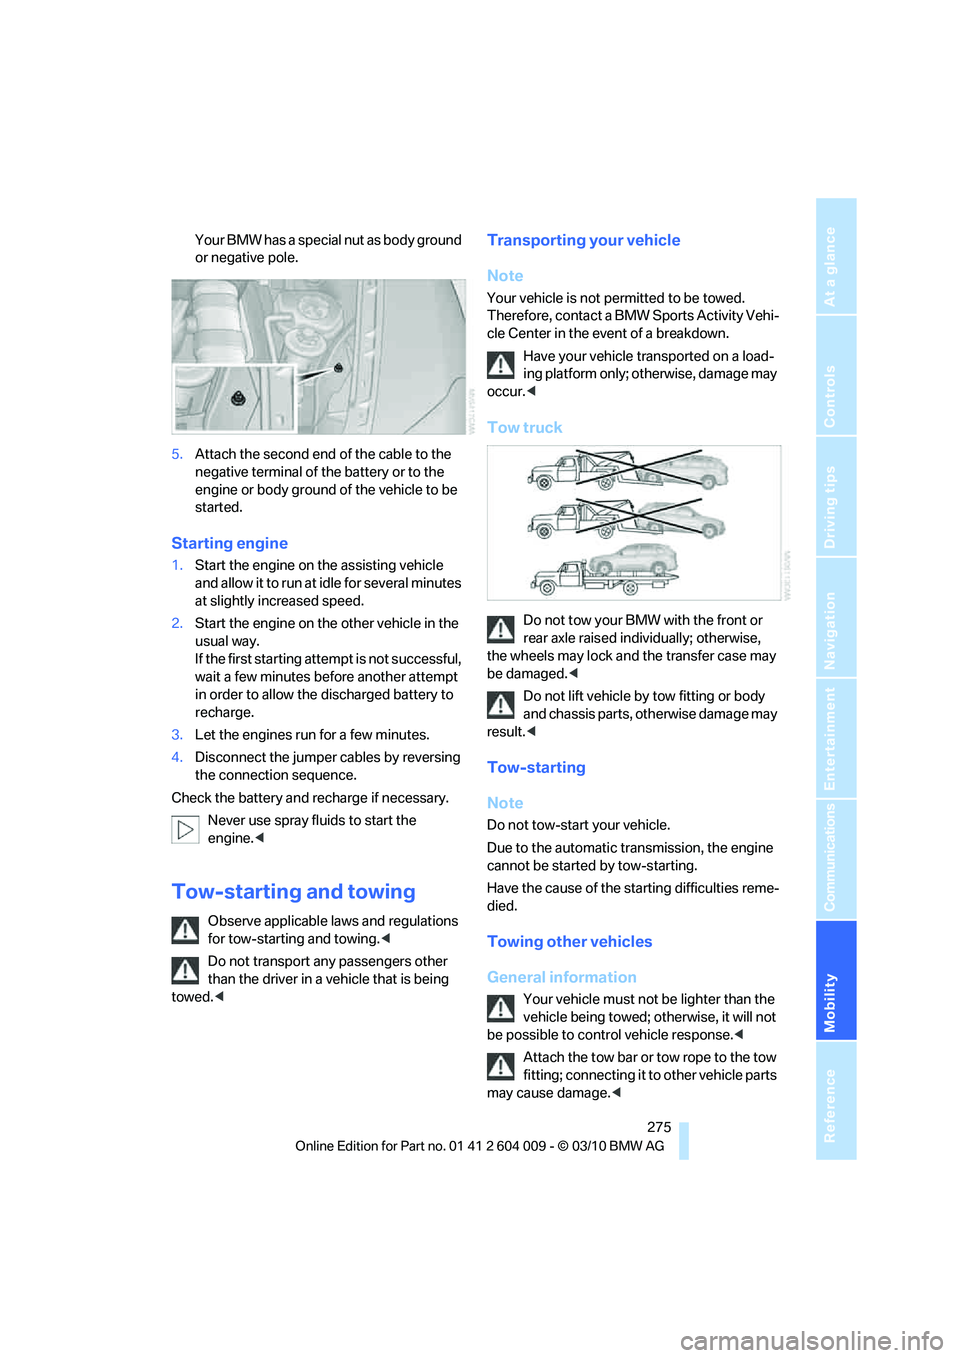
Your BMW has a special nut as body ground
or negative pole.
5.Attach the second end of the cable to the
negative terminal of the battery or to the
engine or body ground of the vehicle to be
started.
Starting engine
1.Start the engine on the assisting vehicle
and allow it to run at idle for several minutes
at slightly increased speed.
2.Start the engine on the other vehicle in the
usual way.
If the first starting attempt is not successful,
wait a few minutes before another attempt
in order to allow the discharged battery to
recharge.
3.Let the engines run for a few minutes.
4.Disconnect the jumper cables by reversing
the connection sequence.
Check the battery and recharge if necessary.
Never use spray fluids to start the
engine.<
Tow-starting and towing
Observe applicable laws and regulations
for tow-starting and towing.<
Do not transport any passengers other
than the driver in a vehicle that is being
towed.<
Transporting your vehicle
Note
Your vehicle is not permitted to be towed.
Therefore, contact a BMW Sports Activity Vehi-
cle Center in the event of a breakdown.
Have your vehicle transported on a load-
ing platform only; otherwise, damage may
occur.<
Tow truck
Do not tow your BMW with the front or
rear axle raised individually; otherwise,
the wheels may lock and the transfer case may
be damaged.<
Do not lift vehicle by tow fitting or body
and chassis parts, otherwise damage may
result.<
Tow-starting
Note
Do not tow-start your vehicle.
Due to the automatic transmission, the engine
cannot be started by tow-starting.
Have the cause of the starting difficulties reme-
died.
Towing other vehicles
General information
Your vehicle must not be lighter than the
vehicle being towed; otherwise, it will not
be possible to control vehicle response.<
Attach the tow bar or tow rope to the tow
fitting; connecting it to other vehicle parts
may cause damage.<
Page 278 of 312
Giving and receiving assistance
276 >Switch on the hazard warning flashers
depending on the local regulations.
>If the electrical system fails, mark the vehi-
cle to be towed, e.g. with a sign or warning
triangle in the rear window.
Towing methods when towing other
vehicles
Tow bar
The tow fittings used should be on the same
side on both vehicles.
Should it prove impossible to avoid mounting
the tow bar at an offset angle, observe the fol-
lowing:
>Clearance and maneuvering capability will
be sharply limited during cornering.
>When mounted at an angle, the tow bar will
exert lateral forces, tending to push the
vehicle sideways.
Only attach the tow bar to the tow fittings,
as attachment to other vehicle parts can
lead to damage.<
Tow rope
When starting off in the towing vehicle, make
sure that the tow rope is taut.
To avoid jerking and the associated stresses on
vehicle components when towing, always use
nylon ropes or nylon straps.
Only secure the tow rope on the tow fit-
ting; connecting it to other vehicle parts
may cause damage.<
Tow fitting
The screw-on tow-fitting must always be car-
ried in the vehicle. It can be screwed in at the
front or rear of the BMW.
It is located in the toolkit under the floor panel
flap in the cargo area, refer to page262.
Use only the tow fitting provided with the
vehicle and screw it all the way in. Use the
tow fitting for towing only on roads. Use the tow
fitting screwed in at the front for maneuvering
the vehicle only. Avoid lateral loading of the tow fitting, e.g. do not lift the vehicle by the tow fit-
ting. Otherwise damage to the tow fitting and
the vehicle can occur.<
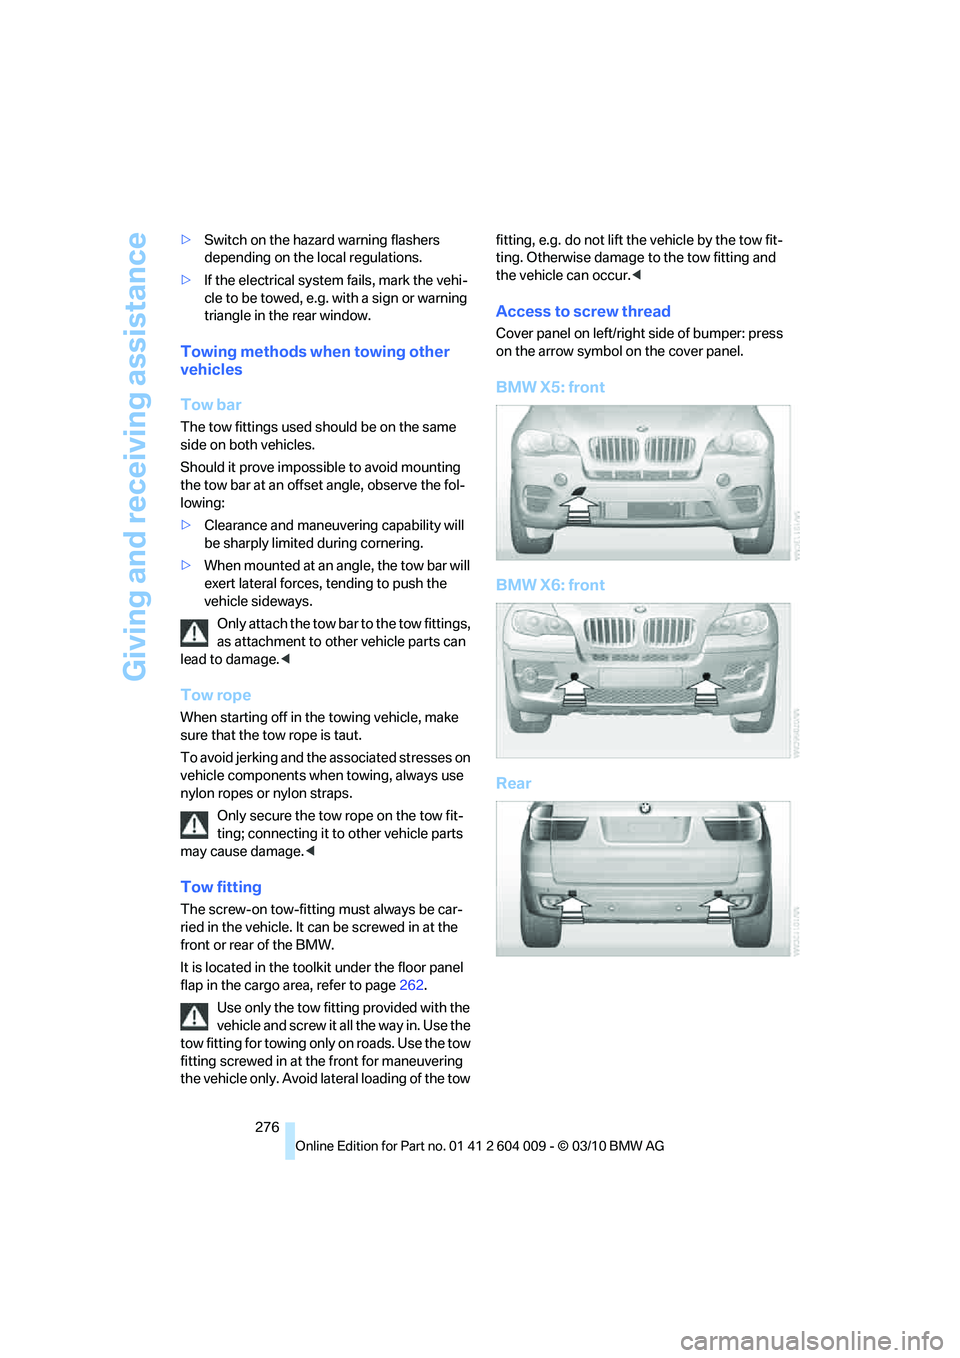
Access to screw thread
Cover panel on left/right side of bumper: press
on the arrow symbol on the cover panel.
BMW X5: front
BMW X6: front
Rear
Page 279 of 312
Mobility
277Reference
At a glance
Controls
Driving tips
Communications
Navigation
Entertainment
Page 280 of 312
