display BMW X5 XDRIVE35D 2012 User Guide
[x] Cancel search | Manufacturer: BMW, Model Year: 2012, Model line: X5 XDRIVE35D, Model: BMW X5 XDRIVE35D 2012Pages: 317, PDF Size: 8.83 MB
Page 21 of 317

Example: setting the clock
Setting the clock
1.
Press the button. The main menu is
displayed.
2. Turn the controller until "Settings" is high‐
lighted, and then press the controller. 3.
If necessary, move the controller to the left
to display "Time/Date"
.
4. Turn the controller until "Time/Date"
is high‐
lighted, and then press the controller. 5.
Turn the controller until "Time:" is high‐
lighted, and then press the controller. 6.
Turn the controller to set the hours and
press the controller.
7. Turn the controller to set the minutes and
press the controller. Status information
Status field
The
following information is displayed in the sta‐
tus field at the top right:
▷ Time.
▷ Current entertainment source.
▷ Sound output, on/off.
▷ Wireless network reception strength.
▷ Telephone status.
▷ Traffic bulletin reception.
Status field symbols
The symbols are grouped into various catego‐
ries.
Radio symbols Symbol Meaning
Traffic bulletins* switched on.
HD Radio* is switched on.
Satellite radio* is switched on.
Telephone symbols
Symbol Meaning
Incoming or outgoing call*.
Missed call*.
Wireless network reception
strength*
Symbol flashes: searching
for network. Wireless network is not available*.
Bluetooth* is switched on.
Roaming* is active.
Text message*, e-mail* was re‐
ceived. Check the SIM card*.
SIM card* is blocked. Seite 21
21Online Edition for Part no. 01 40 2 606 735 - 03 11 500
Reference Mobility Communication Entertainment Navigation Driving tips Controls
At a glance
Page 22 of 317
Symbol Meaning
SIM card* is missing.
Enter the PIN*.
Entertainment symbols
Symbol Meaning
CD/DVD* player.
Music collection*.
Gracenote® database*.
AUX-IN port.
USB audio interface*.
Mobile phone audio interface*.
Additional symbols
Symbol Meaning
Spoken instructions* are switched
off. Request of the current vehicle posi‐
tion*. Split screen*
General information
Additional information can be displayed on the
right side of the split screen, e.g., information
from the computer.
In the divided screen view, the so-called split
screen, this information remains visible even
when you change to another menu.
Switching the split screen on and
off*
1. Press the button.
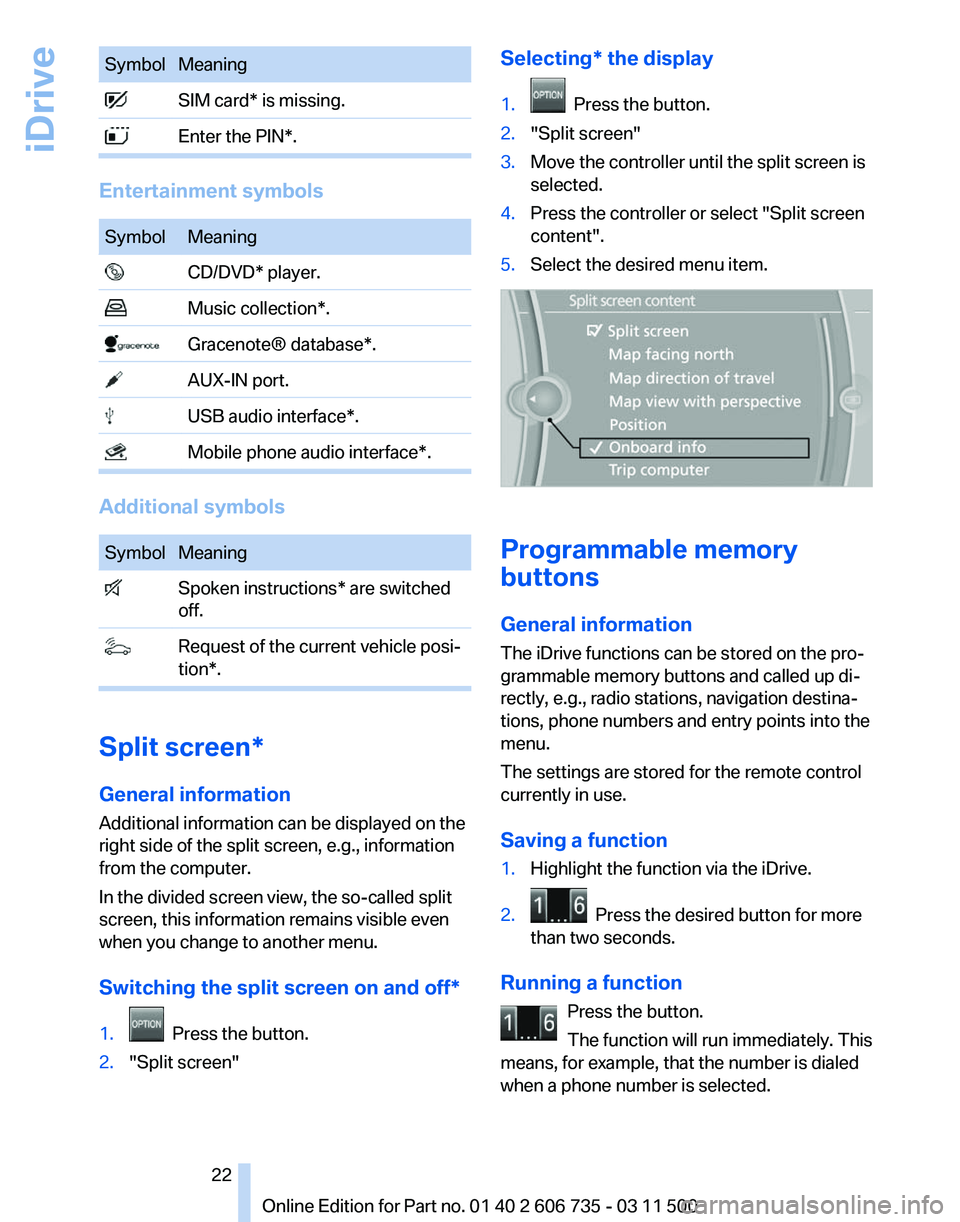
2. "Split screen" Selecting* the display
1. Press the button.
2. "Split screen"
3. Move the controller until the split screen is
selected.
4. Press the controller or select "Split screen
content".
5. Select the desired menu item. Programmable memory
buttons
General information
The iDrive functions can be stored on the pro‐
grammable memory buttons and called up di‐
rectly, e.g., radio stations, navigation destina‐
tions, phone numbers and entry points into the
menu.
The settings are stored for the remote control
currently in use.
Saving a function
1.
Highlight the function via the iDrive.
2. Press the desired button for more
than two seconds.
Running a function Press the button.
The function will run immediately. This
means, for example, that the number is dialed
when a phone number is selected. Seite 22
22 Online Edition for Part no. 01 40 2 606 735 - 03 11 500
iDrive
Page 23 of 317
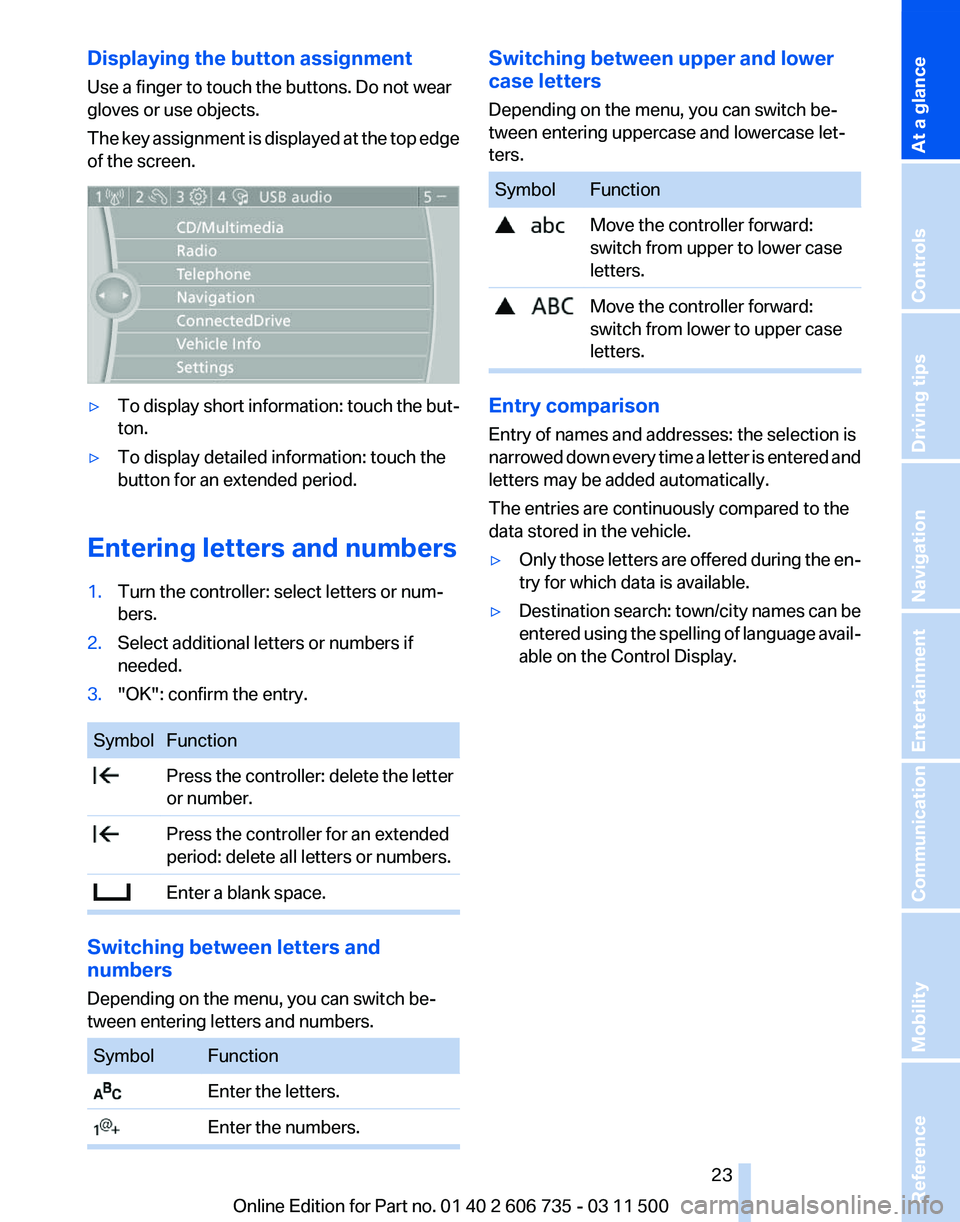
Displaying the button assignment
Use a finger to touch the buttons. Do not wear
gloves or use objects.
The
key assignment is displayed at the top edge
of the screen. ▷
To display short information: touch the but‐
ton.
▷ To display detailed information: touch the
button for an extended period.
Entering letters and numbers
1. Turn the controller: select letters or num‐
bers.
2. Select additional letters or numbers if
needed.
3. "OK": confirm the entry. Symbol Function
Press the controller: delete the letter
or number. Press the controller for an extended
period: delete all letters or numbers. Enter a blank space.
Switching between letters and
numbers
Depending on the menu, you can switch be‐
tween entering letters and numbers.
Symbol Function
Enter the letters.
Enter the numbers. Switching between upper and lower
case letters
Depending on the menu, you can switch be‐
tween entering uppercase and lowercase let‐
ters.
Symbol Function
Move the controller forward:
switch from upper to lower case
letters. Move the controller forward:
switch from lower to upper case
letters. Entry comparison
Entry of names and addresses: the selection is
narrowed
down every time a letter is entered and
letters may be added automatically.
The entries are continuously compared to the
data stored in the vehicle.
▷ Only those letters are offered during the en‐
try for which data is available.
▷ Destination search: town/city names can be
entered
using the spelling of language avail‐
able on the Control Display.
Seite 23
23Online Edition for Part no. 01 40 2 606 735 - 03 11 500
Reference Mobility Communication Entertainment Navigation Driving tips Controls
At a glance
Page 24 of 317
Voice activation system*
The concept
▷
The voice activation system can be used to
operate
functions by means of spoken com‐
mands. The system prompts you to make
your entries.
▷ Functions that can only be used when the
vehicle
is stationary cannot be operated us‐
ing the voice activation system.
▷ The system uses a special microphone lo‐
cated
in the area of the interior rearview mir‐
ror.
▷ ›...‹ Verbal instructions in the Owner's
Manual
to use with the voice activation sys‐
tem.
Requirements
Via the Control Display, set a language that is
also supported by the voice activation system
so
that the spoken commands can be identified.
Set the language, refer to page 80.
Using voice activation
Activating the voice activation system
1. Press the button on the steering
wheel.
2. Wait for the signal.
3. Say the command.
The command appears on the Control Dis‐
play. The symbol on the Control Display indicates
that the voice activation system is active.
If no other commands are available, continue
operating the function via iDrive. Terminating the voice activation
system
Briefly press the button on the steering wheel
or ›Cancel‹.
Possible commands
Most
menu items on the Control Display can be
voiced as commands.
The available commands depend on the menu
that is currently displayed on the Control Dis‐
play.
The functions of the main menu have short com‐
mands.
Some list items, such as the phone book en‐
tries*, can also be selected via the voice activa‐
tion system. Say the list items exactly as they are
displayed on the list.
Having possible commands read aloud
To have the available commands read out
loud: ›Voice commands‹
For example, if the "Settings" menu is displayed,
the commands for the settings are read out loud.
Executing functions using short
commands
Functions on the main menu can be performed
directly by means of short commands, irrespec‐
tive of which menu item is currently selected, for
instance ›Vehicle status‹.
List of short commands of the voice activation
system, refer to page 295.
Help dialog for the voice activation
system
Calling up help dialog: ›Help‹
Additional commands for the help dialog:
▷ ›Help with examples‹: information about the
current operating options and the most im‐
portant
commands for them are announced.
Seite 24
24 Online Edition for Part no. 01 40 2 606 735 - 03 11 500
Voice activation system
Page 25 of 317
▷
›Help with voice activation‹: information
about
the principle of operation for the voice
activation system is announced.
Example: playing back a CD
1. Switch on the Entertainment sound output
if necessary.
2. Press the button on the steering
wheel.
3. ›C D and multimedia‹
The medium last played is played back.
4. Press the button on the steering
wheel.
5. ›C D track ...‹ e.g., CD track 4.
Setting the voice dialog
You
can set whether the system should use the
standard dialog or a shorter version.
In the shorter variant of the voice dialog, the an‐
nouncements from the system are issued in an
abbreviated form.
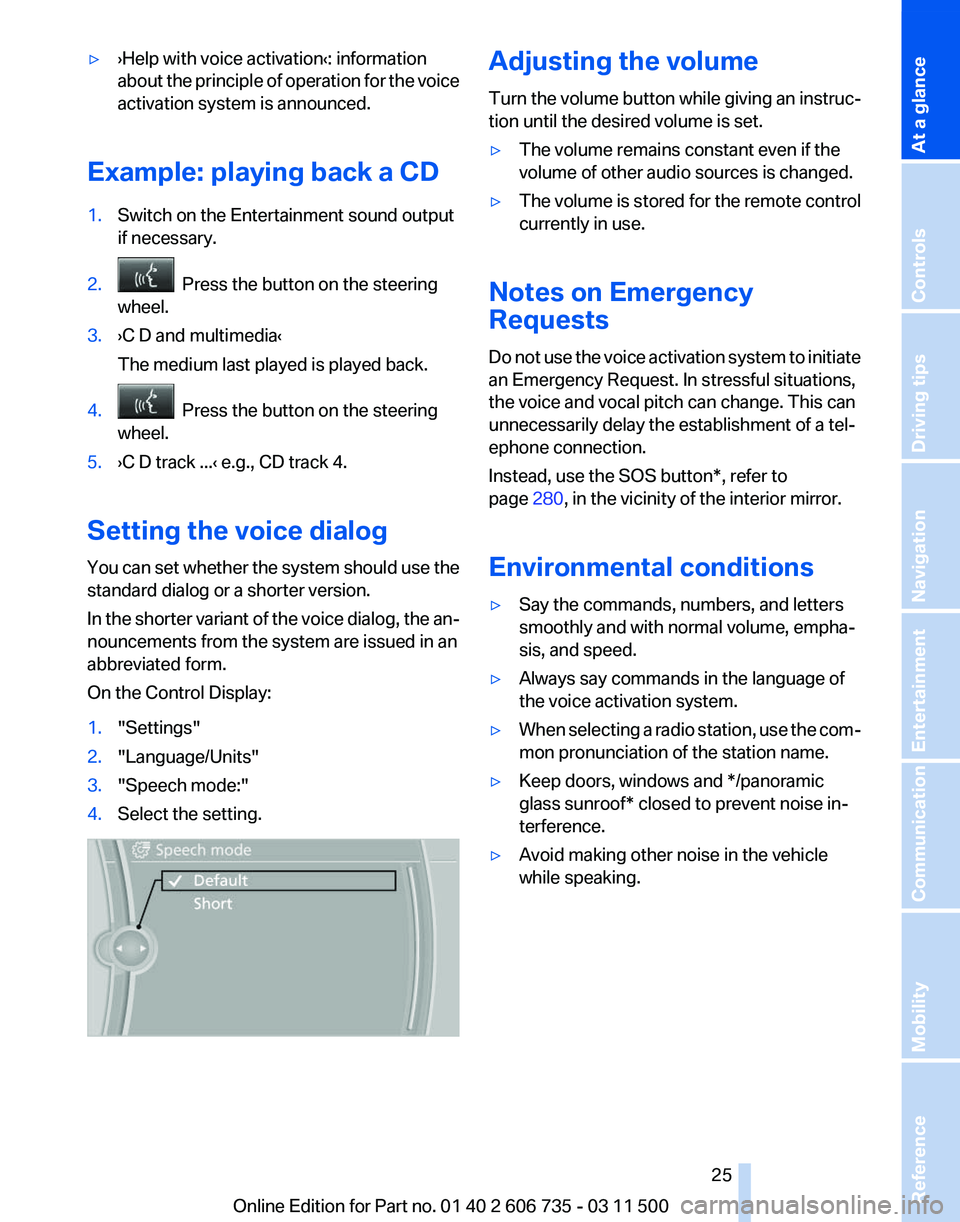
On the Control Display:
1. "Settings"
2. "Language/Units"
3. "Speech mode:"
4. Select the setting. Adjusting the volume
Turn
the volume button while giving an instruc‐
tion until the desired volume is set.
▷ The volume remains constant even if the
volume of other audio sources is changed.
▷ The volume is stored for the remote control
currently in use.
Notes on Emergency
Requests
Do
not use the voice activation system to initiate
an Emergency Request. In stressful situations,
the voice and vocal pitch can change. This can
unnecessarily delay the establishment of a tel‐
ephone connection.
Instead, use the SOS button*, refer to
page 280, in the vicinity of the interior mirror.
Environmental conditions
▷ Say the commands, numbers, and letters
smoothly and with normal volume, empha‐
sis, and speed.
▷ Always say commands in the language of
the voice activation system.
▷ When selecting a radio station, use the com‐
mon pronunciation of the station name.
▷ Keep doors, windows and */panoramic
glass sunroof* closed to prevent noise in‐
terference.
▷ Avoid making other noise in the vehicle
while speaking.
Seite 25
25Online Edition for Part no. 01 40 2 606 735 - 03 11 500
Reference Mobility Communication Entertainment Navigation Driving tips Controls
At a glance
Page 29 of 317
The individual settings are stored for a maximum
of
four remote controls. They are stored for two
remote controls if Comfort Access* is in use.
Personal Profile settings
The following functions and settings can be
stored in a profile.
More information on the settings can be found
under:
▷ Assigning the programmable memory but‐
tons, refer to page 22.
▷ Response of the central locking system
when the car is being unlocked, refer to
page 30.
▷ Automatic locking of the vehicle, refer to
page 33.
▷ Driver's seat, exterior mirror and steering
wheel positions*, refer to page 53.
▷ Settings for the display on the Control Dis‐
play and in the instrument cluster:
▷12h/24h clock format, refer to
page 79.
▷ Date format, refer to page 79.
▷ Brightness of the Control Display, refer
to page 80.
▷ Language on the Control Display, refer
to page 80.
▷ Units of measure for fuel consumption,
distance covered/remaining distances,
and temperature, refer to page 80.
▷ Show visual warning for the Park Distance
Control PDC*, refer to page 111.
▷ Show visual warning for Top View*, refer to
page 114.
▷ Show Side View*, refer to page 116.
▷ Backup camera*:
▷Function selection, refer to page 113.
▷ Type of display, refer to page 114.
▷ Lane departure warning*: last setting, on/
off, refer to page 93.
▷ Head-up Display*: selection, brightness and
position of the display, refer to page 117.▷
Adaptive Drive*: selected chassis and sus‐
pension tuning, refer to page 99.
▷ Light settings:
▷Triple turn signal activation, refer to
page 66.
▷ Welcome lamps, refer to page 81.
▷ Headlamp courtesy delay feature, refer
to page 81.
▷ Daytime running lights, refer to
page 82.
▷ High-beam Assistant*, refer to
page 83.
▷ Automatic climate control with 2-zone con‐
trol: settings, refer to page 120.
▷ Navigation:
▷Voice activation, refer to page 163.
▷ Route criteria, refer to page 161.
▷ Map view settings, refer to page 164.
▷ Entertainment:
▷Tone control, refer to page 172.
▷ Radio, stored stations, refer to
page 180.
▷ CD/multimedia, audio source listened to
last, refer to page 181.
▷ Telephone: volume, refer to page 220.
Central locking system
The concept
The central locking system becomes active
when the driver's door is closed.
The system simultaneously engages and re‐
leases the locks on the following:
▷ Doors.
▷ Tailgate.
▷ Fuel filler flap.
Operating from the outside
▷ Via the remote control.
▷ Via the door lock*.
Seite 29
29Online Edition for Part no. 01 40 2 606 735 - 03 11 500
Reference Mobility Communication Entertainment Navigation Driving tips
Controls At a glance
Page 39 of 317
Warning lamps
The warning lamp in the instrument
cluster lights up when you attempt to
start
the engine: the engine cannot be
started.
The remote control is not in the vehicle or has a
malfunction. Take the remote control with you
inside the vehicle or have it checked. If neces‐
sary, insert another remote control into the ig‐
nition switch.
The warning lamp in the instrument
cluster lights up while the engine is
running: the remote control is no lon‐
ger inside the vehicle.
After switching off the engine, the engine can
only be started again within approx. 10 seconds
if no door has been opened.
The indicator lamp in the instrument
cluster comes on and a message ap‐
pears on the Control Display: replace
the remote control battery.
Replacing the battery
The remote control for Comfort Access con‐
tains a battery that will need to be replaced from
time to time.
1. Take the integrated key out of the remote
control, refer to page 28.
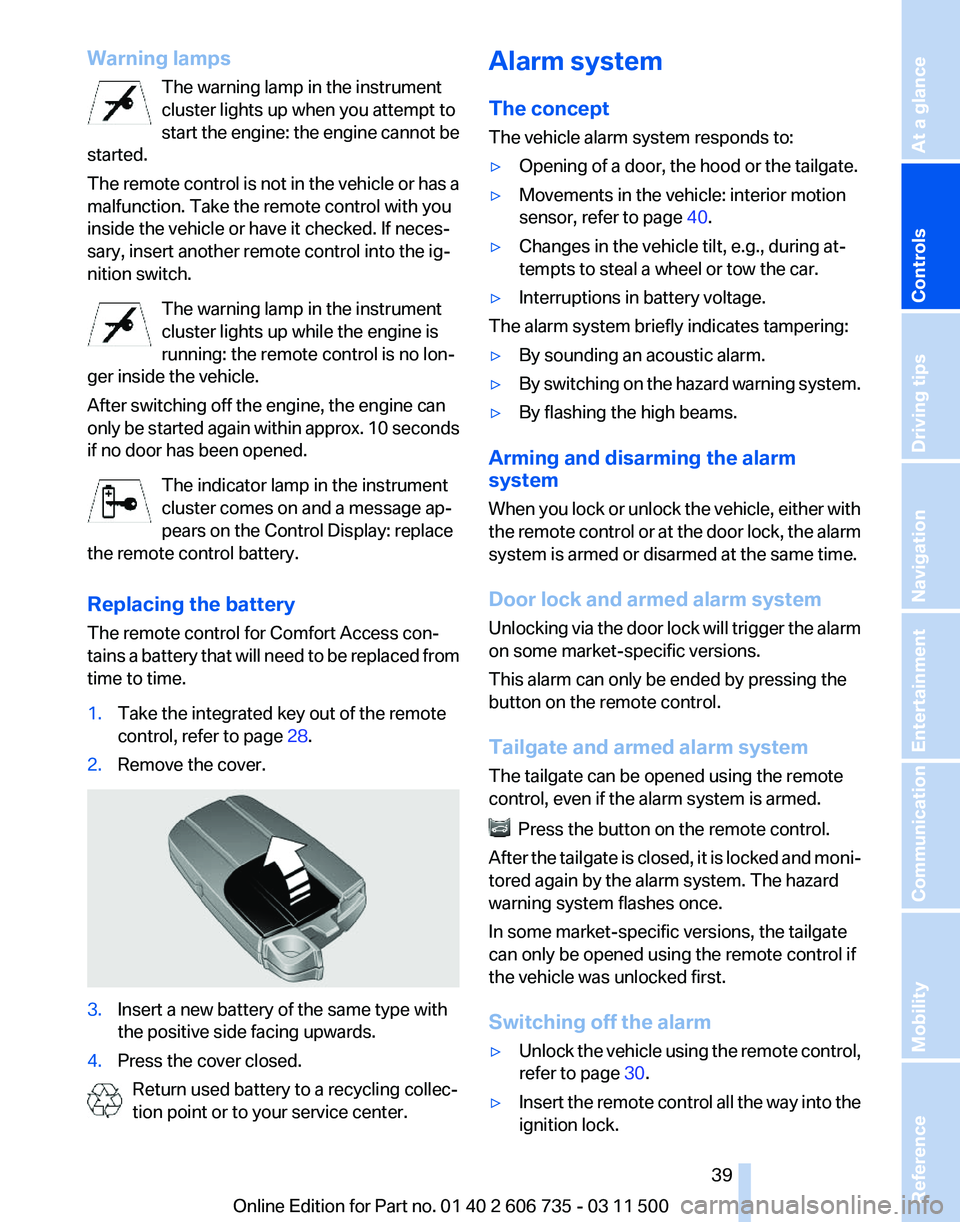
2. Remove the cover. 3.
Insert a new battery of the same type with
the positive side facing upwards.
4. Press the cover closed.
Return used battery to a recycling collec‐
tion point or to your service center. Alarm system
The concept
The vehicle alarm system responds to:
▷
Opening of a door, the hood or the tailgate.
▷ Movements in the vehicle: interior motion
sensor, refer to page 40.
▷ Changes in the vehicle tilt, e.g., during at‐
tempts to steal a wheel or tow the car.
▷ Interruptions in battery voltage.
The alarm system briefly indicates tampering:
▷ By sounding an acoustic alarm.
▷ By switching on the hazard warning system.
▷ By flashing the high beams.
Arming and disarming the alarm
system
When
you lock or unlock the vehicle, either with
the remote control or at the door lock, the alarm
system is armed or disarmed at the same time.
Door lock and armed alarm system
Unlocking via the door lock will trigger the alarm
on some market-specific versions.
This alarm can only be ended by pressing the
button on the remote control.
Tailgate and armed alarm system
The tailgate can be opened using the remote
control, even if the alarm system is armed. Press the button on the remote control.
After
the tailgate is closed, it is locked and moni‐
tored again by the alarm system. The hazard
warning system flashes once.
In some market-specific versions, the tailgate
can only be opened using the remote control if
the vehicle was unlocked first.
Switching off the alarm
▷ Unlock the vehicle using the remote control,
refer to page 30.
▷ Insert the remote control all the way into the
ignition lock.
Seite 39
39Online Edition for Part no. 01 40 2 606 735 - 03 11 500
Reference Mobility Communication Entertainment Navigation Driving tips
Controls At a glance
Page 47 of 317
Press upper or lower section of switch.
BMW X5: rear seats
2nd row seats
If the row of seats is divided
*, each side can be
adjusted separately.
Do not adjust the seat while driving
Never adjust the 2nd row seats while the
vehicle is moving, as otherwise the passengers
on the 3rd row seats could be injured.
Make sure that the locking devices of the 2nd
row seats engage properly. Otherwise the re‐
straining effect of the safety belts during an ac‐
cident could be reduced.◀
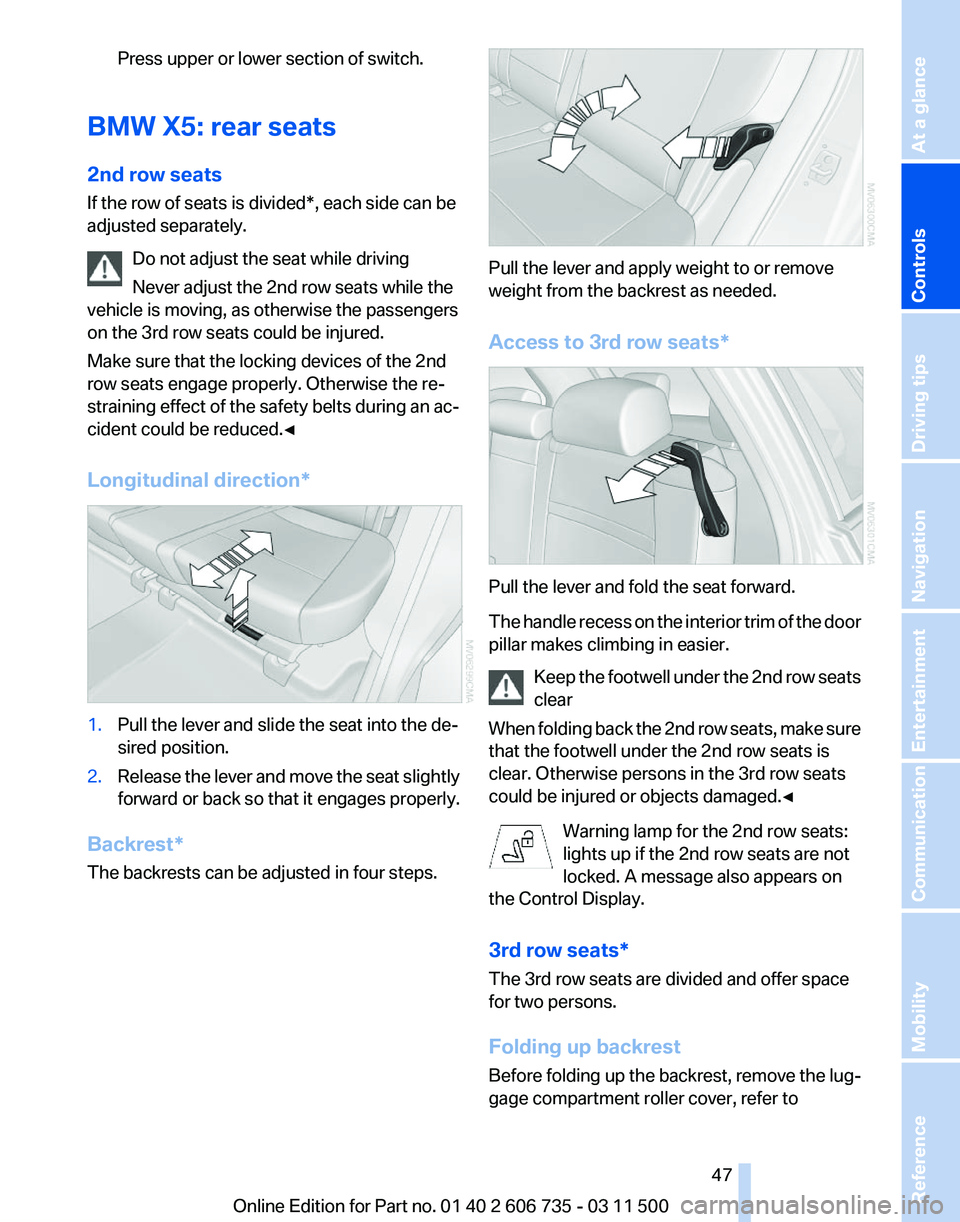
Longitudinal direction* 1.
Pull the lever and slide the seat into the de‐
sired position.
2. Release the lever and move the seat slightly
forward or back so that it engages properly.
Backrest*
The backrests can be adjusted in four steps. Pull the lever and apply weight to or remove
weight from the backrest as needed.
Access to 3rd row seats*
Pull the lever and fold the seat forward.
The
handle recess on the interior trim of the door
pillar makes climbing in easier.
Keep the footwell under the 2nd row seats
clear
When folding back the 2nd row seats, make sure
that the footwell under the 2nd row seats is
clear. Otherwise persons in the 3rd row seats
could be injured or objects damaged.◀
Warning lamp for the 2nd row seats:
lights up if the 2nd row seats are not
locked. A message also appears on
the Control Display.
3rd row seats*
The 3rd row seats are divided and offer space
for two persons.
Folding up backrest
Before folding up the backrest, remove the lug‐
gage compartment roller cover, refer to Seite 47
47Online Edition for Part no. 01 40 2 606 735 - 03 11 500
Reference Mobility Communication Entertainment Navigation Driving tips
Controls At a glance
Page 49 of 317
Active seat ventilation* and
seat heating
*
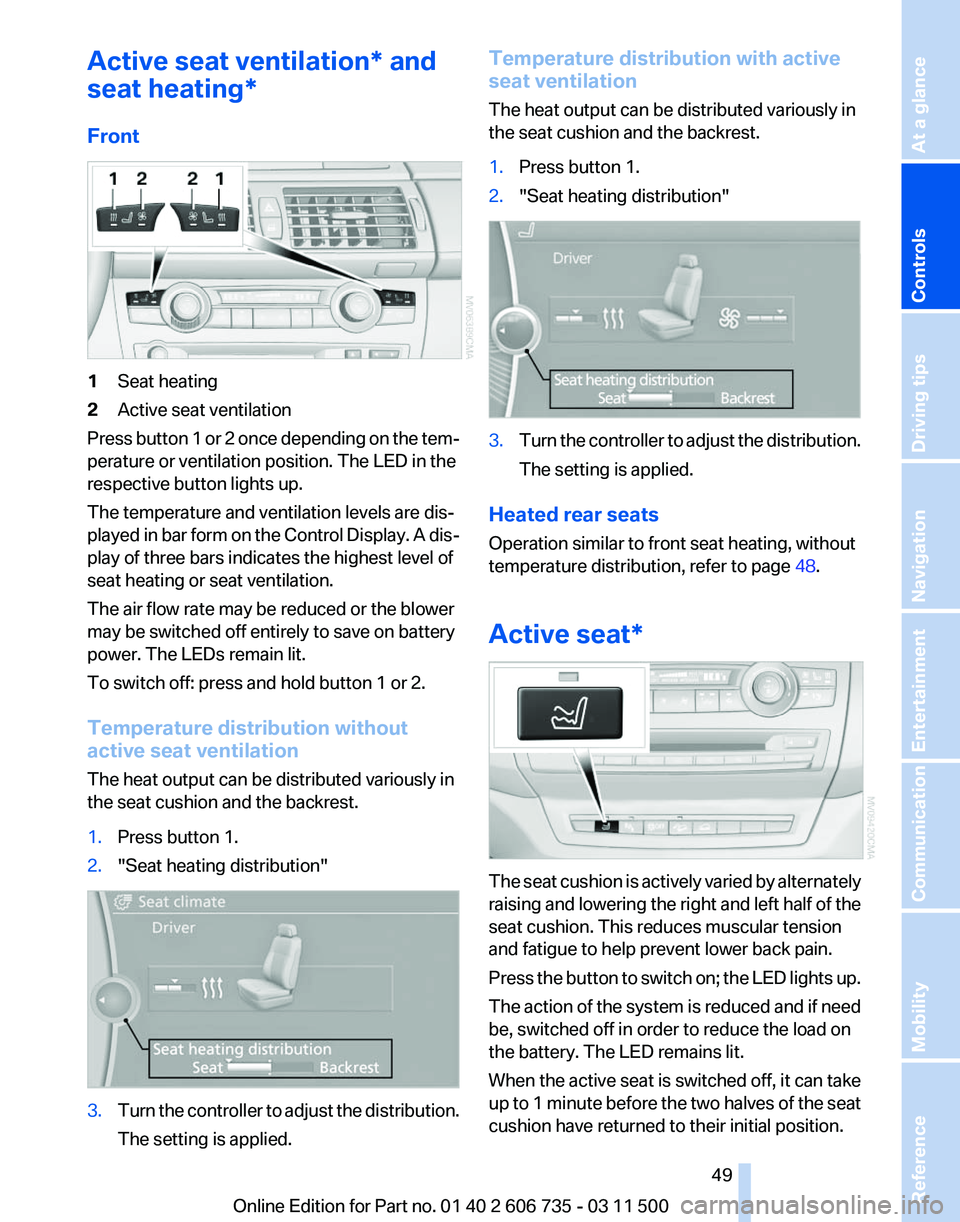
Front 1
Seat heating
2 Active seat ventilation
Press button 1 or 2 once depending on the tem‐
perature or ventilation position. The LED in the
respective button lights up.
The temperature and ventilation levels are dis‐
played
in bar form on the Control Display. A dis‐
play of three bars indicates the highest level of
seat heating or seat ventilation.
The air flow rate may be reduced or the blower
may be switched off entirely to save on battery
power. The LEDs remain lit.
To switch off: press and hold button 1 or 2.
Temperature distribution without
active seat ventilation
The heat output can be distributed variously in
the seat cushion and the backrest.
1. Press button 1.
2. "Seat heating distribution" 3.
Turn the controller to adjust the distribution.
The setting is applied. Temperature distribution with active
seat ventilation
The heat output can be distributed variously in
the seat cushion and the backrest.
1.
Press button 1.
2. "Seat heating distribution" 3.
Turn the controller to adjust the distribution.
The setting is applied.
Heated rear seats
Operation similar to front seat heating, without
temperature distribution, refer to page 48.
Active seat* The seat cushion is actively varied by alternately
raising
and lowering the right and left half of the
seat cushion. This reduces muscular tension
and fatigue to help prevent lower back pain.
Press the button to switch on; the LED lights up.
The action of the system is reduced and if need
be, switched off in order to reduce the load on
the battery. The LED remains lit.
When the active seat is switched off, it can take
up to 1 minute before the two halves of the seat
cushion have returned to their initial position.
Seite 49
49Online Edition for Part no. 01 40 2 606 735 - 03 11 500
Reference Mobility Communication Entertainment Navigation Driving tips
Controls At a glance
Page 50 of 317
Safety belts
General information
Always make sure that safety belts are being
worn by all occupants before driving away.
Although airbags enhance safety by providing
added protection, they are not a substitute for
safety belts.
Number of safety belts
Your
vehicle has been fitted with safety belts for
the safety of you and your passengers.
▷ BMW X5: five or seven* safety belts.
▷ BMW X6: four or five* safety belts.
Notes One person per safety belt
Never
allow more than one person to wear
a single safety belt. Never allow infants or small
children to ride on a passenger's lap.◀
Putting on the belt
Lay the belt, without twisting, snugly
across the lap and shoulders, as close to the
body as possible. Make sure that the belt lies low
around the hips in the lap area and does not
press on the abdomen. Otherwise, the belt can
slip over the hips in the lap area in a frontal im‐
pact and injure the abdomen.
The safety belt must not lie across the neck, rub
on sharp edges, be routed over solid or breaka‐
ble objects, or be pinched.◀
Reduction of restraining effect
Avoid wearing clothing that prevents the
belt from fitting properly, and pull the shoulder
belt periodically to readjust the tension across
your lap; otherwise, the retention effect of the
safety belt may be reduced.◀
Using the middle safety belt
If the middle safety belt in the rear is used,
the larger section of the backrest must be
locked. Otherwise, the safety belt will not have
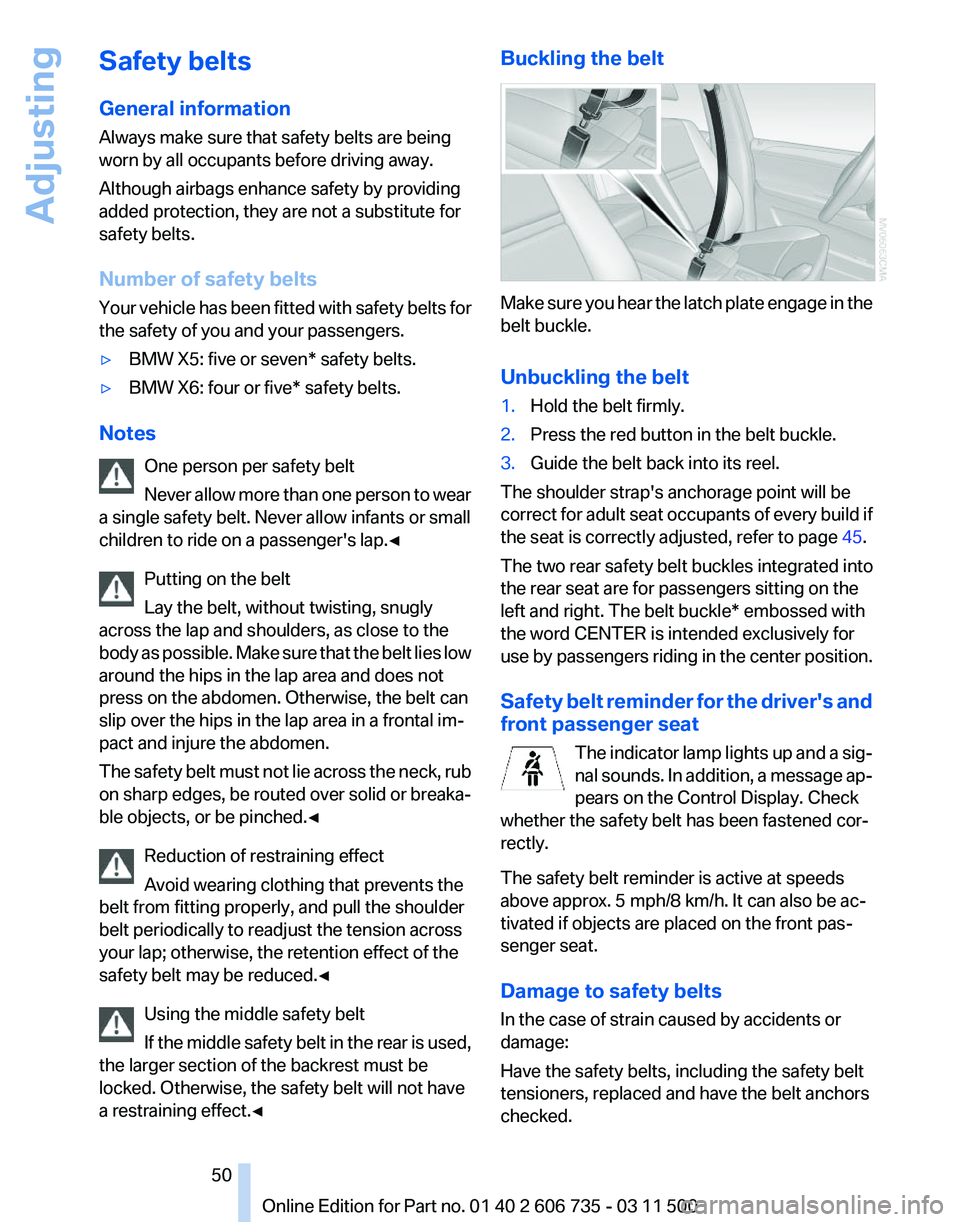
a restraining effect.◀ Buckling the belt
Make sure you hear the latch plate engage in the
belt buckle.
Unbuckling the belt
1.
Hold the belt firmly.
2. Press the red button in the belt buckle.
3. Guide the belt back into its reel.
The shoulder strap's anchorage point will be
correct
for adult seat occupants of every build if
the seat is correctly adjusted, refer to page 45.
The two rear safety belt buckles integrated into
the rear seat are for passengers sitting on the
left and right. The belt buckle* embossed with
the word CENTER is intended exclusively for
use by passengers riding in the center position.
Safety belt reminder for the driver's and
front passenger seat The indicator lamp lights up and a sig‐
nal sounds. In addition, a message ap‐
pears on the Control Display. Check
whether the safety belt has been fastened cor‐
rectly.
The safety belt reminder is active at speeds
above approx. 5 mph/8 km/h. It can also be ac‐
tivated if objects are placed on the front pas‐
senger seat.
Damage to safety belts
In the case of strain caused by accidents or
damage:
Have the safety belts, including the safety belt
tensioners, replaced and have the belt anchors
checked. Seite 50
50 Online Edition for Part no. 01 40 2 606 735 - 03 11 500
Adjusting