AUX BMW X5 XDRIVE35D 2012 Owners Manual
[x] Cancel search | Manufacturer: BMW, Model Year: 2012, Model line: X5 XDRIVE35D, Model: BMW X5 XDRIVE35D 2012Pages: 317, PDF Size: 8.83 MB
Page 22 of 317
Symbol Meaning
SIM card* is missing.
Enter the PIN*.
Entertainment symbols
Symbol Meaning
CD/DVD* player.
Music collection*.
Gracenote® database*.
AUX-IN port.
USB audio interface*.
Mobile phone audio interface*.
Additional symbols
Symbol Meaning
Spoken instructions* are switched
off. Request of the current vehicle posi‐
tion*. Split screen*
General information
Additional information can be displayed on the
right side of the split screen, e.g., information
from the computer.
In the divided screen view, the so-called split
screen, this information remains visible even
when you change to another menu.
Switching the split screen on and
off*
1. Press the button.
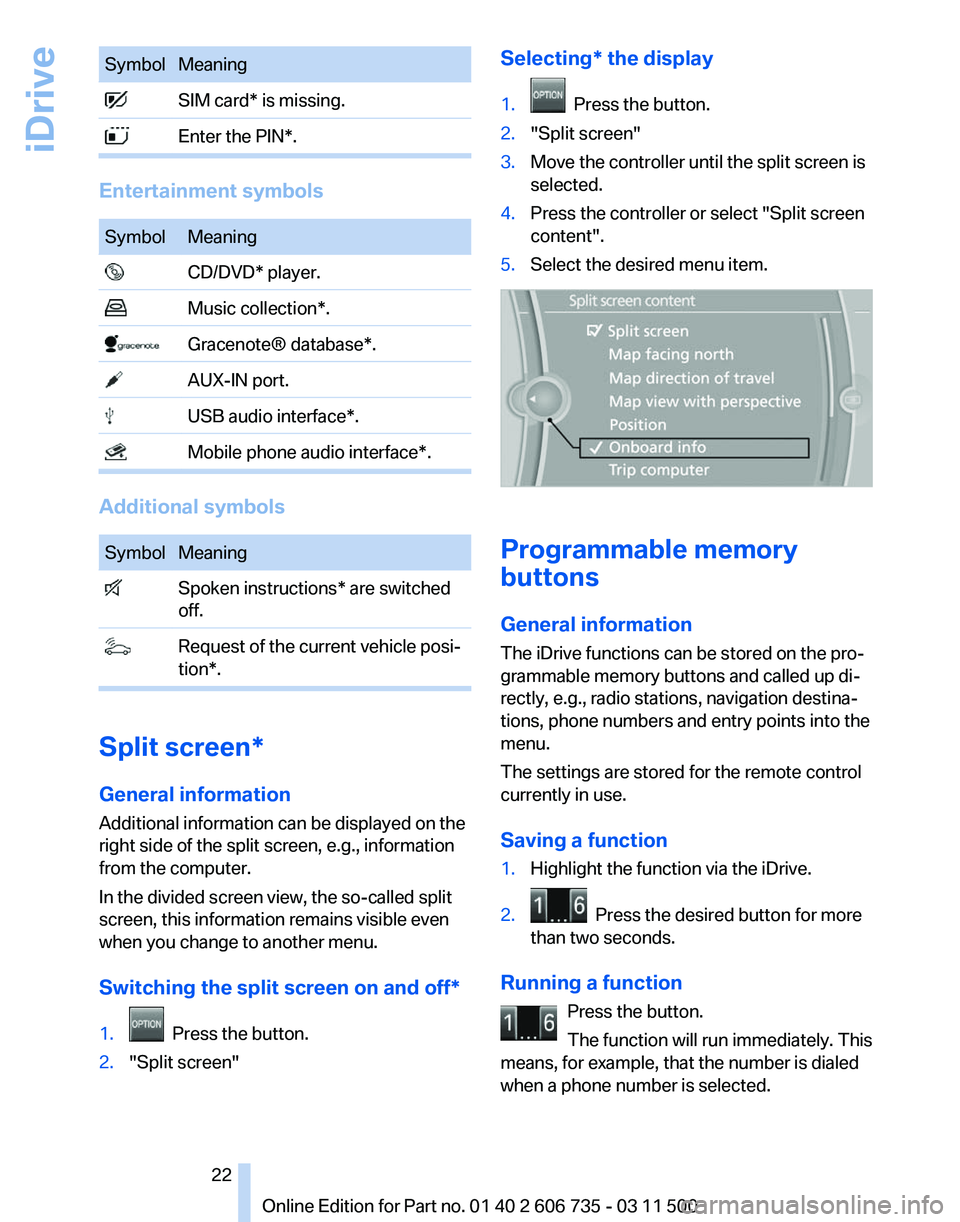
2. "Split screen" Selecting* the display
1. Press the button.
2. "Split screen"
3. Move the controller until the split screen is
selected.
4. Press the controller or select "Split screen
content".
5. Select the desired menu item. Programmable memory
buttons
General information
The iDrive functions can be stored on the pro‐
grammable memory buttons and called up di‐
rectly, e.g., radio stations, navigation destina‐
tions, phone numbers and entry points into the
menu.
The settings are stored for the remote control
currently in use.
Saving a function
1.
Highlight the function via the iDrive.
2. Press the desired button for more
than two seconds.
Running a function Press the button.
The function will run immediately. This
means, for example, that the number is dialed
when a phone number is selected. Seite 22
22 Online Edition for Part no. 01 40 2 606 735 - 03 11 500
iDrive
Page 134 of 317
Storage compartments
Glove compartment
Opening
Press the button. The covers open upward and
downward and the lighting in the glove com‐
partment switches on.
Close the glove compartment again im‐
mediately
Close
the glove compartment immediately after
use while driving; otherwise, injury may occur
during accidents.◀
Closing
Press one of the two covers closed.
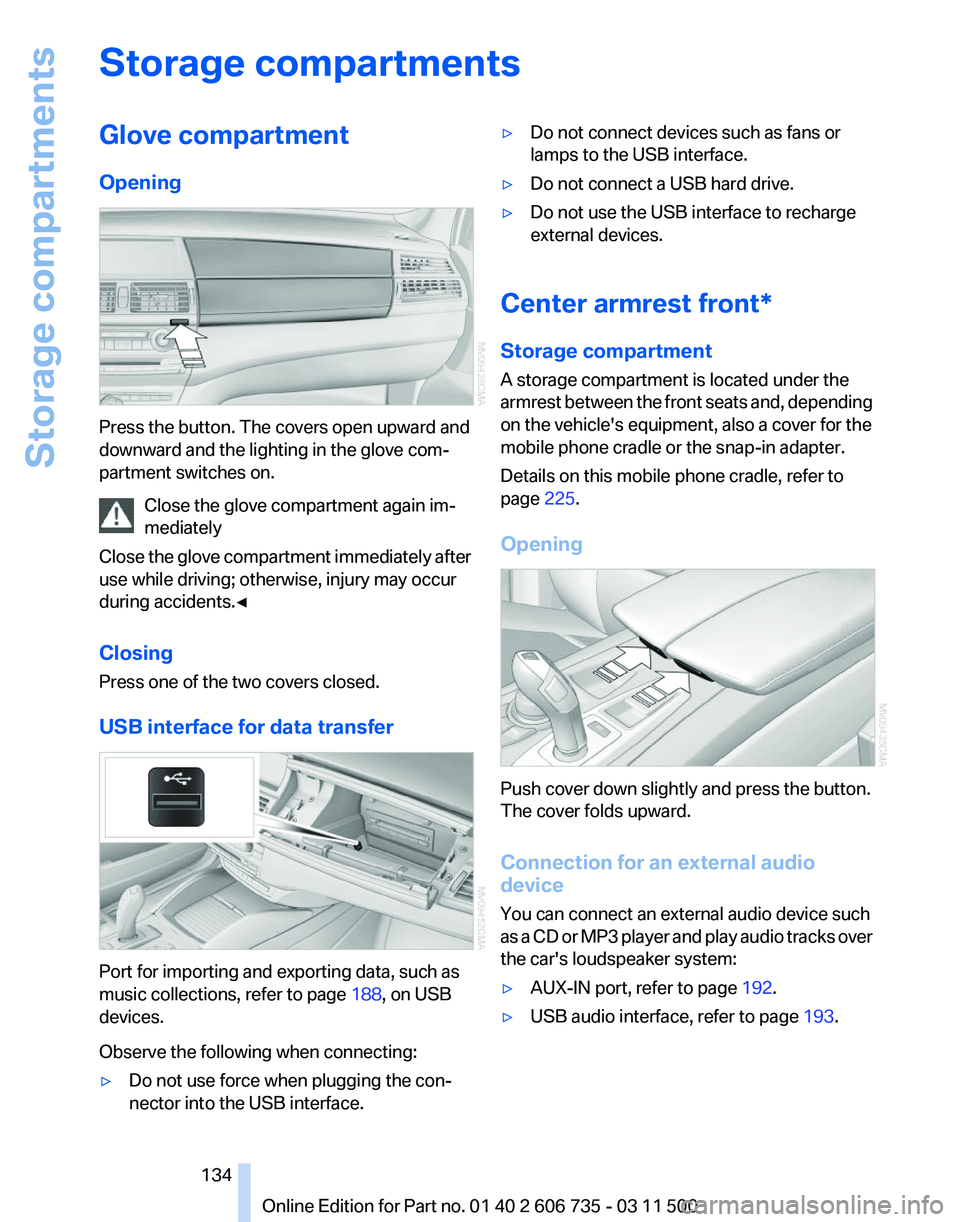
USB interface for data transfer Port for importing and exporting data, such as
music collections, refer to page
188, on USB
devices.
Observe the following when connecting:
▷ Do not use force when plugging the con‐
nector into the USB interface. ▷
Do not connect devices such as fans or
lamps to the USB interface.
▷ Do not connect a USB hard drive.
▷ Do not use the USB interface to recharge
external devices.
Center armrest front*
Storage compartment
A storage compartment is located under the
armrest
between the front seats and, depending
on the vehicle's equipment, also a cover for the
mobile phone cradle or the snap-in adapter.
Details on this mobile phone cradle, refer to
page 225.
Opening Push cover down slightly and press the button.
The cover folds upward.
Connection for an external audio
device
You can connect an external audio device such
as
a CD or MP3 player and play audio tracks over
the car's loudspeaker system:
▷ AUX-IN port, refer to page 192.
▷ USB audio interface, refer to page 193.
Seite 134
134 Online Edition for Part no. 01 40 2 606 735 - 03 11 500
Storage compartments
Page 148 of 317
▷
After driving through water, press on the
brake pedal several times at low speeds to
dry the brakes.
▷ Depending on the prevailing terrain, activate
Dynamic Traction Control DTC, refer to
page 97, briefly.
▷ When the wheels spin, accelerate to enable
the driving stability control systems to dis‐
tribute the drive force to the individual
wheels.
▷ BMW X5 with M Sport Package*: if the ve‐
hicle is primarily used on poor roads or un‐
paved surfaces, it may be advantageous,
depending on the driving style, to use the
stone
chip guard offered by the service cen‐
ter. This reduces the risk of damage to
painted vehicle components, such as in the
area of the side skirts and wheel arches.
Your service center will be glad to advise
you.
After driving on poor roads
Adhere
to the following points to ensure vehicle
safety:
▷ Remove excessive accumulations of dirt
and mud from the vehicle body.
▷ Clear mud, snow, ice, etc., from the wheels
and tires and check for damage.
Saving fuel
General information
Your vehicle contains advanced technology for
the reduction of fuel consumption and emis‐
sions.
Fuel consumption depends on a number of dif‐
ferent factors.
The implementation of certain measures, driv‐
ing style and regular maintenance, refer to
page 268, can have an influence on fuel con‐
sumption and on the environmental impact.
Remove unnecessary cargo
Additional weight increases fuel consumption. Remove attached parts following use
Remove
unneeded auxiliary mirrors, roof or rear
luggage racks after use.
Attached parts on the vehicle impair the aero‐
dynamics and increase the fuel consumption.
Closing the windows and glass
sunroof*/panoramic glass sunroof*
Driving with the glass sunroof/panoramic glass
sunroof and windows open results in increased
air resistance and raises fuel consumption.
Check the tire inflation pressure
regularly
Check and, if necessary, correct the tire inflation
pressure, refer to page 252, at least twice a
month and before starting on a long trip.
Low tire inflation pressure increases rolling re‐
sistance and thus raises fuel consumption and
tire wear.
Drive away without delay
Do not wait for the engine to warm up while the
vehicle remains stationary. Start driving right
away, but at moderate engine speeds.
This is the fastest way for the cold engine to
reach its operating temperature.
Look well ahead when driving
Avoid unnecessary acceleration and braking.
By maintaining a suitable distance to the vehicle
driving ahead of you.
Driving smoothly and looking ahead reduces
fuel consumption.
Avoid high engine speeds
Driving at a low engine speed reduces fuel con‐
sumption and minimizes wear.
Use coasting conditions
When approaching a red light, take your foot off
the accelerator and let the vehicle coast to a halt.
On a downhill gradient, take your foot off the ac‐
celerator and let the vehicle roll.
The flow of fuel is interrupted while coasting.
Seite 148
148 Online Edition for Part no. 01 40 2 606 735 - 03 11 500
Things to remember when driving
Page 192 of 317
Music collection
Backing up the music collection
The entire music collection can be stored on a
USB device. Make sure there is enough free
memory capacity on the USB device.
Depending
on the number of tracks, backing up
the music collection may take several hours.
Therefore, it is best to perform the backup dur‐
ing a long trip.
1. Starting the engine.
2. Connect the USB device to the USB inter‐
face in the glove compartment, refer to
page 134.
3. "CD/Multimedia"
4. "Music collection"
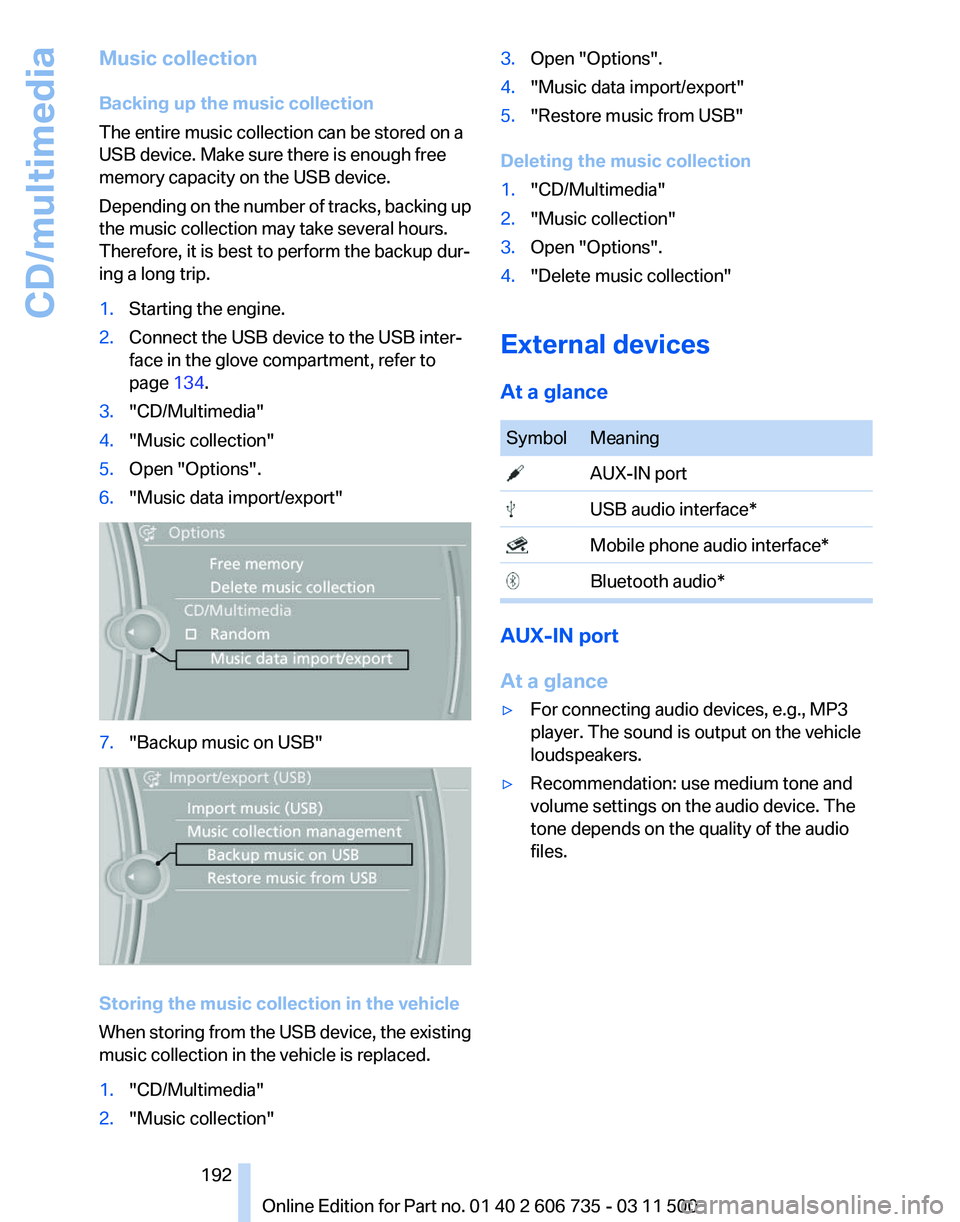
5. Open "Options".
6. "Music data import/export" 7.
"Backup music on USB" Storing the music collection in the vehicle
When
storing from the USB device, the existing
music collection in the vehicle is replaced.
1. "CD/Multimedia"
2. "Music collection" 3.
Open "Options".
4. "Music data import/export"
5. "Restore music from USB"
Deleting the music collection
1. "CD/Multimedia"
2. "Music collection"
3. Open "Options".
4. "Delete music collection"
External devices
At a glance Symbol Meaning
AUX-IN port
USB audio interface*
Mobile phone audio interface*
Bluetooth audio*
AUX-IN port
At a glance
▷
For connecting audio devices, e.g., MP3
player. The sound is output on the vehicle
loudspeakers.
▷ Recommendation: use medium tone and
volume settings on the audio device. The
tone depends on the quality of the audio
files.
Seite 192
192 Online Edition for Part no. 01 40 2 606 735 - 03 11 500
CD/multimedia
Page 193 of 317
Connecting
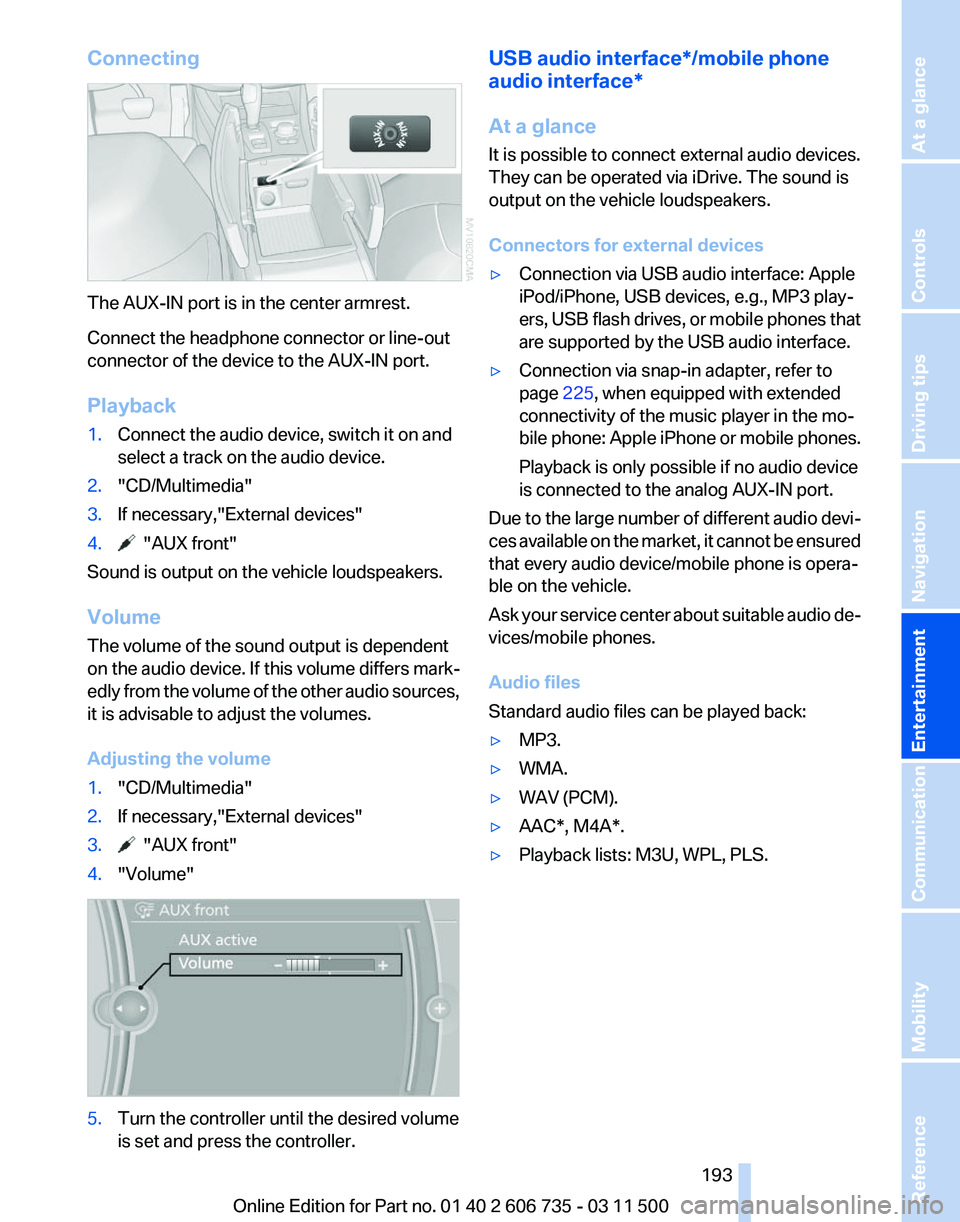
The AUX-IN port is in the center armrest.
Connect the headphone connector or line-out
connector of the device to the AUX-IN port.
Playback
1.
Connect the audio device, switch it on and
select a track on the audio device.
2. "CD/Multimedia"
3. If necessary,"External devices"
4. "AUX front"
Sound is output on the vehicle loudspeakers.
Volume
The volume of the sound output is dependent
on the audio device. If this volume differs mark‐
edly
from the volume of the other audio sources,
it is advisable to adjust the volumes.
Adjusting the volume
1. "CD/Multimedia"
2. If necessary,"External devices"
3. "AUX front"
4. "Volume" 5.
Turn the controller until the desired volume
is set and press the controller. USB audio interface*/mobile phone
audio interface
*
At a glance
It is possible to connect external audio devices.
They can be operated via iDrive. The sound is
output on the vehicle loudspeakers.
Connectors for external devices
▷ Connection via USB audio interface: Apple
iPod/iPhone, USB devices, e.g., MP3 play‐
ers,
USB flash drives, or mobile phones that
are supported by the USB audio interface.
▷ Connection via snap-in adapter, refer to
page 225, when equipped with extended
connectivity of the music player in the mo‐
bile
phone: Apple iPhone or mobile phones.
Playback is only possible if no audio device
is connected to the analog AUX-IN port.
Due to the large number of different audio devi‐
ces
available on the market, it cannot be ensured
that every audio device/mobile phone is opera‐
ble on the vehicle.
Ask your service center about suitable audio de‐
vices/mobile phones.
Audio files
Standard audio files can be played back:
▷ MP3.
▷ WMA.
▷ WAV (PCM).
▷ AAC*, M4A*.
▷ Playback lists: M3U, WPL, PLS.
Seite 193
193Online Edition for Part no. 01 40 2 606 735 - 03 11 500
Reference Mobility Communication
Entertainment Navigation Driving tips Controls At a glance
Page 201 of 317
1.
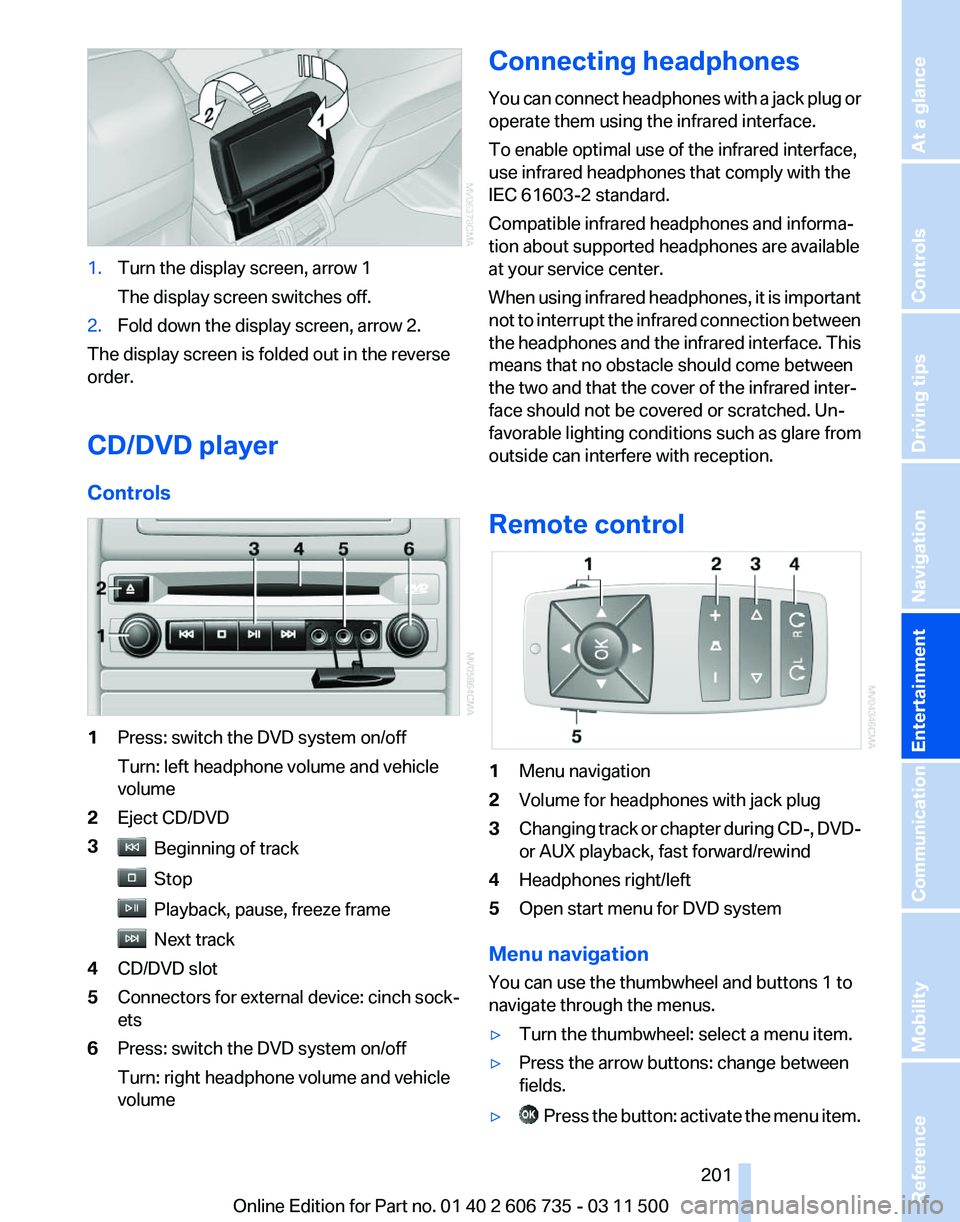
Turn the display screen, arrow 1
The display screen switches off.
2. Fold down the display screen, arrow 2.
The display screen is folded out in the reverse
order.
CD/DVD player
Controls 1
Press: switch the DVD system on/off
Turn: left headphone volume and vehicle
volume
2 Eject CD/DVD
3 Beginning of track
Stop
Playback, pause, freeze frame
Next track
4 CD/DVD slot
5 Connectors for external device: cinch sock‐
ets
6 Press: switch the DVD system on/off
Turn: right headphone volume and vehicle
volume Connecting headphones
You
can connect headphones with a jack plug or
operate them using the infrared interface.
To enable optimal use of the infrared interface,
use infrared headphones that comply with the
IEC 61603-2 standard.
Compatible infrared headphones and informa‐
tion about supported headphones are available
at your service center.
When using infrared headphones, it is important
not to interrupt the infrared connection between
the headphones and the infrared interface. This
means that no obstacle should come between
the two and that the cover of the infrared inter‐
face should not be covered or scratched. Un‐
favorable lighting conditions such as glare from
outside can interfere with reception.
Remote control 1
Menu navigation
2 Volume for headphones with jack plug
3 Changing track or chapter during CD-, DVD-
or AUX playback, fast forward/rewind
4 Headphones right/left
5 Open start menu for DVD system
Menu navigation
You can use the thumbwheel and buttons 1 to
navigate through the menus.
▷ Turn the thumbwheel: select a menu item.
▷ Press the arrow buttons: change between
fields.
▷ Press the button: activate the menu item.
Seite 201
201Online Edition for Part no. 01 40 2 606 735 - 03 11 500
Reference Mobility Communication
Entertainment Navigation Driving tips Controls At a glance
Page 202 of 317
Changing batteries
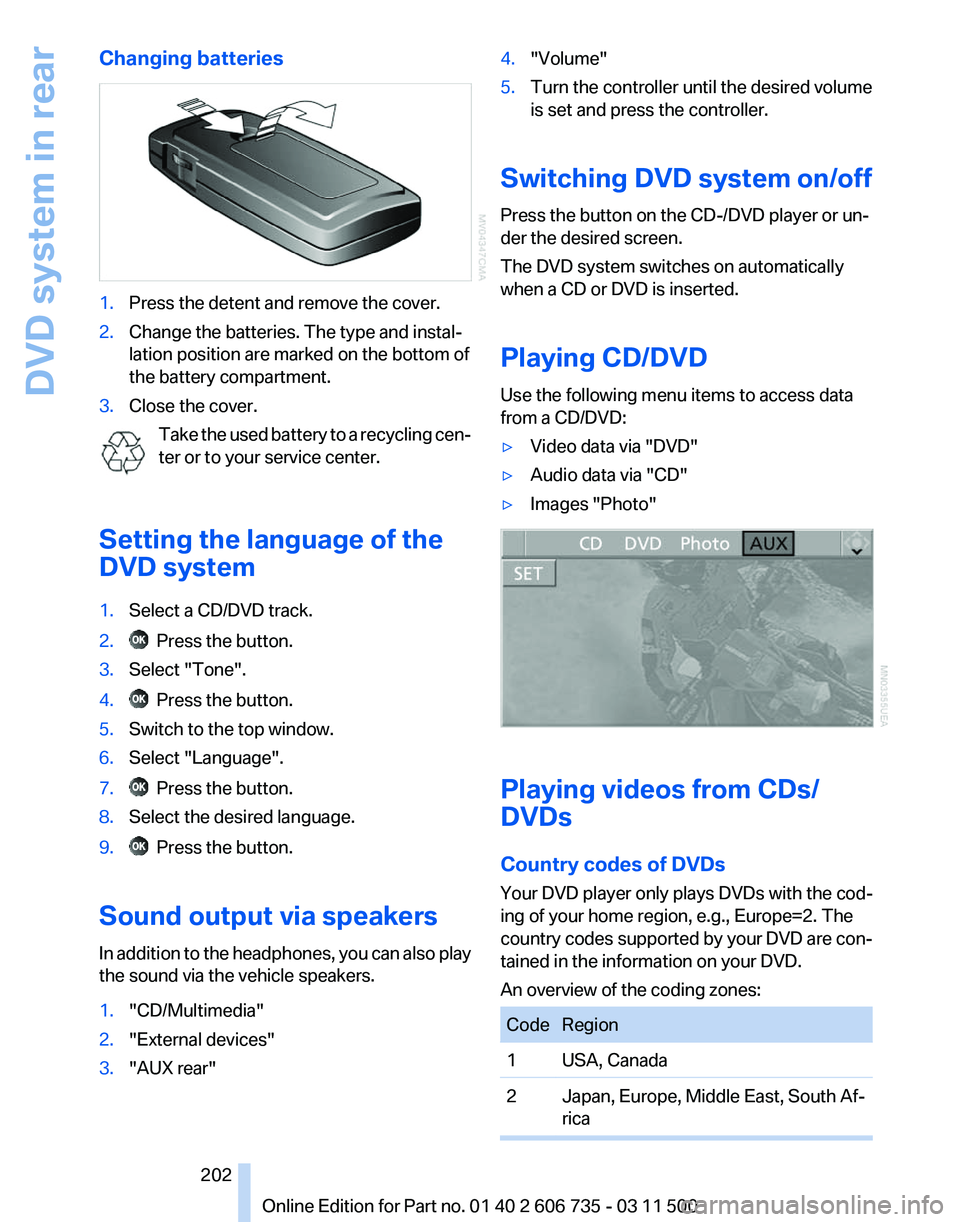
1.
Press the detent and remove the cover.
2. Change the batteries. The type and instal‐
lation position are marked on the bottom of
the battery compartment.
3. Close the cover.
Take the used battery to a recycling cen‐
ter or to your service center.
Setting the language of the
DVD system
1. Select a CD/DVD track.
2. Press the button.
3. Select "Tone".
4. Press the button.
5. Switch to the top window.
6. Select "Language".
7. Press the button.
8. Select the desired language.
9. Press the button.
Sound output via speakers
In addition to the headphones, you can also play
the sound via the vehicle speakers.
1. "CD/Multimedia"
2. "External devices"
3. "AUX rear" 4.
"Volume"
5. Turn the controller until the desired volume
is set and press the controller.
Switching DVD system on/off
Press the button on the CD-/DVD player or un‐
der the desired screen.
The DVD system switches on automatically
when a CD or DVD is inserted.
Playing CD/DVD
Use the following menu items to access data
from a CD/DVD:
▷ Video data via "DVD"
▷ Audio data via "CD"
▷ Images "Photo" Playing videos from CDs/
DVDs
Country codes of DVDs
Your DVD player only plays DVDs with the cod‐
ing of your home region, e.g., Europe=2. The
country
codes supported by your DVD are con‐
tained in the information on your DVD.
An overview of the coding zones: Code Region
1 USA, Canada
2 Japan, Europe, Middle East, South Af‐
rica Seite 202
202 Online Edition for Part no. 01 40 2 606 735 - 03 11 500
DVD system in rear
Page 211 of 317
External device
Connecting
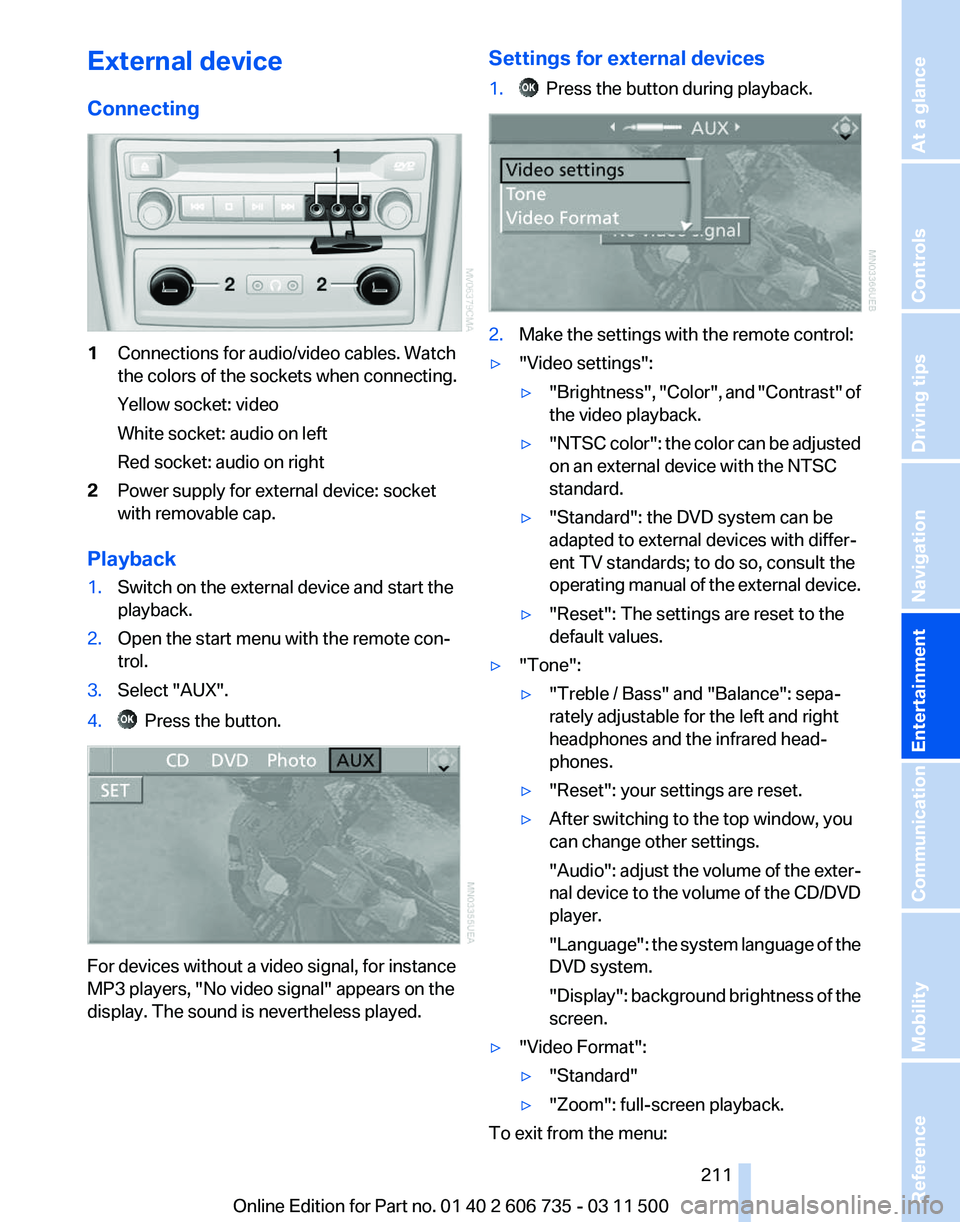
1
Connections for audio/video cables. Watch
the colors of the sockets when connecting.
Yellow socket: video
White socket: audio on left
Red socket: audio on right
2 Power supply for external device: socket
with removable cap.
Playback
1. Switch on the external device and start the
playback.
2. Open the start menu with the remote con‐
trol.
3. Select "AUX".
4. Press the button.
For devices without a video signal, for instance
MP3 players, "No video signal"
appears on the
display. The sound is nevertheless played. Settings for external devices
1. Press the button during playback.
2.
Make the settings with the remote control:
▷ "Video settings":
▷"Brightness", "Color",
and "Contrast" of
the video playback.
▷ "NTSC
color": the color can be adjusted
on an external device with the NTSC
standard.
▷ "Standard": the DVD system can be
adapted to external devices with differ‐
ent TV standards; to do so, consult the
operating
manual of the external device.
▷ "Reset": The settings are reset to the
default values.
▷ "Tone":
▷"Treble / Bass" and "Balance": sepa‐
rately adjustable for the left and right
headphones and the infrared head‐
phones.
▷ "Reset": your settings are reset.
▷ After switching to the top window, you
can change other settings.
"Audio":
adjust the volume of the exter‐
nal device to the volume of the CD/DVD
player.
"Language": the system language of the
DVD system.
"Display": background brightness of the
screen.
▷ "Video Format":
▷"Standard"
▷ "Zoom": full-screen playback.
To exit from the menu:
Seite 211
211Online Edition for Part no. 01 40 2 606 735 - 03 11 500
Reference Mobility Communication
Entertainment Navigation Driving tips Controls At a glance
Page 303 of 317
Automatic climate control in
rear, deactivating on Control
Display 124
Automatic climate control in rear, switching off 125
Automatic climate control, switching off 123, 125
Automatic climate control, ventilation in rear 123
Automatic climate control, with 2-zone control 120
Automatic climate control, with 4-zone control 124
Automatic, cruise control 108
Automatic
Cruise Control 102
Automatic Curb Monitor 54
Automatic headlamp con‐ trol 81, 82
Automatic Hold 64
Automatic Hold, activating 64
Automatic Hold, deactivat‐ ing 64
Automatic Hold, parking 65
Automatic recirculated air control 122
Automatic Soft Closing, doors 33
Automatic Soft Closing, tail‐ gate 34
Automatic tailgate opera‐ tion 34, 36
Automatic transmission with Steptronic 69
Automatic transmission with
Steptronic
– Kickdown 69
AUTO program with automatic
climate control 120, 125
AUX-IN port 134, 192
Average fuel consumption 74
Average fuel consumption, setting the units 80
Average speed 73
Average speed, refer to Com‐ puter 73
Axle loads, refer to Weights 292 B
Backrest curvature, refer to
Lumbar support 46
Backrest width 46
Back
seats, adjusting the head
restraints 52
Backup camera 112
Backup camera, cleaning 114
Backup camera, obstacle marking 113
Backup camera, pathway lines 113
Backup camera, turning lines 113
Balance 172
Band-aids, refer to First aid kit 281
Bass 172
Battery
– Remote control 28
Battery change, remote con‐
trol
for rear DVD system 202
Battery disposal 278
Battery, refer to Vehicle bat‐ tery 278
Battery replacement, remote control for vehicle 39
Before entering the car wash 285
Belts, refer to Safety belts 50
Belt tensioners, refer to Safety belts 50
Beverage holder, refer to Cu‐ pholder 135
Black and white map dis‐ play 166
Blower, refer to Air flow rate 121
Bluetooth audio 196
Bluetooth connection, activat‐ ing/deactivating 217
BMW Advanced Diesel 249
BMW Apps 241
BMW Apps, video play‐ back 195
BMW Assist 237
BMW Assist, refer to Connec‐ tedDrive 237 BMW EfficientDynamics, refer
to Saving fuel 148
BMW homepage 6
BMW Internet page 6
BMW maintenance sys‐ tem 268
BMW Online 239
BMW TeleService 237
Bottle holder, refer to Cu‐ pholder 135
Brake assistant 96
Brake discs, breaking in 142
Brake
fluid, refer to Service re‐
quirements 75
Brake force display 94
Brake force distribution, elec‐ tronic 96
Brake lamps, brake force dis‐ play 94
Brake lights, adaptive 94
Brake pads, breaking in 142
Brakes, BMW maintenance system 268
Brakes, parking brake 63
Brakes, service require‐ ments 75
Brake system, BMW mainte‐ nance system 268
Braking, notes 143
Breakdown assistance 281
Breakdown, transporting the vehicle 282
Breaking in 142
Brightness, on the Control Display 80
Bulb replacement, refer to Lamp and bulb replace‐
ment 270
Button for starting the engine, refer to Start/Stop button 61
C
Calendar 232
Calibration, driver's seat 51
California Proposition 65 Warning 7
Camera, care 287
Seite 303
303Online Edition for Part no. 01 40 2 606 735 - 03 11 500
Reference Mobility Communication Entertainment Navigation Driving tips Controls At a glance