window BMW X6 2008 Owner's Manual
[x] Cancel search | Manufacturer: BMW, Model Year: 2008, Model line: X6, Model: BMW X6 2008Pages: 288, PDF Size: 8.08 MB
Page 109 of 288
Controls
107Reference
At a glance
Driving tips
Communications
Navigation
Entertainment
Mobility
By pressing the button repeatedly, you can
request three operating modes:
>LED off: outside air flows in continuously.
>Left LED on, AUC mode: the system
detects pollutants in the outside air and
shuts off the supply as needed.
>Right LED on, recirculated-air mode: the
supply of outside air is permanently shut off.
Should the windows fog up in the recircu-
lated-air mode, press the AUTO button or
switch off the recirculated-air mode and
increase the air volume if necessary.
The recirculated-air mode should not be used
without interruption over an extended period of
time, as the air quality inside the vehicle deteri-
orates continuously.<
Residual heat
The heat stored in the engine is used to heat the
passenger compartment, e.g. while stopped at
a school to pick up a child.
Switching on
Pressing the right side switches on
the residual heat utilization when
the following conditions are met:
>up to 15 minutes after switching off the
engine
>with the engine at operating temperature
>with sufficient battery voltage
>at an outside temperature below 777/
256
REST appears on the display of the automatic
climate control when the residual heat utiliza-
tion is switched on.
From radio readiness the interior temperature,
the air volume and the air distribution can be
set.
Switching off
You can select the lowest blower speed by
pressing and holding the left side. Pressing
again switches off the residual heat utilization.
REST disappears from the display of the auto-
matic climate control.
Switching automatic climate control on
and off
You can select the lowest blower
speed by pressing and holding the
left side. Pressing again switches
off the automatic climate control.
You switch on the system again by pressing any
button of the automatic climate control.
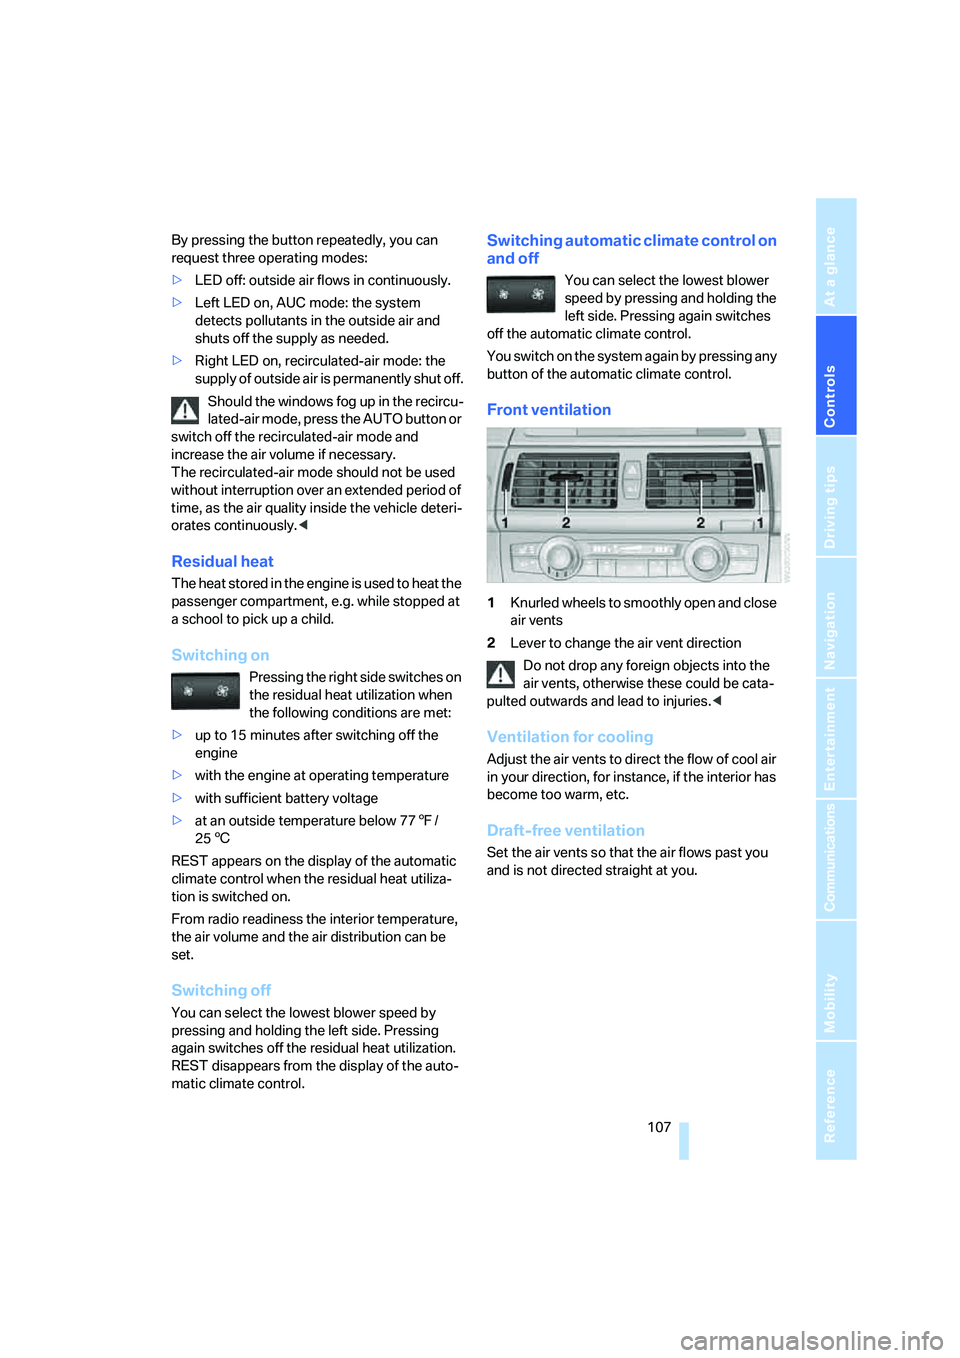
Front ventilation
1Knurled wheels to smoothly open and close
air vents
2Lever to change the air vent direction
Do not drop any foreign objects into the
air vents, otherwise these could be cata-
pulted outwards and lead to injuries.<
Ventilation for cooling
Adjust the air vents to direct the flow of cool air
in your direction, for instance, if the interior has
become too warm, etc.
Draft-free ventilation
Set the air vents so that the air flows past you
and is not directed straight at you.
Page 111 of 288
Controls
109Reference
At a glance
Driving tips
Communications
Navigation
Entertainment
Mobility
The rear automatic climate control is not
ready for operation if the automatic cli-
mate control is switched off. When activating
the function of the automatic climate control for
defrosting the windows and removing conden-
sation, the rear automatic climate control is also
not ready for operation.<
AUTO program
The AUTO program assumes the
adjustment of the air distribution
toward the upper body and in the
footwell, as well as the air volume
for you. It also adapts your instruc-
tions for the temperature to outside influences
throughout the year.
Temperature
Set the desired temperature indi-
vidually on the left and right side.
The rear automatic climate control
adjusts this temperature as quickly
as possible at any time of year, if necessary with
the maximum cooling or heating capacity, and
then keeps it constant.
When switching between different tem-
perature settings in rapid succession, the
rear automatic climate control does not have
sufficient time to adjust the set temperature.<
Air volume, manual
You can vary the air volume by
pressing on the corresponding
side. You can reactivate the auto-
matic mode for the air volume with the AUTO
button.
Switching off rear automatic climate
control
You can select the lowest blower
speed by pressing and holding the
left side. Pressing again switches
off the rear automatic climate control.The rear automatic climate control can
also be switched off with iDrive. To switch
on the rear automatic climate control again, the
system must first be reactivated, refer to Acti-
vating rear automatic climate control.<
You switch on the system again by pressing any
button of the rear automatic climate control.
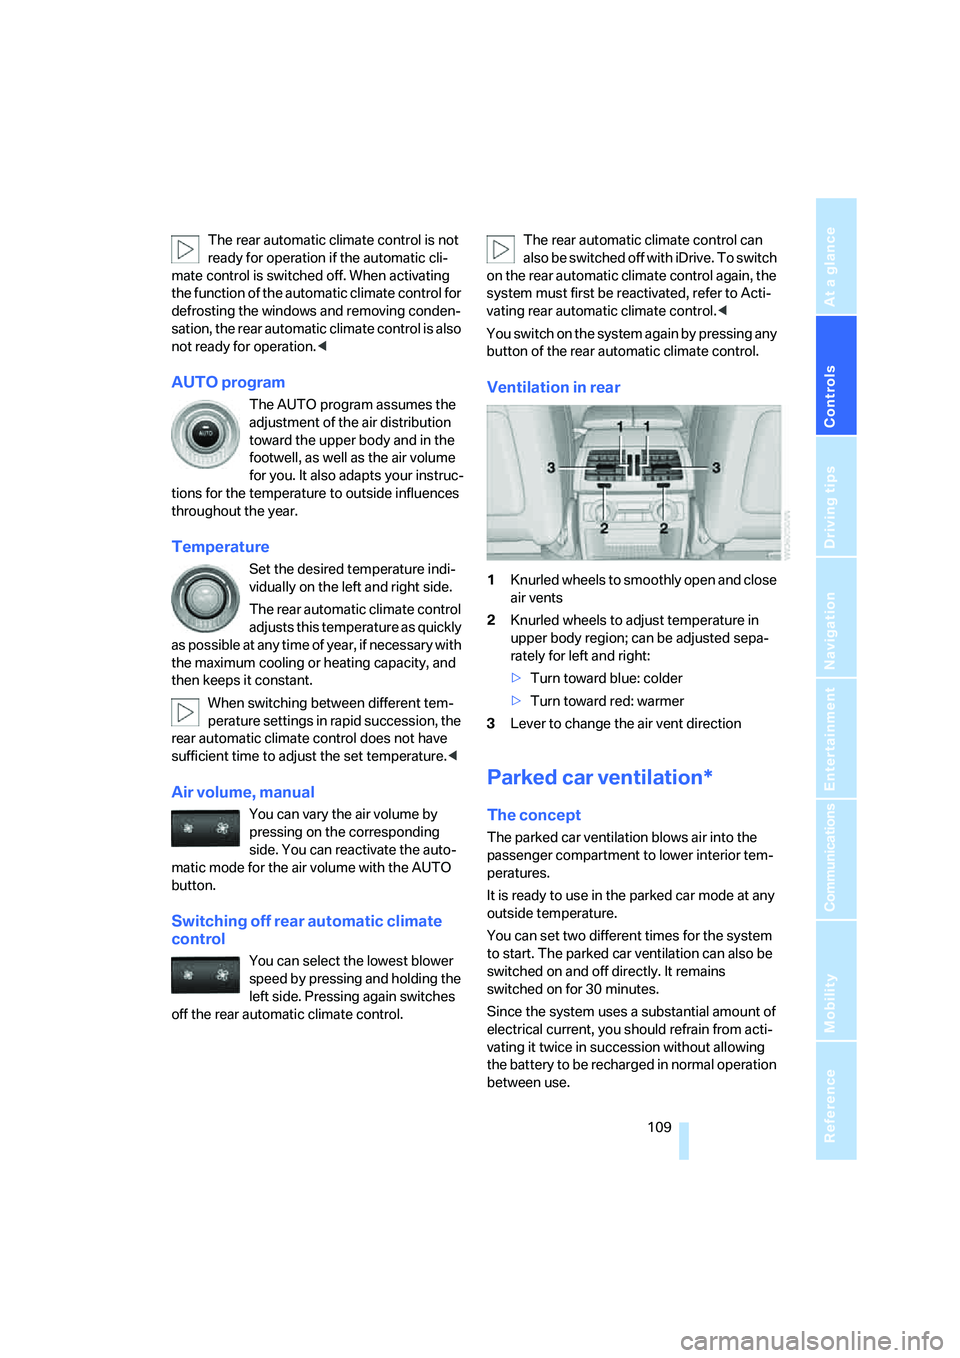
Ventilation in rear
1Knurled wheels to smoothly open and close
air vents
2Knurled wheels to adjust temperature in
upper body region; can be adjusted sepa-
rately for left and right:
>Turn toward blue: colder
>Turn toward red: warmer
3Lever to change the air vent direction
Parked car ventilation*
The concept
The parked car ventilation blows air into the
passenger compartment to lower interior tem-
peratures.
It is ready to use in the parked car mode at any
outside temperature.
You can set two different times for the system
to start. The parked car ventilation can also be
switched on and off directly. It remains
switched on for 30 minutes.
Since the system uses a substantial amount of
electrical current, you should refrain from acti-
vating it twice in succession without allowing
the battery to be recharged in normal operation
between use.
Page 117 of 288
Controls
115Reference
At a glance
Driving tips
Communications
Navigation
Entertainment
Mobility
Calibrating digital compass
Calibrate the digital compass In the following
situations:
>The wrong cardinal direction appears on
the display.
>The cardinal direction displayed does not
change despite a change in the direction of
travel.
>Not all cardinal directions are displayed.
Procedure
1.Make sure that there are no large metal
objects or overhead power lines in the vicin-
ity of your vehicle and that you have enough
space to drive in a circle.
2.Input the currently applicable compass
zone.
3.Press the adjustment button for approx.
6-7 seconds to display C. Then drive in a
complete circle at least once at a maximum
speed of 4 mph/7 km/h.
If the calibration is successful, display C is
replaced with the points of the compass.
Setting right/left-hand drive vehicle
Your digital compass is already set to right or
left-hand drive vehicle to match your vehicle at
the factory.
Setting language
You can set the language of the display.
Press the adjustment button for approx.
12-13 seconds. Briefly press the adjustment
button again to change between English "E"
and German "O".
The setting is automatically stored after approx.
10 seconds.
Roller sun blinds for rear side
windows*
Pull the loop of the roller sun blind and hook
onto bracket.
Do not open the window with the roller
blind raised, as otherwise there is a dan-
ger of damage, and therefore a danger of inju-
ries at higher speeds.<
Glove compartment
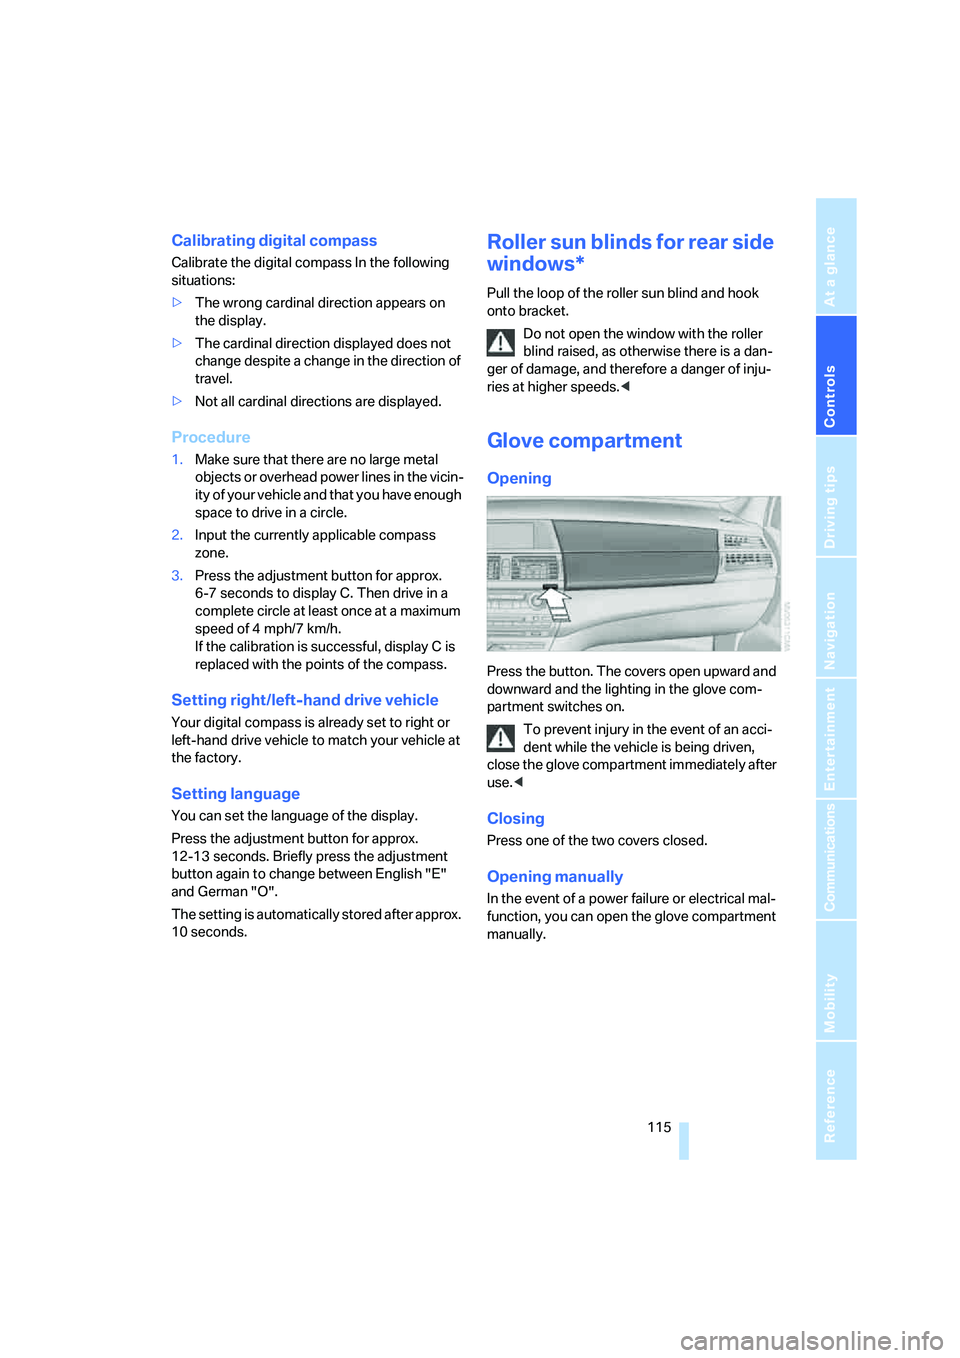
Opening
Press the button. The covers open upward and
downward and the lighting in the glove com-
partment switches on.
To prevent injury in the event of an acci-
dent while the vehicle is being driven,
close the glove compartment immediately after
use.<
Closing
Press one of the two covers closed.
Opening manually
In the event of a power failure or electrical mal-
function, you can open the glove compartment
manually.
Page 128 of 288
Things to remember when driving
126
Things to remember when driving
Break-in period
Moving parts need breaking-in time to adjust to
each other. To ensure that your vehicle contin-
ues to provide optimized economy of operation
throughout an extended service life, we request
that you devote careful attention to the follow-
ing section.
Engine and differential
Always obey all official speed limits.
Up to 1,200 miles/2,000 km
Drive at changing engine and vehicle speeds,
however do not exceed 4,500 rpm or 100 mph/
160 km/h.
Avoid full-throttle operation and use of the
transmission's kick-down mode during these
initial miles.
From 1,200 miles/2,000 km
The engine and vehicle speed can gradually be
increased.
Tires
Due to technical factors associated with their
manufacture, tires do not achieve their full trac-
tion potential until after an initial break-in
period. Therefore, drive reservedly during the
first 200 miles/300 km.
Brake system
Brakes require an initial break-in period of
approx. 300 miles/500 km to achieve optimized
contact and wear patterns between brake pads
and rotors. Drive in a reserved manner during
this break-in period.
Following part replacement
Observe the break-in instructions again if com-
ponents mentioned above must be replaced
after subsequent driving operation.
Saving fuel
The fuel consumption of your vehicle depends
on various factors. Through a few simple steps,
your driving style, and regular maintenance, you
can have a positive influence on your fuel con-
sumption and environmental impact.
Removing unnecessary cargo
Additional weight increases fuel consumption.
Remove add-on parts after use
Remove unneeded auxiliary mirrors, roof or rear
luggage racks after use. Add-on parts attached
to the vehicle impede the aerodynamics and
increase the fuel consumption.
Close windows and glass sunroof
An open glass sunroof or open window likewise
increases the drag coefficient and therefore the
fuel consumption.
Check tire inflation pressures regularly
Check and correct the tire inflation pressure as
needed at least twice a month and before long
trips.
An insufficient tire inflation pressure increases
the rolling resistance and thus increases the
fuel consumption and tire wear.
Driving off immediately
Do not allow the engine to warm up by leaving it
running while the vehicle remains stationary.
Instead, begin to drive at a moderate engine
speed. This is the fastest way for the cold
engine to reach its operating temperature.
Thinking ahead when driving
Avoid unnecessary acceleration and braking.
To do so, maintain the appropriate distance
from the vehicle in front of you. An anticipatory
and smooth driving style reduces fuel con-
sumption.
Page 129 of 288
Driving tips
127Reference
At a glance
Controls
Communications
Navigation
Entertainment
Mobility
Avoiding high engine speeds
Driving at a low engine speed reduces fuel con-
sumption and minimizes wear.
Taking advantage of coasting
The flow of fuel is interrupted when coasting.
Switching off engine during longer
stops
Switch off the engine at longer stops such as
traffic signals, railroad crossings, or in traffic
jams. Even having the engine switched off for
approx. 4 seconds results in fuel savings.
Switch off functions currently not
required
Functions such as air conditioning, seat heat-
ing, or rear window defrosting consume a lot of
energy and require additional fuel. Their influ-
ence is particularly pronounced in city traffic
and stop & go operation. For this reason, it is a
good idea to switch these functions off when
they are not really needed.
Having maintenance carried out
Have the vehicle serviced regularly in order to
achieve the optimum economy and service life
of your vehicle. BMW recommends having the
maintenance performed by a BMW Sports
Activity Vehicle Center. Also please pay atten-
tion to the BMW maintenance system, refer to
page243.
General driving notes
Closing liftgate
Operate the vehicle only when the liftgate
is completely closed. Otherwise, exhaust
fumes could enter into the passenger compart-
ment.
1.Close all windows and the glass sunroof.
2.Increase the air volume of the automatic
climate control to a high level, refer to
page105.
Hot exhaust system
As in all vehicles, extremely high temper-
atures are generated on the exhaust sys-
tem. Do not remove the heat shields installed
adjacent to it, and never apply undercoating to
them. When driving, standing at idle and while
parking take care to avoid possible contact
between the hot exhaust system and any highly
flammable materials such as hay, leaves, grass,
etc. Such contact could lead to a fire, and with it
the risk of serious property damage as well as
personal injury. Do not touch hot tailpipes, as
otherwise there is a danger of burns.<
Hydroplaning
When driving on wet or slushy roads,
reduce road speed. If you do not, a wedge
of water can form between tires and road sur-
face. This phenomenon is referred to as hydro-
planing, and is characterized by a partial or
complete loss of contact between the tires and
the road surface, ultimately undermining your
ability to steer and brake the vehicle.<
The risk of hydroplaning increases as the tread
depth of the tires decreases, also refer to Mini-
mum tread depth on page236.
Driving through water
Do not drive through water on the road if it
is deeper than 18 in/45 cm, and then only
at walking speed at the most. Otherwise, the
vehicle's engine, the electrical systems and the
transmission may be damaged.<
Braking safely
Your BMW is equipped with ABS as a standard
feature. In situations that require it, it is best to
brake with full force. Since the vehicle maintains
steering responsiveness, you can still avoid
Page 132 of 288
Things to remember when driving
130 >Wrap sharp-edged or pointed objects
which could strike the rear window while
driving.
Securing cargo
>Use the luggage net*, retaining straps*, or
securing straps to hold down small and
lightweight luggage and cargo.
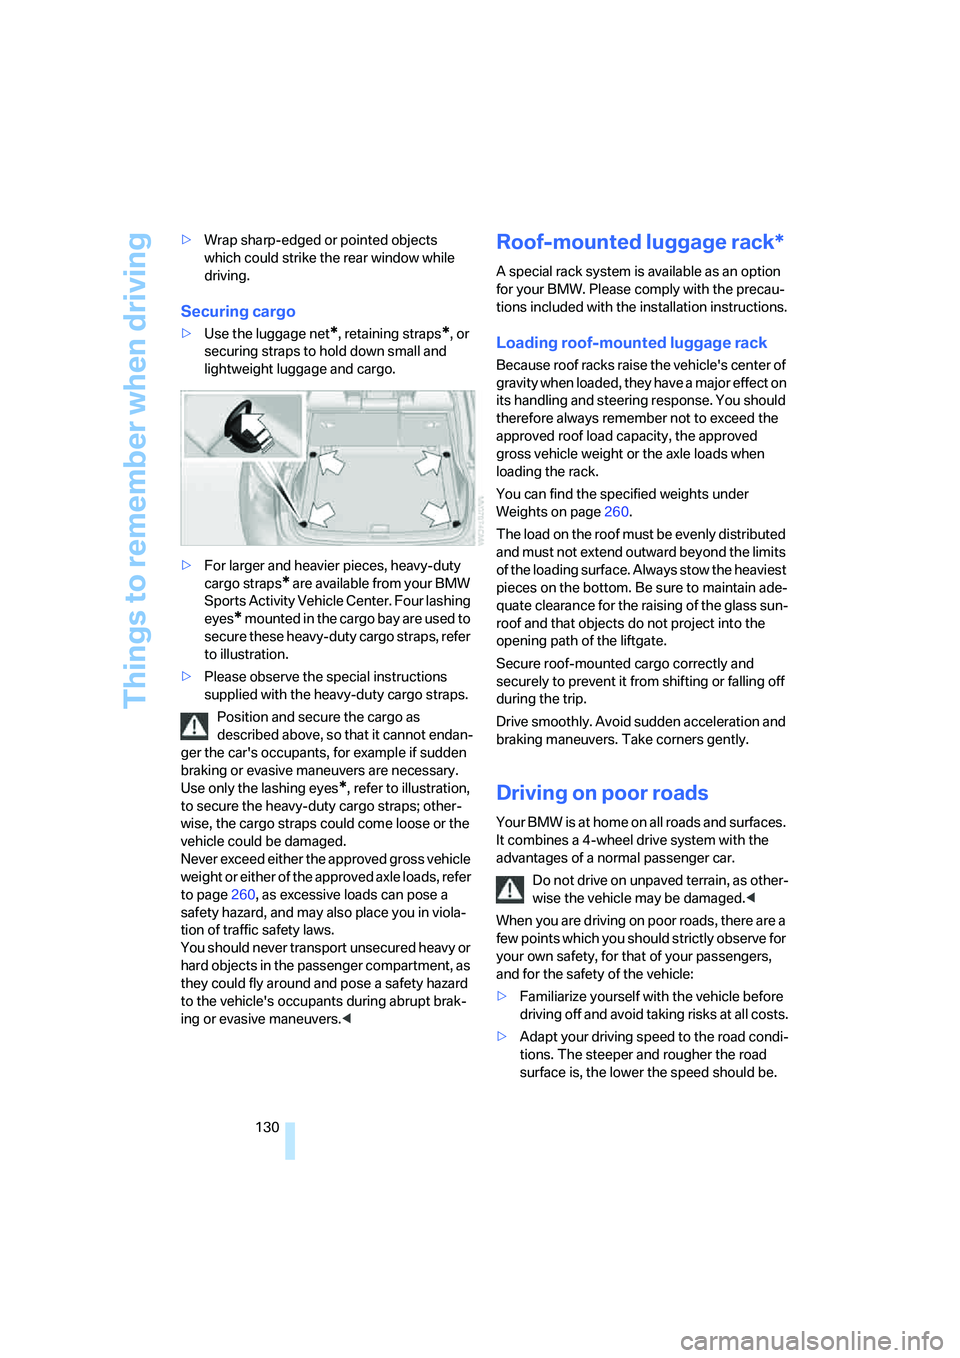
>For larger and heavier pieces, heavy-duty
cargo straps
* are available from your BMW
Sports Activity Vehicle Center. Four lashing
eyes
* mounted in the cargo bay are used to
secure these heavy-duty cargo straps, refer
to illustration.
>Please observe the special instructions
supplied with the heavy-duty cargo straps.
Position and secure the cargo as
described above, so that it cannot endan-
ger the car's occupants, for example if sudden
braking or evasive maneuvers are necessary.
Use only the lashing eyes
*, refer to illustration,
to secure the heavy-duty cargo straps; other-
wise, the cargo straps could come loose or the
vehicle could be damaged.
Never exceed either the approved gross vehicle
weight or either of the approved axle loads, refer
to page260, as excessive loads can pose a
safety hazard, and may also place you in viola-
tion of traffic safety laws.
You should never transport unsecured heavy or
hard objects in the passenger compartment, as
they could fly around and pose a safety hazard
to the vehicle's occupants during abrupt brak-
ing or evasive maneuvers.<
Roof-mounted luggage rack*
A special rack system is available as an option
for your BMW. Please comply with the precau-
tions included with the installation instructions.
Loading roof-mounted luggage rack
Because roof racks raise the vehicle's center of
gravity when loaded, they have a major effect on
its handling and steering response. You should
therefore always remember not to exceed the
approved roof load capacity, the approved
gross vehicle weight or the axle loads when
loading the rack.
You can find the specified weights under
Weights on page260.
The load on the roof must be evenly distributed
and must not extend outward beyond the limits
of the loading surface. Always stow the heaviest
pieces on the bottom. Be sure to maintain ade-
quate clearance for the raising of the glass sun-
roof and that objects do not project into the
opening path of the liftgate.
Secure roof-mounted cargo correctly and
securely to prevent it from shifting or falling off
during the trip.
Drive smoothly. Avoid sudden acceleration and
braking maneuvers. Take corners gently.
Driving on poor roads
Your BMW is at home on all roads and surfaces.
It combines a 4-wheel drive system with the
advantages of a normal passenger car.
Do not drive on unpaved terrain, as other-
wise the vehicle may be damaged.<
When you are driving on poor roads, there are a
few points which you should strictly observe for
your own safety, for that of your passengers,
and for the safety of the vehicle:
>Familiarize yourself with the vehicle before
driving off and avoid taking risks at all costs.
>Adapt your driving speed to the road condi-
tions. The steeper and rougher the road
surface is, the lower the speed should be.
Page 136 of 288
Starting navigation system
134
Starting navigation system
Your navigation system can use satellites to
ascertain the precise position of your vehicle
and guide you reliably to any destination you
enter.
Navigation DVD
The navigation system requires a special navi-
gation DVD. The latest version is available at
your BMW Sports Activity Vehicle Center.
Inserting navigation DVD
Use the lower drive for navigation DVD.
1.Insert the navigation DVD with the labeled
side up.
The navigation DVD is automatically pulled
in.
2.Allow several seconds for the system to
scan the data from the DVD.
Removing navigation DVD
1.Press the button 1.
The DVD emerges slightly from the drive.
2.Remove the DVD.
If the DVD is not ejected from the drive, it is pos-
sible that it is blocked. In this case a message is
also shown on the Control Display.
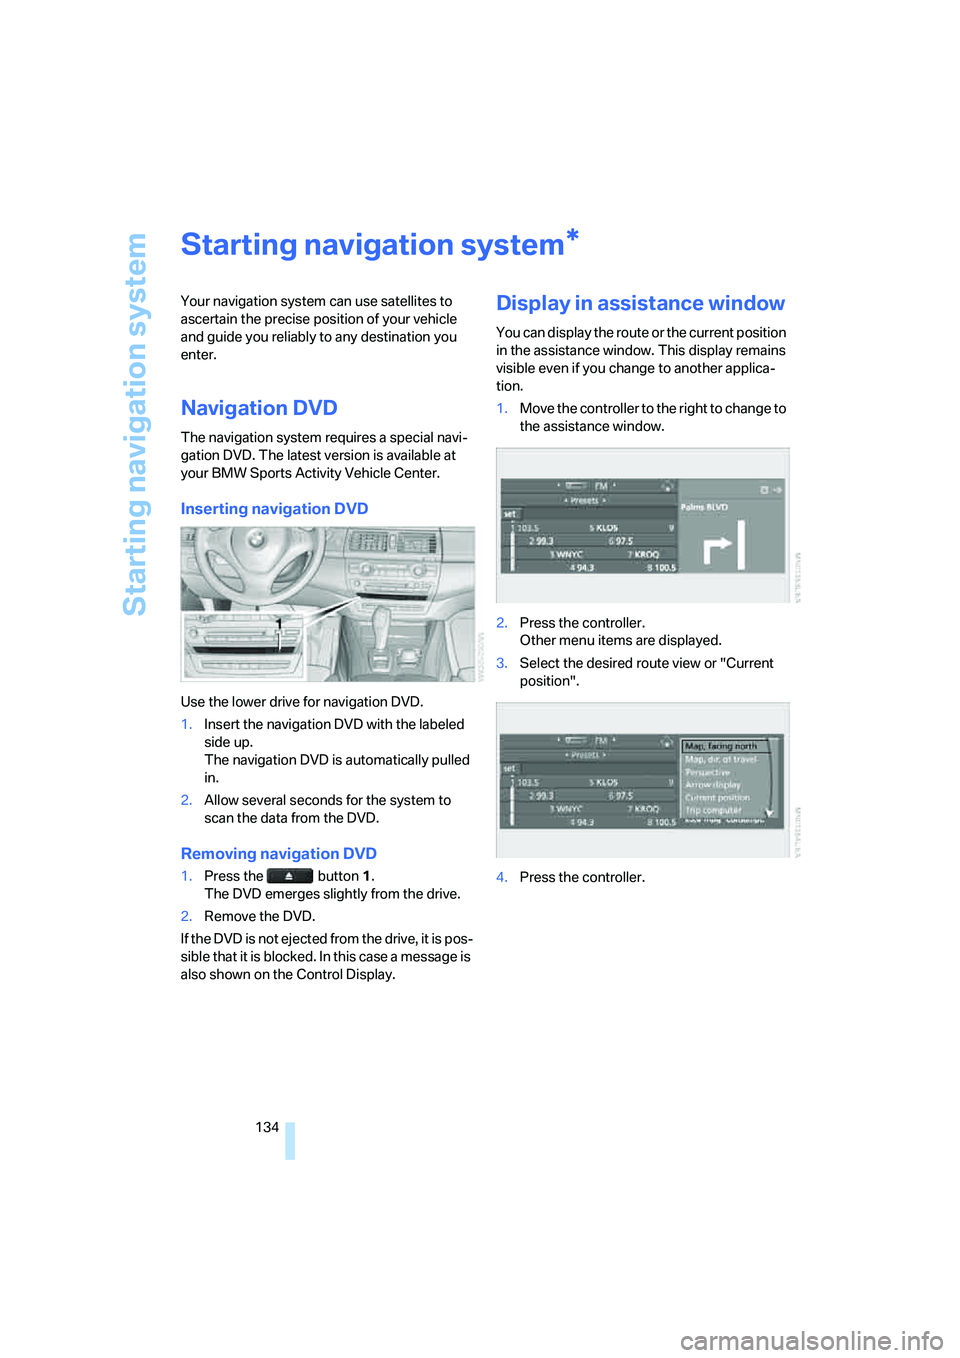
Display in assistance window
You can display the route or the current position
in the assistance window. This display remains
visible even if you change to another applica-
tion.
1.Move the controller to the right to change to
the assistance window.
2.Press the controller.
Other menu items are displayed.
3.Select the desired route view or "Current
position".
4.Press the controller.
*
Page 137 of 288
Navigation
Driving tips
135Reference
At a glance
Controls
Communications
Entertainment
Mobility
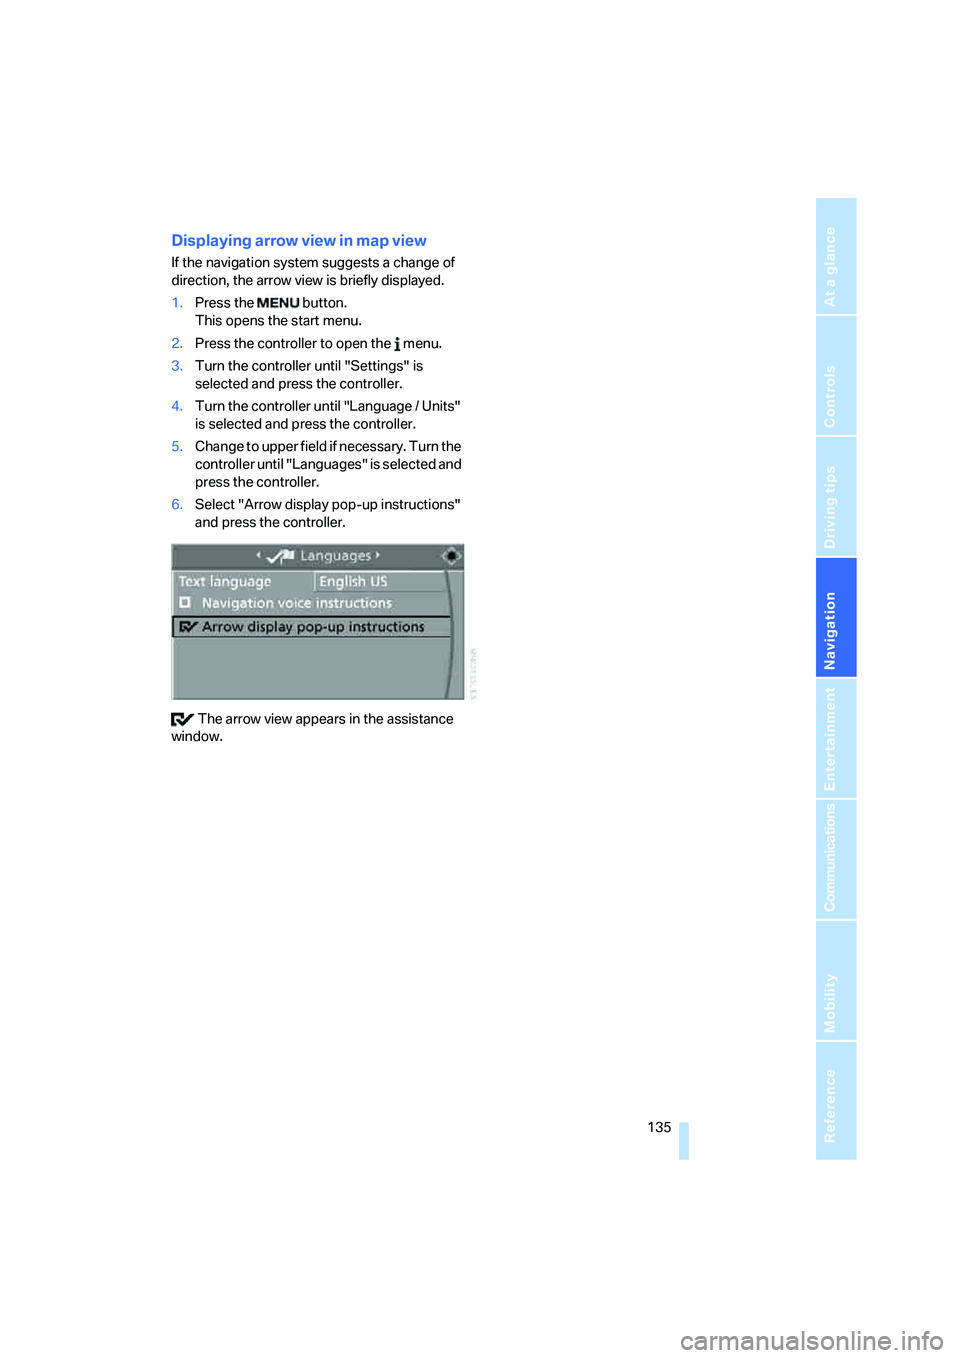
Displaying arrow view in map view
If the navigation system suggests a change of
direction, the arrow view is briefly displayed.
1.Press the button.
This opens the start menu.
2.Press the controller to open the menu.
3.Turn the controller until "Settings" is
selected and press the controller.
4.Turn the controller until "Language / Units"
is selected and press the controller.
5.Change to upper field if necessary. Turn the
controller until "Languages" is selected and
press the controller.
6.Select "Arrow display pop-up instructions"
and press the controller.
The arrow view appears in the assistance
window.
Page 214 of 288
Telephoning
212
Adjusting volume
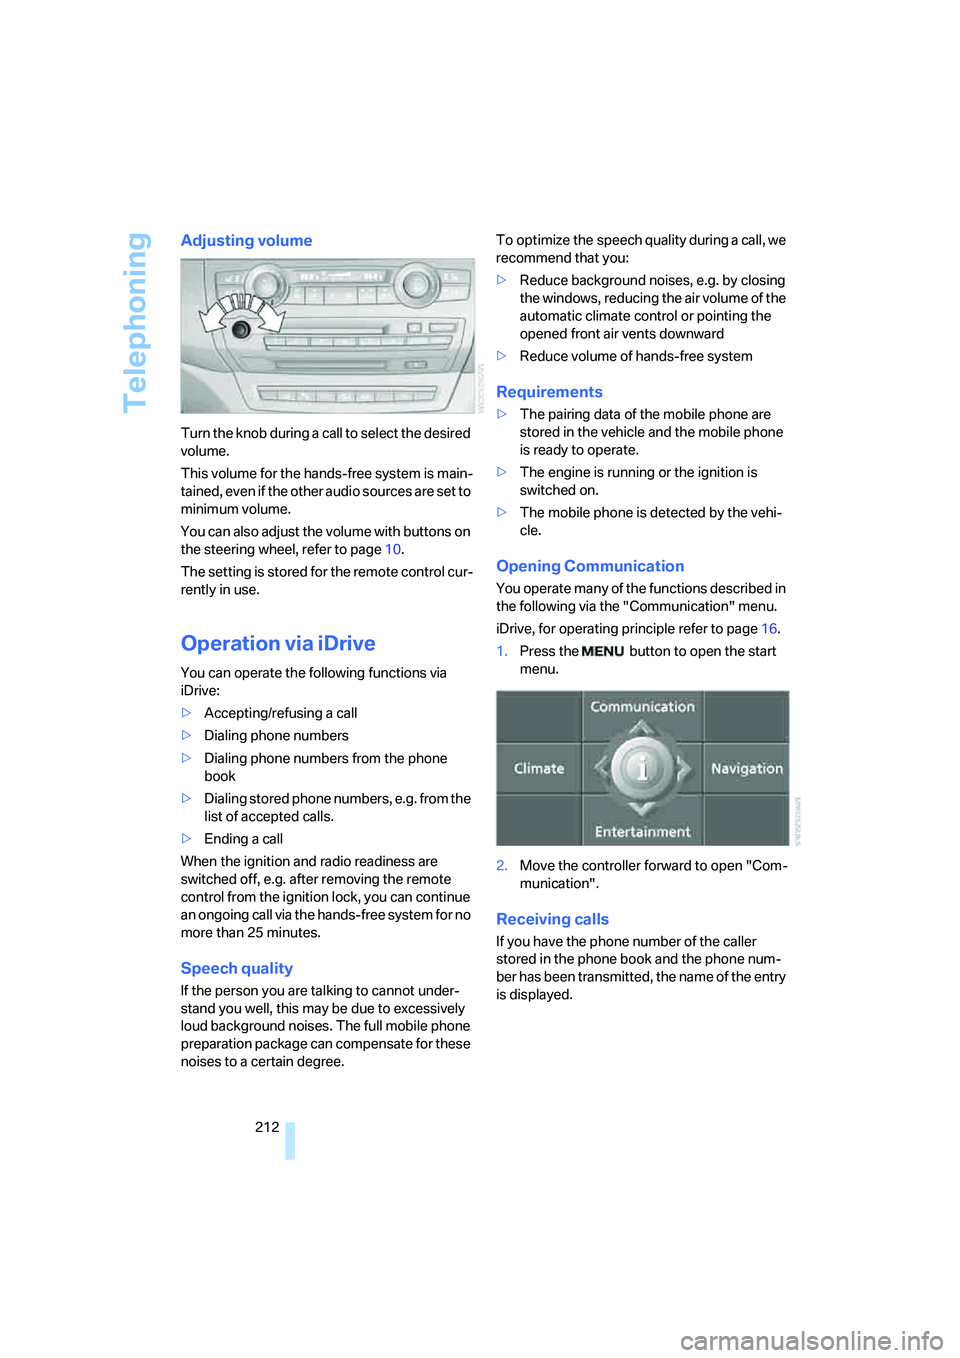
Turn the knob during a call to select the desired
volume.
This volume for the hands-free system is main-
tained, even if the other audio sources are set to
minimum volume.
You can also adjust the volume with buttons on
the steering wheel, refer to page10.
The setting is stored for the remote control cur-
rently in use.
Operation via iDrive
You can operate the following functions via
iDrive:
>Accepting/refusing a call
>Dialing phone numbers
>Dialing phone numbers from the phone
book
>Dialing stored phone numbers, e.g. from the
list of accepted calls.
>Ending a call
When the ignition and radio readiness are
switched off, e.g. after removing the remote
control from the ignition lock, you can continue
an ongoing call via the hands-free system for no
more than 25 minutes.
Speech quality
If the person you are talking to cannot under-
stand you well, this may be due to excessively
loud background noises. The full mobile phone
preparation package can compensate for these
noises to a certain degree. To optimize the speech quality during a call, we
recommend that you:
>Reduce background noises, e.g. by closing
the windows, reducing the air volume of the
automatic climate control or pointing the
opened front air vents downward
>Reduce volume of hands-free system
Requirements
>The pairing data of the mobile phone are
stored in the vehicle and the mobile phone
is ready to operate.
>The engine is running or the ignition is
switched on.
>The mobile phone is detected by the vehi-
cle.
Opening Communication
You operate many of the functions described in
the following via the "Communication" menu.
iDrive, for operating principle refer to page16.
1.Press the button to open the start
menu.
2.Move the controller forward to open "Com-
munication".
Receiving calls
If you have the phone number of the caller
stored in the phone book and the phone num-
ber has been transmitted, the name of the entry
is displayed.
Page 221 of 288
219
Entertainment
Reference
At a glance
Controls
Driving tips Communications
Navigation
Mobility
Creating and editing voice phone
book*
Store entry:
An entry always consists of a name and phone
number.
Delete entry:
You can delete any entry from the voice phone
book.
Delete all entries:
{Delete phone book} deletes all entries in the
phone book.
Have entries read aloud and select:
You can have all the entries of your voice phone
book read aloud in the order of input and select
a certain entry to establish a connection:
Selecting an entry
The connection to the phone number of the
selected entry is established.
Redialing
The {Redial} command opens "Redial".
Notes
Important for voice commands
For voice commands, keep the following in
mind:
>Issue the commands smoothly and at nor-
mal volume, avoiding excessive emphases
and pauses.
>Keep the doors, windows and glass sunroof
closed to prevent interference from ambi-
ent noise.
>Avoid making other noise in the vehicle
while speaking. 1.{Save name}.
The dialog for storing a name is
opened.
2.Speak the name.
The spoken length of the names in the
phone book must not exceed approx.
2seconds.
3.Say the phone number when prompted.
4.To store the phone number:
{Save}.
1.{Delete name}.
The dialog for deleting an entry is
opened.
2.Say the name when prompted.
3.Confirm the prompt with {Yes}.
1.{Delete phone book}.
The dialog for deleting phone book is
opened.
2.Confirm the prompt with {Yes}.
3.Confirm the repeated prompt with
{Yes}.
1.{Read phone book}.
The dialog for reading phone book is
opened.
2.{Dial number} when the desired entry is
read aloud.
1.{Dial name}.
The dialog for selecting an entry is
opened.
2.Say the name when prompted.
3.Confirm the prompt with {Yes}.