fog BMW X6 2013 E71 Owner's Manual
[x] Cancel search | Manufacturer: BMW, Model Year: 2013, Model line: X6, Model: BMW X6 2013 E71Pages: 345, PDF Size: 9.45 MB
Page 12 of 345
CockpitVehicle equipment
This chapter describes all series equipment as
well as country-specific and special equipment
offered for this model series.Therefore, it alsodescribes equipment that may not be found in
your vehicle, for instance due to the selected
special equipment or the country version. This
also applies to safety-related functions and
systems.
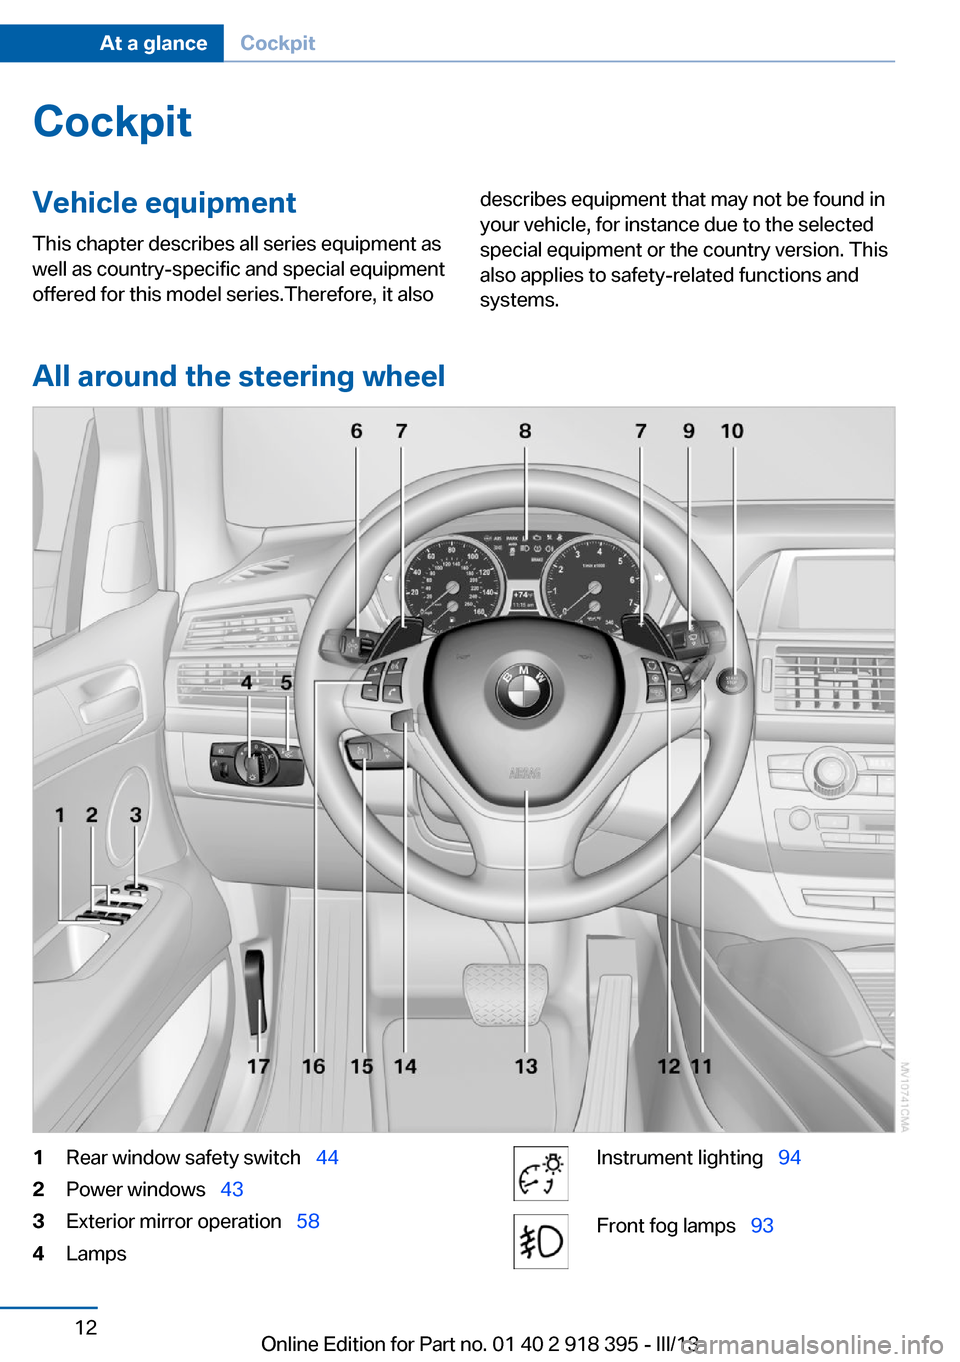
All around the steering wheel
1Rear window safety switch 442Power windows 433Exterior mirror operation 584LampsInstrument lighting 94Front fog lamps 93Seite 12At a glanceCockpit12
Online Edition for Part no. 01 40 2 918 395 - III/13
Page 15 of 345
▷Odometer and trip odometer 79▷High-beam Assistant 92▷ Check Control message
present 85▷Adaptive Drive: sport chassis and sus‐
pension tuning 1099Fuel gauge 8110Resetting the trip odometer 79
Viewing service requirement display 80Indicator/warning lamps
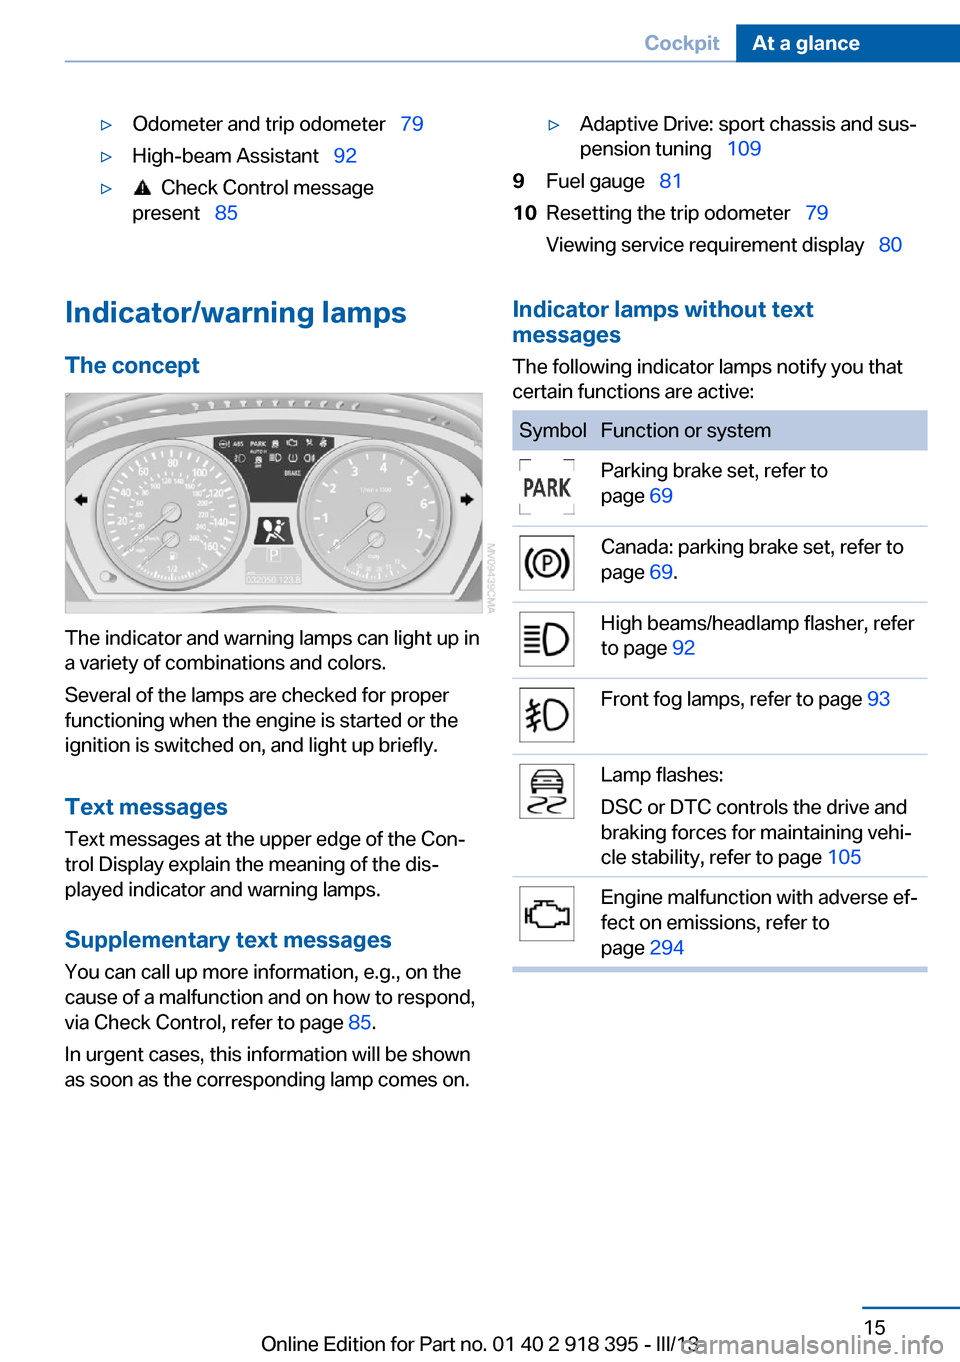
The concept
The indicator and warning lamps can light up in
a variety of combinations and colors.
Several of the lamps are checked for proper
functioning when the engine is started or the
ignition is switched on, and light up briefly.
Text messages Text messages at the upper edge of the Con‐
trol Display explain the meaning of the dis‐
played indicator and warning lamps.
Supplementary text messages
You can call up more information, e.g., on the
cause of a malfunction and on how to respond,
via Check Control, refer to page 85.
In urgent cases, this information will be shown
as soon as the corresponding lamp comes on.
Indicator lamps without text
messages
The following indicator lamps notify you that
certain functions are active:SymbolFunction or systemParking brake set, refer to
page 69Canada: parking brake set, refer to
page 69.High beams/headlamp flasher, refer
to page 92Front fog lamps, refer to page 93Lamp flashes:
DSC or DTC controls the drive and
braking forces for maintaining vehi‐
cle stability, refer to page 105Engine malfunction with adverse ef‐
fect on emissions, refer to
page 294Seite 15CockpitAt a glance15
Online Edition for Part no. 01 40 2 918 395 - III/13
Page 91 of 345
Headlamp courtesy delay feature
The low beams stay lit for a short while after
the ignition is switched off, if the lamps are
switched off and the headlamp flasher is
switched on.
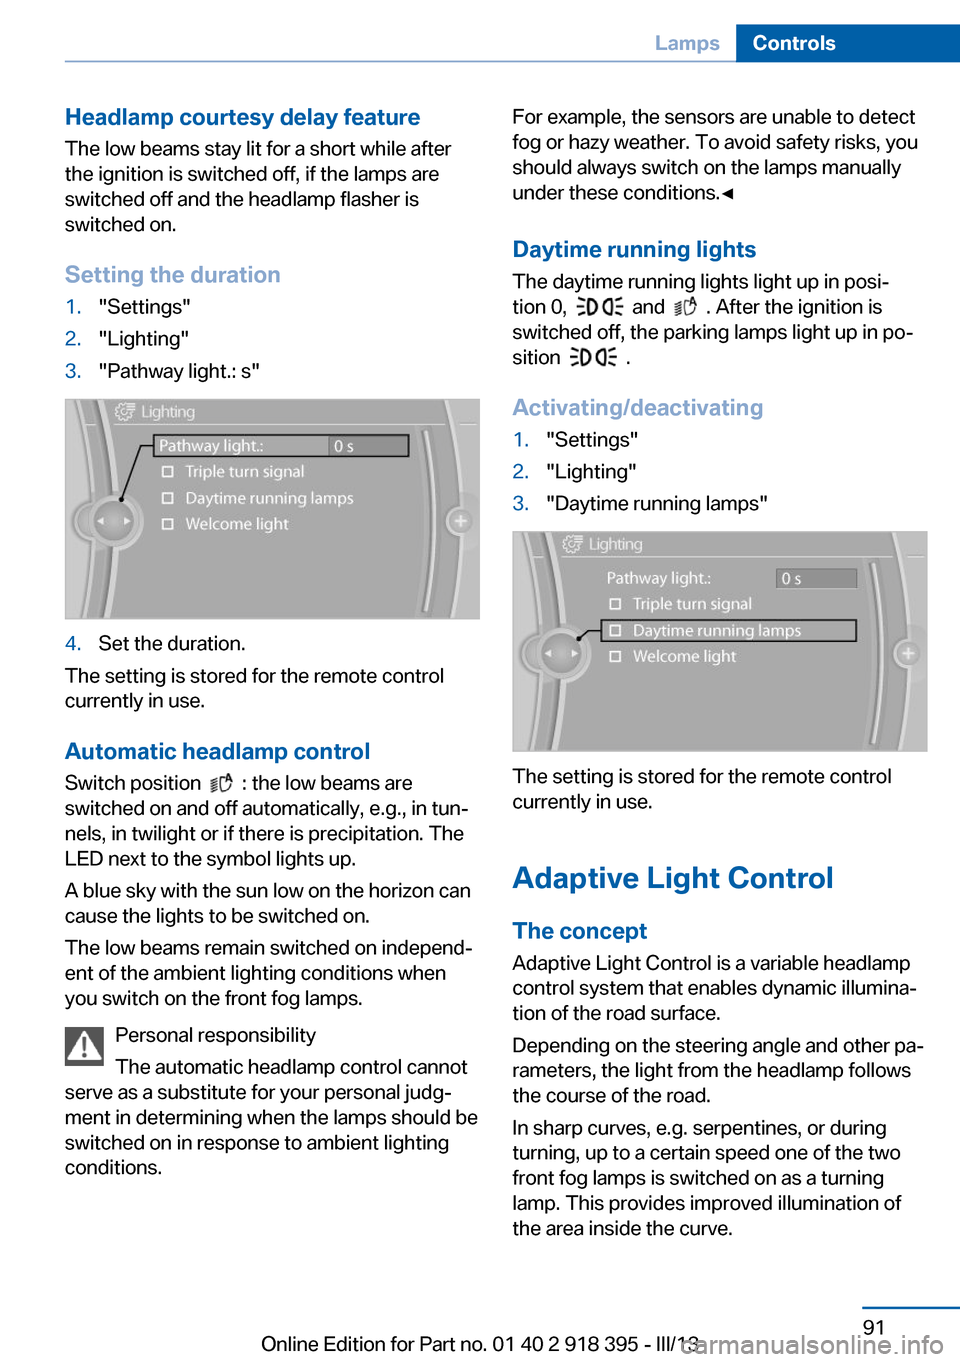
Setting the duration1."Settings"2."Lighting"3."Pathway light.: s"4.Set the duration.
The setting is stored for the remote control
currently in use.
Automatic headlamp control
Switch position
: the low beams are
switched on and off automatically, e.g., in tun‐
nels, in twilight or if there is precipitation. The
LED next to the symbol lights up.
A blue sky with the sun low on the horizon can
cause the lights to be switched on.
The low beams remain switched on independ‐
ent of the ambient lighting conditions when
you switch on the front fog lamps.
Personal responsibility
The automatic headlamp control cannot
serve as a substitute for your personal judg‐
ment in determining when the lamps should be
switched on in response to ambient lighting
conditions.
For example, the sensors are unable to detect
fog or hazy weather. To avoid safety risks, you
should always switch on the lamps manually
under these conditions.◀
Daytime running lights The daytime running lights light up in posi‐
tion 0,
and . After the ignition is
switched off, the parking lamps light up in po‐
sition
.
Activating/deactivating
1."Settings"2."Lighting"3."Daytime running lamps"
The setting is stored for the remote control
currently in use.
Adaptive Light Control
The concept Adaptive Light Control is a variable headlamp
control system that enables dynamic illumina‐
tion of the road surface.
Depending on the steering angle and other pa‐
rameters, the light from the headlamp follows
the course of the road.
In sharp curves, e.g. serpentines, or during
turning, up to a certain speed one of the two
front fog lamps is switched on as a turning
lamp. This provides improved illumination of
the area inside the curve.
Seite 91LampsControls91
Online Edition for Part no. 01 40 2 918 395 - III/13
Page 93 of 345
The system responds to light from oncoming
traffic and traffic driving ahead of you, and to
adequate illumination, e.g., in towns and cities.
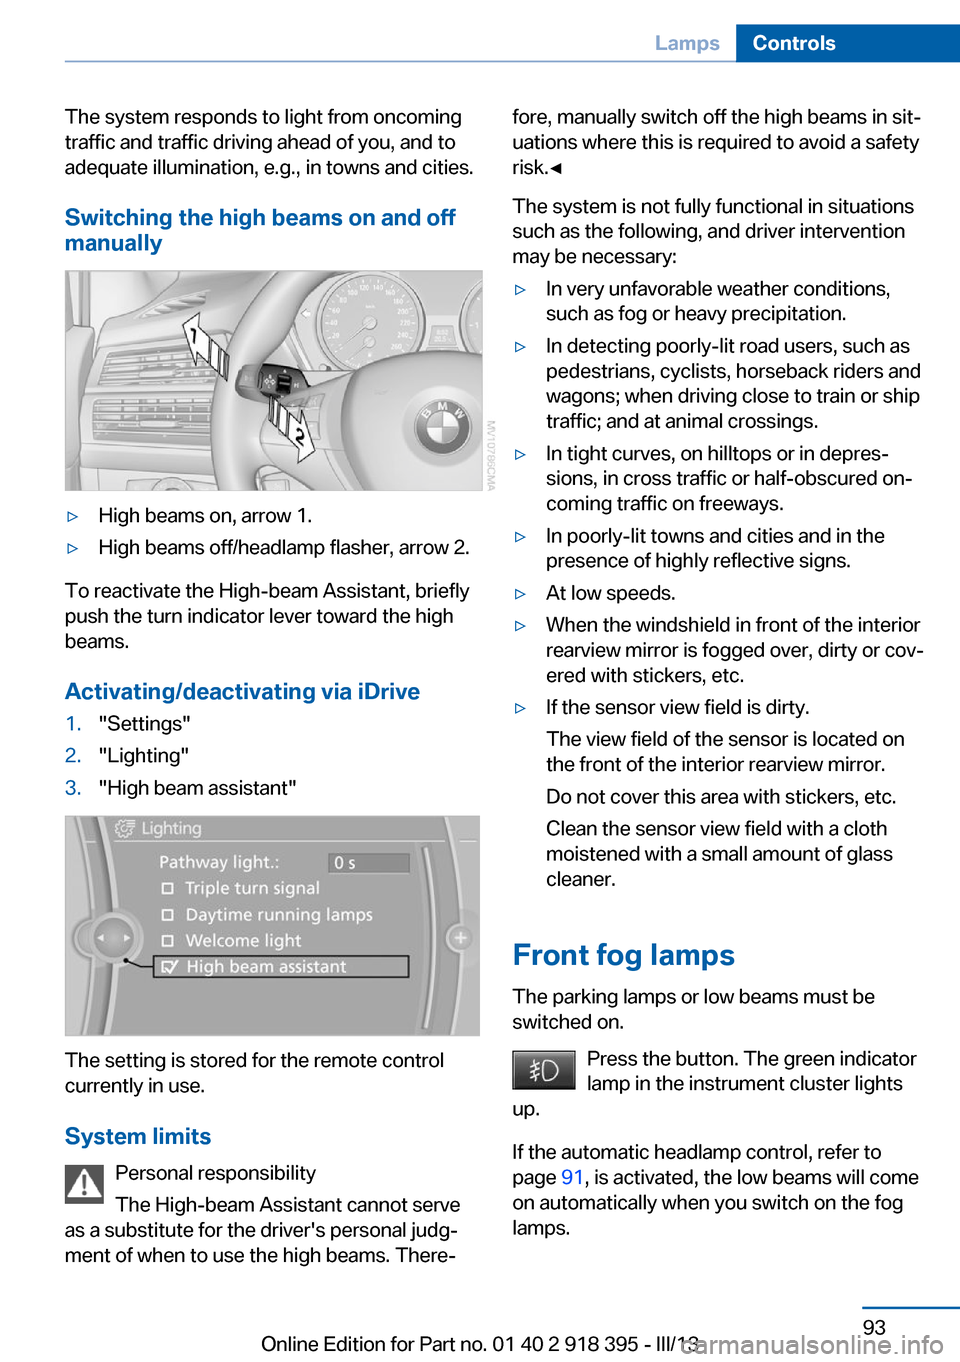
Switching the high beams on and offmanually▷High beams on, arrow 1.▷High beams off/headlamp flasher, arrow 2.
To reactivate the High-beam Assistant, briefly
push the turn indicator lever toward the high
beams.
Activating/deactivating via iDrive
1."Settings"2."Lighting"3."High beam assistant"
The setting is stored for the remote control
currently in use.
System limits Personal responsibility
The High-beam Assistant cannot serve
as a substitute for the driver's personal judg‐
ment of when to use the high beams. There‐
fore, manually switch off the high beams in sit‐
uations where this is required to avoid a safety
risk.◀
The system is not fully functional in situations
such as the following, and driver intervention
may be necessary:▷In very unfavorable weather conditions,
such as fog or heavy precipitation.▷In detecting poorly-lit road users, such as
pedestrians, cyclists, horseback riders and
wagons; when driving close to train or ship
traffic; and at animal crossings.▷In tight curves, on hilltops or in depres‐
sions, in cross traffic or half-obscured on‐
coming traffic on freeways.▷In poorly-lit towns and cities and in the
presence of highly reflective signs.▷At low speeds.▷When the windshield in front of the interior
rearview mirror is fogged over, dirty or cov‐
ered with stickers, etc.▷If the sensor view field is dirty.
The view field of the sensor is located on
the front of the interior rearview mirror.
Do not cover this area with stickers, etc.
Clean the sensor view field with a cloth
moistened with a small amount of glass
cleaner.
Front fog lamps
The parking lamps or low beams must be
switched on.
Press the button. The green indicator
lamp in the instrument cluster lights
up.
If the automatic headlamp control, refer to
page 91, is activated, the low beams will come
on automatically when you switch on the fog
lamps.
Seite 93LampsControls93
Online Edition for Part no. 01 40 2 918 395 - III/13
Page 103 of 345
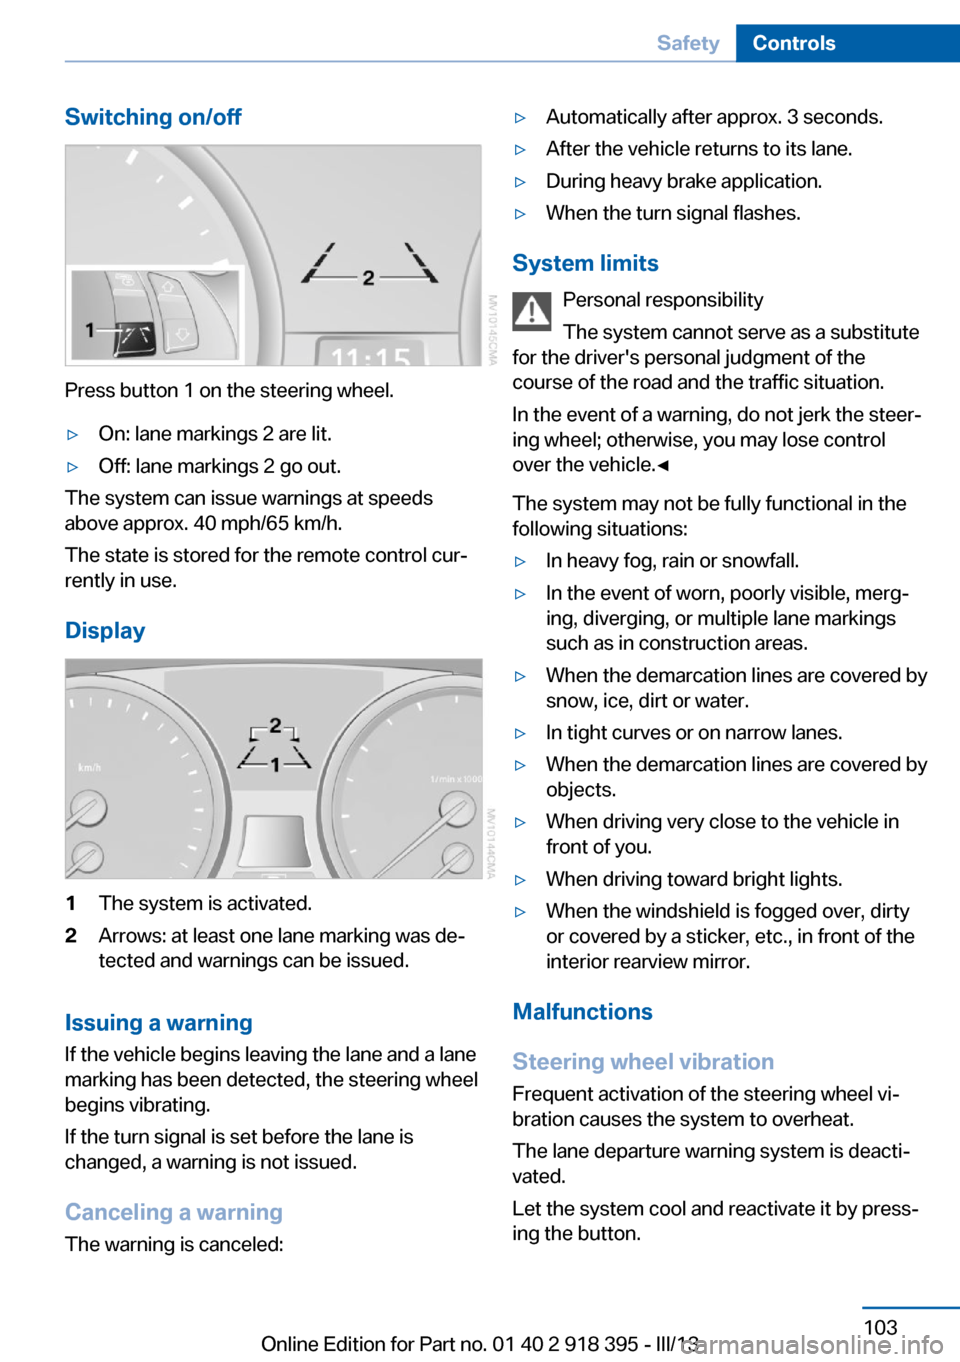
Switching on/off
Press button 1 on the steering wheel.
▷On: lane markings 2 are lit.▷Off: lane markings 2 go out.
The system can issue warnings at speeds
above approx. 40 mph/65 km/h.
The state is stored for the remote control cur‐
rently in use.
Display
1The system is activated.2Arrows: at least one lane marking was de‐
tected and warnings can be issued.
Issuing a warning
If the vehicle begins leaving the lane and a lane
marking has been detected, the steering wheel
begins vibrating.
If the turn signal is set before the lane is
changed, a warning is not issued.
Canceling a warning The warning is canceled:
▷Automatically after approx. 3 seconds.▷After the vehicle returns to its lane.▷During heavy brake application.▷When the turn signal flashes.
System limits
Personal responsibility
The system cannot serve as a substitute
for the driver's personal judgment of the
course of the road and the traffic situation.
In the event of a warning, do not jerk the steer‐
ing wheel; otherwise, you may lose control
over the vehicle.◀
The system may not be fully functional in the
following situations:
▷In heavy fog, rain or snowfall.▷In the event of worn, poorly visible, merg‐
ing, diverging, or multiple lane markings
such as in construction areas.▷When the demarcation lines are covered by
snow, ice, dirt or water.▷In tight curves or on narrow lanes.▷When the demarcation lines are covered by
objects.▷When driving very close to the vehicle in
front of you.▷When driving toward bright lights.▷When the windshield is fogged over, dirty
or covered by a sticker, etc., in front of the
interior rearview mirror.
Malfunctions
Steering wheel vibration
Frequent activation of the steering wheel vi‐
bration causes the system to overheat.
The lane departure warning system is deacti‐
vated.
Let the system cool and reactivate it by press‐
ing the button.
Seite 103SafetyControls103
Online Edition for Part no. 01 40 2 918 395 - III/13
Page 112 of 345
Professional navigation system
If the vehicle is equipped with a Professional
navigation system, the system adapts the ac‐
celeration and deceleration behavior of the ve‐
hicle to the road on which you are currently
driving.
To ensure that the system has the latest infor‐
mation on the course of the road, use the most
recent version of the navigation data.
If the vehicle position is unknown, e.g., if you
have left the region covered by the map, the
navigation system ceases to influence vehicle
behavior.
Applications Please try the system first during sparse traffic
and clear road conditions so that you can get
used to the system. After you have experience
and understand the system, only then use it
during normal traffic.
As with conventional cruise control systems,
active cruise control in no way reduces or sub‐
stitutes for the driver's own personal experi‐
ence, responsibility, alertness and awareness
in adjusting speed, braking or otherwise con‐
trolling the vehicle. The driver should decide
when to use the system on the basis of road,
traffic, visibility, and weather conditions. Active
cruise control is intended for use on highway-
type roadways where traffic is moving rela‐
tively smoothly as well as in slow-moving traf‐
fic congestion. Do not use the system in city
driving; in complex driving situations; heavy
traffic such as during rush hour; on curvy,
winding roads, slippery roads or roads with
sharp curves such as highway off-ramps; dur‐
ing inclement weather such as snow, strong
rain or fog; or when entering interchanges,
service/parking areas or toll booths. It is also
important to regulate your vehicle's speed and
distance setting within applicable legal limits.
Always be ready to take action or apply the
brakes if necessary, especially when the sys‐
tem is actively following a vehicle in front of
you. Otherwise, driving conditions can resultwhich lead to a violation of the law or elevated
risk of an accident.
The minimum initial activation speed is
20 mph/ 30 km/h, and the maximum speed is
110 mph/ 180 km/h. The system can also be
activated while the vehicle is stationary, refer
to page 114.
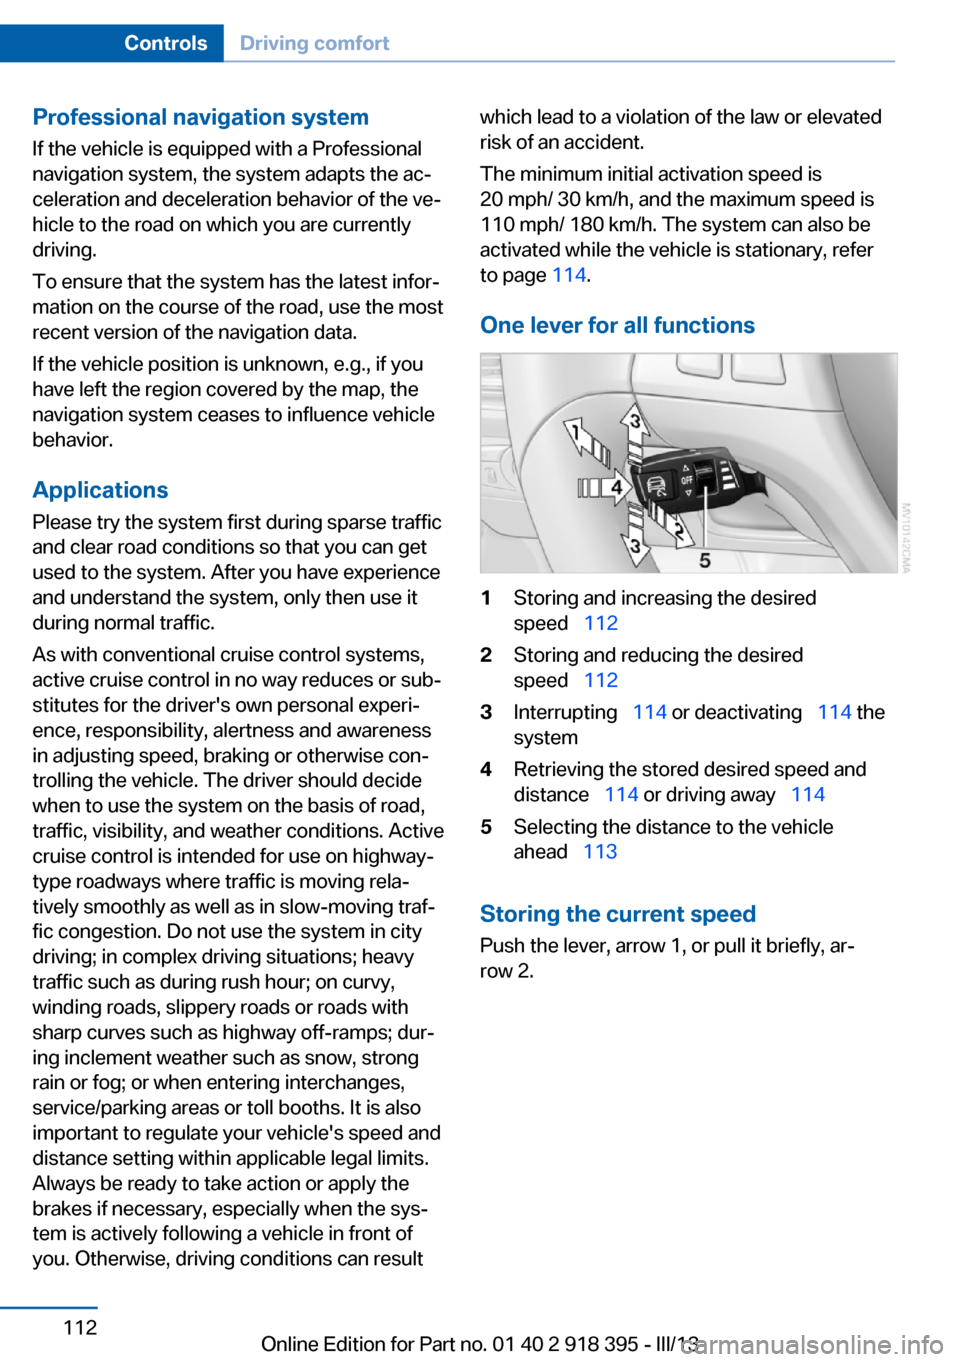
One lever for all functions1Storing and increasing the desired
speed 1122Storing and reducing the desired
speed 1123Interrupting 114 or deactivating 114 the
system4Retrieving the stored desired speed and
distance 114 or driving away 1145Selecting the distance to the vehicle
ahead 113
Storing the current speed
Push the lever, arrow 1, or pull it briefly, ar‐
row 2.
Seite 112ControlsDriving comfort112
Online Edition for Part no. 01 40 2 918 395 - III/13
Page 118 of 345
system activated, resting your foot on the acel‐
erator pedal will cause the system not to brake
even if necessary. Be certain that floormats or
other objects on the vehicle floor do not inter‐
fere with movement of the acccelerator
pedal.◀
Limits of automatic braking
While active cruise control is capable of
braking your vehicle automatically when you
approach a slower vehicle ahead, it is impor‐
tant to be aware that the ability of the system
to apply the brakes is also limited, e.g. when
you reduce your desired speed sharply. lt uses
only a portion of braking system capacity and
does not utilize the full capacity of the vehicle
braking system. Therefore, the system cannot
decrease your speed for large differences in
speed between your vehicle and the vehicle
ahead. Examples: when you approach a vehicle
traveling at a much lower speed than your own
speed such as approaching a toll booth or
when a much slower vehicle cuts in front of
you at close range.◀
Cruise controlThe concept The system is functional at speeds beginning
at approx. 20 mph/30 km/h.
The speed specified using the lever on the
steering column is maintained.
The system brakes on downhill gradients if en‐
gine braking action is insufficient.
Do not use cruise control
Do not use the system if unfavorable
conditions make it impossible to drive at a con‐
stant speed, for instance:▷On curvy roads.▷In heavy traffic.▷On slippery roads, in fog, snow or rain, or
on a loose road surface.Otherwise, you could lose control of the vehi‐
cle and cause an accident.◀
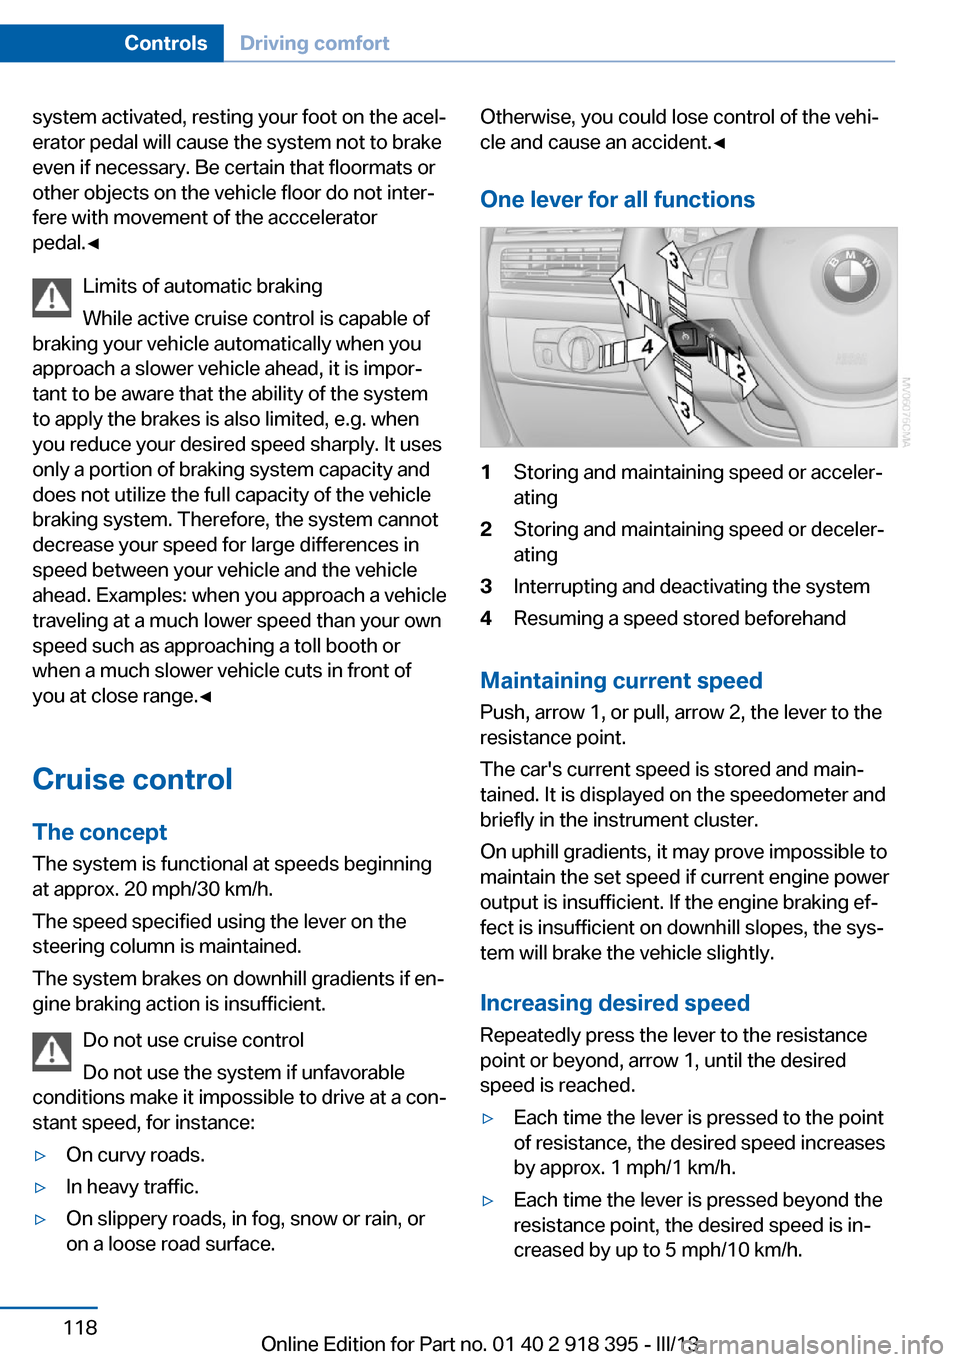
One lever for all functions1Storing and maintaining speed or acceler‐
ating2Storing and maintaining speed or deceler‐
ating3Interrupting and deactivating the system4Resuming a speed stored beforehand
Maintaining current speed
Push, arrow 1, or pull, arrow 2, the lever to the
resistance point.
The car's current speed is stored and main‐ tained. It is displayed on the speedometer and
briefly in the instrument cluster.
On uphill gradients, it may prove impossible to
maintain the set speed if current engine power
output is insufficient. If the engine braking ef‐
fect is insufficient on downhill slopes, the sys‐
tem will brake the vehicle slightly.
Increasing desired speed
Repeatedly press the lever to the resistance
point or beyond, arrow 1, until the desired
speed is reached.
▷Each time the lever is pressed to the point
of resistance, the desired speed increases
by approx. 1 mph/1 km/h.▷Each time the lever is pressed beyond the
resistance point, the desired speed is in‐
creased by up to 5 mph/10 km/h.Seite 118ControlsDriving comfort118
Online Edition for Part no. 01 40 2 918 395 - III/13
Page 132 of 345
Depending on the selected temperature,
AUTO intensity, and outside influences, the air
is directed to the windshield, side windows,
upper body, and into the footwell.
The cooling function is switched on automati‐
cally with the AUTO program.
At the same time, a condensation sensor con‐
trols the program in such a way that window
condensation is prevented as much as possi‐
ble.
To switch off the program: press the button
again or manually adjust the air distribution.
Intensity of the AUTO program
Pressing the AUTO button repeatedly adjusts
the intensity of the AUTO program. The se‐
lected intensity, SOFT, MEDIUM or INTEN‐
SIVE, appears on the display of the automatic
climate control.
Temperature Turn the wheel to set the desired
temperature.
The automatic climate control
achieves this temperature as
quickly as possible, if necessary with the maxi‐
mum cooling or heating capacity, and then
keeps it constant.
Avoid rapidly switching between different tem‐
perature settings. The automatic climate con‐
trol will not have sufficient time to adjust the set temperature.
Maximum heating power can be obtained with
the highest setting, regardless of the external
temperature.
At the lowest setting, cooling is continuous, re‐
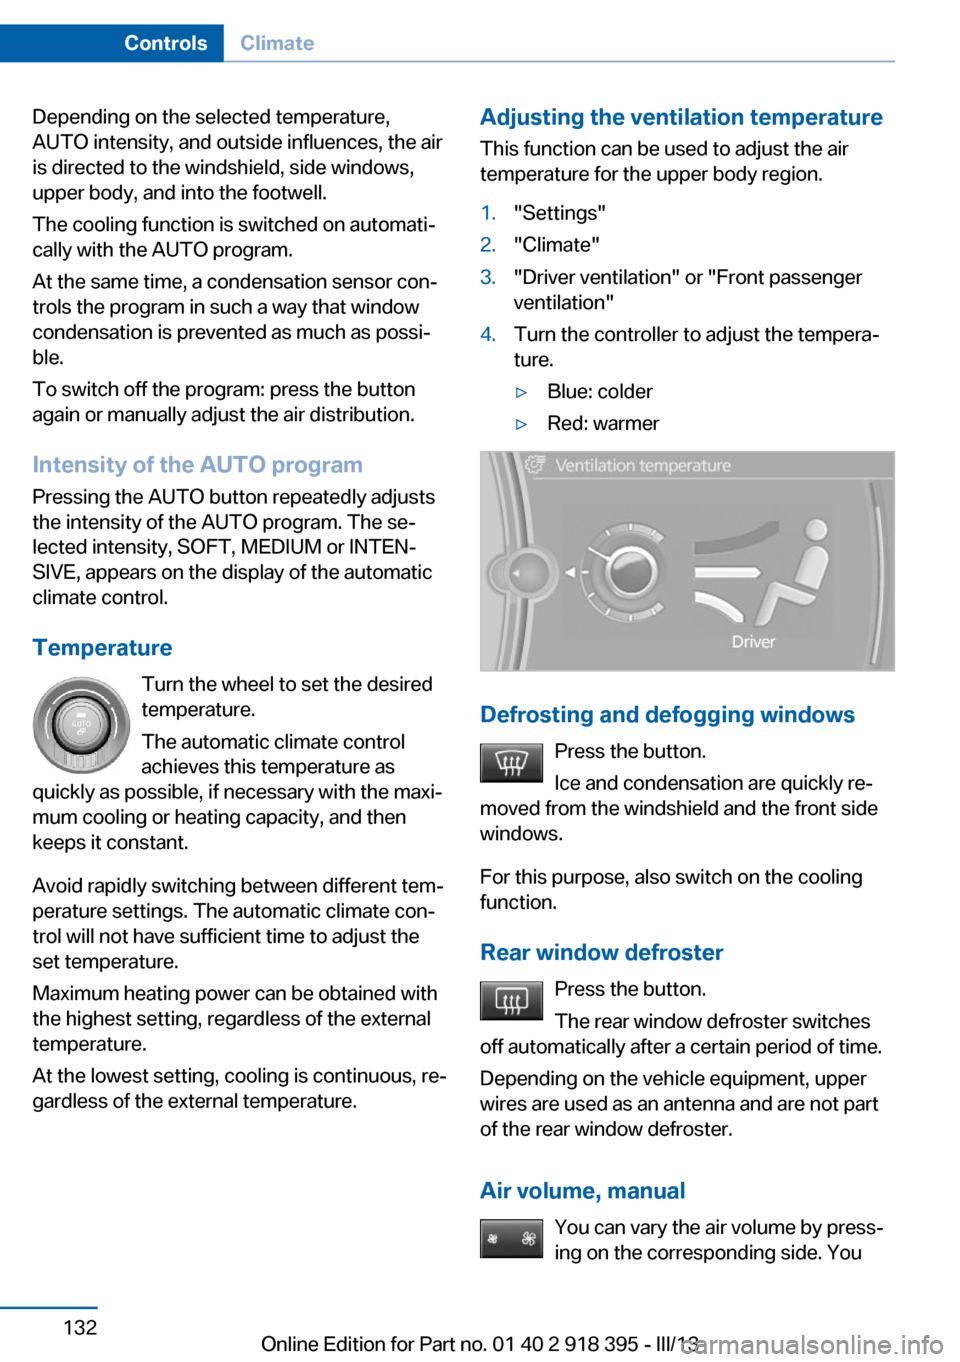
gardless of the external temperature.Adjusting the ventilation temperature
This function can be used to adjust the air
temperature for the upper body region.1."Settings"2."Climate"3."Driver ventilation" or "Front passenger
ventilation"4.Turn the controller to adjust the tempera‐
ture.▷Blue: colder▷Red: warmer
Defrosting and defogging windows
Press the button.
Ice and condensation are quickly re‐
moved from the windshield and the front side
windows.
For this purpose, also switch on the cooling
function.
Rear window defroster Press the button.
The rear window defroster switches
off automatically after a certain period of time.
Depending on the vehicle equipment, upper
wires are used as an antenna and are not part
of the rear window defroster.
Air volume, manual You can vary the air volume by press‐
ing on the corresponding side. You
Seite 132ControlsClimate132
Online Edition for Part no. 01 40 2 918 395 - III/13
Page 133 of 345
can reactivate the automatic mode for the air
volume with the AUTO button.
Manual air distribution
The air flow can be guided into the vehicle in‐
terior, separately for the driver's and front pas‐
senger side, using one of the following pro‐
grams:▷Upper body region.▷Upper body region and footwell.▷Footwell.▷Driver's side: in addition, the windshield,
side windows, and footwell.
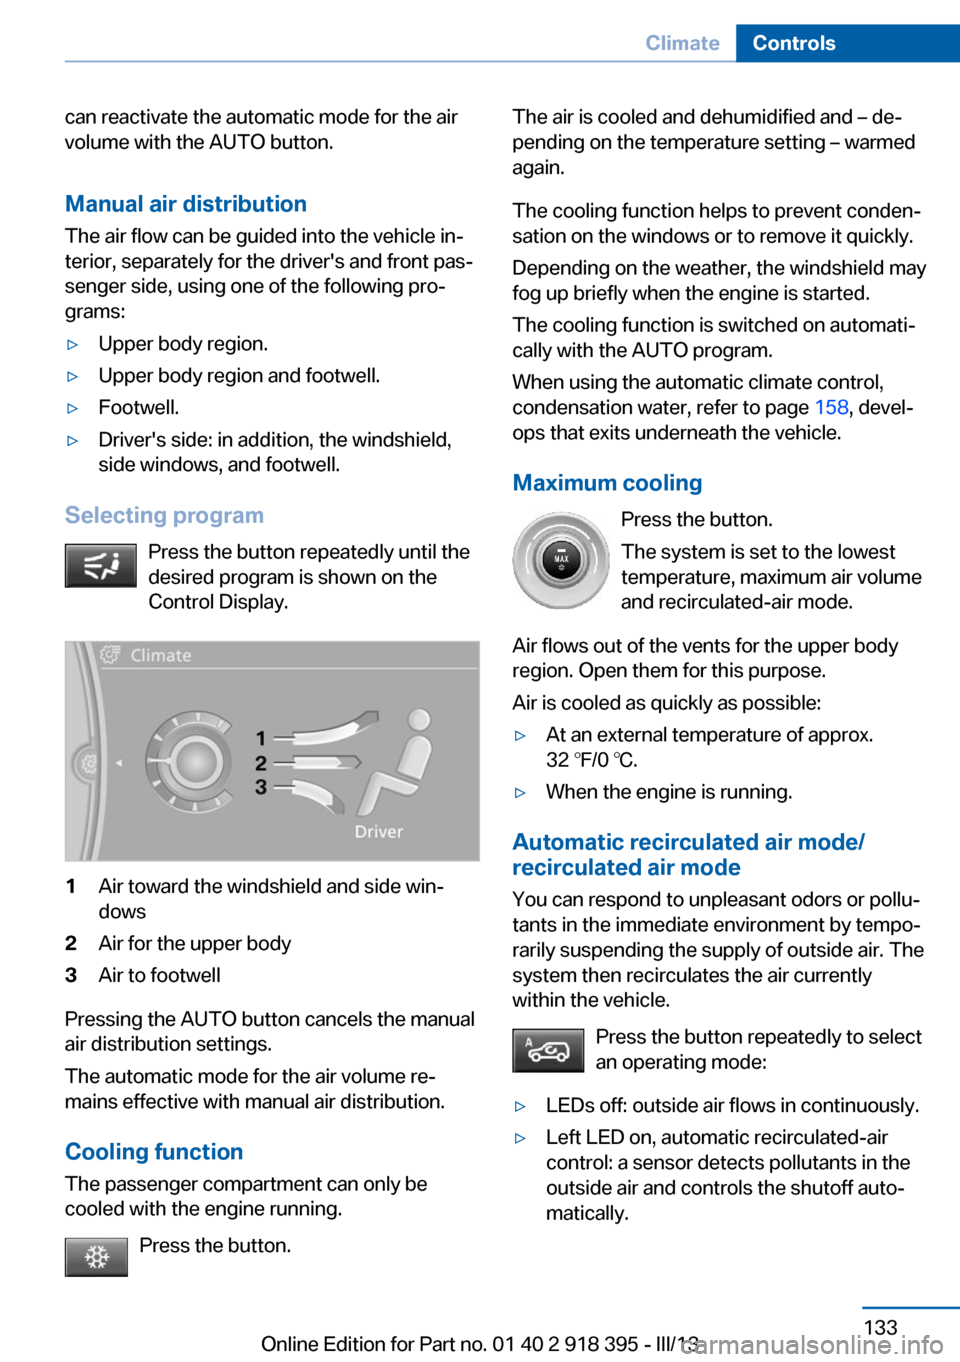
Selecting program
Press the button repeatedly until the
desired program is shown on the
Control Display.
1Air toward the windshield and side win‐
dows2Air for the upper body3Air to footwell
Pressing the AUTO button cancels the manual
air distribution settings.
The automatic mode for the air volume re‐
mains effective with manual air distribution.
Cooling function
The passenger compartment can only be
cooled with the engine running.
Press the button.
The air is cooled and dehumidified and – de‐
pending on the temperature setting – warmed
again.
The cooling function helps to prevent conden‐
sation on the windows or to remove it quickly.
Depending on the weather, the windshield may
fog up briefly when the engine is started.
The cooling function is switched on automati‐
cally with the AUTO program.
When using the automatic climate control,
condensation water, refer to page 158, devel‐
ops that exits underneath the vehicle.
Maximum cooling Press the button.
The system is set to the lowest
temperature, maximum air volume
and recirculated-air mode.
Air flows out of the vents for the upper body
region. Open them for this purpose.
Air is cooled as quickly as possible:▷At an external temperature of approx.
32 ℉/0 ℃.▷When the engine is running.
Automatic recirculated air mode/
recirculated air mode
You can respond to unpleasant odors or pollu‐
tants in the immediate environment by tempo‐
rarily suspending the supply of outside air. The
system then recirculates the air currently
within the vehicle.
Press the button repeatedly to select
an operating mode:
▷LEDs off: outside air flows in continuously.▷Left LED on, automatic recirculated-air
control: a sensor detects pollutants in the
outside air and controls the shutoff auto‐
matically.Seite 133ClimateControls133
Online Edition for Part no. 01 40 2 918 395 - III/13
Page 134 of 345
▷Right LED on, recirculated air mode: the
supply of outside air into the vehicle is per‐
manently blocked.
If the windows are fogged over, switch off the
recirculated-air mode and press the AUTO
button to utilize the condensation sensor.
Make sure that air can flow onto the wind‐
shield.
Continuous recirculated-air mode
The recirculated air mode should not be
used for an extended period of time, as the air
quality inside the vehicle deteriorates stead‐
ily.◀
Residual heat
The heat stored in the engine is used to heat
the interior.
Functional requirement
▷Up to 15 minutes after the engine has been
switched off.▷Warm engine.▷The battery is sufficiently charged.▷External temperature below 77 ℉/25 ℃.
Switching on
1.Switch off the ignition.2.Press the right-hand button.
REST appears on the display of the automatic
climate control when the residual heat utiliza‐
tion is switched on.
From radio readiness the interior temperature,
the air volume and the air distribution can be
set.
Switching off
You can select the lowest blower speed by
pressing and holding the left side. Pressing
again switches off the residual heat utilization.
REST disappears from the display of the auto‐
matic climate control.
Switching on/off the automatic
climate control
Switching off With the blower at its lowest setting,
press the left side of the button to
switch off the automatic climate control.
Switching on Press any button to switch the automatic cli‐mate control back on.
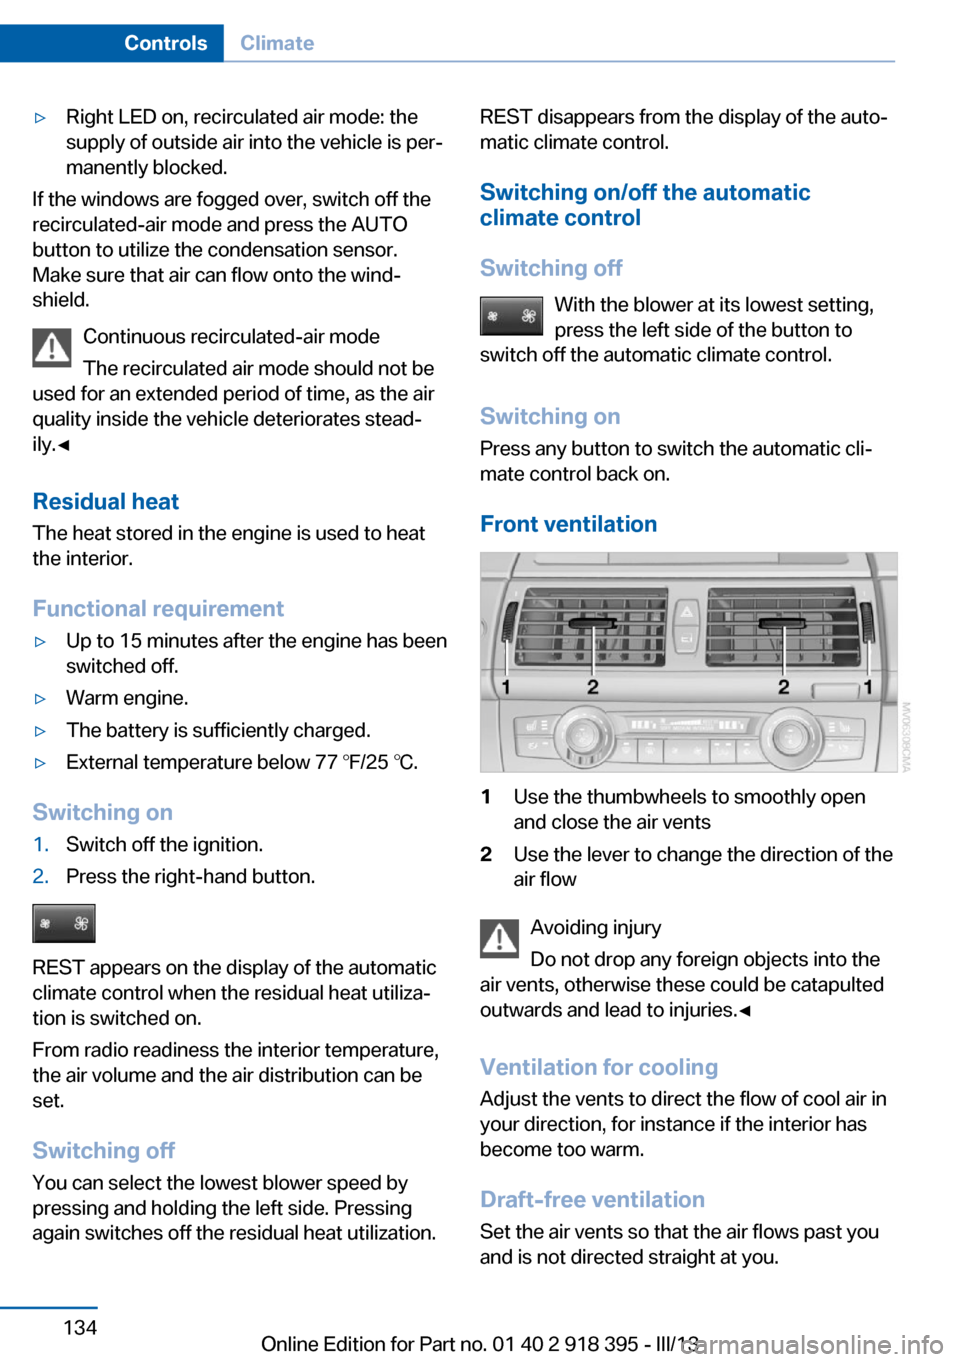
Front ventilation1Use the thumbwheels to smoothly open
and close the air vents2Use the lever to change the direction of the
air flow
Avoiding injury
Do not drop any foreign objects into the
air vents, otherwise these could be catapulted
outwards and lead to injuries.◀
Ventilation for cooling
Adjust the vents to direct the flow of cool air in
your direction, for instance if the interior has
become too warm.
Draft-free ventilation Set the air vents so that the air flows past you
and is not directed straight at you.
Seite 134ControlsClimate134
Online Edition for Part no. 01 40 2 918 395 - III/13