sport BMW X6 2013 E71 Owner's Manual
[x] Cancel search | Manufacturer: BMW, Model Year: 2013, Model line: X6, Model: BMW X6 2013 E71Pages: 345, PDF Size: 9.45 MB
Page 5 of 345
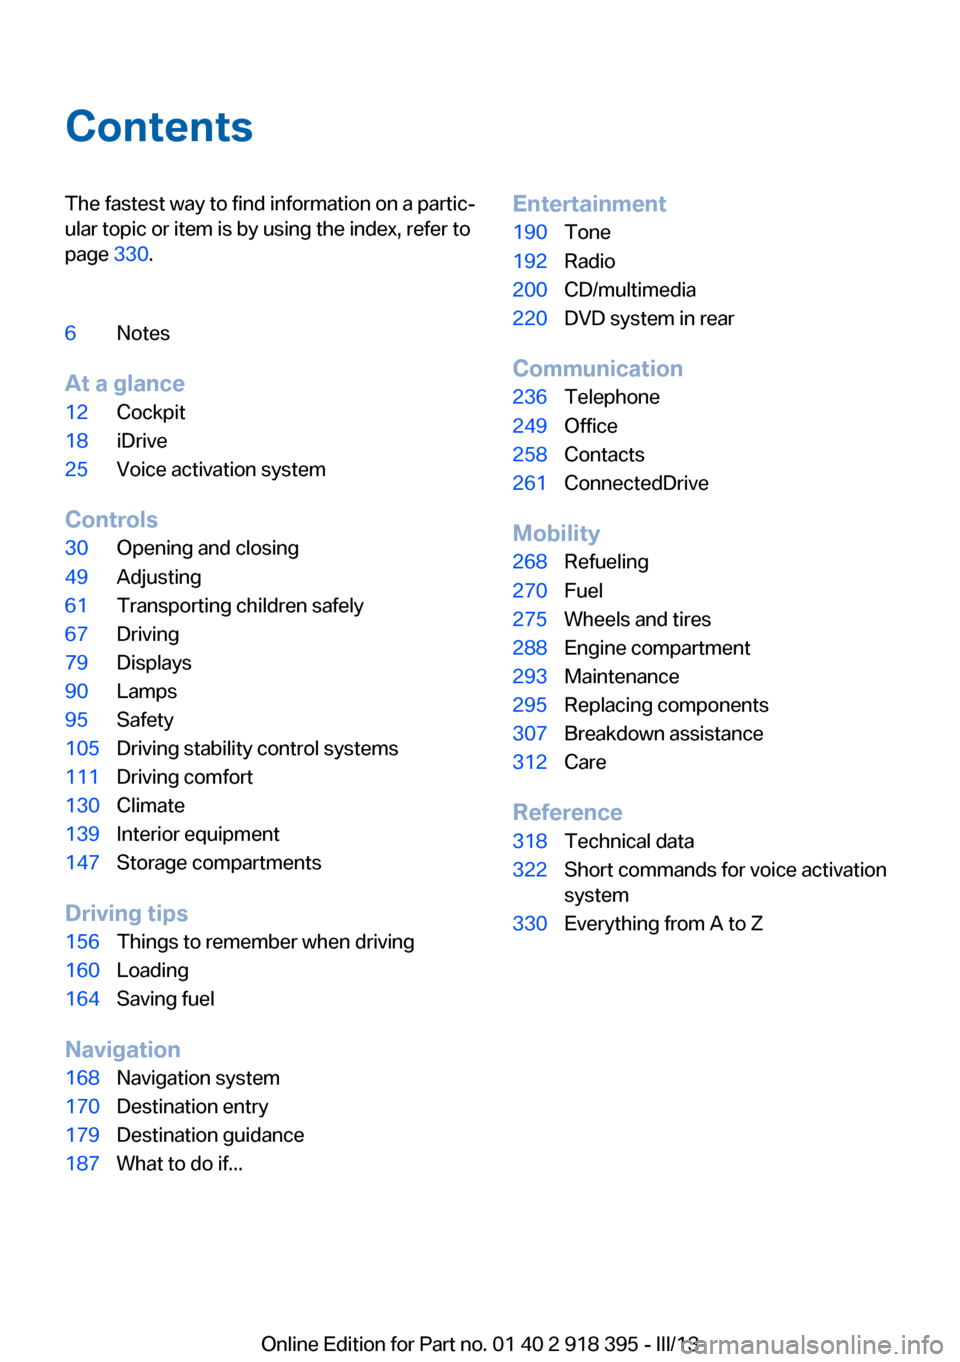
ContentsThe fastest way to find information on a partic‐
ular topic or item is by using the index, refer to
page 330.6Notes
At a glance
12Cockpit18iDrive25Voice activation system
Controls
30Opening and closing49Adjusting61Transporting children safely67Driving79Displays90Lamps95Safety105Driving stability control systems111Driving comfort130Climate139Interior equipment147Storage compartments
Driving tips
156Things to remember when driving160Loading164Saving fuel
Navigation
168Navigation system170Destination entry179Destination guidance187What to do if...Entertainment190Tone192Radio200CD/multimedia220DVD system in rear
Communication
236Telephone249Office258Contacts261ConnectedDrive
Mobility
268Refueling270Fuel275Wheels and tires288Engine compartment293Maintenance295Replacing components307Breakdown assistance312Care
Reference
318Technical data322Short commands for voice activation
system330Everything from A to Z
Online Edition for Part no. 01 40 2 918 395 - III/13
Page 9 of 345
wood, New Jersey 07675-1227, Telephone
1-800-831-1117.
If NHTSA receives similar complaints, it may
open an investigation, and if it finds that a
safety defect exists in a group of vehicles, it
may order a recall and remedy campaign.
However, NHTSA cannot become involved in
individual problems between you, your dealer,
or BMW of North America, LLC.
To contact NHTSA, you may call the Vehicle
Safety Hotline toll-free at 1-888-327-4236
(TTY: 1-800-424-9153); go to http://
www.safercar.gov; or write to: Administrator,
NHTSA, 400 Seventh Street, SW., Washing‐
ton, DC 20590. You can also obtain other in‐
formation about motor vehicle safety from
http://www.safercar.gov
For Canadian customers
Canadian customers who wish to report a
safety- related defect to Transport Canada,
Defect Investigations and Recalls, may tele‐
phone the toll-free hotline 1-800-333-0510.
You can also obtain other information about
motor vehicle safety from http://www.tc.gc.ca/
roadsafety.Seite 9Notes9
Online Edition for Part no. 01 40 2 918 395 - III/13
Page 15 of 345
▷Odometer and trip odometer 79▷High-beam Assistant 92▷ Check Control message
present 85▷Adaptive Drive: sport chassis and sus‐
pension tuning 1099Fuel gauge 8110Resetting the trip odometer 79
Viewing service requirement display 80Indicator/warning lamps
The concept
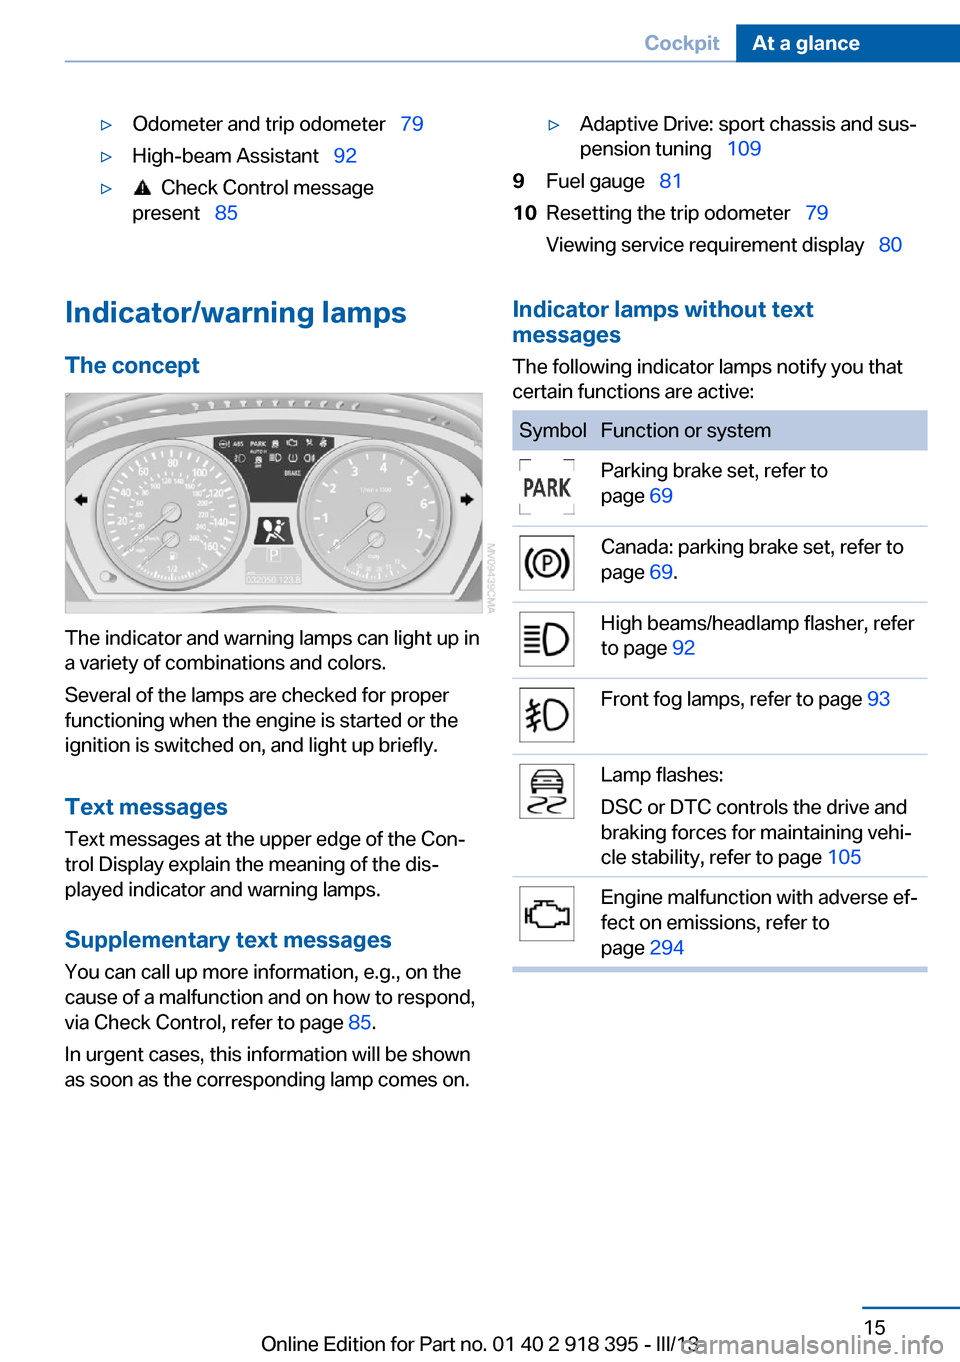
The indicator and warning lamps can light up in
a variety of combinations and colors.
Several of the lamps are checked for proper
functioning when the engine is started or the
ignition is switched on, and light up briefly.
Text messages Text messages at the upper edge of the Con‐
trol Display explain the meaning of the dis‐
played indicator and warning lamps.
Supplementary text messages
You can call up more information, e.g., on the
cause of a malfunction and on how to respond,
via Check Control, refer to page 85.
In urgent cases, this information will be shown
as soon as the corresponding lamp comes on.
Indicator lamps without text
messages
The following indicator lamps notify you that
certain functions are active:SymbolFunction or systemParking brake set, refer to
page 69Canada: parking brake set, refer to
page 69.High beams/headlamp flasher, refer
to page 92Front fog lamps, refer to page 93Lamp flashes:
DSC or DTC controls the drive and
braking forces for maintaining vehi‐
cle stability, refer to page 105Engine malfunction with adverse ef‐
fect on emissions, refer to
page 294Seite 15CockpitAt a glance15
Online Edition for Part no. 01 40 2 918 395 - III/13
Page 43 of 345
Switching off the alarm▷Unlock the vehicle using the remote con‐
trol, refer to page 32.▷Insert the remote control all the way into
the ignition lock.
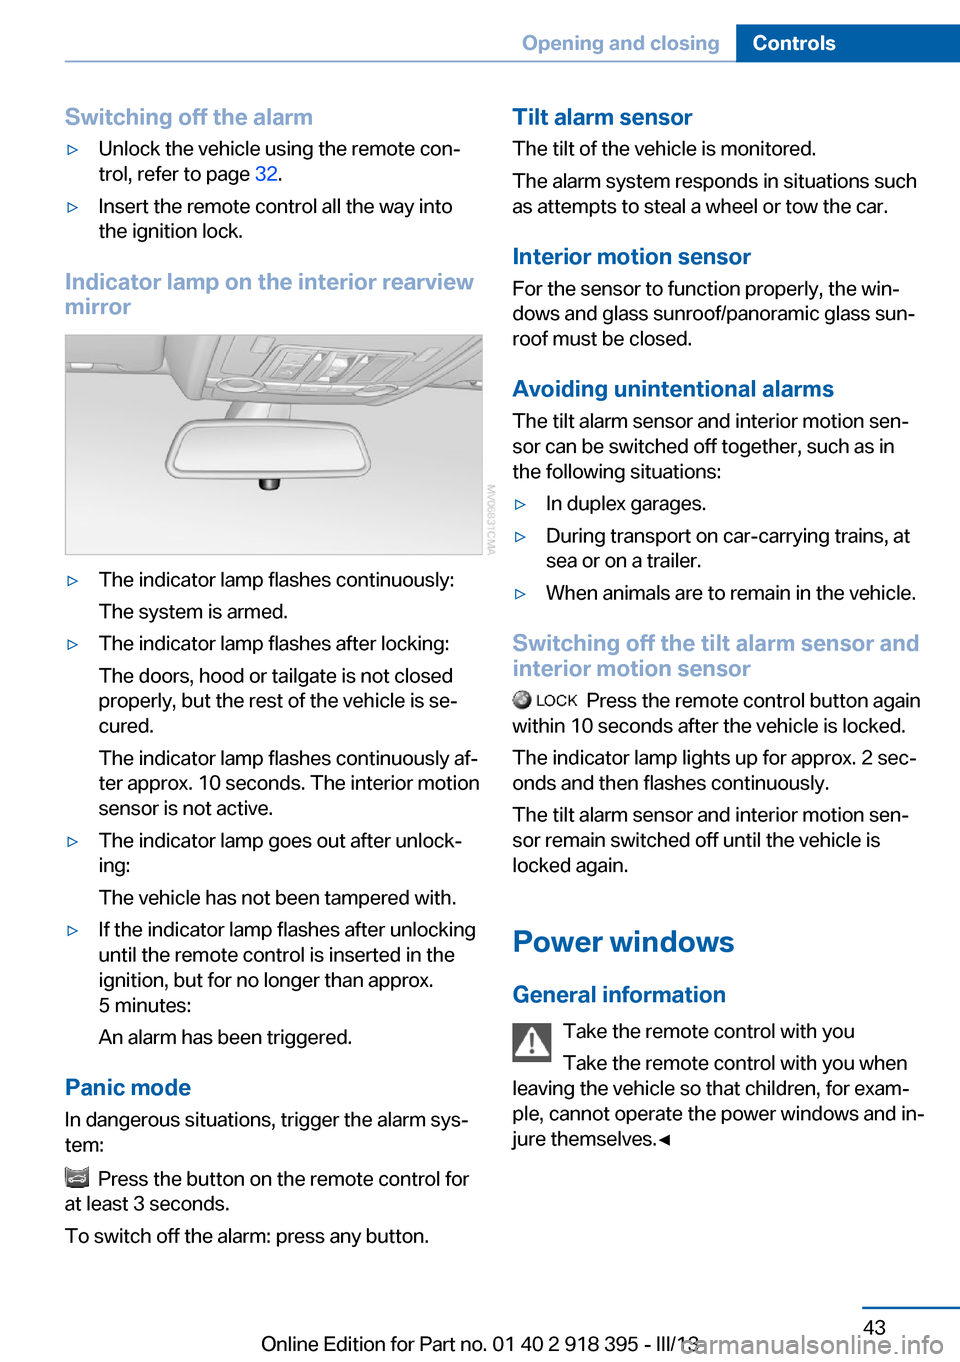
Indicator lamp on the interior rearview
mirror
▷The indicator lamp flashes continuously:
The system is armed.▷The indicator lamp flashes after locking:
The doors, hood or tailgate is not closed
properly, but the rest of the vehicle is se‐
cured.
The indicator lamp flashes continuously af‐
ter approx. 10 seconds. The interior motion
sensor is not active.▷The indicator lamp goes out after unlock‐
ing:
The vehicle has not been tampered with.▷If the indicator lamp flashes after unlocking
until the remote control is inserted in the
ignition, but for no longer than approx.
5 minutes:
An alarm has been triggered.
Panic mode
In dangerous situations, trigger the alarm sys‐
tem:
Press the button on the remote control for
at least 3 seconds.
To switch off the alarm: press any button.
Tilt alarm sensor The tilt of the vehicle is monitored.
The alarm system responds in situations such
as attempts to steal a wheel or tow the car.
Interior motion sensor For the sensor to function properly, the win‐
dows and glass sunroof/panoramic glass sun‐
roof must be closed.
Avoiding unintentional alarms The tilt alarm sensor and interior motion sen‐
sor can be switched off together, such as in
the following situations:▷In duplex garages.▷During transport on car-carrying trains, at
sea or on a trailer.▷When animals are to remain in the vehicle.
Switching off the tilt alarm sensor and
interior motion sensor
Press the remote control button again
within 10 seconds after the vehicle is locked.
The indicator lamp lights up for approx. 2 sec‐
onds and then flashes continuously.
The tilt alarm sensor and interior motion sen‐
sor remain switched off until the vehicle is
locked again.
Power windows General information Take the remote control with youTake the remote control with you when
leaving the vehicle so that children, for exam‐
ple, cannot operate the power windows and in‐
jure themselves.◀
Seite 43Opening and closingControls43
Online Edition for Part no. 01 40 2 918 395 - III/13
Page 45 of 345
switches in the rear passenger area, such as
by children.
Press the button.
The LED lights up if the safety function is
switched on.
Safety switch for rear operation
Press the safety switch when transport‐
ing children in the rear; otherwise, injury may
result if the windows are closed without super‐
vision.◀
Roller sunblinds for the rear
side windows
Pull the loop of the roller sun blind and hook
onto bracket.
Do not open the window while the roller
sunblind is tilted
Do not open the window while the roller sun‐
blind is tilted; otherwise, there is a risk of dam‐
age at high speeds that may result in personal injury.◀
X5: panoramic glass sunroof
General information
The glass sunroof and the sliding visor can be
operated together or separately using the
switch.
Danger of pinching
Monitor the closing process and make
sure that the closing path of the glass sunroof
is clear; otherwise, injuries may result.◀
Take the remote control with you
Take the remote control with you when
leaving the vehicle so that children, for exam‐
ple, cannot operate the roof and injure them‐
selves.◀
Tilting the glass sunroof
Press the switch.
The closed sunroof is tilted and
the sliding visor opens slightly.
Do not use force to close the sliding visor
Do not use force to close the sliding visor
with the glass sunroof in its tilted position, oth‐
erwise the mechanism will be damaged.◀
Opening/closing the sliding visor
You can move the sliding visor independently
with the sunroof closed or tilted.
▷Press the switch in the de‐
sired direction to the resist‐
ance point and hold it there.
The sliding visor moves
while the switch is being
held.▷Press the switch in the desired direction
past the resistance point.
The sliding visor moves automatically.
Pressing the switch again stops the mo‐
tion.
Opening/closing the glass sunroof
With the sliding visor open, proceed as descri‐
bed under Sliding visor.
Seite 45Opening and closingControls45
Online Edition for Part no. 01 40 2 918 395 - III/13
Page 61 of 345
Transporting children safelyVehicle equipmentThis chapter describes all series equipment as
well as country-specific and special equipment
offered for this model series.Therefore, it also
describes equipment that may not be found in
your vehicle, for instance due to the selected
special equipment or the country version. This
also applies to safety-related functions and
systems.
The right place for children
Note Children in the vehicle
Do not leave children unattended in the
vehicle; otherwise, they could endanger them‐
selves and other persons, e.g., by opening the
doors.◀
Children should always be in the rear
Accident research shows that the safest place
for children is on the rear seat.
Transporting children in the rear
Transport children younger than
13 years of age or shorter than 5 ft/150 cm on
the 2nd row seats only, using child restraint fix‐
ing systems suitable for the age, weight, and
height of the child. Otherwise, there is the in‐
creased danger of injury in an accident.
Children 13 years of age or older must wear a
safety belt as soon as a suitable child restraint
fixing system can no longer be used, due to
their age, weight and size.◀
Children on the front passenger seat
Should it be necessary to use a child restraint
fixing system on the front passenger seat,
make sure that the front and side airbags onthe front passenger side are deactivated. Auto‐
matic deactivation of front passenger airbags,
refer to page 96.
Deactivating the front passenger airbags
If a child restraint fixing system is used in
the front passenger seat, the front passenger
airbags must be deactivated; otherwise, there
is an increased risk of injury to the child when
the airbags are triggered, even with a child re‐
straint fixing system.◀
Installing child restraint
fixing systems
Notes Manufacturer's information for child re‐
straint fixing systems
To select, mount and use child restraint fixing
systems, observe the information provided by
the system manufacturer; otherwise, the pro‐
tective effect can be impaired.◀
Note the following in vehicles equipped
with 3rd row seats
BMW X5: in vehicles with 3rd row seats, make
sure that the seat of the 2nd row seats on
which the child restraint fixing system is
mounted is properly locked. Otherwise, there
is an increased risk of injury for the child in an
accident.
Do not mount child restraint fixing systems on
the 3rd row seats, as otherwise the protection
provided by these child restraint fixing systems
may be reduced.◀
BMW X5: before mounting a child restraint fix‐
ing system in the center seat of the 2nd row
seats, move the outer seat cushions and back‐
rests into the rearmost positions.Seite 61Transporting children safelyControls61
Online Edition for Part no. 01 40 2 918 395 - III/13
Page 62 of 345
On the front passenger seatAfter installing a child restraint fixing system
on the front passenger seat, ensure that the
front and side airbags on the front passenger
side are deactivated.
Deactivating the front passenger airbags
If a child restraint fixing system is used in
the front passenger seat, the front passenger
airbags must be deactivated; otherwise, there
is an increased risk of injury to the child when
the airbags are triggered, even with a child re‐
straint fixing system.◀
Seat position and height Before installing a child restraint fixing system,
move the front passenger seat as far back as
possible and adjust its height to the highest
position to obtain the best possible position for
the belt and to offer optimal protection in the
event of an accident.
Do not change the seat position and height af‐
ter this.
Backrest width Before mounting a child restraint fixing system
on the front passenger seat, open the backrest
width, refer to page 50, completely. Do not
change the backrest width after this.
Backrest width for the child seat
Before installing a child restraint fixing
system in the front passenger seat, the back‐
rest width must be opened completely. Do not
change the adjustment after this; otherwise,
the stability of the child seat will be reduced.◀Child seat security
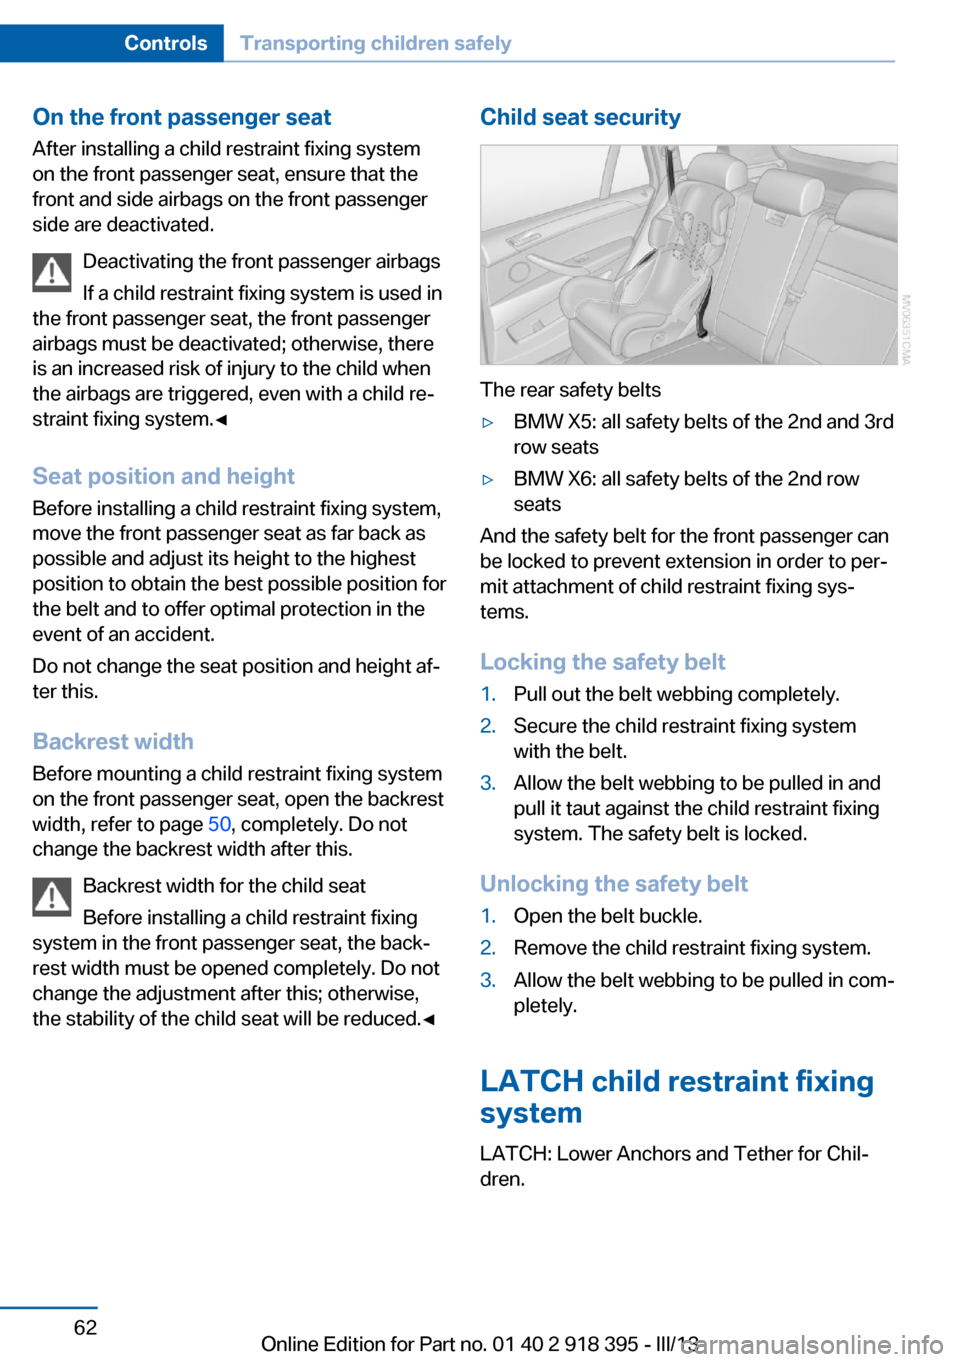
The rear safety belts
▷BMW X5: all safety belts of the 2nd and 3rd
row seats▷BMW X6: all safety belts of the 2nd row
seats
And the safety belt for the front passenger can
be locked to prevent extension in order to per‐
mit attachment of child restraint fixing sys‐
tems.
Locking the safety belt
1.Pull out the belt webbing completely.2.Secure the child restraint fixing system
with the belt.3.Allow the belt webbing to be pulled in and
pull it taut against the child restraint fixing
system. The safety belt is locked.
Unlocking the safety belt
1.Open the belt buckle.2.Remove the child restraint fixing system.3.Allow the belt webbing to be pulled in com‐
pletely.
LATCH child restraint fixing
system
LATCH: Lower Anchors and Tether for Chil‐
dren.
Seite 62ControlsTransporting children safely62
Online Edition for Part no. 01 40 2 918 395 - III/13
Page 63 of 345
NoteManufacturer's information for LATCHchild restraint fixing systems
To mount and use the LATCH child restraint
fixing systems, observe the operating and
safety information from the system manufac‐
turer; otherwise, the level of protection may be
reduced.◀
Mounts for the lower LATCH anchors
The lower anchors may be used to attach the
CRS to the vehicle seat up to a combined child
and CRS weight of 65 lb/30 kg when the child
is restrained by the internal harnesses.
Correctly engage the lower LATCH an‐
chors
Make sure that the lower LATCH anchors have
properly engaged and that the child restraint
fixing system is resting snugly against the
backrest; otherwise, the degree of protection
offered may be reduced.◀
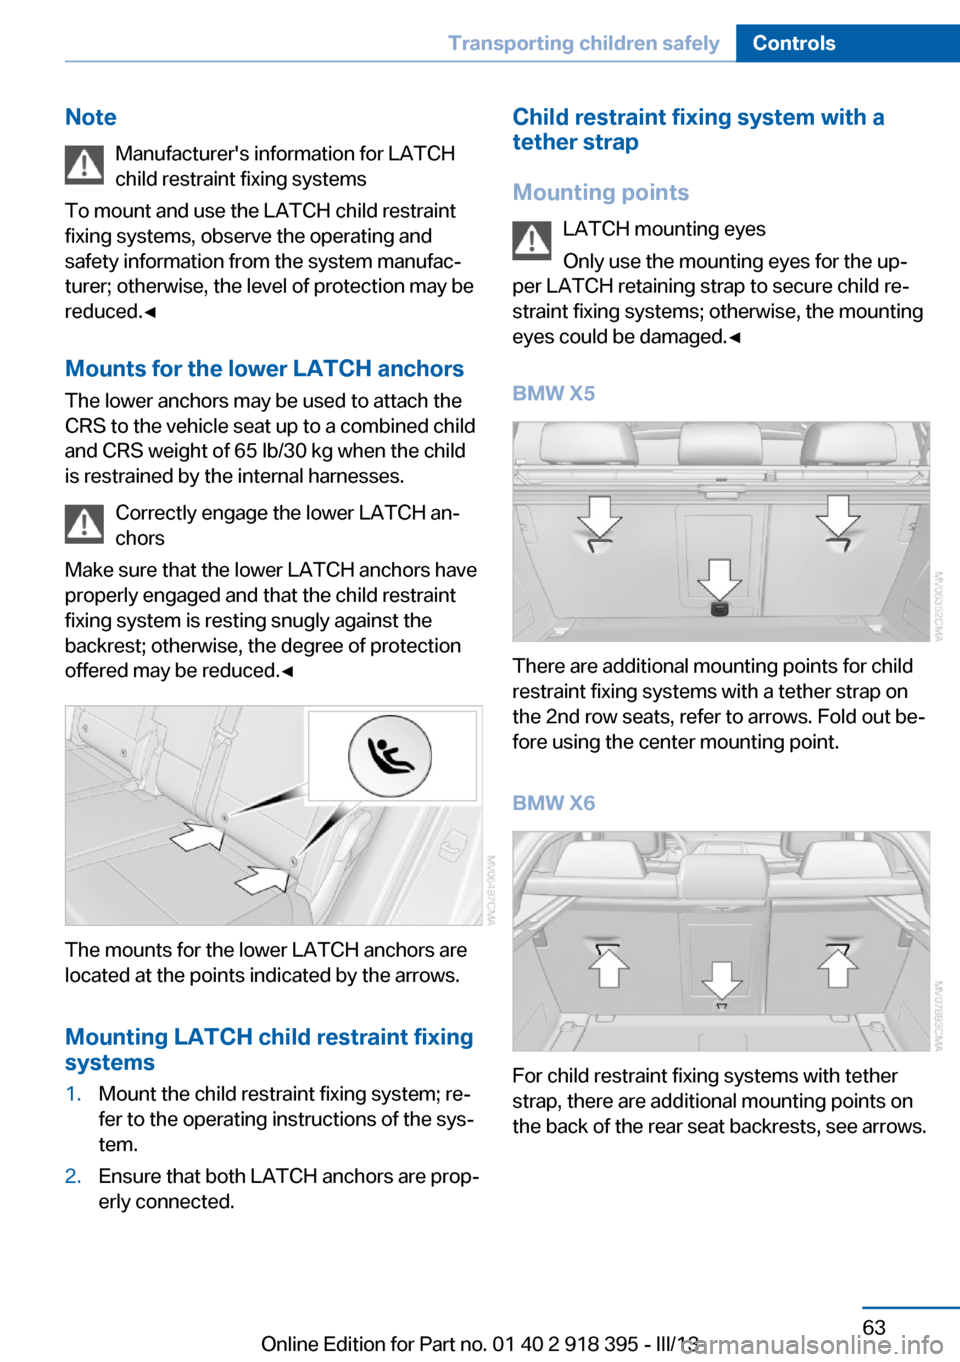
The mounts for the lower LATCH anchors are
located at the points indicated by the arrows.
Mounting LATCH child restraint fixing
systems
1.Mount the child restraint fixing system; re‐
fer to the operating instructions of the sys‐
tem.2.Ensure that both LATCH anchors are prop‐
erly connected.Child restraint fixing system with a
tether strap
Mounting points LATCH mounting eyes
Only use the mounting eyes for the up‐
per LATCH retaining strap to secure child re‐
straint fixing systems; otherwise, the mounting
eyes could be damaged.◀
BMW X5
There are additional mounting points for child
restraint fixing systems with a tether strap on
the 2nd row seats, refer to arrows. Fold out be‐
fore using the center mounting point.
BMW X6
For child restraint fixing systems with tether
strap, there are additional mounting points on
the back of the rear seat backrests, see arrows.
Seite 63Transporting children safelyControls63
Online Edition for Part no. 01 40 2 918 395 - III/13
Page 64 of 345
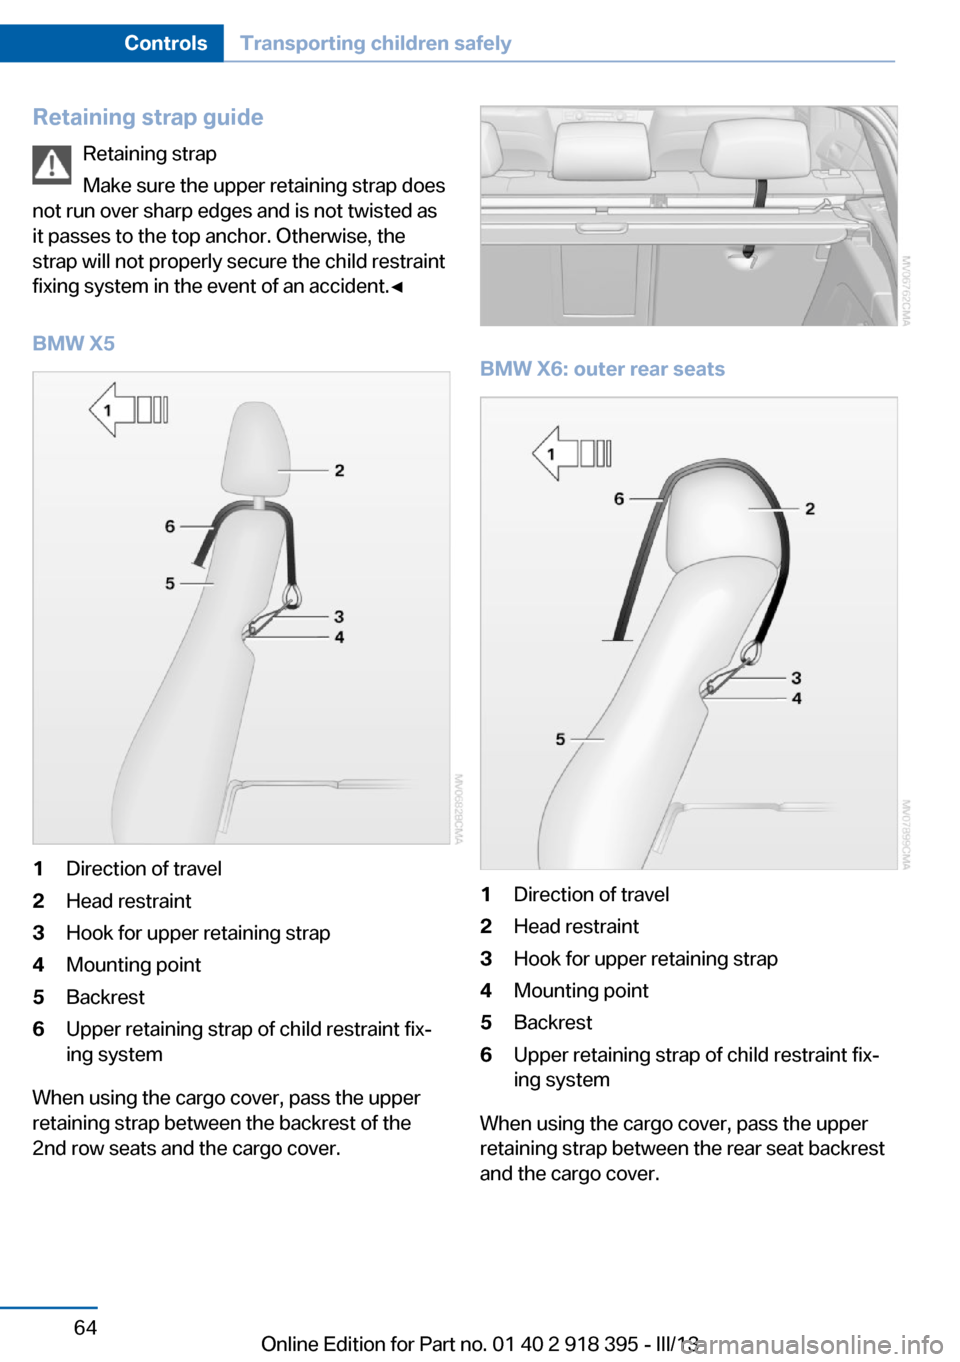
Retaining strap guideRetaining strap
Make sure the upper retaining strap does
not run over sharp edges and is not twisted as
it passes to the top anchor. Otherwise, the
strap will not properly secure the child restraint
fixing system in the event of an accident.◀
BMW X51Direction of travel2Head restraint3Hook for upper retaining strap4Mounting point5Backrest6Upper retaining strap of child restraint fix‐
ing system
When using the cargo cover, pass the upper
retaining strap between the backrest of the
2nd row seats and the cargo cover.
BMW X6: outer rear seats
1Direction of travel2Head restraint3Hook for upper retaining strap4Mounting point5Backrest6Upper retaining strap of child restraint fix‐
ing system
When using the cargo cover, pass the upper
retaining strap between the rear seat backrest
and the cargo cover.
Seite 64ControlsTransporting children safely64
Online Edition for Part no. 01 40 2 918 395 - III/13
Page 65 of 345
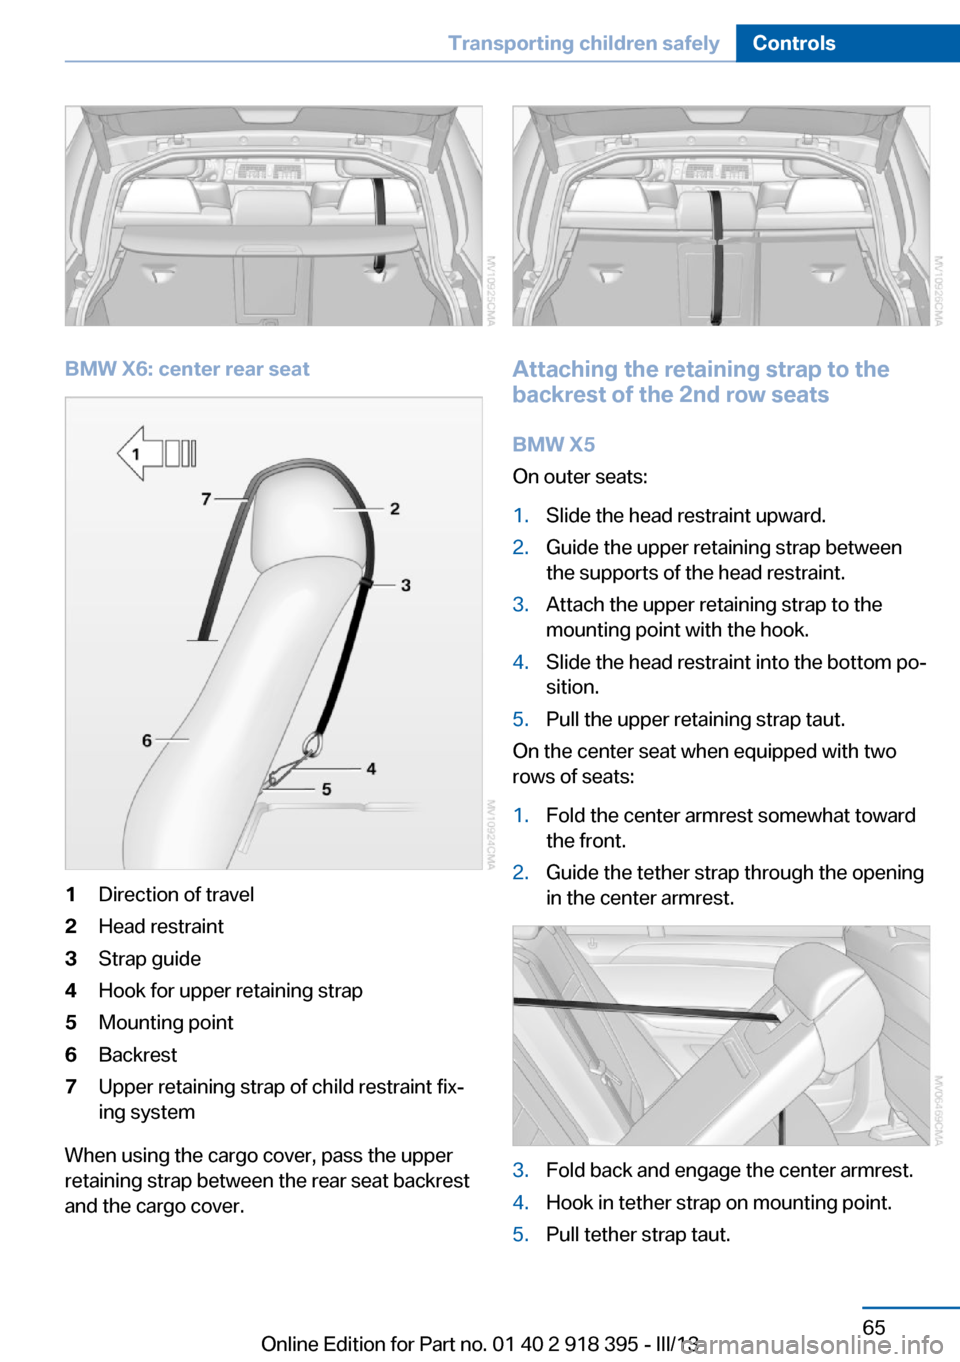
BMW X6: center rear seat
1Direction of travel2Head restraint3Strap guide4Hook for upper retaining strap5Mounting point6Backrest7Upper retaining strap of child restraint fix‐
ing system
When using the cargo cover, pass the upper
retaining strap between the rear seat backrest
and the cargo cover.
Attaching the retaining strap to the
backrest of the 2nd row seats
BMW X5
On outer seats:
1.Slide the head restraint upward.2.Guide the upper retaining strap between
the supports of the head restraint.3.Attach the upper retaining strap to the
mounting point with the hook.4.Slide the head restraint into the bottom po‐
sition.5.Pull the upper retaining strap taut.
On the center seat when equipped with two
rows of seats:
1.Fold the center armrest somewhat toward
the front.2.Guide the tether strap through the opening
in the center armrest.3.Fold back and engage the center armrest.4.Hook in tether strap on mounting point.5.Pull tether strap taut.Seite 65Transporting children safelyControls65
Online Edition for Part no. 01 40 2 918 395 - III/13