height BMW X6 2015 F16 Owner's Manual
[x] Cancel search | Manufacturer: BMW, Model Year: 2015, Model line: X6, Model: BMW X6 2015 F16Pages: 265, PDF Size: 6.17 MB
Page 35 of 265
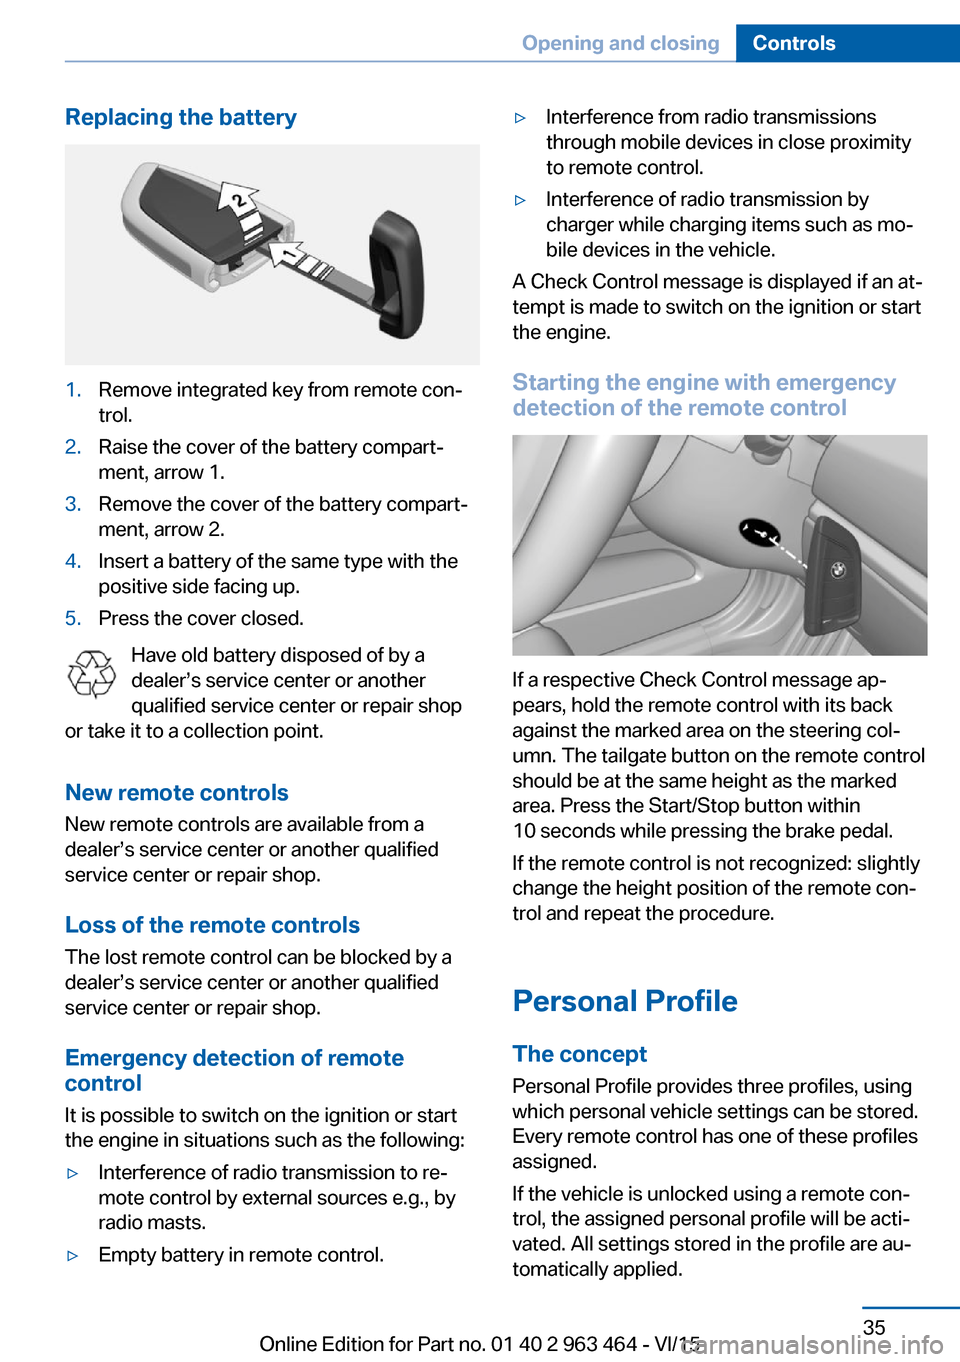
Replacing the battery1.Remove integrated key from remote con‐
trol.2.Raise the cover of the battery compart‐
ment, arrow 1.3.Remove the cover of the battery compart‐
ment, arrow 2.4.Insert a battery of the same type with the
positive side facing up.5.Press the cover closed.
Have old battery disposed of by a
dealer’s service center or another
qualified service center or repair shop
or take it to a collection point.
New remote controlsNew remote controls are available from a
dealer’s service center or another qualified
service center or repair shop.
Loss of the remote controls
The lost remote control can be blocked by a
dealer’s service center or another qualified
service center or repair shop.
Emergency detection of remote
control
It is possible to switch on the ignition or start
the engine in situations such as the following:
▷Interference of radio transmission to re‐
mote control by external sources e.g., by
radio masts.▷Empty battery in remote control.▷Interference from radio transmissions
through mobile devices in close proximity
to remote control.▷Interference of radio transmission by
charger while charging items such as mo‐
bile devices in the vehicle.
A Check Control message is displayed if an at‐
tempt is made to switch on the ignition or start
the engine.
Starting the engine with emergency
detection of the remote control
If a respective Check Control message ap‐
pears, hold the remote control with its back
against the marked area on the steering col‐
umn. The tailgate button on the remote control
should be at the same height as the marked
area. Press the Start/Stop button within
10 seconds while pressing the brake pedal.
If the remote control is not recognized: slightly
change the height position of the remote con‐
trol and repeat the procedure.
Personal Profile
The concept Personal Profile provides three profiles, using
which personal vehicle settings can be stored.
Every remote control has one of these profiles
assigned.
If the vehicle is unlocked using a remote con‐
trol, the assigned personal profile will be acti‐
vated. All settings stored in the profile are au‐
tomatically applied.
Seite 35Opening and closingControls35
Online Edition for Part no. 01 40 2 963 464 - VI/15
Page 41 of 265
Automatic tailgate operation
Adjusting the opening height
You can set how far the tailgate should open.
CAUTION
The tailgate swings back and up when it
opens. There is risk of property damage. Make
sure that the area of movement of the tailgate
is clear during opening and closing.◀
When adjusting the opening height, ensure
that there is a clearance of at least 4 in/10 cm
above the tailgate.1."Settings"2."Tailgate"3.Turn the controller until the desired open‐
ing height is selected.
Opening
CAUTION
The tailgate swings back and up when it
opens. There is risk of property damage. Make
sure that the area of movement of the tailgate
is clear during opening and closing.◀
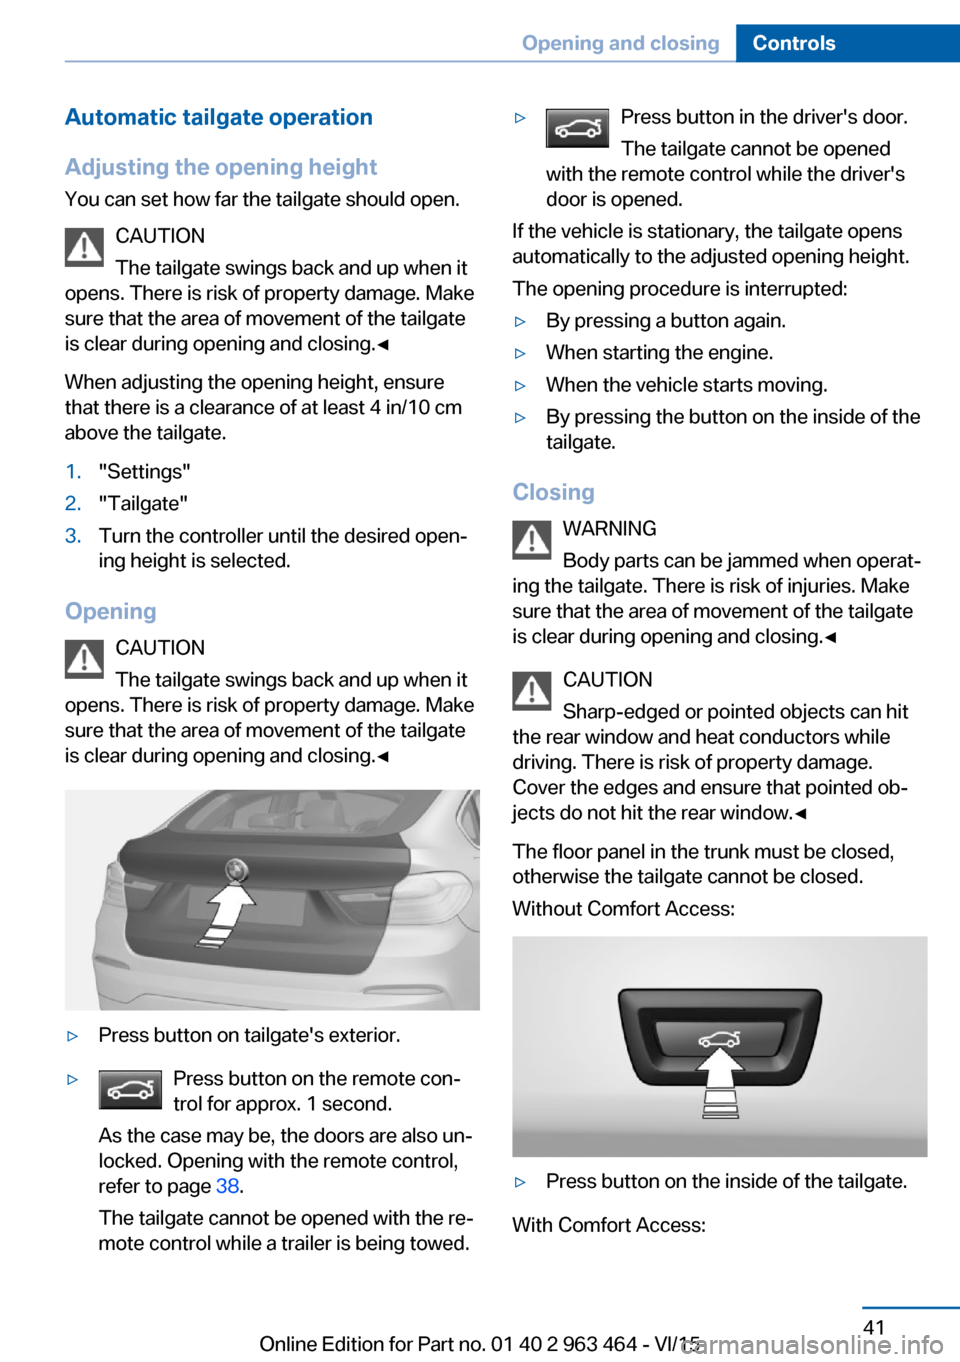
▷Press button on tailgate's exterior.▷Press button on the remote con‐
trol for approx. 1 second.
As the case may be, the doors are also un‐
locked. Opening with the remote control,
refer to page 38.
The tailgate cannot be opened with the re‐
mote control while a trailer is being towed.▷Press button in the driver's door.
The tailgate cannot be opened
with the remote control while the driver's
door is opened.
If the vehicle is stationary, the tailgate opens
automatically to the adjusted opening height.
The opening procedure is interrupted:
▷By pressing a button again.▷When starting the engine.▷When the vehicle starts moving.▷By pressing the button on the inside of the
tailgate.
Closing
WARNING
Body parts can be jammed when operat‐
ing the tailgate. There is risk of injuries. Make sure that the area of movement of the tailgate
is clear during opening and closing.◀
CAUTION
Sharp-edged or pointed objects can hit
the rear window and heat conductors while
driving. There is risk of property damage.
Cover the edges and ensure that pointed ob‐
jects do not hit the rear window.◀
The floor panel in the trunk must be closed,
otherwise the tailgate cannot be closed.
Without Comfort Access:
▷Press button on the inside of the tailgate.
With Comfort Access:
Seite 41Opening and closingControls41
Online Edition for Part no. 01 40 2 963 464 - VI/15
Page 52 of 265
AdjustingVehicle features and options
This chapter describes all standard, country-
specific and optional features offered with the
series. It also describes features that are not
necessarily available in your car, e. g., due to
the selected options or country versions. This
also applies to safety-related functions and
systems. The respectively applicable country
provisions must be observed when using the
respective features and systems.
Sitting safely The ideal seating position can make a vital
contribution to relaxed, fatigue-free driving.
The seating position plays an important role in
an accident in combination with:▷Safety belts, refer to page 55.▷Head restraints, refer to page 57.▷Airbags, refer to page 106.
Front seats
Information WARNING
Seat adjustments while driving can lead
to unexpected movements of the seat. Vehicle
control could be lost. There is risk of an acci‐
dent. Only adjust the side on the driver's side
when the vehicle is stationary.◀
WARNING
With a backrest inclined too far to the
rear, the protective effect of the safety belt
cannot be ensured anymore. There is a danger
of sliding under the safety belt in an accident.
There is risk of injuries or danger to life. Adjust
the seat prior to starting the trip. Adjust the
backrest in an as upright position as possible
and do not adjust again while driving.◀
WARNING
There is risk of jamming when moving
the seats. There is risk of injuries or risk of
property damage. Make sure that the area of
movement of the seat is clear prior to any ad‐
justment.◀
Electrically adjustable seats
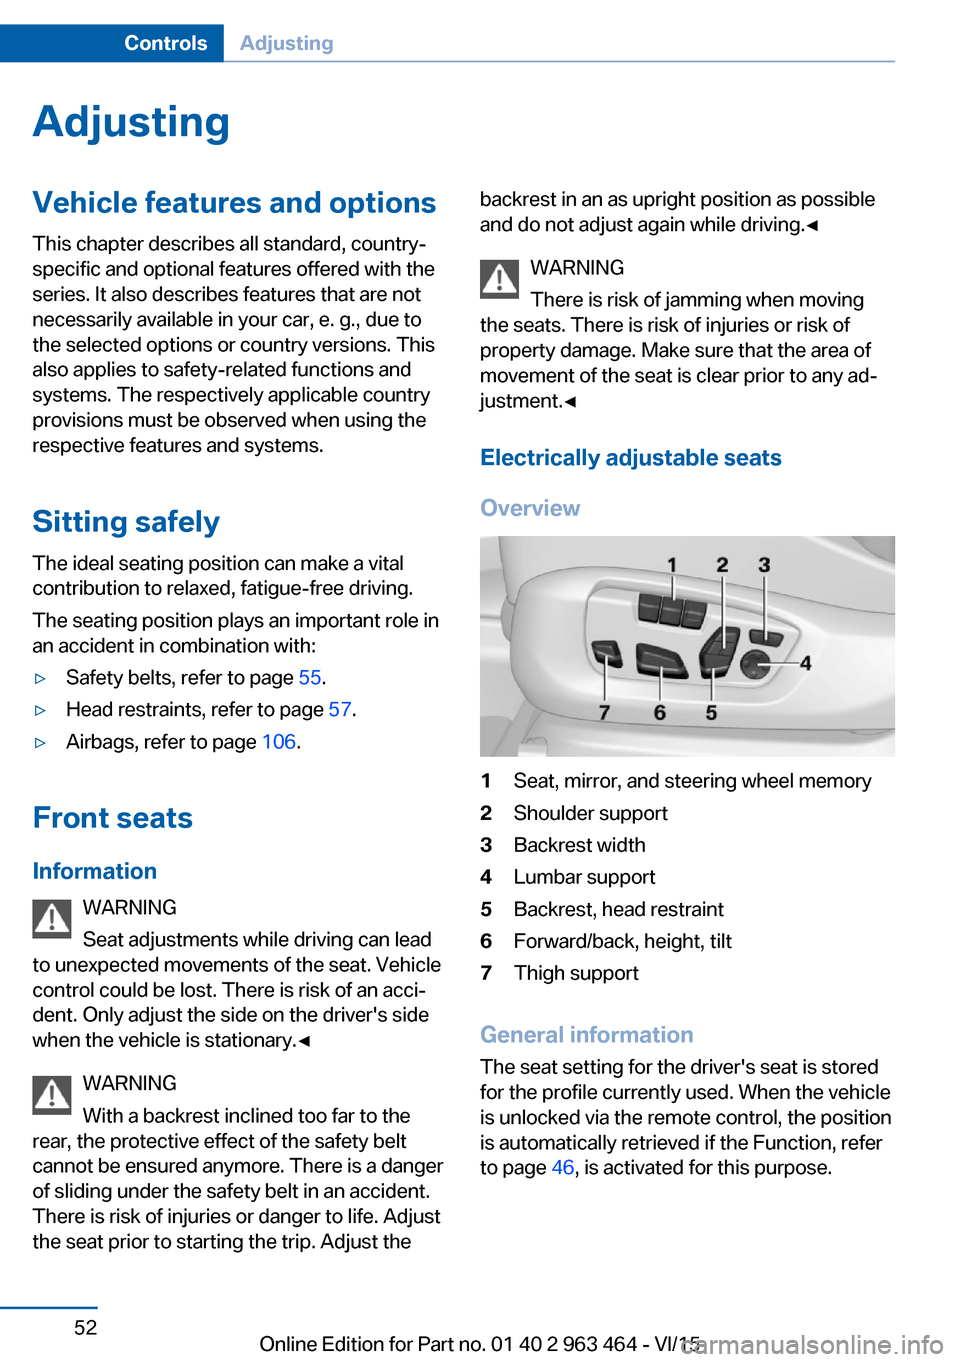
Overview1Seat, mirror, and steering wheel memory2Shoulder support3Backrest width4Lumbar support5Backrest, head restraint6Forward/back, height, tilt7Thigh support
General information
The seat setting for the driver's seat is stored
for the profile currently used. When the vehicle
is unlocked via the remote control, the position
is automatically retrieved if the Function, refer
to page 46, is activated for this purpose.
Seite 52ControlsAdjusting52
Online Edition for Part no. 01 40 2 963 464 - VI/15
Page 53 of 265
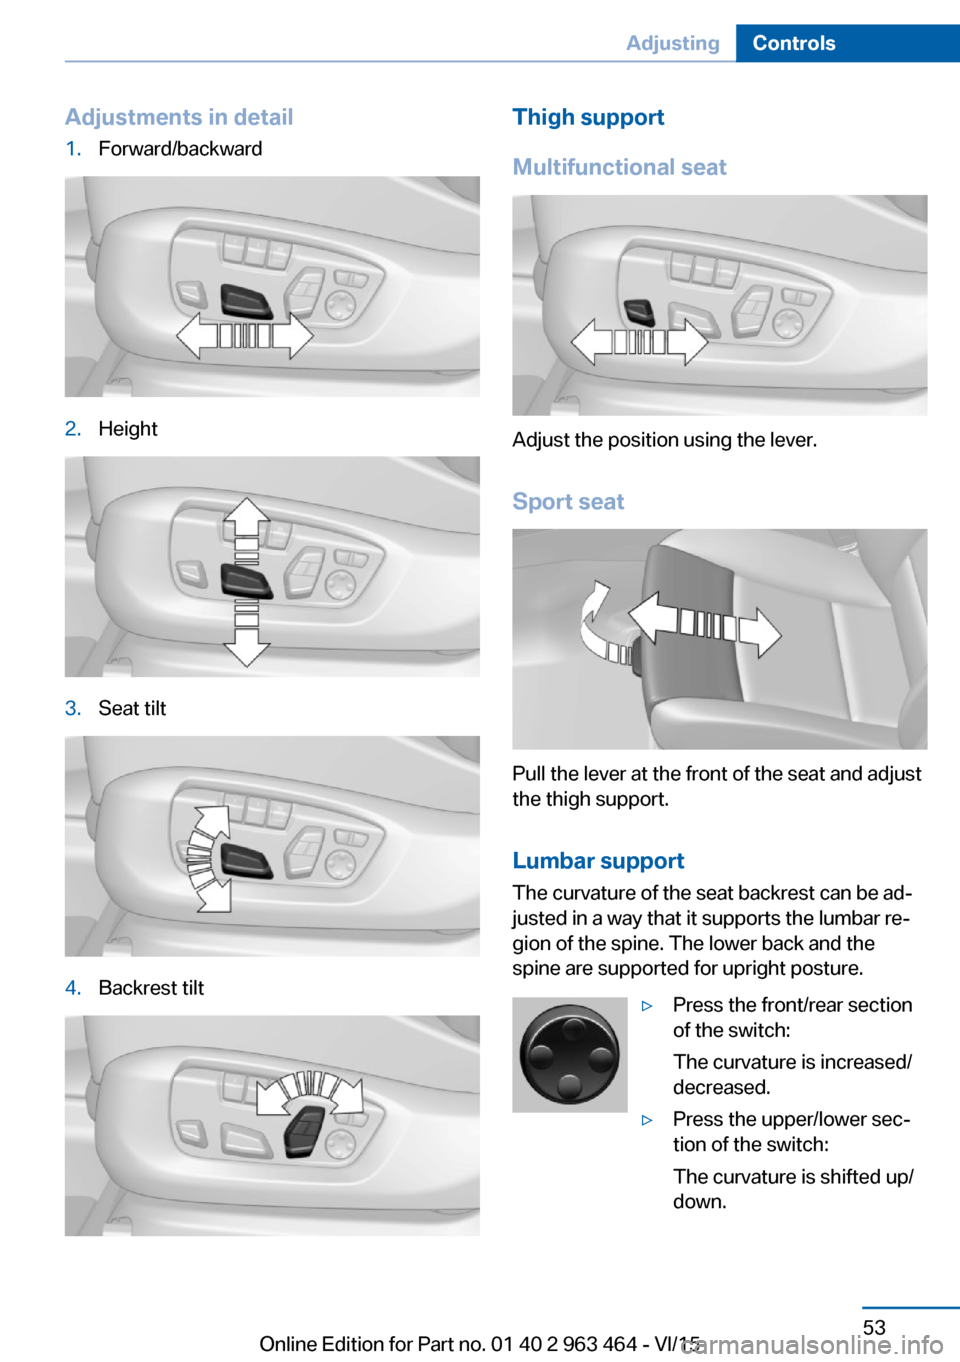
Adjustments in detail1.Forward/backward2.Height3.Seat tilt4.Backrest tiltThigh support
Multifunctional seat
Adjust the position using the lever.
Sport seat
Pull the lever at the front of the seat and adjust
the thigh support.
Lumbar support The curvature of the seat backrest can be ad‐
justed in a way that it supports the lumbar re‐
gion of the spine. The lower back and the
spine are supported for upright posture.
▷Press the front/rear section
of the switch:
The curvature is increased/
decreased.▷Press the upper/lower sec‐
tion of the switch:
The curvature is shifted up/
down.Seite 53AdjustingControls53
Online Edition for Part no. 01 40 2 963 464 - VI/15
Page 57 of 265
▷Safety belts are damaged, soiled or
changed in any other way.▷Safety belt buckle is damaged or heavily
soiled.▷Belt tensioners or belt retractors were
modified.
Safety belts can be imperceptibly damaged in
the event of an accident. There is risk of inju‐
ries or danger to life. Do not modify safety
belts, safety belt buckles, belt tensioners, belt
retractors or belt anchors and keep them
clean. Have the safety belts checked after an
accident at the dealer’s service center or an‐
other qualified service center or repair shop.◀
Wear and tear after accidents or when dam‐
aged otherwise:
Have the safety belts, including the safety belt
tensioners, replaced and have the belt anchors
checked.
Head restraints Information WARNING
A missing protective effect due to re‐
moved or not correctly adjusted head re‐
straints can cause injuries in the head and
neck area. There is risk of injuries. Install head
restraints on occupied seats prior to driving
and make sure that the center of the head re‐
straint supports the back of the head at eye
level.◀
WARNING
Objects on the head restraint reduce the
protective effect in the head and neck area.
There is risk of injuries.
▷Do not use seat or head restraint covers.▷Do not hang objects, e.g., clothes hangers,
directly on the head restraint.▷Only use accessories that have been de‐
termined to be safe for attachment to a
head restraint.▷Do not use any accessories, e.g. pillows,
while driving.◀
Correctly adjusted head restraint
General information
A correctly adjusted head restraint reduces the
risk of injury to cervical vertebrae in the event
of an accident.
Height Adjust the head restraint so that its center is
approximately at ear level.
Distance
Adjust the distance so that the head restraint
is as close as possible to the back of the head.
Active head restraint In the event of a rear-end collision with a cer‐
tain severity, the active head restraint automat‐
ically reduces the distance from the head.
Wear and tear after accidents or when dam‐
aged otherwise:
Have the active headrest checked and if
needed replaced.
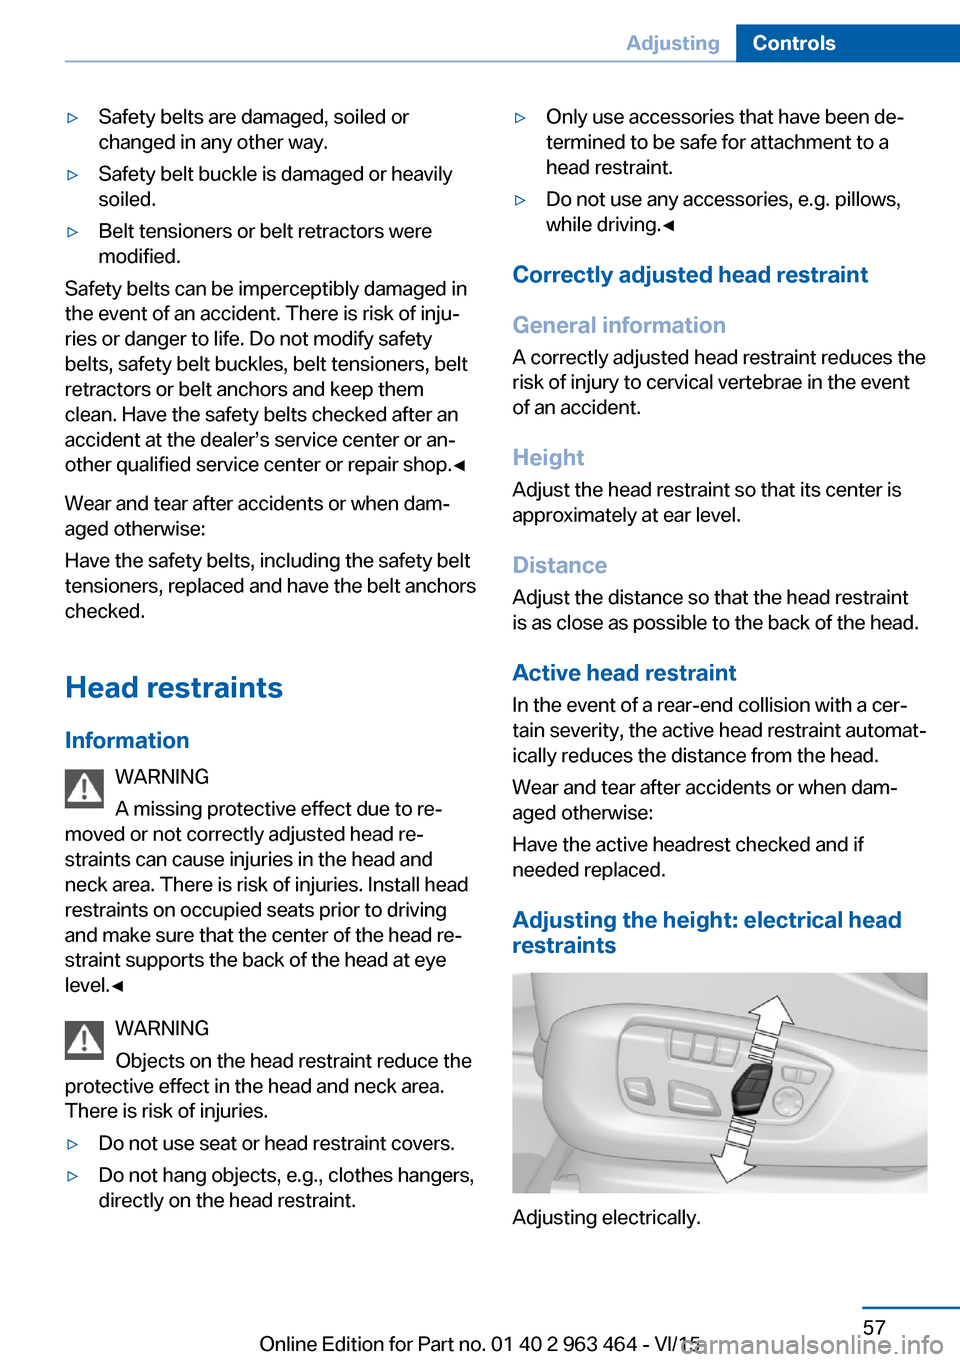
Adjusting the height: electrical head
restraints
Adjusting electrically.
Seite 57AdjustingControls57
Online Edition for Part no. 01 40 2 963 464 - VI/15
Page 63 of 265
securely against the backrest. If possible, ad‐
just the backrest tilt for all affected backrests
and correctly adjust the seats. Make sure that
seats and backrests are securely engaged. If
possible, adjust the height of the head re‐
straints or remove them.◀
Installing child restraint
systems
Information Pay attention to the specifications of the child
restraint system manufacturer when selecting,
installing, and using child restraint systems.
WARNING
The stability of the child restraint system
is limited or compromised with incorrect seat
adjustment or improper installation of the child
seat. There is risk of injuries or danger to life.
Make sure that the child restraint system fits
securely against the backrest. If possible, ad‐
just the backrest tilt for all affected backrests
and correctly adjust the seats. Make sure that
seats and backrests are securely engaged. If
possible, adjust the height of the head re‐
straints or remove them.◀
On the front passenger seat
Deactivating airbags WARNING
Active front-seat passenger airbags can
injure a child in a child restraint system when
the airbags are activated. There is risk of inju‐
ries. Make sure that the front-seat passenger
airbags are deactivated and that the PASSEN‐
GER AIRBAG OFF indicator lamp lights up.◀
After installing a child restraint system in the
front passenger seat, make sure that the front,
knee and side airbags on the front passenger
side are deactivated.Deactivate the front-seat passenger airbags
automatically, refer to page 108.
Seat position and height
Before installing a child restraint system, move
the front passenger seat as far back as possi‐
ble and adjust its height to the highest and
thus best possible position for the belt and to
offer optimal protection in the event of an acci‐
dent.
If the upper anchorage of the safety belt is lo‐
cated in front of the belt guide of the child seat,
move the passenger seat carefully forward un‐
til the best possible belt guide position is
reached.
Backrest width Adjustable backrest width: before installing a
child restraint system in the front passenger
seat, open the backrest width completely. Do
not change the backrest width again and do
not call up a memory position.
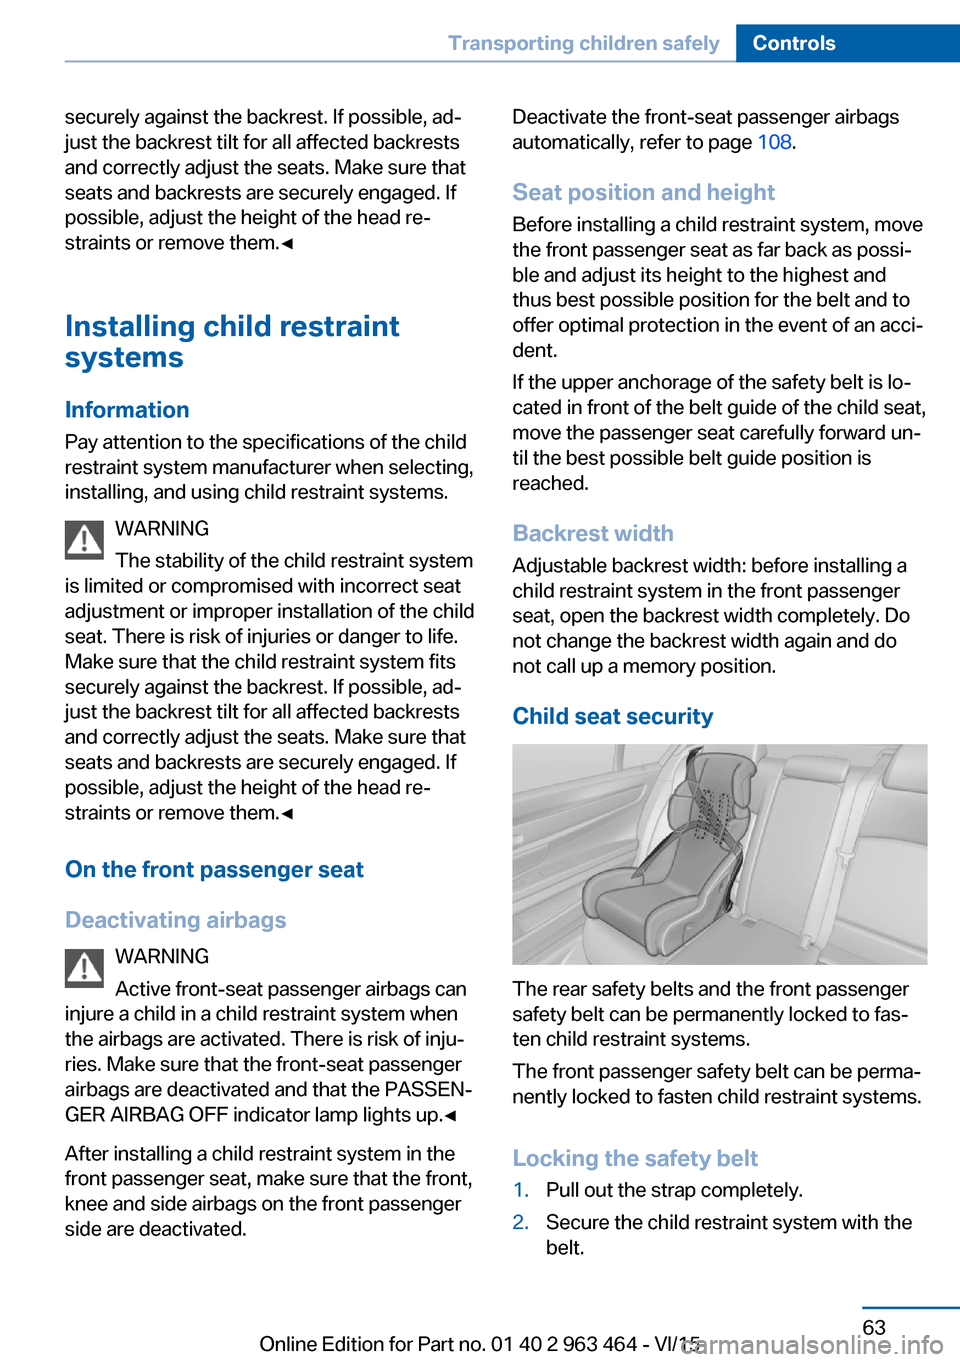
Child seat security
The rear safety belts and the front passenger
safety belt can be permanently locked to fas‐
ten child restraint systems.
The front passenger safety belt can be perma‐
nently locked to fasten child restraint systems.
Locking the safety belt
1.Pull out the strap completely.2.Secure the child restraint system with the
belt.Seite 63Transporting children safelyControls63
Online Edition for Part no. 01 40 2 963 464 - VI/15
Page 99 of 265
The conceptThis system projects important information
into the driver's field of vision, e. g., the speed.
The driver can get information without averting
his or her eyes from the road.
Information
Follow the instructions for cleaning the Head-
up Display, refer to page 246.
Display visibility The visibility of the displays in the Head-up
Display is influenced by the following factors:▷Certain sitting positions.▷Objects on the cover of the Head-up Dis‐
play.▷Sunglasses with certain polarization filters.▷Wet roads.▷Unfavorable light conditions.
If the image is distorted, have the basic set‐
tings checked by a dealer’s service center or
another qualified service center or repair shop.
Switching on/off
1."Settings"2."Head-Up Display"3."Head-Up Display"
Display
Overview
The following information is displayed on the
Head-up Display:
▷Speed.▷Navigation system.▷Check Control messages.▷Selection list from the instrument cluster.▷Driver assistance systems.
Some of this information is only displayed
briefly as needed.
Selecting displays in the Head-up Display
On the Control Display:1."Settings"2."Head-Up Display"3."Displayed information"4.Select the desired displays in the Head-up
Display.
Settings are stored for the profile currently
used.
Setting the brightness The brightness is automatically adjusted to the
ambient brightness.
The basic setting can be adjusted manually.
On the Control Display:
1."Settings"2."Head-Up Display"3."Brightness"4.Turn the controller until the desired bright‐
ness is set.5.Press the controller.
When the low beams are activated, the bright‐
ness of the Head-up Display can be addition‐
ally influenced using the instrument lighting.
Settings are stored for the profile currently
used.
Adjusting the height
On the Control Display:
1."Settings"2."Head-Up Display"3."Height"4.Turn the controller until the desired height
is reached.5.Press the controller.
Settings are stored for the profile currently
used.
Seite 99DisplaysControls99
Online Edition for Part no. 01 40 2 963 464 - VI/15
Page 138 of 265
Display in the instrument clusterThe selected speed is displayed
in the speedometer.▷Green: the system is actively
braking the vehicle.▷Orange: the system is on
standby.
Malfunction
A message is displayed in the instrument clus‐
ter. HDC is not available, e.g., due to elevated
brake temperatures.
Active Steering
Active Steering varies the steering angle of the
wheels in relation to the steering wheel move‐
ment as a function of the speed.
At lower speeds, for example during turning or
maneuvering, the steering angle is increased,
that is to say the steering becomes more di‐
rect.
At higher speeds, the steering angle is increas‐
ingly reduced.
This enables even more precise handling at
high speeds and more responsive steering
with reduced steering angle at low speeds.
Active roll stabilization The concept
The system reduces the lateral inclination of
the vehicle that occurs during rapid driving in
curves or during quick evasive maneuvers.
Driving stability and driving comfort are in‐
creased under all driving conditions. The sys‐
tem utilizes active stabilizer bars on the front
and rear axles that react immediately to all driv‐
ing situations.
Programs
The system offers two different programs.
Select the programs via the Driving Dynamics
Control, refer to page 139.
SPORT Sporty tuning for greater driving agility.
COMFORT
Comfort-oriented tuning for optimal comfort.
Vertical Dynamic Control The concept This system reduces undesirable vehicle mo‐
tion when using a dynamic driving style or trav‐
eling on uneven road surfaces.
The system enhances driving dynamics and
comfort fitting road surface and driving style.
Programs The system offers several different programs.
Select the programs via the Driving Dynamics
Control, refer to page 139.
SPORT/SPORT+
Consistently sporty control of the shock ab‐
sorbers for greater driving agility.
COMFORT/ECO PRO Balanced tuning.
Self-leveling suspension The concept
The self-leveling suspension keeps the vehicle
height and ground clearance constant. The
height of the vehicle at the rear axle is main‐
tained at a predefined level under all load con‐
ditions.Seite 138ControlsDriving stability control systems138
Online Edition for Part no. 01 40 2 963 464 - VI/15
Page 179 of 265
Make sure that the child restraint system fits
securely against the backrest. If possible, ad‐
just the backrest tilt for all affected backrests
and correctly adjust the seats. Make sure that
seats and backrests are securely engaged. If
possible, adjust the height of the head re‐
straints or remove them.◀
WARNING
With an unlocked backrest, an unsecured
load can be thrown into the car's interior, e.g.
in case of an accident, braking or evasive ma‐
neuver. There is risk of injuries. Make sure that
the backrest engages into the locking after
folding it back.◀
WARNING
With a rear backrest that is not locked,
the protective function of the middle safety
belt is not guaranteed. There is risk of injuries
or danger to life. If you are using the middle safety belt, lock the wider rear backrest.◀
Folding down the sides CAUTION
Screens in the rear can be damaged
when folding down the rear backrest. There is
risk of property damage. Make sure that the
area of movement is clear prior to folding down
the rear backrest.◀
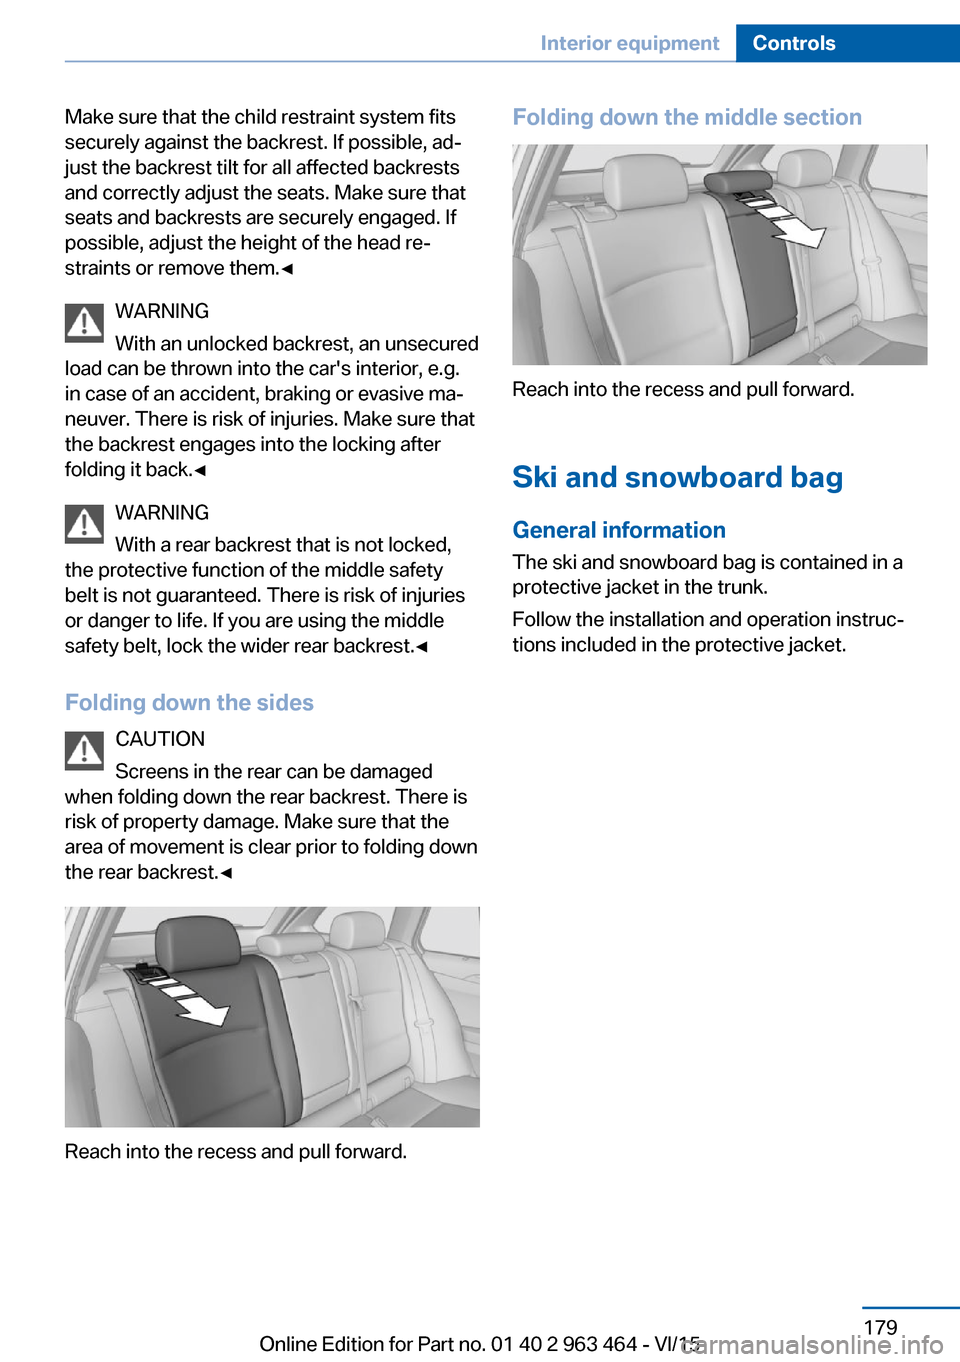
Reach into the recess and pull forward.
Folding down the middle section
Reach into the recess and pull forward.
Ski and snowboard bag General information
The ski and snowboard bag is contained in a
protective jacket in the trunk.
Follow the installation and operation instruc‐
tions included in the protective jacket.
Seite 179Interior equipmentControls179
Online Edition for Part no. 01 40 2 963 464 - VI/15
Page 189 of 265
Hot exhaust systemWARNING
During driving operation, high tempera‐
tures can occur underneath the body, e.g.
caused by the exhaust gas system. If combus‐
tible materials, such as leaves or grass, come
in contact with hot parts of the exhaust gas
system, these materials can ignite. There is
risk of injuries or risk of property damage.
Do not remove the heat shields installed and
never apply undercoating to them. Make sure
that no combustible materials can come in
contact with hot vehicle parts in driving opera‐
tion, idle or during parking. Do not touch the
hot exhaust system.◀
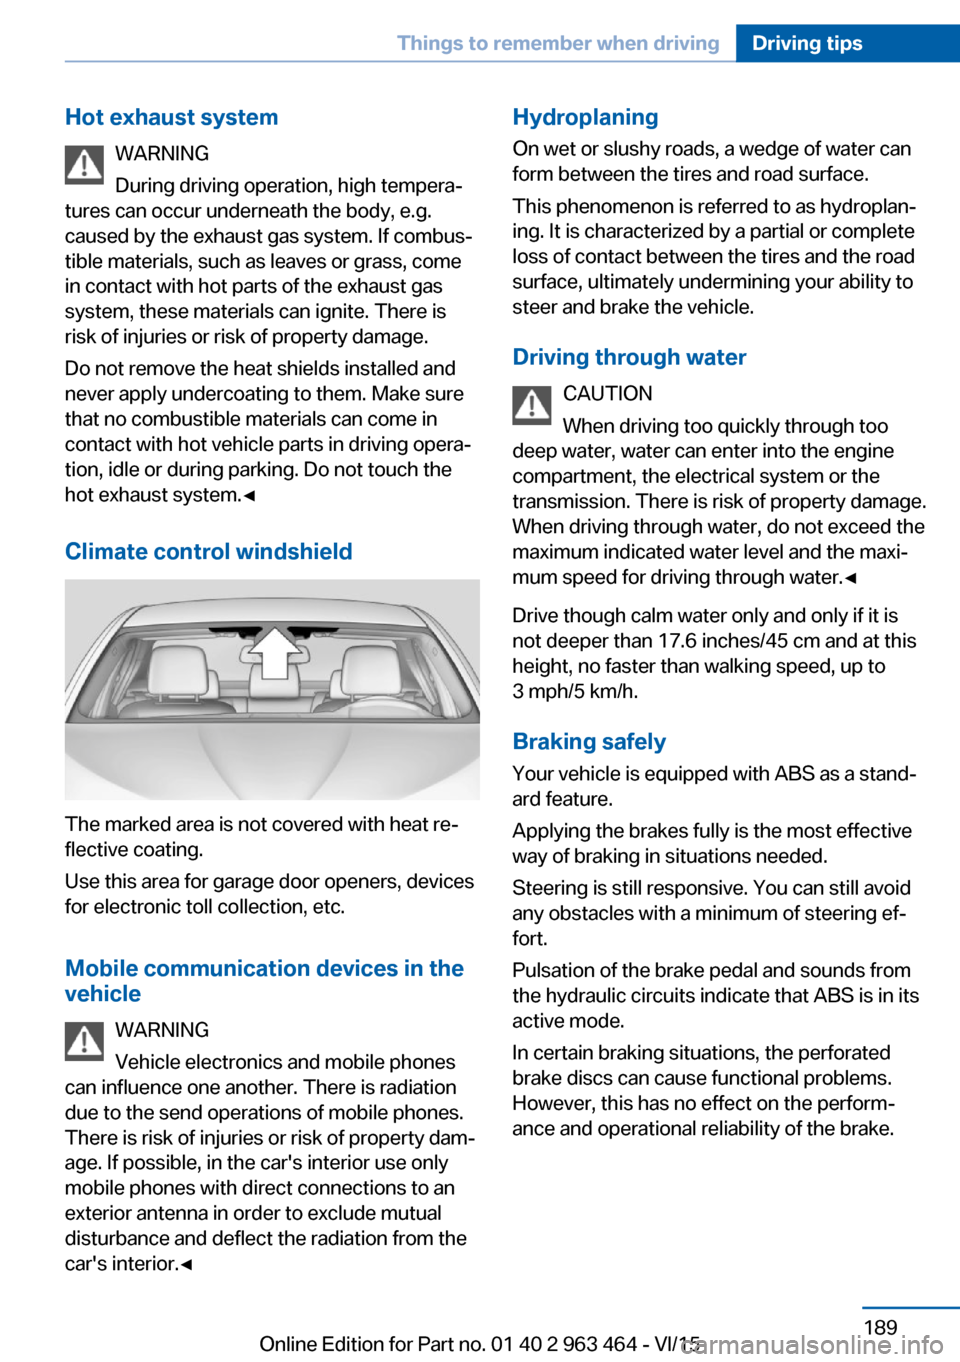
Climate control windshield
The marked area is not covered with heat re‐
flective coating.
Use this area for garage door openers, devices
for electronic toll collection, etc.
Mobile communication devices in the vehicle
WARNING
Vehicle electronics and mobile phones
can influence one another. There is radiation
due to the send operations of mobile phones.
There is risk of injuries or risk of property dam‐
age. If possible, in the car's interior use only
mobile phones with direct connections to an
exterior antenna in order to exclude mutual
disturbance and deflect the radiation from the
car's interior.◀
Hydroplaning
On wet or slushy roads, a wedge of water can
form between the tires and road surface.
This phenomenon is referred to as hydroplan‐
ing. It is characterized by a partial or complete
loss of contact between the tires and the road
surface, ultimately undermining your ability to
steer and brake the vehicle.
Driving through water CAUTION
When driving too quickly through too
deep water, water can enter into the engine
compartment, the electrical system or the
transmission. There is risk of property damage.
When driving through water, do not exceed the
maximum indicated water level and the maxi‐
mum speed for driving through water.◀
Drive though calm water only and only if it is
not deeper than 17.6 inches/45 cm and at this
height, no faster than walking speed, up to
3 mph/5 km/h.
Braking safely Your vehicle is equipped with ABS as a stand‐
ard feature.
Applying the brakes fully is the most effective
way of braking in situations needed.
Steering is still responsive. You can still avoid
any obstacles with a minimum of steering ef‐
fort.
Pulsation of the brake pedal and sounds from
the hydraulic circuits indicate that ABS is in its
active mode.
In certain braking situations, the perforated
brake discs can cause functional problems.
However, this has no effect on the perform‐
ance and operational reliability of the brake.Seite 189Things to remember when drivingDriving tips189
Online Edition for Part no. 01 40 2 963 464 - VI/15