fold seats BMW X6 M 2012 Owners Manual
[x] Cancel search | Manufacturer: BMW, Model Year: 2012, Model line: X6 M, Model: BMW X6 M 2012Pages: 317, PDF Size: 8.83 MB
Page 47 of 317
Press upper or lower section of switch.
BMW X5: rear seats
2nd row seats
If the row of seats is divided
*, each side can be
adjusted separately.
Do not adjust the seat while driving
Never adjust the 2nd row seats while the
vehicle is moving, as otherwise the passengers
on the 3rd row seats could be injured.
Make sure that the locking devices of the 2nd
row seats engage properly. Otherwise the re‐
straining effect of the safety belts during an ac‐
cident could be reduced.◀
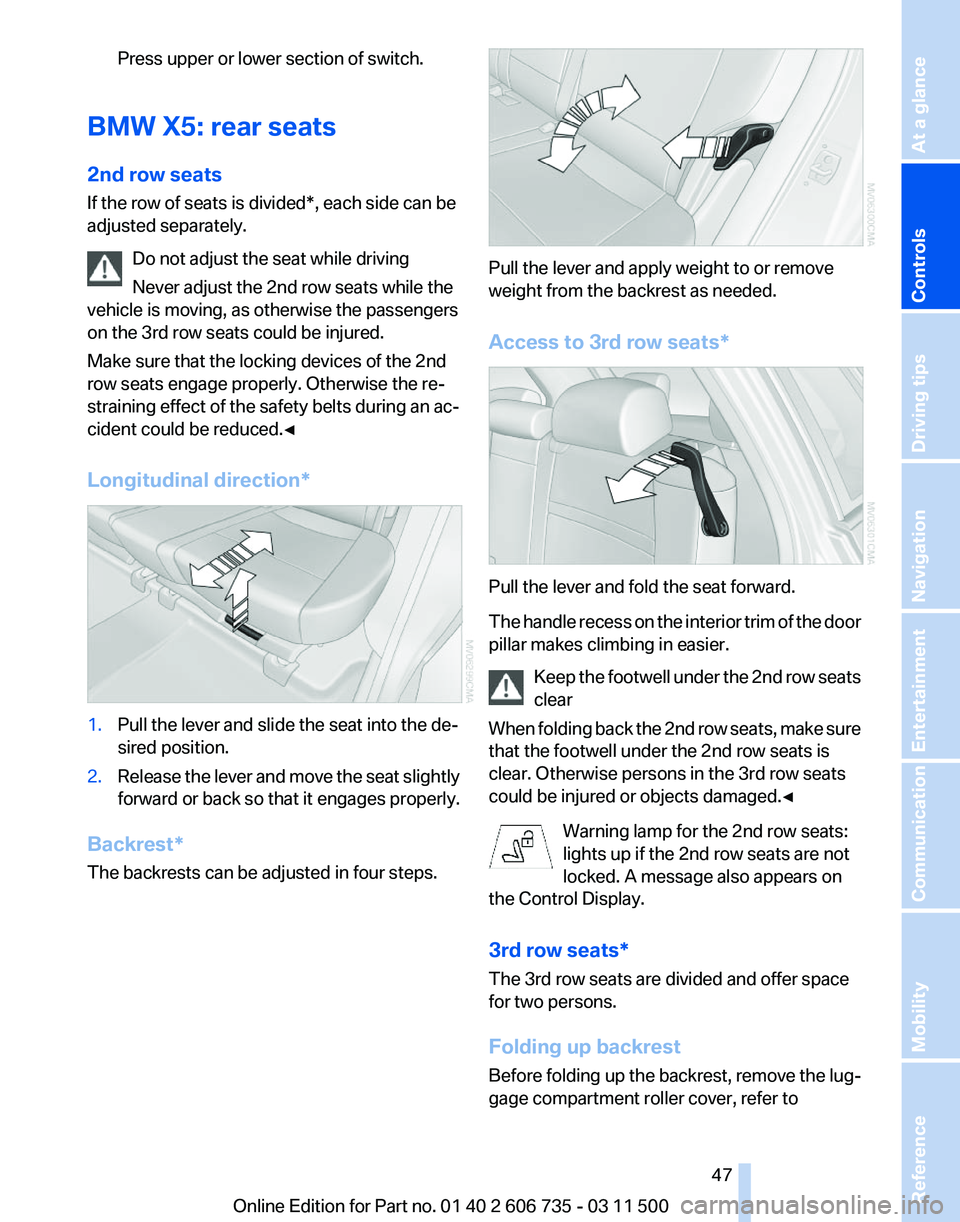
Longitudinal direction* 1.
Pull the lever and slide the seat into the de‐
sired position.
2. Release the lever and move the seat slightly
forward or back so that it engages properly.
Backrest*
The backrests can be adjusted in four steps. Pull the lever and apply weight to or remove
weight from the backrest as needed.
Access to 3rd row seats*
Pull the lever and fold the seat forward.
The
handle recess on the interior trim of the door
pillar makes climbing in easier.
Keep the footwell under the 2nd row seats
clear
When folding back the 2nd row seats, make sure
that the footwell under the 2nd row seats is
clear. Otherwise persons in the 3rd row seats
could be injured or objects damaged.◀
Warning lamp for the 2nd row seats:
lights up if the 2nd row seats are not
locked. A message also appears on
the Control Display.
3rd row seats*
The 3rd row seats are divided and offer space
for two persons.
Folding up backrest
Before folding up the backrest, remove the lug‐
gage compartment roller cover, refer to Seite 47
47Online Edition for Part no. 01 40 2 606 735 - 03 11 500
Reference Mobility Communication Entertainment Navigation Driving tips
Controls At a glance
Page 48 of 317
page
132, and, if necessary, slide the 2nd row
seats slightly forward.
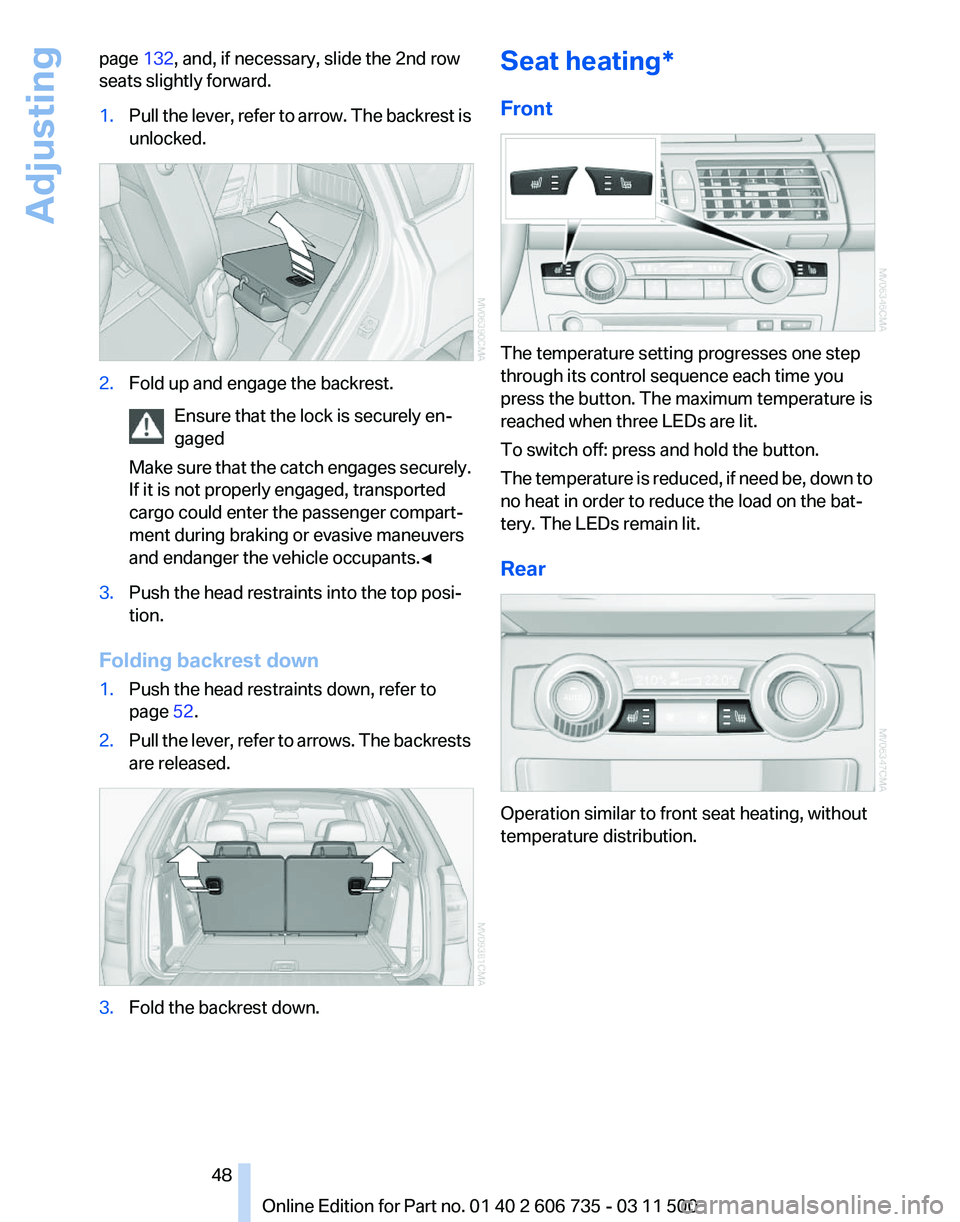
1. Pull the lever, refer to arrow. The backrest is
unlocked. 2.
Fold up and engage the backrest.
Ensure that the lock is securely en‐
gaged
Make
sure that the catch engages securely.
If it is not properly engaged, transported
cargo could enter the passenger compart‐
ment during braking or evasive maneuvers
and endanger the vehicle occupants.◀ 3.
Push the head restraints into the top posi‐
tion.
Folding backrest down
1. Push the head restraints down, refer to
page 52.
2. Pull the lever, refer to arrows. The backrests
are released. 3.
Fold the backrest down. Seat heating*
Front
The temperature setting progresses one step
through its control sequence each time you
press the button. The maximum temperature is
reached when three LEDs are lit.
To switch off: press and hold the button.
The
temperature is reduced, if need be, down to
no heat in order to reduce the load on the bat‐
tery. The LEDs remain lit.
Rear Operation similar to front seat heating, without
temperature distribution.
Seite 48
48 Online Edition for Part no. 01 40 2 606 735 - 03 11 500
Adjusting
Page 52 of 317
Electrical
Adjusting electrically.
Front seats: adjusting the distance
from the back of the head
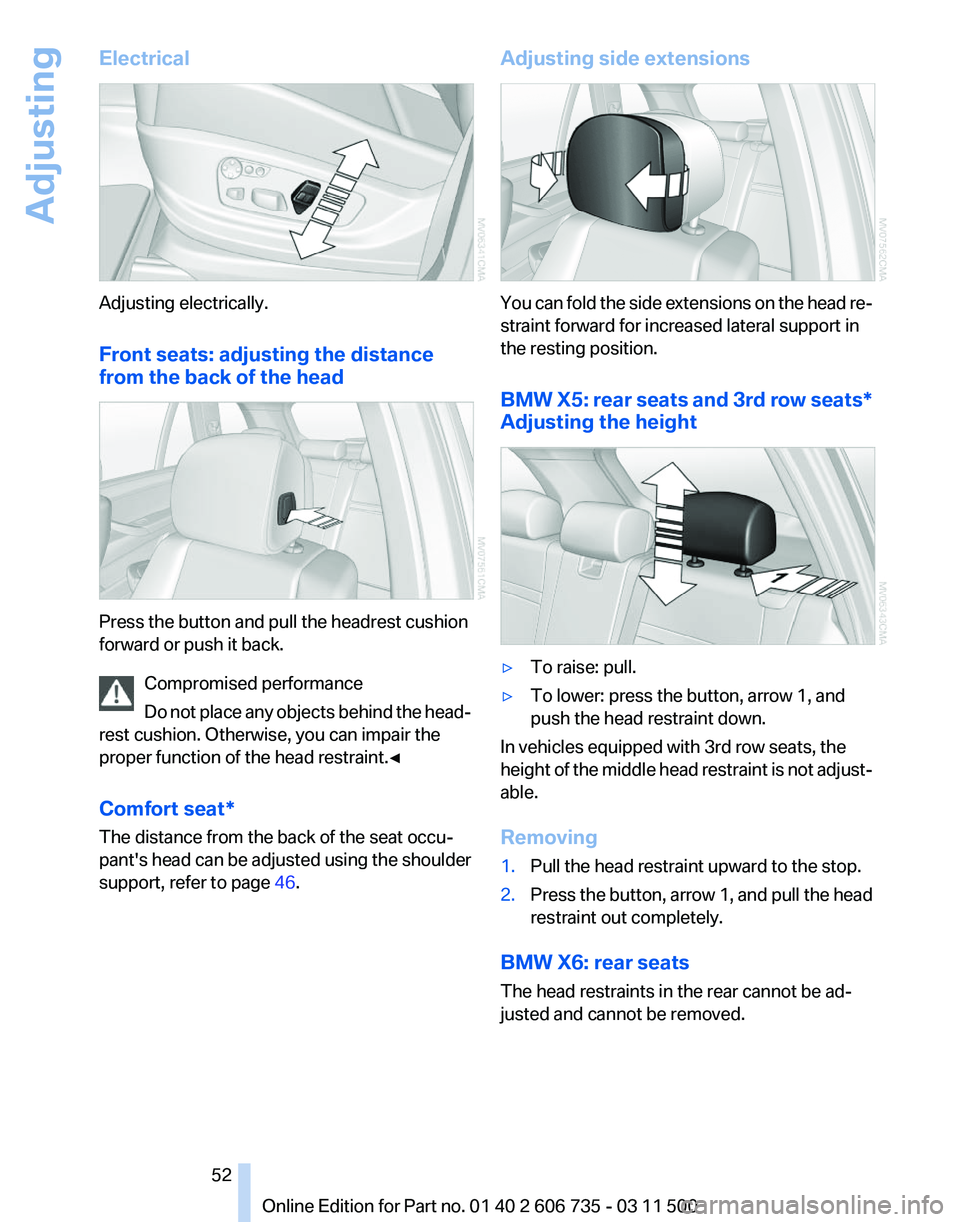
Press the button and pull the headrest cushion
forward or push it back.
Compromised performance
Do
not place any objects behind the head‐
rest cushion. Otherwise, you can impair the
proper function of the head restraint.◀
Comfort seat*
The distance from the back of the seat occu‐
pant's head can be adjusted using the shoulder
support, refer to page 46. Adjusting side extensions
You can fold the side extensions on the head re‐
straint forward for increased lateral support in
the resting position.
BMW
X5: rear seats and 3rd row seats*
Adjusting the height ▷
To raise: pull.
▷ To lower: press the button, arrow 1, and
push the head restraint down.
In vehicles equipped with 3rd row seats, the
height
of the middle head restraint is not adjust‐
able.
Removing
1. Pull the head restraint upward to the stop.
2. Press the button, arrow 1, and pull the head
restraint out completely.
BMW X6: rear seats
The head restraints in the rear cannot be ad‐
justed and cannot be removed.
Seite 52
52 Online Edition for Part no. 01 40 2 606 735 - 03 11 500
Adjusting
Page 58 of 317
Mounting LATCH child restraint fixing
systems
1.
Mount the child restraint fixing system; refer
to the operating instructions of the system.
2. Ensure that both LATCH anchors are prop‐
erly connected.
Child restraint fixing system with a
tether strap
Mounting points LATCH mounting eyes
Only
use the mounting eyes for the upper
LATCH retaining strap to secure child restraint
fixing systems; otherwise, the mounting eyes
could be damaged.◀
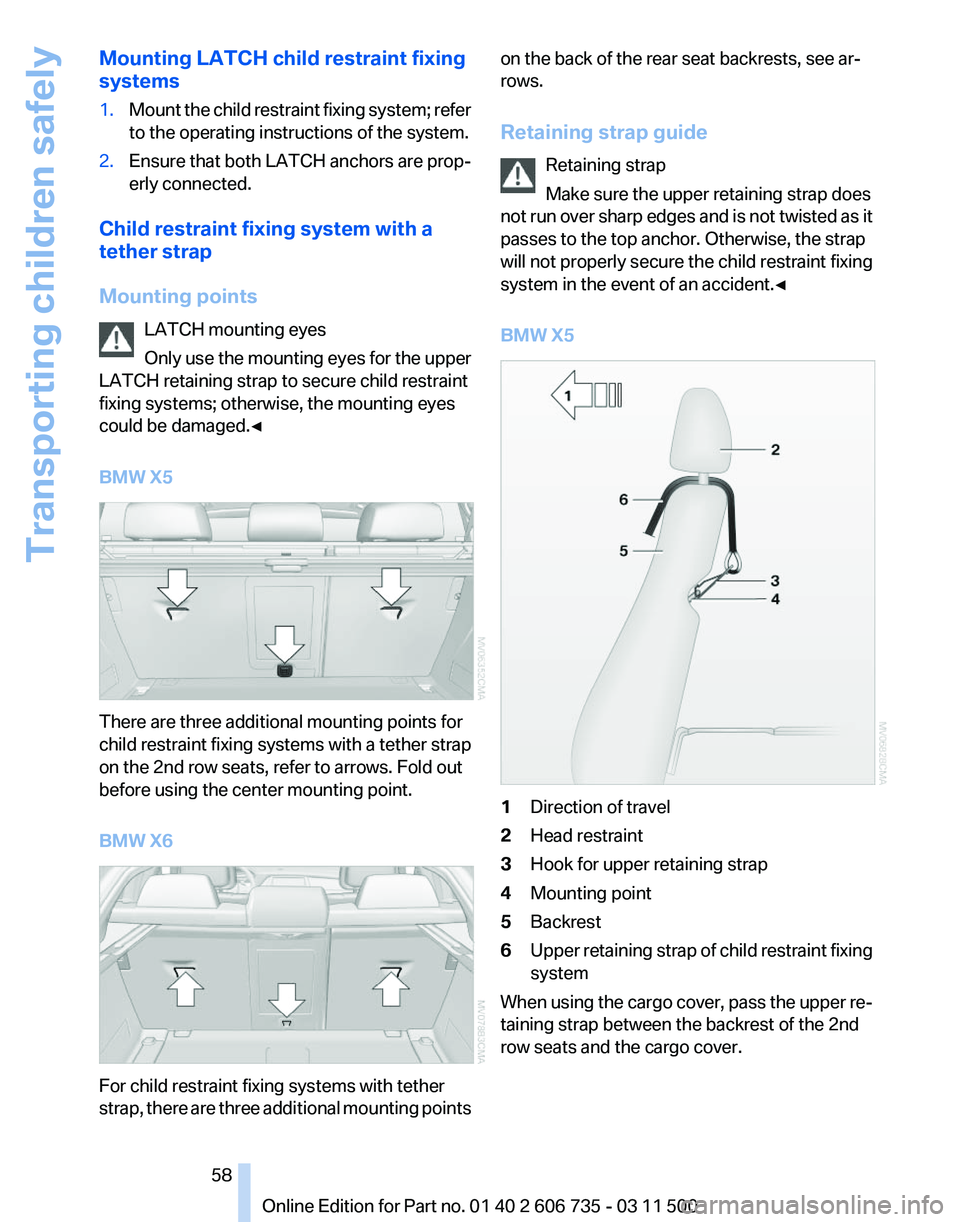
BMW X5 There are three additional mounting points for
child restraint fixing systems with a tether strap
on the 2nd row seats, refer to arrows. Fold out
before using the center mounting point.
BMW X6
For child restraint fixing systems with tether
strap,
there are three additional mounting points on the back of the rear seat backrests, see ar‐
rows.
Retaining strap guide
Retaining strap
Make sure the upper retaining strap does
not
run over sharp edges and is not twisted as it
passes to the top anchor. Otherwise, the strap
will not properly secure the child restraint fixing
system in the event of an accident.◀
BMW X5 1
Direction of travel
2 Head restraint
3 Hook for upper retaining strap
4 Mounting point
5 Backrest
6 Upper retaining strap of child restraint fixing
system
When using the cargo cover, pass the upper re‐
taining strap between the backrest of the 2nd
row seats and the cargo cover. Seite 58
58 Online Edition for Part no. 01 40 2 606 735 - 03 11 500
Transporting children safely
Page 60 of 317
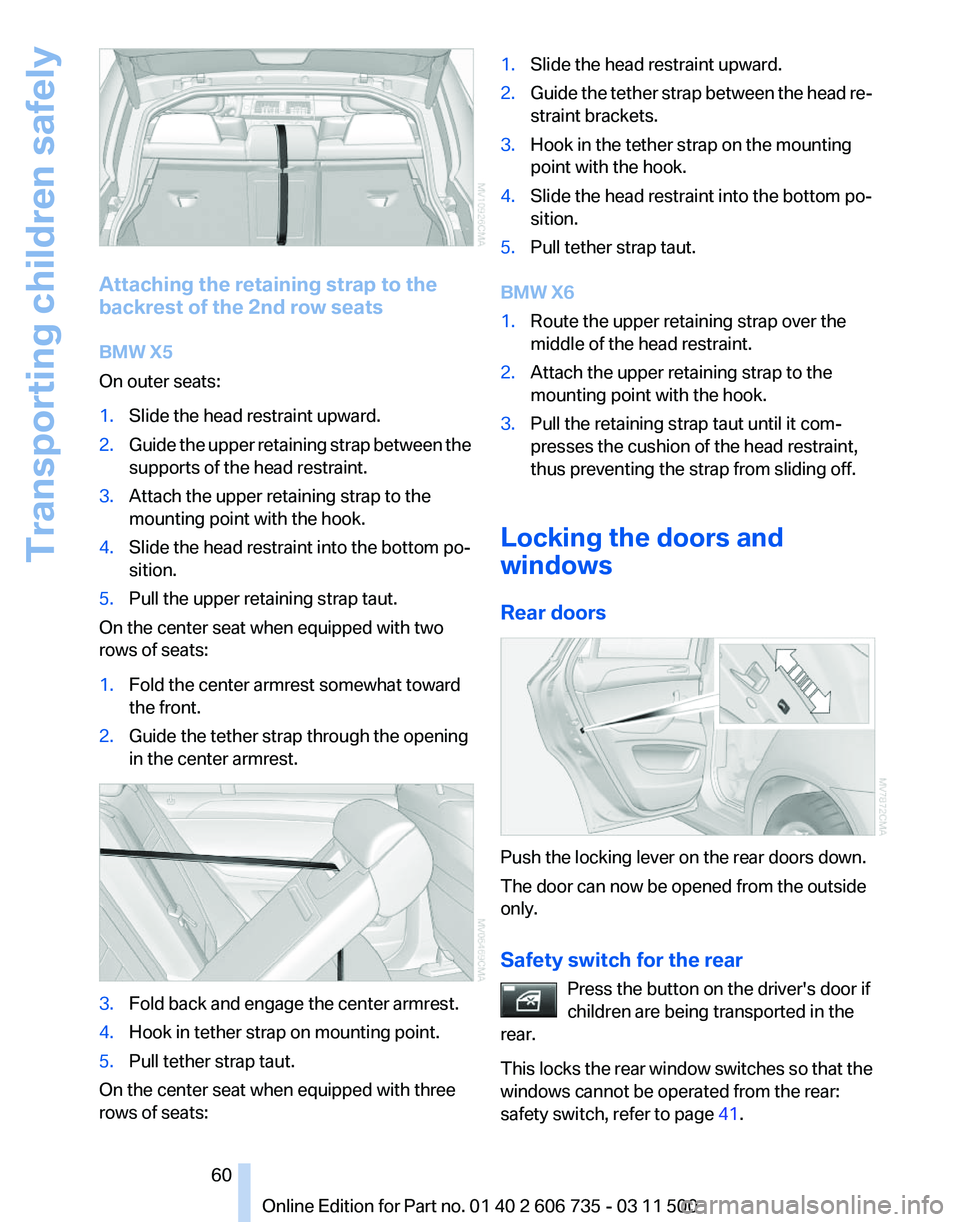
Attaching the retaining strap to the
backrest of the 2nd row seats
BMW X5
On outer seats:
1.
Slide the head restraint upward.
2. Guide the upper retaining strap between the
supports of the head restraint.
3. Attach the upper retaining strap to the
mounting point with the hook.
4. Slide the head restraint into the bottom po‐
sition.
5. Pull the upper retaining strap taut.
On the center seat when equipped with two
rows of seats:
1. Fold the center armrest somewhat toward
the front.
2. Guide the tether strap through the opening
in the center armrest. 3.
Fold back and engage the center armrest.
4. Hook in tether strap on mounting point.
5. Pull tether strap taut.
On the center seat when equipped with three
rows of seats: 1.
Slide the head restraint upward.
2. Guide the tether strap between the head re‐
straint brackets.
3. Hook in the tether strap on the mounting
point with the hook.
4. Slide the head restraint into the bottom po‐
sition.
5. Pull tether strap taut.
BMW X6
1. Route the upper retaining strap over the
middle of the head restraint.
2. Attach the upper retaining strap to the
mounting point with the hook.
3. Pull the retaining strap taut until it com‐
presses the cushion of the head restraint,
thus preventing the strap from sliding off.
Locking the doors and
windows
Rear doors Push the locking lever on the rear doors down.
The door can now be opened from the outside
only.
Safety switch for the rear
Press the button on the driver's door if
children are being transported in the
rear.
This
locks the rear window switches so that the
windows cannot be operated from the rear:
safety switch, refer to page 41. Seite 60
60 Online Edition for Part no. 01 40 2 606 735 - 03 11 500
Transporting children safely
Page 134 of 317
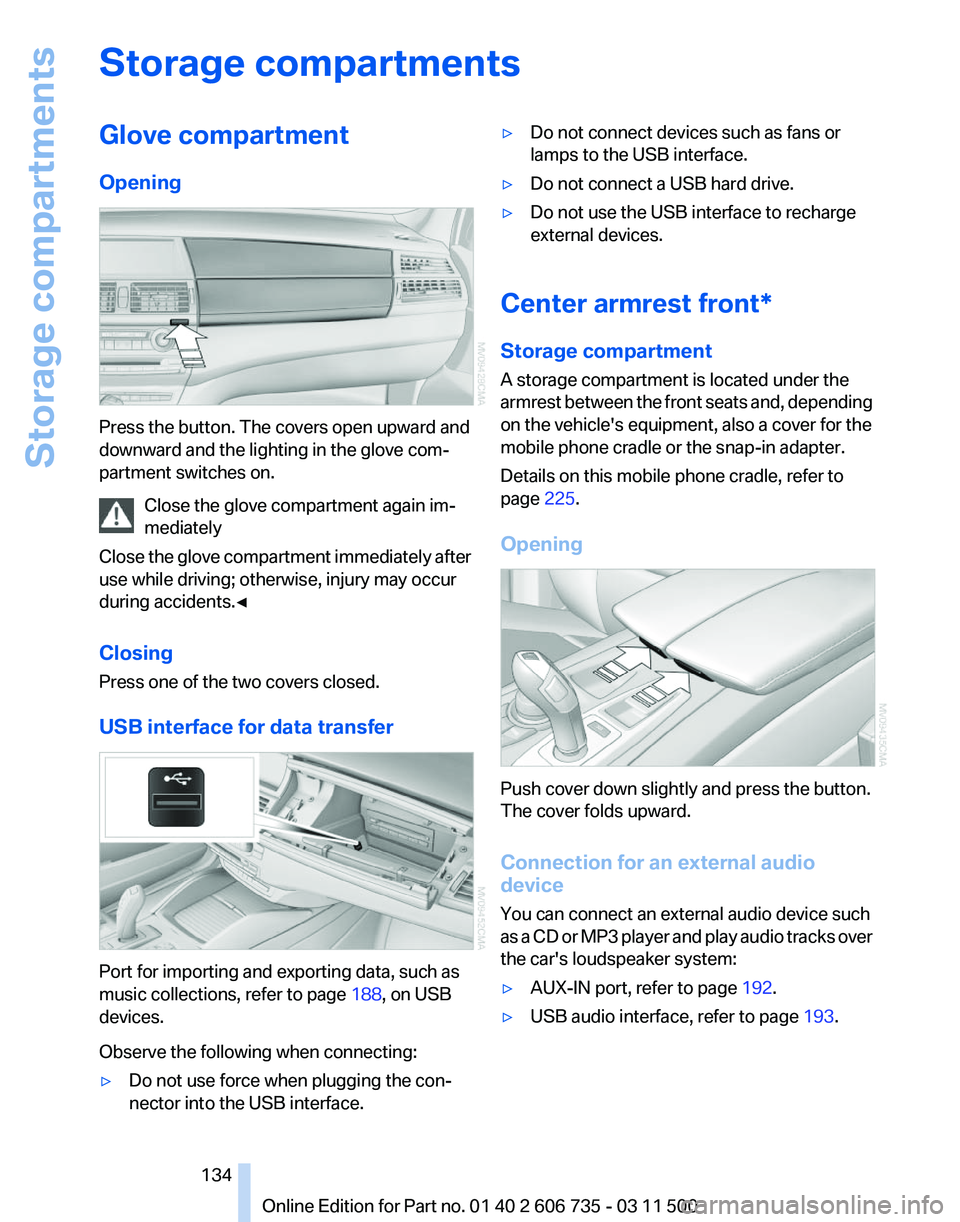
Storage compartments
Glove compartment
Opening
Press the button. The covers open upward and
downward and the lighting in the glove com‐
partment switches on.
Close the glove compartment again im‐
mediately
Close
the glove compartment immediately after
use while driving; otherwise, injury may occur
during accidents.◀
Closing
Press one of the two covers closed.
USB interface for data transfer Port for importing and exporting data, such as
music collections, refer to page
188, on USB
devices.
Observe the following when connecting:
▷ Do not use force when plugging the con‐
nector into the USB interface. ▷
Do not connect devices such as fans or
lamps to the USB interface.
▷ Do not connect a USB hard drive.
▷ Do not use the USB interface to recharge
external devices.
Center armrest front*
Storage compartment
A storage compartment is located under the
armrest
between the front seats and, depending
on the vehicle's equipment, also a cover for the
mobile phone cradle or the snap-in adapter.
Details on this mobile phone cradle, refer to
page 225.
Opening Push cover down slightly and press the button.
The cover folds upward.
Connection for an external audio
device
You can connect an external audio device such
as
a CD or MP3 player and play audio tracks over
the car's loudspeaker system:
▷ AUX-IN port, refer to page 192.
▷ USB audio interface, refer to page 193.
Seite 134
134 Online Edition for Part no. 01 40 2 606 735 - 03 11 500
Storage compartments
Page 135 of 317
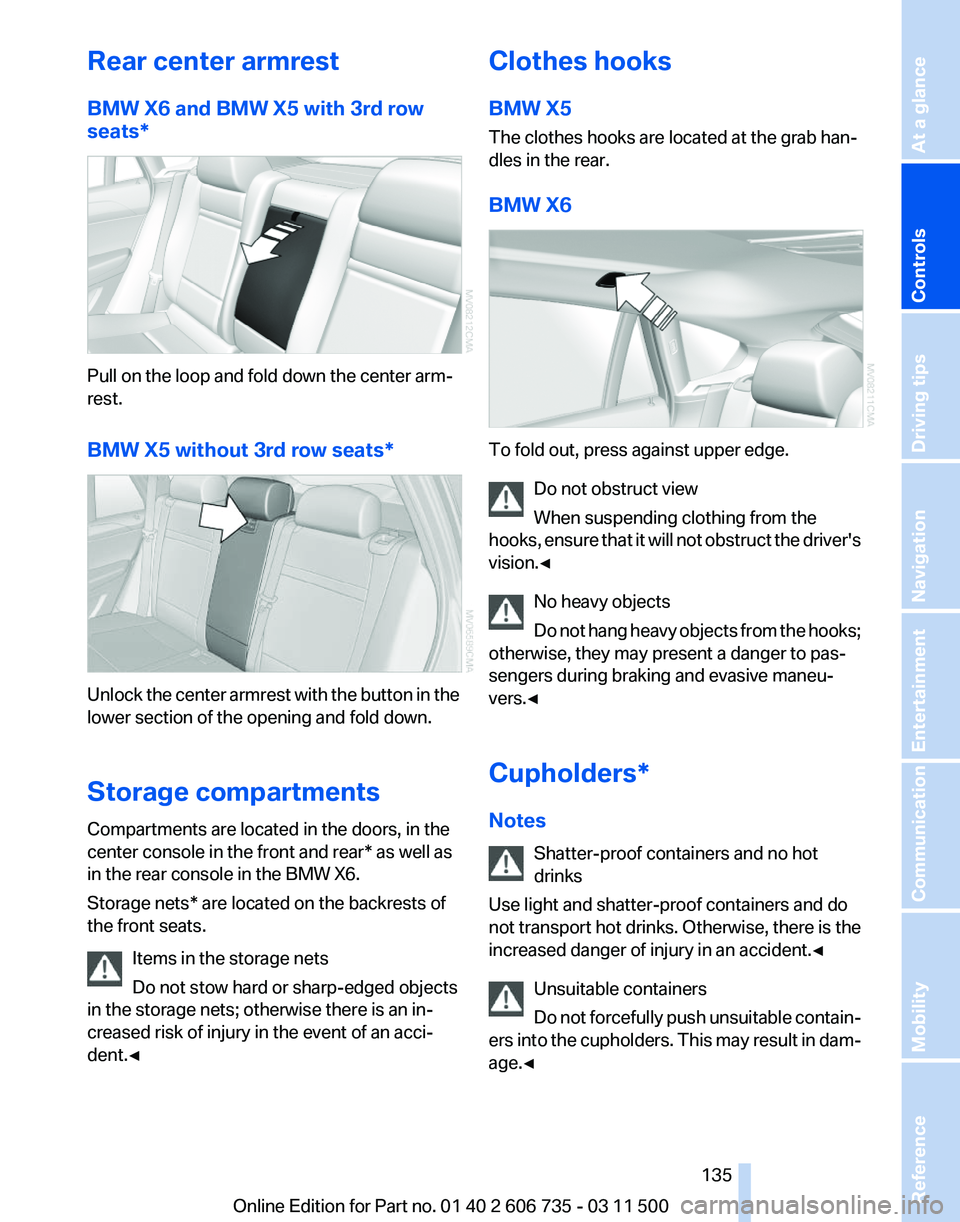
Rear center armrest
BMW X6 and BMW X5 with 3rd row
seats*
Pull on the loop and fold down the center arm‐
rest.
BMW X5 without 3rd row seats*
Unlock the center armrest with the button in the
lower section of the opening and fold down.
Storage compartments
Compartments are located in the doors, in the
center console in the front and rear* as well as
in the rear console in the BMW X6.
Storage nets* are located on the backrests of
the front seats.
Items in the storage nets
Do not stow hard or sharp-edged objects
in the storage nets; otherwise there is an in‐
creased risk of injury in the event of an acci‐
dent.◀ Clothes hooks
BMW X5
The clothes hooks are located at the grab han‐
dles in the rear.
BMW X6
To fold out, press against upper edge.
Do not obstruct view
When suspending clothing from the
hooks,
ensure that it will not obstruct the driver's
vision.◀
No heavy objects
Do not hang heavy objects from the hooks;
otherwise, they may present a danger to pas‐
sengers during braking and evasive maneu‐
vers.◀
Cupholders*
Notes
Shatter-proof containers and no hot
drinks
Use light and shatter-proof containers and do
not transport hot drinks. Otherwise, there is the
increased danger of injury in an accident.◀
Unsuitable containers
Do not forcefully push unsuitable contain‐
ers into the cupholders. This may result in dam‐
age.◀ Seite 135
135Online Edition for Part no. 01 40 2 606 735 - 03 11 500
Reference Mobility Communication Entertainment Navigation Driving tips
Controls At a glance
Page 136 of 317
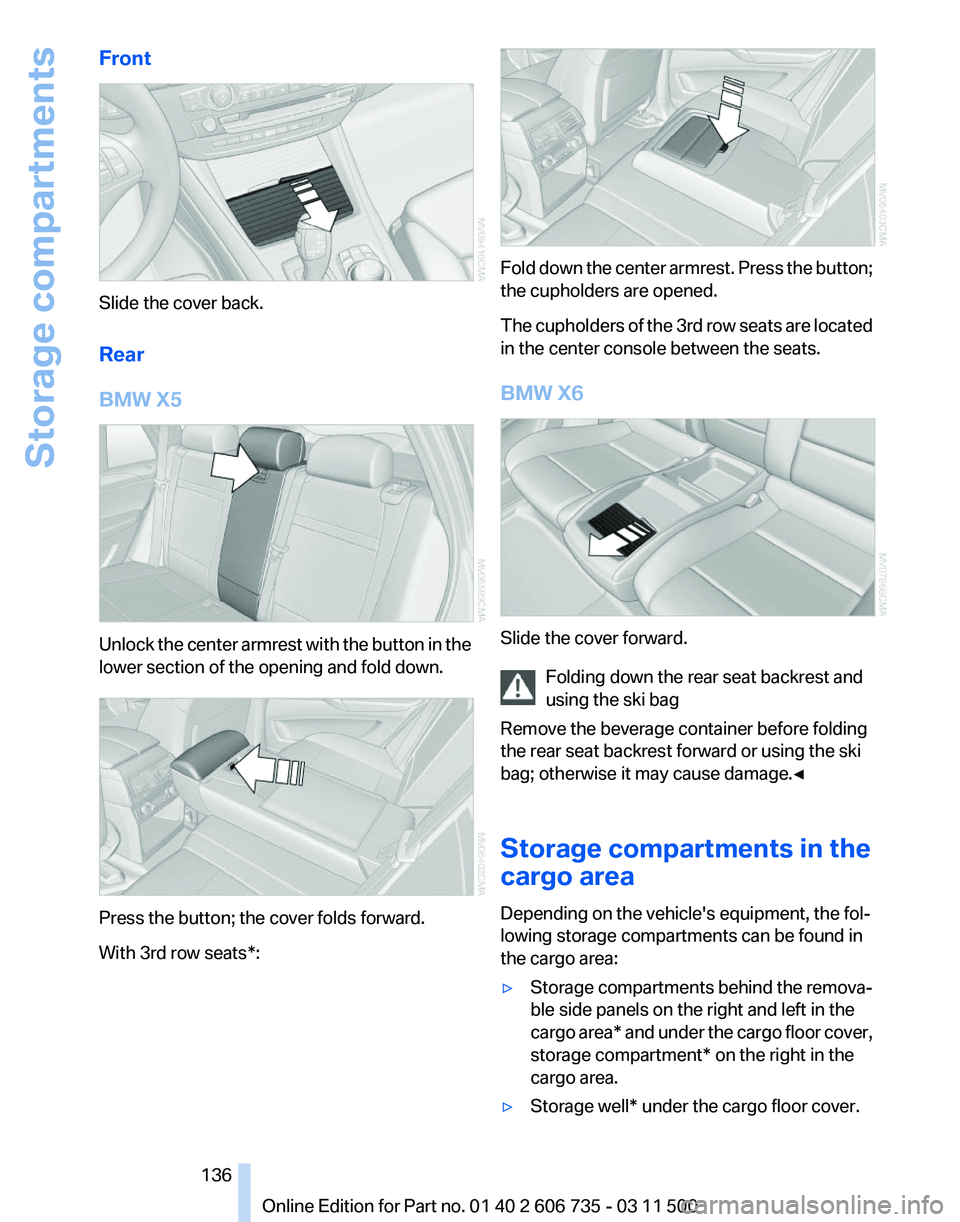
Front
Slide the cover back.
Rear
BMW X5
Unlock the center armrest with the button in the
lower section of the opening and fold down.
Press the button; the cover folds forward.
With 3rd row seats*: Fold down the center armrest. Press the button;
the cupholders are opened.
The
cupholders of the 3rd row seats are located
in the center console between the seats.
BMW X6 Slide the cover forward.
Folding down the rear seat backrest and
using the ski bag
Remove the beverage container before folding
the rear seat backrest forward or using the ski
bag; otherwise it may cause damage.
◀
Storage compartments in the
cargo area
Depending on the vehicle's equipment, the fol‐
lowing storage compartments can be found in
the cargo area:
▷ Storage compartments behind the remova‐
ble side panels on the right and left in the
cargo
area* and under the cargo floor cover,
storage compartment* on the right in the
cargo area.
▷ Storage well* under the cargo floor cover. Seite 136
136 Online Edition for Part no. 01 40 2 606 735 - 03 11 500
Storage compartments
Page 138 of 317
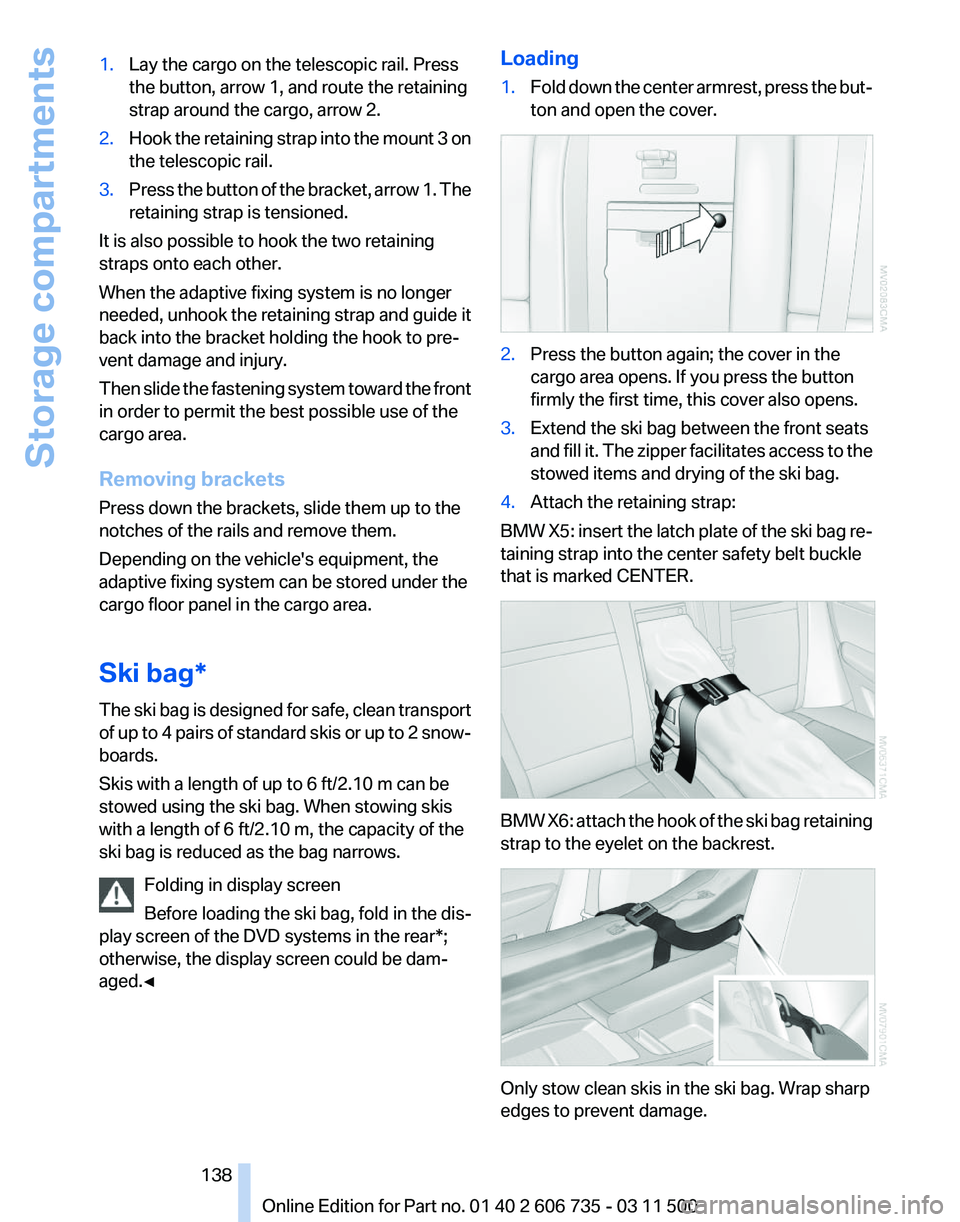
1.
Lay the cargo on the telescopic rail. Press
the button, arrow 1, and route the retaining
strap around the cargo, arrow 2.
2. Hook the retaining strap into the mount 3 on
the telescopic rail.
3. Press the button of the bracket, arrow 1. The
retaining strap is tensioned.
It is also possible to hook the two retaining
straps onto each other.
When the adaptive fixing system is no longer
needed,
unhook the retaining strap and guide it
back into the bracket holding the hook to pre‐
vent damage and injury.
Then slide the fastening system toward the front
in order to permit the best possible use of the
cargo area.
Removing brackets
Press down the brackets, slide them up to the
notches of the rails and remove them.
Depending on the vehicle's equipment, the
adaptive fixing system can be stored under the
cargo floor panel in the cargo area.
Ski bag*
The ski bag is designed for safe, clean transport
of up to 4 pairs of standard skis or up to 2 snow‐
boards.
Skis with a length of up to 6 ft/2.10 m can be
stowed using the ski bag. When stowing skis
with a length of 6 ft/2.10 m, the capacity of the
ski bag is reduced as the bag narrows.
Folding in display screen
Before loading the ski bag, fold in the dis‐
play screen of the DVD systems in the rear*;
otherwise, the display screen could be dam‐
aged.◀ Loading
1.
Fold down the center armrest, press the but‐
ton and open the cover. 2.
Press the button again; the cover in the
cargo area opens. If you press the button
firmly the first time, this cover also opens.
3. Extend the ski bag between the front seats
and
fill it. The zipper facilitates access to the
stowed items and drying of the ski bag.
4. Attach the retaining strap:
BMW X5: insert the latch plate of the ski bag re‐
taining strap into the center safety belt buckle
that is marked CENTER. BMW X6: attach the hook of the ski bag retaining
strap to the eyelet on the backrest.
Only stow clean skis in the ski bag. Wrap sharp
edges to prevent damage.
Seite 138
138 Online Edition for Part no. 01 40 2 606 735 - 03 11 500
Storage compartments
Page 307 of 317
Flat Tire Monitor FTM, snow
chains 261
Flat tire, run-flat tires 261
Flat
tire, Tire Pressure Monitor
TPM 90
Flat tire, warning lamp 89, 91
Flat tire, wheel change 275
Flooding, refer to Driving through water 143
Floor carpet, care 287
Floor mats, care 287
FM/AM station 174
Fog on windows, remov‐ ing 121
Foldable rear seat back‐ rest 133
Foot brake 143
Footwell lamps, refer to Inte‐ rior lamps 84
For your own safety 6
Four-wheel drive, refer to xDrive 98
Front airbags 86
Front fog lamps 84
Front fog lamps, indicator lamp 84
FTM Flat Tire Monitor 88
Fuel 248
Fuel
– Refer to Average fuel con‐ sumption 74
Fuel, average consump‐
tion 74
Fuel cap 246
Fuel cap, closing 246
Fuel consumption display
– Average fuel consump‐ tion 74
Fuel consumption display,
current fuel consumption 72
Fuel-efficient driving, refer to Current
fuel consumption 72
Fuel filler flap, closing 246
Fuel filler flap, opening 246
Fuel filler flap, unlocking in case of an electrical malfunc‐
tion 246
Fuel gauge 73
Fuel, high-quality brands 248 Fuel, quality
248
Fuel, saving 148
Fuel, specifications 248
Fuel
tank capacity, refer to Fill‐
ing capacities 293
Fuel tank contents, refer to Filling capacities 293
Fuel tank, refer to Filling ca‐ pacities 293
Fuse 279
G
Garage door opener, refer to Integrated universal remote
control 127
Gasoline gauge, refer to Fuel gauge 73
Gasoline, refer to Required fuel 248
Gas station recommenda‐ tion 162
Gear change, automatic trans‐ mission with Steptronic 70
Gear change, via shift pad‐ dles 70
General driving notes 142
Glass sunroof, closing 43
Glass sunroof, electric
– Convenient operation 30
– Remote control 30
Glass sunroof, initializing 44
Glass sunroof, opening 43
Glass sunroof, pinch protec‐
tion 44
Glass sunroof, power fail‐ ure 44
Glass sunroof, refer to Panor‐ amic glass sunroof 42
Glass sunroof, tilting 43
Glove compartment 134
Glove compartment
– USB interface 134
Glove compartment, light‐
ing 134
GPS navigation, refer to Navi‐ gation system 152
Gross vehicle weight, refer to Weights 292 H
Handbrake, refer to Parking
brake 63
Hand-held transmitter, alter‐ nating code 128
Hands-free microphone 16
Hazard warning sys‐ tem 16, 280
HDC Hill Descent Control 98
HD Radio 175
Head airbags 86
Headlamp control, auto‐ matic 81, 82
Headlamp courtesy delay fea‐ ture 81
Headlamp flasher 66, 83
Headlamp flasher, indicator lamp 15
Headlamps 81
Headlamps, care 285
Headlamps, cleaning 67
Headlamps, cleaning, washer fluid 68
Headliner 17
Headphones,
connecting, rear
DVD system 201
Head restraints 51
Head-up Display 117
Head-up Display, care 287
Heatable rear window 121
Heating 119
Heating
– Seats 48
Heating, interior 119
Heating, mirrors 54
Heating, residual heat 122
Heating with the engine switched off, refer to Resid‐
ual heat 122
Heavy cargo, refer to Stowing cargo 145
Height, refer to Dimen‐ sions 291
High-beam Assistant 83
High beams 83
High beams/low beams, auto‐ matic, refer to High-beam
Assistant 83
Seite 307
307Online Edition for Part no. 01 40 2 606 735 - 03 11 500
Reference Mobility Communication Entertainment Navigation Driving tips Controls At a glance