turn signal BMW X6 M 2012 Owners Manual
[x] Cancel search | Manufacturer: BMW, Model Year: 2012, Model line: X6 M, Model: BMW X6 M 2012Pages: 317, PDF Size: 8.83 MB
Page 13 of 317
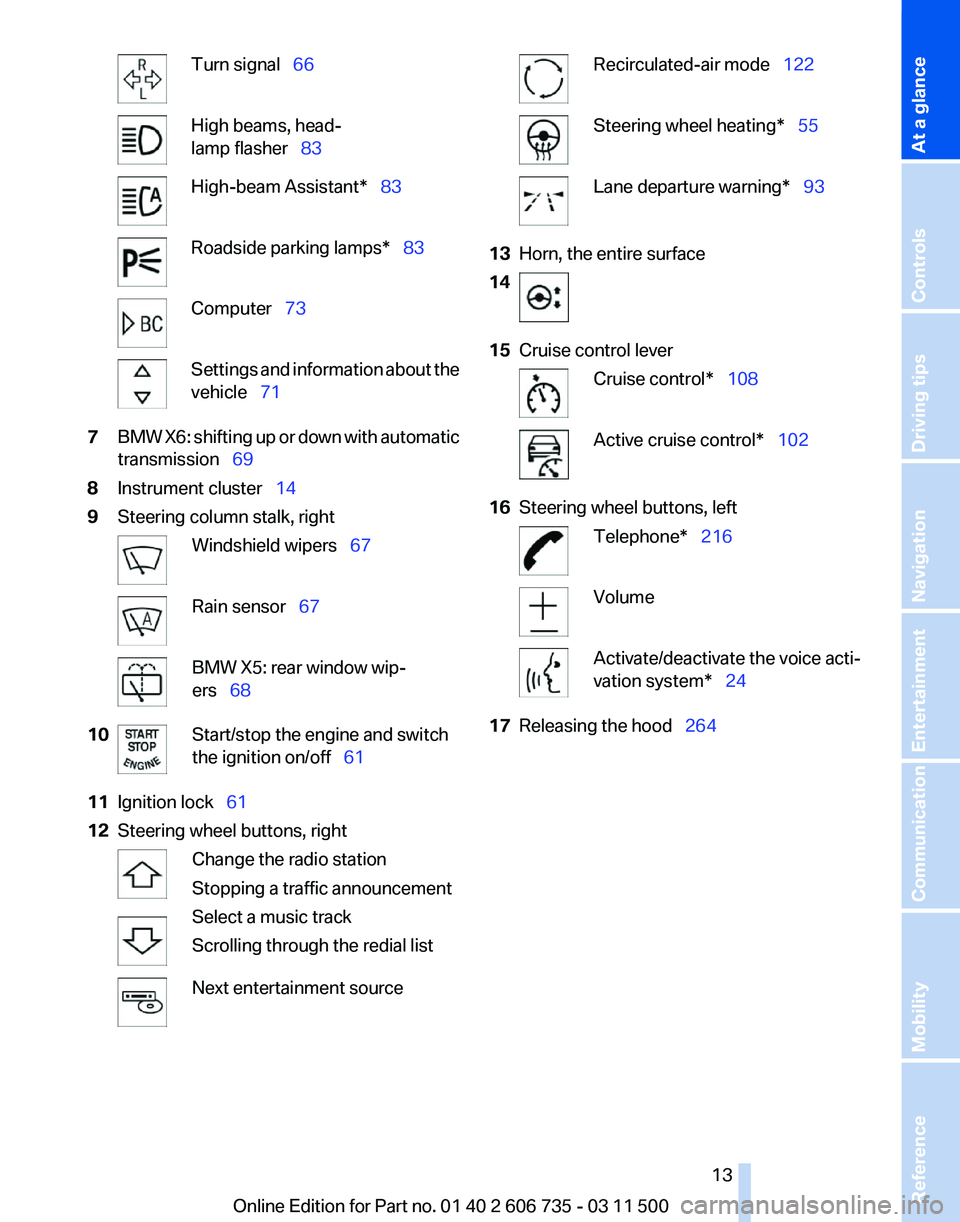
Turn signal 66
High beams, head‐
lamp flasher 83
High-beam Assistant* 83
Roadside parking lamps* 83
Computer 73
Settings and information about the
vehicle 71
7 BMW X6: shifting up or down with automatic
transmission 69
8 Instrument cluster 14
9 Steering column stalk, right Windshield wipers 67
Rain sensor
67 BMW X5: rear window wip‐
ers 68
10 Start/stop the engine and switch
the ignition on/off 61
11 Ignition lock 61
12 Steering wheel buttons, right Change the radio station
Stopping a traffic announcement
Select a music track
Scrolling through the redial list
Next entertainment source Recirculated-air mode 122
Steering wheel heating* 55
Lane departure warning* 93
13 Horn, the entire surface
14 15
Cruise control lever Cruise control*
108 Active cruise control*
102
16 Steering wheel buttons, left Telephone* 216
Volume
Activate/deactivate the voice acti‐
vation system* 24
17 Releasing the hood 264
Seite 13
13Online Edition for Part no. 01 40 2 606 735 - 03 11 500
Reference Mobility Communication Entertainment Navigation Driving tips Controls
At a glance
Page 14 of 317
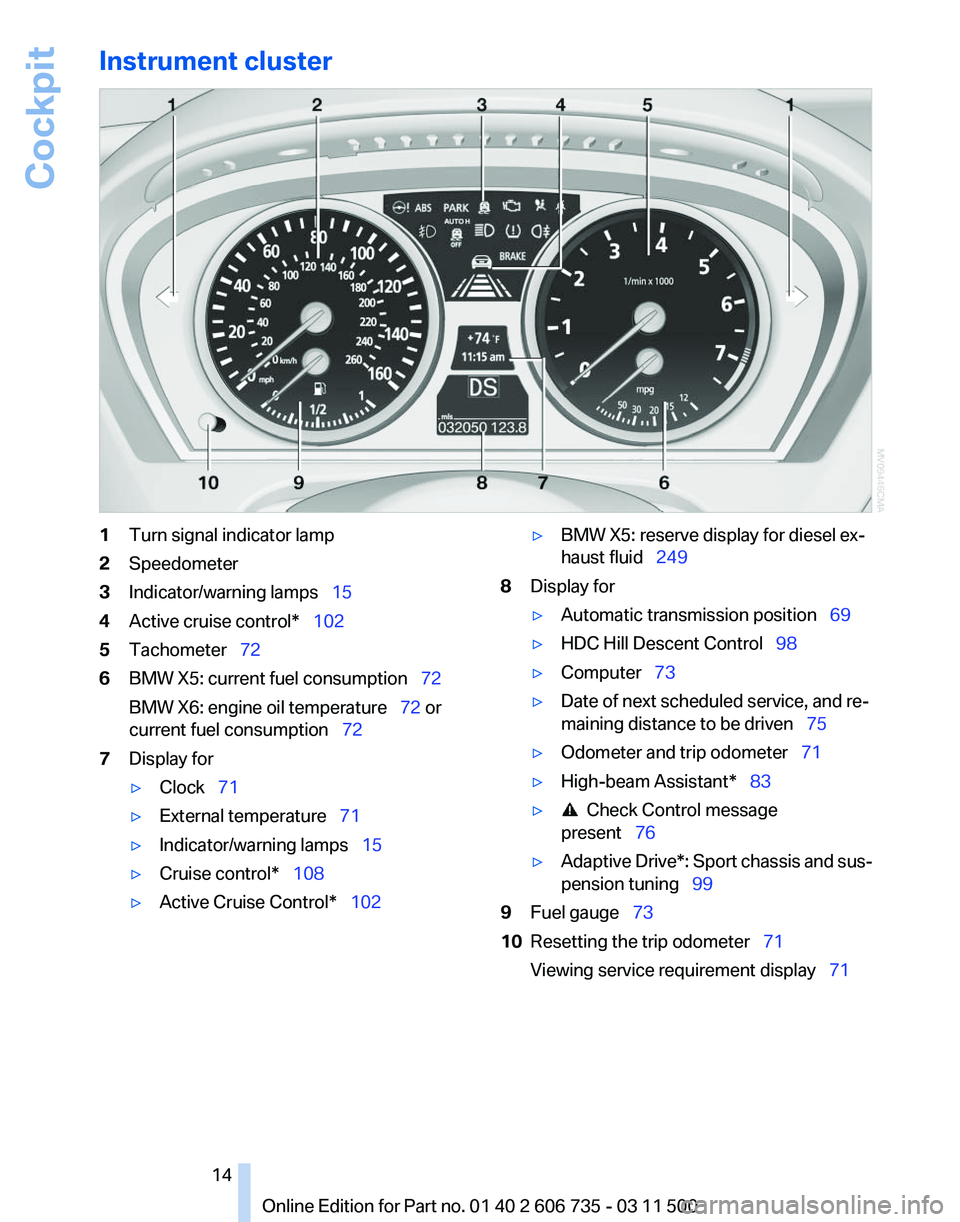
Instrument cluster
1
Turn signal indicator lamp
2 Speedometer
3 Indicator/warning lamps 15
4 Active cruise control* 102
5 Tachometer 72
6 BMW X5: current fuel consumption 72
BMW X6: engine oil temperature
72 or
current fuel consumption 72
7 Display for
▷Clock 71
▷ External temperature 71
▷ Indicator/warning lamps 15
▷ Cruise control* 108
▷ Active Cruise Control* 102 ▷
BMW X5: reserve display for diesel ex‐
haust fluid 249
8 Display for
▷Automatic transmission position 69
▷ HDC Hill Descent Control 98
▷ Computer 73
▷ Date of next scheduled service, and re‐
maining distance to be driven
75
▷ Odometer and trip odometer 71
▷ High-beam Assistant* 83
▷ Check Control message
present 76
▷ Adaptive Drive*:
Sport chassis and sus‐
pension tuning 99
9 Fuel gauge 73
10 Resetting the trip odometer 71
Viewing service requirement display 71
Seite 14
14 Online Edition for Part no. 01 40 2 606 735 - 03 11 500
Cockpit
Page 29 of 317
The individual settings are stored for a maximum
of
four remote controls. They are stored for two
remote controls if Comfort Access* is in use.
Personal Profile settings
The following functions and settings can be
stored in a profile.
More information on the settings can be found
under:
▷ Assigning the programmable memory but‐
tons, refer to page 22.
▷ Response of the central locking system
when the car is being unlocked, refer to
page 30.
▷ Automatic locking of the vehicle, refer to
page 33.
▷ Driver's seat, exterior mirror and steering
wheel positions*, refer to page 53.
▷ Settings for the display on the Control Dis‐
play and in the instrument cluster:
▷12h/24h clock format, refer to
page 79.
▷ Date format, refer to page 79.
▷ Brightness of the Control Display, refer
to page 80.
▷ Language on the Control Display, refer
to page 80.
▷ Units of measure for fuel consumption,
distance covered/remaining distances,
and temperature, refer to page 80.
▷ Show visual warning for the Park Distance
Control PDC*, refer to page 111.
▷ Show visual warning for Top View*, refer to
page 114.
▷ Show Side View*, refer to page 116.
▷ Backup camera*:
▷Function selection, refer to page 113.
▷ Type of display, refer to page 114.
▷ Lane departure warning*: last setting, on/
off, refer to page 93.
▷ Head-up Display*: selection, brightness and
position of the display, refer to page 117.▷
Adaptive Drive*: selected chassis and sus‐
pension tuning, refer to page 99.
▷ Light settings:
▷Triple turn signal activation, refer to
page 66.
▷ Welcome lamps, refer to page 81.
▷ Headlamp courtesy delay feature, refer
to page 81.
▷ Daytime running lights, refer to
page 82.
▷ High-beam Assistant*, refer to
page 83.
▷ Automatic climate control with 2-zone con‐
trol: settings, refer to page 120.
▷ Navigation:
▷Voice activation, refer to page 163.
▷ Route criteria, refer to page 161.
▷ Map view settings, refer to page 164.
▷ Entertainment:
▷Tone control, refer to page 172.
▷ Radio, stored stations, refer to
page 180.
▷ CD/multimedia, audio source listened to
last, refer to page 181.
▷ Telephone: volume, refer to page 220.
Central locking system
The concept
The central locking system becomes active
when the driver's door is closed.
The system simultaneously engages and re‐
leases the locks on the following:
▷ Doors.
▷ Tailgate.
▷ Fuel filler flap.
Operating from the outside
▷ Via the remote control.
▷ Via the door lock*.
Seite 29
29Online Edition for Part no. 01 40 2 606 735 - 03 11 500
Reference Mobility Communication Entertainment Navigation Driving tips
Controls At a glance
Page 66 of 317
Have the malfunction corrected
Have the malfunction corrected at the
nearest service center or at a workshop that
works
according to BMW repair procedures with
correspondingly trained personnel. If the park‐
ing brake has been released manually in re‐
sponse to a malfunction, only technicians can
return it to operation.◀
Following manual release, the actual status of
the parking brake may deviate from that dis‐
played by the indicator lamp.
Putting into operation after a power
failure
Putting the parking brake into operation
The parking brake should only be put into
operation again if it was manually released due
to an interruption in the supply of electrical
power. Otherwise the operation of the parking
brake is not ensured and there is a danger of the
vehicle rolling despite the parking brake being
set.◀
Procedure
1. Switch on the ignition.
2. Press the button with the brake depressed.
The indicator lamp in the instrument
cluster goes out as soon as the parking
brake is ready for operation.
Indicator lamp in Canadian models.
Any
noises which occur are normal. Startup may
take several seconds. Turn signal, high beams,
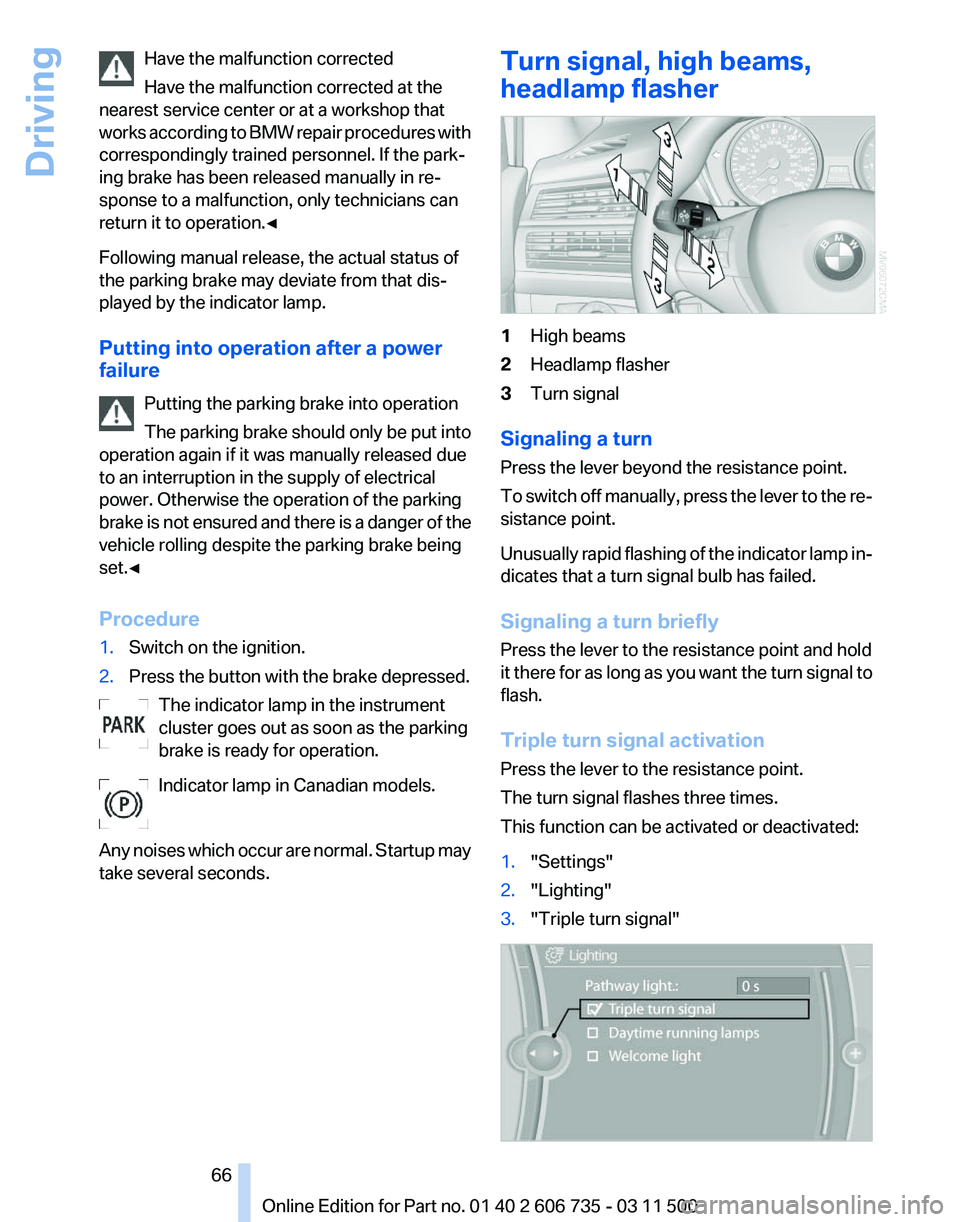
headlamp flasher
1
High beams
2 Headlamp flasher
3 Turn signal
Signaling a turn
Press the lever beyond the resistance point.
To
switch off manually, press the lever to the re‐
sistance point.
Unusually rapid flashing of the indicator lamp in‐
dicates that a turn signal bulb has failed.
Signaling a turn briefly
Press the lever to the resistance point and hold
it there for as long as you want the turn signal to
flash.
Triple turn signal activation
Press the lever to the resistance point.
The turn signal flashes three times.
This function can be activated or deactivated:
1. "Settings"
2. "Lighting"
3. "Triple turn signal" Seite 66
66 Online Edition for Part no. 01 40 2 606 735 - 03 11 500
Driving
Page 71 of 317
Displays
Odometer, external
temperature display, clock
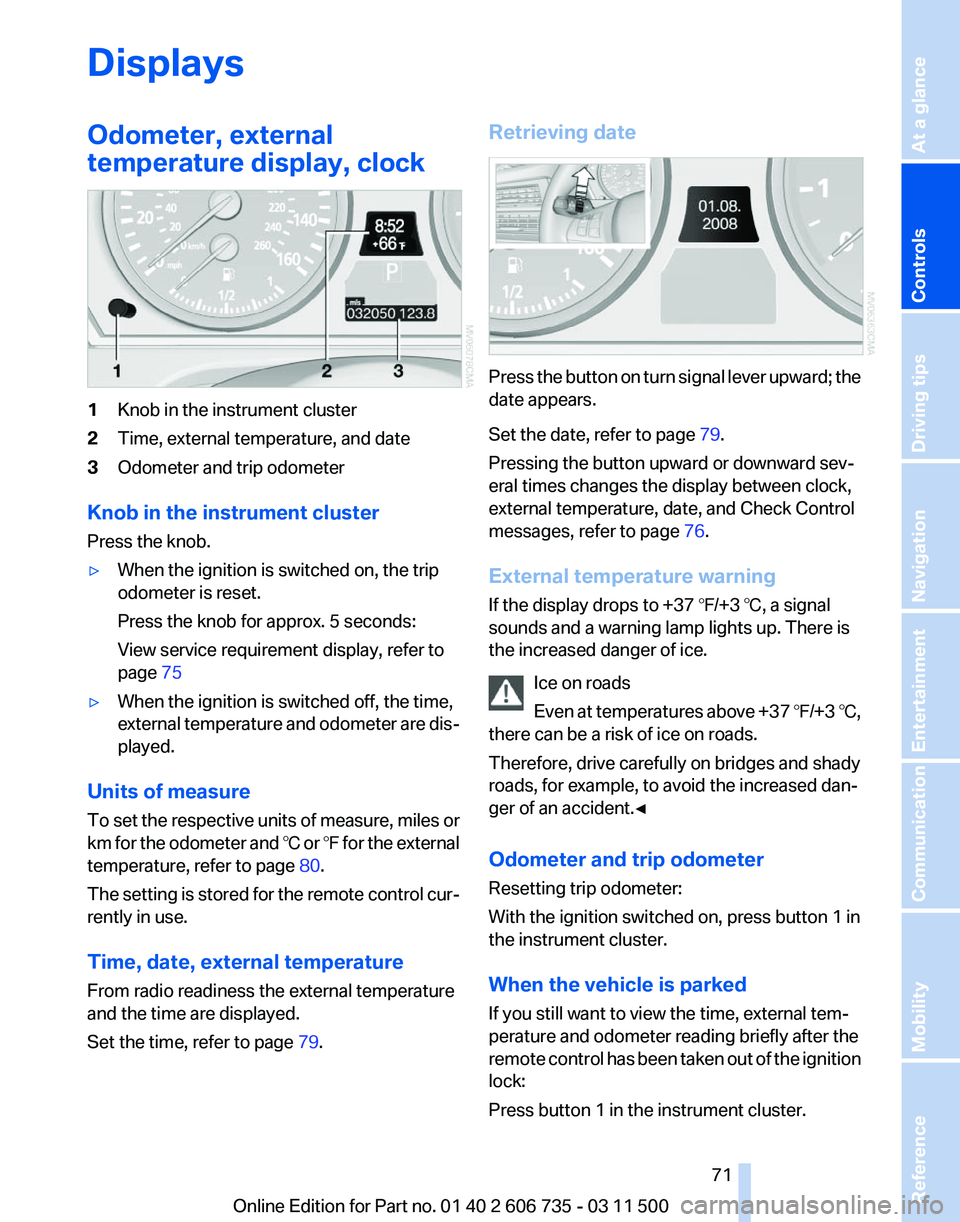
1
Knob in the instrument cluster
2 Time, external temperature, and date
3 Odometer and trip odometer
Knob in the instrument cluster
Press the knob.
▷ When the ignition is switched on, the trip
odometer is reset.
Press the knob for approx. 5 seconds:
View service requirement display, refer to
page 75
▷ When the ignition is switched off, the time,
external
temperature and odometer are dis‐
played.
Units of measure
To
set the respective units of measure, miles or
km for the odometer and ℃ or ℉ for the external
temperature, refer to page 80.
The setting is stored for the remote control cur‐
rently in use.
Time, date, external temperature
From radio readiness the external temperature
and the time are displayed.
Set the time, refer to page 79.Retrieving date
Press the button on turn signal lever upward; the
date appears.
Set the date, refer to page
79.
Pressing the button upward or downward sev‐
eral times changes the display between clock,
external temperature, date, and Check Control
messages, refer to page 76.
External temperature warning
If the display drops to +37 ℉/+3 ℃, a signal
sounds and a warning lamp lights up. There is
the increased danger of ice. Ice on roads
Even
at temperatures above +37 ℉/+3 ℃,
there can be a risk of ice on roads.
Therefore, drive carefully on bridges and shady
roads, for example, to avoid the increased dan‐
ger of an accident.◀
Odometer and trip odometer
Resetting trip odometer:
With the ignition switched on, press button 1 in
the instrument cluster.
When the vehicle is parked
If you still want to view the time, external tem‐
perature and odometer reading briefly after the
remote control has been taken out of the ignition
lock:
Press button 1 in the instrument cluster. Seite 71
71Online Edition for Part no. 01 40 2 606 735 - 03 11 500
Reference Mobility Communication Entertainment Navigation Driving tips
Controls At a glance
Page 73 of 317
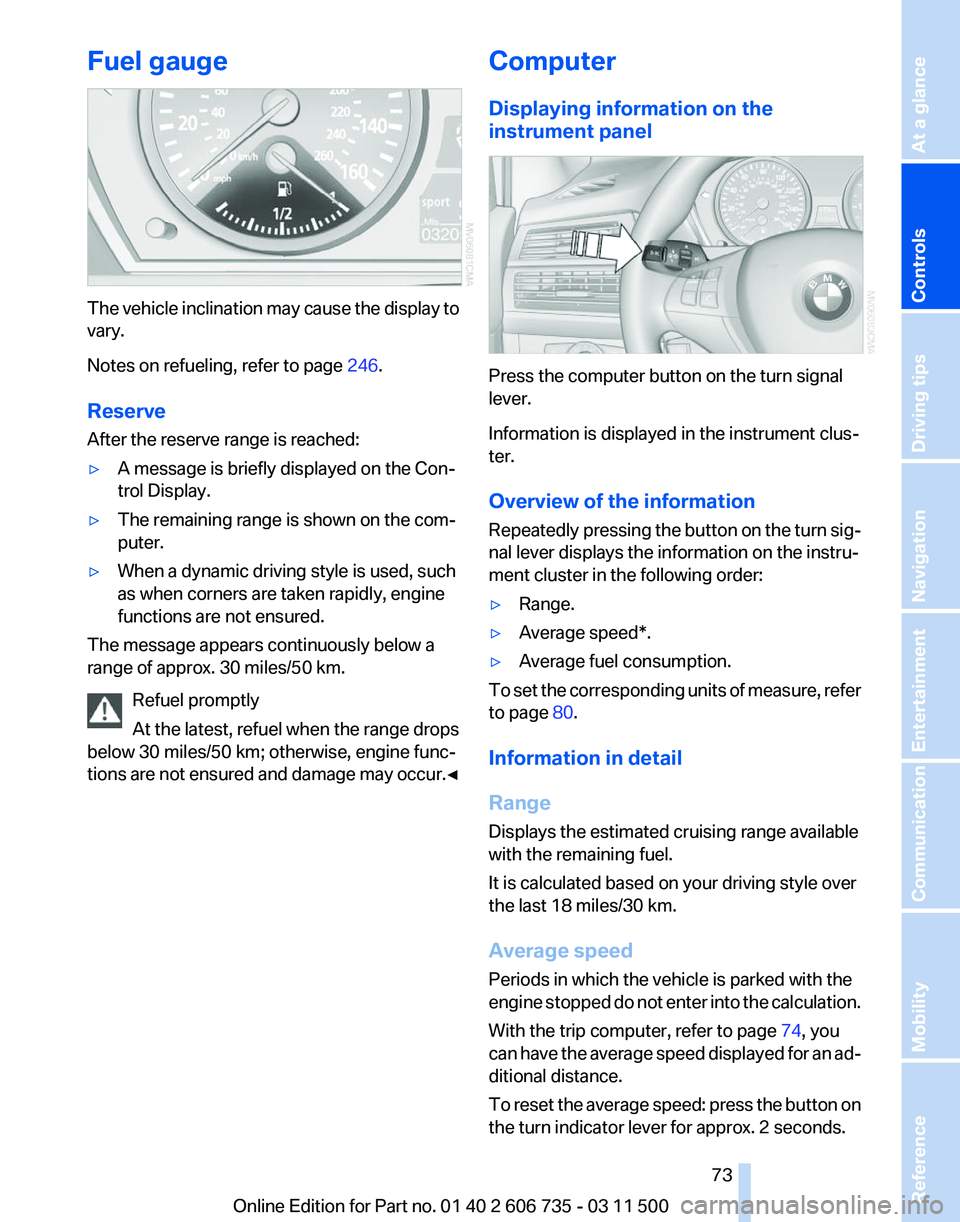
Fuel gauge
The vehicle inclination may cause the display to
vary.
Notes on refueling, refer to page
246.
Reserve
After the reserve range is reached:
▷ A message is briefly displayed on the Con‐
trol Display.
▷ The remaining range is shown on the com‐
puter.
▷ When a dynamic driving style is used, such
as when corners are taken rapidly, engine
functions are not ensured.
The message appears continuously below a
range of approx. 30 miles/50 km.
Refuel promptly
At the latest, refuel when the range drops
below 30 miles/50 km; otherwise, engine func‐
tions
are not ensured and damage may occur.◀ Computer
Displaying information on the
instrument panel
Press the computer button on the turn signal
lever.
Information is displayed in the instrument clus‐
ter.
Overview of the information
Repeatedly
pressing the button on the turn sig‐
nal lever displays the information on the instru‐
ment cluster in the following order:
▷ Range.
▷ Average speed*.
▷ Average fuel consumption.
To set the corresponding units of measure, refer
to page 80.
Information in detail
Range
Displays the estimated cruising range available
with the remaining fuel.
It is calculated based on your driving style over
the last 18 miles/30 km.
Average speed
Periods in which the vehicle is parked with the
engine
stopped do not enter into the calculation.
With the trip computer, refer to page 74, you
can have the average speed displayed for an ad‐
ditional distance.
To reset the average speed: press the button on
the turn indicator lever for approx. 2 seconds.
Seite 73
73Online Edition for Part no. 01 40 2 606 735 - 03 11 500
Reference Mobility Communication Entertainment Navigation Driving tips
Controls At a glance
Page 77 of 317
in some circumstances, an acoustic signal and
text
messages at the top of the Control Display.
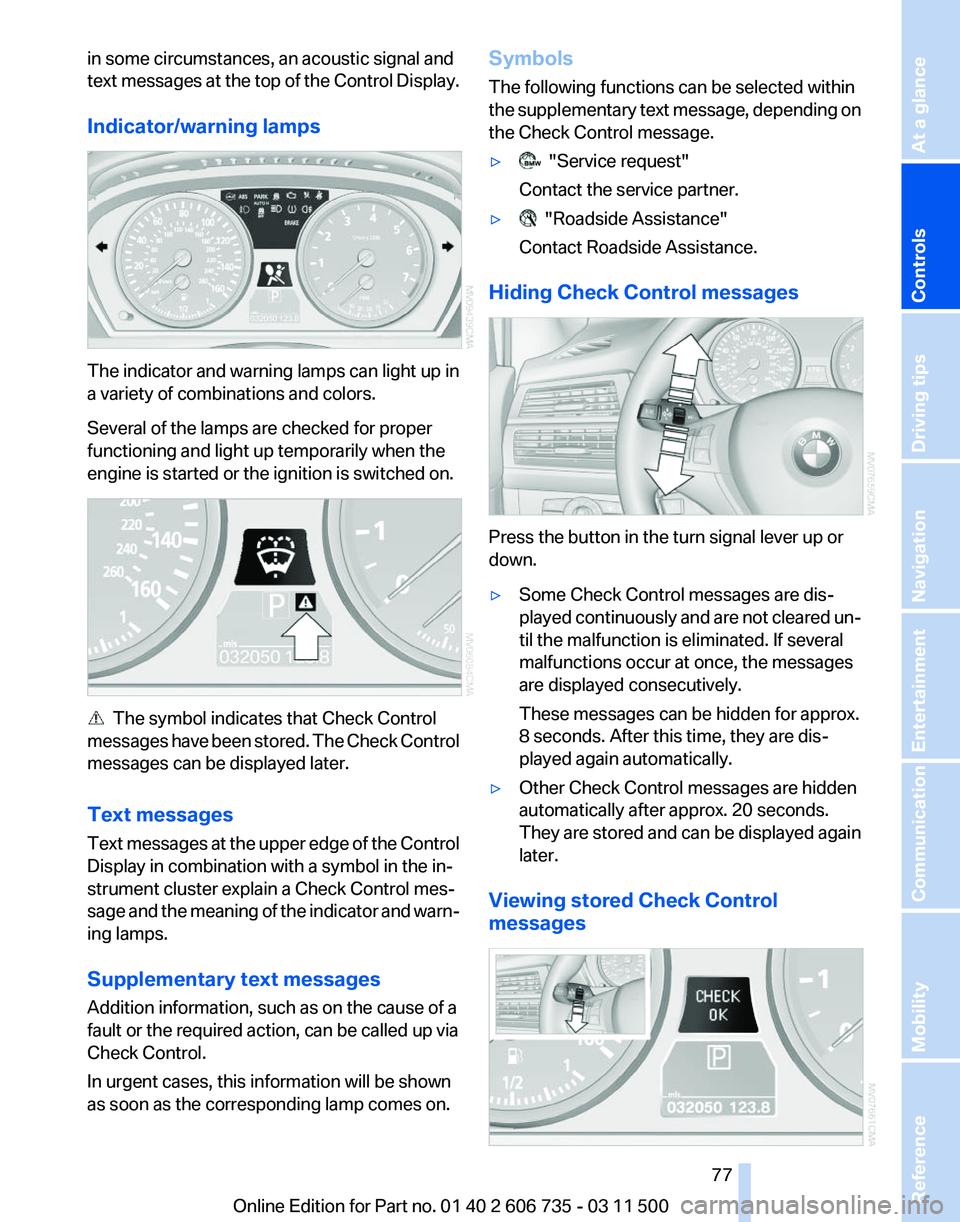
Indicator/warning lamps The indicator and warning lamps can light up in
a variety of combinations and colors.
Several of the lamps are checked for proper
functioning and light up temporarily when the
engine is started or the ignition is switched on.
The symbol indicates that Check Control
messages
have been stored. The Check Control
messages can be displayed later.
Text messages
Text messages at the upper edge of the Control
Display in combination with a symbol in the in‐
strument cluster explain a Check Control mes‐
sage and the meaning of the indicator and warn‐
ing lamps.
Supplementary text messages
Addition information, such as on the cause of a
fault or the required action, can be called up via
Check Control.
In urgent cases, this information will be shown
as soon as the corresponding lamp comes on. Symbols
The following functions can be selected within
the
supplementary text message, depending on
the Check Control message.
▷ "Service request"
Contact the service partner.
▷ "Roadside Assistance"
Contact Roadside Assistance.
Hiding Check Control messages Press the button in the turn signal lever up or
down.
▷
Some Check Control messages are dis‐
played
continuously and are not cleared un‐
til the malfunction is eliminated. If several
malfunctions occur at once, the messages
are displayed consecutively.
These messages can be hidden for approx.
8 seconds. After this time, they are dis‐
played again automatically.
▷ Other Check Control messages are hidden
automatically after approx. 20 seconds.
They
are stored and can be displayed again
later.
Viewing stored Check Control
messages Seite 77
77Online Edition for Part no. 01 40 2 606 735 - 03 11 500
Reference Mobility Communication Entertainment Navigation Driving tips
Controls At a glance
Page 78 of 317
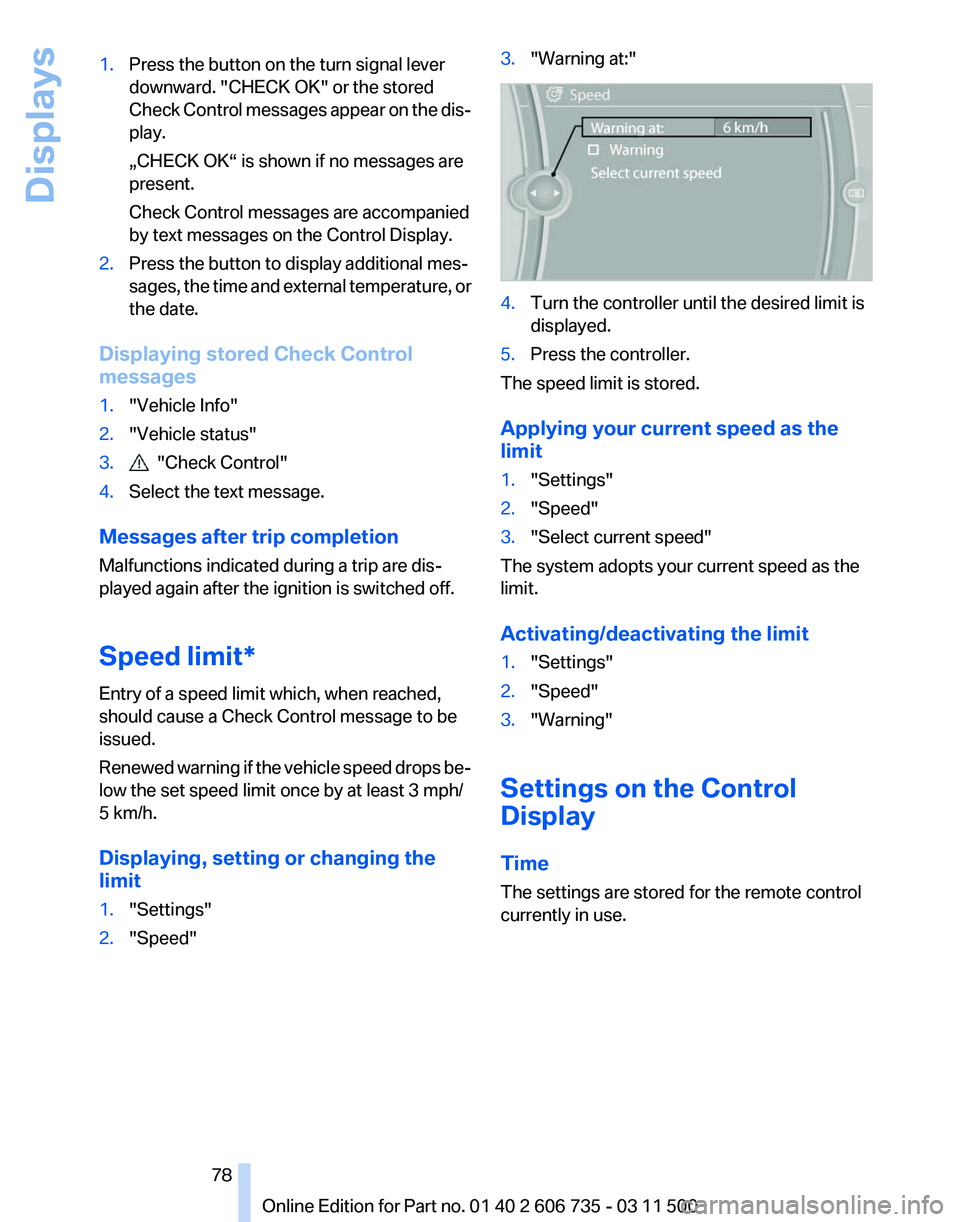
1.
Press the button on the turn signal lever
downward. "CHECK OK" or the stored
Check
Control messages appear on the dis‐
play.
„CHECK OK“ is shown if no messages are
present.
Check Control messages are accompanied
by text messages on the Control Display.
2. Press the button to display additional mes‐
sages,
the time and external temperature, or
the date.
Displaying stored Check Control
messages
1. "Vehicle Info"
2. "Vehicle status"
3. "Check Control"
4. Select the text message.
Messages after trip completion
Malfunctions indicated during a trip are dis‐
played again after the ignition is switched off.
Speed limit
*
Entry of a speed limit which, when reached,
should cause a Check Control message to be
issued.
Renewed warning if the vehicle speed drops be‐
low the set speed limit once by at least 3 mph/
5 km/h.
Displaying, setting or changing the
limit
1. "Settings"
2. "Speed" 3.
"Warning at:" 4.
Turn the controller until the desired limit is
displayed.
5. Press the controller.
The speed limit is stored.
Applying your current speed as the
limit
1. "Settings"
2. "Speed"
3. "Select current speed"
The system adopts your current speed as the
limit.
Activating/deactivating the limit
1. "Settings"
2. "Speed"
3. "Warning"
Settings on the Control
Display
Time
The settings are stored for the remote control
currently in use.
Seite 78
78 Online Edition for Part no. 01 40 2 606 735 - 03 11 500
Displays
Page 82 of 317
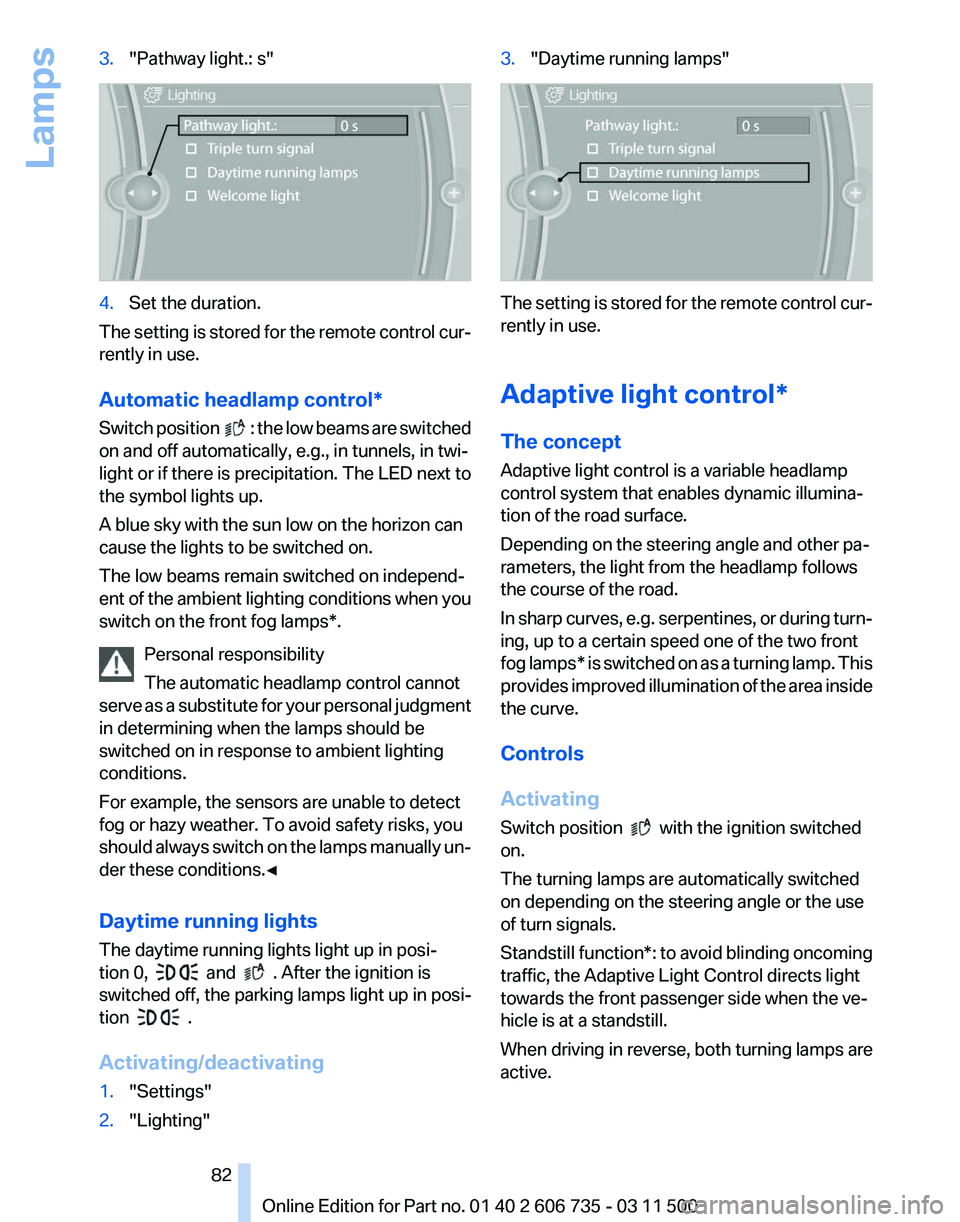
3.
"Pathway light.: s" 4.
Set the duration.
The setting is stored for the remote control cur‐
rently in use.
Automatic headlamp control
*
Switch position : the low beams are switched
on and off automatically, e.g., in tunnels, in twi‐
light or if there is precipitation. The LED next to
the symbol lights up.
A blue sky with the sun low on the horizon can
cause the lights to be switched on.
The low beams remain switched on independ‐
ent
of the ambient lighting conditions when you
switch on the front fog lamps*.
Personal responsibility
The automatic headlamp control cannot
serve as a substitute for your personal judgment
in determining when the lamps should be
switched on in response to ambient lighting
conditions.
For example, the sensors are unable to detect
fog or hazy weather. To avoid safety risks, you
should always switch on the lamps manually un‐
der these conditions.◀
Daytime running lights
The daytime running lights light up in posi‐
tion 0, and . After the ignition is
switched off, the parking lamps light up in posi‐
tion .
Activating/deactivating
1. "Settings"
2. "Lighting" 3.
"Daytime running lamps" The setting is stored for the remote control cur‐
rently in use.
Adaptive light control*
The concept
Adaptive light control is a variable headlamp
control system that enables dynamic illumina‐
tion of the road surface.
Depending on the steering angle and other pa‐
rameters, the light from the headlamp follows
the course of the road.
In
sharp curves, e.g. serpentines, or during turn‐
ing, up to a certain speed one of the two front
fog lamps* is switched on as a turning lamp. This
provides improved illumination of the area inside
the curve.
Controls
Activating
Switch position with the ignition switched
on.
The turning lamps are automatically switched
on depending on the steering angle or the use
of turn signals.
Standstill function*:
to avoid blinding oncoming
traffic, the Adaptive Light Control directs light
towards the front passenger side when the ve‐
hicle is at a standstill.
When driving in reverse, both turning lamps are
active.
Seite 82
82 Online Edition for Part no. 01 40 2 606 735 - 03 11 500
Lamps
Page 93 of 317
should stop and check your tires as soon as
possible, and inflate them to the proper pres‐
sure.
Driving on a significantly under-inflated tire
causes the tire to overheat and can lead to tire
failure. Under-inflation also reduces fuel effi‐
ciency and tire tread life, and may affect the ve‐
hicle's handling and stopping ability.
Please note that the TPMS is not a substitute for
proper tire maintenance, and it is the driver's re‐
sponsibility to maintain correct tire pressure,
even if under-inflation has not reached the level
to trigger illumination of the TPMS low tire pres‐
sure telltale.
Your vehicle has also been equipped with a
TPMS malfunction indicator to indicate when
the system is not operating properly. The TPMS
malfunction indicator is combined with the low
tire pressure telltale. When the system detects
a malfunction, the telltale will flash for approxi‐
mately one minute and then remain continu‐
ously illuminated. This sequence will continue
upon subsequent vehicle startups as long as the
malfunction exists. When the malfunction indi‐
cator is illuminated, the system may not be able
to detect or signal low tire pressure as intended.
TPMS malfunctions may occur for a variety of
reasons, including the installation of replace‐
ment or alternate tires or wheels on the vehicle
that prevent the TPMS from functioning prop‐
erly. Always check the TPMS malfunction tell‐
tale after replacing one or more tires or wheels
on your vehicle to ensure that the replacement
or alternate tires and wheels allow the TPMS to
continue to function properly.
Lane departure warning*
The concept
This system issues a warning at speeds above
approx. 40 mph/65 km/h if the vehicle is about
to leave the lane on roads with lane markings.
The steering wheel begins vibrating lightly.
The system does not issue a warning if the turn
signal is set before leaving the lane. Switching on/off
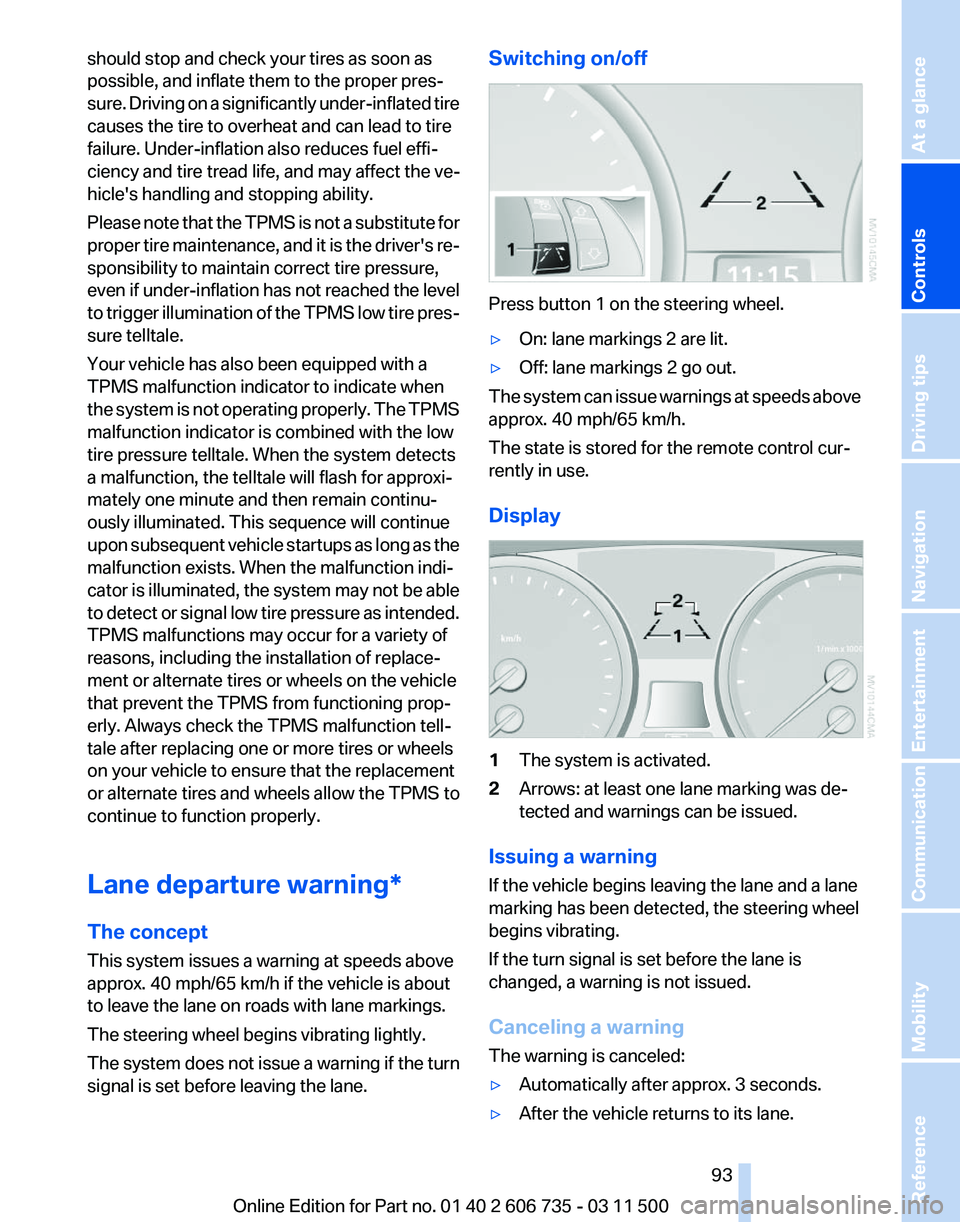
Press button 1 on the steering wheel.
▷
On: lane markings 2 are lit.
▷ Off: lane markings 2 go out.
The system can issue warnings at speeds above
approx. 40 mph/65 km/h.
The state is stored for the remote control cur‐
rently in use.
Display 1
The system is activated.
2 Arrows: at least one lane marking was de‐
tected and warnings can be issued.
Issuing a warning
If the vehicle begins leaving the lane and a lane
marking has been detected, the steering wheel
begins vibrating.
If the turn signal is set before the lane is
changed, a warning is not issued.
Canceling a warning
The warning is canceled:
▷ Automatically after approx. 3 seconds.
▷ After the vehicle returns to its lane.
Seite 93
93Online Edition for Part no. 01 40 2 606 735 - 03 11 500
Reference Mobility Communication Entertainment Navigation Driving tips
Controls At a glance