change wheel BMW X6 XDRIVE 35I 2014 User Guide
[x] Cancel search | Manufacturer: BMW, Model Year: 2014, Model line: X6 XDRIVE 35I, Model: BMW X6 XDRIVE 35I 2014Pages: 323, PDF Size: 8.36 MB
Page 94 of 323
Switching on/off
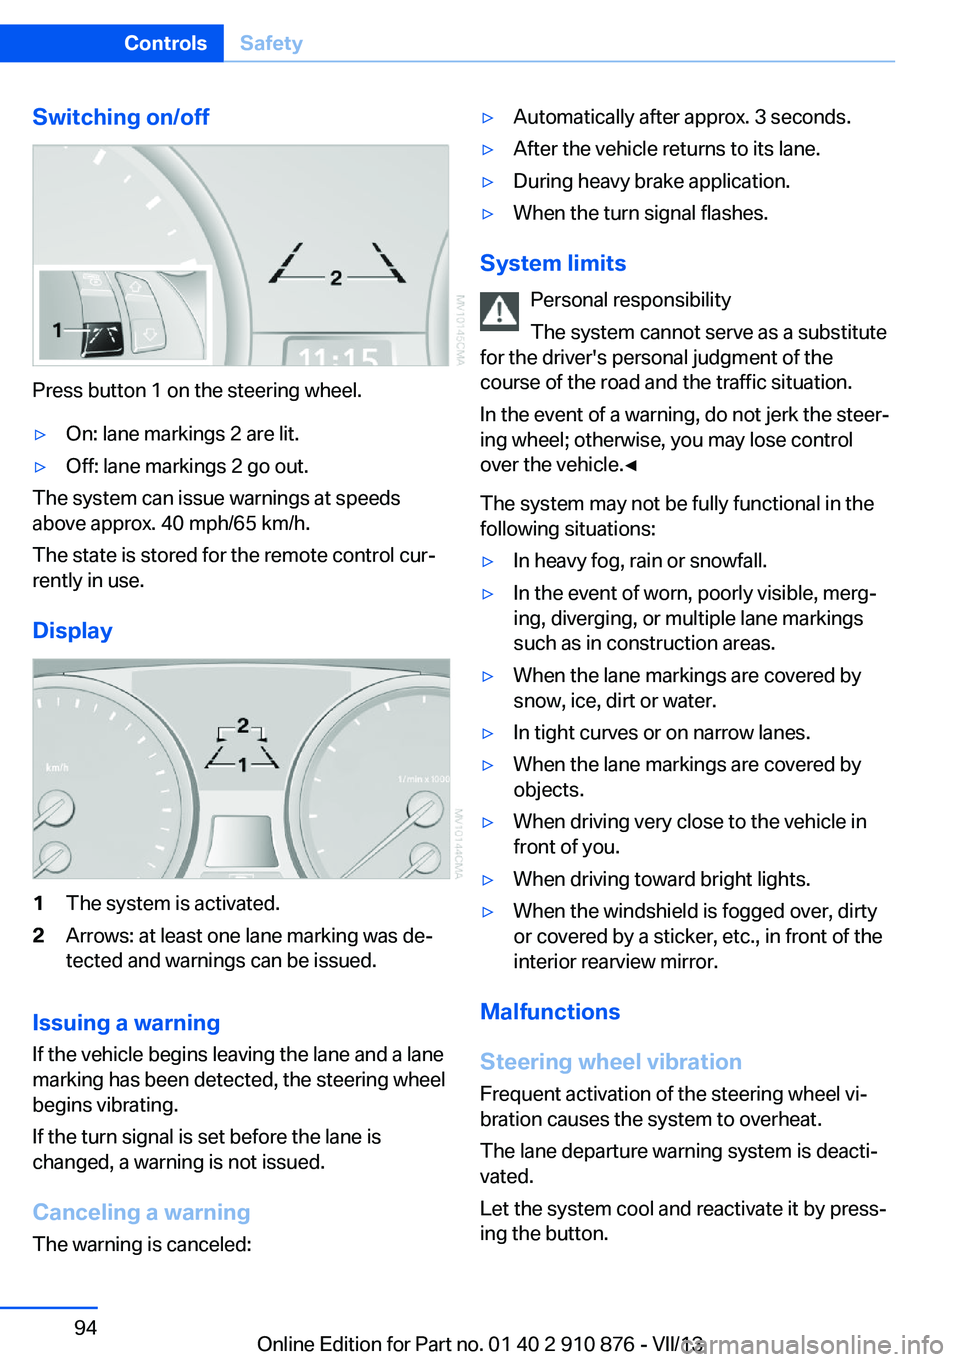
Press button 1 on the steering wheel.
▷On: lane markings 2 are lit.▷Off: lane markings 2 go out.
The system can issue warnings at speeds
above approx. 40 mph/65 km/h.
The state is stored for the remote control cur‐
rently in use.
Display
1The system is activated.2Arrows: at least one lane marking was de‐
tected and warnings can be issued.
Issuing a warning
If the vehicle begins leaving the lane and a lane
marking has been detected, the steering wheel
begins vibrating.
If the turn signal is set before the lane is
changed, a warning is not issued.
Canceling a warning The warning is canceled:
▷Automatically after approx. 3 seconds.▷After the vehicle returns to its lane.▷During heavy brake application.▷When the turn signal flashes.
System limits
Personal responsibility
The system cannot serve as a substitute
for the driver's personal judgment of the
course of the road and the traffic situation.
In the event of a warning, do not jerk the steer‐
ing wheel; otherwise, you may lose control
over the vehicle.◀
The system may not be fully functional in the
following situations:
▷In heavy fog, rain or snowfall.▷In the event of worn, poorly visible, merg‐
ing, diverging, or multiple lane markings
such as in construction areas.▷When the lane markings are covered by
snow, ice, dirt or water.▷In tight curves or on narrow lanes.▷When the lane markings are covered by
objects.▷When driving very close to the vehicle in
front of you.▷When driving toward bright lights.▷When the windshield is fogged over, dirty
or covered by a sticker, etc., in front of the
interior rearview mirror.
Malfunctions
Steering wheel vibration
Frequent activation of the steering wheel vi‐
bration causes the system to overheat.
The lane departure warning system is deacti‐
vated.
Let the system cool and reactivate it by press‐
ing the button.
Seite 94ControlsSafety94
Online Edition for Part no. 01 40 2 910 876 - VII/13
Page 96 of 323
Driving stability control systemsVehicle equipmentThis chapter describes all series equipment as
well as country-specific and special equipment
offered for this model series.Therefore, it also
describes equipment that may not be found in
your vehicle, for instance due to the selected
special equipment or the country version. This
also applies to safety-related functions and
systems.
Antilock Brake System ABS
ABS prevents locking of the wheels during
braking.
The vehicle remains steerable even during full
brake applications, thus increasing active
safety.
ABS is operational every time you start the en‐
gine.
CBC Cornering Brake
Control
When braking during curves or when braking
during a lane change, driving stability and
steering response are improved further.
Electronic brake-force
distribution
The system controls the brake pressure in the
rear wheels to ensure stable braking behavior.
Brake assistantWhen you apply the brakes rapidly, this system
automatically produces the maximum braking
force boost. It thus helps to achieve the short‐
est possible braking distance during full brak‐ing. This system utilizes all of the benefits pro‐
vided by ABS.
Do not reduce the pressure on the brake pedal
for the duration of the full braking.
Dynamic Stability Control DSC
The concept
DSC prevents traction loss in the driving
wheels when driving away and accelerating.
DSC also recognizes unstable vehicle condi‐
tions, such as fishtailing or nose-diving. Sub‐
ject to physical limits, DSC helps to keep the
vehicle on a steady course by reducing engine
speed and by applying brakes to the individual
wheels.
Adjust your driving style to the situation
An appropriate driving style is always the
responsibility of the driver.
The laws of physics cannot be repealed, even
with DSC.
Do not reduce the additional safety margin
with a risky driving style, as otherwise there is
a risk of an accident.◀
Deactivating DSC: DSC OFF
When DSC is deactivated, driving stability is
reduced during acceleration and when driving
in bends.
To increase vehicle stability, activate DSC
again as soon as possible.Seite 96ControlsDriving stability control systems96
Online Edition for Part no. 01 40 2 910 876 - VII/13
Page 99 of 323
greater the drive forces in the associated
wheel.
The transparent arrows indicate the maximum
value the drive forces over the last 10 seconds.
Malfunction
Malfunctions are displayed via Check Control,
refer to page 76.
Hill Descent Control HDC The conceptHDC is a downhill driving assistant that auto‐
matically controls vehicle speed on steep
downhill gradients. The vehicle moves at ap‐
proximately walking speed without braking in‐
tervention by the driver.
You can activate the Hill Descent Control at
speeds below approx. 22 mph/35 km/h. When
moving downhill at speeds below approx.
22 mph/35 km/h, the vehicle reduces its speed
to approximately walking speed, approx.
5 mph/8 km/h and keeps it constant.
Only use HDC in transmission positions D or R.
Increasing or reducing speed
The speed can be changed in the range from
approx. 4 mph/6 km/h to ap‐
prox. 15 mph/25 km/h by pressing the acceler‐
ator or brake pedal lightly.
A target speed within the same range can be
specified using the lever of the cruise control.
On inclines over 10 %, you can reduce the
speed to approx. 3 mph/4 km/h. Pull the lever
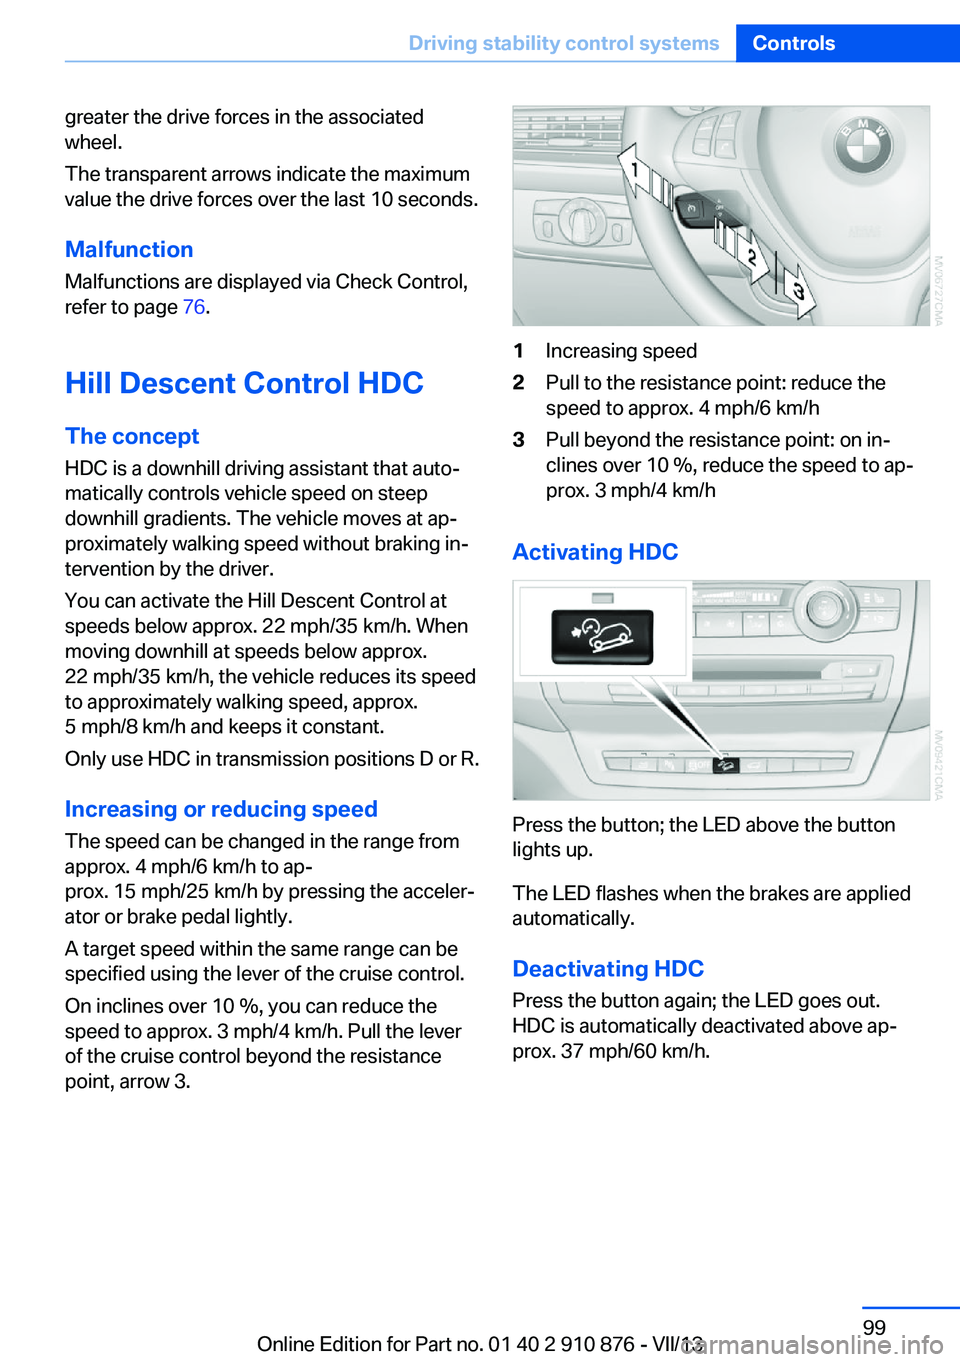
of the cruise control beyond the resistance point, arrow 3.1Increasing speed2Pull to the resistance point: reduce the
speed to approx. 4 mph/6 km/h3Pull beyond the resistance point: on in‐
clines over 10 %, reduce the speed to ap‐
prox. 3 mph/4 km/h
Activating HDC
Press the button; the LED above the button
lights up.
The LED flashes when the brakes are applied
automatically.
Deactivating HDC
Press the button again; the LED goes out.
HDC is automatically deactivated above ap‐
prox. 37 mph/60 km/h.
Seite 99Driving stability control systemsControls99
Online Edition for Part no. 01 40 2 910 876 - VII/13
Page 107 of 323
Compliance statement:
This device complies with part 15 of the FCC
Rules. Operation is subject to the following
two conditions:▷This device may not cause harmful inter‐
ference, and▷This device must accept any interference
received, including interference that may
cause undesired operation.
Any unauthorized modifications or changes to
these devices could void the user's authority to
operate this equipment.
System limits
Speed range
Best results are achieved when using the sys‐
tem on well-developed roads and highways.
The desired speed can be selected between
20 mph/30 km/h and 110 mph/180 km/h.
The system can also be activated when sta‐
tionary.
Comply with the legal speed limit in every sit‐
uation when using the system.
Detection range
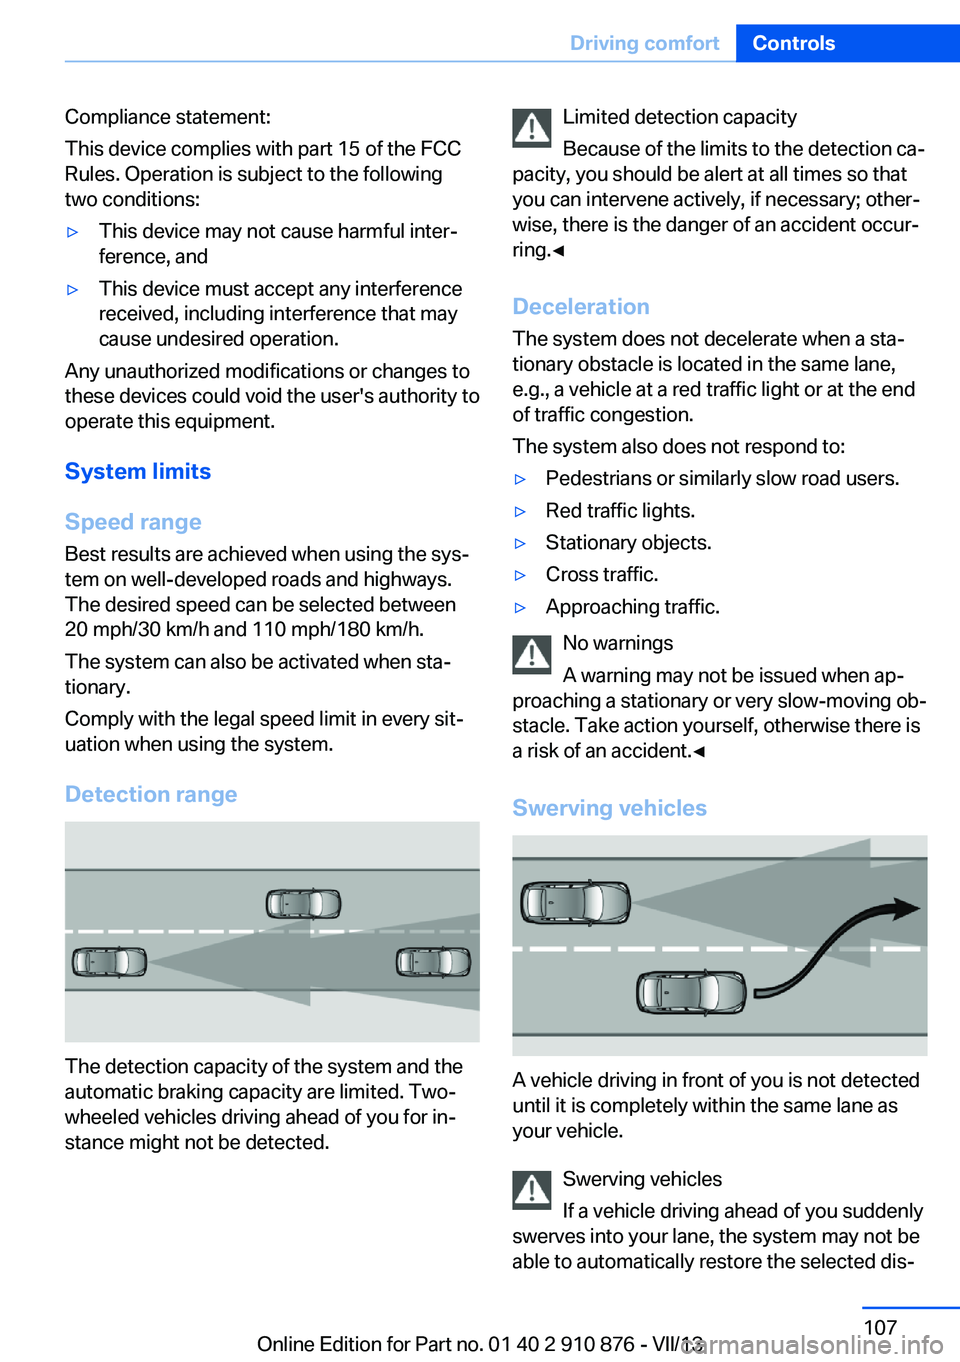
The detection capacity of the system and the
automatic braking capacity are limited. Two-
wheeled vehicles driving ahead of you for in‐
stance might not be detected.
Limited detection capacity
Because of the limits to the detection ca‐
pacity, you should be alert at all times so that
you can intervene actively, if necessary; other‐
wise, there is the danger of an accident occur‐
ring.◀
Deceleration
The system does not decelerate when a sta‐
tionary obstacle is located in the same lane,
e.g., a vehicle at a red traffic light or at the end
of traffic congestion.
The system also does not respond to:▷Pedestrians or similarly slow road users.▷Red traffic lights.▷Stationary objects.▷Cross traffic.▷Approaching traffic.
No warnings
A warning may not be issued when ap‐
proaching a stationary or very slow-moving ob‐
stacle. Take action yourself, otherwise there is
a risk of an accident.◀
Swerving vehicles
A vehicle driving in front of you is not detected
until it is completely within the same lane as
your vehicle.
Swerving vehicles
If a vehicle driving ahead of you suddenly
swerves into your lane, the system may not be
able to automatically restore the selected dis‐
Seite 107Driving comfortControls107
Online Edition for Part no. 01 40 2 910 876 - VII/13
Page 125 of 323
▷Right LED on, recirculated air mode: the
supply of outside air into the vehicle is per‐
manently blocked.
If the windows are fogged over, switch off the
recirculated-air mode and press the AUTO
button to utilize the condensation sensor.
Make sure that air can flow onto the wind‐
shield.
Continuous recirculated-air mode
The recirculated air mode should not be
used for an extended period of time, as the air
quality inside the vehicle deteriorates stead‐
ily.◀
Residual heat
The heat stored in the engine is used to heat
the interior.
Functional requirement
▷Up to 15 minutes after the engine has been
switched off.▷Warm engine.▷The battery is sufficiently charged.▷External temperature below 77 ℉/25 ℃.
Switching on
1.Switch off the ignition.2.Press the right-hand button.
REST appears on the display of the automatic
climate control when the residual heat utiliza‐
tion is switched on.
From radio readiness the interior temperature,
the air volume and the air distribution can be
set.
Switching off
You can select the lowest blower speed by
pressing and holding the left side. Pressing
again switches off the residual heat utilization.
REST disappears from the display of the auto‐
matic climate control.
Switching on/off the automatic
climate control
Switching off With the blower at its lowest setting,
press the left side of the button to
switch off the automatic climate control.
Switching on Press any button to switch the automatic cli‐mate control back on.
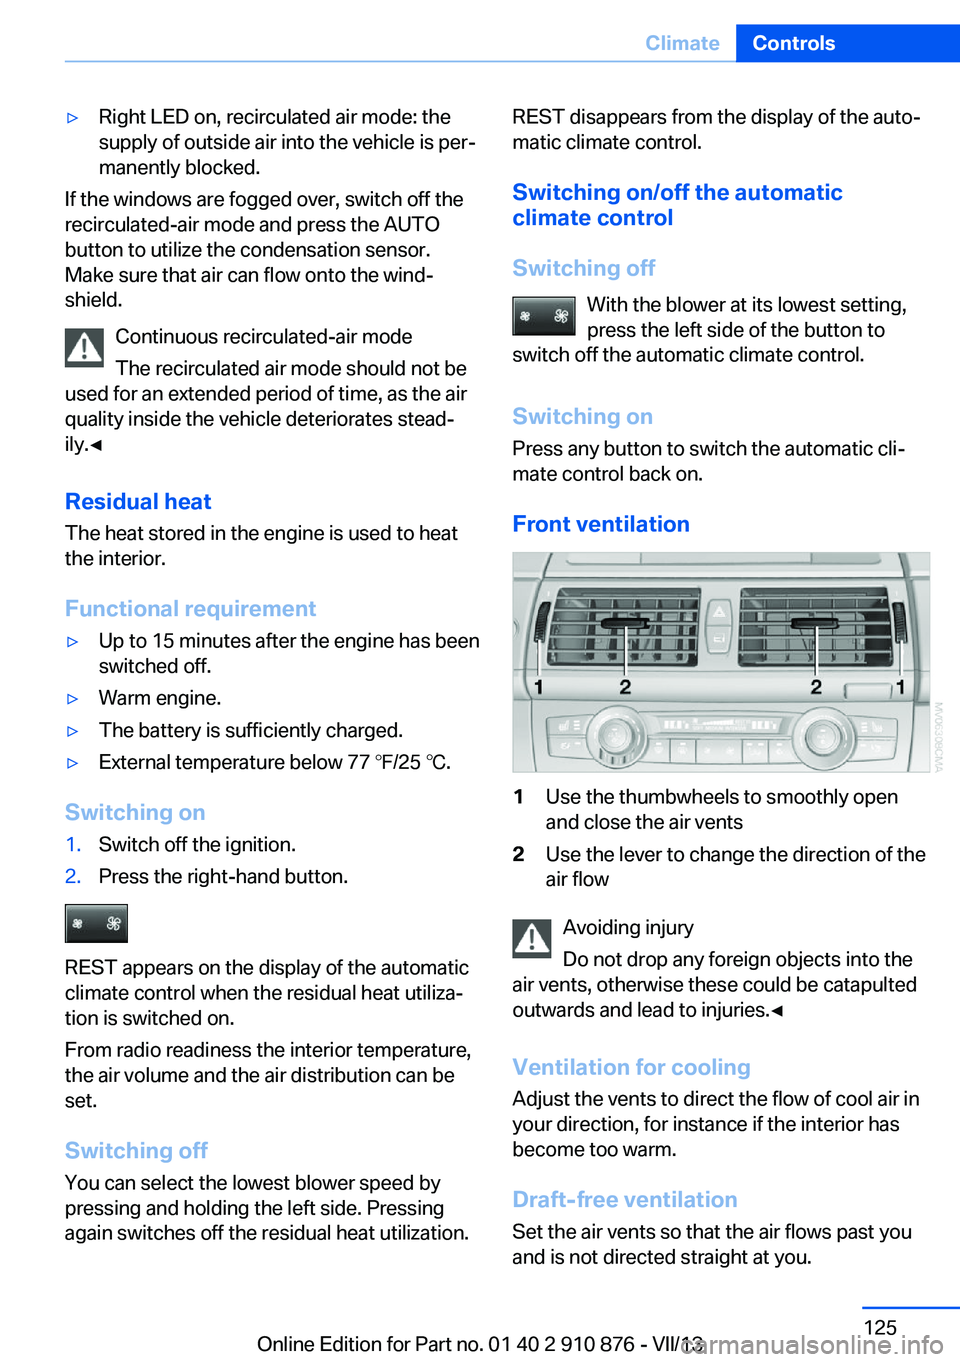
Front ventilation1Use the thumbwheels to smoothly open
and close the air vents2Use the lever to change the direction of the
air flow
Avoiding injury
Do not drop any foreign objects into the
air vents, otherwise these could be catapulted
outwards and lead to injuries.◀
Ventilation for cooling
Adjust the vents to direct the flow of cool air in
your direction, for instance if the interior has
become too warm.
Draft-free ventilation Set the air vents so that the air flows past you
and is not directed straight at you.
Seite 125ClimateControls125
Online Edition for Part no. 01 40 2 910 876 - VII/13
Page 126 of 323
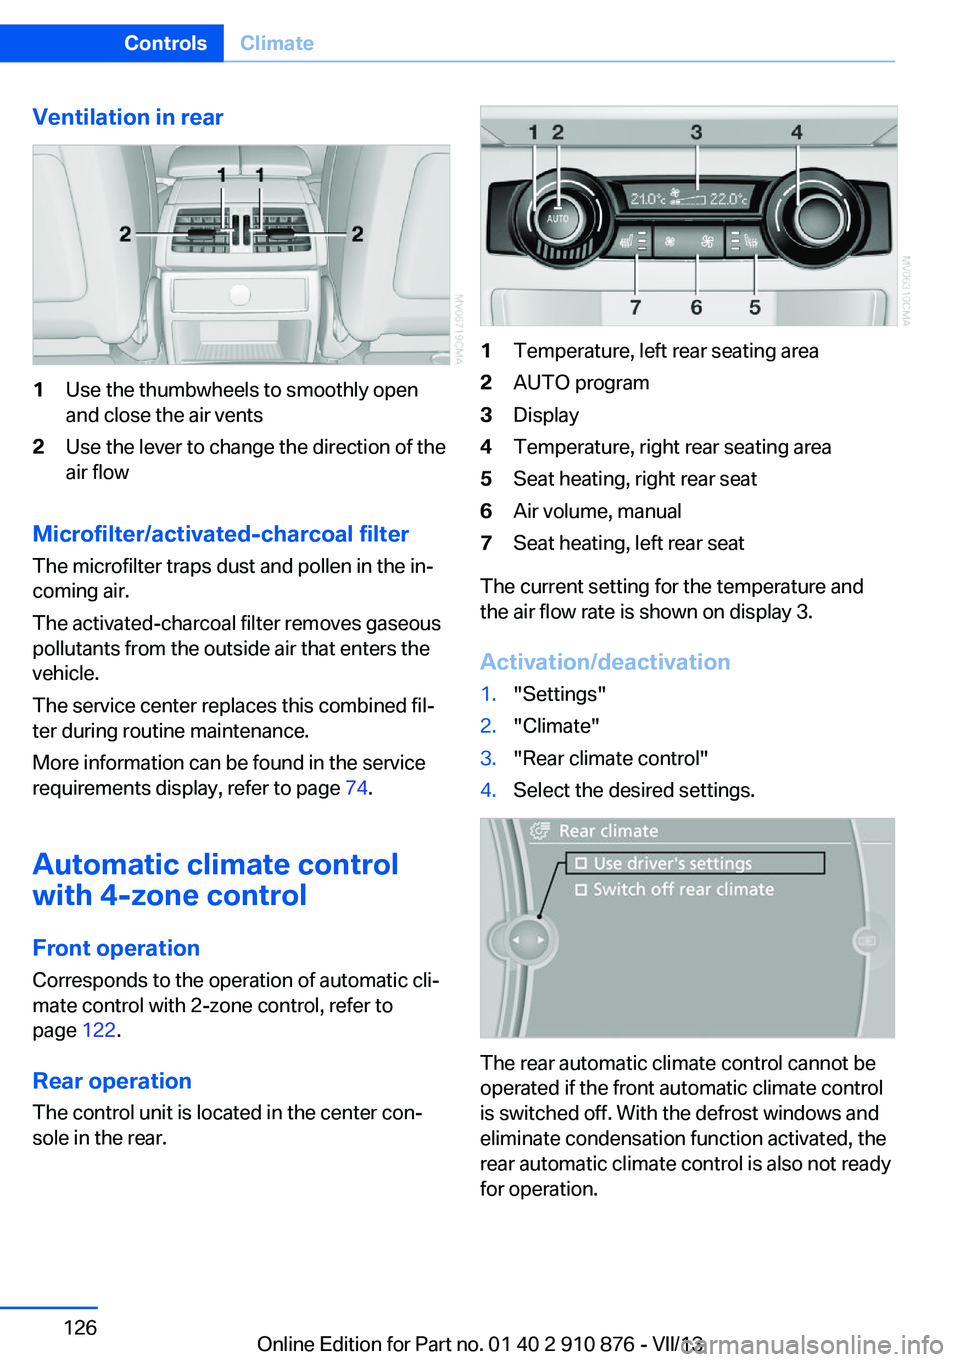
Ventilation in rear1Use the thumbwheels to smoothly open
and close the air vents2Use the lever to change the direction of the
air flow
Microfilter/activated-charcoal filter
The microfilter traps dust and pollen in the in‐
coming air.
The activated-charcoal filter removes gaseous
pollutants from the outside air that enters the
vehicle.
The service center replaces this combined fil‐
ter during routine maintenance.
More information can be found in the service
requirements display, refer to page 74.
Automatic climate control
with 4-zone control
Front operation Corresponds to the operation of automatic cli‐
mate control with 2-zone control, refer to
page 122.
Rear operation
The control unit is located in the center con‐
sole in the rear.
1Temperature, left rear seating area2AUTO program3Display4Temperature, right rear seating area5Seat heating, right rear seat6Air volume, manual7Seat heating, left rear seat
The current setting for the temperature and
the air flow rate is shown on display 3.
Activation/deactivation
1."Settings"2."Climate"3."Rear climate control"4.Select the desired settings.
The rear automatic climate control cannot be
operated if the front automatic climate control
is switched off. With the defrost windows and
eliminate condensation function activated, the
rear automatic climate control is also not ready
for operation.
Seite 126ControlsClimate126
Online Edition for Part no. 01 40 2 910 876 - VII/13
Page 127 of 323
AUTO programThe AUTO program automatically
sets the air distribution toward the
upper body and in the footwell, as
well as the air flow rate. It also
adapts your instructions for the
temperature to outside influences throughout
the year.
Temperature Set the desired temperature indi‐
vidually on the left and right side.
The automatic climate control achieves this
temperature as quickly as possible regardless
of the season, using maximum cooling or heat‐
ing power if necessary, and then maintains it.
When switching between different tempera‐
ture settings in rapid succession, the auto‐
matic climate control does not have sufficient
time to adjust the set temperature.
Air volume, manual The air flow rate can be varied by
pressing on the corresponding side.
The automatic mode for the air flow rate can
be switched on again using the AUTO button.
Switching off rear automatic climate
control
With the blower at its lowest setting,
press the left side of the button to
switch off the automatic climate control.
The automatic climate control can also be
switched off with iDrive. To switch on the auto‐
matic climate control again, the system must
first be reactivated, refer to Activating/deacti‐
vating.
The system is switched on again by pressing
any button of the rear automatic climate con‐
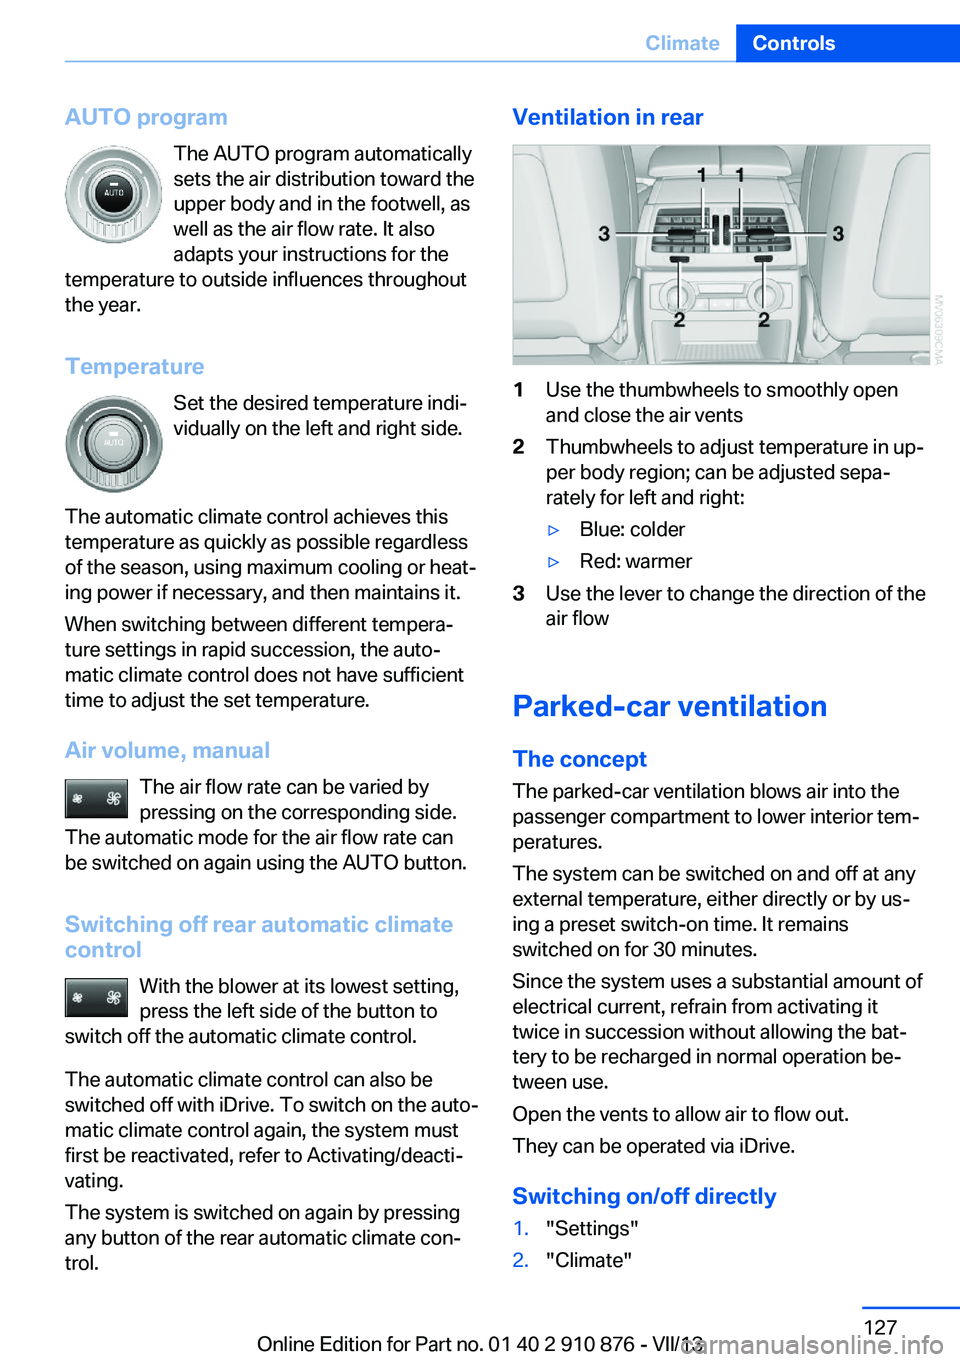
trol.Ventilation in rear1Use the thumbwheels to smoothly open
and close the air vents2Thumbwheels to adjust temperature in up‐
per body region; can be adjusted sepa‐
rately for left and right:▷Blue: colder▷Red: warmer3Use the lever to change the direction of the
air flow
Parked-car ventilation
The concept The parked-car ventilation blows air into the
passenger compartment to lower interior tem‐
peratures.
The system can be switched on and off at any
external temperature, either directly or by us‐
ing a preset switch-on time. It remains
switched on for 30 minutes.
Since the system uses a substantial amount of
electrical current, refrain from activating it
twice in succession without allowing the bat‐
tery to be recharged in normal operation be‐
tween use.
Open the vents to allow air to flow out.
They can be operated via iDrive.
Switching on/off directly
1."Settings"2."Climate"Seite 127ClimateControls127
Online Edition for Part no. 01 40 2 910 876 - VII/13
Page 166 of 323
Add a destination as a further destination,
refer to page 167.▷"Exit interactive map": return to the map
view.▷"View in northern direction" or "View in driving direction"▷"Display destination": the map section
around the destination is displayed.▷"Display current location": the map section
around your current location is displayed.▷"Find points of interest": the search for
special destinations is started.
Destination entry by voice
General information
▷Instructions for voice activation system, re‐
fer to page 25.▷When making a destination entry by voice,
you can change between voice operation
and iDrive.▷To have the available spoken instructions
read out loud: ›Voice commands‹.
Saying the entries
▷The town/city, street, and house number
can be entered using a single command.▷Spell the entry if the spoken language and
the language of the system differ.▷Say the letters smoothly, and avoid exag‐
gerating the pronunciation and inserting
lengthy pauses between the letters.▷The methods of entry depend on the navi‐
gation data in use and the country and lan‐
guage settings.
Entering the address in a command
1. Press the button on the steering
wheel.2.›Enter address‹3.Wait for a request from the system.4.Say the address in the suggested order.5.Continue making the entry as prompted by
the system.
If necessary, individually name the sepa‐
rate components of the address, e.g., the
town/city.
Entering a town/city separately
The town/city can be said as a complete word.
With the destination entry menu displayed:
1. Press the button on the steering
wheel.2.›City‹ or ›Spell city‹3.Wait for the system to prompt you for the
town/city.4.Say the name of the town/city, or name at
least the first three letters.
Depending on the entry, up to 20 towns/
cities may be suggested.5.Select a location:▷Select a recommended town/
city: ›Yes‹.▷Select a different town/city: ›New
entry‹.▷Select an entry: ›Entry ...‹, for instance,
entry 2.▷Spell an entry: ›Spell city‹.6.Continue making the entry as prompted by
the system.
If there are several towns/cities with the same
name:
Towns/cities of the same name are grouped in
a list and displayed as one location followed by
an ellipsis.
1.Select an entry: ›Yes‹ or ›Entry ...‹, e. g., En‐
try 2.2.Select the desired town/city.Seite 166NavigationDestination entry166
Online Edition for Part no. 01 40 2 910 876 - VII/13
Page 182 of 323
RadioVehicle equipment
This chapter describes all series equipment as
well as country-specific and special equipment
offered for this model series.Therefore, it also
describes equipment that may not be found in
your vehicle, for instance due to the selected
special equipment or the country version. This
also applies to safety-related functions and
systems.
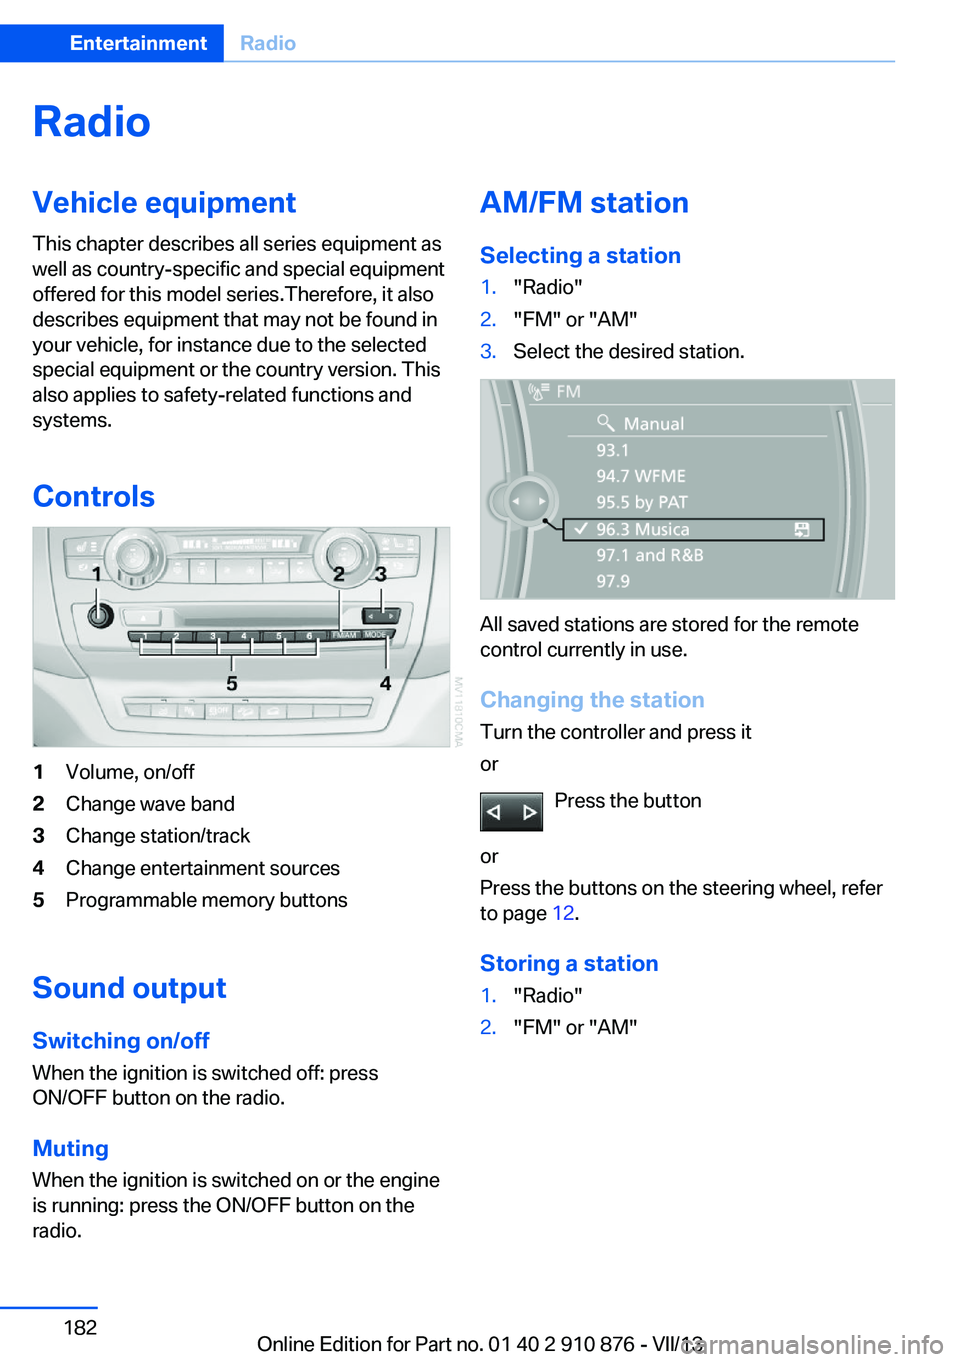
Controls1Volume, on/off2Change wave band3Change station/track4Change entertainment sources5Programmable memory buttons
Sound outputSwitching on/offWhen the ignition is switched off: press
ON/OFF button on the radio.
Muting
When the ignition is switched on or the engine
is running: press the ON/OFF button on the
radio.
AM/FM station
Selecting a station1."Radio"2."FM" or "AM"3.Select the desired station.
All saved stations are stored for the remote
control currently in use.
Changing the station
Turn the controller and press it
or
Press the button
or
Press the buttons on the steering wheel, refer
to page 12.
Storing a station
1."Radio"2."FM" or "AM"Seite 182EntertainmentRadio182
Online Edition for Part no. 01 40 2 910 876 - VII/13
Page 212 of 323
Menu navigation
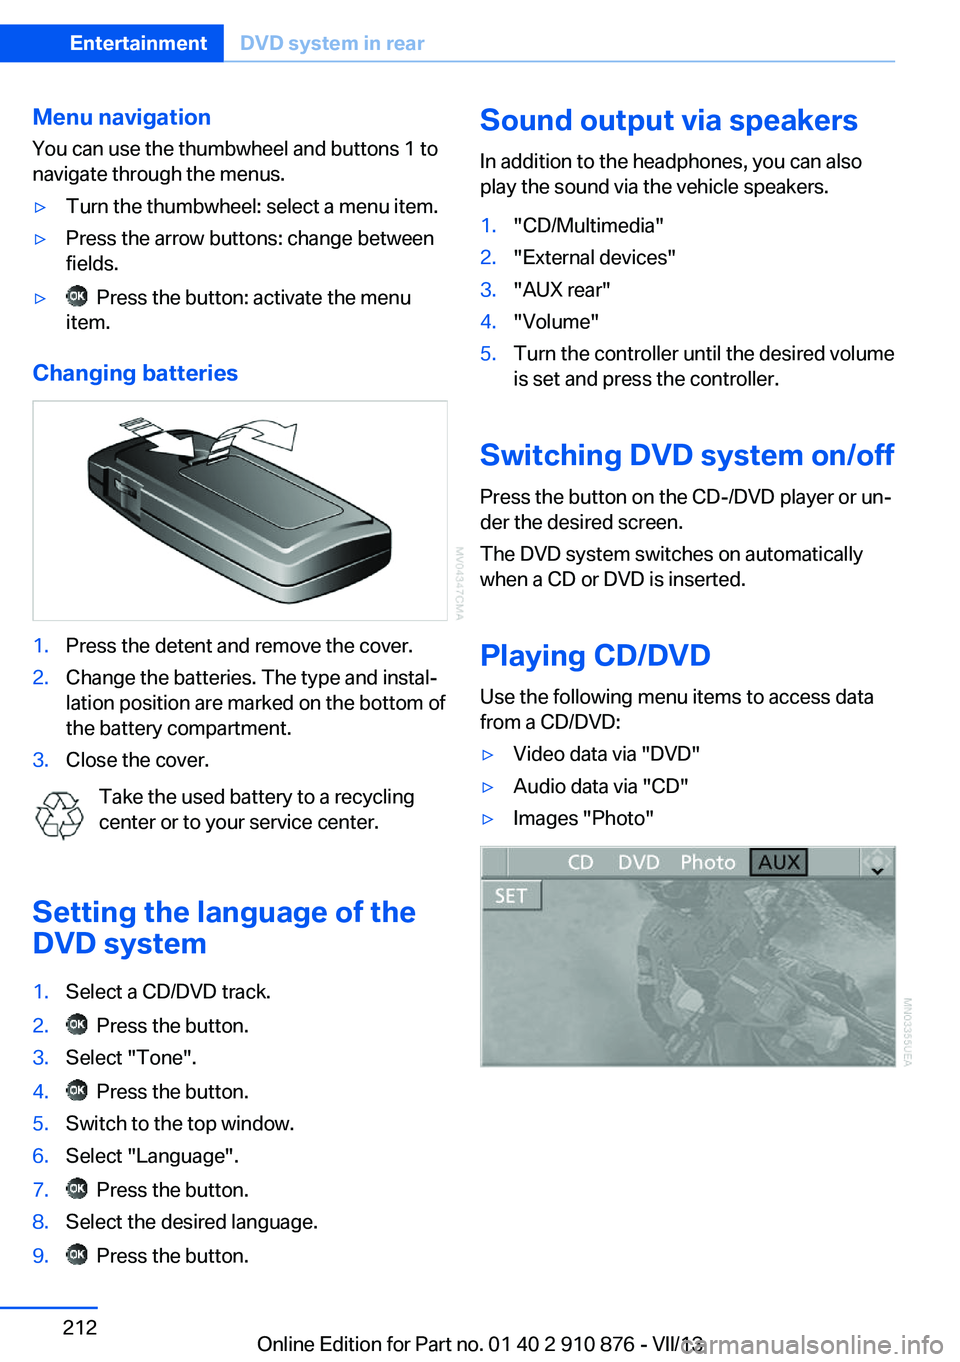
You can use the thumbwheel and buttons 1 to
navigate through the menus.▷Turn the thumbwheel: select a menu item.▷Press the arrow buttons: change between
fields.▷ Press the button: activate the menu
item.
Changing batteries
1.Press the detent and remove the cover.2.Change the batteries. The type and instal‐
lation position are marked on the bottom of
the battery compartment.3.Close the cover.
Take the used battery to a recycling
center or to your service center.
Setting the language of the
DVD system
1.Select a CD/DVD track.2. Press the button.3.Select "Tone".4. Press the button.5.Switch to the top window.6.Select "Language".7. Press the button.8.Select the desired language.9. Press the button.Sound output via speakers
In addition to the headphones, you can also
play the sound via the vehicle speakers.1."CD/Multimedia"2."External devices"3."AUX rear"4."Volume"5.Turn the controller until the desired volume
is set and press the controller.
Switching DVD system on/off
Press the button on the CD-/DVD player or un‐
der the desired screen.
The DVD system switches on automatically
when a CD or DVD is inserted.
Playing CD/DVD
Use the following menu items to access data
from a CD/DVD:
▷Video data via "DVD"▷Audio data via "CD"▷Images "Photo"Seite 212EntertainmentDVD system in rear212
Online Edition for Part no. 01 40 2 910 876 - VII/13