climate control BMW Z4 2.5I 2003 Owners Manual
[x] Cancel search | Manufacturer: BMW, Model Year: 2003, Model line: Z4 2.5I, Model: BMW Z4 2.5I 2003Pages: 106, PDF Size: 2.47 MB
Page 5 of 106
At a glance
Controls
Driving tips
Mobility
Reference
Everything under control
47Odometer
47Tachometer
47Fuel gauge
47Coolant temperature gauge
48Service interval display
48Outside temperature
48Clock
49Computer*
Technology for safety and driving
convenience
51Dynamic Stability Control DSC
52Brake Force Display
53Antilock Brake System ABS
53Flat Tire Monitor
Controlling the climate for pleasant
driving
55Air conditioning
57Automatic climate control*
Interior conveniences
60Glove compartment
60Storage compartments
61Beverage holder
61Preparations for the cellular phone*
61Ashtray*
Special operating instructions
64Break-in procedures
65Driving notes
65Brake system
66Cargo loading
67Hardtop preparation*
Refueling
70Fuel filler door
70Fuel specifications
Wheels and tires
71Tire inflation pressure
73Tire condition
73Tire replacement
74Wheel and tire combinations
75Run Flat tires
76Winter tires
76Snow chains*
In the engine compartment
77Hood
78Engine compartment
79Washer fluids for washer systems
79Engine oil
80Coolant
81Brake fluid
Maintenance
82The BMW Maintenance System
82Care
Laws and regulations
83California Proposition 65 warning
83OBD interface socket
Replacement procedures
84Onboard tool kit
84Windshield wiper blades
84Lamps and bulbs
87Changing a wheel
87Battery
Giving and receiving assistance
89Warning triangle*
89First-aid kit*
89Jump-starting
90Towing and tow-starting the vehicle
Technical data
94Engine data
94Weights
95Dimensions
96Capacities
Everything from A - Z
97Index
Page 21 of 106
At a glance
Controls
Driving tips
Mobility
Reference
21
To unlock and open
>Either unlock the doors together with
the button for the central locking sys-
tem and then pull each of the release
handles above the armrests
or
>pull the release handle for each door
twice: the initial pull unlocks the door,
and the second one opens it.
To lock
>Either use the central locking button to
lock all doors at once
or
>press the individual door lock buttons
down.
To prevent the driver from being
inadvertently locked out of the
vehicle, the driver's door lock button
will not engage as long as the door is
open.<
Since persons or animals in the vehi-
cle could lock the doors from the
inside, always take the vehicle keys with
you so that the vehicle can be opened
again from the outside at any time.<
Luggage compartment lid
To open from the outside
Turn the master key to the left as far as it
will go. The luggage compartment lid will
open slightly.
If the alarm system is armed, opening the
luggage compartment with the key will trig-
ger an alarm; refer also to page 27.
To open from the inside
If the luggage compartment lid has not
been locked separately, you can open it
with this button in the footwell on the
driver's side when the vehicle is stationary.
To close
The handle recess in the interior trim panel
of the luggage compartment lid makes it
easier to pull the lid down.
To avoid injuries, be sure that the
travel path of the luggage compart-
ment lid is clear when it is closed, following
the same precautions as with all closing
procedures.<
Operate the vehicle only when the
luggage compartment lid is closed,
since exhaust fumes could penetrate into
the interior of the vehicle. Should it be
absolutely necessary to operate the vehicle
with the luggage compartment lid open and
with the convertible top closed:
>Close all windows
>Increase the air supply from the air con-
ditioner or automatic climate control to
a high level. Refer to page 55 or 57.<
Page 55 of 106
At a glance
Controls
Driving tips
Mobility
Reference
55
Controlling the climate for pleasant
driving
Air conditioning
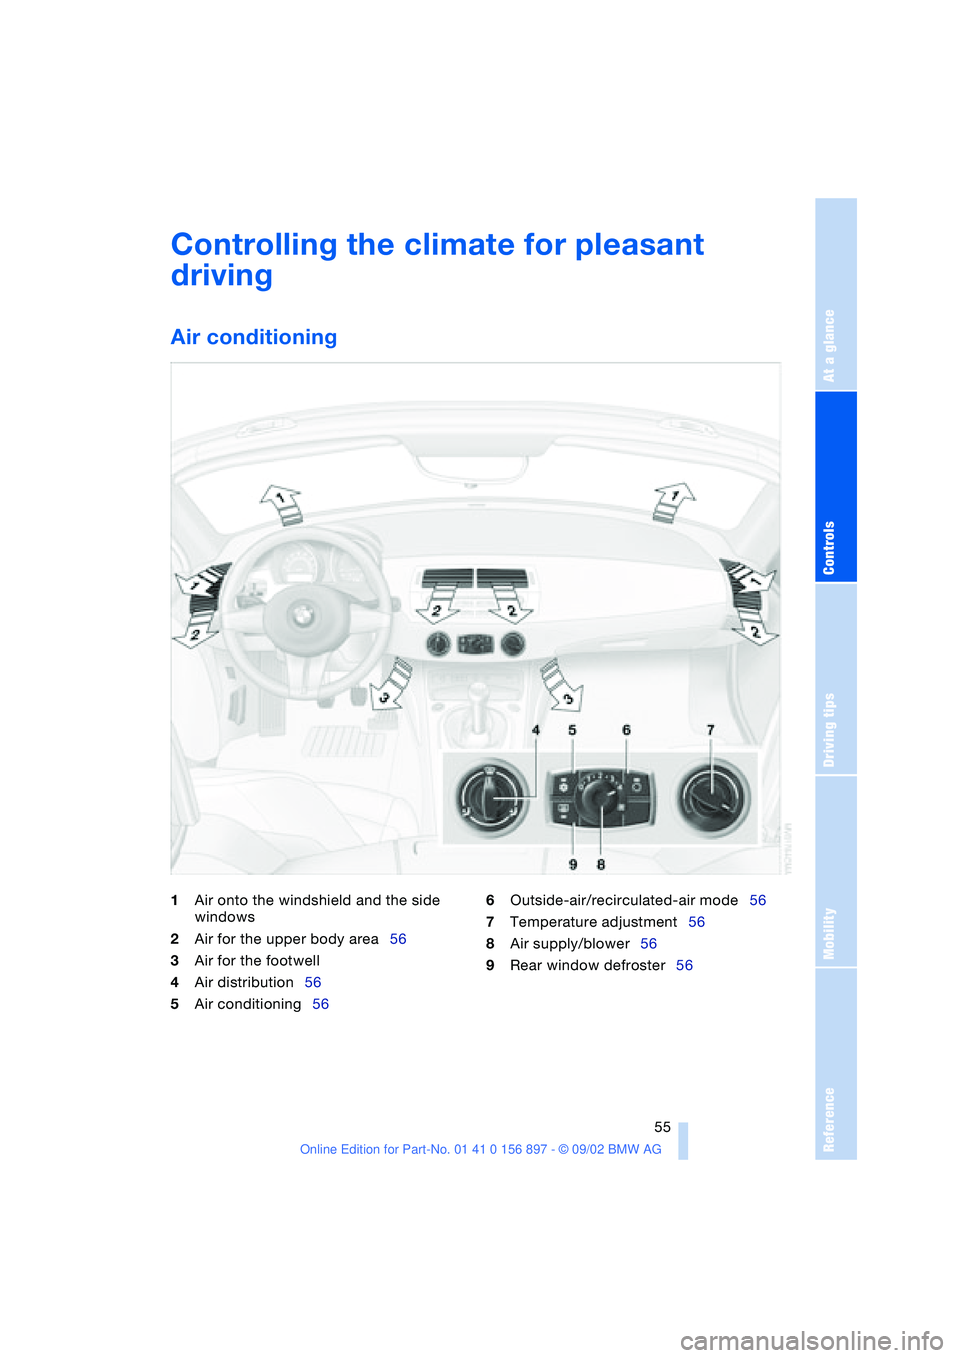
1Air onto the windshield and the side
windows
2Air for the upper body area56
3Air for the footwell
4Air distribution56
5Air conditioning566Outside-air/recirculated-air mode56
7Temperature adjustment56
8Air supply/blower56
9Rear window defroster56
Page 56 of 106
Controlling the climate for pleasant driving
56
Air distribution
You can direct airflow onto the
windows , toward the upper
body and into the footwell .
All intermediate settings are pos-
sible.
Air supply/blower
You can set the blower to 8 differ-
ent levels. Both heating and ven-
tilation become more effective as
the air supply rate is increased.
Temperature
In order to increase the tempera-
ture of the passenger compart-
ment, turn to the right – red zone.
Air conditioning
The air is cooled and dehumidi-
fied and – depending on the tem-
perature setting – rewarmed.
Depending on the weather, the
windshield may fog over briefly when the
engine is started.
Condensation forms during operation
of the air conditioning system, which
then exits under the vehicle. Traces of con-
densed water on the ground underneath
the vehicle are thus normal.<
Outside-air/recirculated-air mode
If there are unpleasant odors in
the outside air, you can tempo-
rarily block the supply of incom-
ing air. The system then recircu-
lates the air currently within the vehicle.
If the windows fog over in the recircu-
lated air mode, switch this mode off
and increase the air supply as required.<
Rear window defroster
The indicator lamp lights up when
the rear window defroster is
active. The rear window defroster
switches off automatically.
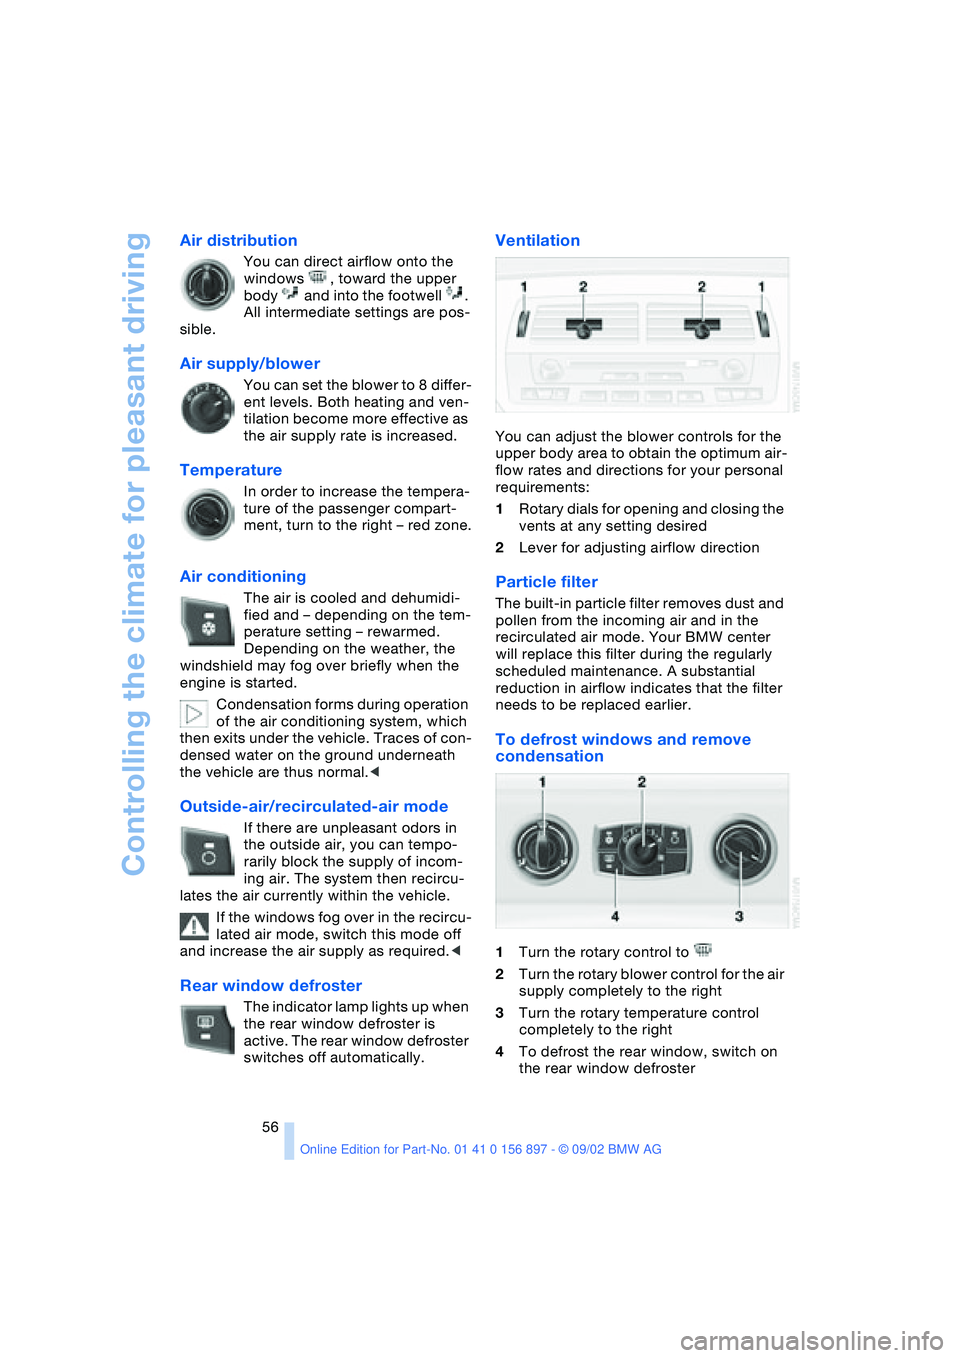
Ventilation
You can adjust the blower controls for the
upper body area to obtain the optimum air-
flow rates and directions for your personal
requirements:
1Rotary dials for opening and closing the
vents at any setting desired
2Lever for adjusting airflow direction
Particle filter
The built-in particle filter removes dust and
pollen from the incoming air and in the
recirculated air mode. Your BMW center
will replace this filter during the regularly
scheduled maintenance. A substantial
reduction in airflow indicates that the filter
needs to be replaced earlier.
To defrost windows and remove
condensation
1Turn the rotary control to
2Turn the rotary blower control for the air
supply completely to the right
3Turn the rotary temperature control
completely to the right
4To defrost the rear window, switch on
the rear window defroster
Page 57 of 106
At a glance
Controls
Driving tips
Mobility
Reference
57
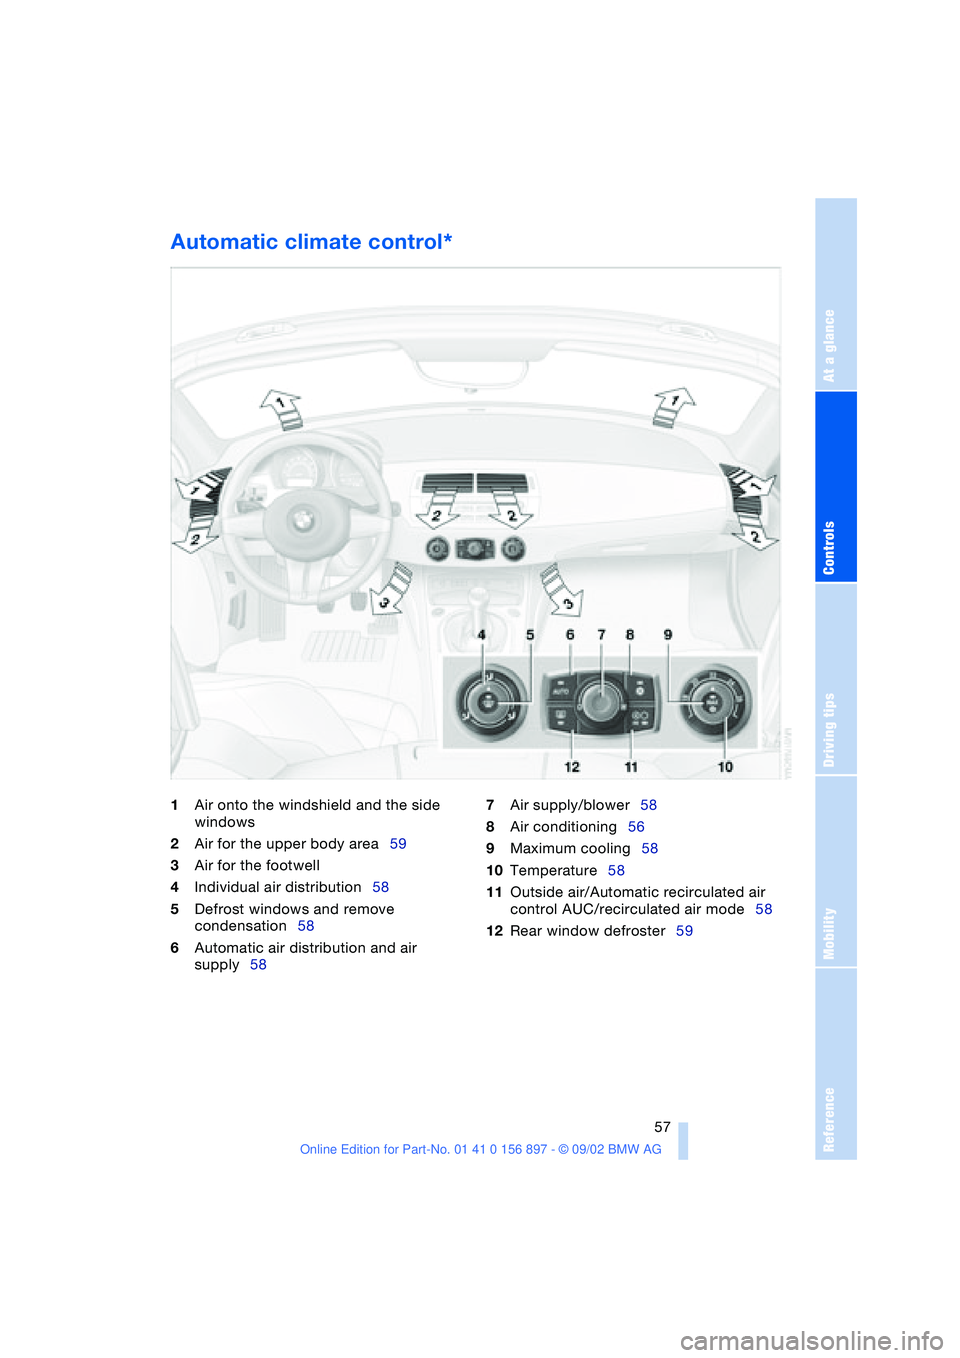
Automatic climate control*
1Air onto the windshield and the side
windows
2Air for the upper body area59
3Air for the footwell
4Individual air distribution58
5Defrost windows and remove
condensation58
6Automatic air distribution and air
supply587Air supply/blower58
8Air conditioning56
9Maximum cooling58
10Temperature58
11Outside air/Automatic recirculated air
control AUC/recirculated air mode58
12Rear window defroster59
Page 58 of 106
Controlling the climate for pleasant driving
58
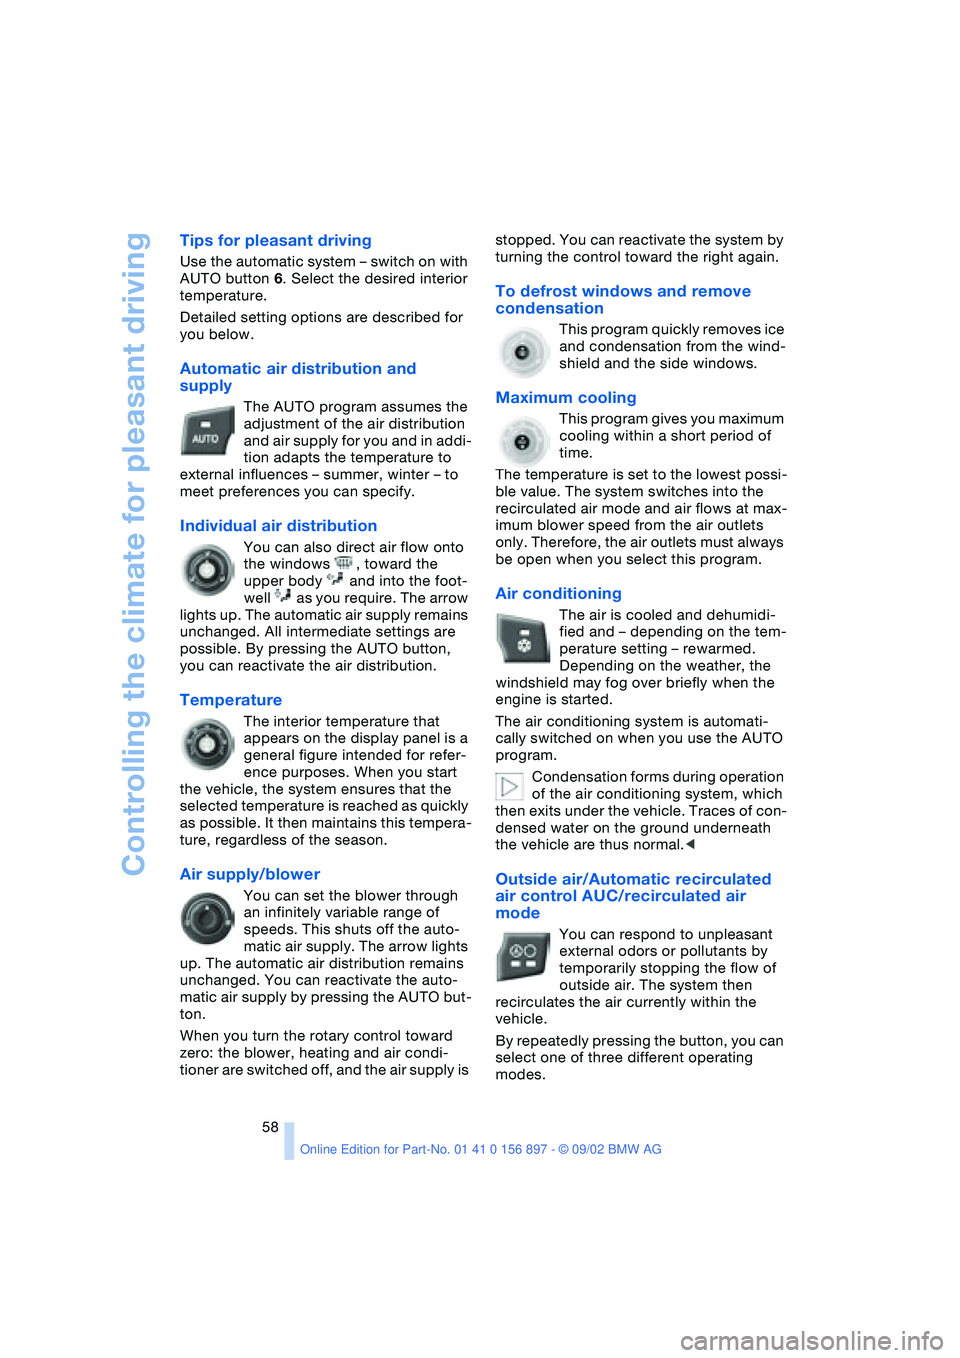
Tips for pleasant driving
Use the automatic system – switch on with
AUTO button 6. Select the desired interior
temperature.
Detailed setting options are described for
you below.
Automatic air distribution and
supply
The AUTO program assumes the
adjustment of the air distribution
and air supply for you and in addi-
tion adapts the temperature to
external influences – summer, winter – to
meet preferences you can specify.
Individual air distribution
You can also direct air flow onto
the windows , toward the
upper body and into the foot-
well as you require. The arrow
lights up. The automatic air supply remains
unchanged. All intermediate settings are
possible. By pressing the AUTO button,
you can reactivate the air distribution.
Temperature
The interior temperature that
appears on the display panel is a
general figure intended for refer-
ence purposes. When you start
the vehicle, the system ensures that the
selected temperature is reached as quickly
as possible. It then maintains this tempera-
ture, regardless of the season.
Air supply/blower
You can set the blower through
an infinitely variable range of
speeds. This shuts off the auto-
matic air supply. The arrow lights
up. The automatic air distribution remains
unchanged. You can reactivate the auto-
matic air supply by pressing the AUTO but-
ton.
When you turn the rotary control toward
zero: the blower, heating and air condi-
tioner are switched off, and the air supply is stopped. You can reactivate the system by
turning the control toward the right again.
To defrost windows and remove
condensation
This program quickly removes ice
and condensation from the wind-
shield and the side windows.
Maximum cooling
This program gives you maximum
cooling within a short period of
time.
The temperature is set to the lowest possi-
ble value. The system switches into the
recirculated air mode and air flows at max-
imum blower speed from the air outlets
only. Therefore, the air outlets must always
be open when you select this program.
Air conditioning
The air is cooled and dehumidi-
fied and – depending on the tem-
perature setting – rewarmed.
Depending on the weather, the
windshield may fog over briefly when the
engine is started.
The air conditioning system is automati-
cally switched on when you use the AUTO
program.
Condensation forms during operation
of the air conditioning system, which
then exits under the vehicle. Traces of con-
densed water on the ground underneath
the vehicle are thus normal.<
Outside air/Automatic recirculated
air control AUC/recirculated air
mode
You can respond to unpleasant
external odors or pollutants by
temporarily stopping the flow of
outside air. The system then
recirculates the air currently within the
vehicle.
By repeatedly pressing the button, you can
select one of three different operating
modes.
Page 74 of 106
Wheels and tires
74 one and one-half (1 γ) times as well on the
government course as a tire graded 100.
The relative performance of tires depends
upon the actual conditions of their use,
however, and may depart significantly from
the norm due to variations in driving habits,
service practices and differences in road
characteristics and climate.
Traction
The traction grades, from highest to lowest,
are AA, A, B and C.
Those grades represent the tire's ability to
stop on wet pavement as measured under
controlled conditions on specified govern-
ment test surfaces of asphalt and concrete.
A tire marked C may have poor traction
performance.
The traction grade assigned to this
tire is based on straight-ahead brak-
ing traction tests, and does not include
acceleration, cornering, hydroplaning, or
peak traction characteristics.<
Temperature
The temperature grades are A – the
highest – B, and C, representing the tire's
resistance to the generation of heat and its
ability to dissipate heat when tested under
controlled conditions on a specified indoor
laboratory test wheel.
Sustained high temperature can cause the
material of the tire to degenerate and
reduce tire life, and excessive temperature
can lead to sudden tire failure. The grade C
corresponds to a level of performance
which all passenger car tires must meet
under the Federal Motor Vehicle Safety
Standard No. 109. Grades B and A repre-
sent higher levels of performance on the
laboratory test wheel than the minimum
required by law.
The temperature grade for this tire is
established for a tire that is properly
inflated and not overloaded. Excessive
speed, under-inflation, or excessive load-
ing, either separately or in combination,
can cause heat buildup and possible tire
failure.<
Uniform Tire Quality Grading
Quality grades can be found where appli-
cable on the tire sidewall between tread
shoulder and maximum section width. For
example:
Tread wear 200 Traction AA
Temperature A
Wheel and tire combina-
tions
The right choice
Use wheels and tires approved by
BMW for your particular vehicle. Vari-
ations in factors such as manufacturing tol-
erances mean that even wheels and tires
with identical official size ratings could
actually have dimensions different from the
approved units. These differences could
lead to body contact, and with it the risk of
severe accidents. If non-approved wheels
and tires are used, BMW cannot evaluate
their suitability, and therefore cannot be
held liable for driving safety.<
BMW tests certain tire brands for each tire
size, classifies them as road-safe and
approves them. Consult your BMW center
for more information. Observe any country-
specific regulations, e.g. on making a cor-
responding entry in the vehicle documents.
The correct wheel and tire combina-
tion affects different systems such as
ABS, DSC, DTC and DBC. The function of
these systems is impaired if improper
wheel and tire combinations are used.
For this reason, use tires of the same brand
and tread configuration. In the event of a
flat tire, for example, remount the approved
wheel and tire combination as soon as pos-
sible.<
Page 97 of 106
At a glance
Controls
Driving tips
Mobility
Reference
97
A
ABS Antilock Brake
System 53
– indicator lamp 14
Accessories 7
Activated-charcoal filter 59
Air conditioning 55, 56
– air distribution 56
– air supply 56
– automatic climate
control 58
– defrosting windows
and removing
condensation 56
– outside-air mode 56
– rear window defroster 56
– recirculated-air mode 56
– temperature 56
Air distribution
– air conditioning 56
– automatic climate
control 58
Air outlets 56, 59
Air pressure 71
– checking 71
Air supply
– air conditioning 56
– automatic climate
control 58
Airbags 33
– activation/deactivation 34
– indicator lamp 14, 33
– passenger airbags
lamp 35
Alarm system 27
– arming/disarming 27
– indicator lamp 27
– tilt alarm sensor 28
– triggering 19
All-season tires, refer to
Winter tires 76
Antifreeze
– coolant 81
– washer fluid 79Antilock Brake System ABS
– indicator lamp 14
Anti-theft alarm system,
refer to Alarm system 27
Approved axle load 94
Approved gross vehicle
weight 94
Ashtray 61
AUC Automatic recircu-
lated air control 58
Automatic
– air distribution 58
– air supply 58
– cruise control 44
– lamp control 45
Automatic car wash, refer
to the Caring for your
vehicle brochure
Automatic climate
control 57, 58
– air conditioning 58
– air distribution 58
– air supply 58
– Automatic recirculated air
control AUC 58
– defrosting windows
and removing
condensation 58
– maximum cooling 58
– outside air 58
– rear window defroster 59
– recirculated air mode 58
– temperature 58
Automatic transmission
with Steptronic 40
– display 41
– electronic transmission
control 41
– indicator lamp 14
– manual mode 41
– selector lever position 40
– sport program 41
Automatic windshield
washer 44Average fuel
consumption 50
Average speed 50
Axle load, approved 94
B
Backrest, refer to Seats 30
Backup lamps 40
– bulb replacement 86
Bandages 89
Battery 87
Battery charge current
– indicator lamp 14, 88
Belt tensioner, refer to
Safety belts 31
Belts 31
Beverage holder 61
Blinker, refer to Turn signal
indicators 42
Blower
– air conditioning 56
– automatic climate
control 58
BMW High Performance
synthetic oils 80
BMW Maintenance
System 82
Bore 94
Brake fluid 81
– indicator lamp 14, 81
– refilling 81
Brake Force Display 52
Brake hydraulic system 65
Brake hydraulics
– indicator lamp 14
Brake lamps
– bulb replacement 86
– indicator lamp, defective
bulb 14
Brake pads 66
– indicator lamp 14
Everything from A - Z
Index
Page 98 of 106
Everything from A - Z
98 Brake system 65
– brake fluid level 81
– brake pads 66
– break-in procedures 64
– disc brakes 65
Brakes
– driving notes 65
Break-in procedures 64
– brake system 64
– clutch 64
– differential 64
– engine 64
– tires 64
Bulb
– defective 45
– replacement 84
C
California Proposition 65
warning 83
Can holder 61
Capacities 94, 96
– luggage
compartment 22, 94
Car battery 87
Car radio, refer to the
Owner's Manual for Radio
Car wash, refer to the Car-
ing for your vehicle bro-
chure
Cargo loading 66
Cassette player operation,
refer to the Owner's Man-
ual for Radio
Catalytic converter, refer to
High temperatures 65
CD player operation, refer
to the Owner's Manual for
Radio
Cellular phone
preparation 61
Cellular phone, refer to the
separate Owner's Manual
Center high-mount brake
lamp 87
Central locking system 18
– button 20
– interior 20
Charge indicator
lamp 14, 88Check gas cap 70
– indicator lamp 14
Child seat 34
Child-restraint mounting
system (LATCH) 36
Child-restraint systems 34
Cigarette lighter 61
Cleaning the headlamps 43
Cleaning the windshield 43
Clock
– 12/24-hour mode 49
– adjusting, refer also to the
radio or onboard com-
puter Owner's Manual
Clothes hooks 27
Cluster 13
Clutch
– break-in procedure 64
Cockpit 12
Code, refer to the Owner's
Manual for Radio
Combination switch, refer
to Turn signal indicators/
Headlamp flasher 42
Compartments 60
Compression ratio 94
Computer 49
– average fuel
consumption 50
– average speed 50
– clock, 12/24-hour
mode 49
– cruising range 50
– outside temperature 49
Condensation
– removing from
windows 56, 58
Configuring adjustments,
refer to Vehicle Memory,
Key Memory 37
Consumption 50
Convenience operation
– convertible top 20
– windows 20
Convertible top 23
– convenience operation 20
– electrical fault 25
– emergency operation 25
– malfunction 25
– manual operation 23
– mechanical 23Convertible top compart-
ment panel 22
Coolant 80, 96
– indicator lamp 14
Coolant thermometer 47
Cooling system 96
Cooling, maximum 58
Copyright 4, 6
Cruise control 44
Cruising range 50
Cup holder, refer to Bever-
age holder 61
Curb weight 94
Cylinders 94
D
Data 94
– engine 94
– filling capacities 96
– weights 94
Daytime driving lamps 45
DBC Dynamic Brake
Control 52
Defects 8
Deflector for wind 26
Defrost setting 56, 58
Defroster, rear window
– air conditioning 56
– automatic climate
control 59
Defrosting
– windows 56, 58
Differential
– break-in procedures 64
Digital clock
Dimensions 95
Dimming mirror 33
Dipstick, engine oil 79
Disc brakes 65
Displacement 94
Displays, refer to Instru-
ment cluster 13
Door lock 20
Door lock buttons 21
Doors
– emergency operation 20
– locking 19
– unlocking 19
DOT quality grades 73
Drivelogic 42
Page 101 of 106
At a glance
Controls
Driving tips
Mobility
Reference
101
N
Navigation system, refer to
the separate Owner's
Manual
Nets 60
O
OBD socket 83
Odometer 47
Oil 79
– additives 80
– capacity 96
– quality 80
Oil change interval, refer to
the Service and Warranty
Information Booklet for
US models/Warranty and
Service Guide Booklet for
Canadian models
Oil consumption 79
Oil dipstick 79
Oil filter change 96
Oil level 79
– checking 79
– indicator lamp 14
Oil pressure 79
– indicator lamp 14
Oil sensor 79
– indicator lamp 14
OIL SERVICE 48
Oil types 80
Onboard computer, refer to
Computer or to the sepa-
rate Owner's Manual for
Onboard Computer
Onboard tool kit 84
Operating elements 12
Outlets, refer to
Ventilation 56, 59
Output 94
Outside air mode
– air conditioning 56
Outside temperature
display 48
– changing units 49
– in computer 49
P
Paintwork, refer to the Car-
ing for your vehicle bro-
chure
Panel lighting 46
Panic mode 19
Parking brake 39
– indicator lamp 14
Parking lamps 45
Particle filter
– automatic climate
control 56
Passenger airbags
– activation/deactivation 34
Pollen, refer to
– Microfilter/activated-
charcoal filter 59
– Particle filter 56
Power seat 30
Power steering, electric 42
Power windows 22
Preparations for the cellular
phone 61
Pressure monitor, tires 53
Pressure, tires 71
R
Radiator 96
Radio, refer to the Owner's
Manual for Radio
Rain sensor 43
Reading lamps 46
Rear lamps 86
– bulb replacement 86
Rear window defroster
– air conditioning 56
– automatic climate
control 59
Rearview mirror 32
Recirculated air mode
– air conditioning 56
– automatic climate
control 58
Refueling 70
Remote control 18
– interior motion sensor 19
– luggage compartment
lid 19
– malfunction 19Remote control keys 18
Replacement key 18
Replacement of tires 73
Reserve tank indicator
lamp 47
Restraint systems 34
Reverse 40
Run Flat tires 73, 75, 87
– flat tire 75
S
Safety belts 31
Safety defects 8
Seat adjustment
– storing 30
Seat heating 31
Seat memory 30
Seats 29
– adjustment,
mechanical 29
– adjustment, power 30
Securing loads 66
Securing, locking the
vehicle 19
Selector lever
– automatic
transmission 40
– position, automatic
transmission 40
Service 48
Service and warranty 7
Service and Warranty Infor-
mation Booklet 82
Service Engine Soon 83
– indicator lamp 14
Service interval
display 48, 82
Shiftlock 40
Side airbags 33
Snow chains 76
Socket
– for Onboard
Diagnostics 83
– refer to Cigarette lighter
socket 61
Spare fuses 88
Spare key 18
Special oils 80
Speed control, refer to
Cruise control 44