headlamp BMW Z4 ROADSTER 3.0I 2005 E85 Owner's Manual
[x] Cancel search | Manufacturer: BMW, Model Year: 2005, Model line: Z4 ROADSTER 3.0I, Model: BMW Z4 ROADSTER 3.0I 2005 E85Pages: 120, PDF Size: 3.82 MB
Page 12 of 120
Cockpit
10
Cockpit
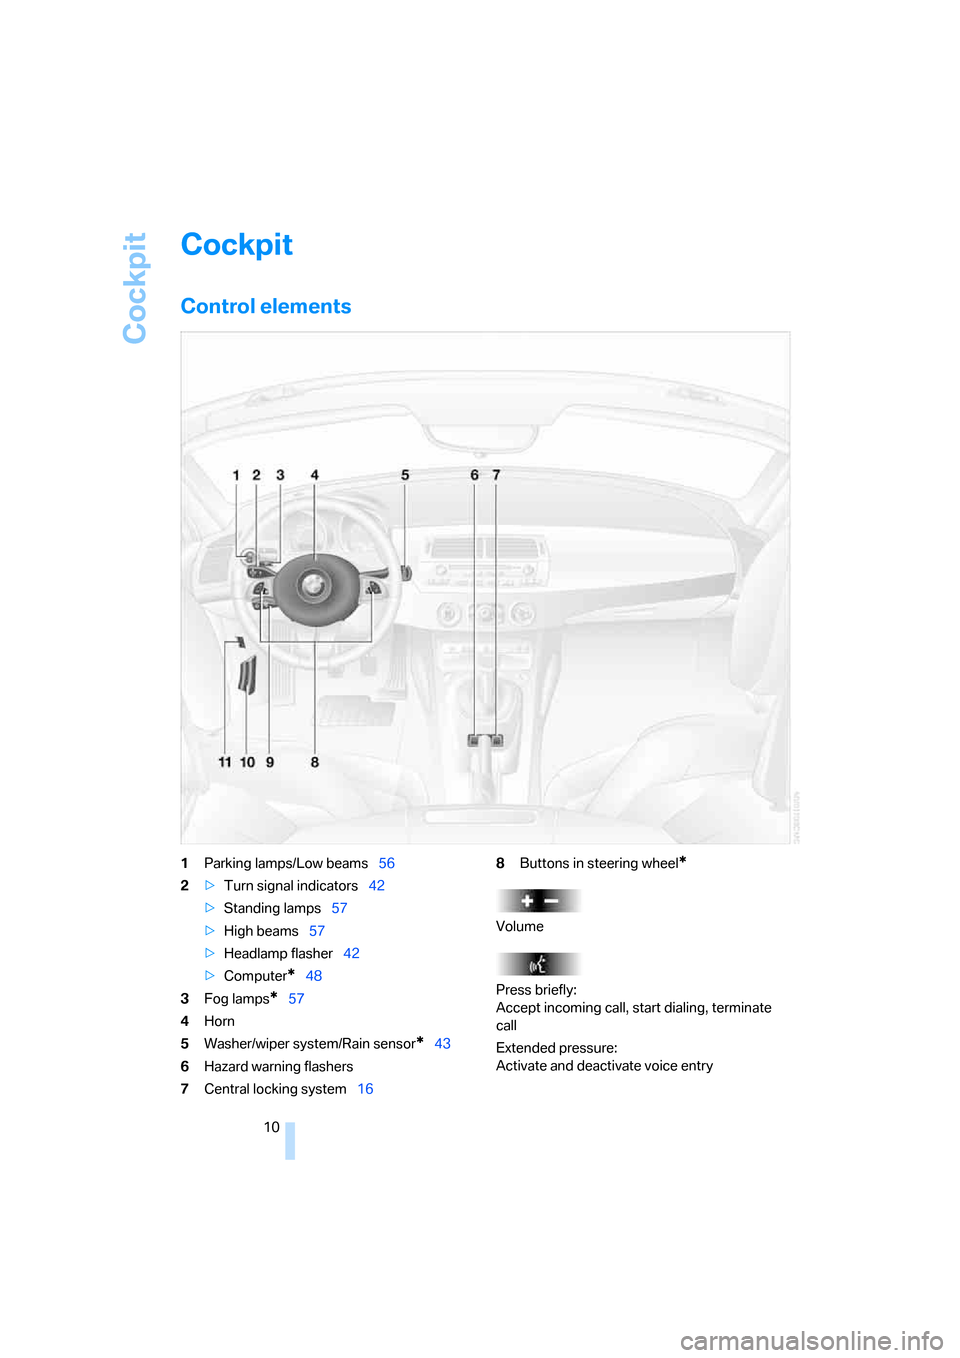
Control elements
1Parking lamps/Low beams56
2>Turn signal indicators42
>Standing lamps57
>High beams57
>Headlamp flasher42
>Computer
*48
3Fog lamps
*57
4Horn
5Washer/wiper system/Rain sensor
*43
6Hazard warning flashers
7Central locking system168Buttons in steering wheel
*
Volume
Press briefly:
Accept incoming call, start dialing, terminate
call
Extended pressure:
Activate and deactivate voice entry
Page 15 of 120
At a glance
Controls
Driving tips
Mobility Reference
13
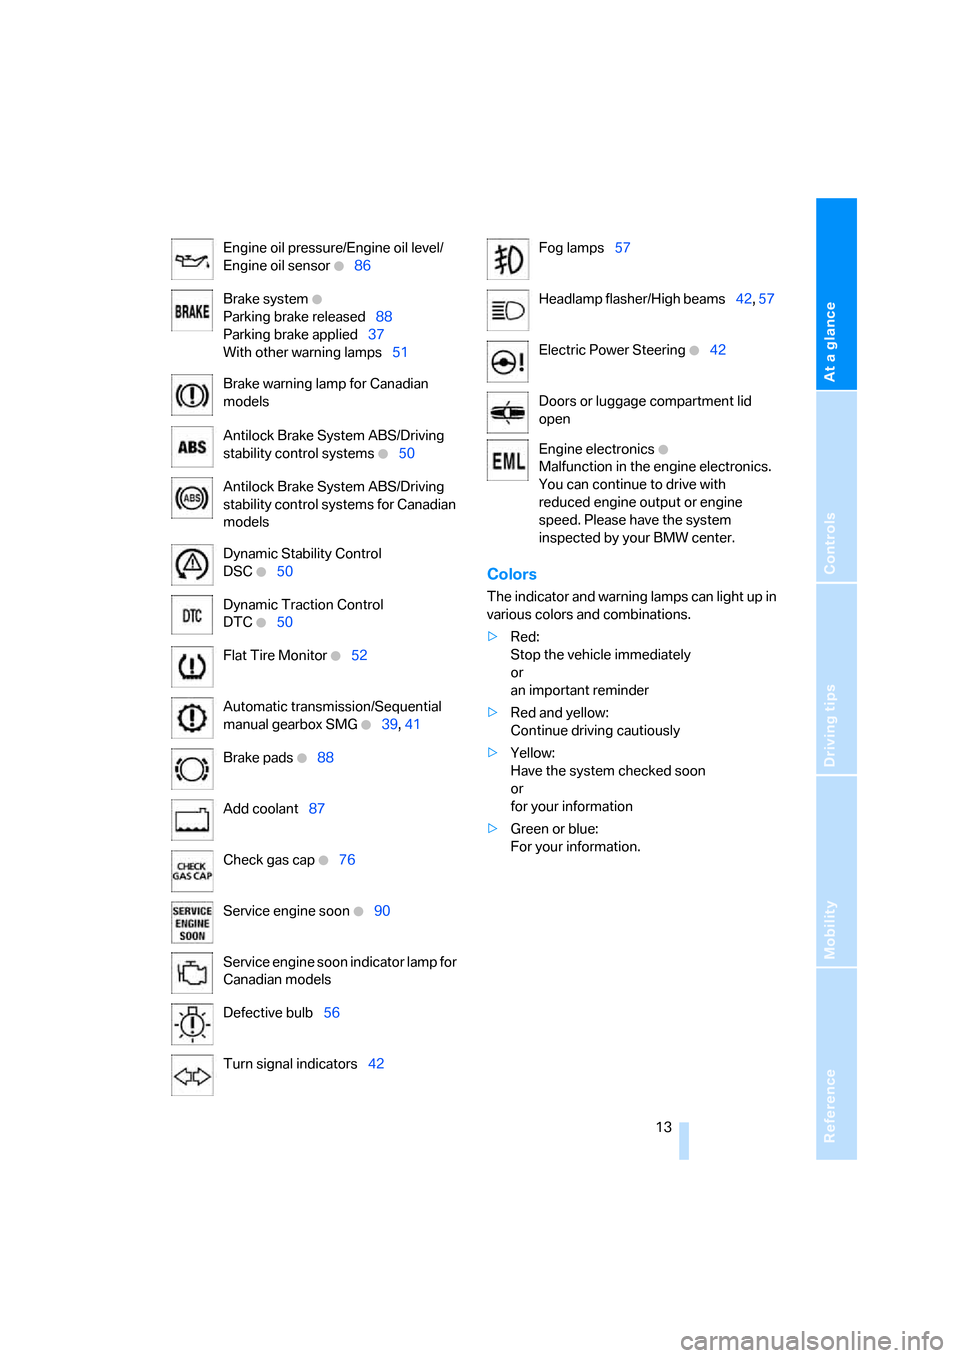
Colors
The indicator and warning lamps can light up in
various colors and combinations.
>Red:
Stop the vehicle immediately
or
an important reminder
>Red and yellow:
Continue driving cautiously
>Yellow:
Have the system checked soon
or
for your information
>Green or blue:
For your information. Engine oil pressure/Engine oil level/
Engine oil sensor
+86
Brake system
+
Parking brake released88
Parking brake applied37
With other warning lamps51
Brake warning lamp for Canadian
models
Antilock Brake System ABS/Driving
stability control systems
+50
Antilock Brake System ABS/Driving
stability control systems for Canadian
models
Dynamic Stability Control
DSC
+50
Dynamic Traction Control
DTC
+50
Flat Tire Monitor
+52
Automatic transmission/Sequential
manual gearbox SMG
+39, 41
Brake pads
+88
Add coolant87
Check gas cap
+76
Service engine soon
+90
Service engine soon indicator lamp for
Canadian models
Defective bulb56
Turn signal indicators42
Fog lamps57
Headlamp flasher/High beams42, 57
Electric Power Steering
+42
Doors or luggage compartment lid
open
Engine electronics
+
Malfunction in the engine electronics.
You can continue to drive with
reduced engine output or engine
speed. Please have the system
inspected by your BMW center.
Page 44 of 120
Driving
42
To activate the system
Ignition key in position 2
Press the SPORT button.
The LED in the button lights up.
To deactivate the system
Press the SPORT button again.
The LED in the button goes out.
Acceleration assistant with SMG
The acceleration assistant permits optimum
racing-style acceleration on skid-resistant
roads.
Do not use the acceleration assistant too
often, as this could cause the vehicle's
parts to wear prematurely.<
1.Activate Driving Dynamic Control
2.Press the DTC button, refer to page51, for
more than three seconds
3.Depress the accelerator all the way down
rapidly: kickdown. The optimum rpm for
driving off will be adjusted.
To maintain vehicle stability, drive with
the DSC switched on whenever possi-
ble.<
Electric Power Steering EPS
The concept
The electric power steering is a direct, sporting
steering system that is speed-sensitive.
Power support is reduced with an increase in
driving speed.
Malfunction
The indicator lamp stays lit:
The system has malfunctioned or is
faulty.
Steering remains operational.
Have the system checked as soon as possible.
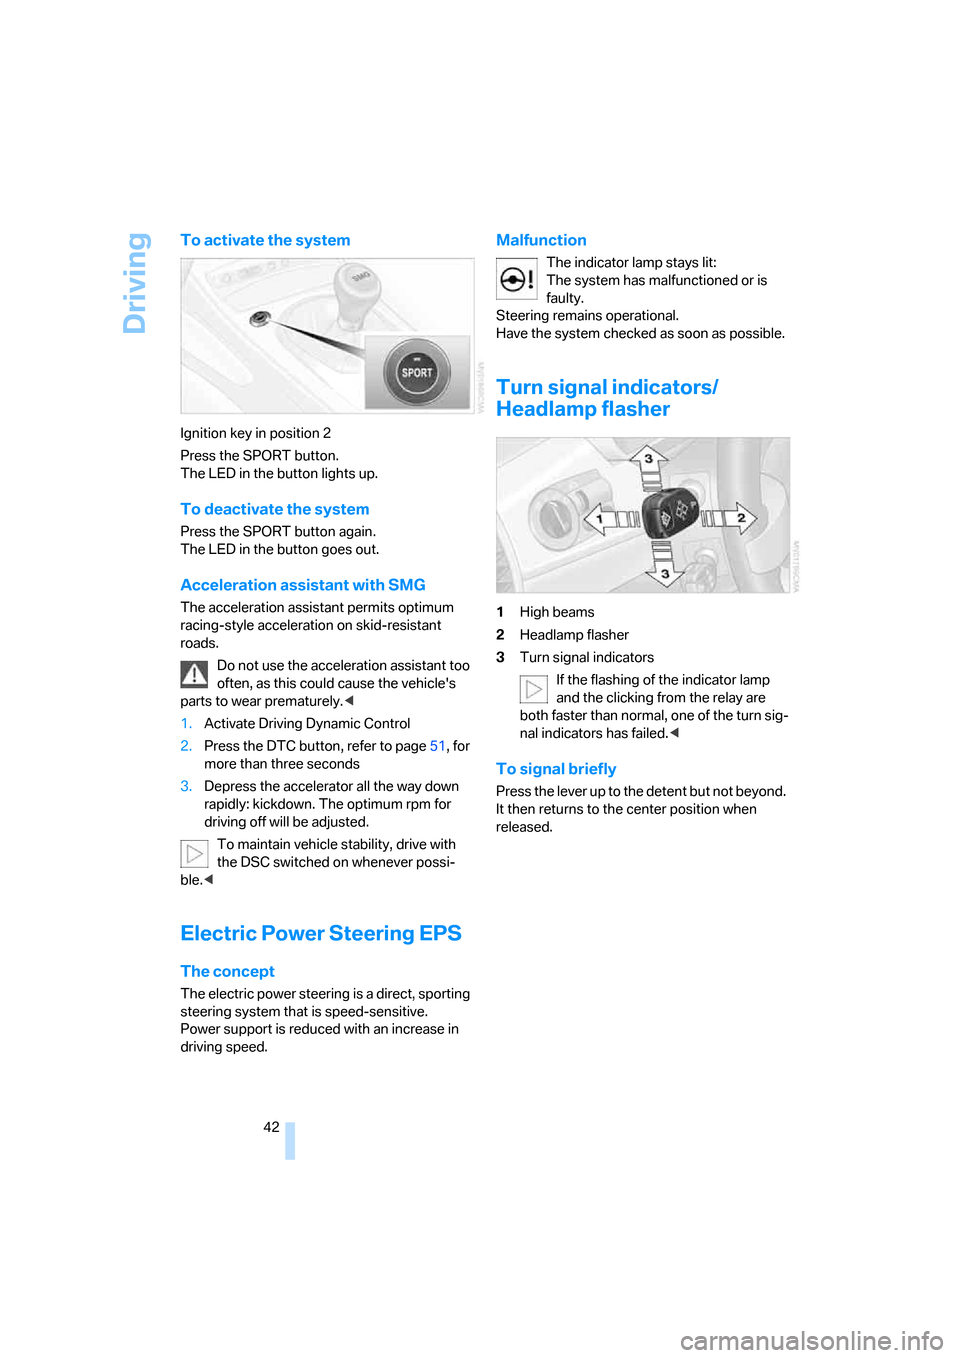
Turn signal indicators/
Headlamp flasher
1High beams
2Headlamp flasher
3Turn signal indicators
If the flashing of the indicator lamp
and the clicking from the relay are
both faster than normal, one of the turn sig-
nal indicators has failed.<
To signal briefly
Press the lever up to the detent but not beyond.
It then returns to the center position when
released.
Page 45 of 120
Reference
At a glance
Controls
Driving tips
Mobility
43
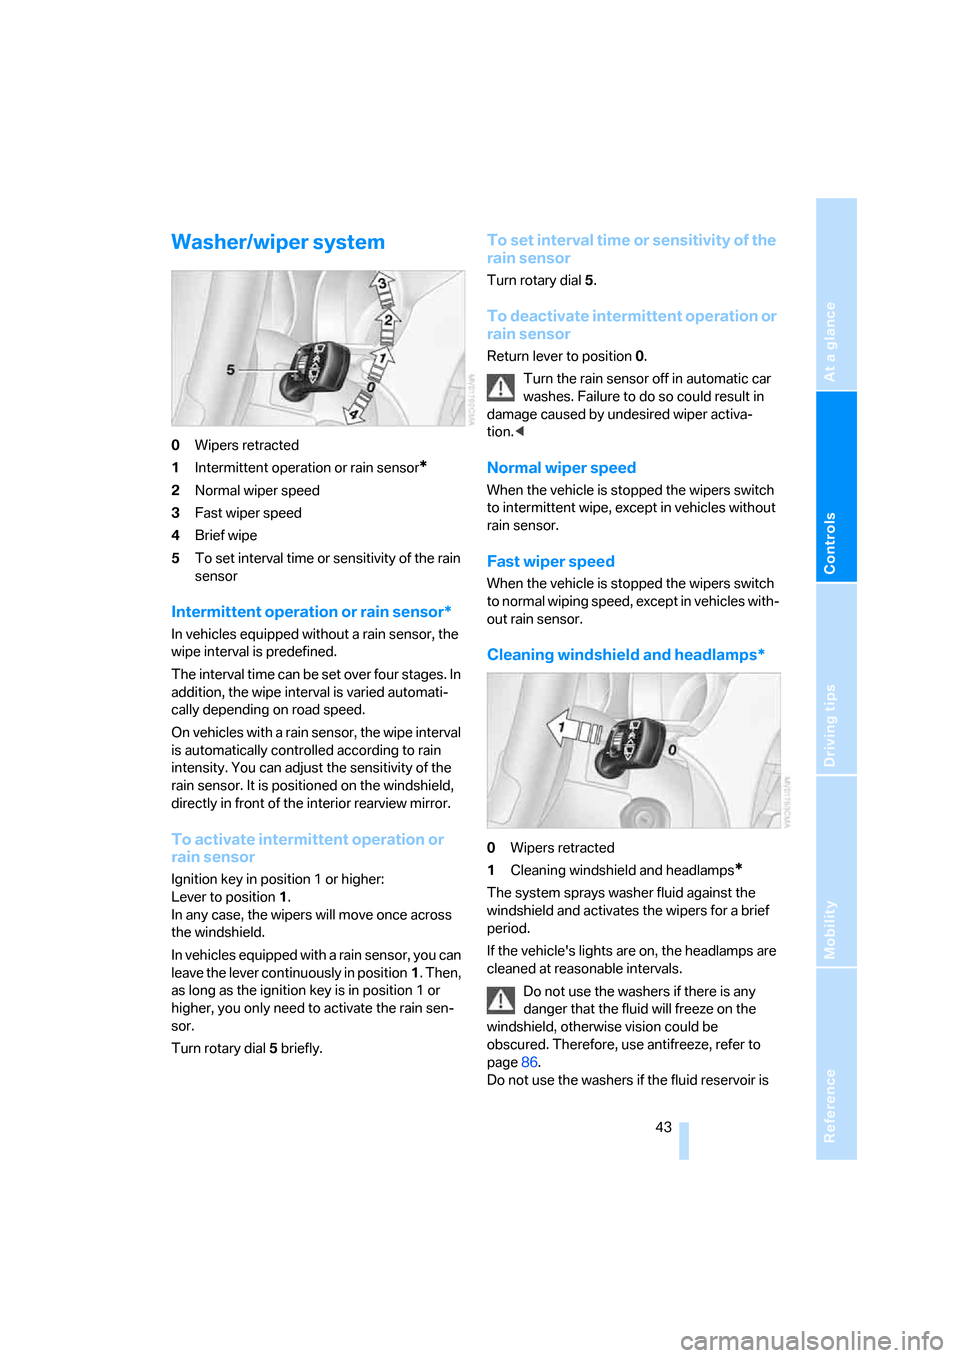
Washer/wiper system
0Wipers retracted
1Intermittent operation or rain sensor
*
2Normal wiper speed
3Fast wiper speed
4Brief wipe
5To set interval time or sensitivity of the rain
sensor
Intermittent operation or rain sensor*
In vehicles equipped without a rain sensor, the
wipe interval is predefined.
The interval time can be set over four stages. In
addition, the wipe interval is varied automati-
cally depending on road speed.
On vehicles with a rain sensor, the wipe interval
is automatically controlled according to rain
intensity. You can adjust the sensitivity of the
rain sensor. It is positioned on the windshield,
directly in front of the interior rearview mirror.
To activate intermittent operation or
rain sensor
Ignition key in position 1 or higher:
Lever to position 1.
In any case, the wipers will move once across
the windshield.
In vehicles equipped with a rain sensor, you can
leave the lever continuously in position1. Then,
as long as the ignition key is in position 1 or
higher, you only need to activate the rain sen-
sor.
Turn rotary dial5 briefly.
To set interval time or sensitivity of the
rain sensor
Turn rotary dial 5.
To deactivate intermittent operation or
rain sensor
Return lever to position 0.
Turn the rain sensor off in automatic car
washes. Failure to do so could result in
damage caused by undesired wiper activa-
tion.<
Normal wiper speed
When the vehicle is stopped the wipers switch
to intermittent wipe, except in vehicles without
rain sensor.
Fast wiper speed
When the vehicle is stopped the wipers switch
to normal wiping speed, except in vehicles with-
out rain sensor.
Cleaning windshield and headlamps*
0Wipers retracted
1Cleaning windshield and headlamps
*
The system sprays washer fluid against the
windshield and activates the wipers for a brief
period.
If the vehicle's lights are on, the headlamps are
cleaned at reasonable intervals.
Do not use the washers if there is any
danger that the fluid will freeze on the
windshield, otherwise vision could be
obscured. Therefore, use antifreeze, refer to
page86.
Do not use the washers if the fluid reservoir is
Page 58 of 120
Lamps
56
Lamps
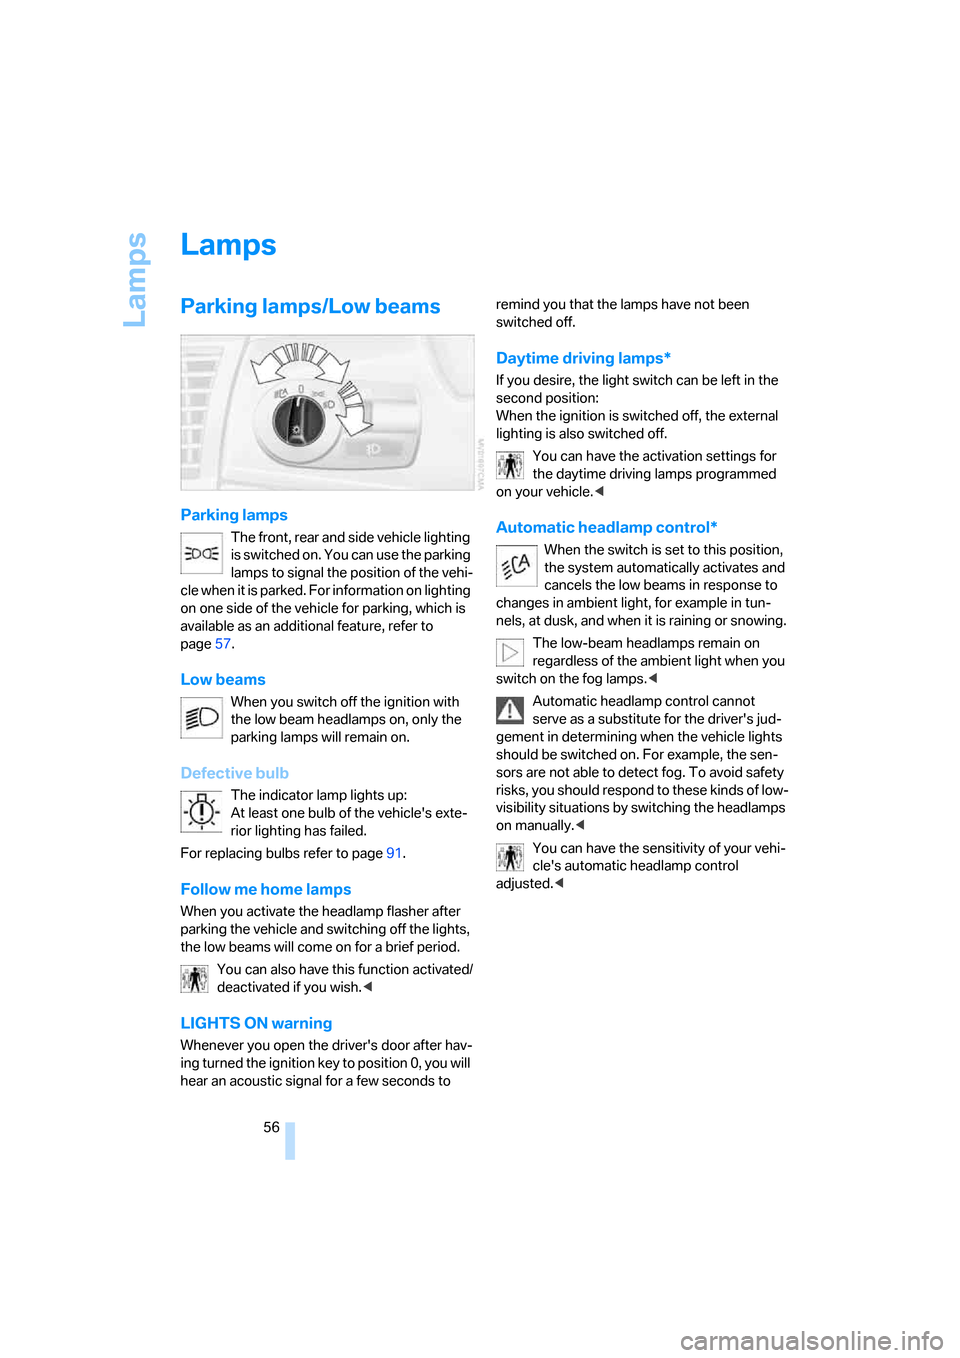
Parking lamps/Low beams
Parking lamps
The front, rear and side vehicle lighting
is switched on. You can use the parking
lamps to signal the position of the vehi-
cle when it is parked. For information on lighting
on one side of the vehicle for parking, which is
available as an additional feature, refer to
page57.
Low beams
When you switch off the ignition with
the low beam headlamps on, only the
parking lamps will remain on.
Defective bulb
The indicator lamp lights up:
At least one bulb of the vehicle's exte-
rior lighting has failed.
For replacing bulbs refer to page91.
Follow me home lamps
When you activate the headlamp flasher after
parking the vehicle and switching off the lights,
the low beams will come on for a brief period.
You can also have this function activated/
deactivated if you wish.<
LIGHTS ON warning
Whenever you open the driver's door after hav-
ing turned the ignition key to position 0, you will
hear an acoustic signal for a few seconds to remind you that the lamps have not been
switched off.
Daytime driving lamps*
If you desire, the light switch can be left in the
second position:
When the ignition is switched off, the external
lighting is also switched off.
You can have the activation settings for
the daytime driving lamps programmed
on your vehicle.<
Automatic headlamp control*
When the switch is set to this position,
the system automatically activates and
cancels the low beams in response to
changes in ambient light, for example in tun-
nels, at dusk, and when it is raining or snowing.
The low-beam headlamps remain on
regardless of the ambient light when you
switch on the fog lamps.<
Automatic headlamp control cannot
serve as a substitute for the driver's jud-
gement in determining when the vehicle lights
should be switched on. For example, the sen-
sors are not able to detect fog. To avoid safety
risks, you should respond to these kinds of low-
visibility situations by switching the headlamps
on manually.<
You can have the sensitivity of your vehi-
cle's automatic headlamp control
adjusted.<
Page 59 of 120
Reference
At a glance
Controls
Driving tips
Mobility
57
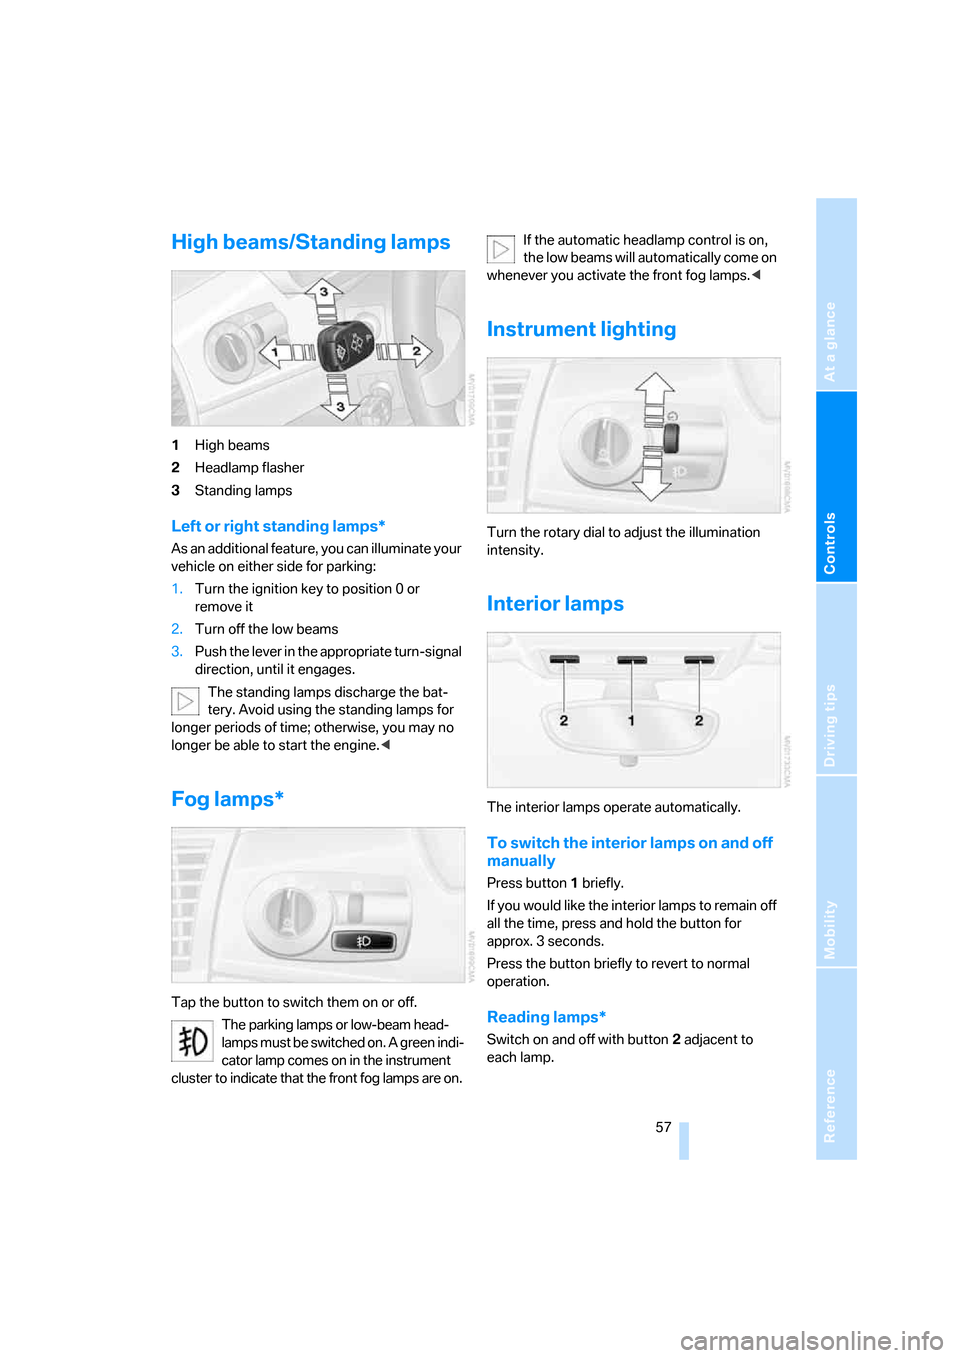
High beams/Standing lamps
1High beams
2Headlamp flasher
3Standing lamps
Left or right standing lamps*
As an additional feature, you can illuminate your
vehicle on either side for parking:
1.Turn the ignition key to position 0 or
remove it
2.Turn off the low beams
3.Push the lever in the appropriate turn-signal
direction, until it engages.
The standing lamps discharge the bat-
tery. Avoid using the standing lamps for
longer periods of time; otherwise, you may no
longer be able to start the engine.<
Fog lamps*
Tap the button to switch them on or off.
The parking lamps or low-beam head-
lamps must be switched on. A green indi-
cator lamp comes on in the instrument
cluster to indicate that the front fog lamps are on.If the automatic headlamp control is on,
the low beams will automatically come on
whenever you activate the front fog lamps.<
Instrument lighting
Turn the rotary dial to adjust the illumination
intensity.
Interior lamps
The interior lamps operate automatically.
To switch the interior lamps on and off
manually
Press button1 briefly.
If you would like the interior lamps to remain off
all the time, press and hold the button for
approx. 3 seconds.
Press the button briefly to revert to normal
operation.
Reading lamps*
Switch on and off with button2 adjacent to
each lamp.
Page 87 of 120
Reference
At a glance
Controls
Driving tips
Mobility
85
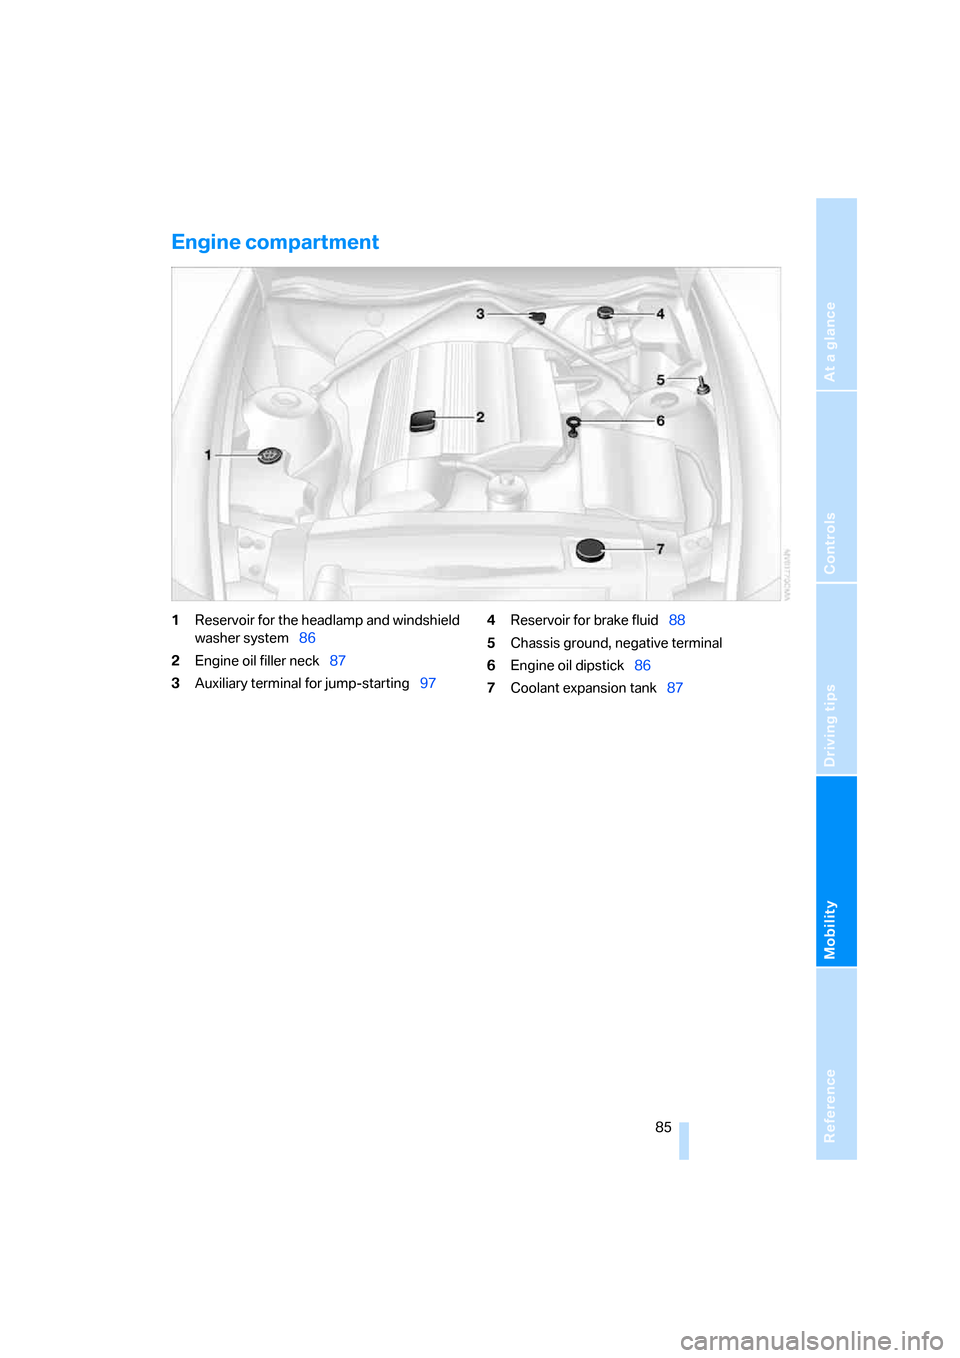
Engine compartment
1Reservoir for the headlamp and windshield
washer system86
2Engine oil filler neck87
3Auxiliary terminal for jump-starting974Reservoir for brake fluid88
5Chassis ground, negative terminal
6Engine oil dipstick86
7Coolant expansion tank87
Page 88 of 120
In the engine compartment
86
Washer fluids for washer
systems
Headlamp* and windshield washer
system
Capacity of windshield washer system: approx.
3.2 quarts/3 liters.
Capacity when equipped with headlamp
washer system: approx. 5.3 quarts/5 liters.
Fill with water and, if required, with an antifreeze
agent according to the manufacturer's recom-
mendations.
We recommend that you mix the washer
fluid before adding it to the reservoir.<
Antifreeze agents for the washing sys-
tems are highly flammable. For this rea-
son, keep them away from sources of flame and
store them only in their original containers.
Store them so that they are inaccessible to chil-
dren. Comply with the instructions on the con-
tainers.<
Engine oil
Oil consumption is directly influenced by your
driving style and vehicle operating conditions.
Warning lamp
Engine oil pressure
The warning lamp lights up in red:
The engine oil pressure is too low.
Stop the vehicle immediately and
switch off the engine. Check the engine oil level
and top up if necessary. If the oil level is correct,
please contact the nearest BMW center.Do not continue driving, as the engine
could sustain serious damage from inad-
equate lubrication.<
Engine oil level
The warning lamp lights up in yellow
while driving:
The oil level is at the absolute mini-
mum; refill as soon as possible. Do not drive
more than 30 miles/50 km before refilling.
The warning lamp lights up in yellow
after the engine has been switched off:
Add engine oil at the earliest opportu-
nity, e.g. when you stop to refuel.
Engine oil sensor
The warning lamp lights up in yellow
within 20 seconds after the engine is
started:
The oil level sensor is defective. Please have it
checked by a BMW center.
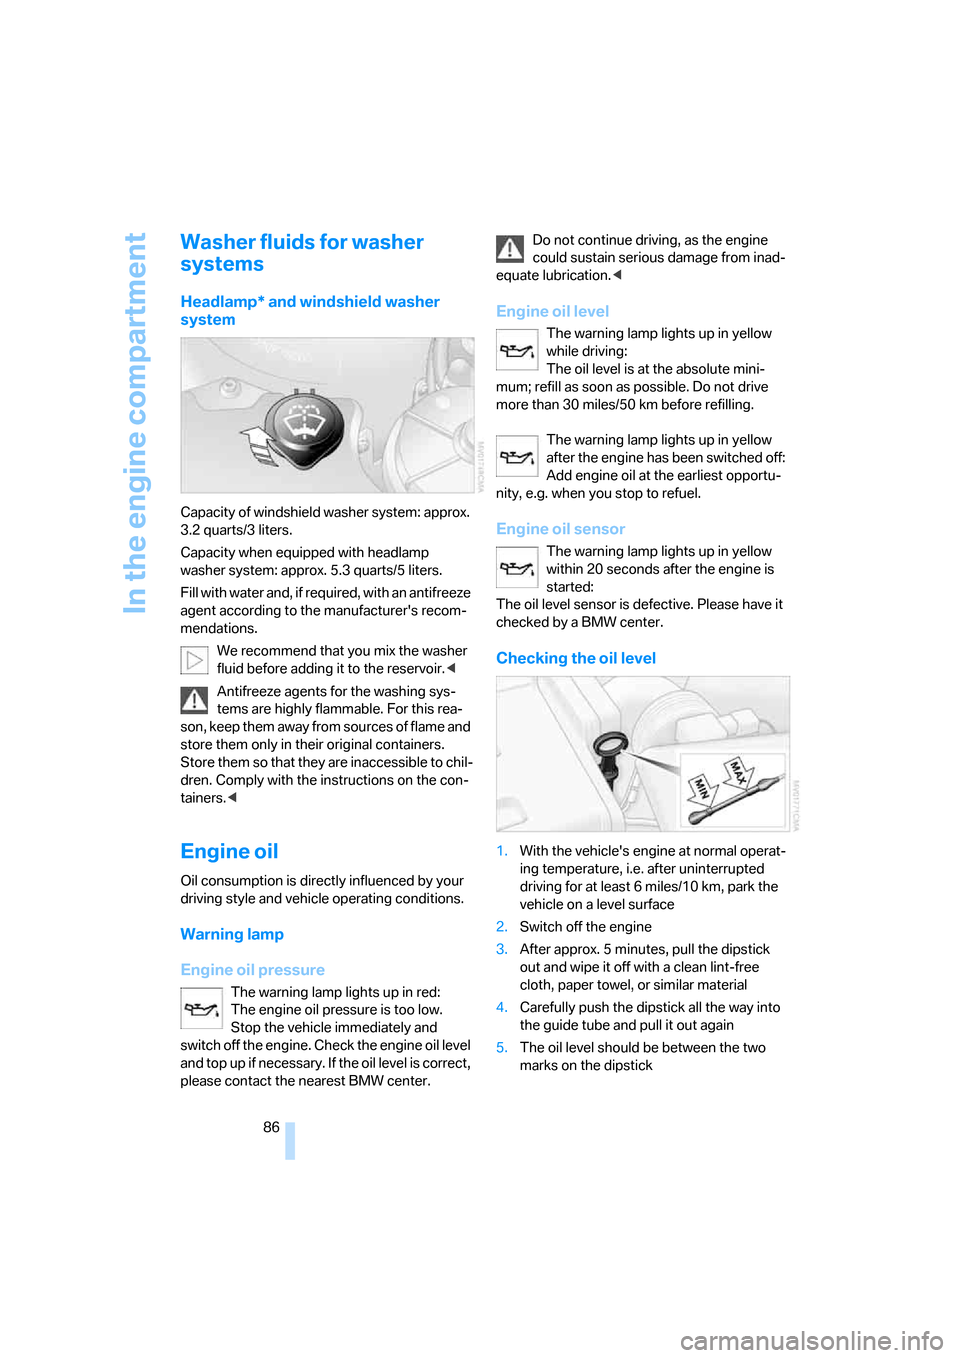
Checking the oil level
1.With the vehicle's engine at normal operat-
ing temperature, i.e. after uninterrupted
driving for at least 6 miles/10 km, park the
vehicle on a level surface
2.Switch off the engine
3.After approx. 5 minutes, pull the dipstick
out and wipe it off with a clean lint-free
cloth, paper towel, or similar material
4.Carefully push the dipstick all the way into
the guide tube and pull it out again
5.The oil level should be between the two
marks on the dipstick
Page 93 of 120
Reference
At a glance
Controls
Driving tips
Mobility
91
Replacement procedures
Onboard tool kit
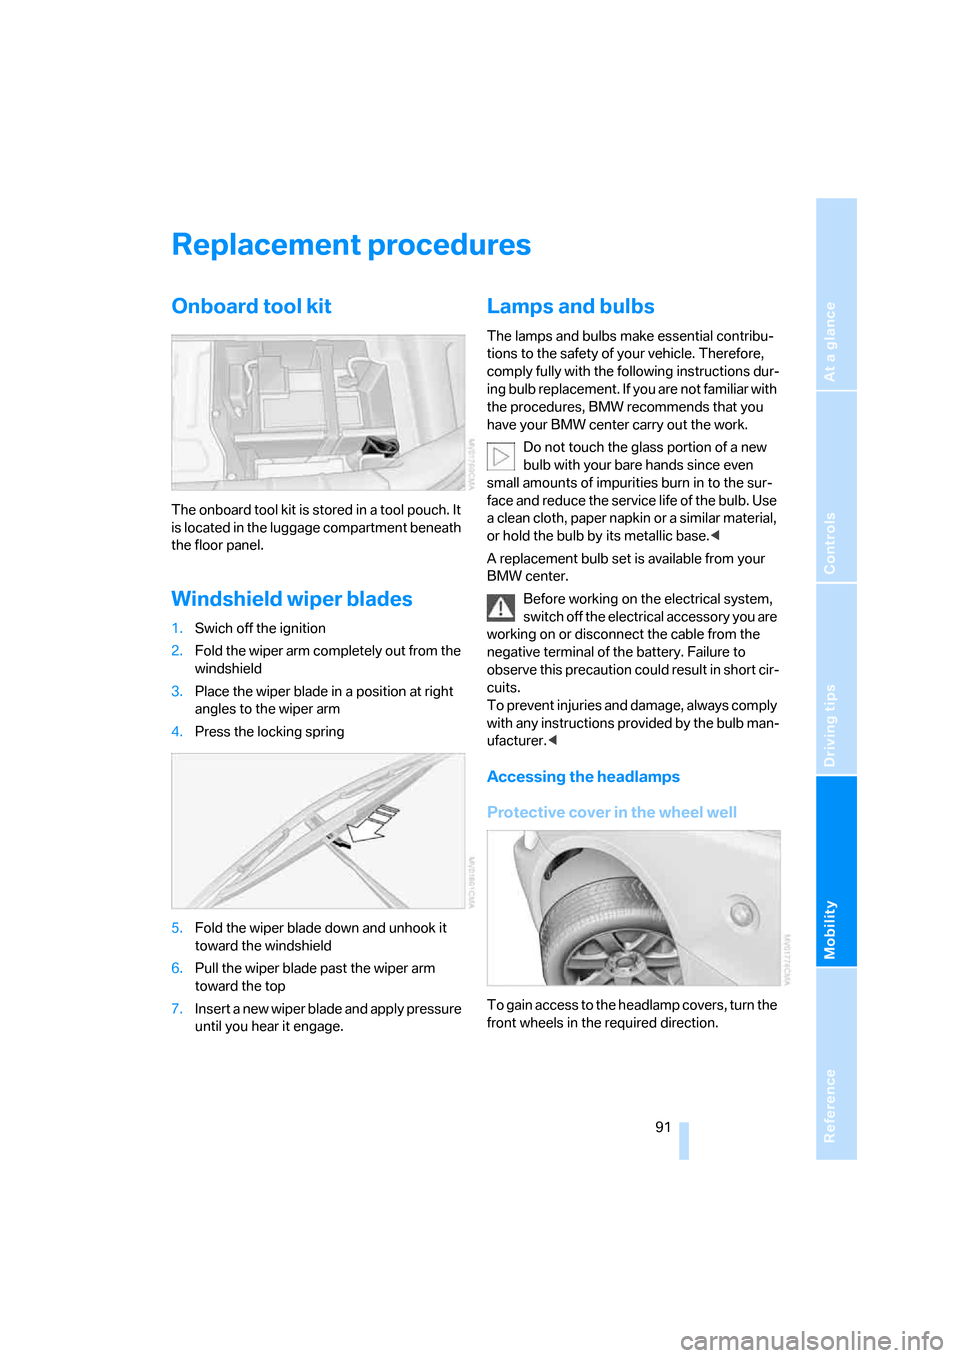
The onboard tool kit is stored in a tool pouch. It
is located in the luggage compartment beneath
the floor panel.
Windshield wiper blades
1.Swich off the ignition
2.Fold the wiper arm completely out from the
windshield
3.Place the wiper blade in a position at right
angles to the wiper arm
4.Press the locking spring
5.Fold the wiper blade down and unhook it
toward the windshield
6.Pull the wiper blade past the wiper arm
toward the top
7.Insert a new wiper blade and apply pressure
until you hear it engage.
Lamps and bulbs
The lamps and bulbs make essential contribu-
tions to the safety of your vehicle. Therefore,
comply fully with the following instructions dur-
ing bulb replacement. If you are not familiar with
the procedures, BMW recommends that you
have your BMW center carry out the work.
Do not touch the glass portion of a new
bulb with your bare hands since even
small amounts of impurities burn in to the sur-
face and reduce the service life of the bulb. Use
a clean cloth, paper napkin or a similar material,
or hold the bulb by its metallic base.<
A replacement bulb set is available from your
BMW center.
Before working on the electrical system,
switch off the electrical accessory you are
working on or disconnect the cable from the
negative terminal of the battery. Failure to
observe this precaution could result in short cir-
cuits.
To prevent injuries and damage, always comply
with any instructions provided by the bulb man-
ufacturer.<
Accessing the headlamps
Protective cover in the wheel well
To gain access to the headlamp covers, turn the
front wheels in the required direction.
Page 94 of 120
Replacement procedures
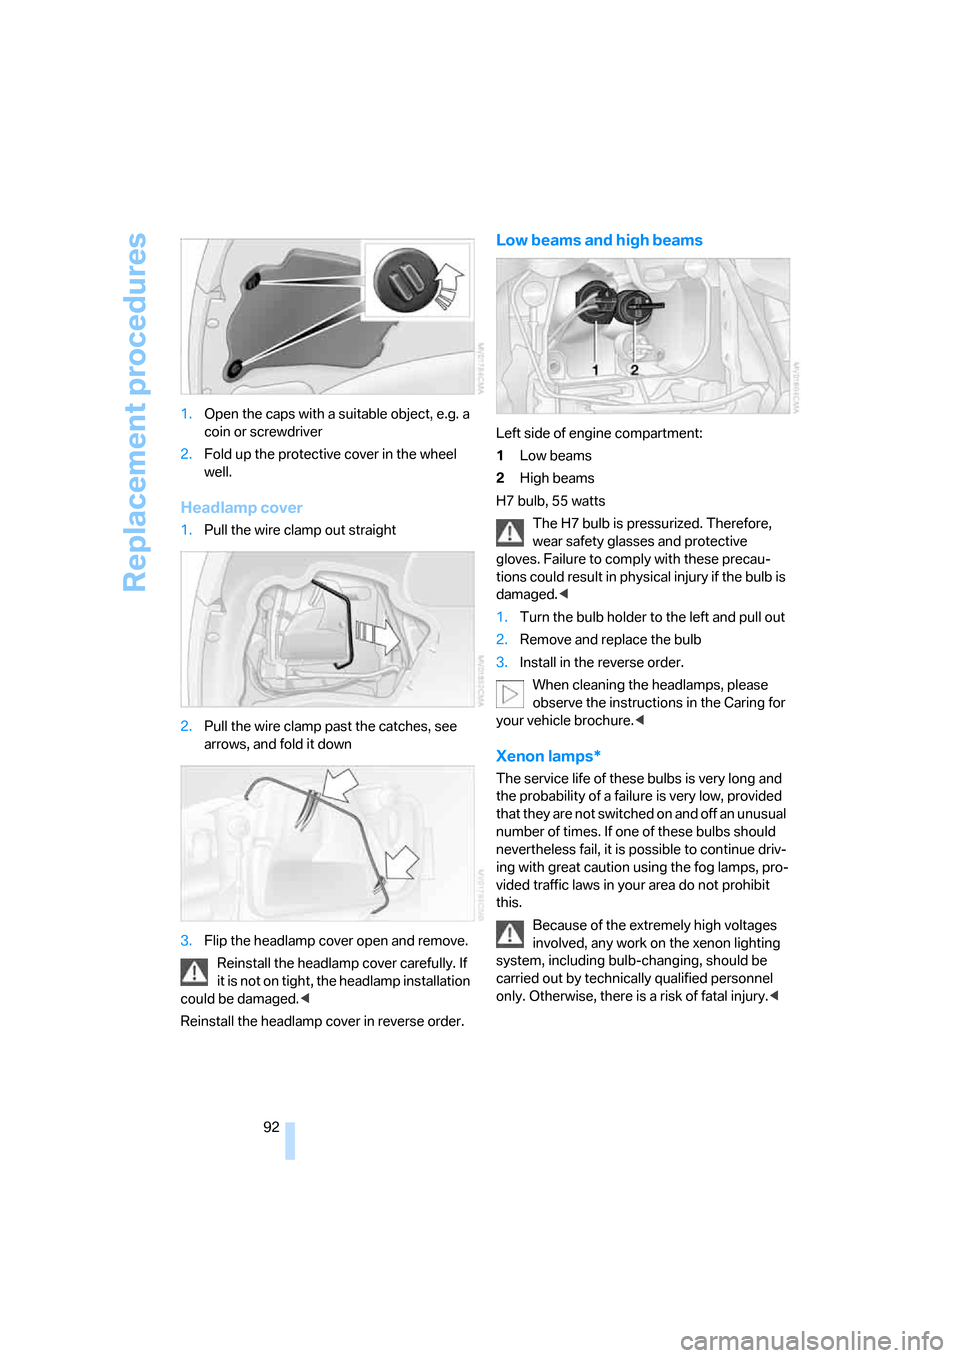
92 1.Open the caps with a suitable object, e.g. a
coin or screwdriver
2.Fold up the protective cover in the wheel
well.
Headlamp cover
1.Pull the wire clamp out straight
2.Pull the wire clamp past the catches, see
arrows, and fold it down
3.Flip the headlamp cover open and remove.
Reinstall the headlamp cover carefully. If
it is not on tight, the headlamp installation
could be damaged.<
Reinstall the headlamp cover in reverse order.
Low beams and high beams
Left side of engine compartment:
1Low beams
2High beams
H7 bulb, 55 watts
The H7 bulb is pressurized. Therefore,
wear safety glasses and protective
gloves. Failure to comply with these precau-
tions could result in physical injury if the bulb is
damaged.<
1.Turn the bulb holder to the left and pull out
2.Remove and replace the bulb
3.Install in the reverse order.
When cleaning the headlamps, please
observe the instructions in the Caring for
your vehicle brochure.<
Xenon lamps*
The service life of these bulbs is very long and
the probability of a failure is very low, provided
that they are not switched on and off an unusual
number of times. If one of these bulbs should
nevertheless fail, it is possible to continue driv-
ing with great caution using the fog lamps, pro-
vided traffic laws in your area do not prohibit
this.
Because of the extremely high voltages
involved, any work on the xenon lighting
system, including bulb-changing, should be
carried out by technically qualified personnel
only. Otherwise, there is a risk of fatal injury.<