headlamp BMW Z4 SDRIVE35I 2009 Owners Manual
[x] Cancel search | Manufacturer: BMW, Model Year: 2009, Model line: Z4 SDRIVE35I, Model: BMW Z4 SDRIVE35I 2009Pages: 248, PDF Size: 7.63 MB
Page 12 of 248
Cockpit
10
Cockpit
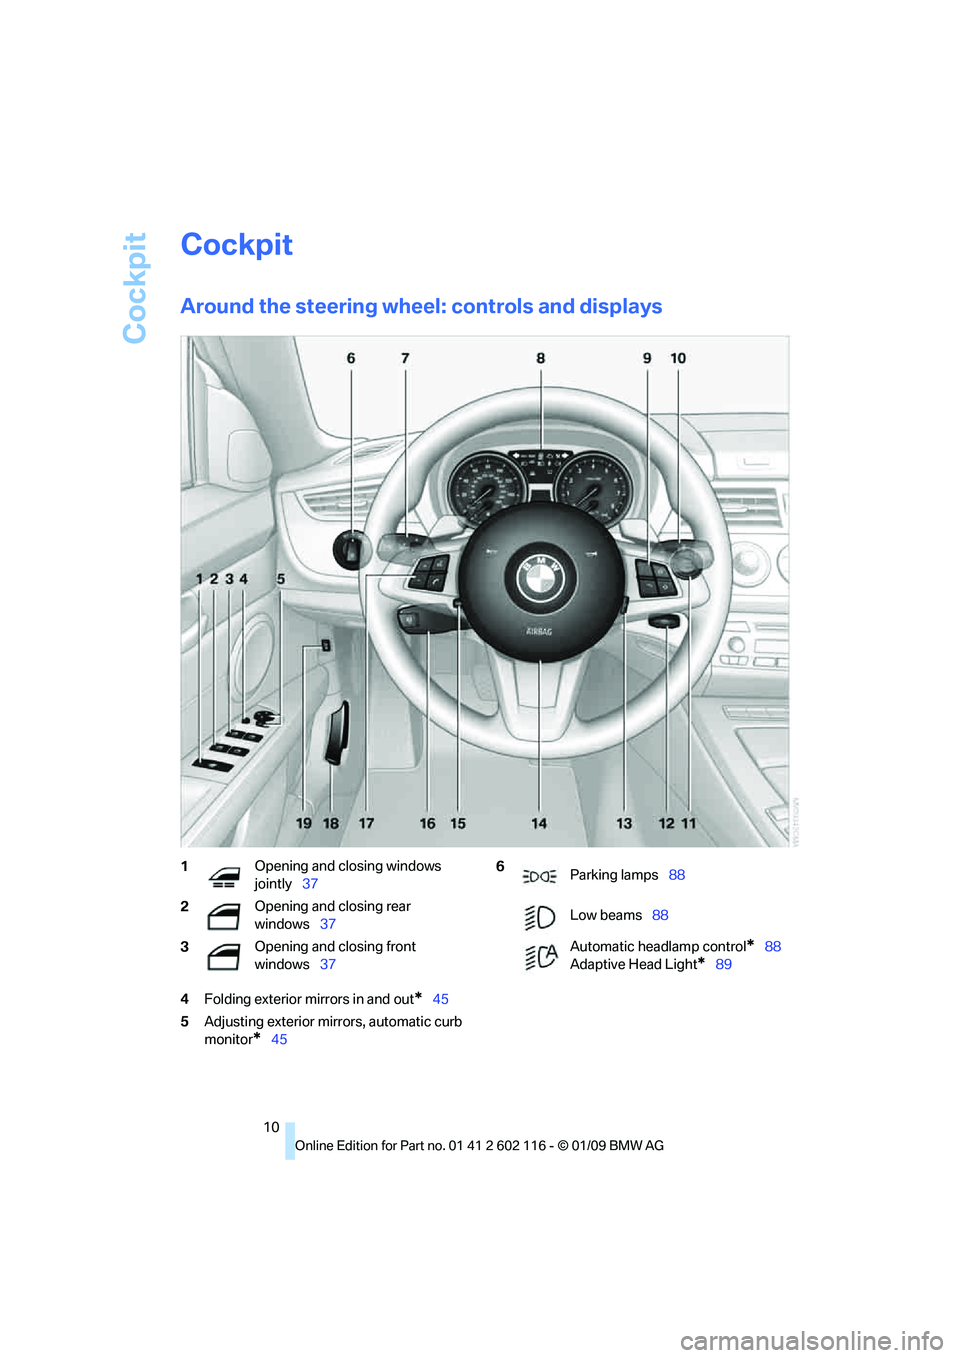
Around the steering wheel: controls and displays
4Folding exterior mirrors in and out*45
5 Adjusting exterior mirrors, automatic curb
monitor
*45
1 Opening and closing windows
jointly
37
2 Opening and closing rear
windows
37
3 Opening and closing front
windows
376
Parking lamps 88
Low beams 88
Automatic headlamp control
*88
Adaptive Head Light
*89
Page 13 of 248
At a glance
11Reference
Controls
Driving tips
Communications
Navigation
Entertainment
Mobility
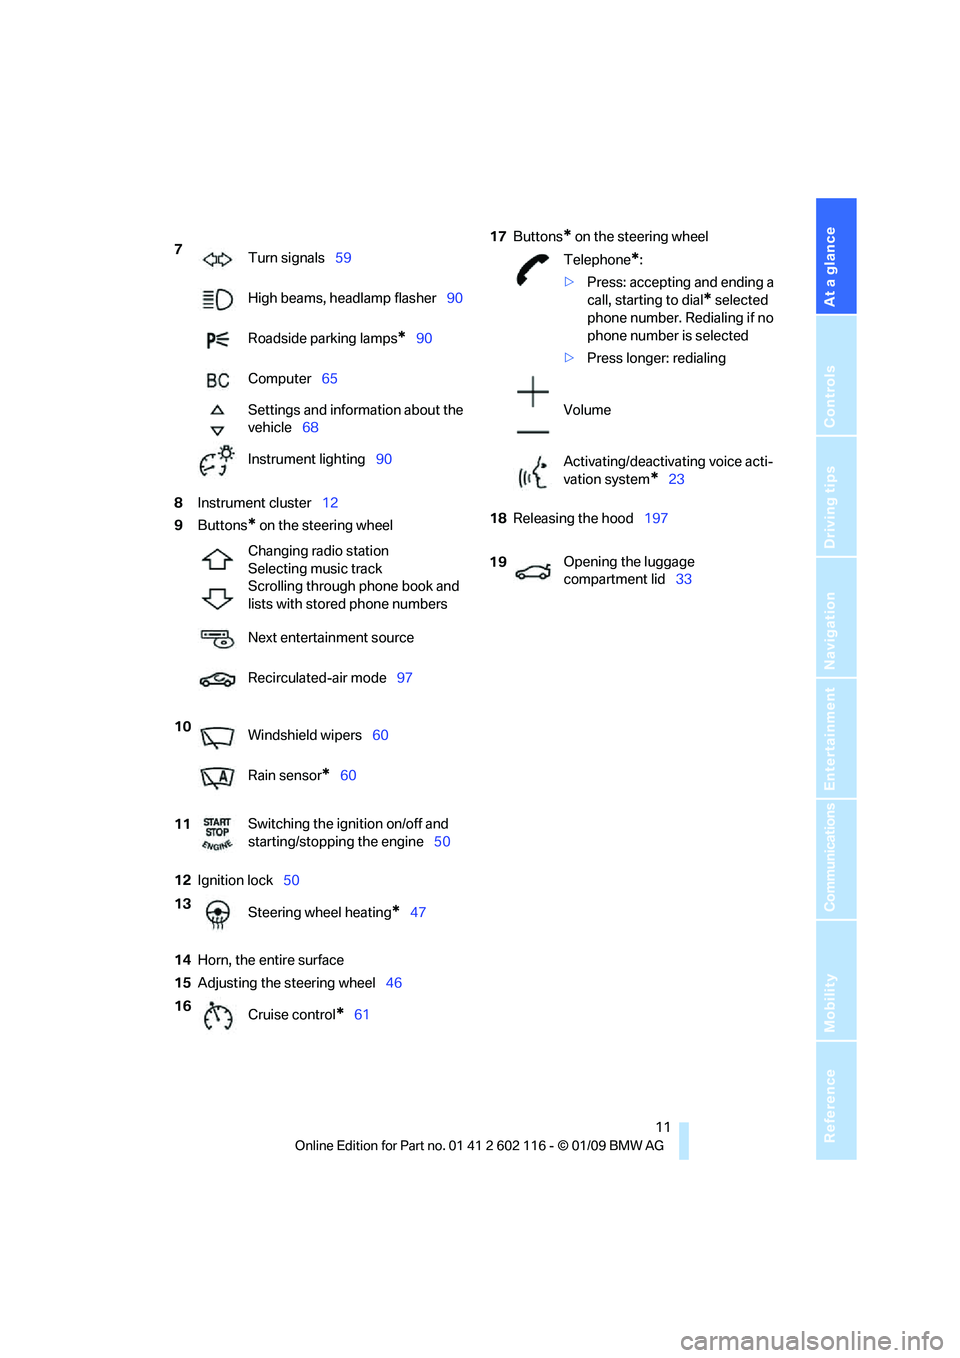
8Instrument cluster 12
9 Buttons
* on the steering wheel
12 Ignition lock 50
14 Horn, the entire surface
15 Adjusting the steering wheel 4617
Buttons
* on the steering wheel
18 Releasing the hood 197
7
Turn signals 59
High beams, headlamp flasher 90
Roadside parking lamps
*90
Computer 65
Settings and information about the
vehicle 68
Instrument lighting 90
Changing radio station
Selecting music track
Scrolling through phone book and
lists with stored phone numbers
Next entertainment source
Recirculated-air mode 97
10 Windshield wipers 60
Rain sensor
*60
11 Switching the ignition on/off and
starting/stopping the engine
50
13 Steering wheel heating
*47
16 Cruise control
*61
Telephone*:
> Press: accepting and ending a
call, starting to dial
* selected
phone number. Redialing if no
phone number is selected
> Press longer: redialing
Volume
Activating/deactivating voice acti-
vation system
*23
19 Opening the luggage
compartment lid
33
Page 15 of 248
At a glance
13Reference
Controls
Driving tips
Communications
Navigation
Entertainment
Mobility
Indicator and warning lamps
The concept
Indicator and warning lamps can light up in a
variety of combinations and colors.
Some lamps are checked for proper functioning
and thus come on briefly when the engine is
started or the ignition is switched on.
Explanatory text messages
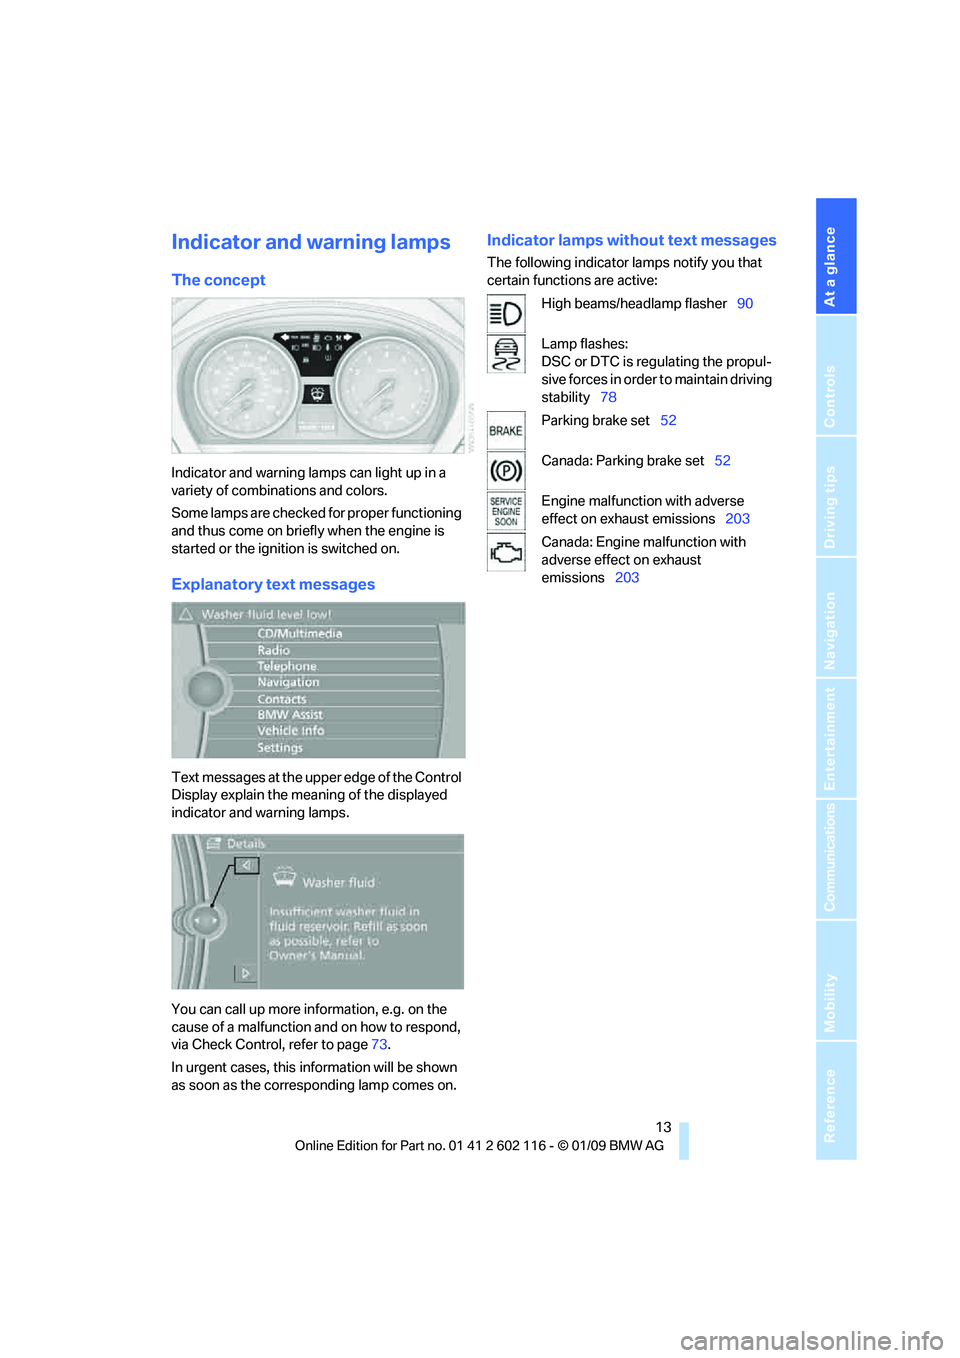
Text messages at the upper edge of the Control
Display explain the meaning of the displayed
indicator and warning lamps.
You can call up more information, e.g. on the
cause of a malfunction and on how to respond,
via Check Control, refer to page 73.
In urgent cases, this information will be shown
as soon as the corresponding lamp comes on.
Indicator lamps without text messages
The following indicator lamps notify you that
certain functions are active:
High beams/headlamp flasher 90
Lamp flashes:
DSC or DTC is regulating the propul-
sive forces in order to maintain driving
stability 78
Parking brake set 52
Canada: Parking brake set 52
Engine malfunction with adverse
effect on exhaust emissions 203
Canada: Engine malfunction with
adverse effect on exhaust
emissions 203
Page 61 of 248
Controls
59Reference
At a glance
Driving tips
Communications
Navigation
Entertainment
Mobility
5.Turn the Allen wrench as far as it will go,
arrow 2. The transmission lock is released.
Do not turn the Allen wrench in the
opposite direction as this may dam-
age the mechanism.<
6. Draw the Allen wrench out of the opening.
After parking the vehicle, lock the trans-
mission lock again. Otherwise, there is a
danger of the vehicle rolling. <
Locking
1.Press the button, see arrow.
The transmission lock is locked again.
2. Clip the sleeve of the selector lever back in
place.
3. Set the parking brake.
Jump-starting and towing, refer to page 214.
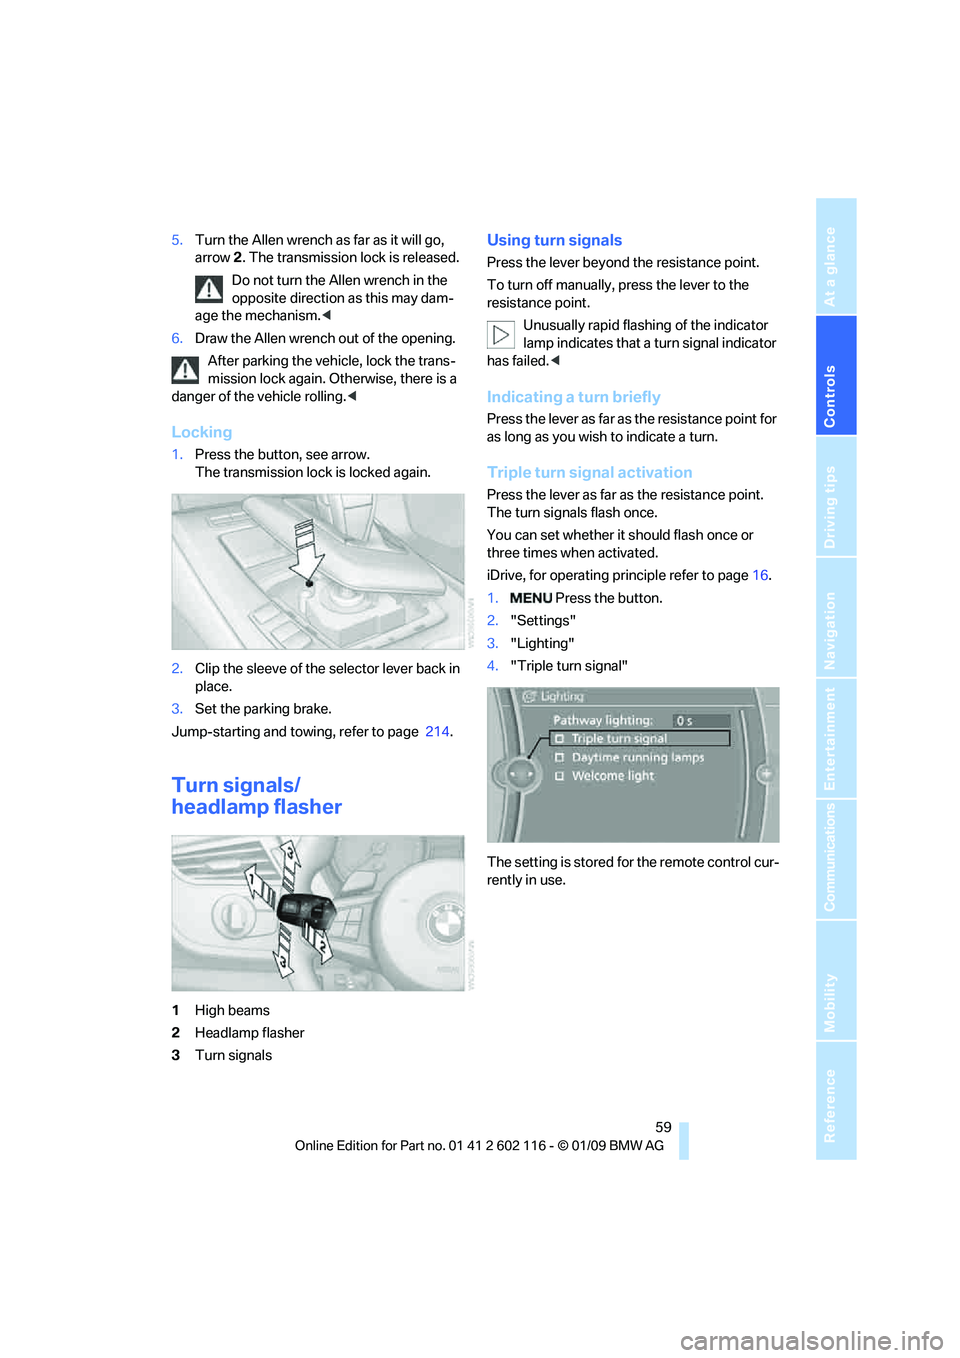
Turn signals/
headlamp flasher
1High beams
2 Headlamp flasher
3 Turn signals
Using turn signals
Press the lever beyond the resistance point.
To turn off manually, press the lever to the
resistance point.
Unusually rapid flashi ng of the indicator
lamp indicates that a turn signal indicator
has failed. <
Indicating a turn briefly
Press the lever as far as the resistance point for
as long as you wish to indicate a turn.
Triple turn signal activation
Press the lever as far as the resistance point.
The turn signals flash once.
You can set whether it should flash once or
three times when activated.
iDrive, for operating pr inciple refer to page16.
1. Press the button.
2. "Settings"
3. "Lighting"
4. "Triple turn signal"
The setting is stored for the remote control cur-
rently in use.
Page 62 of 248
Driving
60
Wiper system
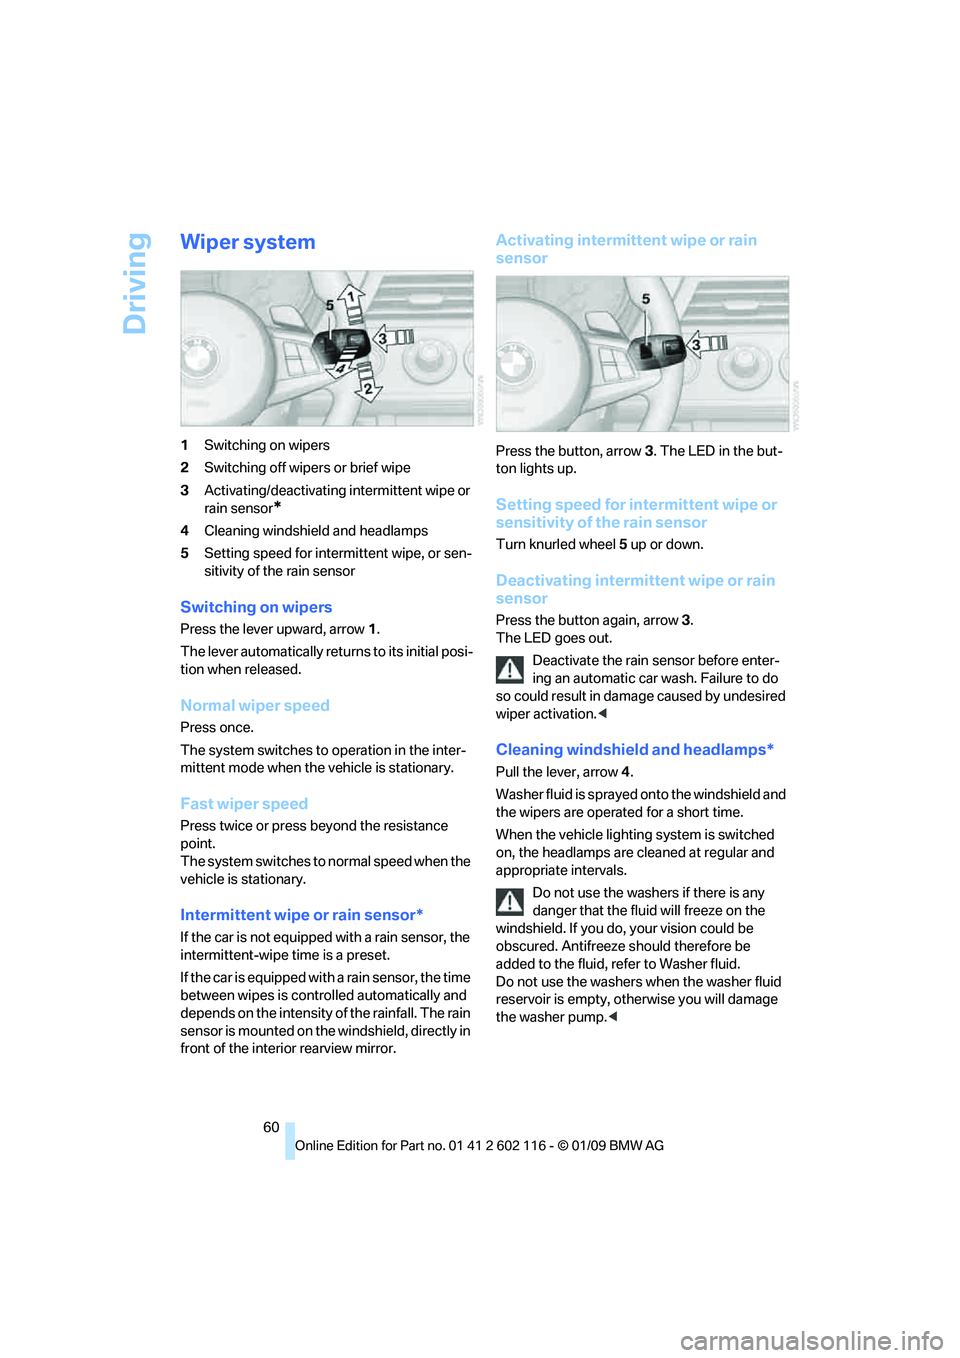
1Switching on wipers
2 Switching off wipers or brief wipe
3 Activating/deactivating intermittent wipe or
rain sensor
*
4Cleaning windshield and headlamps
5 Setting speed for intermittent wipe, or sen-
sitivity of the rain sensor
Switching on wipers
Press the lever upward, arrow 1.
The lever automatically retu rns to its initial posi-
tion when released.
Normal wiper speed
Press once.
The system switches to operation in the inter-
mittent mode when the vehicle is stationary.
Fast wiper speed
Press twice or press beyond the resistance
point.
The system switches to normal speed when the
vehicle is stationary.
Intermittent wipe or rain sensor*
If the car is not equipped with a rain sensor, the
intermittent-wipe time is a preset.
If the car is equipped with a rain sensor, the time
between wipes is contro lled automatically and
depends on the intensity of the rainfall. The rain
sensor is mounted on the windshield, directly in
front of the interior rearview mirror.
Activating intermitte nt wipe or rain
sensor
Press the button, arrow 3. The LED in the but-
ton lights up.
Setting speed for inte rmittent wipe or
sensitivity of the rain sensor
Turn knurled wheel 5 up or down.
Deactivating intermit tent wipe or rain
sensor
Press the button again, arrow 3.
The LED goes out.
Deactivate the rain sensor before enter-
ing an automatic car wash. Failure to do
so could result in damage caused by undesired
wiper activation. <
Cleaning windshield and headlamps*
Pull the lever, arrow 4.
Washer fluid is sprayed onto the windshield and
the wipers are operated for a short time.
When the vehicle lighting system is switched
on, the headlamps are cleaned at regular and
appropriate intervals. Do not use the washers if there is any
danger that the fluid will freeze on the
windshield. If you do, your vision could be
obscured. Antifreeze should therefore be
added to the fluid, refer to Washer fluid.
Do not use the washers when the washer fluid
reservoir is empty, ot herwise you will damage
the washer pump.<
Page 90 of 248
Lamps
88
Lamps
Parking lamps/low beams
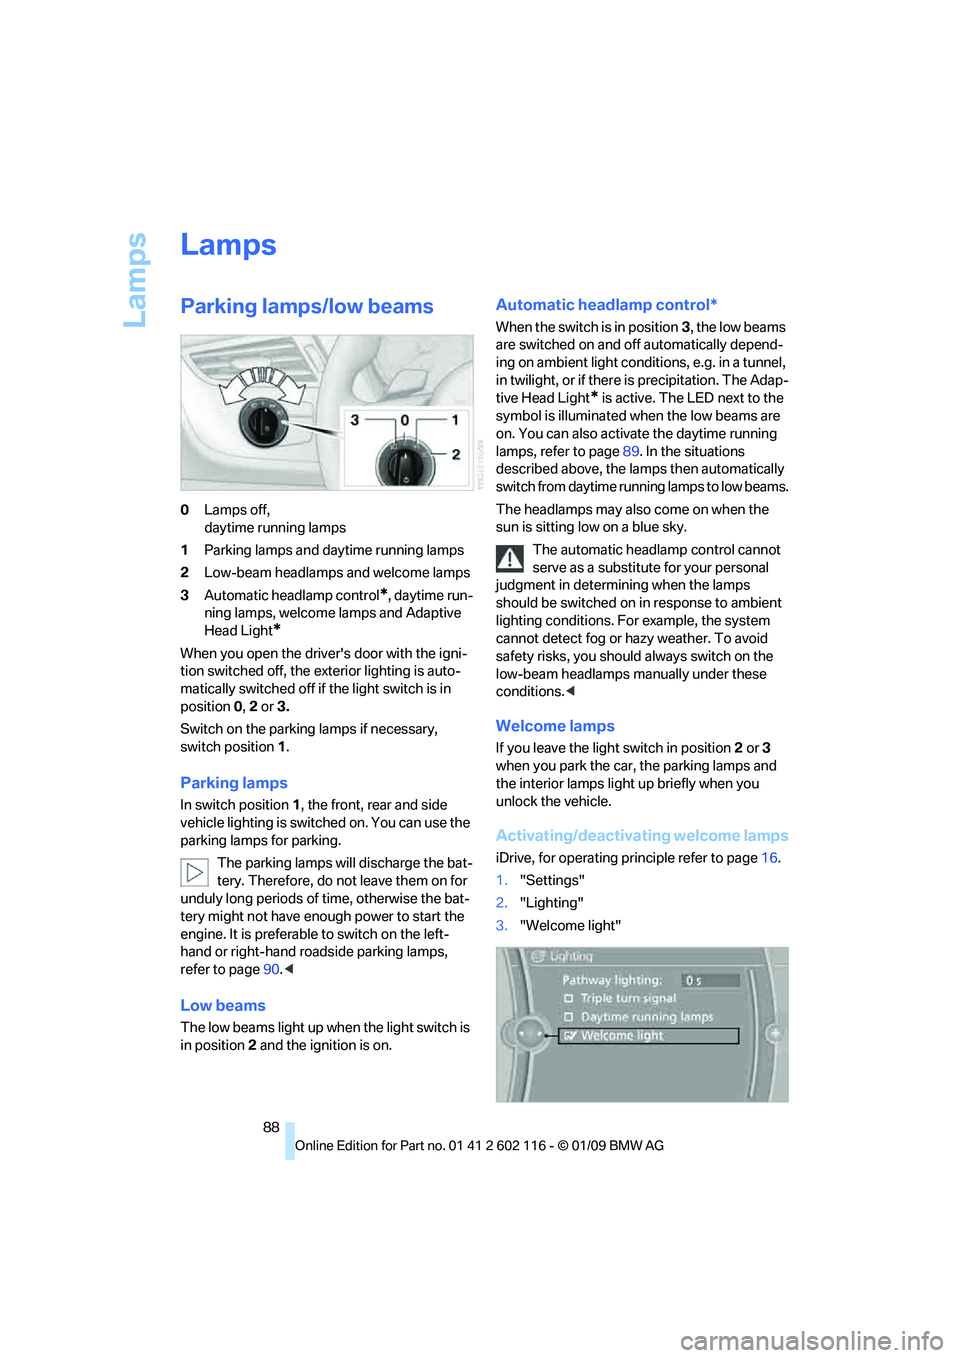
0Lamps off,
daytime running lamps
1 Parking lamps and daytime running lamps
2 Low-beam headlamps and welcome lamps
3 Automatic headlamp control
*, daytime run-
ning lamps, welcome lamps and Adaptive
Head Light
*
When you open the driver's door with the igni-
tion switched off, the exterior lighting is auto-
matically switched off if the light switch is in
position 0, 2 or 3.
Switch on the parkin g lamps if necessary,
switch position 1.
Parking lamps
In switch position 1, the front, rear and side
vehicle lighting is switch ed on. You can use the
parking lamps for parking.
The parking lamps will discharge the bat-
tery. Therefore, do not leave them on for
unduly long periods of time, otherwise the bat-
tery might not have enou gh power to start the
engine. It is preferable to switch on the left-
hand or right-hand ro adside parking lamps,
refer to page 90.<
Low beams
The low beams light up wh en the light switch is
in position 2 and the ignition is on.
Automatic headlamp control*
When the switch is in position 3, the low beams
are switched on and off automatically depend-
ing on ambient light conditions, e.g. in a tunnel,
in twilight, or if there is precipitation. The Adap-
tive Head Light
* is active. The LED next to the
symbol is illuminated when the low beams are
on. You can also activate the daytime running
lamps, refer to page 89. In the situations
described above, the la mps then automatically
switch from daytime runn ing lamps to low beams.
The headlamps may also come on when the
sun is sitting low on a blue sky. The automatic headla mp control cannot
serve as a substitute for your personal
judgment in determin ing when the lamps
should be switched on in response to ambient
lighting conditions. For example, the system
cannot detect fog or hazy weather. To avoid
safety risks, you should always switch on the
low-beam headlamps ma nually under these
conditions. <
Welcome lamps
If you leave the light switch in position 2 or 3
when you park the car, the parking lamps and
the interior lamps light up briefly when you
unlock the vehicle.
Activating/deactivating welcome lamps
iDrive, for operating pr inciple refer to page16.
1. "Settings"
2. "Lighting"
3. "Welcome light"
Page 91 of 248
Controls
89Reference
At a glance
Driving tips
Communications
Navigation
Entertainment
Mobility
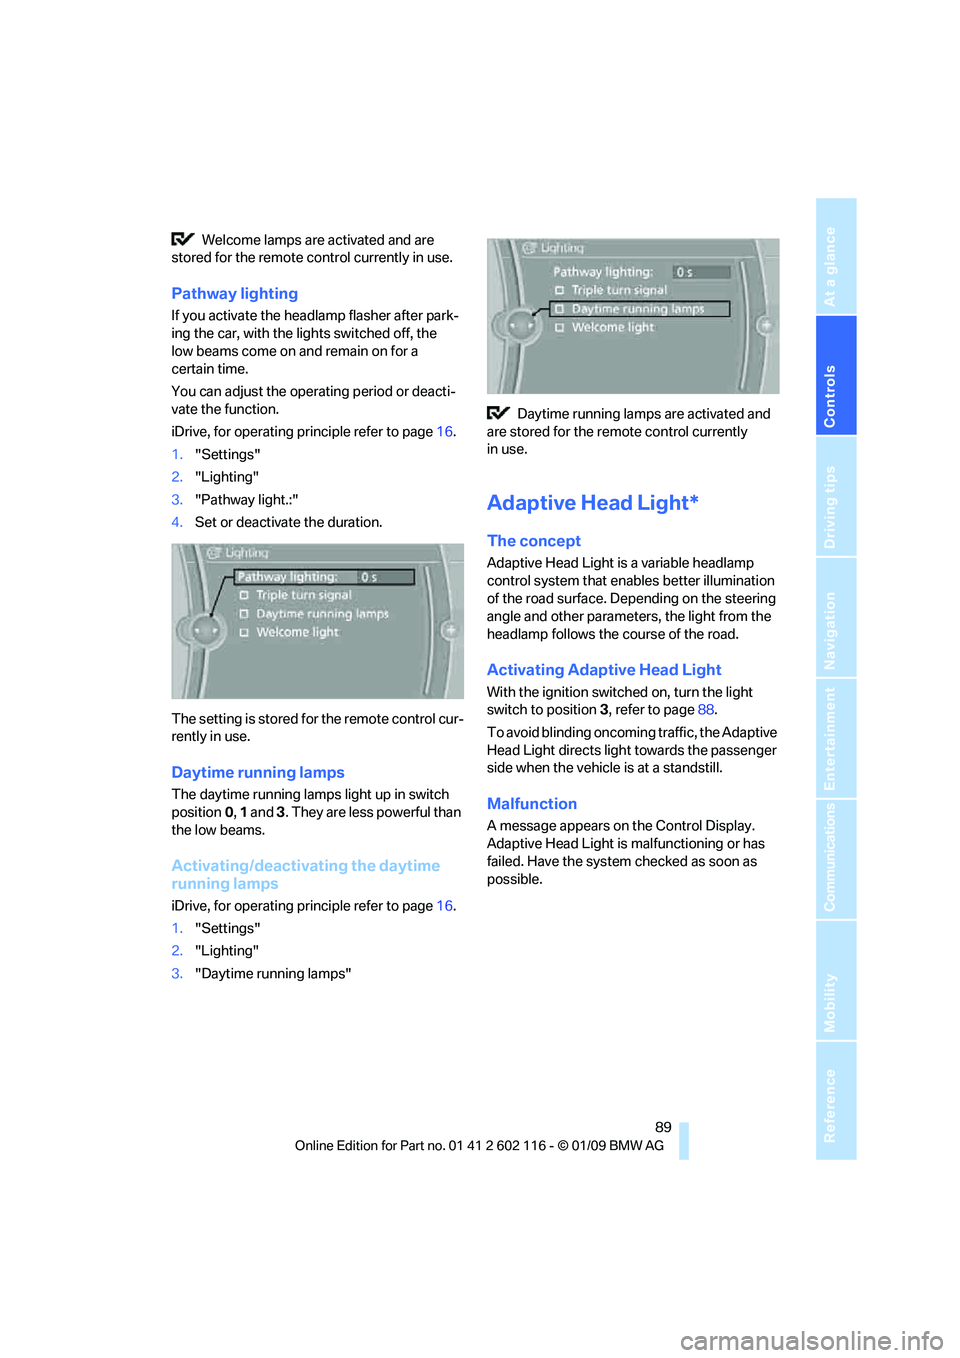
Welcome lamps are activated and are
stored for the remote control currently in use.
Pathway lighting
If you activate the head lamp flasher after park-
ing the car, with the lig hts switched off, the
low beams come on and remain on for a
certain time.
You can adjust the operating period or deacti-
vate the function.
iDrive, for operating principle refer to page 16.
1. "Settings"
2. "Lighting"
3. "Pathway light.:"
4. Set or deactivate the duration.
The setting is stored for the remote control cur-
rently in use.
Daytime running lamps
The daytime running lamps light up in switch
position 0, 1 and 3. They are less powerful than
the low beams.
Activating/deactivating the daytime
running lamps
iDrive, for operating principle refer to page 16.
1. "Settings"
2. "Lighting"
3. "Daytime running lamps" Daytime running lamps are activated and
are stored for the remote control currently
in use.
Adaptive Head Light*
The concept
Adaptive Head Light is a variable headlamp
control system that en ables better illumination
of the road surface. Depending on the steering
angle and other parameters, the light from the
headlamp follows the course of the road.
Activating Adapti ve Head Light
With the ignition switched on, turn the light
switch to position 3, refer to page 88.
To avoid blinding oncoming traffic, the Adaptive
Head Light directs light towards the passenger
side when the vehicle is at a standstill.
Malfunction
A message appears on the Control Display.
Adaptive Head Light is malfunctioning or has
failed. Have the system checked as soon as
possible.
Page 92 of 248
Lamps
90
High beams/roadside parking
lamps
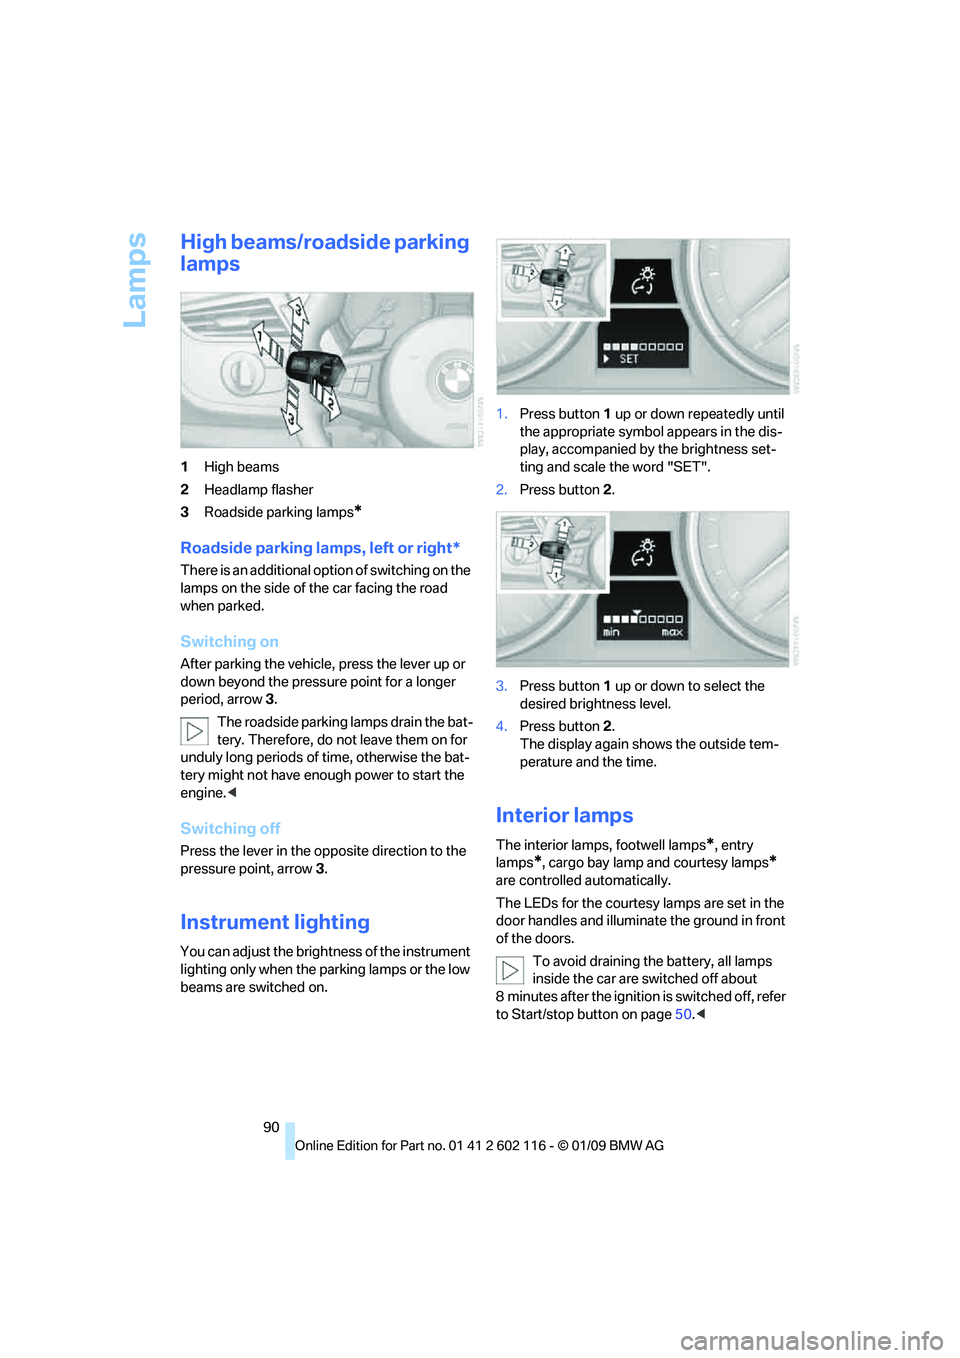
1High beams
2 Headlamp flasher
3 Roadside parking lamps
*
Roadside parking lamps, left or right*
There is an additional option of switching on the
lamps on the side of the car facing the road
when parked.
Switching on
After parking the vehicle, press the lever up or
down beyond the pressu re point for a longer
period, arrow 3.
The roadside parking lamps drain the bat-
tery. Therefore, do not leave them on for
unduly long periods of time, otherwise the bat-
tery might not have enou gh power to start the
engine. <
Switching off
Press the lever in the opposite direction to the
pressure point, arrow 3.
Instrument lighting
You can adjust the brightness of the instrument
lighting only when the parking lamps or the low
beams are switched on. 1.
Press button 1 up or down repeatedly until
the appropriate symbol appears in the dis-
play, accompanied by the brightness set-
ting and scale the word "SET".
2. Press button 2.
3. Press button 1 up or down to select the
desired brightness level.
4. Press button 2.
The display again shows the outside tem-
perature and the time.
Interior lamps
The interior lamps, footwell lamps*, entry
lamps
*, cargo bay lamp and courtesy lamps*
are controlled automatically.
The LEDs for the courtesy lamps
are set in the
door handles and illuminate the ground in front
of the doors.
To avoid draining the battery, all lamps
inside the car are switched off about
8 minutes after the ignition is switched off, refer
to Start/stop button on page 50.<
Page 200 of 248
Under the hood
198
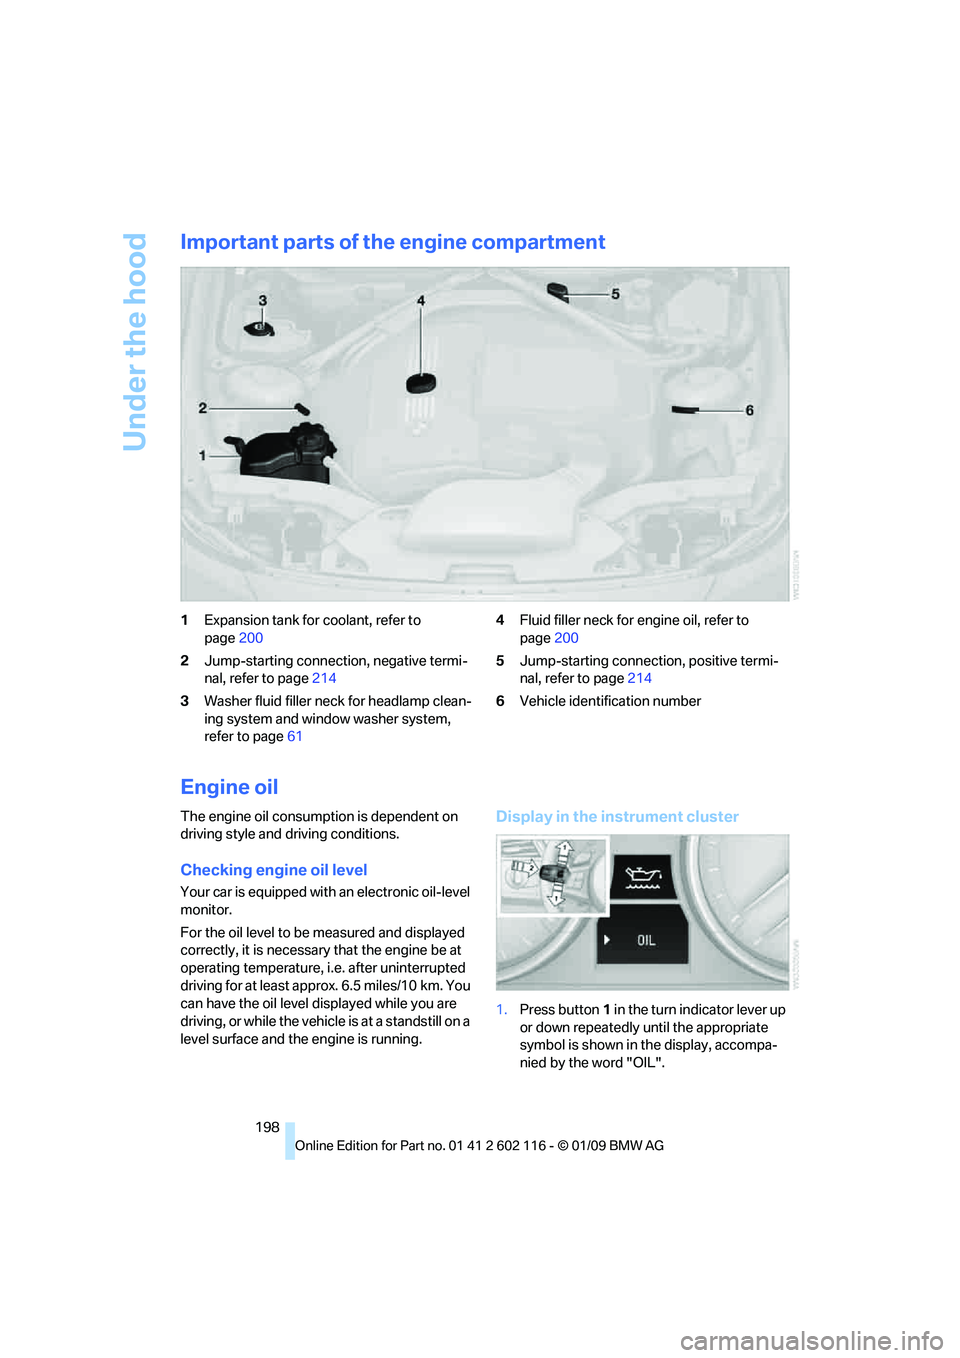
Important parts of the engine compartment
1Expansion tank for coolant, refer to
page 200
2 Jump-starting connection, negative termi-
nal, refer to page 214
3 Washer fluid filler neck for headlamp clean-
ing system and window washer system,
refer to page 61 4
Fluid filler neck for engine oil, refer to
page 200
5 Jump-starting connection, positive termi-
nal, refer to page 214
6 Vehicle identification number
Engine oil
The engine oil consumption is dependent on
driving style and driving conditions.
Checking engine oil level
Your car is equipped with an electronic oil-level
monitor.
For the oil level to be measured and displayed
correctly, it is necessary that the engine be at
operating temperature, i.e. after uninterrupted
driving for at least approx. 6.5 miles/10 km. You
can have the oil level displayed while you are
driving, or while the vehicle is at a standstill on a
level surface and the engine is running.
Display in the instrument cluster
1.Press button 1 in the turn indicator lever up
or down repeatedly until the appropriate
symbol is shown in the display, accompa-
nied by the word "OIL".
Page 207 of 248
Mobility
205Reference
At a glance
Controls
Driving tips
Communications
Navigation
Entertainment
7-gear sport automatic transmission
with dual clutch
Before driving into an automatic car wash, per-
form the following steps to ensure that the vehi-
cle can roll:
1. Insert the remote control, even with conve-
nient access, into the ignition lock.
2. Engage transmission position N.
3. Release the parking brake.
4. Switch off the engine.
5. Leave the remote control in the ignition lock
so that the vehicle can roll.
Transmission position P is engaged:
> Automatically after approx. 30 minutes
> When you take the remo te control out of the
ignition lock
Steam jets / high -pressure washers
When using steam jets or high-pressure
washers, ensure that you maintain suffi-
cient clearance to the vehicle and do not exceed
a temperature of 60°C.
Insufficient clearance or excessive pressure or
temperature can lead to component damage or
water penetration. Follow the operating instruc-
tions of the high-pressure washer. <
When using high-pressure washers, do
not spray against the seals of the retract-
able hardtop, the sensor s and the cameras, e.g.
of the Park Distance Control or Rear View Cam-
era, for an extended period and maintain a dis-
tance of at least 12 in/30 cm. <
Manual car wash
When washing the vehicle by hand, use large
quantities of water and car shampoo if neces-
sary. Clean the vehicle with a sponge or wash-
ing brush, applying light pressure only.
Before cleaning the windshield, deacti-
vate the rain sensor or switch off the igni-
tion to prevent unintent ional activation of the
wipers. <
Observe local regulations pertaining to
washing vehicles by hand. <
Headlamps
Do not rub them dry and do not use abrasive or
corrosive cleaning agents.
Remove contamination, such as insects, by
soaking with shampoo or insect remover and
then rinsing with plenty of water.
Thaw ice with a windshield de-icer and do not
use an ice scraper.
Windows
Clean the inside and outside surfaces of the
windows and the mirrors with window cleaner.
Do not clean the mirrors with cleaners
containing quartz. <
Retractable hardtop
Proceed as you would in a normal car wash.
When you open a we t hardtop, water
drops may run into the cargo bay. If nec-
essary, remove items from the cargo bay
beforehand to avoid water stains or soiling. <
Paintwork care
Regular care contributes to value retention and
protects the paintwork against the long-term
effects of damaging substances.
Region-specific environmental influences can
damage the vehicle paintwork. Therefore, it is
important to adapt the frequency and scope of
car care accordingly.
Immediately remove aggressive materials such
as spilled fuel, oil, grease, brake fluid, tree sap or
bird droppings to prevent damage to the
paintwork.
Repairing paintwork damage
Immediately repair scratches or similar
damage, such as that caused by stones
hitting the vehicle, wher e necessary to prevent
rusting. <
BMW recommends having paintwork damage
repaired by a profession al paint repair work-
shop according to BMW specifications using
original BMW paint materials.