turn signal BUICK CASCADA 2017 Owner's Guide
[x] Cancel search | Manufacturer: BUICK, Model Year: 2017, Model line: CASCADA, Model: BUICK CASCADA 2017Pages: 381, PDF Size: 6.58 MB
Page 191 of 381
Buick Cascada Owner Manual (GMNA-Localizing-U.S.-9967834) - 2017 - crc -
7/18/16
190 Infotainment System
Display Settings
Touch Config on the Home Page or
press CONFIG on the center stack,
then select Display Settings from
the list.
The following options may display:
Home Page Menu :Touch to
customize the first page of the
Home Page.
Rear Camera Options : Touch to
enable or disable Symbols and
Guide Lines..
Display Off : Touch to turn off the
display. The display will return when
any center stack control is pressed
or the screen is touched (if
equipped).
Map Settings : Touch to enter the
submenu to change Map Display
settings and enable Speed Limit
display on map.
Map Display : Touch to change the
screen background.
. The Automatic setting adjusts
the screen background
automatically depending on the
exterior lighting conditions. .
The Day setting brightens the
map background.
. The Night setting darkens the
map background.
To change the overall brightness
setting for the display, use the
vehicle interior lighting instrument
panel illumination control.
Speed Limits : Touch to enable or
disable displayed speed limits on
the map.
Global Positioning
System (GPS)
The position of the vehicle is
determined by using satellite
signals, various vehicle signals, and
map data.
At times, other interference such as
the satellite condition, road
configuration, condition of the
vehicle, and/or other circumstances
can affect the navigation system's
ability to determine the accurate
position of the vehicle. The GPS shows the current position
of the vehicle using signals sent by
GPS Satellites. When the vehicle is
not receiving signals from the
satellites, a symbol appears on the
map screen. See
Navigation
Symbols 0172.
This system might not be available
or interference can occur if any of
the following are true:
. Signals are obstructed by tall
buildings, trees, large trucks,
or a tunnel.
. Satellites are being repaired or
improved.
For more information if the GPS is
not functioning properly, see
Problems with Route Guidance
0 191 andIf the System Needs
Service 0192.
Vehicle Positioning
At times, the position of the vehicle
on the map could be inaccurate due
to one or more of the following
reasons:
.
The road system has changed.
Page 192 of 381
Buick Cascada Owner Manual (GMNA-Localizing-U.S.-9967834) - 2017 - crc -
7/18/16
Infotainment System 191
.The vehicle is driving on slippery
road surfaces such as sand,
gravel, or snow.
. The vehicle is traveling on
winding roads or long straight
roads.
. The vehicle is approaching a tall
building or a large vehicle.
. The surface streets run parallel
to a freeway.
. The vehicle has been transferred
by a vehicle carrier or a ferry.
. The current position calibration
is set incorrectly.
. The vehicle is traveling at high
speed.
. The vehicle changes directions
more than once, or the vehicle is
turning on a turn table in a
parking lot.
. The vehicle is entering and/or
exiting a parking lot, garage, or a
lot with a roof.
. The GPS signal is not received.
. A roof carrier is installed on the
vehicle. .
Tire chains have been installed.
. The tires are replaced or worn.
. The tire pressure for the tires is
incorrect.
. This is the first navigation use
after the map data is updated.
. The 12-volt battery was
disconnected for several days.
. The vehicle is driving in heavy
traffic where driving is at low
speeds, and the vehicle is
stopped and started repeatedly.
Problems with Route
Guidance
Inappropriate route guidance can
occur under one or more of the
following conditions:
.
The turn was not made on the
road indicated.
. Route guidance might not be
available when using automatic
rerouting for the next right or
left turn.
. The route might not be changed
when using automatic rerouting. .
There is no route guidance when
turning at an intersection.
. Plural names of places might be
announced occasionally.
. It could take a long time to
operate automatic rerouting
during high-speed driving.
. Automatic rerouting might
display a route returning to the
set waypoint if heading for a
destination without passing
through a set waypoint.
. The route prohibits the entry of a
vehicle due to a regulation by
time or season or any other
regulation which may be given.
. Some routes might not be
searched.
. The route to the destination
might not be shown if there are
new roads, if roads have
recently changed, or if certain
roads are not listed in the map
data. See Maps0172.
To recalibrate the vehicle's position
on the map, park with the vehicle
running for two to five minutes, until
the vehicle position updates. Make
Page 224 of 381

Buick Cascada Owner Manual (GMNA-Localizing-U.S.-9967834) - 2017 - crc -
7/18/16
Driving and Operating 223
clear roads in shaded areas.
The surface of a curve or an
overpass can remain icy when
the surrounding roads are clear.
Avoid sudden steering
maneuvers and braking while
on ice.
. Turn off cruise control.
Blizzard Conditions
Stop the vehicle in a safe place and
signal for help. Stay with the vehicle
unless there is help nearby.
If possible, use Roadside
Assistance. See Roadside
Assistance Program 0351. To get
help and keep everyone in the
vehicle safe:
. Turn on the hazard warning
flashers.
. Tie a red cloth to an outside
mirror.
{Warning
Snow can trap engine exhaust
under the vehicle. This may
cause exhaust gases to get
inside. Engine exhaust contains
carbon monoxide (CO), which
cannot be seen or smelled. It can
cause unconsciousness and even
death.
If the vehicle is stuck in snow:
. Clear snow from the base of
the vehicle, especially any
blocking the exhaust pipe.
. Open a window about 5 cm
(2 in) on the vehicle side
that is away from the wind,
to bring in fresh air.
. Fully open the air outlets on
or under the instrument
panel.
. Adjust the climate control
system to circulate the air
inside the vehicle and set
(Continued)
Warning (Continued)
the fan speed to the highest
setting. See“Climate
Control Systems.”
For more information about CO,
see Engine Exhaust 0233.
To save fuel, run the engine for
short periods to warm the vehicle
and then shut the engine off and
partially close the window. Moving
about to keep warm also helps.
If it takes time for help to arrive,
when running the engine, push the
accelerator pedal slightly so the
engine runs faster than the idle
speed. This keeps the battery
charged to restart the vehicle and to
signal for help with the headlamps.
Do this as little as possible, to
save fuel.
If the Vehicle Is Stuck
Slowly and cautiously spin the
wheels to free the vehicle when
stuck in sand, mud, ice, or snow.
Page 249 of 381

Buick Cascada Owner Manual (GMNA-Localizing-U.S.-9967834) - 2017 - crc -
7/18/16
248 Driving and Operating
Cleaning the System
If the FCA system does not seem to
operate properly, clean the outside
of the windshield area in front of the
camera sensor before considering
taking the vehicle in for service.
Lane Departure
Warning (LDW)
If equipped, LDW may help avoid
crashes due to unintentional lane
departures. It may provide an alert if
the vehicle is crossing a lane
without using a turn signal in that
direction. LDW uses a camera
sensor to detect the lane markings
at speeds of 56 km/h (35 mph) or
greater.
{Warning
The LDW system does not steer
the vehicle. The LDW system
may not:. Provide enough time to
avoid a crash.
(Continued)
Warning (Continued)
.Detect lane markings under
poor weather or visibility
conditions. This can occur if
the windshield or
headlamps are blocked by
dirt, snow, or ice; if they are
not in proper condition; or if
the sun shines directly into
the camera.
. Detect road edges.
. Detect lanes on winding or
hilly roads.
If LDW only detects lane
markings on one side of the road,
it will only warn you when
departing the lane on the side
where it has detected a lane
marking. Always keep your
attention on the road and
maintain proper vehicle position
within the lane, or vehicle
damage, injury, or death could
occur. Always keep the
windshield, headlamps, and (Continued)
Warning (Continued)
camera sensors clean and in
good repair. Do not use LDW in
bad weather conditions.
How the System Works
The LDW camera sensor is on the
windshield ahead of the rearview
mirror.
To turn LDW on and off, press
@on
the center stack. The control
indicator will light when LDW is on.
When LDW is on,@is green if
LDW is available to warn of a lane
departure. If the vehicle crosses a
detected lane marking without using
the turn signal in that direction,
@
changes to amber and flashes.
Page 255 of 381
Buick Cascada Owner Manual (GMNA-Localizing-U.S.-9967834) - 2017 - crc -
7/18/16
254 Vehicle Care
Vehicle Care
General Information
General Information . . . . . . . . . . 255
California Proposition65 Warning . . . . . . . . . . . . . . . . . 255
California Perchlorate Materials Requirements . . . . . 255
Accessories and Modifications . . . . . . . . . . . . . . . . 255
Vehicle Checks
Doing Your OwnService Work . . . . . . . . . . . . . . . 256
Hood . . . . . . . . . . . . . . . . . . . . . . . . . 257
Engine Compartment Overview . . . . . . . . . . . . . . . . . . . . 259
Engine Oil . . . . . . . . . . . . . . . . . . . . 260
Engine Oil Life System . . . . . . . 262
Automatic Transmission Fluid . . . . . . . . . . . . . . . . . . . . . . . . 263
Engine Air Cleaner/Filter . . . . . . 263
Cooling System . . . . . . . . . . . . . . 264
Engine Coolant . . . . . . . . . . . . . . . 265
Engine Overheating . . . . . . . . . . 268
Washer Fluid . . . . . . . . . . . . . . . . . 269
Brakes . . . . . . . . . . . . . . . . . . . . . . . 270
Brake Fluid . . . . . . . . . . . . . . . . . . . 270
Battery - North America . . . . . . 271
Starter Switch Check . . . . . . . . . 272 Automatic Transmission Shift
Lock Control Function
Check . . . . . . . . . . . . . . . . . . . . . . . 272
Ignition Transmission Lock Check . . . . . . . . . . . . . . . . . . . . . . . 273
Park Brake and P (Park) Mechanism Check . . . . . . . . . . 273
Wiper Blade Replacement . . . . 273
Headlamp Aiming
Headlamp Aiming . . . . . . . . . . . . 274
Bulb Replacement
Bulb Replacement . . . . . . . . . . . . 275
High Intensity Discharge (HID) Lighting . . . . . . . . . . . . . . . . . . . . . 275
LED Lighting . . . . . . . . . . . . . . . . . 275
Adaptive Forward Lighting Lamps . . . . . . . . . . . . . . . . . . . . . . 275
Fog Lamps . . . . . . . . . . . . . . . . . . . 276
Front Turn Signal Lamps . . . . . 276
Sidemarker Lamps . . . . . . . . . . . 277
Side Turn Signal Lamps . . . . . . 278
Back-Up Lamps . . . . . . . . . . . . . . 279
License Plate Lamp . . . . . . . . . . 280
Replacement Bulbs . . . . . . . . . . . 281
Electrical System
Electrical System Overload . . . 281
Fuses and Circuit Breakers . . . 282
Engine Compartment Fuse Block . . . . . . . . . . . . . . . . . . . . . . . . 282 Instrument Panel Fuse
Block . . . . . . . . . . . . . . . . . . . . . . . . 285
Rear Compartment Fuse Block . . . . . . . . . . . . . . . . . . . . . . . . 286
Wheels and Tires
Tires . . . . . . . . . . . . . . . . . . . . . . . . . . 288
All-Season Tires . . . . . . . . . . . . . . 289
Winter Tires . . . . . . . . . . . . . . . . . . 289
Low-Profile Tires . . . . . . . . . . . . . 290
Tire Sidewall Labeling . . . . . . . . 290
Tire Designations . . . . . . . . . . . . . 292
Tire Terminology andDefinitions . . . . . . . . . . . . . . . . . . 293
Tire Pressure . . . . . . . . . . . . . . . . . 295
Tire Pressure Monitor System . . . . . . . . . . . . . . . . . . . . . . 296
Tire Pressure Monitor Operation . . . . . . . . . . . . . . . . . . . 297
Tire Inspection . . . . . . . . . . . . . . . . 300
Tire Rotation . . . . . . . . . . . . . . . . . 301
When It Is Time for New Tires . . . . . . . . . . . . . . . . . . . . . . . . 302
Buying New Tires . . . . . . . . . . . . . 302
Different Size Tires and Wheels . . . . . . . . . . . . . . . . . . . . . . 304
Uniform Tire Quality Grading . . . . . . . . . . . . . . . . . . . . . 304
Wheel Alignment and Tire Balance . . . . . . . . . . . . . . . . . . . . . 306
Wheel Replacement . . . . . . . . . . 306
Page 264 of 381
Buick Cascada Owner Manual (GMNA-Localizing-U.S.-9967834) - 2017 - crc -
7/18/16
Vehicle Care 263
If the system is ever reset
accidentally, the oil must be
changed at 5 000 km (3,000 mi)
since the last oil change.
Remember to reset the oil life
system whenever the oil is changed.
How to Reset the Engine Oil
Life System
Reset the system whenever the
engine oil is changed so that the
system can calculate the next
engine oil change. To reset the
system:1. Turn the ignition to ON/RUN with the engine off.
2. Press the DIC MENU button on the turn signal lever to enter
the Vehicle Information Menu.
Use the thumbwheel to scroll
through the menu items until
you reach REMAINING
OIL LIFE.
3. Press SET/CLR to reset the oil life at 100%.
4. Turn the ignition to LOCK/OFF. The system is reset when the
CHANGE ENGINE OIL SOON
message is off and the REMAINING
OIL LIFE 100% message is
displayed.
If the CHANGE ENGINE OIL SOON
message comes back on when the
vehicle is started, the engine oil life
system has not been reset. Repeat
the procedure.
Automatic Transmission
Fluid
How to Check Automatic
Transmission Fluid
It is not necessary to check the
transmission fluid level.
A transmission fluid leak is the only
reason for fluid loss. If a leak
occurs, take the vehicle to your
dealer and have it repaired as soon
as possible.
There is a special procedure for
checking and changing the
transmission fluid. Because this
procedure is difficult, you should
have this done at your dealer. Change the fluid at the intervals
listed in
Maintenance Schedule
0 332, and be sure to use the fluid
listed in Recommended Fluids and
Lubricants 0341.
Engine Air Cleaner/Filter
The engine air cleaner/filter is in the
engine compartment on the
passenger side of the vehicle. See
Engine Compartment
Overview 0259.
When to Inspect the Engine Air
Cleaner/Filter
For intervals on changing and
inspecting the engine air cleaner/
filter, see Maintenance
Schedule 0332.
How to Inspect the Engine Air
Cleaner/Filter
Do not start the engine or have the
engine running with the engine air
cleaner/filter housing open. Before
removing the engine air cleaner/
filter, make sure that the engine air
cleaner/filter housing and nearby
components are free of dirt and
debris. Remove the engine air
Page 277 of 381
Buick Cascada Owner Manual (GMNA-Localizing-U.S.-9967834) - 2017 - crc -
7/18/16
276 Vehicle Care
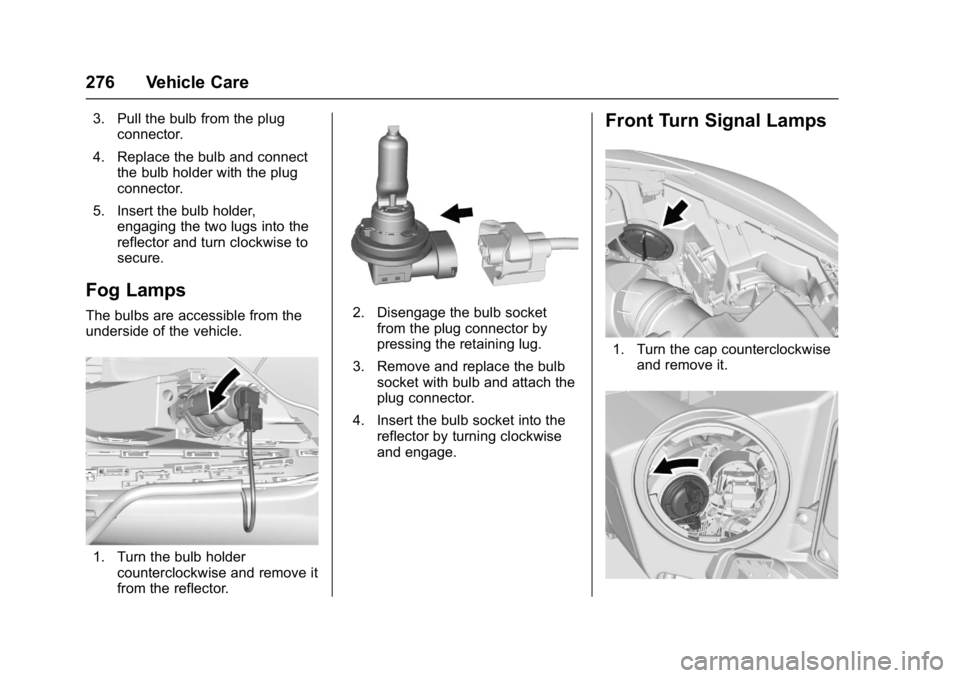
3. Pull the bulb from the plugconnector.
4. Replace the bulb and connect the bulb holder with the plug
connector.
5. Insert the bulb holder, engaging the two lugs into the
reflector and turn clockwise to
secure.
Fog Lamps
The bulbs are accessible from the
underside of the vehicle.
1. Turn the bulb holdercounterclockwise and remove it
from the reflector.
2. Disengage the bulb socket
from the plug connector by
pressing the retaining lug.
3. Remove and replace the bulb socket with bulb and attach the
plug connector.
4. Insert the bulb socket into the reflector by turning clockwise
and engage.
Front Turn Signal Lamps
1. Turn the cap counterclockwiseand remove it.
Page 279 of 381
Buick Cascada Owner Manual (GMNA-Localizing-U.S.-9967834) - 2017 - crc -
7/18/16
278 Vehicle Care
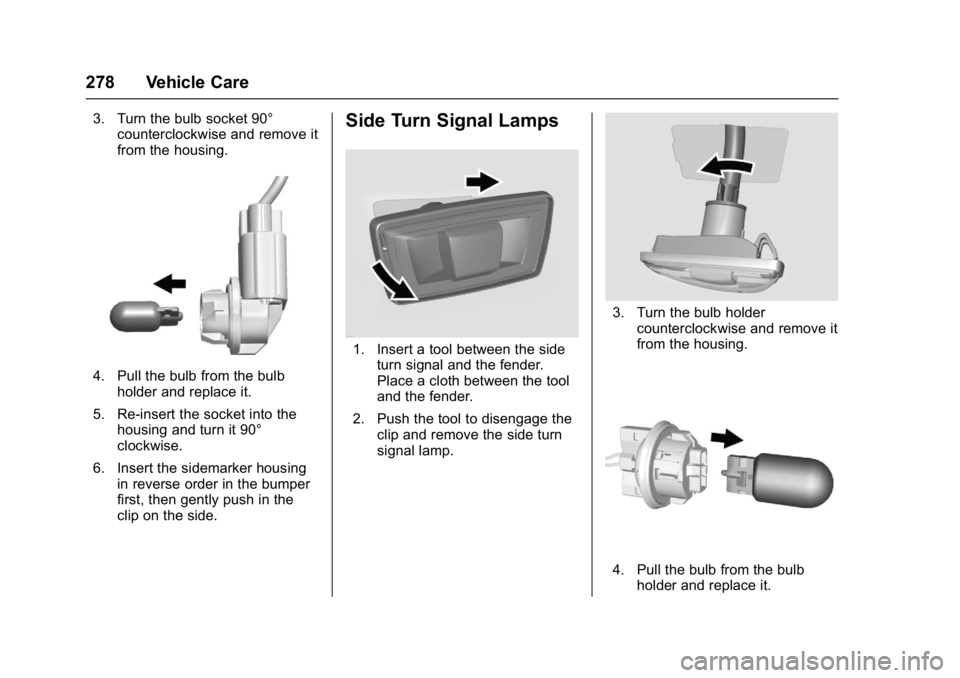
3. Turn the bulb socket 90°counterclockwise and remove it
from the housing.
4. Pull the bulb from the bulb
holder and replace it.
5. Re-insert the socket into the housing and turn it 90°
clockwise.
6. Insert the sidemarker housing in reverse order in the bumper
first, then gently push in the
clip on the side.
Side Turn Signal Lamps
1. Insert a tool between the sideturn signal and the fender.
Place a cloth between the tool
and the fender.
2. Push the tool to disengage the clip and remove the side turn
signal lamp.
3. Turn the bulb holdercounterclockwise and remove it
from the housing.
4. Pull the bulb from the bulbholder and replace it.
Page 282 of 381
Buick Cascada Owner Manual (GMNA-Localizing-U.S.-9967834) - 2017 - crc -
7/18/16
Vehicle Care 281
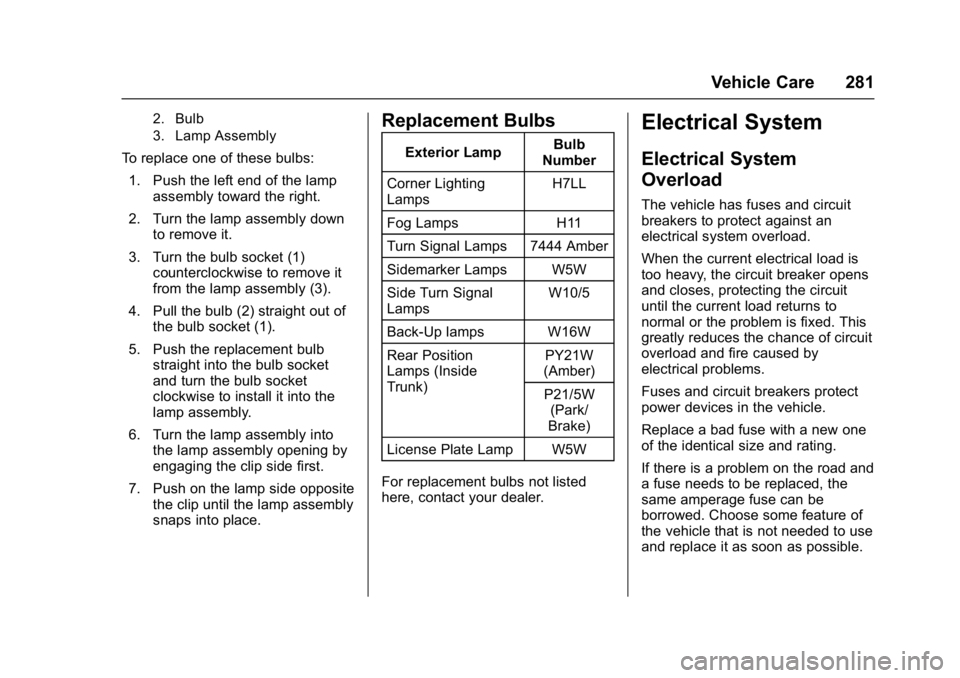
2. Bulb
3. Lamp Assembly
To replace one of these bulbs:1. Push the left end of the lamp assembly toward the right.
2. Turn the lamp assembly down to remove it.
3. Turn the bulb socket (1) counterclockwise to remove it
from the lamp assembly (3).
4. Pull the bulb (2) straight out of the bulb socket (1).
5. Push the replacement bulb straight into the bulb socket
and turn the bulb socket
clockwise to install it into the
lamp assembly.
6. Turn the lamp assembly into the lamp assembly opening by
engaging the clip side first.
7. Push on the lamp side opposite the clip until the lamp assembly
snaps into place.
Replacement Bulbs
Exterior Lamp Bulb
Number
Corner Lighting
Lamps H7LL
Fog Lamps H11
Turn Signal Lamps 7444 Amber
Sidemarker Lamps W5W
Side Turn Signal
Lamps W10/5
Back-Up lamps W16W
Rear Position
Lamps (Inside
Trunk) PY21W
(Amber)
P21/5W (Park/
Brake)
License Plate Lamp W5W
For replacement bulbs not listed
here, contact your dealer.
Electrical System
Electrical System
Overload
The vehicle has fuses and circuit
breakers to protect against an
electrical system overload.
When the current electrical load is
too heavy, the circuit breaker opens
and closes, protecting the circuit
until the current load returns to
normal or the problem is fixed. This
greatly reduces the chance of circuit
overload and fire caused by
electrical problems.
Fuses and circuit breakers protect
power devices in the vehicle.
Replace a bad fuse with a new one
of the identical size and rating.
If there is a problem on the road and
a fuse needs to be replaced, the
same amperage fuse can be
borrowed. Choose some feature of
the vehicle that is not needed to use
and replace it as soon as possible.
Page 301 of 381
Buick Cascada Owner Manual (GMNA-Localizing-U.S.-9967834) - 2017 - crc -
7/18/16
300 Vehicle Care
The TPMS sensor matching
process is:1. Set the parking brake.
2. Put an automatic transmission in P (Park) or a manual
transmission in 1 (First) or
R (Reverse).
3. Turn the ignition to ON/RUN with the engine off. See Ignition
Positions 0228.
4. Press MENU to select the Vehicle Information Menu in
the Driver Information
Center (DIC).
5. Use the thumbwheel to scroll to the Tire Pressure Menu Item
screen.
6. Press SET/CLR to begin the sensor matching process.
A message asking if the
process should begin should
appear.
7. Press SET/CLR again to confirm the selection. The horn sounds twice to
signal the receiver is in relearn
mode and the TIRE
LEARNING ACTIVE message
displays on the DIC screen.
8. Start with the driver side front tire.
9. Place the relearn tool against the tire sidewall, near the valve
stem. Then press the button to
activate the TPMS sensor.
A horn chirp confirms that the
sensor identification code has
been matched to this tire and
wheel position.
10. Proceed to the passenger side front tire, and repeat the
procedure in Step 8.
11. Proceed to the passenger side rear tire, and repeat the
procedure in Step 8.
12. Proceed to the driver side rear tire, and repeat the procedure
in Step 8. The horn sounds two
times to indicate the sensor
identification code has been
matched to the driver side rear
tire, and the TPMS sensor matching process is no longer
active. The TIRE LEARNING
ACTIVE message on the DIC
display screen goes off.
13. Turn the ignition to LOCK/OFF.
14. Set all four tires to the recommended air pressure
level as indicated on the Tire
and Loading Information label.
Tire Inspection
We recommend that the tires,
including the spare tire, if the
vehicle has one, be inspected
for signs of wear or damage at
least once a month.
Replace the tire if:
.The indicators at three or
more places around the tire
can be seen.
.There is cord or fabric
showing through the tire's
rubber.