display BUICK CASCADA 2019 Owner's Guide
[x] Cancel search | Manufacturer: BUICK, Model Year: 2019, Model line: CASCADA, Model: BUICK CASCADA 2019Pages: 307, PDF Size: 5.12 MB
Page 118 of 307
Buick Cascada Owner Manual (GMNA-Localizing-U.S.-12461774) - 2019 -
CRC - 3/26/18
Instruments and Controls 117
Personalization Menus
The following list of menu items may
be available:
.Languages
. Time and Date
. Radio Settings
. Phone Settings
. Navigation Settings
. Display Settings
. Vehicle Settings
Each menu is detailed in the
following information.
Languages
Select Languages, then select from
the available language(s).
Time and Date
Manually set the time and date. See
“Time and Date Settings” under
“Configuration Menu” in the
infotainment manual.
Radio Settings
Select and the following may
display:
. Auto Volume
. Gracenote Options
. SXM Channel Art
. Max Startup Volume
. Number of Favorite Pages
. SXM Categories
. Software Versions Menu
Auto Volume
This feature adjusts the volume to
minimize the effects of unwanted
background noise that can result
from changing road surfaces, driving
speeds, or open windows. This
feature works best at lower volume
settings where background noise is
typically louder than the sound
system volume.
Select Off, Low, Medium, or High. Gracenote Options
Select and the following may
display:
.
Normalization
Normalization
This feature improves voice
recognition and media groupings.
See “Configuration Menu” in the
infotainment manual.
Select to enable or disable.
SXM Channel Art
This feature turns the SXM Audio
page background on the SXM
Channel display on and off.
Select to enable or disable.
Max Startup Volume
This feature sets the maximum
startup volume. If the vehicle is
started and the volume is greater
than this level, the volume is
adjusted to this level.
Touch + or −to increase or
decrease the volume.
Page 119 of 307
Buick Cascada Owner Manual (GMNA-Localizing-U.S.-12461774) - 2019 -
CRC - 3/26/18
118 Instruments and Controls
Number of Favorite Pages
Select to set the number of favorite
pages to display.
Select the desired number.
SXM Categories
This allows which available SXM
Categories are used and displayed.
Select to enable or disable available
categories.
Software Versions Menu
Select to display information about
the system and update software if
available.
Phone Settings
Select and the following may
display:
.Bluetooth
Bluetooth
Select and the following may
display:
. Device List
. Pair Device Device List
Select to connect to a different
phone source, disconnect a phone,
or delete a phone.
Pair Device
Select to pair a new device. See
“Bluetooth”
in the infotainment
manual.
Navigation Settings
See “Configuration Menu” in the
infotainment manual.
Display Settings
Select and the following may
display:
. Home Page Menu
. Display Off
. Map Settings
Home Page Menu
Select and the following may
display:
. Customize
. Sort
. Restore Home Page Defaults Customize
This feature allows the selection of
what icons will be on the first
Home Page.
Select and follow the screen
prompts.
Sort
This feature allows the icons on the
Home Page to be moved.
Select and follow the screen
prompts.
Restore Home Page Defaults
This feature will restore the Home
Page to the factory settings.
Select and follow the screen
prompts.
Display Off
Select to turn the display off. The
display will return when any
infotainment controls on the center
stack are pressed or the
infotainment screen is touched.
Page 120 of 307
Buick Cascada Owner Manual (GMNA-Localizing-U.S.-12461774) - 2019 -
CRC - 3/26/18
Instruments and Controls 119
Map Settings
See“Map Settings” in the
infotainment manual.
Vehicle Settings
Select and the following may
display:
. Climate and Air Quality
. Comfort and Convenience
. Collision Detection Systems
. Lighting
. Power Door Locks
. Remote Lock/Unlock/Start
. Return to Factory Settings?
Climate and Air Quality
Select and the following may
display:
.Auto Fan Speed
. Remote Start Auto Heat Seat
. Auto Rear Defog
Auto Fan Speed
Choose the blower speed setting.
Select High, Medium, or Low. Remote Start Auto Heat Seat
When on, this feature will turn the
heated seats on when using remote
start on cold days.
Select to enable or disable.
Auto Rear Defog
When on, this feature turns on the
rear window defogger at vehicle
start when the interior temperature
is cold and fog is likely. The auto
rear defog function can be disabled
by selecting
1. When off, the
feature can be turned on by
selecting
1. See “Rear Window
Defogger” underDual Automatic
Climate Control System 0130.
Select to enable or disable.
Comfort and Convenience
Select and the following may
display:
. Chime Volume
. Button Chime Chime Volume
This allows the selection of the
chime volume level.
Select Low or High.
Button Chime
This allows the Button Chime
feature to be turned on or off.
Select to enable or disable.
Collision Detection Systems
Select and the following may
display:
.
Park Assist
Park Assist
This allows the Park Assist feature
to be turned on or off.
Select Off or On.
Lighting
Select and the following may
display:
. Vehicle Locator Lights
. Exit Lighting
Page 121 of 307
Buick Cascada Owner Manual (GMNA-Localizing-U.S.-12461774) - 2019 -
CRC - 3/26/18
120 Instruments and Controls
Vehicle Locator Lights
This allows the vehicle locator lights
to be turned on or off.
Select to enable or disable.
Exit Lighting
This allows the selection of how
long the exterior lamps stay on
when leaving the vehicle when it is
dark outside.
Select Off, 30 Seconds, 1 Minute,
or 2 Minutes.
Power Door Locks
Select and the following may
display:
.Open Door Anti Lock Out
. Auto Door Unlock
. Delay Door Lock
Open Door Anti Lock Out
When on, this feature will keep the
driver door from locking until the
door is closed. If this feature is
turned on, the Delay Door Lock
menu will not be available.
Select to enable or disable. Auto Door Unlock
This allows selection of which doors
will automatically unlock when the
vehicle is shifted into P (Park).
Select All Doors, Driver Door, or Off.
Delay Door Lock
When on, this feature will delay the
locking of the doors. See
Delayed
Locking 028.
Select to enable or disable.
Remote Lock/Unlock/Start
Select and the following may
display:
. Remote Unlock Feedback
. Remote Lock Feedback
. Remote Door Unlock
Remote Unlock Feedback
When on, the exterior lamps will
flash when unlocking the vehicle
with the RKE transmitter.
Select Flash Lights or Off. Remote Lock Feedback
This allows selection of what
feedback is provided when locking
the vehicle with the RKE transmitter.
Select Lights and Horn, Lights Only,
Horn Only, or Off.
Remote Door Unlock
This allows selection of which doors
will unlock on the first press of
Kon
the RKE transmitter. If Driver Door
is selected, all doors will unlock on
the second press of
Kwithin
five seconds of the prior press.
Select Driver Door or All Doors.
Return to Factory Settings?
This returns all of the vehicle
personalization settings to the
factory settings.
Select Yes or No.
Page 126 of 307
Buick Cascada Owner Manual (GMNA-Localizing-U.S.-12461774) - 2019 -
CRC - 3/26/18
Lighting 125
If after signaling a turn or lane
change the arrow flashes rapidly or
does not come on, a signal bulb
may be burned out. Replace any
burned out bulbs. If a bulb is not
burned out, check the fuse. See
Fuses and Circuit Breakers0204.
Fog Lamps
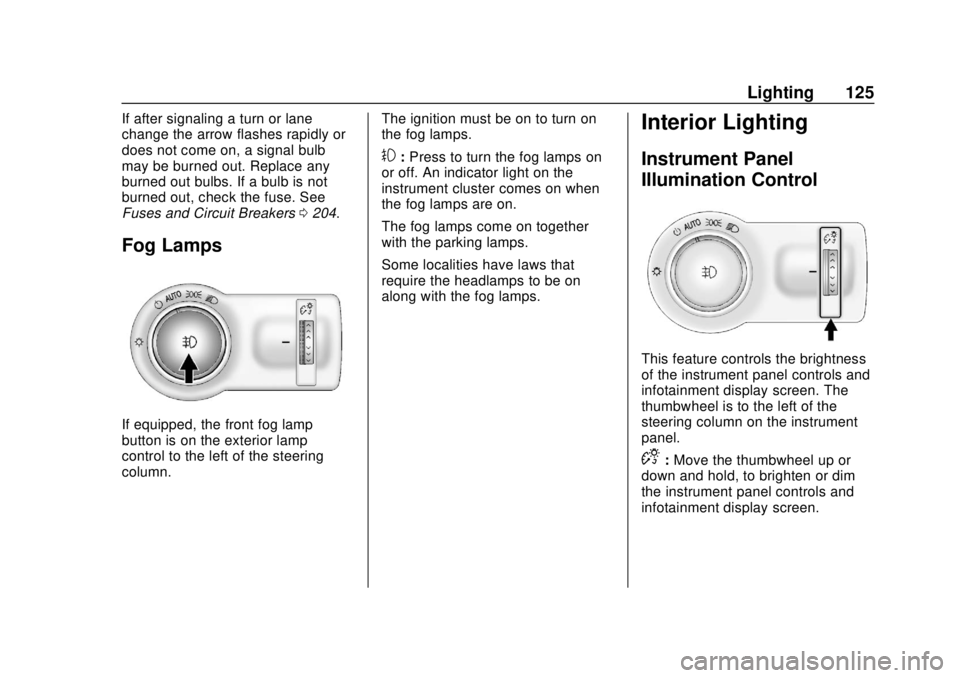
If equipped, the front fog lamp
button is on the exterior lamp
control to the left of the steering
column. The ignition must be on to turn on
the fog lamps.
#:
Press to turn the fog lamps on
or off. An indicator light on the
instrument cluster comes on when
the fog lamps are on.
The fog lamps come on together
with the parking lamps.
Some localities have laws that
require the headlamps to be on
along with the fog lamps.
Interior Lighting
Instrument Panel
Illumination Control
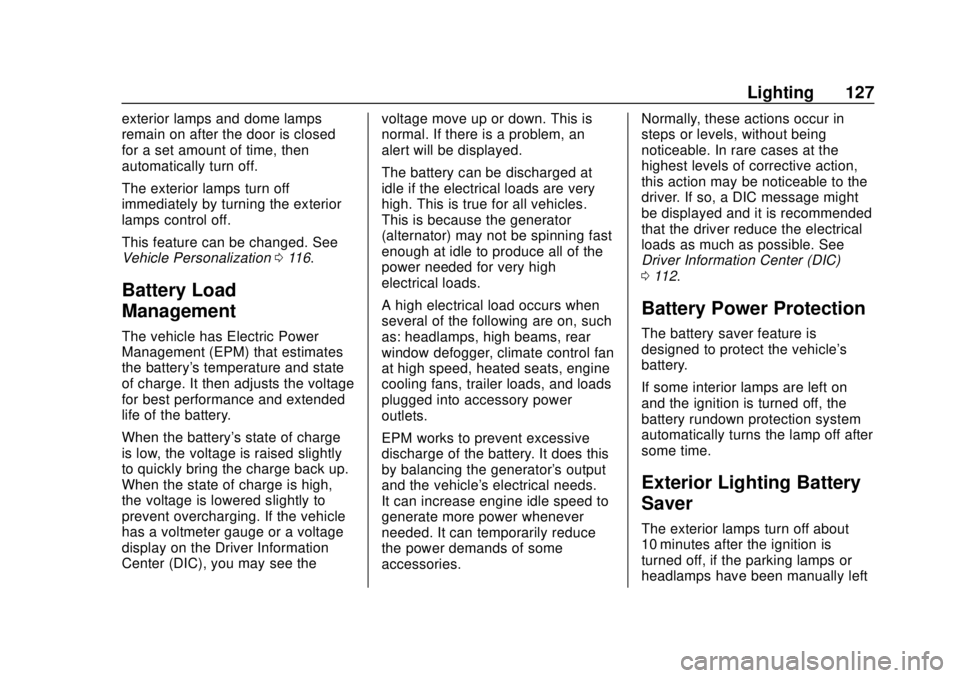
This feature controls the brightness
of the instrument panel controls and
infotainment display screen. The
thumbwheel is to the left of the
steering column on the instrument
panel.
D: Move the thumbwheel up or
down and hold, to brighten or dim
the instrument panel controls and
infotainment display screen.
Page 128 of 307
Buick Cascada Owner Manual (GMNA-Localizing-U.S.-12461774) - 2019 -
CRC - 3/26/18
Lighting 127
exterior lamps and dome lamps
remain on after the door is closed
for a set amount of time, then
automatically turn off.
The exterior lamps turn off
immediately by turning the exterior
lamps control off.
This feature can be changed. See
Vehicle Personalization0116.
Battery Load
Management
The vehicle has Electric Power
Management (EPM) that estimates
the battery's temperature and state
of charge. It then adjusts the voltage
for best performance and extended
life of the battery.
When the battery's state of charge
is low, the voltage is raised slightly
to quickly bring the charge back up.
When the state of charge is high,
the voltage is lowered slightly to
prevent overcharging. If the vehicle
has a voltmeter gauge or a voltage
display on the Driver Information
Center (DIC), you may see the voltage move up or down. This is
normal. If there is a problem, an
alert will be displayed.
The battery can be discharged at
idle if the electrical loads are very
high. This is true for all vehicles.
This is because the generator
(alternator) may not be spinning fast
enough at idle to produce all of the
power needed for very high
electrical loads.
A high electrical load occurs when
several of the following are on, such
as: headlamps, high beams, rear
window defogger, climate control fan
at high speed, heated seats, engine
cooling fans, trailer loads, and loads
plugged into accessory power
outlets.
EPM works to prevent excessive
discharge of the battery. It does this
by balancing the generator's output
and the vehicle's electrical needs.
It can increase engine idle speed to
generate more power whenever
needed. It can temporarily reduce
the power demands of some
accessories.Normally, these actions occur in
steps or levels, without being
noticeable. In rare cases at the
highest levels of corrective action,
this action may be noticeable to the
driver. If so, a DIC message might
be displayed and it is recommended
that the driver reduce the electrical
loads as much as possible. See
Driver Information Center (DIC)
0
112.
Battery Power Protection
The battery saver feature is
designed to protect the vehicle's
battery.
If some interior lamps are left on
and the ignition is turned off, the
battery rundown protection system
automatically turns the lamp off after
some time.
Exterior Lighting Battery
Saver
The exterior lamps turn off about
10 minutes after the ignition is
turned off, if the parking lamps or
headlamps have been manually left
Page 131 of 307
Buick Cascada Owner Manual (GMNA-Localizing-U.S.-12461774) - 2019 -
CRC - 3/26/18
130 Climate Controls
Climate Controls
Climate Control Systems
Dual Automatic ClimateControl System . . . . . . . . . . . . . 130
Air Vents
Air Vents . . . . . . . . . . . . . . . . . . . . . 133
Maintenance
Passenger Compartment AirFilter . . . . . . . . . . . . . . . . . . . . . . . . 134
Service . . . . . . . . . . . . . . . . . . . . . . . 134
Climate Control
Systems
Dual Automatic Climate
Control System
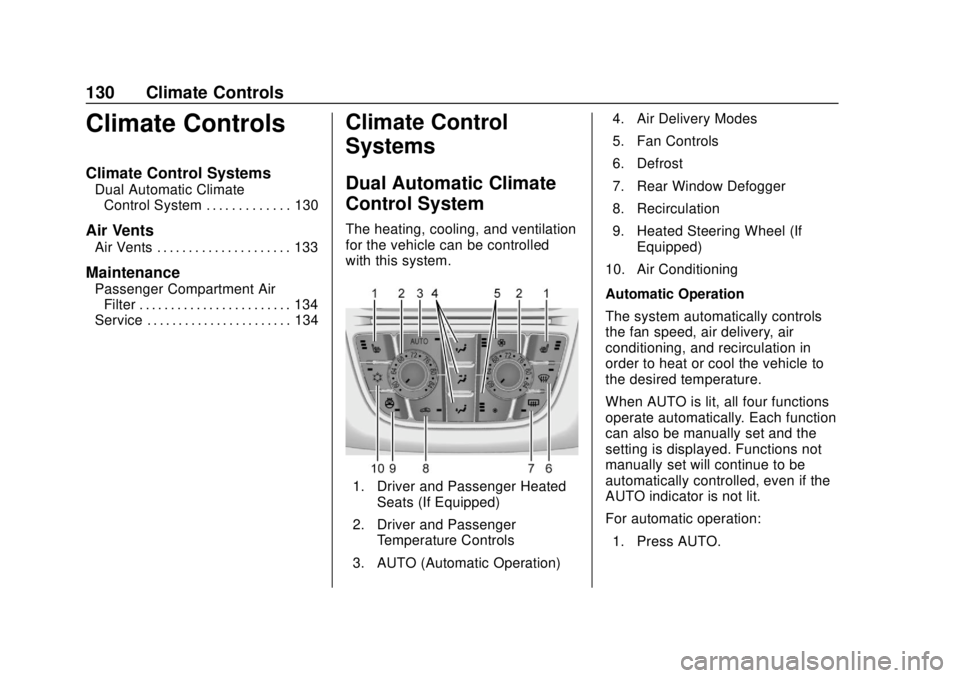
The heating, cooling, and ventilation
for the vehicle can be controlled
with this system.
1. Driver and Passenger Heated
Seats (If Equipped)
2. Driver and Passenger Temperature Controls
3. AUTO (Automatic Operation) 4. Air Delivery Modes
5. Fan Controls
6. Defrost
7. Rear Window Defogger
8. Recirculation
9. Heated Steering Wheel (If
Equipped)
10. Air Conditioning
Automatic Operation
The system automatically controls
the fan speed, air delivery, air
conditioning, and recirculation in
order to heat or cool the vehicle to
the desired temperature.
When AUTO is lit, all four functions
operate automatically. Each function
can also be manually set and the
setting is displayed. Functions not
manually set will continue to be
automatically controlled, even if the
AUTO indicator is not lit.
For automatic operation: 1. Press AUTO.
Page 132 of 307
Buick Cascada Owner Manual (GMNA-Localizing-U.S.-12461774) - 2019 -
CRC - 3/26/18
Climate Controls 131
2. Set the temperature. Allow thesystem time to stabilize. Then
adjust the temperature as
needed for best comfort.
To improve fuel efficiency and
to cool the vehicle faster,
recirculation may be
automatically selected in warm
weather. The recirculation light
will not come on. Press
L
to select recirculation; press it
again to select outside air.
English units can be changed to
metric units through the Driver
Information Center (DIC). See
Driver Information Center (DIC)
0 112.
Manual Operation
9: Press the lower9button to
decrease the fan speed. Pressing
the lower button longer turns the fan
and cooling off. When off is
selected, the system will stop air
from flowing into the cabin. If any
buttons are pressed or knobs are
turned, the climate control system
will turn on and operate at the
current setting. Press the upper
9
button to increase the fan speed.
The selected fan speed is indicated
by the number of segments on the
display screen. Press AUTO to
return to automatic operation.
Air Delivery Modes : Press
%,Y,
or
[to change the direction of the
airflow. Any combination of the three
buttons can be selected. The
indicator light in the button will turn
on. The current mode appears in
the display screen. Pressing any of
the three buttons cancels automatic
air delivery control and the direction
of the airflow is controlled manually.
Press AUTO to return to automatic
operation.
To change the current mode, select
one or more of the following:
%: Air is directed to the
windshield and side window vents.
Y: Air is directed to the instrument
panel outlets.
[: Air is directed to the floor
outlets.
0: Press to clear the windshield
of fog or frost more quickly. Air is
directed to the windshield.
For best results, clear all snow and
ice from the windshield before
defrosting.
#: Press to turn the air
conditioning on or off. If the fan is
turned off or the outside
temperature falls below freezing, the
air conditioning compressor will
not run.
Press AUTO to return to automatic
operation and the air conditioner
runs as needed. When the indicator
light is on, the air conditioner runs
automatically to cool the air inside
the vehicle or to dry the air needed
to defog the windshield faster.
L: Press to turn recirculation on
or off. An indicator light comes on.
Air is recirculated to quickly cool the
inside of the vehicle or reduce entry
of outside air and odors.
Page 148 of 307
Buick Cascada Owner Manual (GMNA-Localizing-U.S.-12461774) - 2019 -
CRC - 3/26/18
Driving and Operating 147
Caution
Using a tool to force the key to
turn in the ignition could cause
damage to the switch or break the
key. Use the correct key, make
sure it is all the way in, and turn it
only with your hand. If the key
cannot be turned by hand, see
your dealer.
The key must be fully extended to
start the vehicle.
To shift out of P (Park), turn the
ignition on and apply the brake
pedal.
0 : When the vehicle is stopped,
turn the ignition off to turn the
engine off. Retained Accessory
Power (RAP) will remain active. See
Retained Accessory Power (RAP)
0 149.
This is the only position from which
the key can be removed. This locks
the ignition and automatic
transmission. Do not turn the engine off when the
vehicle is moving. This will cause a
loss of power assist in the brake
and steering systems and disable
the airbags.
If the vehicle must be shut off in an
emergency:
1. Brake using a firm and steady pressure. Do not pump the
brakes repeatedly. This may
deplete power assist, requiring
increased brake pedal force.
2. Shift the vehicle to N (Neutral). This can be done while the
vehicle is moving. After shifting
to N (Neutral), continue to
firmly apply the brakes and
steer the vehicle to a safe
location.
3. Come to a complete stop. Shift to P (Park). Turn the
ignition off.
4. Set the parking brake. See Electric Parking Brake 0156.
{Warning
Turning off the vehicle while
moving may cause loss of power
assist in the brake and steering
systems and disable the airbags.
While driving, only shut the
vehicle off in an emergency.
If the vehicle cannot be pulled over,
and must be shut off while driving,
turn the ignition to ACC/
ACCESSORY.
1 : This position provides power to
some of the electrical accessories.
To move the key from ACC/
ACCESSORY to off, push in the key
and then turn the ignition to off.
2 : The ignition switch stays in this
position when the engine is running.
This position can be used to operate
the electrical accessories, including
the ventilation fan and 12-volt power
outlet, as well as to display some
warning and indicator lights. This
position can also be used for
service and diagnostics, and to
verify the proper operation of the
Page 155 of 307
Buick Cascada Owner Manual (GMNA-Localizing-U.S.-12461774) - 2019 -
CRC - 3/26/18
154 Driving and Operating
Caution (Continued)
the vehicle warranty. Be sure the
engine is not running at high
speed when shifting the vehicle.
D : This position is for normal
driving. It provides the best fuel
economy. If more power is needed
for passing, and the vehicle is:
. Going less than 56 km/h
(35 mph), push the accelerator
pedal about halfway down.
. Going about 56 km/h (35 mph) or
more, push the accelerator all
the way down.
Caution
If the vehicle does not shift gears,
the transmission could be
damaged. Have the vehicle
serviced right away.
Caution
A transmission hot message may
display if the automatic
transmission fluid is too hot.
Driving under this condition can
damage the vehicle. Stop and idle
the engine to cool the automatic
transmission fluid. This message
clears when the transmission fluid
has cooled sufficiently.
Manual Mode
Driver Shift Control (DSC)
Caution
Driving with the engine at a high
rpm without upshifting while using
Driver Shift Control (DSC), could
damage the vehicle. Always
upshift when necessary while
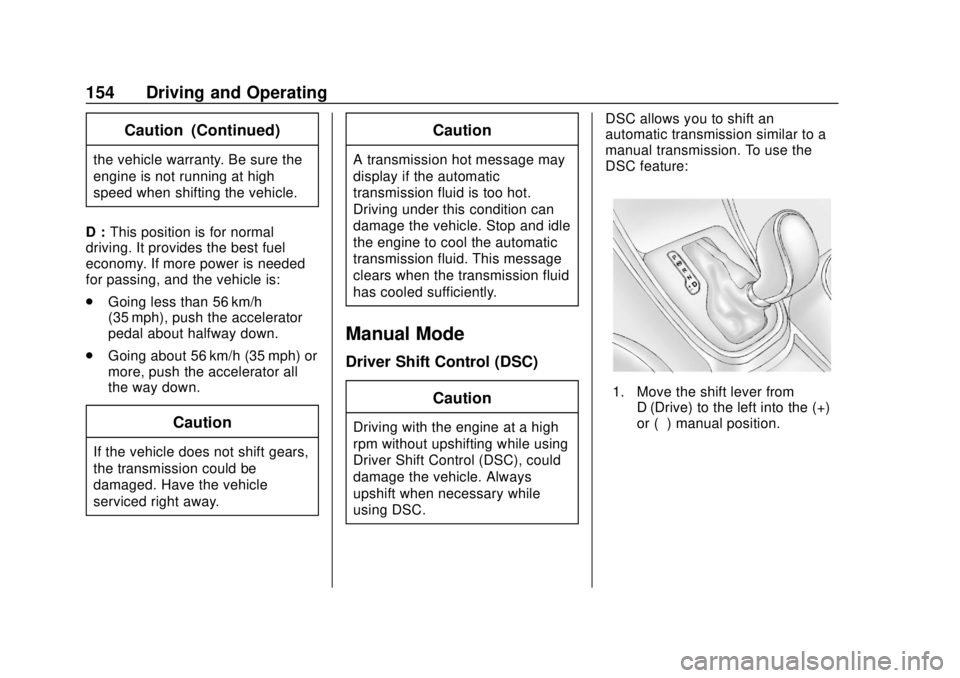
using DSC. DSC allows you to shift an
automatic transmission similar to a
manual transmission. To use the
DSC feature:
1. Move the shift lever from
D (Drive) to the left into the (+)
or (−) manual position.