cooling BUICK CASCADA 2019 Owner's Manual
[x] Cancel search | Manufacturer: BUICK, Model Year: 2019, Model line: CASCADA, Model: BUICK CASCADA 2019Pages: 307, PDF Size: 5.12 MB
Page 16 of 307
Buick Cascada Owner Manual (GMNA-Localizing-U.S.-12461774) - 2019 -
CRC - 3/26/18
In Brief 15
HI :Use for fast wipes.
LO : Use for slow wipes.
INT : Move the lever up to INT, then
turn the
xINT band up or down
for more or less sensitivity to
moisture.
OFF : Use to turn the wipers off.
1X : For a single wipe, briefly move
the lever down. For several wipes,
hold the lever down.
n L: Pull the lever toward you to
spray windshield washer fluid and
activate the wipers.
See Windshield Wiper/Washer 096.
Climate Controls
The heating, cooling, defrosting, and
ventilation for the vehicle can be
controlled with this system.
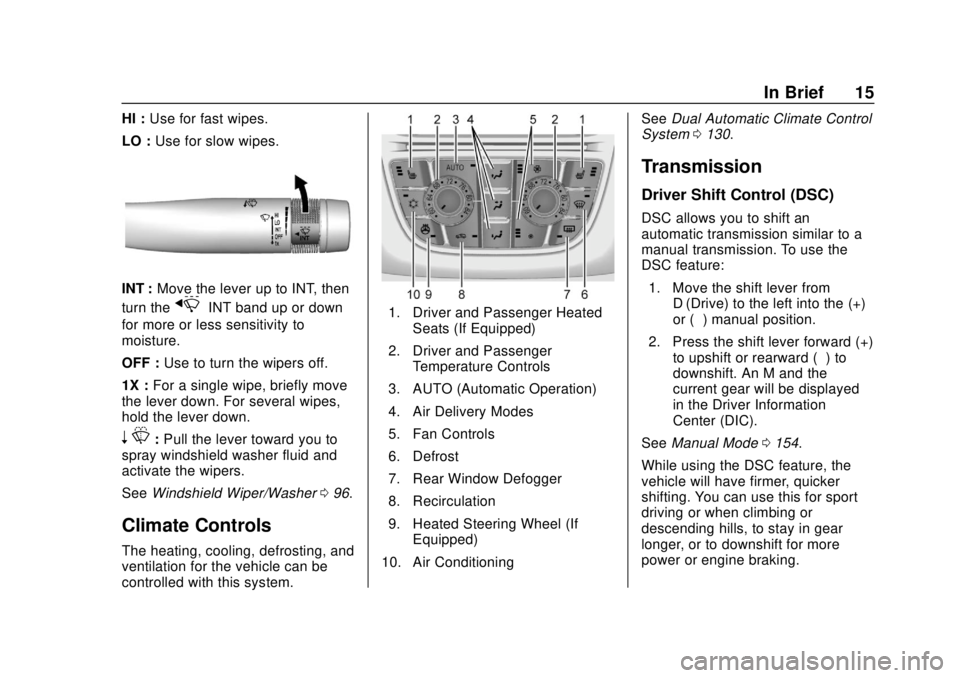
1. Driver and Passenger Heated
Seats (If Equipped)
2. Driver and Passenger Temperature Controls
3. AUTO (Automatic Operation)
4. Air Delivery Modes
5. Fan Controls
6. Defrost
7. Rear Window Defogger
8. Recirculation
9. Heated Steering Wheel (If Equipped)
10. Air Conditioning See
Dual Automatic Climate Control
System 0130.
Transmission
Driver Shift Control (DSC)
DSC allows you to shift an
automatic transmission similar to a
manual transmission. To use the
DSC feature:
1. Move the shift lever from D (Drive) to the left into the (+)
or (−) manual position.
2. Press the shift lever forward (+) to upshift or rearward (−) to
downshift. An M and the
current gear will be displayed
in the Driver Information
Center (DIC).
See Manual Mode 0154.
While using the DSC feature, the
vehicle will have firmer, quicker
shifting. You can use this for sport
driving or when climbing or
descending hills, to stay in gear
longer, or to downshift for more
power or engine braking.
Page 128 of 307
Buick Cascada Owner Manual (GMNA-Localizing-U.S.-12461774) - 2019 -
CRC - 3/26/18
Lighting 127
exterior lamps and dome lamps
remain on after the door is closed
for a set amount of time, then
automatically turn off.
The exterior lamps turn off
immediately by turning the exterior
lamps control off.
This feature can be changed. See
Vehicle Personalization0116.
Battery Load
Management
The vehicle has Electric Power
Management (EPM) that estimates
the battery's temperature and state
of charge. It then adjusts the voltage
for best performance and extended
life of the battery.
When the battery's state of charge
is low, the voltage is raised slightly
to quickly bring the charge back up.
When the state of charge is high,
the voltage is lowered slightly to
prevent overcharging. If the vehicle
has a voltmeter gauge or a voltage
display on the Driver Information
Center (DIC), you may see the voltage move up or down. This is
normal. If there is a problem, an
alert will be displayed.
The battery can be discharged at
idle if the electrical loads are very
high. This is true for all vehicles.
This is because the generator
(alternator) may not be spinning fast
enough at idle to produce all of the
power needed for very high
electrical loads.
A high electrical load occurs when
several of the following are on, such
as: headlamps, high beams, rear
window defogger, climate control fan
at high speed, heated seats, engine
cooling fans, trailer loads, and loads
plugged into accessory power
outlets.
EPM works to prevent excessive
discharge of the battery. It does this
by balancing the generator's output
and the vehicle's electrical needs.
It can increase engine idle speed to
generate more power whenever
needed. It can temporarily reduce
the power demands of some
accessories.Normally, these actions occur in
steps or levels, without being
noticeable. In rare cases at the
highest levels of corrective action,
this action may be noticeable to the
driver. If so, a DIC message might
be displayed and it is recommended
that the driver reduce the electrical
loads as much as possible. See
Driver Information Center (DIC)
0
112.
Battery Power Protection
The battery saver feature is
designed to protect the vehicle's
battery.
If some interior lamps are left on
and the ignition is turned off, the
battery rundown protection system
automatically turns the lamp off after
some time.
Exterior Lighting Battery
Saver
The exterior lamps turn off about
10 minutes after the ignition is
turned off, if the parking lamps or
headlamps have been manually left
Page 131 of 307
Buick Cascada Owner Manual (GMNA-Localizing-U.S.-12461774) - 2019 -
CRC - 3/26/18
130 Climate Controls
Climate Controls
Climate Control Systems
Dual Automatic ClimateControl System . . . . . . . . . . . . . 130
Air Vents
Air Vents . . . . . . . . . . . . . . . . . . . . . 133
Maintenance
Passenger Compartment AirFilter . . . . . . . . . . . . . . . . . . . . . . . . 134
Service . . . . . . . . . . . . . . . . . . . . . . . 134
Climate Control
Systems
Dual Automatic Climate
Control System
The heating, cooling, and ventilation
for the vehicle can be controlled
with this system.
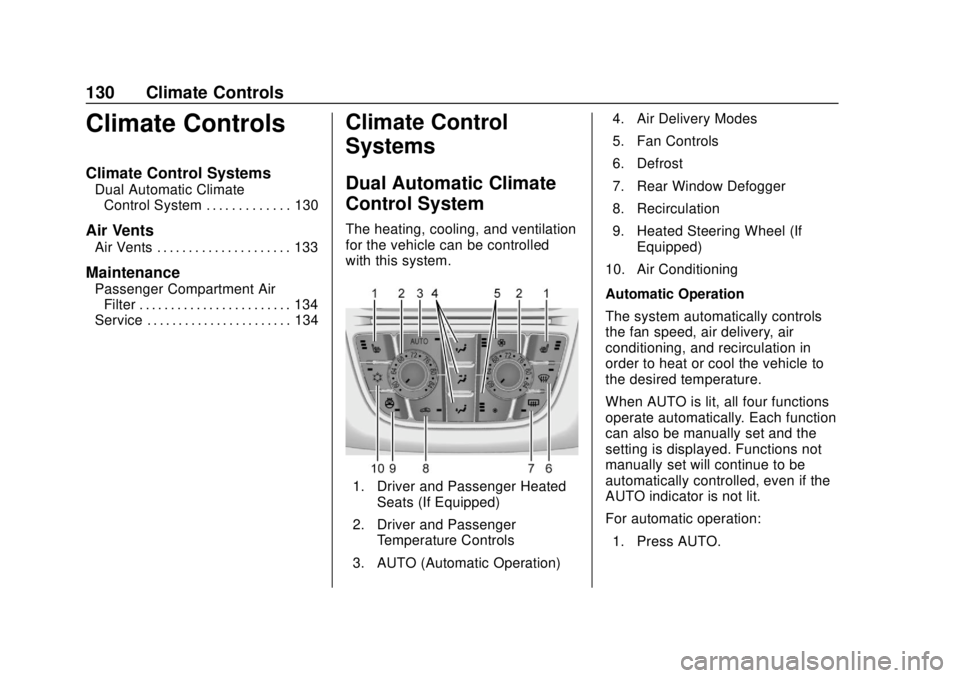
1. Driver and Passenger Heated
Seats (If Equipped)
2. Driver and Passenger Temperature Controls
3. AUTO (Automatic Operation) 4. Air Delivery Modes
5. Fan Controls
6. Defrost
7. Rear Window Defogger
8. Recirculation
9. Heated Steering Wheel (If
Equipped)
10. Air Conditioning
Automatic Operation
The system automatically controls
the fan speed, air delivery, air
conditioning, and recirculation in
order to heat or cool the vehicle to
the desired temperature.
When AUTO is lit, all four functions
operate automatically. Each function
can also be manually set and the
setting is displayed. Functions not
manually set will continue to be
automatically controlled, even if the
AUTO indicator is not lit.
For automatic operation: 1. Press AUTO.
Page 132 of 307
Buick Cascada Owner Manual (GMNA-Localizing-U.S.-12461774) - 2019 -
CRC - 3/26/18
Climate Controls 131
2. Set the temperature. Allow thesystem time to stabilize. Then
adjust the temperature as
needed for best comfort.
To improve fuel efficiency and
to cool the vehicle faster,
recirculation may be
automatically selected in warm
weather. The recirculation light
will not come on. Press
L
to select recirculation; press it
again to select outside air.
English units can be changed to
metric units through the Driver
Information Center (DIC). See
Driver Information Center (DIC)
0 112.
Manual Operation
9: Press the lower9button to
decrease the fan speed. Pressing
the lower button longer turns the fan
and cooling off. When off is
selected, the system will stop air
from flowing into the cabin. If any
buttons are pressed or knobs are
turned, the climate control system
will turn on and operate at the
current setting. Press the upper
9
button to increase the fan speed.
The selected fan speed is indicated
by the number of segments on the
display screen. Press AUTO to
return to automatic operation.
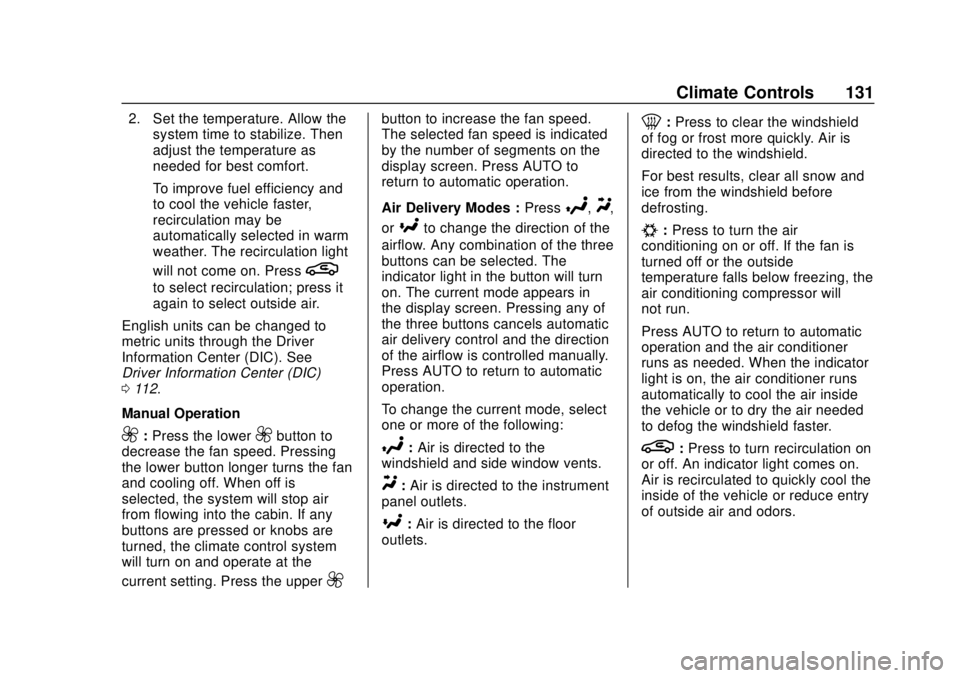
Air Delivery Modes : Press
%,Y,
or
[to change the direction of the
airflow. Any combination of the three
buttons can be selected. The
indicator light in the button will turn
on. The current mode appears in
the display screen. Pressing any of
the three buttons cancels automatic
air delivery control and the direction
of the airflow is controlled manually.
Press AUTO to return to automatic
operation.
To change the current mode, select
one or more of the following:
%: Air is directed to the
windshield and side window vents.
Y: Air is directed to the instrument
panel outlets.
[: Air is directed to the floor
outlets.
0: Press to clear the windshield
of fog or frost more quickly. Air is
directed to the windshield.
For best results, clear all snow and
ice from the windshield before
defrosting.
#: Press to turn the air
conditioning on or off. If the fan is
turned off or the outside
temperature falls below freezing, the
air conditioning compressor will
not run.
Press AUTO to return to automatic
operation and the air conditioner
runs as needed. When the indicator
light is on, the air conditioner runs
automatically to cool the air inside
the vehicle or to dry the air needed
to defog the windshield faster.
L: Press to turn recirculation on
or off. An indicator light comes on.
Air is recirculated to quickly cool the
inside of the vehicle or reduce entry
of outside air and odors.
Page 141 of 307
Buick Cascada Owner Manual (GMNA-Localizing-U.S.-12461774) - 2019 -
CRC - 3/26/18
140 Driving and Operating
Other Rainy Weather Tips
Besides slowing down, other wet
weather driving tips include:
.Allow extra following distance.
. Pass with caution.
. Keep windshield wiping
equipment in good shape.
. Keep the windshield washer fluid
reservoir filled.
. Have good tires with proper
tread depth. See Tires0211.
. Turn off cruise control.
Hill and Mountain Roads
Driving on steep hills or through
mountains is different than driving
on flat or rolling terrain. Tips include:
.Keep the vehicle serviced and in
good shape.
. Check all fluid levels and brakes,
tires, cooling system, and
transmission.
. Shift to a lower gear when going
down steep or long hills.
{Warning
Using the brakes to slow the
vehicle on a long downhill slope
can cause brake overheating, can
reduce brake performance, and
could result in a loss of braking.
Shift the transmission to a lower
gear to let the engine assist the
brakes on a steep downhill slope.
{Warning
Coasting downhill in N (Neutral)
or with the ignition off is
dangerous. This can cause
overheating of the brakes and
loss of steering assist. Always
have the engine running and the
vehicle in gear.
. Drive at speeds that keep the
vehicle in its own lane. Do not
swing wide or cross the
center line. .
Be alert on top of hills;
something could be in your lane
(e.g., stalled car, crash).
. Pay attention to special road
signs (e.g., falling rocks area,
winding roads, long grades,
passing or no-passing zones)
and take appropriate action.
Winter Driving
Driving on Snow or Ice
Snow or ice between the tires and
the road creates less traction or
grip, so drive carefully. Wet ice can
occur at about 0 °C (32 °F) when
freezing rain begins to fall. Avoid
driving on wet ice or in freezing rain
until roads can be treated.
For Slippery Road Driving:
.Accelerate gently. Accelerating
too quickly causes the wheels to
spin and makes the surface
under the tires slick.
. Turn on Traction Control. See
Traction Control/Electronic
Stability Control 0158.
Page 176 of 307
Buick Cascada Owner Manual (GMNA-Localizing-U.S.-12461774) - 2019 -
CRC - 3/26/18
Vehicle Care 175
Vehicle Care
General Information
General Information . . . . . . . . . . 176
California Proposition65 Warning . . . . . . . . . . . . . . . . . 176
California Perchlorate Materials Requirements . . . . . 177
Accessories and Modifications . . . . . . . . . . . . . . . . 177
Vehicle Checks
Doing Your OwnService Work . . . . . . . . . . . . . . . 177
Hood . . . . . . . . . . . . . . . . . . . . . . . . . 178
Engine Compartment Overview . . . . . . . . . . . . . . . . . . . . 180
Engine Oil . . . . . . . . . . . . . . . . . . . . 181
Engine Oil Life System . . . . . . . 183
Automatic Transmission Fluid . . . . . . . . . . . . . . . . . . . . . . . . 184
Engine Air Cleaner/Filter . . . . . . 185
Cooling System . . . . . . . . . . . . . . 186
Engine Overheating . . . . . . . . . . 189
Washer Fluid . . . . . . . . . . . . . . . . . 190
Brakes . . . . . . . . . . . . . . . . . . . . . . . 191
Brake Fluid . . . . . . . . . . . . . . . . . . . 192
Battery - North America . . . . . . 193
Starter Switch Check . . . . . . . . . 193 Automatic Transmission Shift
Lock Control Function
Check . . . . . . . . . . . . . . . . . . . . . . . 194
Ignition Transmission Lock Check . . . . . . . . . . . . . . . . . . . . . . . 194
Park Brake and P (Park) Mechanism Check . . . . . . . . . . 194
Wiper Blade Replacement . . . . 195
Windshield Replacement . . . . . 195
Gas Strut(s) . . . . . . . . . . . . . . . . . . 195
Headlamp Aiming
Headlamp Aiming . . . . . . . . . . . . 197
Bulb Replacement
Bulb Replacement . . . . . . . . . . . . 197
High Intensity Discharge (HID) Lighting . . . . . . . . . . . . . . . . . . . . . 197
LED Lighting . . . . . . . . . . . . . . . . . 197
Adaptive Forward Lighting Lamps . . . . . . . . . . . . . . . . . . . . . . 197
Fog Lamps . . . . . . . . . . . . . . . . . . . 198
Front Turn Signal Lamps . . . . . 199
Sidemarker Lamps . . . . . . . . . . . 199
Side Turn Signal Lamps . . . . . . 200
Back-Up Lamps . . . . . . . . . . . . . . 201
License Plate Lamp . . . . . . . . . . 203
Electrical System
Electrical System Overload . . . 203
Fuses and Circuit Breakers . . . 204 Engine Compartment Fuse
Block . . . . . . . . . . . . . . . . . . . . . . . . 204
Instrument Panel Fuse Block . . . . . . . . . . . . . . . . . . . . . . . . 207
Rear Compartment Fuse
Block . . . . . . . . . . . . . . . . . . . . . . . . 209
Wheels and Tires
Tires . . . . . . . . . . . . . . . . . . . . . . . . . . 211
All-Season Tires . . . . . . . . . . . . . . 212
Winter Tires . . . . . . . . . . . . . . . . . . 212
Low-Profile Tires . . . . . . . . . . . . . 213
Tire Sidewall Labeling . . . . . . . . 213
Tire Designations . . . . . . . . . . . . . 215
Tire Terminology andDefinitions . . . . . . . . . . . . . . . . . . 216
Tire Pressure . . . . . . . . . . . . . . . . . 218
Tire Pressure Monitor
System . . . . . . . . . . . . . . . . . . . . . . 219
Tire Pressure Monitor Operation . . . . . . . . . . . . . . . . . . . 220
Tire Inspection . . . . . . . . . . . . . . . . 223
Tire Rotation . . . . . . . . . . . . . . . . . 224
When It Is Time for New Tires . . . . . . . . . . . . . . . . . . . . . . . . 225
Buying New Tires . . . . . . . . . . . . . 225
Different Size Tires and Wheels . . . . . . . . . . . . . . . . . . . . . . 227
Uniform Tire Quality Grading . . . . . . . . . . . . . . . . . . . . . 227
Page 182 of 307
Buick Cascada Owner Manual (GMNA-Localizing-U.S.-12461774) - 2019 -
CRC - 3/26/18
Vehicle Care 181
1.Engine Air Cleaner/Filter 0185.
2. Engine Cooling Fan (Out of View). See Cooling System
0 186.
3. Engine Oil Dipstick. See Engine Oil 0181.
4. Engine Oil Fill Cap. See Engine Oil 0181.
5. Brake Fluid Reservoir. See Brakes 0191.
6. Battery - North America 0193.
7. Engine Coolant Surge Tank and Pressure Cap. See
Cooling System 0186.
8. Windshield Washer Fluid Reservoir. See Washer Fluid
0 190.
9. Engine Compartment Fuse
Block 0204.
Engine Oil
To ensure proper engine
performance and long life, careful
attention must be paid to engine oil. Following these simple, but
important steps will help protect
your investment:
.
Use engine oil approved to the
proper specification and of the
proper viscosity grade. See
“Selecting the Right Engine Oil”
in this section.
. Check the engine oil level
regularly and maintain the
proper oil level. See “Checking
Engine Oil” and“When to Add
Engine Oil” in this section.
. Change the engine oil at the
appropriate time. See Engine Oil
Life System 0183.
. Always dispose of engine oil
properly. See “What to Do with
Used Oil” in this section.
Checking Engine Oil
Check the engine oil level regularly,
every 650 km (400 mi), especially
prior to a long trip. The engine oil
dipstick handle is a loop. See
Engine Compartment Overview
0180 for the location.
{Warning
The engine oil dipstick handle
may be hot; it could burn you.
Use a towel or glove to touch the
dipstick handle.
If a low oil Driver Information Center
(DIC) message displays, check the
oil level.
Follow these guidelines:
. To get an accurate reading, park
the vehicle on level ground.
Check the engine oil level after
the engine has been off for at
least two hours. Checking the
engine oil level on steep grades
or too soon after engine shutoff
can result in incorrect readings.
Accuracy improves when
checking a cold engine prior to
starting. Remove the dipstick
and check the level.
. If unable to wait two hours, the
engine must be off for at least
15 minutes if the engine is
warm, or at least 30 minutes if
Page 187 of 307
Buick Cascada Owner Manual (GMNA-Localizing-U.S.-12461774) - 2019 -
CRC - 3/26/18
186 Vehicle Care
Cooling System
The cooling system allows the
engine to maintain the correct
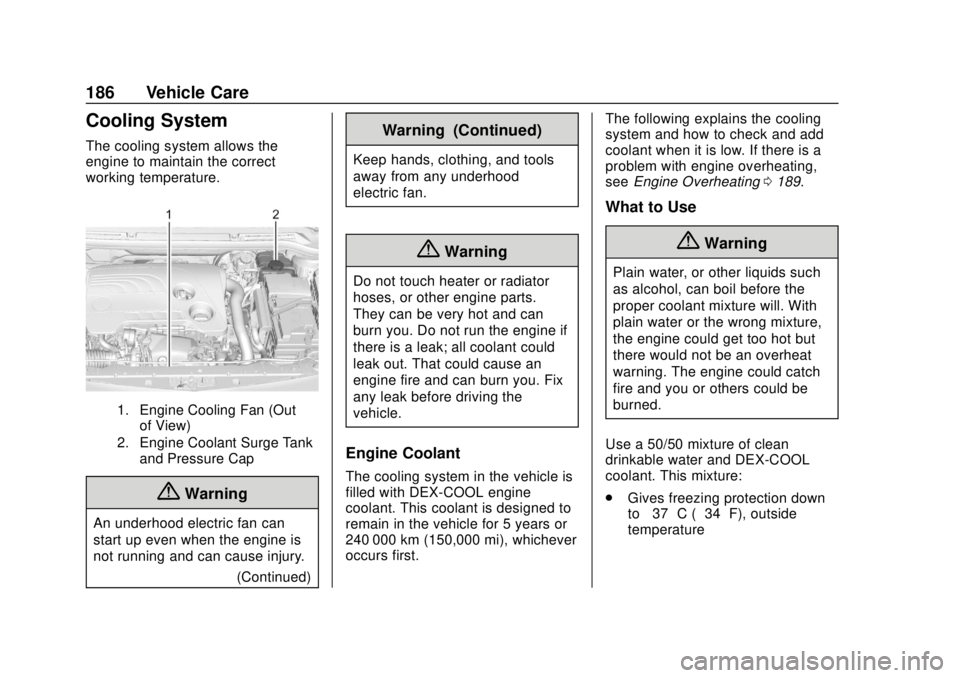
working temperature.
1. Engine Cooling Fan (Outof View)
2. Engine Coolant Surge Tank and Pressure Cap
{Warning
An underhood electric fan can
start up even when the engine is
not running and can cause injury.
(Continued)
Warning (Continued)
Keep hands, clothing, and tools
away from any underhood
electric fan.
{Warning
Do not touch heater or radiator
hoses, or other engine parts.
They can be very hot and can
burn you. Do not run the engine if
there is a leak; all coolant could
leak out. That could cause an
engine fire and can burn you. Fix
any leak before driving the
vehicle.
Engine Coolant
The cooling system in the vehicle is
filled with DEX-COOL engine
coolant. This coolant is designed to
remain in the vehicle for 5 years or
240 000 km (150,000 mi), whichever
occurs first. The following explains the cooling
system and how to check and add
coolant when it is low. If there is a
problem with engine overheating,
see
Engine Overheating 0189.
What to Use
{Warning
Plain water, or other liquids such
as alcohol, can boil before the
proper coolant mixture will. With
plain water or the wrong mixture,
the engine could get too hot but
there would not be an overheat
warning. The engine could catch
fire and you or others could be
burned.
Use a 50/50 mixture of clean
drinkable water and DEX-COOL
coolant. This mixture:
. Gives freezing protection down
to−37 °C (−34 °F), outside
temperature
Page 188 of 307
Buick Cascada Owner Manual (GMNA-Localizing-U.S.-12461774) - 2019 -
CRC - 3/26/18
Vehicle Care 187
.Gives boiling protection up to
129 °C (265 °F), engine
temperature
. Protects against rust and
corrosion
. Will not damage aluminum parts
. Helps keep the proper engine
temperature
Caution
Do not use anything other than a
mix of DEX-COOL coolant that
meets GM Standard
GMW3420 and clean, drinkable
water. Anything else can cause
damage to the engine cooling
system and the vehicle, which
would not be covered by the
vehicle warranty.
Never dispose of engine coolant by
putting it in the trash, pouring it on
the ground, or into sewers, streams,
or bodies of water. Have the coolant
changed by an authorized service
center, familiar with legal
requirements regarding used coolant disposal. This will help
protect the environment and your
health.
Checking Coolant
The vehicle must be on a level
surface when checking the coolant
level.
It is normal to see coolant moving in
the upper coolant hose return line
when the engine is running.
Check to see if coolant is visible in
the coolant surge tank. If the coolant
inside the coolant surge tank is
boiling, do not do anything else until
it cools down.
If coolant is visible but the coolant
level is not at or above the mark
pointed to, add a 50/50 mixture of
clean, drinkable water and
DEX-COOL coolant.
Be sure the cooling system is cool
before this is done.
If no coolant is visible in the coolant
surge tank, add coolant as follows:
How to Add Coolant to the
Coolant Surge Tank
{Warning
Steam and scalding liquids from a
hot cooling system are under
pressure. Turning the pressure
cap, even a little, can cause them
to come out at high speed and
you could be burned. Never turn
the cap when the cooling system,
including the pressure cap, is hot.
Wait for the cooling system and
pressure cap to cool.
{Warning
Plain water, or other liquids such
as alcohol, can boil before the
proper coolant mixture will. With
plain water or the wrong mixture,
the engine could get too hot but
there would not be an overheat
warning. The engine could catch
fire and you or others could be
burned.
Page 189 of 307
Buick Cascada Owner Manual (GMNA-Localizing-U.S.-12461774) - 2019 -
CRC - 3/26/18
188 Vehicle Care
{Warning
Spilling coolant on hot engine
parts can burn you. Coolant
contains ethylene glycol and it will
burn if the engine parts are hot
enough.
Caution
Failure to follow the specific
coolant fill procedure could cause
the engine to overheat and could
cause system damage. If coolant
is not visible in the surge tank,
contact your dealer.
If no problem is found, check to see
if coolant is visible in the coolant
surge tank. If coolant is visible but
the coolant level is not at the
indicated level mark, add a
50/50 mixture of clean, drinkable
water and DEX-COOL coolant at the
coolant surge tank, but be sure the cooling system, including the
coolant surge tank pressure cap, is
cool before you do it.
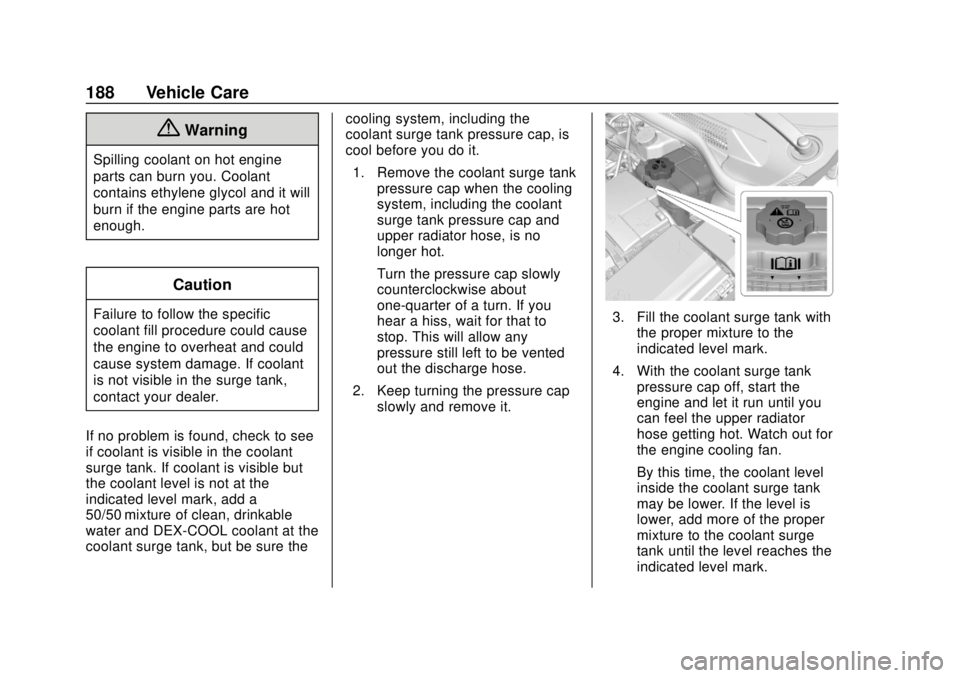
1. Remove the coolant surge tank pressure cap when the cooling
system, including the coolant
surge tank pressure cap and
upper radiator hose, is no
longer hot.
Turn the pressure cap slowly
counterclockwise about
one-quarter of a turn. If you
hear a hiss, wait for that to
stop. This will allow any
pressure still left to be vented
out the discharge hose.
2. Keep turning the pressure cap slowly and remove it.3. Fill the coolant surge tank withthe proper mixture to the
indicated level mark.
4. With the coolant surge tank pressure cap off, start the
engine and let it run until you
can feel the upper radiator
hose getting hot. Watch out for
the engine cooling fan.
By this time, the coolant level
inside the coolant surge tank
may be lower. If the level is
lower, add more of the proper
mixture to the coolant surge
tank until the level reaches the
indicated level mark.