meter BUICK CENTURY 1994 Owners Manual
[x] Cancel search | Manufacturer: BUICK, Model Year: 1994, Model line: CENTURY, Model: BUICK CENTURY 1994Pages: 308, PDF Size: 16.3 MB
Page 67 of 308
?art 2 Features and Controls
Here you can learn about the many standard and optional features on your Buick. and information on starting. shifting
and braking
. Also explained are the instrument panel and the warning systems that tell you if everything is working
properly
.. and what to do if you have a problem .
Part 2 includes:
Keys ........................................................................\
.. 66
DoorLocks .............................. ................................... 67
New Vehicle Break-In ..................... ..................................... 74
StartingtheEngine
................................................................. 76
ShiftingtheTransaxle ............................................................ 79
Windows ....................................................................... \
87
TiltSteeringWheel
................................................................ 88
Turn Signal/Headlight Beam Lever .................................................... 89
Headlight High-Low Beam Changer
.............................................. 91
Windshield Wipermasher ...................................................... 91
CruiseControl
................................................................ 94
Headlights
........................................................................\
98
Mirrors ........................................................................\
.. 102
Instrumentpanel ................................................................... 110
Speedometer and Odometer ..................................................... 110
Warning Lights . Gages and Indicators ............................................. 111
65
ProCarManuals.com
Page 112 of 308
The Instrument Panel: Your
Information System
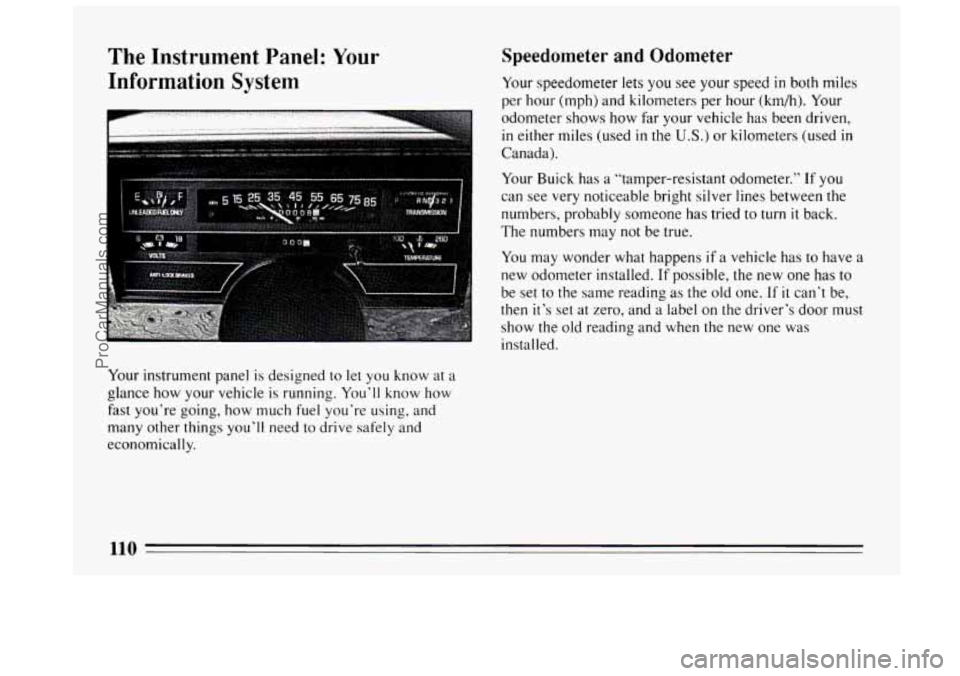
Your instrument panel is designed to let you know at a
glance how your vehicle is running. You’ll know how
fast you’re going, how much
fuel you’re using, and
many other things you’ll need to drive safely and
economically.
Speedometer and Odometer
Your speedometer lets you see your speed in both miles
per hour (mph) and kilometers per hour (km/h). Your
odometer shows how far your vehicle has been driven,
in either miles (used in the U.S.) or kilometers (used in
Canada).
Your Buick has a “tamper-resistant odometer.”
If you
can see very noticeable bright silver lines between the
numbers, probably someone has tried to turn
it back.
The numbers may not be true.
You may wonder what happens if a vehicle has
to have a
new odometer installed.
If possible, the new one has to
be set to the same reading as the old one.
If it can’t be,
then it’s set at zero, and a label on the driver’s door must
show the old reading and when the new one was
installed.
110
ProCarManuals.com
Page 113 of 308
Trip Odometer
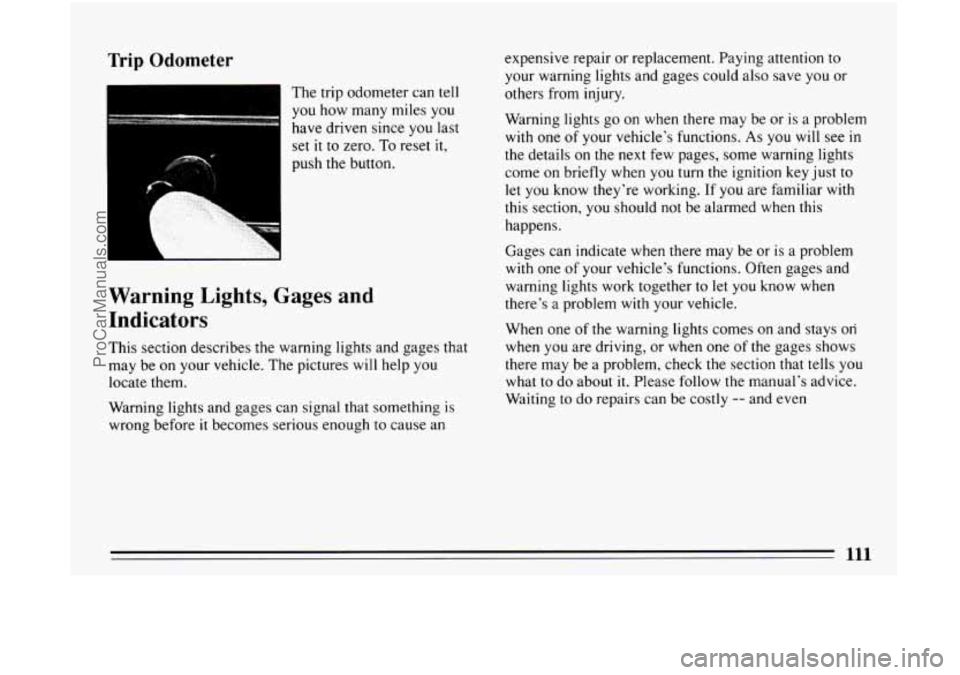
The trip odometer can tell
you how many miles you
have driven since you last
set
it to zero. To reset it,
push the button.
L
Warning Lights, Gages and
Indicators
This section describes the warning lights and gages that
may be on your vehicle. The pictures will help you
locate them.
Warning lights and gages can signal that something
is
wrong before it becomes serious enough to cause an expensive
repair or replacement. Paying attention to
your warning lights and gages could also save you or
others from injury.
Warning lights go on when there may be or is a problem
with one of
your vehicle’s functions. As you will see in
the details on the next few pages, some warning lights
come
on briefly when you turn the ignition key just to
let you know they’re working. If you are familiar with
this section,
you should not be alarmed when this
happens.
Gages can indicate when there may be
or is a problem
with one
of your vehicle’s functions. Often gages and
warning lights work together to let you know when
there’s a problem with your vehicle.
When one of the warning lights comes on and stays
on
when you are driving, or when one of the gages shows
there may be a problem, check
the section that tells you
what to do about it. Please follow the manual’s advice.
Waiting to
do repairs can be costly -- and even
111
ProCarManuals.com
Page 160 of 308
The most important advice on freeway driving is: Keep
up with traffic and keep to the right. Drive at the same
speed most
of the other drivers are driving. Too-fast or
too-slow driving breaks a smooth traffic
flow. Treat the
left lane on a freeway
as a passing lane.
At the entrance there is usually
a ramp that leads to the
freeway.
If you have a clear view of the freeway as you
drive along the entrance ramp, you should begin to
check traffic. Try to determine where
you expect to
blend with the flow. Try to merge into the gap at close to
the prevailing speed. Switch on your turn signal, check
your mirrors and glance over your shoulder as often as
necessary. Try to blend smoothly with the traffic flow.
Once
you are on the freeway, adjust your speed to the
posted limit or
to the prevailing rate if it’s slower. Stay
in the right lane unless you want
to pass.
Before changing lanes, check your mirrors. Then use
your turn signal.
Just before you leave the lane, glance quickly over your
shoulder to make sure there isn’t another vehicle in your
“blind” spot.
Once you are moving on the freeway, make certain you
allow a reasonable following distance. Expect to move
slightly slower at night. When
you want
to leave the freeway, move to the proper
lane well in advance. If you miss your exit do not, under
any circumstances, stop and back
up. Drive on to the
next exit.
The exit ramp can be curved, sometimes quite sharply.
The exit speed is usually posted.
Reduce your speed according
to your speedometer, not
to your sense of motion. After driving for any distance
at higher speeds, you may tend to think you are going
slower than you actually are.
Before Leaving on a Long Trip
Make sure you’re ready. Try to be well rested. If you
must start when you’re not fresh
-- such as after a day’s
work
-- don’t plan to make too many miles that first part
of the journey. Wear comfortable clothing and shoes you
can easily drive
in.
Is your vehicle ready for a long trip? If you keep it
serviced and maintained, it’s ready to go. If it needs
service, have
it done before starting out. Of course,
you’ll find experienced and able service experts
in
Buick dealerships all across North America. They’ll be
ready and willing to help
if you need it.
158
ProCarManuals.com
Page 245 of 308
Temperature - A, B, C
The temperature grades are A (the highest), B, and C,
representing the tire’s resistance to the generation of
heat and its ability to dissipate heat when tested under
controlled conditions
on a specified indoor laboratory
test wheel. Sustained high temperature can cause the
material of
the tire to degenerate and reduce tire life, and
excessive temperature can lead
to sudden tire failure.
The grade
C corresponds to a level of performance
which all passenger car tires must meet under the
Federal Motor Vehicle Safety Standard
No. 109. Grades
B and A represent higher levels of performance on the
laboratory test wheel than the minimum required by law.
Warning: The temperature grade for
this tire is
established for a tire that is properly inflated and not
overloaded. Excessive speed, underinflation, or
excessive loading, either separately or in combination,
can cause heat buildup and possible tire failure.
These grades are molded
on the sidewalls of passenger
car tires.
While the tires available as standard or optional
equipment
on General Motors vehicles may vary with
respect to these grades, all such tires meet General
Motors performance standards and have been approved
for use
on General Motors vehicles. All passenger type
(P Metric) tires must conform to Federal safety
requirements in addition to these grades.
Wheel Alignment and Tire Balance
The wheels on your vehicle were aligned and balanced
carefully
at the factory to give you the longest tire life
and best overall performance.
In most cases, you will not need to have your wheels
aligned again. However, if
you notice unusual tire wear
or your vehicle pulling one way or the other, the
alignment may need
to be reset. If you notice your
vehicle vibrating when driving on a smooth road, your
wheels may need to be rebalanced.
Wheel Replacement
Replace any wheel that is bent, cracked or badly rusted.
If wheel nuts keep coming loose, the wheel, wheel bolts,
and wheel nuts should be replaced. If the wheel leaks
air, replace it (except some aluminum wheels, which can
sometimes be repaired). See your Buick dealer if any of
these conditions
exist.
Your dealer will know the kind of wheel you need.
Each new wheel should have the same load carrying
capacity, diameter, width, offset, and be mounted the same way as
the one it replaces.
243
ProCarManuals.com
Page 246 of 308
If you need to replace any of your wheels, wheel bolts,
or wheel nuts, replace them only with new
GM original
equipment parts. This way,
you will be sure to have the
right wheel, wheel bolts, and wheel nuts for your Buick
model.
NOTICE:
The wrong wheel can also cause problems with
bearing life, brake cooling, speedometer/odometer
calibration, headlight aim, bumper height, vehicle
ground clearance, and tire
or tire chain clearance
to the body and chassis.
Used Replacement Wheels
Tire Chains
NOTICE:
Use tire chains only where legal and only when
you must. Use only
SAE Class “S” type chains
that are the proper size for your tires. Install
them on the front tires and tighten them as
tightly
as possible with the ends securely
fastened. Drive slowly and follow the chain
manufacturer’s instructions.
If you can hear the
chains contacting your vehicle, stop and
retighten them.
If the contact continues, slow
down
until it stops. Driving too fast with chains
on will damage your vehicle.
244
ProCarManuals.com
Page 257 of 308
r Fuse Usage
I
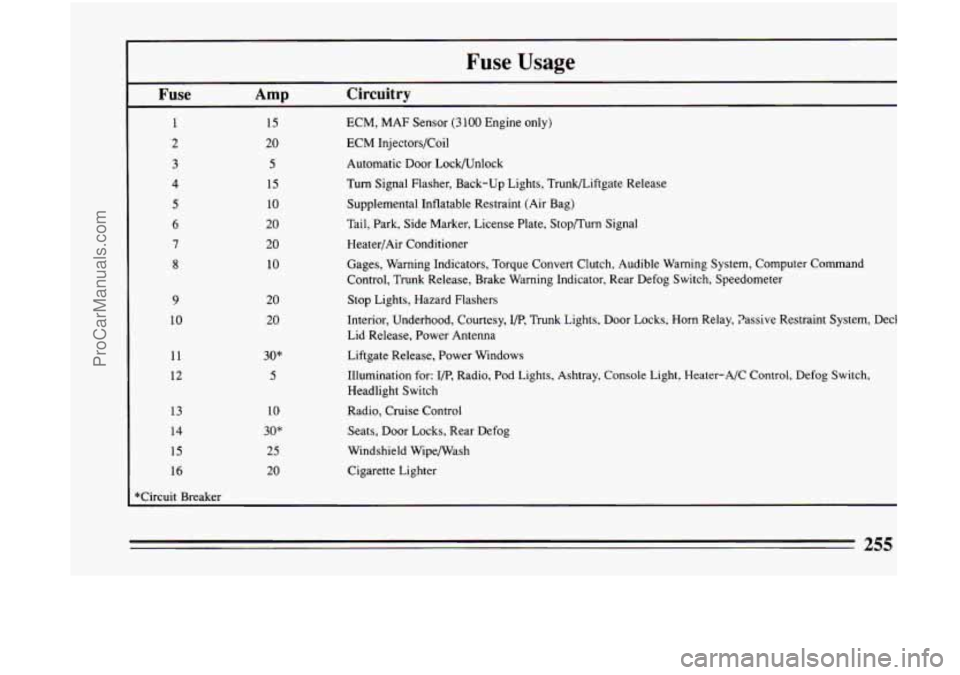
Fuse Amp Circuitry
1 15 ECM, MAF Sensor (3 100 Engine only)
2 20 ECM Injectors/Coil
3
4
5
6
7
8
9
10
11
12
13
14
15
I 16
5
15
10
20
20
10
20 20
30"
5
10
30"
25
20
Automatic Door LockAJnlock
Turn Signal Flasher, Back-up Lights, Trunkbiftgate Release
Supplemental Inflatable Restraint (Air Bag)
Tail, Park, Side Marker, License Plate, Stop/Turn Signal Heater/Air Conditioner
Gages, Warning Indicators, Torque Convert Clutch, Audible Warning\
System, Computer Command
Control, Trunk Release, Brake Warning Indicator, Rear Defog Swit\
ch, Speedometer
Stop Lights, Hazard Flashers
Interior, Underhood, Courtesy,
I/P, Trunk Lights, Door Locks, Horn Relay, Passive Restraint System, \
Deck
Lid Release, Power Antenna
Liftgate Release, Power Windows
Illumination for:
I/P, Radio, Pod Lights, Ashtray, Console Light, Heater-A/C Control, D\
efog Switch,
Headlight Switch
Radio, Cruise Control
Seats, Door Locks, Rear Defog
Windshield WipefWash
Cigarette Lighter
255
ProCarManuals.com
Page 268 of 308
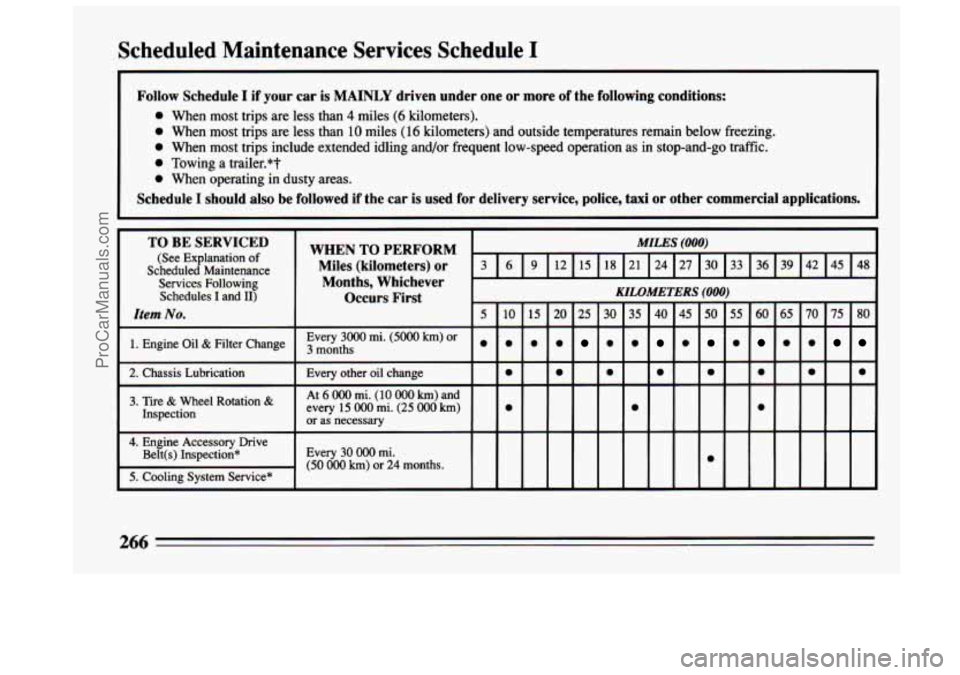
Scheduled Maintenance Services Schedule I
~
Follow Schedule I if your car is MAINLY driven under one or more of the following conditions:
0 When most trips are less than 4 miles (6 kilometers).
0 When most trips are less than 10 miles (16 kilometers) and outside temperatures remain below fr\
eezing.
0 When most trips include extended idling and/or frequent low-spee\
d operation as in stop-and-go traffic.
0 Towing a trailer.*?
0 When operating in dusty areas.
Schedule I should also be followed if the car is used for delivery service, police, taxi or other commercial applications. \
TO BE SERVICED
(See Explanation of
Scheduled Maintenance Miles (kilometers) or
Services Following Months, Whichever
Schedules I and 11) Occurs First KILOMETERS (000)
WHEN TO PERFORM MILES (000)
3
Item No.
Every30oOmi.(50@)km)or months 0 0 0 0 0 0 0 0 0 0 1. Engine oil & Filter Change
5 10 15 20 25 30 35 40 45 50 55 60 65 70 75 80
3. Tire & Wheel Rotation &
Every other oil change 0 0 0 0 0 0 0 0 2. Chassis Lubrication
every 15 ooo mi. (25 ooo km)
At 6 OOO mi. (10 000 km) and
or as necessary
4. Engine Accessory Drive
5. Cooling System Service"
Inspection
0 0 0
Belt(s)
Inspection* Every 30 OOO mi.
(50 000 km) or 24 months. 0
266
ProCarManuals.com
Page 270 of 308
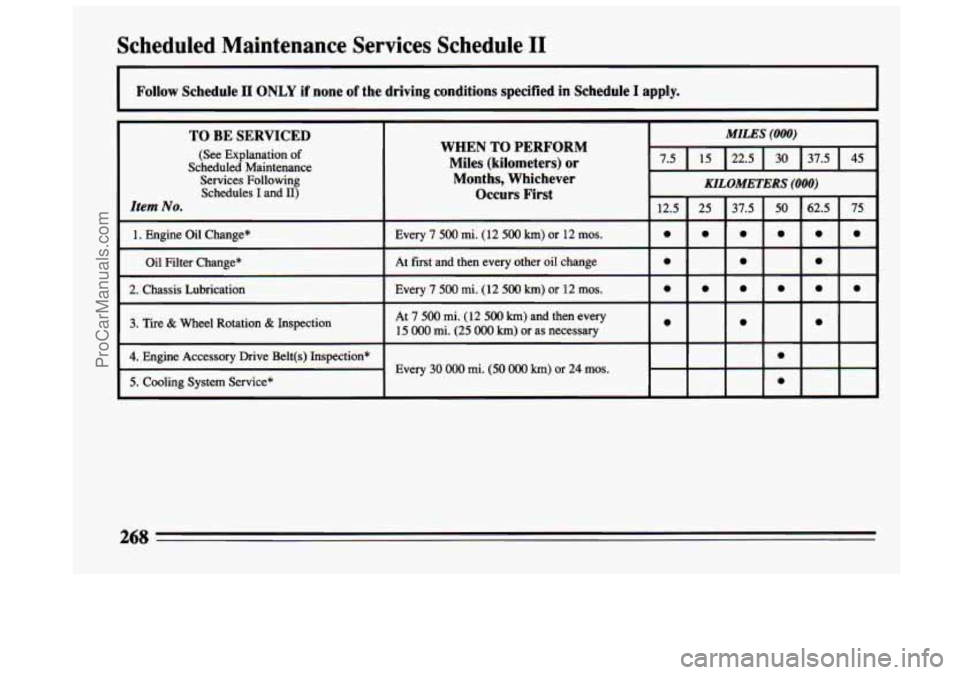
Scheduled Maintenance Services Schedule I1
I Follow Schedule I1 ONLY if none of the driving conditions specified in Schedule I apply.
TO BE SERVICED
(See Explanation of
Scheduled Maintenance
Services Following Schedules
I and 11)
Item No.
1. Engine Oil Change*
Oil Filter Change"
2. Chassis Lubrication
3. Tire & Wheel Rotation & Inspection
4. Engine Accessory Drive Belt(s) Inspection*
5. Cooling System Service*
MILES (000)
WHEN TO PERFORM
Miles (kilometers) or
Months, Whichever
Occurs First
or as necessary
Every
30 000 mi. (50 OOO km) or 24 mos.
268
ProCarManuals.com
Page 271 of 308
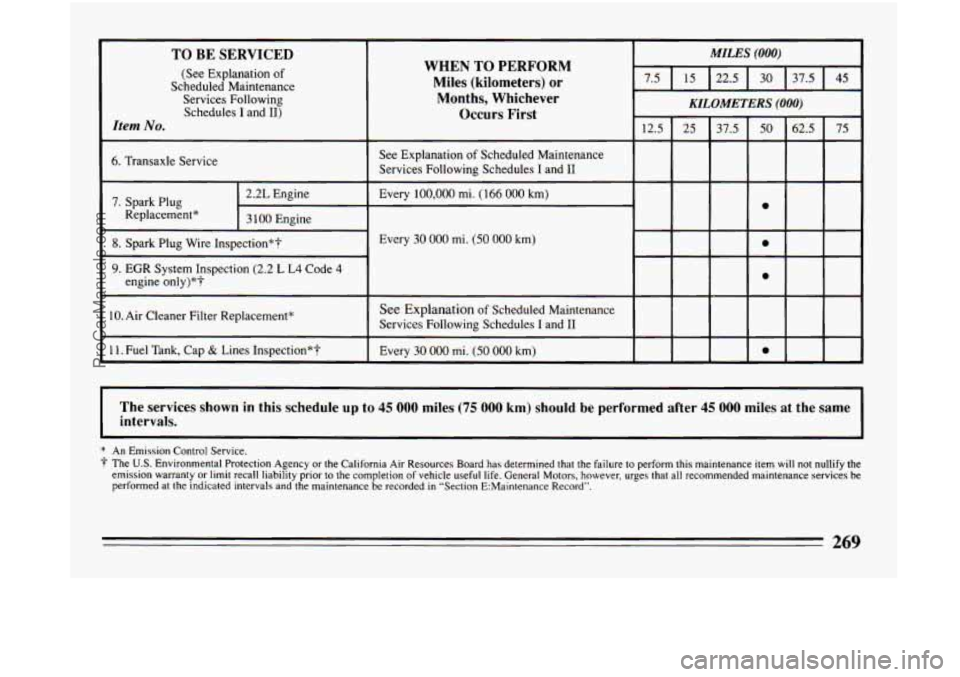
TO BE SERVICED
(See Explanation of
Scheduled Maintenance Services Following Schedules I and
11)
Item No.
I
6. Transaxle Service
7. Spark Plug
Replacement*
I 8. Spark Plug Wire Inspection*?
I
9. EGR System Inspection (2.2 L L4 Code 4
engine only)*?
I
10. Air Cleaner Filter Replacement”
I 1 1. Fuel Tank, Cap & Lines Inspection*?
WHEN TO PERFORM
Miles (kilometers) or
Months, Whichever Occurs First
I MILES (000) I .,
I KILOMETERS (000)
See Explanation of Scheduled Maintenance
Services Following Schedules
I and I1
Every
100,000 mi. ( 166 000 km)
Every
30 000 mi. (50 000 km)
See Explanation of Scheduled Maintenance
Services Following Schedules I and I1
Every
30 000 mi. (50 000 km)
50 75 62.5
a
a
a
a
The services shown in this schedule up to 45 000 miles (75 000 km) should be performed after 45 000 miles at the same
intervals.
* An Emission Control Service.
? The U.S. Environmental Protection Agency or the California Air Resources Board has determined that the failure to perform this maintenance item will not nullify the
emission warranty or limit recall liability prior to the completion of vehicle useful life. General Motors, however, urges that all recommended maintenance services be
performed at the indicated intervals and the maintenance be recorded in “Section E:Maintenance Record”.
269
ProCarManuals.com