tow BUICK CENTURY 2003 Owner's Guide
[x] Cancel search | Manufacturer: BUICK, Model Year: 2003, Model line: CENTURY, Model: BUICK CENTURY 2003Pages: 344, PDF Size: 2.57 MB
Page 198 of 344
Turn Signals When Towing a Trailer
When you tow a trailer, your vehicle may need a
different turn signal ¯asher and/or extra wiring. Check
with your dealer. The arrows on your instrument
panel will ¯ash whenever you signal a turn or lane
change. Properly hooked up, the trailer lamps will also
¯ash, telling other drivers you're about to turn,
change lanes or stop.
When towing a trailer, the arrows on your instrument
panel will ¯ash for turns even if the bulbs on the trailer
are burned out. Thus, you may think drivers behind
you are seeing your signal when they are not. It's
important to check occasionally to be sure the trailer
bulbs are still working.
Driving On Grades
Reduce speed and shift to a lower gearbeforeyou start
down a long or steep downgrade. If you don't shift
down, you might have to use your brakes so much that
they would get hot and no longer work well.
On a long uphill grade, shift down and reduce your
speed to around 45 mph (70 km/h) to reduce the
possibility of engine and transaxle overheating.
If you are towing a trailer, you may want to drive in
THIRD (3) instead of AUTOMATIC OVERDRIVE (
X).
Shift to a lower gear as needed.
Parking on Hills
{CAUTION:
You really should not park your vehicle, with a
trailer attached, on a hill. If something goes
wrong, your rig could start to move. People
can be injured, and both your vehicle and the
trailer can be damaged.
But if you ever have to park your rig on a hill, here's
how to do it:
1. Apply your regular brakes, but don't shift into
PARK (P) yet.
2. Have someone place chocks under the trailer's
wheels.
3. When the wheel chocks are in place, release the
regular brakes until the chocks absorb the load.
4. Reapply the regular brakes. Then apply your
parking brake, and shift to PARK (P).
5. Release the regular brakes.
4-40
Page 199 of 344
When You Are Ready to Leave After
Parking on a Hill
1. Apply your regular brakes and hold the pedal down
while you:
┬Ěstart your engine,
┬Ěshift into a gear, and
┬Ěrelease the parking brake.
2. Let up on the brake pedal.
3. Drive slowly until the trailer is clear of the chocks.
4. Stop and have someone pick up and store
the chocks.
Maintenance When Trailer Towing
Your vehicle will need service more often when you're
pulling a trailer. See the Maintenance Schedule for more
on this. Things that are especially important in trailer
operation are automatic transaxle ¯uid (don't over®ll),
engine oil, drive belt, cooling system and brake system.
Each of these is covered in this manual, and the
Index will help you ®nd them quickly. If you're trailering,
it's a good idea to review this information before you
start your trip.
Check periodically to see that all hitch nuts and bolts
are tight.
Engine Cooling When Trailer Towing
Your cooling system may temporarily overheat during
severe operating conditions. SeeEngine Overheating
on page 5-26.
4-41
Page 214 of 344
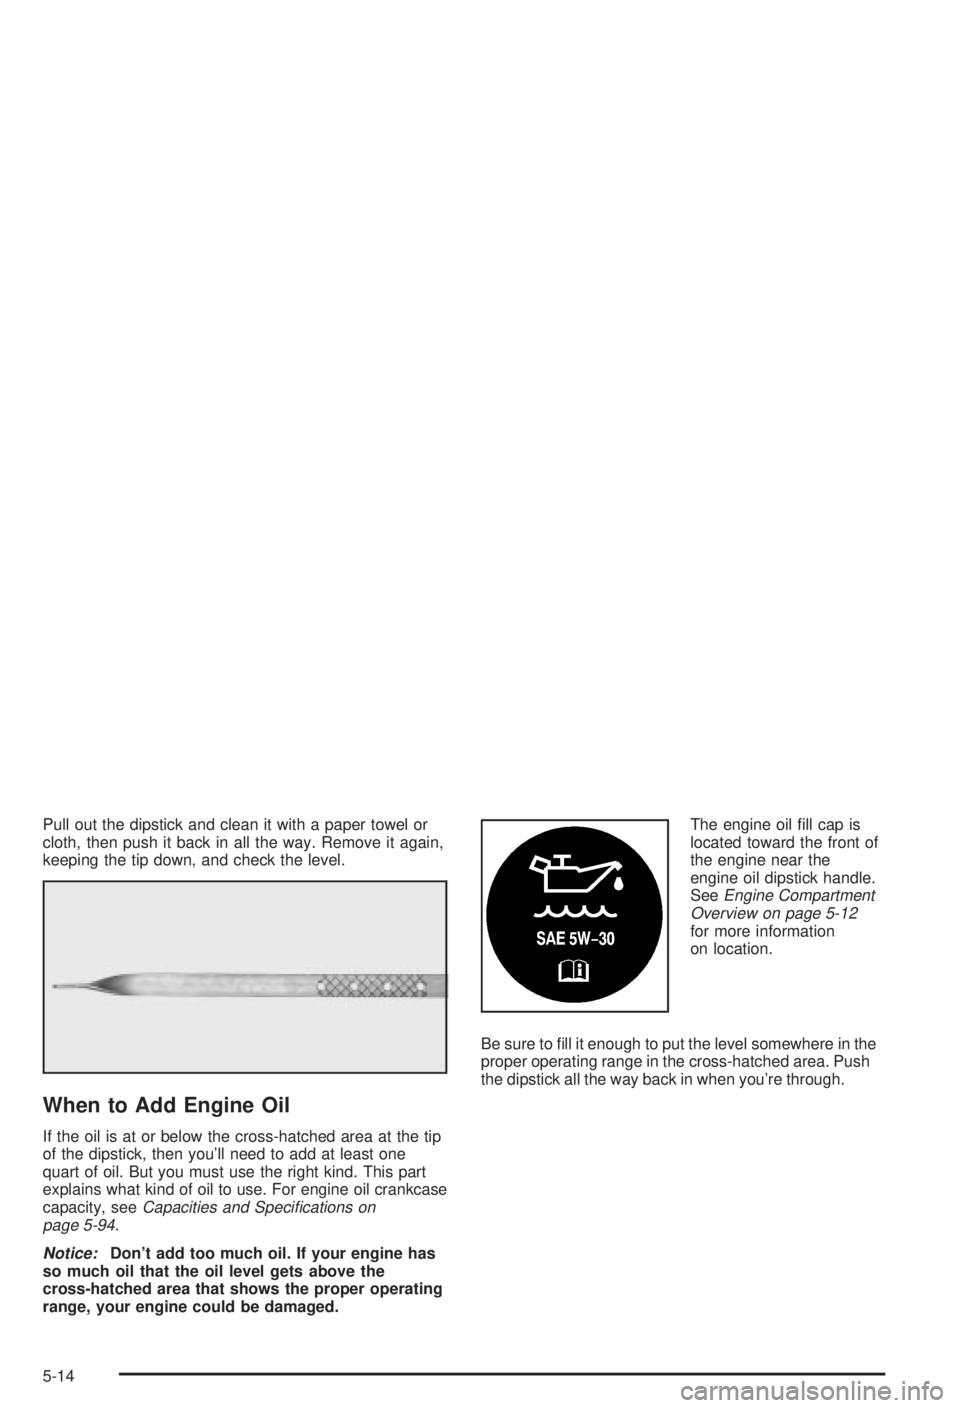
Pull out the dipstick and clean it with a paper towel or
cloth, then push it back in all the way. Remove it again,
keeping the tip down, and check the level.
When to Add Engine Oil
If the oil is at or below the cross-hatched area at the tip
of the dipstick, then you'll need to add at least one
quart of oil. But you must use the right kind. This part
explains what kind of oil to use. For engine oil crankcase
capacity, see
Capacities and Speci®cations on
page 5-94.
Notice:Don't add too much oil. If your engine has
so much oil that the oil level gets above the
cross-hatched area that shows the proper operating
range, your engine could be damaged.The engine oil ®ll cap is
located toward the front of
the engine near the
engine oil dipstick handle.
See
Engine Compartment
Overview on page 5-12
for more information
on location.
Be sure to ®ll it enough to put the level somewhere in the
proper operating range in the cross-hatched area. Push
the dipstick all the way back in when you're through.
5-14
Page 219 of 344
{CAUTION:
Operating the engine with the air cleaner/®lter
off can cause you or others to be burned. The
air cleaner not only cleans the air, it helps to
stop ¯ame if the engine back®res. If it isn't there
and the engine back®res, you could be burned.
Don't drive with it off, and be careful working on
the engine with the air cleaner/®lter off.
Notice:If the air cleaner/®lter is off, a back®re can
cause a damaging engine ®re. And, dirt can
easily get into your engine, which will damage it.
Always have the air cleaner/®lter in place when
you're driving.
Automatic Transaxle Fluid
When to Check and Change
A good time to check your automatic transaxle ¯uid
level is when the engine oil is changed.
Change both the ¯uid and ®lter every 50,000 miles
(83 000 km) if the vehicle is mainly driven under one or
more of these conditions:
┬ĚIn heavy city traffic where the outside temperature
regularly reaches 90ÉF (32ÉC) or higher.
┬ĚIn hilly or mountainous terrain.
┬ĚWhen doing frequent trailer towing.
┬ĚUses such as found in taxi, police or delivery
service.
If you do not use your vehicle under any of these
conditions, change the ¯uid and ®lter at 100,000 miles
(166 000 km).
See
Part A: Scheduled Maintenance Services on
page 6-4.
5-19
Page 221 of 344
Checking the Fluid Level
Prepare your vehicle as follows:
┬ĚPark your vehicle on a level place. Keep the engine
running.
┬ĚWith the parking brake applied, place the shift lever
in PARK (P).
┬ĚWith your foot on the brake pedal, move the shift
lever through each gear range, pausing for about
three seconds in each range. Then, position the shift
lever in PARK (P).
┬ĚLet the engine run at idle for three to ┬«ve minutes.Then, without shutting off the engine, follow these steps:
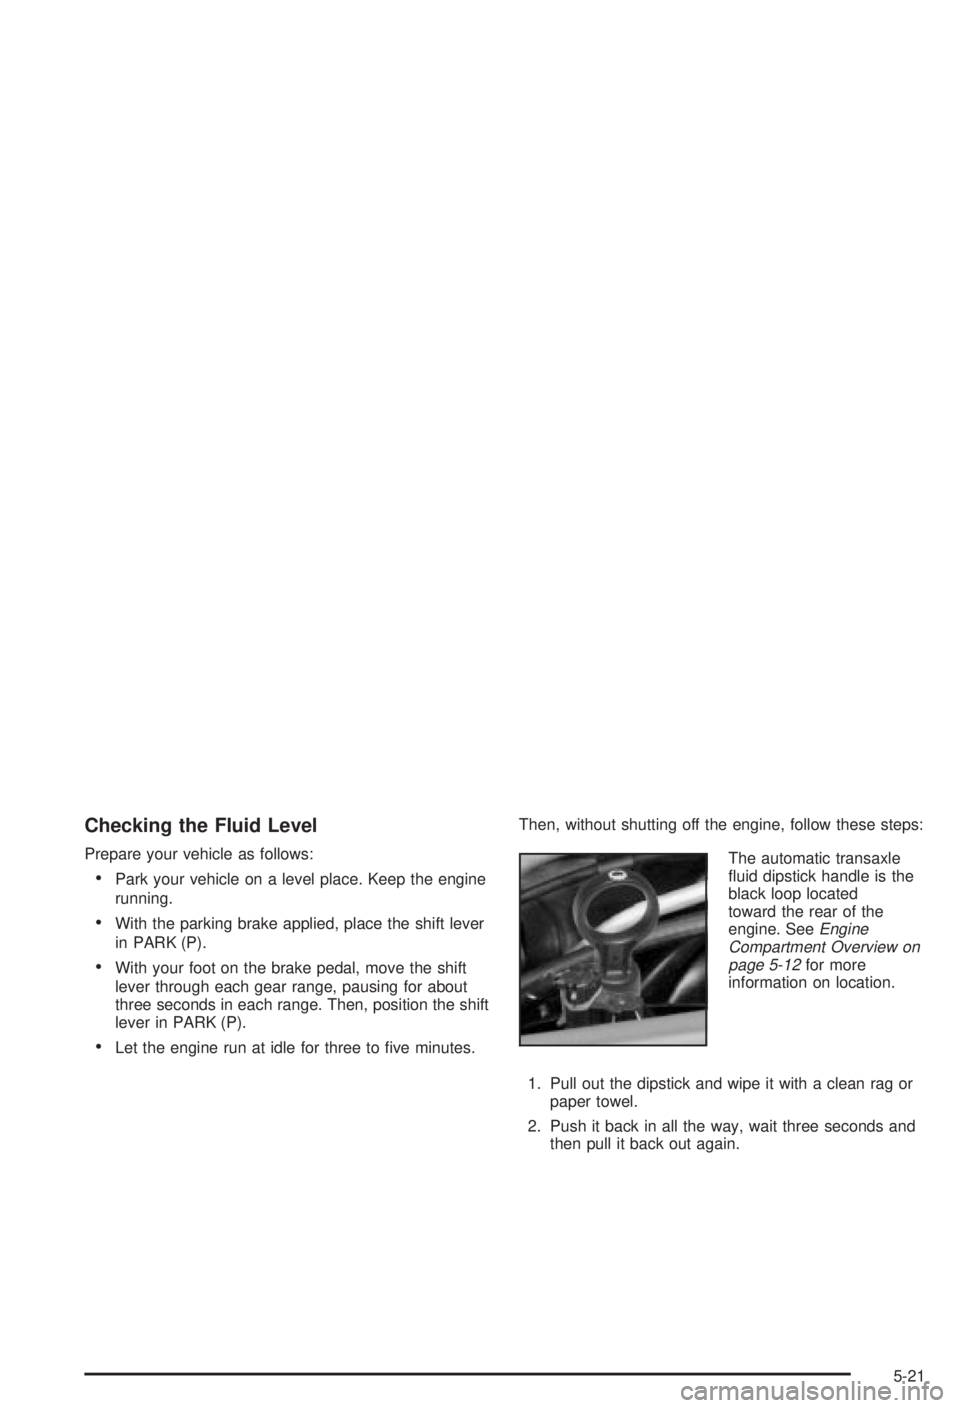
The automatic transaxle
¯uid dipstick handle is the
black loop located
toward the rear of the
engine. See
Engine
Compartment Overview on
page 5-12
for more
information on location.
1. Pull out the dipstick and wipe it with a clean rag or
paper towel.
2. Push it back in all the way, wait three seconds and
then pull it back out again.
5-21
Page 226 of 344
Radiator Pressure Cap
Notice:Your radiator cap is a pressure-type cap
and must be tightly installed to prevent coolant loss
and possible engine damage from overheating.
Be sure the arrows on the cap line up with the
over¯ow tube on the radiator ®ller neck.
The radiator pressure cap is located near the front of
the engine compartment on the passenger's side of the
vehicle. See
Engine Compartment Overview on
page 5-12for more information on location.
Engine Overheating
You will ®nd a coolant temperature gage and a hot
engine warning light on your instrument panel.
See
Engine Coolant Temperature Gage on page 3-30andEngine Coolant Temperature Warning Light on
page 3-29.
Overheated Engine Protection
Operating Mode
The emergency engine protection operating mode
allows your vehicle to be driven to a safe place in an
emergency situation. If an overheated engine condition
exists, this protection mode alternates ®ring groups
of cylinders to help prevent engine damage. In
this mode, you will notice a signi®cant loss in power and
engine performance. The engine coolant temperature
gage indicator will move to the red area, showing that an
overheated engine condition exists. Driving extended
miles (km) and/or towing a trailer in the overheated
protection mode should be avoided.
Notice:After driving in the overheated engine
protection operating mode, to avoid engine damage,
allow the engine to cool before attempting any repair.
The engine oil will be severely degraded. Repair the
cause of coolant loss, change the oil and reset the oil
life system. See ªEngine Oilº in the Index.
5-26
Page 228 of 344
If No Steam Is Coming From Your
Engine
An overheat warning can indicate a serious problem.
If you get an engine overheat warning but see or
hear no steam, the problem may not be too serious.
Sometimes the engine can get a little too hot when you:
┬ĚClimb a long hill on a hot day.
┬ĚStop after high-speed driving.
┬ĚIdle for long periods in traffic.
┬ĚTow a trailer.
If you get the overheat warning with no sign of steam,
try this for a minute or so:
1. In heavy traffic, let the engine idle in NEUTRAL (N)
while stopped. If it is safe to do so, pull off the road,
shift to PARK (P) or NEUTRAL (N) and let the
engine idle.
2. Turn on your heater to full hot at the highest fan
speed and open the window as necessary.If you no longer have the overheat warning, you can
drive. Just to be safe, drive slower for about 10 minutes.
If the warning doesn't come back on, you can drive
normally.
If the warning continues, and you have not stopped, pull
over, stop, and park your vehicle right away.
If there's still no sign of steam, you can idle the engine
for three minutes while you're parked. If you still
have the warning,
turn off the engine and get everyone
out of the vehicleuntil it cools down. Also, see
ªOverheated Engine Protection Operating Modeº listed
previously in this section.
You may decide not to lift the hood but to get service
help right away.
5-28
Page 256 of 344
Windshield Wiper Blade
Replacement
Windshield wiper blades should be inspected at least
twice a year for wear or cracking. See ªWiper Blade
Check┬║ under
Part B: Owner Checks and Services on
page 6-10for more information.
1. Turn on the wipers to LO.
2. Turn off the ignition while the wipers are at the
outer positions of the wiper pattern. The blades
are more accessible for removal/replacement while
in this position.
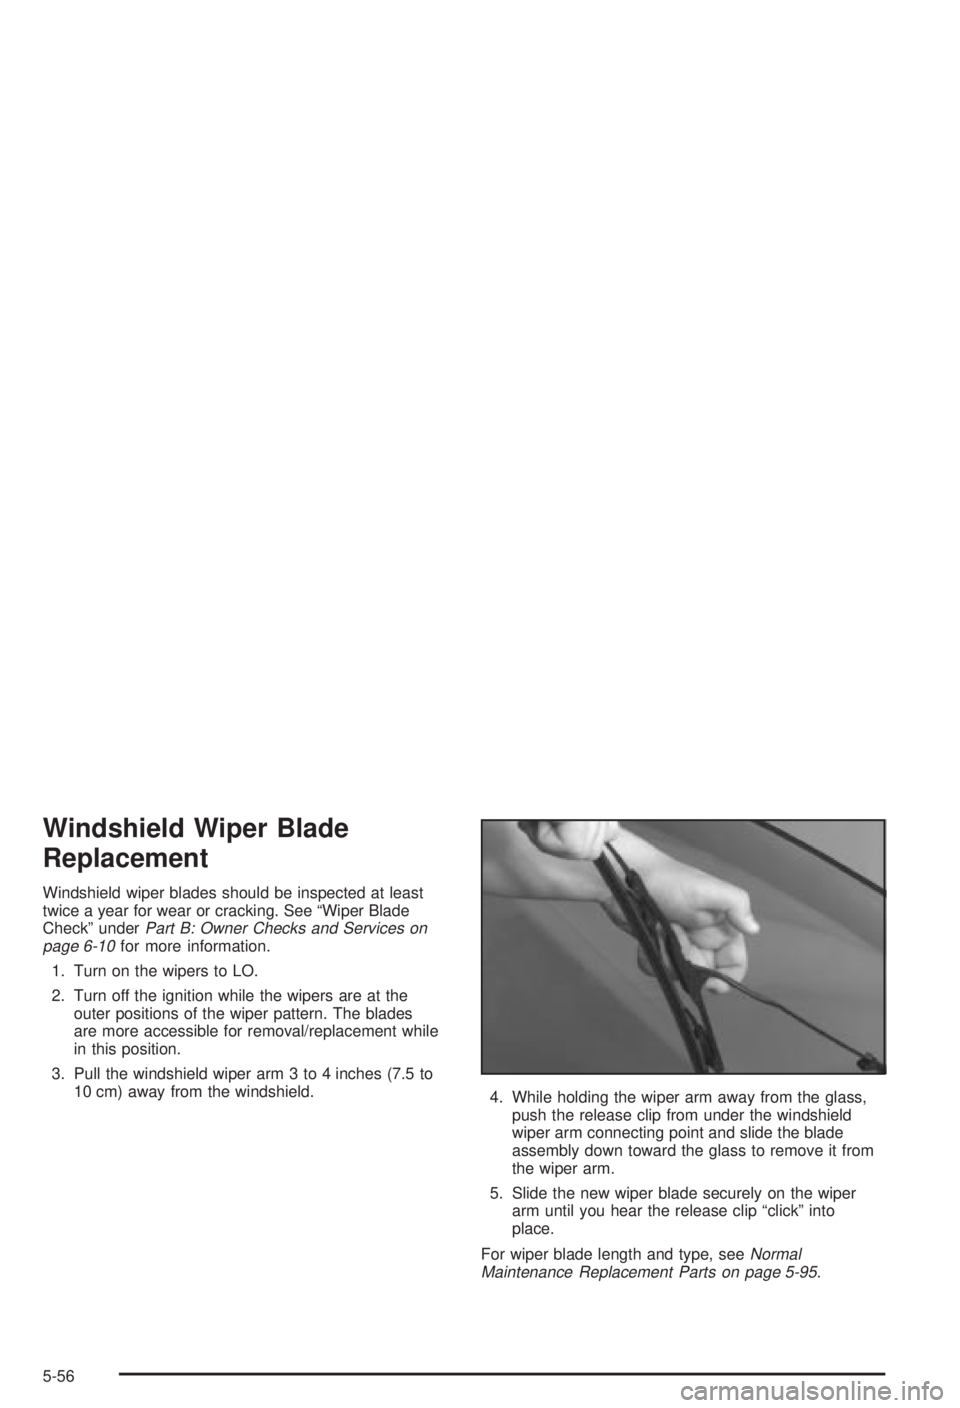
3. Pull the windshield wiper arm 3 to 4 inches (7.5 to
10 cm) away from the windshield.
4. While holding the wiper arm away from the glass,
push the release clip from under the windshield
wiper arm connecting point and slide the blade
assembly down toward the glass to remove it from
the wiper arm.
5. Slide the new wiper blade securely on the wiper
arm until you hear the release clip ªclickº into
place.
For wiper blade length and type, see
Normal
Maintenance Replacement Parts on page 5-95.
5-56
Page 261 of 344
{CAUTION:
Rust or dirt on a wheel, or on the parts to
which it is fastened, can make wheel nuts
become loose after a time. The wheel could
come off and cause an accident. When you
change a wheel, remove any rust or dirt from
places where the wheel attaches to the vehicle.
In an emergency, you can use a cloth or a
paper towel to do this; but be sure to use a
scraper or wire brush later, if you need to, to
get all the rust or dirt off. See ªChanging a Flat
Tire┬║ in the Index.
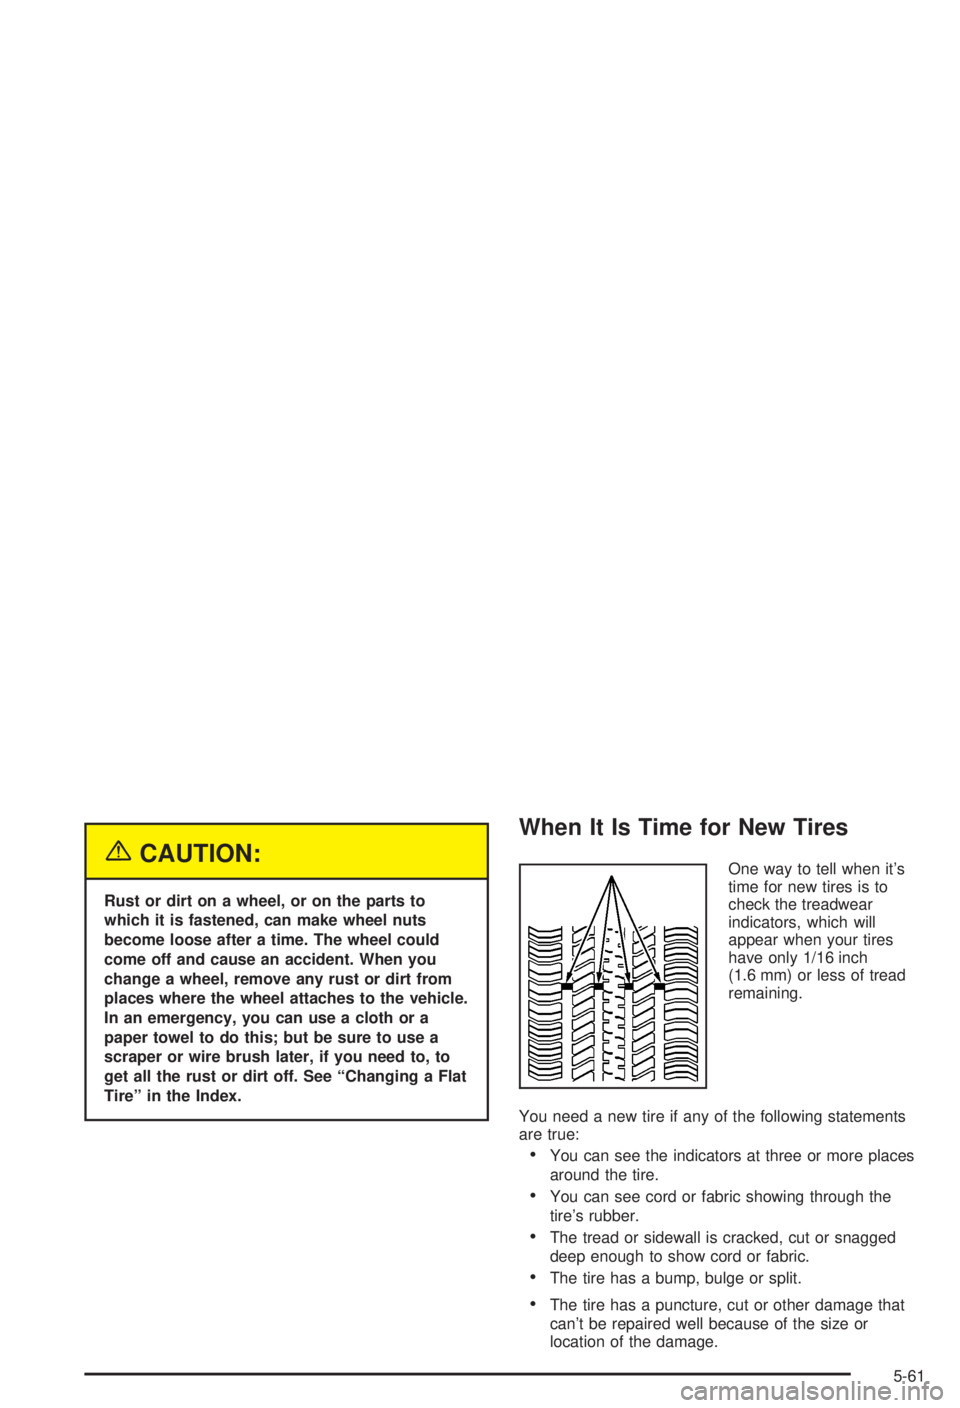
When It Is Time for New Tires
One way to tell when it's
time for new tires is to
check the treadwear
indicators, which will
appear when your tires
have only 1/16 inch
(1.6 mm) or less of tread
remaining.
You need a new tire if any of the following statements
are true:
┬ĚYou can see the indicators at three or more places
around the tire.
┬ĚYou can see cord or fabric showing through the
tire's rubber.
┬ĚThe tread or sidewall is cracked, cut or snagged
deep enough to show cord or fabric.
┬ĚThe tire has a bump, bulge or split.
┬ĚThe tire has a puncture, cut or other damage that
can't be repaired well because of the size or
location of the damage.
5-61
Page 266 of 344
Tire Chains
Notice:Use tire chains only where legal and only
when you must. Use only SAE Class ªSº type chains
that are the proper size for your tires. Install them
on the front tires and tighten them as tightly as
possible with the ends securely fastened. Drive
slowly and follow the chain manufacturer's
instructions. If you can hear the chains contacting
your vehicle, stop and retighten them. If the contact
continues, slow down until it stops. Driving too
fast or spinning the wheels with chains on will
damage your vehicle.
If a Tire Goes Flat
It's unusual for a tire to ªblowoutº while you're driving,
especially if you maintain your tires properly. If air goes
out of a tire, it's much more likely to leak out slowly.
But if you should ever have a ªblowout,º here are a few
tips about what to expect and what to do:
If a front tire fails, the ¯at tire will create a drag that
pulls the vehicle toward that side. Take your foot off the
accelerator pedal and grip the steering wheel ®rmly.
Steer to maintain lane position, and then gently brake to
a stop well out of the traffic lane.A rear blowout, particularly on a curve, acts much like a
skid and may require the same correction you'd use
in a skid. In any rear blowout, remove your foot from the
accelerator pedal. Get the vehicle under control by
steering the way you want the vehicle to go. It may be
very bumpy and noisy, but you can still steer. Gently
brake to a stop, well off the road if possible.
{CAUTION:
Lifting a vehicle and getting under it to do
maintenance or repairs is dangerous without
the appropriate safety equipment and training.
The jack provided with your vehicle is
designed only for changing a ¯at tire. If it is
used for anything else, you or others could be
badly injured or killed if the vehicle slips off
the jack. Use the jack provided with your
vehicle only for changing a ¯at tire.
If a tire goes ¯at, the next part shows how to use your
jacking equipment to change a ¯at tire safely.
5-66