fuses BUICK CENTURY 2003 Owner's Manual
[x] Cancel search | Manufacturer: BUICK, Model Year: 2003, Model line: CENTURY, Model: BUICK CENTURY 2003Pages: 344, PDF Size: 2.57 MB
Page 88 of 344
Clean and dry the key. Wait about three minutes and try
again. If the starter still won't work, and the key
appears to be clean and dry, wait about three minutes
and try another ignition key. At this time, you may
also want to check the fuse. See
Fuses and Circuit
Breakers on page 5-89. If the starter won't work with the
other key, your vehicle needs service. If your vehicle
does start, the ®rst ignition key may be faulty. See your
dealer or a locksmith who can service the PASS-Key
žII.
If you accidentally use a key that has a damaged or
missing resistor pellet, the starter won't work. The
SECURITY warning light on the instrument panel will
then come on. But you don't have to wait three minutes
before trying another ignition key.
See your dealer or a locksmith who can service the
PASS-Key
žII to have a new key made.If you're ever driving and the SECURITY warning light
comes on, you will be able to restart your engine if
you turn it off. Your PASS-Key
žII system, however, is
not working properly and must be serviced by your
dealer. Your vehicle is not protected by the
PASS-Key
žII system.
If you lose or damage a PASS-Key
žII ignition key, see
your dealer or a locksmith who can service
PASS-Key
žII to have a new key made. Also, seeRoadside Assistance Program on page 7-6for more
information.
2-18
Page 109 of 344
The main components of the instrument panel are the
following:
A. Exterior Lamps Control. See
Exterior Lamps on
page 3-11.
B. Turn Signal/Multifunction Lever. See
Turn
Signal/Multifunction Lever on page 3-5.
C. Instrument Panel Cluster. See
Instrument Panel
Cluster on page 3-23.
D. Audio Steering Wheel Controls. See
Audio Steering
Wheel Controls on page 3-50.
E. Gear Shift Lever. See
Automatic Transaxle
Operation on page 2-23.
F. Air Outlets. See
Outlet Adjustment on page 3-20.
G. Side Window Defogger Outlet.
H. Hood Release. See
Hood Release on page 5-11.
I. Tilt Wheel Lever. See
Tilt Wheel on page 3-4.
J. Horn. (See
Horn on page 3-4.
K. Audio System. See
Audio System(s) on page 3-39.
L. Ashtray. See
Ashtrays and Cigarette Lighter on
page 3-16.
M. Climate Control. See
Dual Climate Control System
on page 3-17.
N. Glove Box.
O. Instrument Panel Fuse Block. See
Fuses and Circuit
Breakers on page 5-89.
Hazard Warning Flashers
Your hazard warning ¯ashers let you warn others.
They also let police know you have a problem. Your
front and rear turn signal lamps will ¯ash on and off.
3-3
Page 112 of 344
Turn and Lane-Change Signals
The turn signal has two upward positions for right and
two downward positions for left. These positions
allow you to signal a turn or a lane change.
To signal a turn, move the lever all the way up or down.
When the turn is ®nished, the lever will return
automatically.
An arrow on the instrument
panel cluster will ¯ash in
the direction of the
turn or lane change.
To signal a lane change, just raise or lower the lever
until the arrow starts to ¯ash. Hold it there until you
complete your lane change. The lever will return by itself
when you release it.If the arrow ¯ashes faster than normal as you signal a
turn or a lane change, a signal bulb may be burned
out and other drivers won't see your turn signal.
If a bulb is burned out, replace it to help avoid an
accident. If the arrows don't go on at all when you signal
a turn, check for burned-out bulbs and then check the
fuse. See
Fuses and Circuit Breakers on page 5-89.
A chime will sound if you leave your turn signal on for
more than 3/4 mile (1.2 km).
Headlamp High/Low-Beam Changer
To change your headlamps from low beams to
high beams, or high to low, pull the multifunction lever
all the way toward you. Then release it.
This light, located on the
instrument panel cluster,
will come on while the
high-beam lamps are on.
3-6
Page 202 of 344
Appearance Care............................................5-79
Cleaning the Inside of Your Vehicle.................5-79
Care of Safety Belts......................................5-82
Weatherstrips...............................................5-82
Cleaning the Outside of Your Vehicle..............5-82
Sheet Metal Damage.....................................5-84
Finish Damage.............................................5-84
Underbody Maintenance................................5-85
Chemical Paint Spotting.................................5-85
Vehicle Care/Appearance Materials..................5-85
Vehicle Identi®cation......................................5-87
Vehicle Identi®cation Number (VIN).................5-87
Service Parts Identi®cation Label.....................5-87Electrical System............................................5-88
Add-On Electrical Equipment..........................5-88
Headlamp Wiring..........................................5-88
Windshield Wiper Fuses................................5-88
Power Windows and Other Power Options.......5-88
Fuses and Circuit Breakers............................5-89
Capacities and Speci®cations..........................5-94
Capacities and Speci®cations.........................5-94
Normal Maintenance Replacement Parts..........5-95
Normal Maintenance Replacement Parts..........5-95
Section 5 Service and Appearance Care
5-2
Page 213 of 344
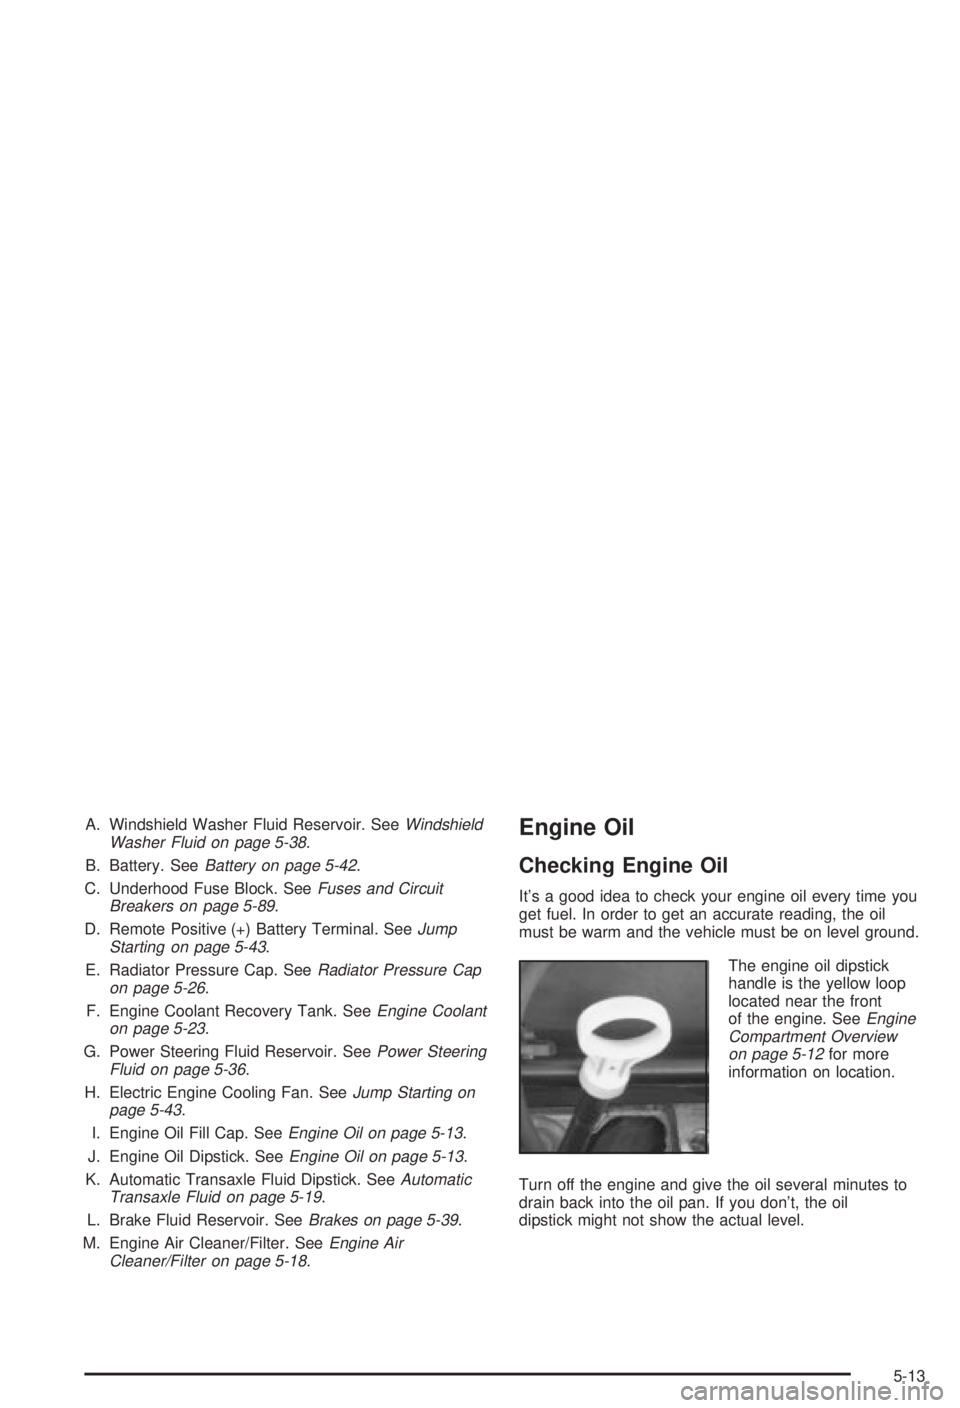
A. Windshield Washer Fluid Reservoir. SeeWindshield
Washer Fluid on page 5-38.
B. Battery. See
Battery on page 5-42.
C. Underhood Fuse Block. See
Fuses and Circuit
Breakers on page 5-89.
D. Remote Positive (+) Battery Terminal. See
Jump
Starting on page 5-43.
E. Radiator Pressure Cap. See
Radiator Pressure Cap
on page 5-26.
F. Engine Coolant Recovery Tank. See
Engine Coolant
on page 5-23.
G. Power Steering Fluid Reservoir. See
Power Steering
Fluid on page 5-36.
H. Electric Engine Cooling Fan. See
Jump Starting on
page 5-43.
I. Engine Oil Fill Cap. See
Engine Oil on page 5-13.
J. Engine Oil Dipstick. See
Engine Oil on page 5-13.
K. Automatic Transaxle Fluid Dipstick. See
Automatic
Transaxle Fluid on page 5-19.
L. Brake Fluid Reservoir. See
Brakes on page 5-39.
M. Engine Air Cleaner/Filter. See
Engine Air
Cleaner/Filter on page 5-18.
Engine Oil
Checking Engine Oil
It's a good idea to check your engine oil every time you
get fuel. In order to get an accurate reading, the oil
must be warm and the vehicle must be on level ground.
The engine oil dipstick
handle is the yellow loop
located near the front
of the engine. See
Engine
Compartment Overview
on page 5-12
for more
information on location.
Turn off the engine and give the oil several minutes to
drain back into the oil pan. If you don't, the oil
dipstick might not show the actual level.
5-13
Page 259 of 344
The tire in¯ation monitor system detects differences in tire
rotation speeds that are caused by changes in tire
pressure. The system can alert you about a low tire ± but
it doesn't replace normal tire maintenance. See
Tires on
page 5-57.
When the LOW TIRE light comes on, you should stop
as soon as you can and check all your tires for damage.
(If a tire is ¯at, see
If a Tire Goes Flat on page 5-66.)
Also check the tire pressure in all four tires as soon as
you can. See
In¯ation -- Tire Pressure on page 5-57.
The LOW TIRE light will also be displayed (while
the ignition is on) until you reset (calibrate) the system.
Don't reset the tire in¯ation monitor system without
®rst correcting the cause of the problem and checking
and adjusting the pressure in all four tires. If you
reset the system when the tire pressures are incorrect,
the system will not work properly and may not alert
you when a tire is low.
Any time you adjust a tire's pressure, rotate your tires,
or have one or more tires repaired or replaced, you'll
need to reset (calibrate) the tire in¯ation monitor system.
You'll also need to reset the system whenever you
buy new tires and whenever the vehicle's battery has
been disconnected.To reset (calibrate) the system:
1. Turn the ignition to RUN.
2. Locate the red RESET button inside of your
instrument panel fuse block.
The fuse block is located under the cover labeled
FUSES, which is at the end of the instrument panel
on the passenger's side of the vehicle. The
RESET button is the ®rst button in the top row of
the fuse block.
3. Press and hold the RESET button for about ®ve
seconds.
The LOW TIRE light will come on and ¯ash three
times. Then it will go off. If the light doesn't go
off, see your dealer for service.
The system completes the calibration process during
driving.
The system normally takes 15 to 20 minutes of driving
in each of three speed ranges to ªlearnº tire pressures.
The speed ranges are 15 to 40 mph (25 to 65 km/h),
40 to 65 mph (65 to 105 km/h) and above 65 mph
(105 km/h). When learning is complete, the system will
alert you after two to eight minutes if a tire is 12 psi
(83 kPa) different from the other three tires. Detection
thresholds may be higher and detection times may
be longer on rough roads, curves and at high speeds.
The system is not capable of detection at speeds greater
than 70 mph (110 km/h).
5-59
Page 288 of 344
Electrical System
Add-On Electrical Equipment
Notice:Don't add anything electrical to your vehicle
unless you check with your dealer ®rst. Some
electrical equipment can damage your vehicle and
the damage wouldn't be covered by your warranty.
Some add-on electrical equipment can keep other
components from working as they should.
Your vehicle has an air bag system. Before attempting
to add anything electrical to your vehicle, see
Servicing Your Air Bag-Equipped Vehicle on page 1-62.
Headlamp Wiring
The headlamp wiring is protected by a circuit breaker in
the underhood fuse block. An electrical overload will
cause the lamps to go on and off, or in some cases to
remain off. If this happens, have your headlamp
system checked right away.
Windshield Wiper Fuses
The windshield wiper motor is protected by a circuit
breaker and a fuse. If the motor overheats due to heavy
snow, etc., the wiper will stop until the motor cools. If
the overload is caused by some electrical problem, have
it ®xed.
Power Windows and Other Power
Options
Circuit breakers in the instrument panel fuse block
protect the power windows and other power accessories.
When the current load is too heavy, the circuit breaker
opens and closes, protecting the circuit until the
problem is ®xed.
5-88
Page 289 of 344
Fuses and Circuit Breakers
The wiring circuits in your vehicle are protected from
short circuits by a combination of fuses, circuit breakers
and in the fuse block wiring itself. This greatly reduces
the chance of ®res caused by electrical problems.
Look at the silver-colored band inside the fuse. If the
band is broken or melted, replace the fuse. Be sure you
replace a bad fuse with a new one of the identical
size and rating.
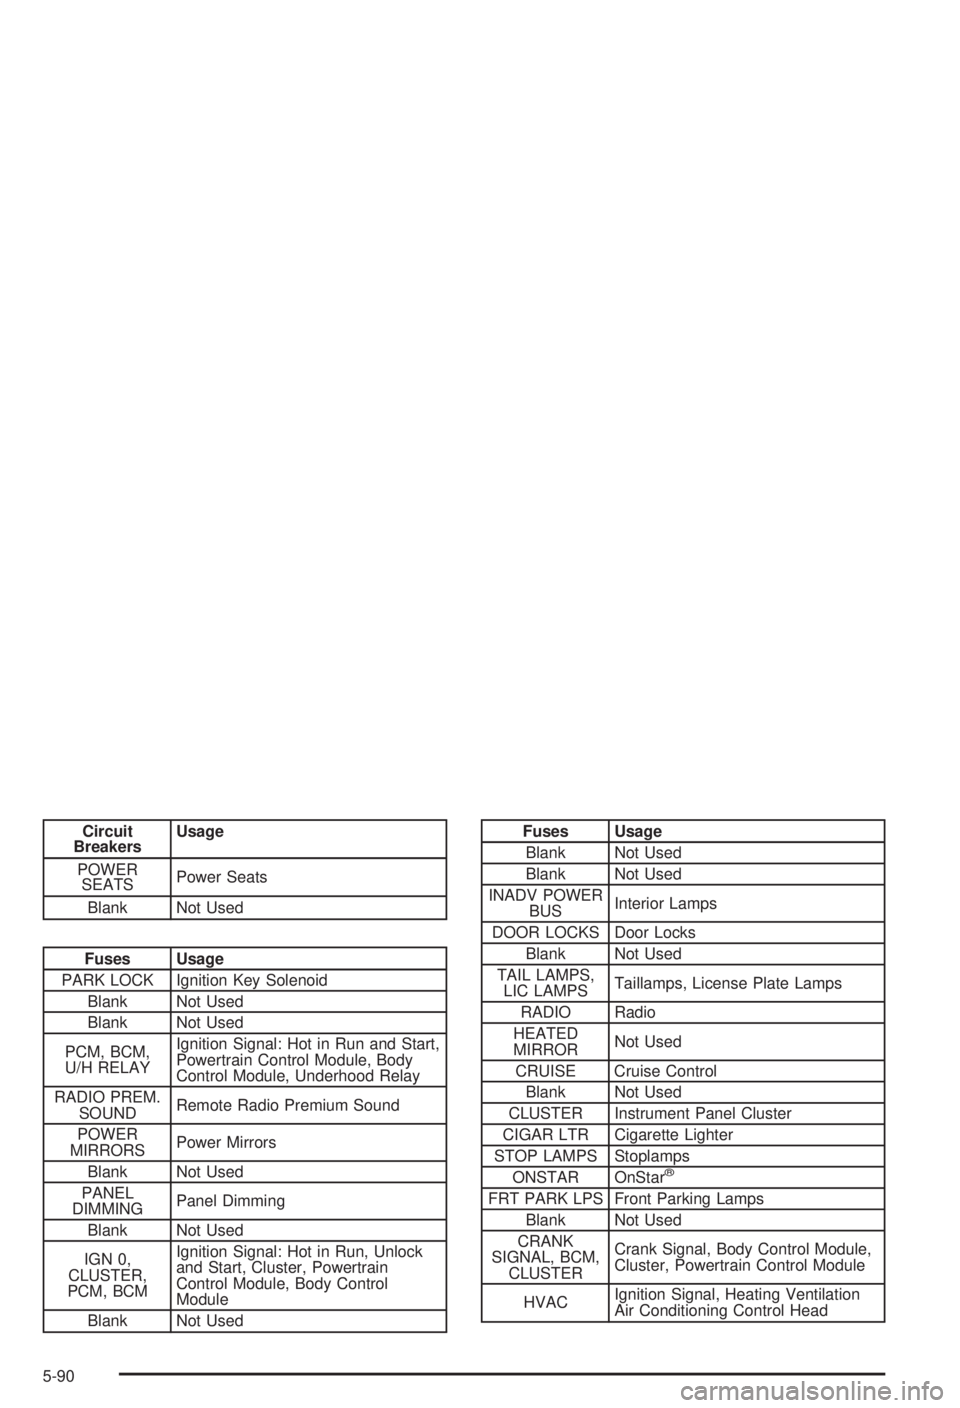
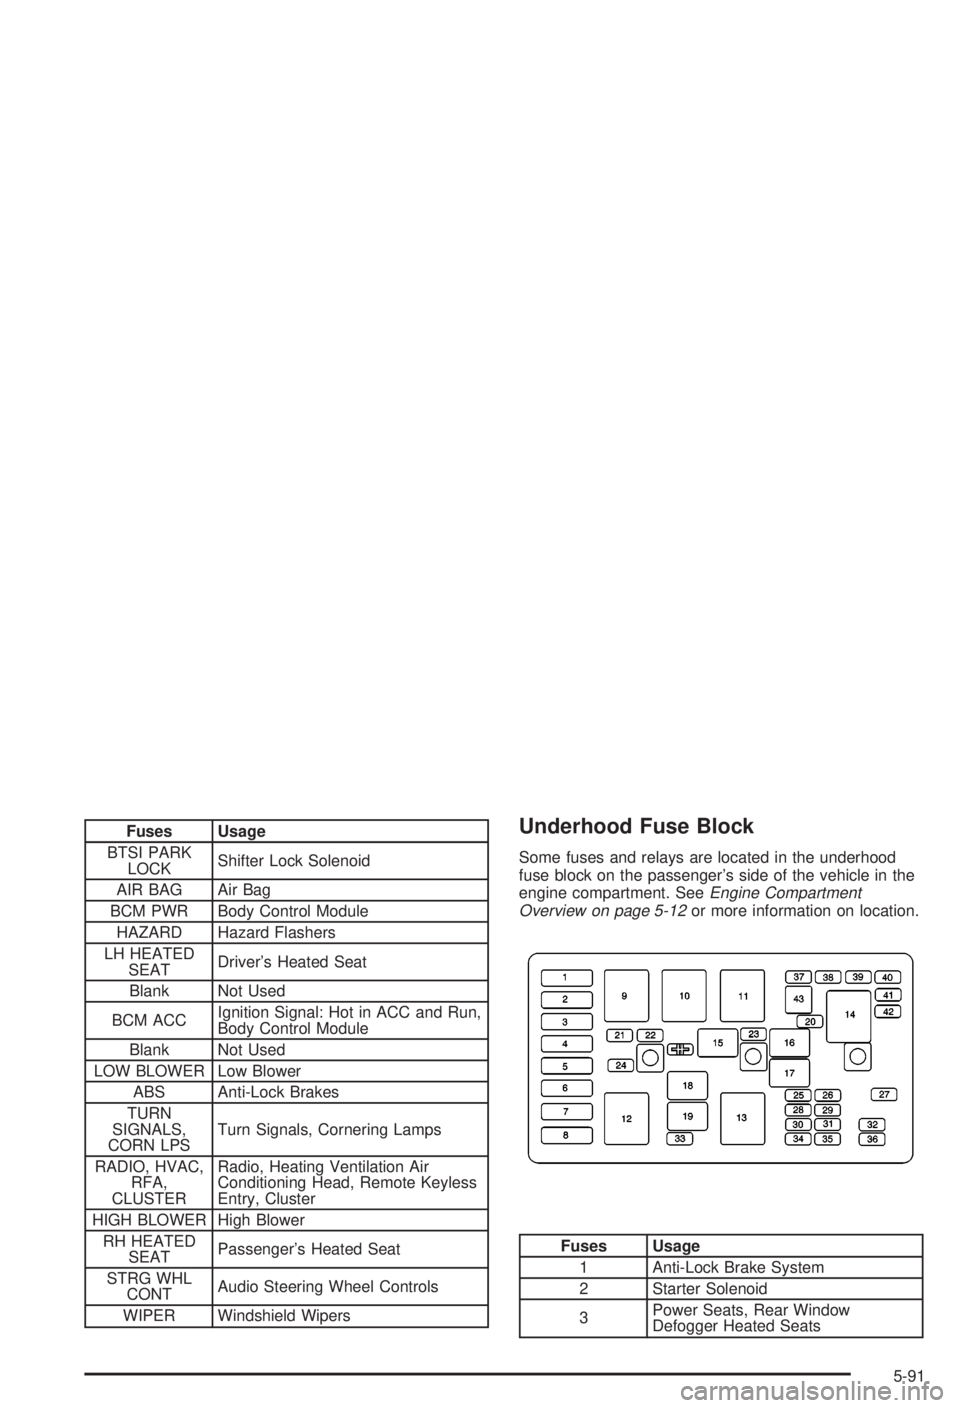
Instrument Panel Fuse Block
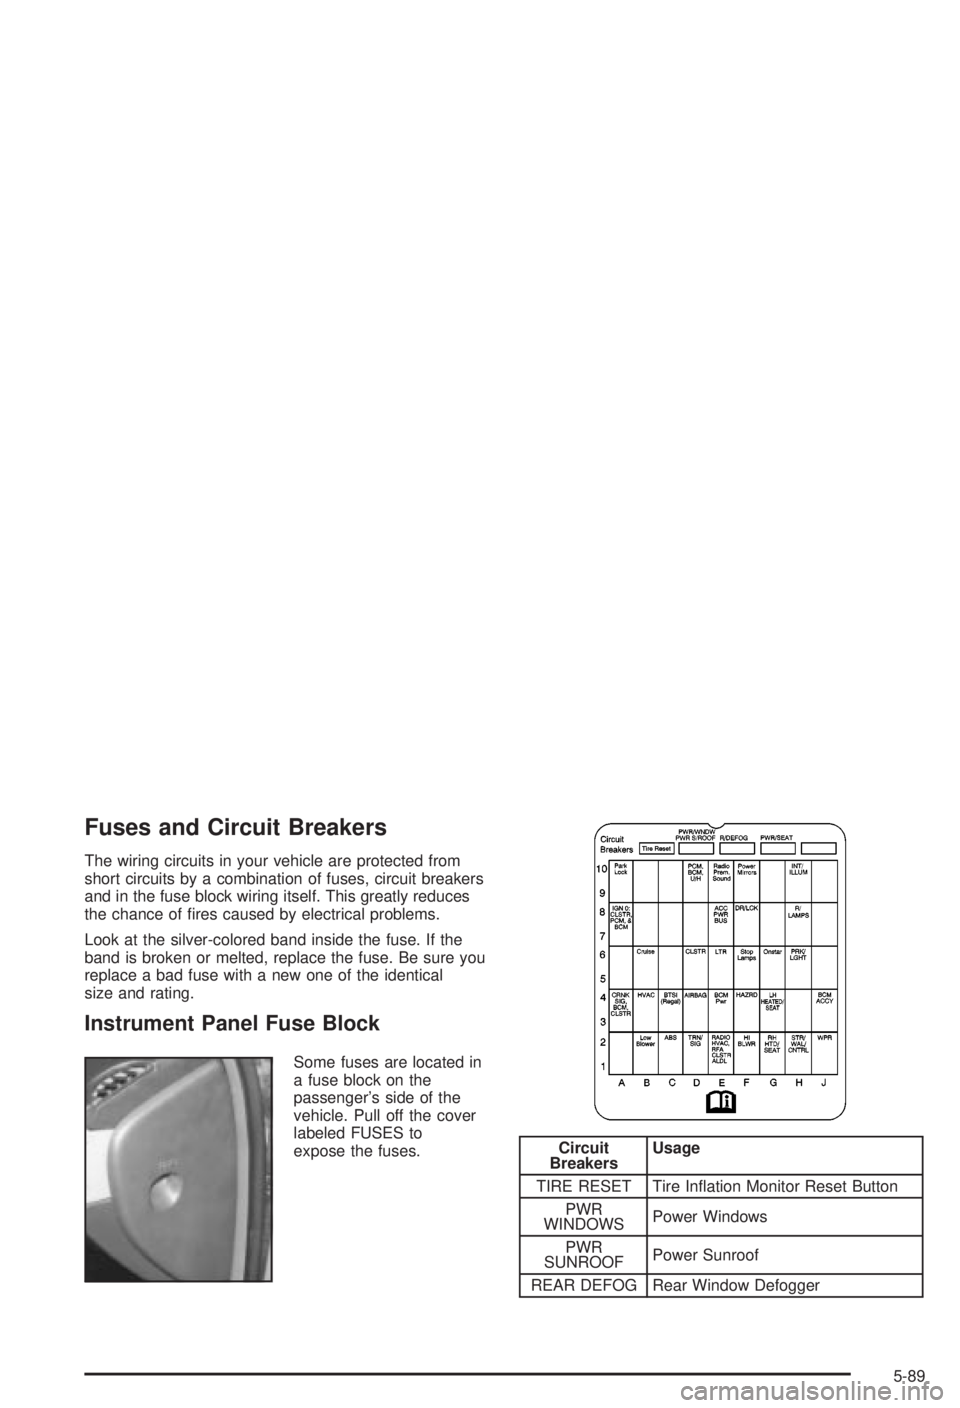
Some fuses are located in
a fuse block on the
passenger's side of the
vehicle. Pull off the cover
labeled FUSES to
expose the fuses.
Circuit
BreakersUsage
TIRE RESET Tire In¯ation Monitor Reset Button
PWR
WINDOWSPower Windows
PWR
SUNROOFPower Sunroof
REAR DEFOG Rear Window Defogger
5-89
Page 290 of 344
Circuit
BreakersUsage
POWER
SEATSPower Seats
Blank Not Used
Fuses Usage
PARK LOCK Ignition Key Solenoid
Blank Not Used
Blank Not Used
PCM, BCM,
U/H RELAYIgnition Signal: Hot in Run and Start,
Powertrain Control Module, Body
Control Module, Underhood Relay
RADIO PREM.
SOUNDRemote Radio Premium Sound
POWER
MIRRORSPower Mirrors
Blank Not Used
PANEL
DIMMINGPanel Dimming
Blank Not Used
IGN 0,
CLUSTER,
PCM, BCMIgnition Signal: Hot in Run, Unlock
and Start, Cluster, Powertrain
Control Module, Body Control
Module
Blank Not Used
Fuses Usage
Blank Not Used
Blank Not Used
INADV POWER
BUSInterior Lamps
DOOR LOCKS Door Locks
Blank Not Used
TAIL LAMPS,
LIC LAMPSTaillamps, License Plate Lamps
RADIO Radio
HEATED
MIRRORNot Used
CRUISE Cruise Control
Blank Not Used
CLUSTER Instrument Panel Cluster
CIGAR LTR Cigarette Lighter
STOP LAMPS Stoplamps
ONSTAR OnStar
ž
FRT PARK LPS Front Parking Lamps
Blank Not Used
CRANK
SIGNAL, BCM,
CLUSTERCrank Signal, Body Control Module,
Cluster, Powertrain Control Module
HVACIgnition Signal, Heating Ventilation
Air Conditioning Control Head
5-90
Page 291 of 344
Fuses Usage
BTSI PARK
LOCKShifter Lock Solenoid
AIR BAG Air Bag
BCM PWR Body Control Module
HAZARD Hazard Flashers
LH HEATED
SEATDriver's Heated Seat
Blank Not Used
BCM ACCIgnition Signal: Hot in ACC and Run,
Body Control Module
Blank Not Used
LOW BLOWER Low Blower
ABS Anti-Lock Brakes
TURN
SIGNALS,
CORN LPSTurn Signals, Cornering Lamps
RADIO, HVAC,
RFA,
CLUSTERRadio, Heating Ventilation Air
Conditioning Head, Remote Keyless
Entry, Cluster
HIGH BLOWER High Blower
RH HEATED
SEATPassenger's Heated Seat
STRG WHL
CONTAudio Steering Wheel Controls
WIPER Windshield WipersUnderhood Fuse Block
Some fuses and relays are located in the underhood
fuse block on the passenger's side of the vehicle in the
engine compartment. See
Engine Compartment
Overview on page 5-12or more information on location.
Fuses Usage
1 Anti-Lock Brake System
2 Starter Solenoid
3Power Seats, Rear Window
Defogger Heated Seats
5-91