horn BUICK CENTURY 2003 Owner's Manual
[x] Cancel search | Manufacturer: BUICK, Model Year: 2003, Model line: CENTURY, Model: BUICK CENTURY 2003Pages: 344, PDF Size: 2.57 MB
Page 75 of 344
Remote Keyless Entry System
Operation
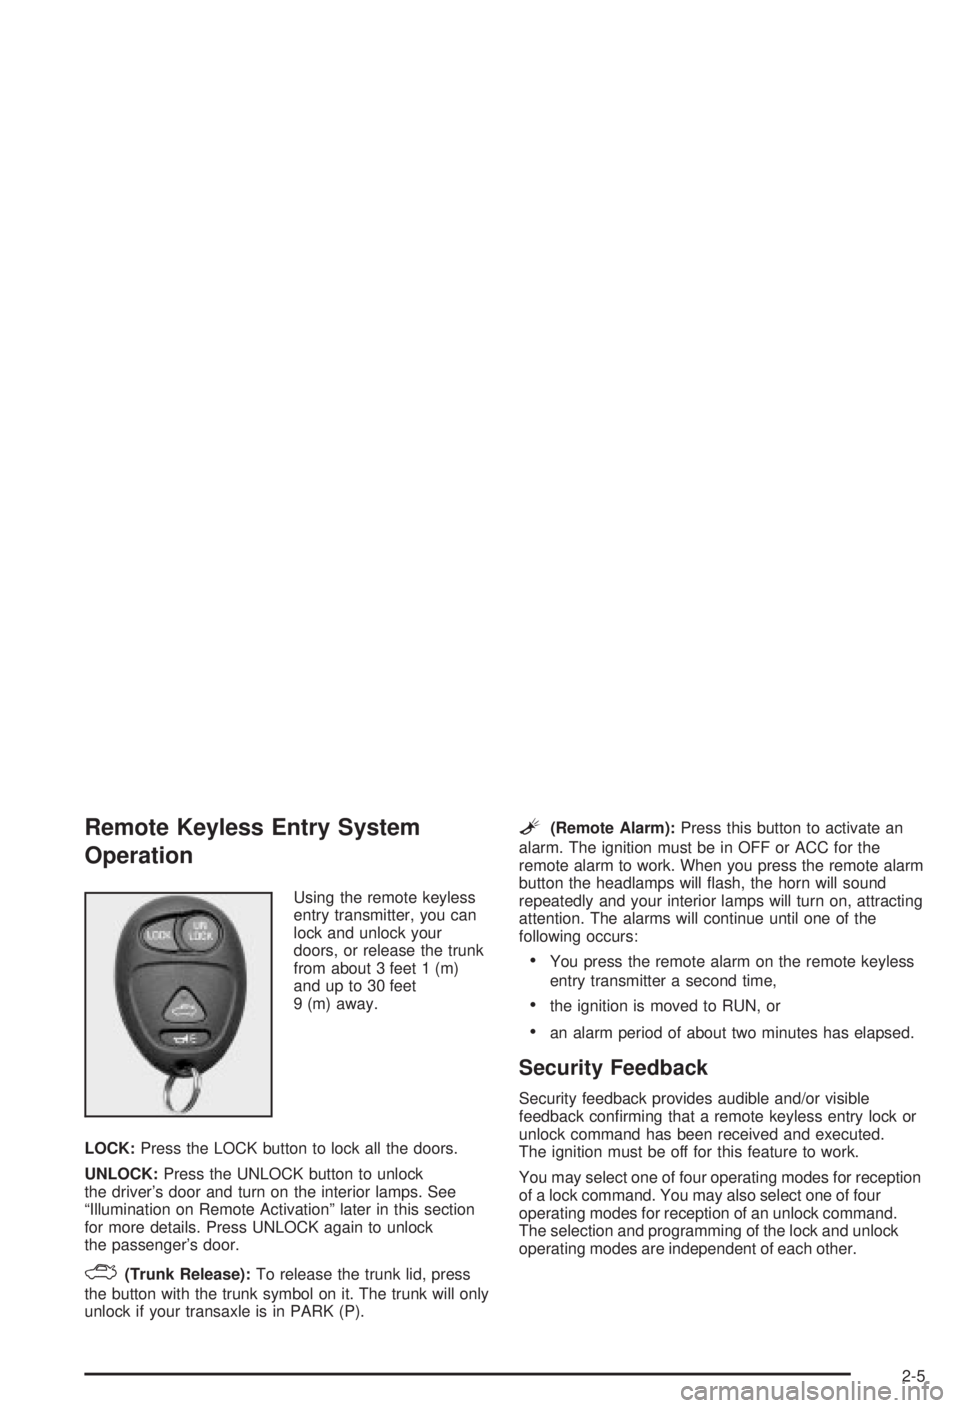
Using the remote keyless
entry transmitter, you can
lock and unlock your
doors, or release the trunk
from about 3 feet 1 (m)
and up to 30 feet
9 (m) away.
LOCK:Press the LOCK button to lock all the doors.
UNLOCK:Press the UNLOCK button to unlock
the driver's door and turn on the interior lamps. See
ªIllumination on Remote Activationº later in this section
for more details. Press UNLOCK again to unlock
the passenger's door.
F(Trunk Release):To release the trunk lid, press
the button with the trunk symbol on it. The trunk will only
unlock if your transaxle is in PARK (P).
L(Remote Alarm):Press this button to activate an
alarm. The ignition must be in OFF or ACC for the
remote alarm to work. When you press the remote alarm
button the headlamps will ¯ash, the horn will sound
repeatedly and your interior lamps will turn on, attracting
attention. The alarms will continue until one of the
following occurs:
·You press the remote alarm on the remote keyless
entry transmitter a second time,
·the ignition is moved to RUN, or
·an alarm period of about two minutes has elapsed.
Security Feedback
Security feedback provides audible and/or visible
feedback con®rming that a remote keyless entry lock or
unlock command has been received and executed.
The ignition must be off for this feature to work.
You may select one of four operating modes for reception
of a lock command. You may also select one of four
operating modes for reception of an unlock command.
The selection and programming of the lock and unlock
operating modes are independent of each other.
2-5
Page 76 of 344
Programmable Modes
Your vehicle can be programmed to one of the following
modes.
Mode 1:No Veri®cation
Mode 2:Horn Chirp only
Mode 3:Headlamps Flash only
Mode 4:Horn Chirp and Headlamps Flash
The vehicle was originally programmed to Mode 3. The
mode may have been changed since then. To
determine the current mode, or to change the mode, do
the following:
1. Close all doors and turn the ignition key to RUN.
2. Press and hold the power door lock switch in
the lock position.
3. While holding the door lock switch in the lock
position, press and release the remote keyless entry
transmitter LOCK button. This will start the
customization mode. While in the customizationmode, the feature will sound the number of chimes
corresponding to the current lock mode. If you
do not wish to change the current mode, you can
either exit the programming mode by following
the instructions listed here or program the
next feature available on your vehicle.
4. Each additional press of the remote keyless entry
transmitter LOCK button will cause your vehicle to
advance the lock mode by one, starting from
the current lock mode.
5. If cycled beyond Mode 4, the vehicle will enter
Mode 1. When the door lock switch is released,
the vehicle will remain in the most recent lock mode.
The mode you selected is now set. You can either exit
the programming mode by following the previous
instructions or program the next feature available on
your vehicle.
Disconnecting the vehicle's battery for up to a year will
not change the programmed mode for the lock and
unlock security feedback features.
2-6
Page 79 of 344
Notice:When replacing the battery, use care not to
touch any of the circuitry. Static from your body
transferred to these surfaces may damage the
transmitter.
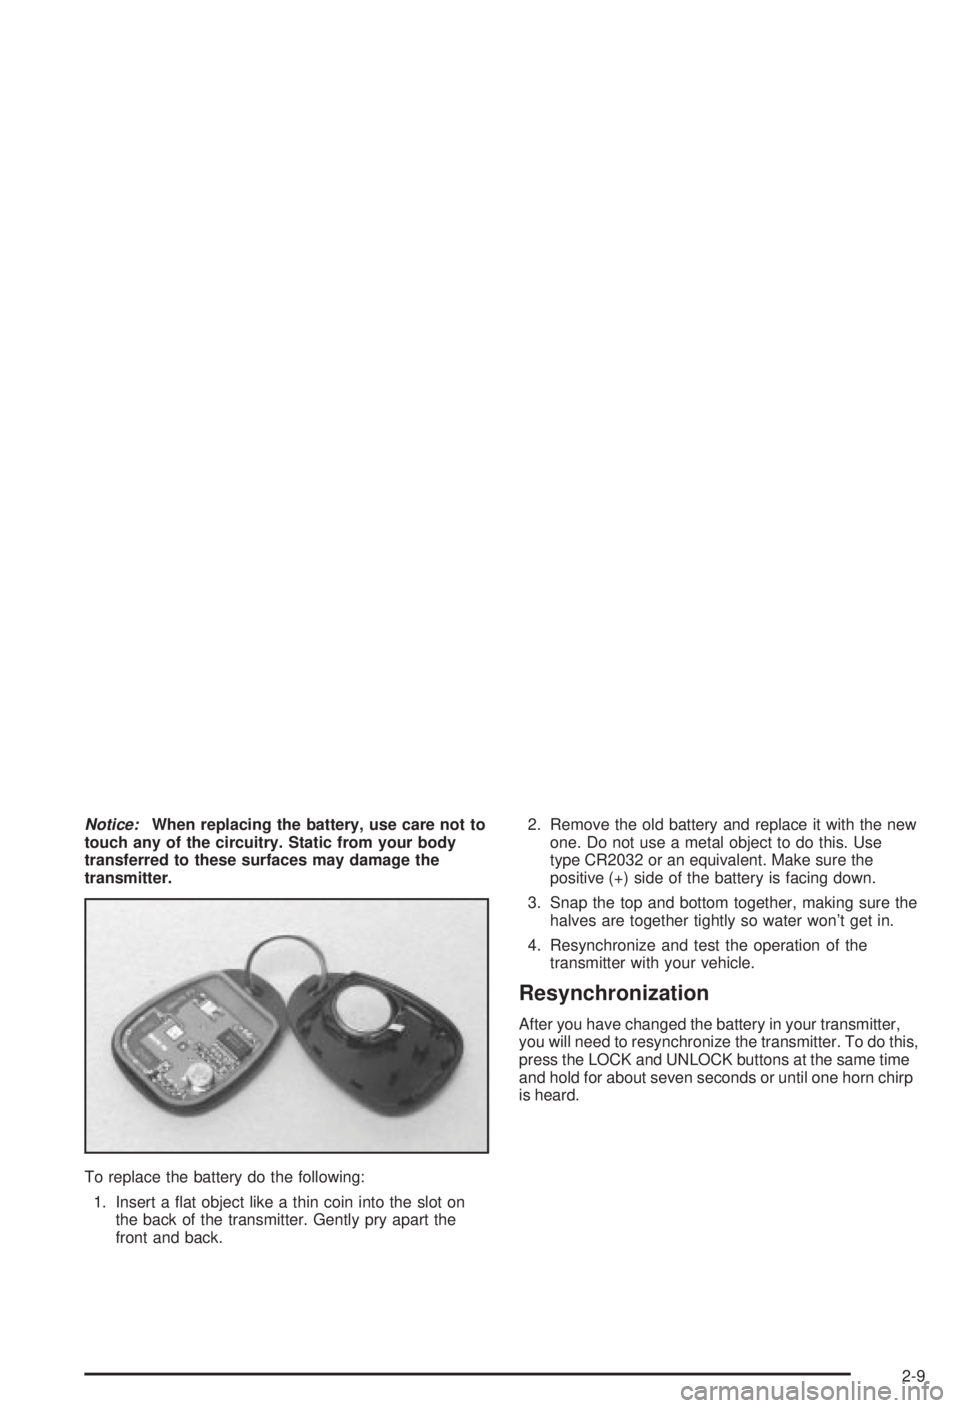
To replace the battery do the following:
1. Insert a ¯at object like a thin coin into the slot on
the back of the transmitter. Gently pry apart the
front and back.2. Remove the old battery and replace it with the new
one. Do not use a metal object to do this. Use
type CR2032 or an equivalent. Make sure the
positive (+) side of the battery is facing down.
3. Snap the top and bottom together, making sure the
halves are together tightly so water won't get in.
4. Resynchronize and test the operation of the
transmitter with your vehicle.
Resynchronization
After you have changed the battery in your transmitter,
you will need to resynchronize the transmitter. To do this,
press the LOCK and UNLOCK buttons at the same time
and hold for about seven seconds or until one horn chirp
is heard.
2-9
Page 107 of 344
Instrument Panel Overview...............................3-2
Hazard Warning Flashers................................3-3
Other Warning Devices...................................3-4
Horn.............................................................3-4
Tilt Wheel.....................................................3-4
Turn Signal/Multifunction Lever.........................3-5
Exterior Lamps.............................................3-11
Interior Lamps..............................................3-14
Auxiliary Power Connection
(Power Drop)............................................3-16
Ashtrays and Cigarette Lighter........................3-16
Climate Controls............................................3-17
Dual Climate Control System..........................3-17
Outlet Adjustment.........................................3-20
Passenger Compartment Air Filter...................3-20
Warning Lights, Gages and Indicators.............3-22
Instrument Panel Cluster................................3-23
Speedometer and Odometer...........................3-24
Safety Belt Reminder Light.............................3-24
Air Bag Readiness Light................................3-25
Charging System Light..................................3-26
Brake System Warning Light..........................3-27
Anti-Lock Brake System Warning Light.............3-28
Enhanced Traction System Warning Light.........3-28
Low Traction Light........................................3-29Engine Coolant Temperature Warning Light......3-29
Engine Coolant Temperature Gage..................3-30
Tire Pressure Light.......................................3-30
Malfunction Indicator Lamp.............................3-31
Oil Pressure Light.........................................3-34
Low Oil Level Light.......................................3-35
Change Engine Oil Light................................3-35
Security Light...............................................3-36
Cruise Control Light......................................3-36
Low Washer Fluid Warning Light.....................3-36
Door/Trunk Ajar Warning Light........................3-36
Service Vehicle Soon Light............................3-37
Fuel Gage...................................................3-37
Low Fuel Warning Light.................................3-38
Audio System(s).............................................3-39
Setting the Time...........................................3-39
AM-FM Radio...............................................3-40
Radio with Cassette and CD..........................3-42
Theft-Deterrent Feature..................................3-48
Audio Steering Wheel Controls.......................3-50
Understanding Radio Reception......................3-50
Care of Your Cassette Tape Player.................3-51
Care of Your CDs.........................................3-52
Care of Your CD Player................................3-52
Fixed Mast Antenna......................................3-52
Section 3 Instrument Panel
3-1
Page 109 of 344
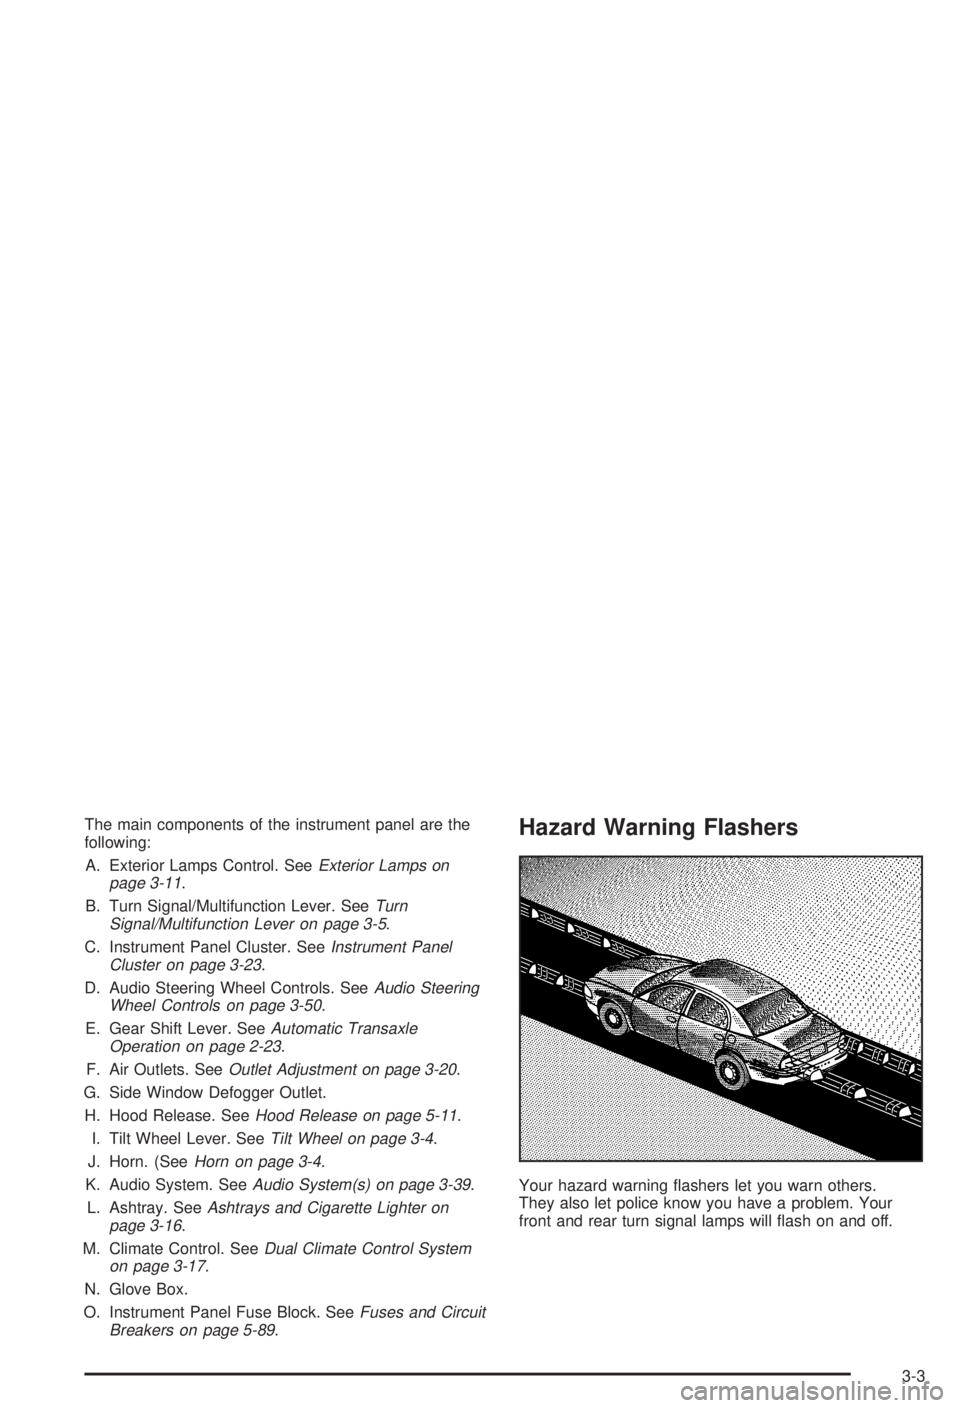
The main components of the instrument panel are the
following:
A. Exterior Lamps Control. See
Exterior Lamps on
page 3-11.
B. Turn Signal/Multifunction Lever. See
Turn
Signal/Multifunction Lever on page 3-5.
C. Instrument Panel Cluster. See
Instrument Panel
Cluster on page 3-23.
D. Audio Steering Wheel Controls. See
Audio Steering
Wheel Controls on page 3-50.
E. Gear Shift Lever. See
Automatic Transaxle
Operation on page 2-23.
F. Air Outlets. See
Outlet Adjustment on page 3-20.
G. Side Window Defogger Outlet.
H. Hood Release. See
Hood Release on page 5-11.
I. Tilt Wheel Lever. See
Tilt Wheel on page 3-4.
J. Horn. (See
Horn on page 3-4.
K. Audio System. See
Audio System(s) on page 3-39.
L. Ashtray. See
Ashtrays and Cigarette Lighter on
page 3-16.
M. Climate Control. See
Dual Climate Control System
on page 3-17.
N. Glove Box.
O. Instrument Panel Fuse Block. See
Fuses and Circuit
Breakers on page 5-89.
Hazard Warning Flashers
Your hazard warning ¯ashers let you warn others.
They also let police know you have a problem. Your
front and rear turn signal lamps will ¯ash on and off.
3-3
Page 110 of 344
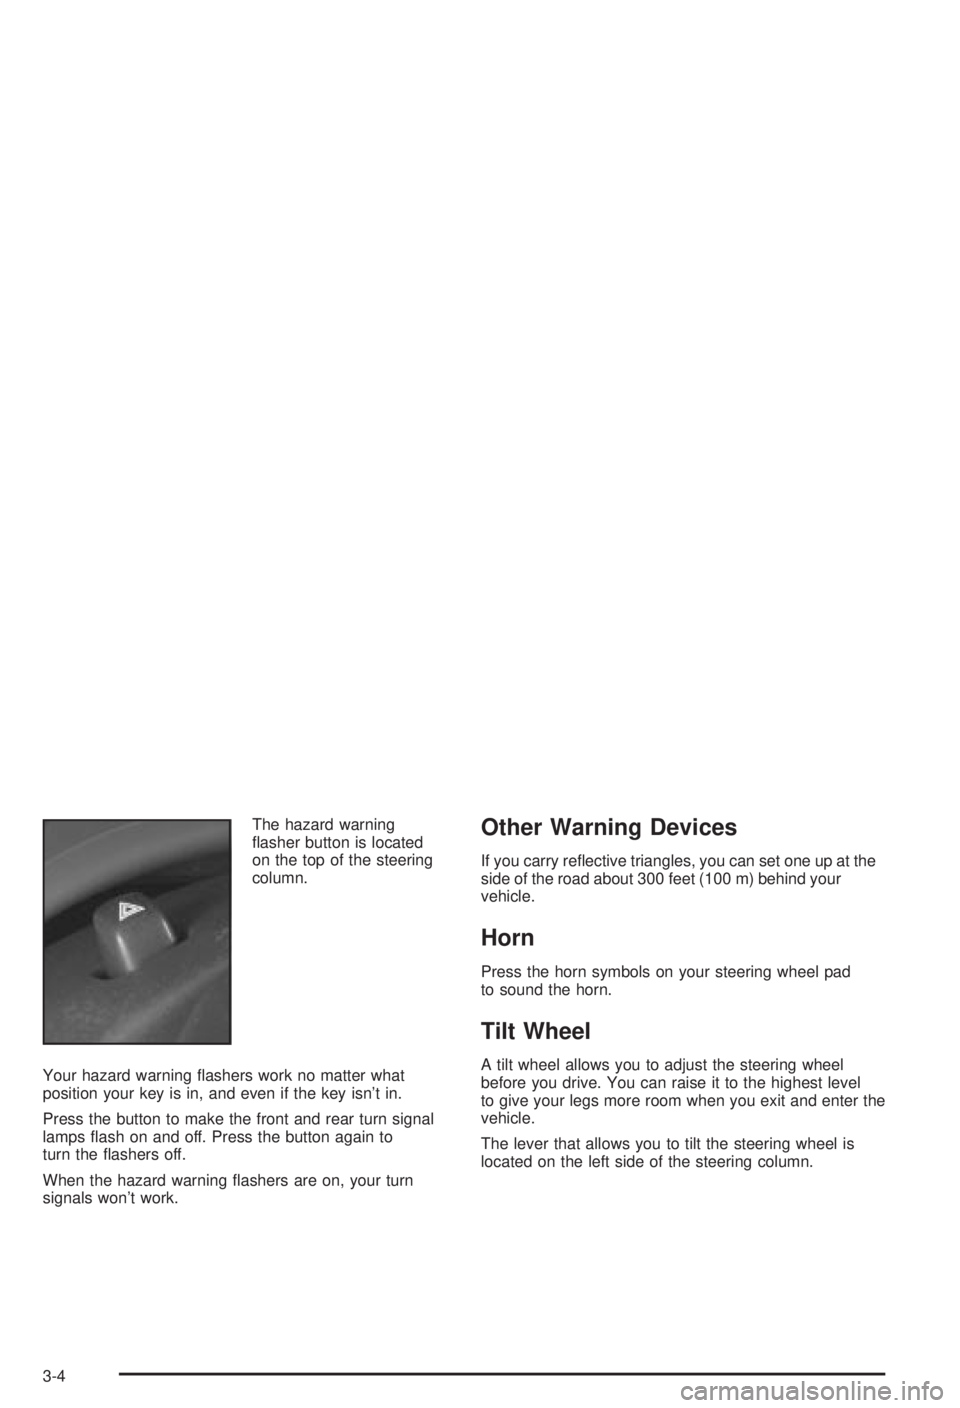
The hazard warning
¯asher button is located
on the top of the steering
column.
Your hazard warning ¯ashers work no matter what
position your key is in, and even if the key isn't in.
Press the button to make the front and rear turn signal
lamps ¯ash on and off. Press the button again to
turn the ¯ashers off.
When the hazard warning ¯ashers are on, your turn
signals won't work.Other Warning Devices
If you carry re¯ective triangles, you can set one up at the
side of the road about 300 feet (100 m) behind your
vehicle.
Horn
Press the horn symbols on your steering wheel pad
to sound the horn.
Tilt Wheel
A tilt wheel allows you to adjust the steering wheel
before you drive. You can raise it to the highest level
to give your legs more room when you exit and enter the
vehicle.
The lever that allows you to tilt the steering wheel is
located on the left side of the steering column.
3-4
Page 292 of 344
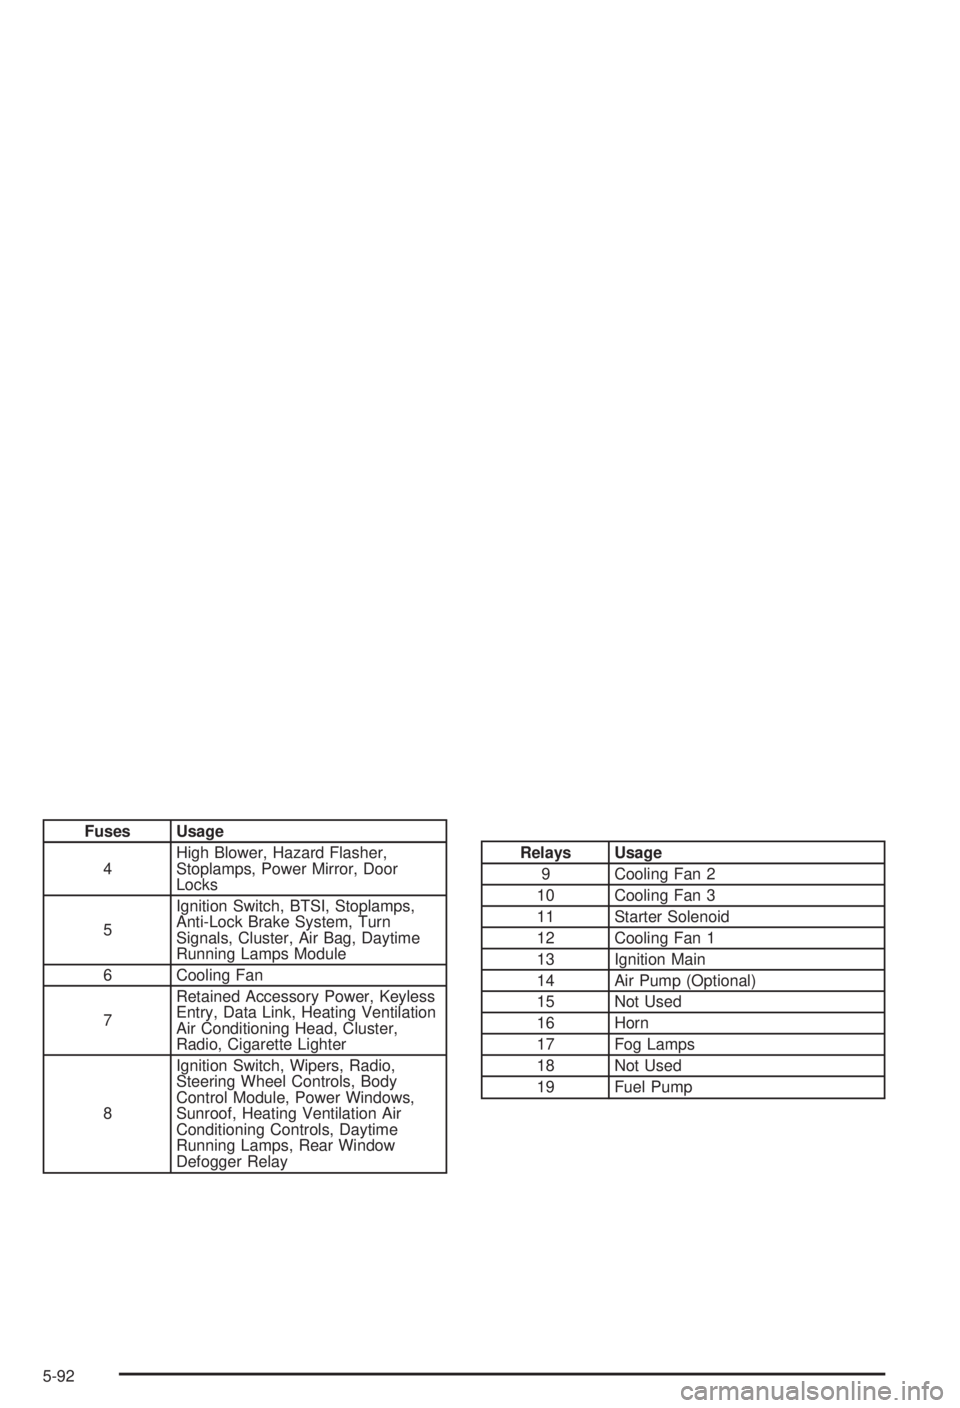
Fuses Usage
4High Blower, Hazard Flasher,
Stoplamps, Power Mirror, Door
Locks
5Ignition Switch, BTSI, Stoplamps,
Anti-Lock Brake System, Turn
Signals, Cluster, Air Bag, Daytime
Running Lamps Module
6 Cooling Fan
7Retained Accessory Power, Keyless
Entry, Data Link, Heating Ventilation
Air Conditioning Head, Cluster,
Radio, Cigarette Lighter
8Ignition Switch, Wipers, Radio,
Steering Wheel Controls, Body
Control Module, Power Windows,
Sunroof, Heating Ventilation Air
Conditioning Controls, Daytime
Running Lamps, Rear Window
Defogger Relay
Relays Usage
9 Cooling Fan 2
10 Cooling Fan 3
11 Starter Solenoid
12 Cooling Fan 1
13 Ignition Main
14 Air Pump (Optional)
15 Not Used
16 Horn
17 Fog Lamps
18 Not Used
19 Fuel Pump
5-92
Page 293 of 344
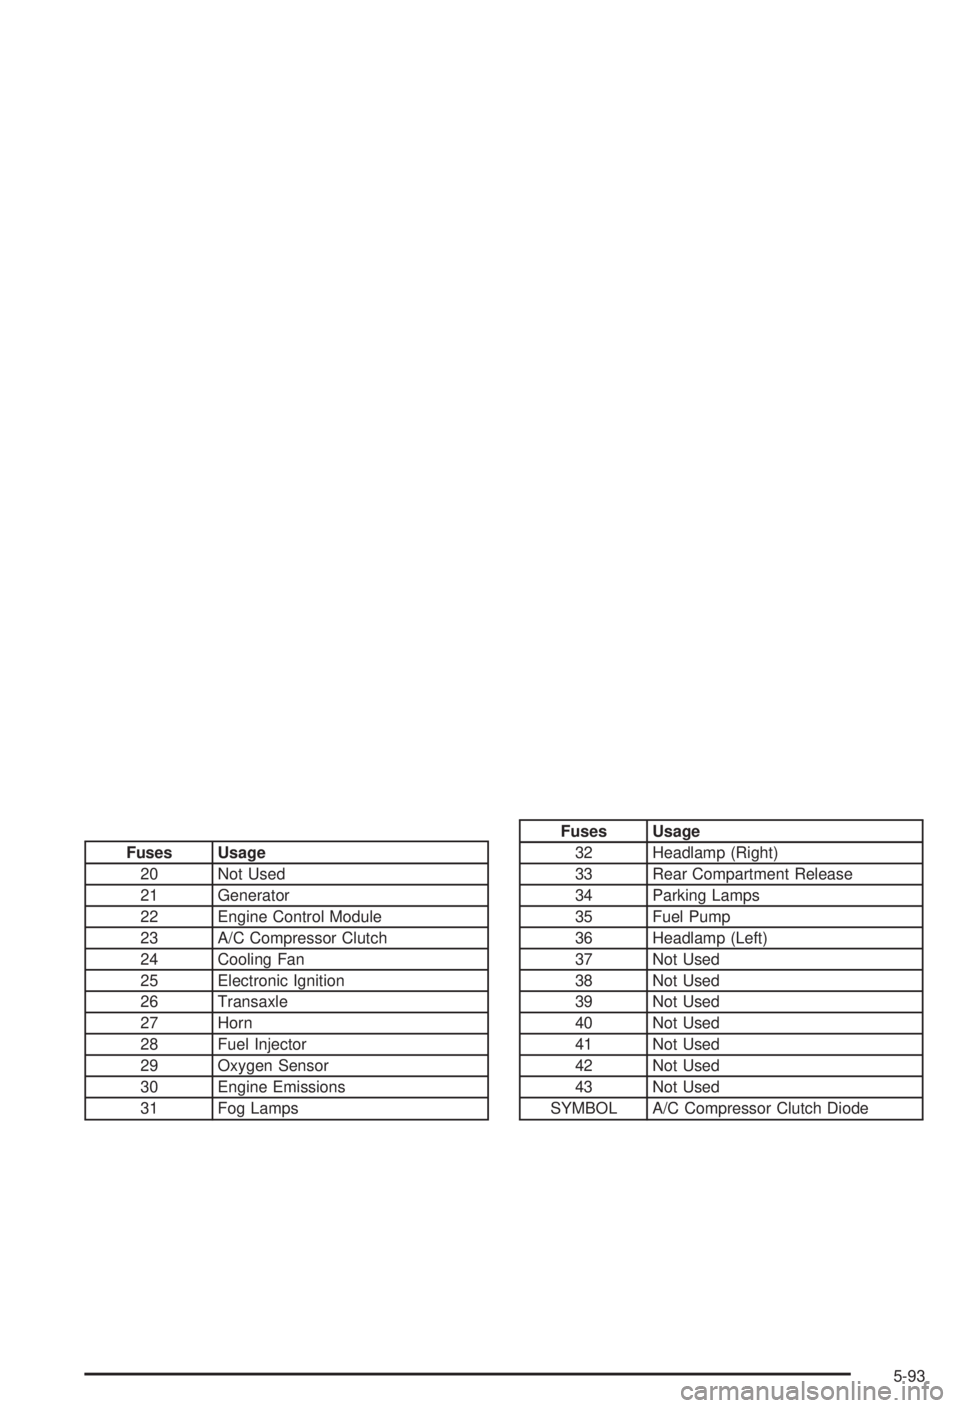
Fuses Usage
20 Not Used
21 Generator
22 Engine Control Module
23 A/C Compressor Clutch
24 Cooling Fan
25 Electronic Ignition
26 Transaxle
27 Horn
28 Fuel Injector
29 Oxygen Sensor
30 Engine Emissions
31 Fog Lamps
Fuses Usage
32 Headlamp (Right)
33 Rear Compartment Release
34 Parking Lamps
35 Fuel Pump
36 Headlamp (Left)
37 Not Used
38 Not Used
39 Not Used
40 Not Used
41 Not Used
42 Not Used
43 Not Used
SYMBOL A/C Compressor Clutch Diode
5-93
Page 334 of 344
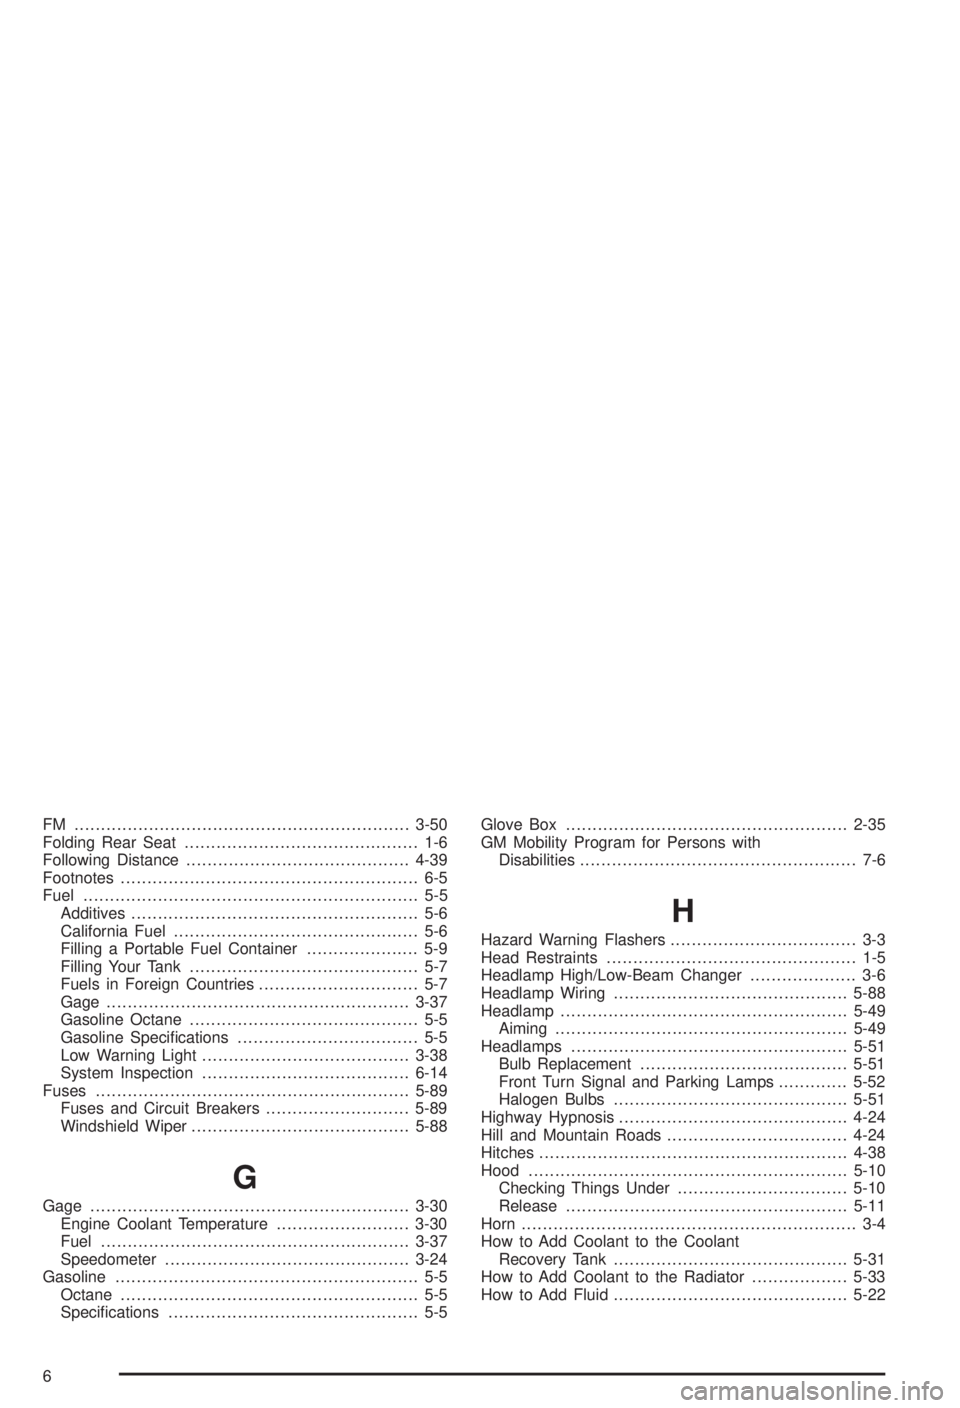
FM ...............................................................3-50
Folding Rear Seat............................................ 1-6
Following Distance..........................................4-39
Footnotes........................................................ 6-5
Fuel............................................................... 5-5
Additives...................................................... 5-6
California Fuel.............................................. 5-6
Filling a Portable Fuel Container..................... 5-9
Filling Your Tank........................................... 5-7
Fuels in Foreign Countries.............................. 5-7
Gage.........................................................3-37
Gasoline Octane........................................... 5-5
Gasoline Speci®cations.................................. 5-5
Low Warning Light.......................................3-38
System Inspection.......................................6-14
Fuses...........................................................5-89
Fuses and Circuit Breakers...........................5-89
Windshield Wiper.........................................5-88
G
Gage............................................................3-30
Engine Coolant Temperature.........................3-30
Fuel..........................................................3-37
Speedometer..............................................3-24
Gasoline......................................................... 5-5
Octane........................................................ 5-5
Speci®cations............................................... 5-5Glove Box.....................................................2-35
GM Mobility Program for Persons with
Disabilities.................................................... 7-6
H
Hazard Warning Flashers................................... 3-3
Head Restraints............................................... 1-5
Headlamp High/Low-Beam Changer.................... 3-6
Headlamp Wiring............................................5-88
Headlamp......................................................5-49
Aiming.......................................................5-49
Headlamps....................................................5-51
Bulb Replacement.......................................5-51
Front Turn Signal and Parking Lamps.............5-52
Halogen Bulbs............................................5-51
Highway Hypnosis...........................................4-24
Hill and Mountain Roads..................................4-24
Hitches..........................................................4-38
Hood............................................................5-10
Checking Things Under................................5-10
Release.....................................................5-11
Horn............................................................... 3-4
How to Add Coolant to the Coolant
Recovery Tank............................................5-31
How to Add Coolant to the Radiator..................5-33
How to Add Fluid............................................5-22
6