buttons BUICK ENCLAVE 2010 Owner's Manual
[x] Cancel search | Manufacturer: BUICK, Model Year: 2010, Model line: ENCLAVE, Model: BUICK ENCLAVE 2010Pages: 438, PDF Size: 2.47 MB
Page 9 of 438
In Brief 1-3
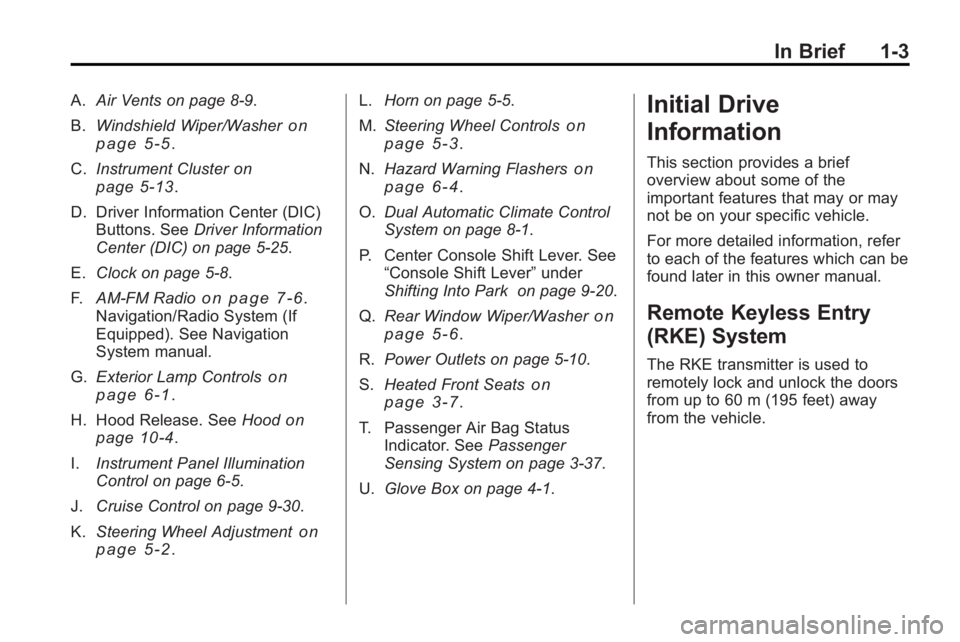
A.Air Vents on page 8‑9.
B. Windshield Wiper/Washer
on
page 5‑5.
C. Instrument Cluster
on
page 5‑13.
D. Driver Information Center (DIC) Buttons. See Driver Information
Center (DIC) on page 5‑25.
E. Clock on page 5‑8.
F. AM-FM Radio
on page 7‑6.
Navigation/Radio System (If
Equipped). See Navigation
System manual.
G. Exterior Lamp Controls
on
page 6‑1.
H. Hood Release. See Hood
on
page 10‑4.
I. Instrument Panel Illumination
Control on page 6‑5.
J. Cruise Control on page 9‑30.
K. Steering Wheel Adjustment
on
page 5‑2. L.
Horn on page 5‑5.
M. Steering Wheel Controls
on
page 5‑3.
N. Hazard Warning Flashers
on
page 6‑4.
O. Dual Automatic Climate Control
System on page 8‑1.
P. Center Console Shift Lever. See “Console Shift Lever” under
Shifting Into Park on page 9‑20.
Q. Rear Window Wiper/Washer
on
page 5‑6.
R. Power Outlets on page 5‑10.
S. Heated Front Seats
on
page 3‑7.
T. Passenger Air Bag Status Indicator. See Passenger
Sensing System on page 3‑37.
U. Glove Box on page 4‑1.
Initial Drive
Information
This section provides a brief
overview about some of the
important features that may or may
not be on your specific vehicle.
For more detailed information, refer
to each of the features which can be
found later in this owner manual.
Remote Keyless Entry
(RKE) System
The RKE transmitter is used to
remotely lock and unlock the doors
from up to 60 m (195 feet) away
from the vehicle.
Page 23 of 438
In Brief 1-17
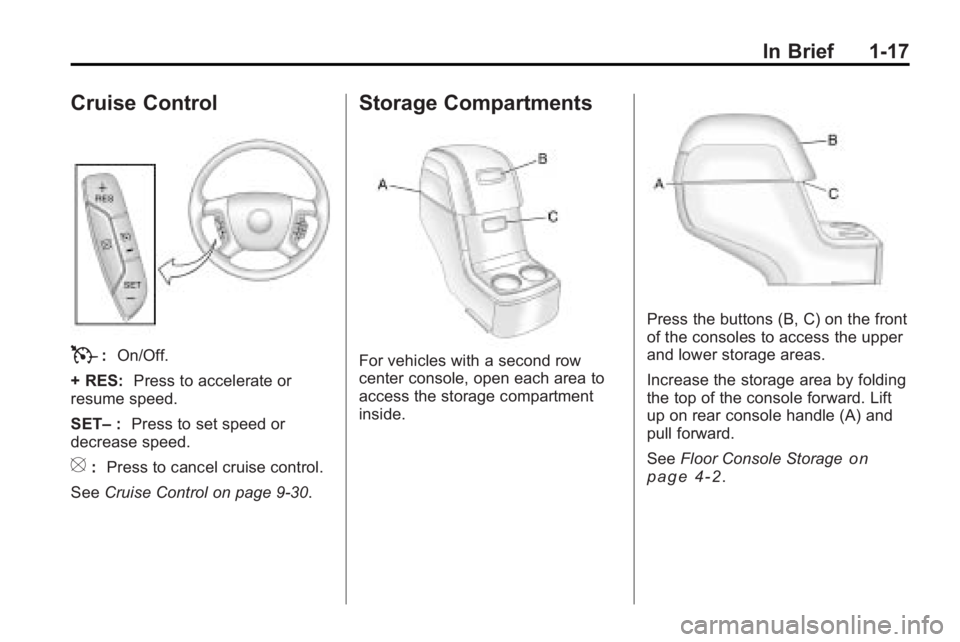
Cruise Control
T:On/Off.
+ RES: Press to accelerate or
resume speed.
SET– :Press to set speed or
decrease speed.
[: Press to cancel cruise control.
See Cruise Control on page 9‑30.
Storage Compartments
For vehicles with a second row
center console, open each area to
access the storage compartment
inside.
Press the buttons (B, C) on the front
of the consoles to access the upper
and lower storage areas.
Increase the storage area by folding
the top of the console forward. Lift
up on rear console handle (A) and
pull forward.
SeeFloor Console Storage
on
page 4‑2.
Page 28 of 438
![BUICK ENCLAVE 2010 Owners Manual 1-22 In Brief
The OnStar system can record and
transmit vehicle information. This
information is automatically sent to
an OnStar call center when
Qis
pressed,
]is pressed, or if the
airbags or ACR sys BUICK ENCLAVE 2010 Owners Manual 1-22 In Brief
The OnStar system can record and
transmit vehicle information. This
information is automatically sent to
an OnStar call center when
Qis
pressed,
]is pressed, or if the
airbags or ACR sys](/img/43/35347/w960_35347-27.png)
1-22 In Brief
The OnStar system can record and
transmit vehicle information. This
information is automatically sent to
an OnStar call center when
Qis
pressed,
]is pressed, or if the
airbags or ACR system deploy.
This information usually includes the
vehicle's GPS location and, in the
event of a crash, additional
information regarding the crash that
the vehicle was involved in (e.g. the
direction from which the vehicle was
hit). When the virtual advisor feature
of OnStar hands-free calling is
used, the vehicle also sends OnStar
the vehicle's GPS location so they
can provide services where it is
located.
Location information about the
vehicle is only available if the GPS
satellite signals are unobstructed
and available. The vehicle must have a working
electrical system, including
adequate battery power, for the
OnStar equipment to operate. There
are other problems OnStar cannot
control that may prevent OnStar
from providing OnStar service at
any particular time or place. Some
examples are damage to important
parts of the vehicle in a crash, hills,
tall buildings, tunnels, weather or
wireless phone network congestion.
OnStar Steering Wheel
Controls
This vehicle may have a Talk/Mute
button that can be used to interact
with OnStar hands-free calling. See
Steering Wheel Controls
on
page 5‑3for more information. On some vehicles, the mute button
can be used to dial numbers into
voice mail systems, or to dial phone
extensions. See the OnStar Owner's
Guide for more information.
Your Responsibility
Increase the volume of the radio if
the OnStar advisor cannot be heard.
If the light next to the OnStar
buttons is red, the system may not
be functioning properly. Press
Q
and request a vehicle diagnostic.
If the light appears clear (no light is
appearing), your OnStar
subscription has expired and all
services have been deactivated.
Press
Qto confirm that the OnStar
equipment is active.
Page 34 of 438
2-6 Keys, Doors and Windows
After entering the vehicle during a
remote start, insert and turn the key
to the ON/RUN position to drive the
vehicle.
If the vehicle is left running it
automatically shuts off after
10 minutes unless a time extension
has been done.
Extending Engine Run Time
To extend the engine run time by
10 minutes, repeat Steps 1 though 3
while the engine is still running.
The engine run time can only be
extended if it is the first remote start
since the vehicle has been driven.
Remote start can be extended
one time.
If the remote start procedure is used
again before the first 10 minute
time frame has ended, the first
10 minutes will immediately expire
and the second 10 minute time
frame will start.
For example, if the lock button and
then the remote start buttons are
pressed again after the vehicle hasbeen running for five minutes,
10 minutes are added, allowing the
engine to run for a total of
15 minutes.
A maximum of two remote starts or
remote start attempts are allowed
between ignition cycles.
After the vehicle's engine has been
started two times using the remote
start button, the ignition must be
turned on and then back off before
the remote start procedure can be
used again.
Shutting the Engine Off After a
Remote Start
To manually shut off a remote start:
.Aim the RKE transmitter at the
vehicle and press
/until the
parking lamps turn off.
.Turn on the hazard warning
flashers.
.Turn the ignition switch on and
then off.
Conditions in Which the
Remote Start Will Not Work
The vehicle cannot be started using
the remote start feature if the key is
in the ignition, the hood is open, or if
there is an emission control system
malfunction.
The engine turns off during a remote
start if the coolant temperature gets
too high or if the oil pressure
gets low.
Vehicles that have the remote
vehicle start feature are shipped
from the factory with the remote
vehicle start system enabled. The
system may be enabled or disabled
through the DIC if the vehicle has
DIC buttons. See “REMOTE
START” underVehicle
Personalization
on page 5‑40for
additional information. If the vehicle
does not have DIC buttons, see
your dealer/retailer to enable or
disable the remote start system.
Page 38 of 438
2-10 Keys, Doors and Windows
Power Liftgate Operation
The vehicle may have a power
liftgate. The vehicle must be in
P (Park) to use this feature.
The taillamps will flash and a chime
will sound when the power liftgate
is used.
{WARNING
You or others could be injured if
caught in the path of the power
liftgate. Make sure there is no one
in the way of the liftgate as it is
opening and closing.
Notice: If you open the liftgate
without checking for overhead
obstructions such as a garage
door, you could damage the
liftgate or the liftgate glass.
Always check to make sure the
area above and behind the liftgate
is clear before opening it. The power liftgate can be power
opened and closed in the
following ways:
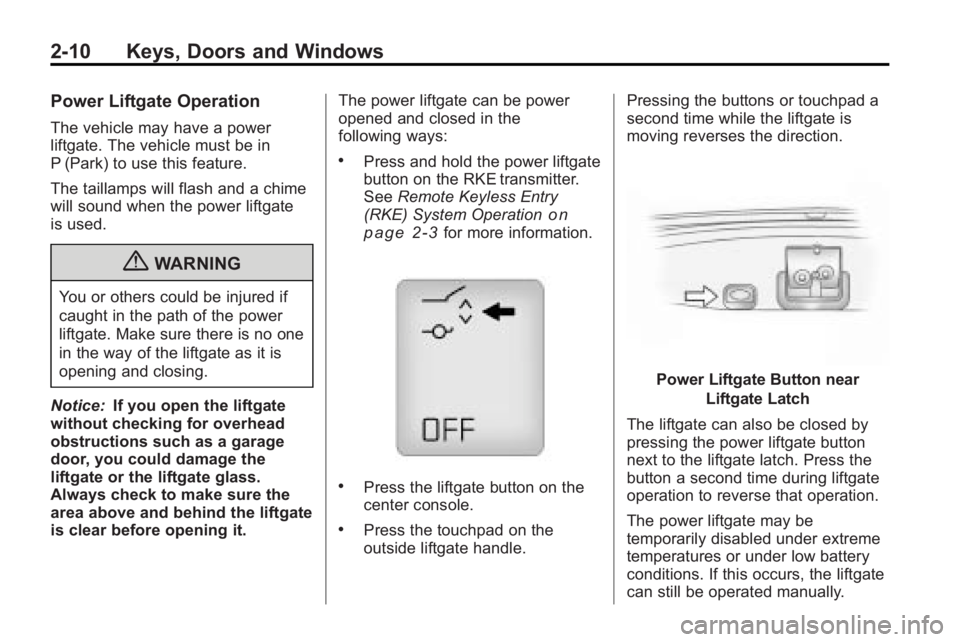
.Press and hold the power liftgate
button on the RKE transmitter.
See
Remote Keyless Entry
(RKE) System Operation
on
page 2‑3for more information.
.Press the liftgate button on the
center console.
.Press the touchpad on the
outside liftgate handle. Pressing the buttons or touchpad a
second time while the liftgate is
moving reverses the direction.
Power Liftgate Button near
Liftgate Latch
The liftgate can also be closed by
pressing the power liftgate button
next to the liftgate latch. Press the
button a second time during liftgate
operation to reverse that operation.
The power liftgate may be
temporarily disabled under extreme
temperatures or under low battery
conditions. If this occurs, the liftgate
can still be operated manually.
Page 46 of 438
2-18 Keys, Doors and Windows
Interior Mirrors
Automatic Dimming
Rearview Mirror
The vehicle has an automatic
dimming inside rearview mirror.
Automatic dimming reduces the
glare from the headlamps of the
vehicle behind you. The dimming
feature comes on and the indicator
light illuminates each time the
ignition is turned to start.
Vehicles with OnStar
®have three
additional control buttons located at
the bottom of the mirror. See your
dealer/retailer for more information
about OnStar
®and how to
subscribe to it. See the OnStar®
owner guide for more information
about the services OnStar®
provides.
O(On/Off): Press to turn the
dimming feature on or off.
The vehicle may also have a
Rear Vision Camera (RVC). See
Rear Vision Camera (RVC)
on
page 9‑34for more information.
If the vehicle has RVC,
the
Obutton for turning the
dimming feature on or off will not
be available.
Cleaning the Mirror
Do not spray glass cleaner directly
on the mirror. Use a soft towel
dampened with water.
Windows
{WARNING
Leaving children, helpless adults,
or pets in a vehicle with the
windows closed is dangerous.
They can be overcome by the
extreme heat and suffer
permanent injuries or even death
from heat stroke. Never leave a
child, a helpless adult, or a pet
alone in a vehicle, especially with
the windows closed in warm or
hot weather.
Page 54 of 438
3-4 Seats and Restraints
A second seating and mirror
position can be programmed by
repeating the above steps and
pressing button 2.
To recall the memory positions, the
vehicle must be in P (Park). Press
and release either button 1 or 2. The
seat, outside mirrors, and power
steering column will move to the
position previously stored. You will
hear a single beep.
If the RKE transmitter is used to
enter the vehicle and the remote
recall memory feature has been
turned on, automatic seat and mirror
movement will occur. See
“MEMORY SEAT RECALL”under
Vehicle Personalization
on
page 5‑40for more information.
To stop recall movement of the
memory feature at any time, press
one of the power seat controls,
memory buttons, or power mirror
buttons. If something has blocked the driver
seat while recalling a memory
position, the driver seat recall may
stop working. If this happens,
remove the obstruction and press
the appropriate control for the area
that is not recalling for two seconds.
Try pressing the memory button
again. If the memory position is still
not being recalled, see your dealer/
retailer for service.
Easy Exit Seat
S:
With the vehicle in P (Park),
press the exit button. You will hear a
single beep. The driver seat will
move back into the exit position.
If the easy exit seat feature has
been turned on in the Driver
Information Center (DIC), automatic
seat movement will occur when the
key is removed from the ignition.
For programming information, see
Vehicle Personalization
on
page 5‑40for more information.
Lumbar Adjustment
Manual Lumbar
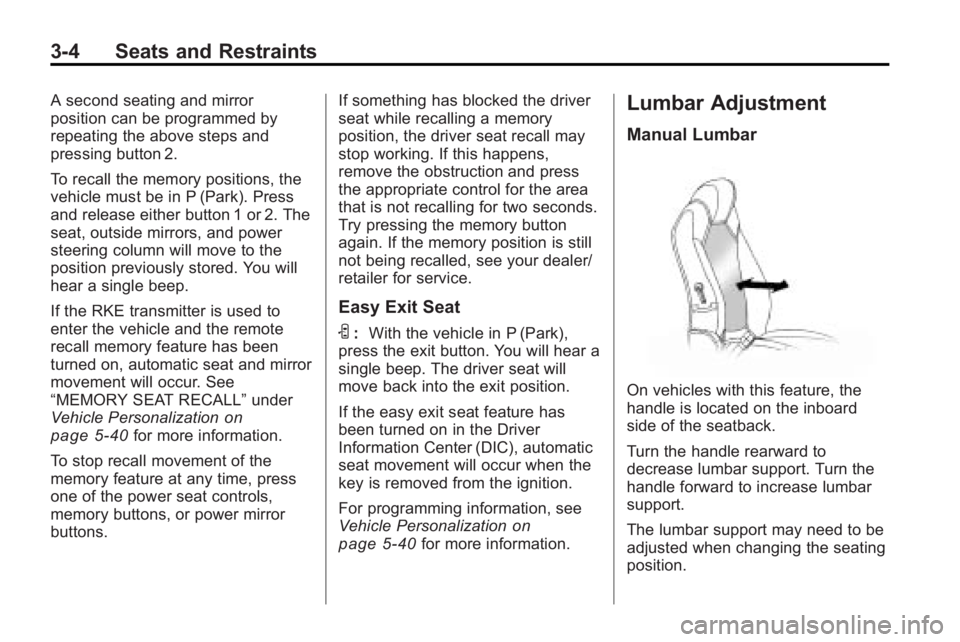
On vehicles with this feature, the
handle is located on the inboard
side of the seatback.
Turn the handle rearward to
decrease lumbar support. Turn the
handle forward to increase lumbar
support.
The lumbar support may need to be
adjusted when changing the seating
position.
Page 144 of 438
5-26 Instruments and Controls
The outside air temperature and
compass, if equipped, also display
on the DIC when viewing the trip
and fuel information. The outside air
temperature automatically appears
in the top right corner of the DIC
display. If there is a problem with
the system that controls the
temperature display, the numbers
will be replaced with dashes. If this
occurs, have the vehicle serviced.
The compass will be shown in the
bottom right corner of the DIC
display. SeeCompass
on
page 5‑6for more information.
The DIC has different displays
which can be accessed by pressing
the DIC buttons located on the
instrument panel.
The DIC displays trip, fuel, and
vehicle system information, and
warning messages if a system
problem is detected.
The DIC also allows some features
to be customized. See Vehicle
Personalization
on page 5‑40for
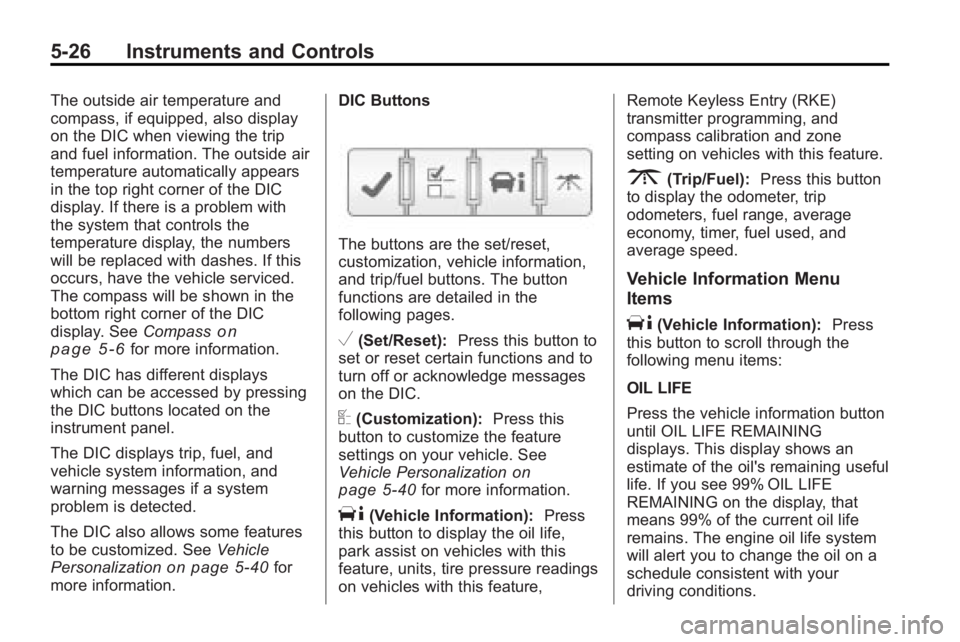
more information. DIC Buttons
The buttons are the set/reset,
customization, vehicle information,
and trip/fuel buttons. The button
functions are detailed in the
following pages.
V(Set/Reset):
Press this button to
set or reset certain functions and to
turn off or acknowledge messages
on the DIC.
U(Customization): Press this
button to customize the feature
settings on your vehicle. See
Vehicle Personalization
on
page 5‑40for more information.
T(Vehicle Information): Press
this button to display the oil life,
park assist on vehicles with this
feature, units, tire pressure readings
on vehicles with this feature, Remote Keyless Entry (RKE)
transmitter programming, and
compass calibration and zone
setting on vehicles with this feature.
3(Trip/Fuel):
Press this button
to display the odometer, trip
odometers, fuel range, average
economy, timer, fuel used, and
average speed.
Vehicle Information Menu
Items
T(Vehicle Information): Press
this button to scroll through the
following menu items:
OIL LIFE
Press the vehicle information button
until OIL LIFE REMAINING
displays. This display shows an
estimate of the oil's remaining useful
life. If you see 99% OIL LIFE
REMAINING on the display, that
means 99% of the current oil life
remains. The engine oil life system
will alert you to change the oil on a
schedule consistent with your
driving conditions.
Page 146 of 438
5-28 Instruments and Controls
If a low tire pressure condition is
detected by the system while
driving, a message advising you
add air to a specific tire will appear
in the display. SeeTire Pressure
on
page 10‑44and Tire Messageson
page 5‑37for more information.
If the tire pressure display shows
dashes instead of a value, there
may be a problem with your vehicle.
If this consistently occurs, see your
dealer/retailer for service.
RELEARN REMOTE KEY
This display allows you to match
Remote Keyless Entry (RKE)
transmitters to your vehicle. This
procedure will erase all previously
learned transmitters. Therefore, they
must be relearned as additional
transmitters. To match an RKE transmitter to your
vehicle:
1. Press the vehicle information
button until PRESS
VTO
RELEARN REMOTE KEY
displays.
2. Press the set/reset button until REMOTE KEY LEARNING
ACTIVE is displayed.
3. Press and hold the lock and unlock buttons on the first
transmitter at the same time for
about 15 seconds.
On vehicles with memory recall
seats, the first transmitter
learned will match driver 1 and
the second will match driver 2.
A chime will sound indicating
that the transmitter is matched. 4. To match additional transmitters
at this time, repeat Step 3.
Each vehicle can have a
maximum of eight transmitters
matched to it.
5. To exit the programming mode, you must cycle the key to
LOCK/OFF.
COMPASS ZONE SETTING
This display will be available if the
vehicle has a compass. See
Compass
on page 5‑6for more
information.
COMPASS RECALIBRATION
This display will be available if the
vehicle has a compass. See
Compass
on page 5‑6for more
information.
Blank Display
This display shows no information.
Page 149 of 438
Instruments and Controls 5-31
Vehicle Messages
Messages are displayed on the DIC
to notify the driver that the status of
the vehicle has changed and that
some action may be needed by the
driver to correct the condition.
Multiple messages may appear one
after another.
Some messages may not require
immediate action, but you can press
any of the DIC buttons on the
instrument panel to acknowledge
that you received the messages and
to clear them from the display.
Some messages cannot be cleared
from the DIC display because they
are more urgent. These messages
require action before they can be
cleared. You should take any
messages that appear on the
display seriously and remember that
clearing the messages will only
make the messages disappear, not
correct the problem.The following are the possible
messages that can be displayed
and some information about them.
Battery Voltage and
Charging Messages
BATTERY SAVER ACTIVE
This message displays when the
system detects that the battery
voltage is dropping below expected
levels. The battery saver system
starts reducing certain features of
the vehicle that you may be able to
notice. At the point that the features
are disabled, this message is
displayed. It means that the vehicle
is trying to save the charge in the
battery.
Turn off all unnecessary
accessories to allow the battery to
recharge.
The normal battery voltage range is
11.5 to 15.5 volts.
SERVICE BATTERY
CHARGING SYSTEM
On some vehicles, this message
displays if there is a problem with
the battery charging system.
Under certain conditions, the
charging system light may also turn
on in the instrument panel cluster.
See
Charging System Light
on
page 5‑18. Driving with this
problem could drain the battery.
Turn off all unnecessary
accessories. Have the electrical
system checked as soon as
possible. See your dealer/retailer.