stop start BUICK ENCLAVE 2010 Owner's Manual
[x] Cancel search | Manufacturer: BUICK, Model Year: 2010, Model line: ENCLAVE, Model: BUICK ENCLAVE 2010Pages: 438, PDF Size: 2.47 MB
Page 26 of 438
1-20 In Brief
Driving for Better Fuel
Economy
Driving habits can affect fuel
mileage. Here are some driving tips
to get the best fuel economy
possible.
.Avoid fast starts and accelerate
smoothly.
.Brake gradually and avoid
abrupt stops.
.Avoid idling the engine for long
periods of time.
.When road and weather
conditions are appropriate, use
cruise control, if equipped.
.Always follow posted speed
limits or drive more slowly when
conditions require.
.Keep vehicle tires properly
inflated.
.Combine several trips into a
single trip.
.Replace the vehicle's tires with
the same TPC Spec number
molded into the tire's sidewall
near the size.
.Follow recommended scheduled
maintenance.
Roadside Assistance
Program
Roadside Assistance
U.S.:1-800-252-1112;
TTY Users: 1-888-889-2438;
Canada: 1-800-268-6800
As the owner of a new Buick, you
are automatically enrolled in the
Roadside Assistance program. This
program provides technically trained
advisors who are available 24 hours
a day, 365 days a year, minor repair
information or towing arrangements. Roadside Assistance and OnStar
If you have a current OnStar
subscription, press the OnStar
button and the current GPS location
will be sent to an OnStar Advisor
who will assess your problem,
contact Roadside Assistance, and
relay exact location to get you the
help you need.
Online Owner Center
The Online Owner Center is a
complimentary service that includes
online service reminders, vehicle
maintenance tips, online owner
manual, special privileges
and more.
Sign up today at:
www.gmownercenter.com/buick.
Page 40 of 438
2-12 Keys, Doors and Windows
To open the liftgate, press the
touchpad on the handle on the
outside of the liftgate and lift the
gate open. To close the liftgate, use
the pull cup to lower the liftgate and
close. The liftgate latch will power
close. Always close the liftgate
before driving.
If the RKE button or the power close
button on the liftgate is pressed
while power operation is disabled,
the lights will flash three times, but
the liftgate will not move.
It is not recommended that you
drive with the liftgate open.
However, if you must drive with the
liftgate open, the liftgate should be
set to manual operation by pressing
the OFF switch on the center
console.Vehicle Security
Vehicle theft is big business,
especially in some cities. This
vehicle has theft-deterrent features,
however, they do not make it
impossible to steal.
Anti-Theft Alarm System
On vehicles with an anti-theft alarm
system, to activate the system:
.PressQon the Remote Keyless
Entry (RKE) transmitter or the
power door lock switch when
any door is open.
The security light flashes.
When the door is closed, the
security light stops flashing and
stays on solid for approximately 30 seconds. The content theft
deterrent alarm is not armed
until the security light goes off.
If the delayed locking feature is
active, the alarm is not activated
until all doors are closed and the
security light goes off.
.PressQwhen the driver door is
closed. The security light comes
on solid for approximately
30 seconds and then goes off.
The content theft deterrent alarm
is not armed until the security
light goes off.
The theft-deterrent system will not
activate if the doors are locked with
the vehicle's key or the manual
door lock.
If a locked door is opened
without using the RKE transmitter,
a ten second pre-alarm occurs.
The horn chirps and the lights flash.
If the key is not placed in the
ignition and turned to START or the
door is not unlocked by pressing
Q
Page 55 of 438
Seats and Restraints 3-5
Power Lumbar
On vehicles with power lumbar, the
controls used to operate this feature
are located on the outboard side of
the seats. See“Power Lumbar”
under Power Seat Adjustment
on
page 3‑3for more information.
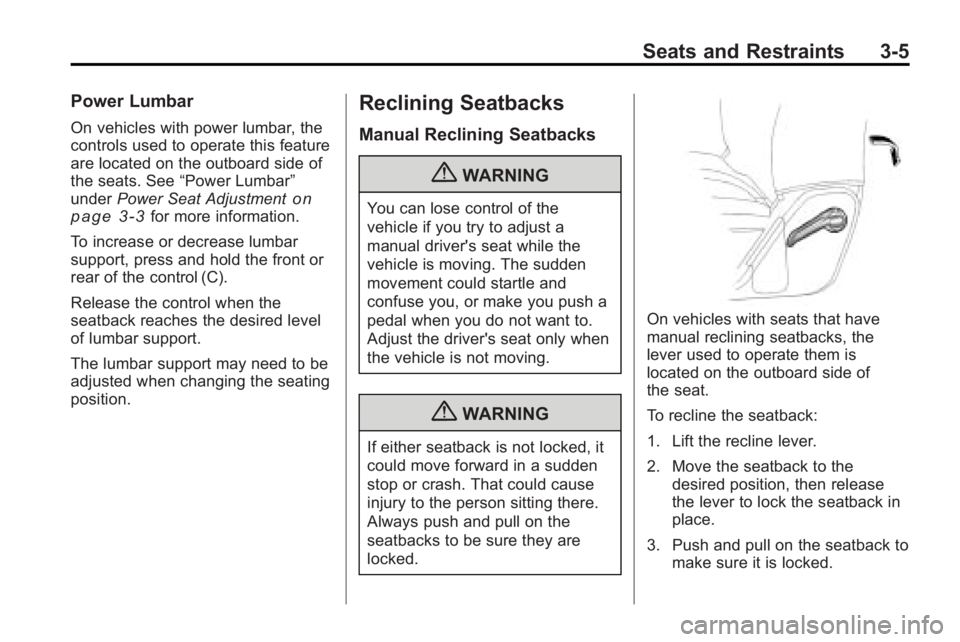
To increase or decrease lumbar
support, press and hold the front or
rear of the control (C).
Release the control when the
seatback reaches the desired level
of lumbar support.
The lumbar support may need to be
adjusted when changing the seating
position.
Reclining Seatbacks
Manual Reclining Seatbacks
{WARNING
You can lose control of the
vehicle if you try to adjust a
manual driver's seat while the
vehicle is moving. The sudden
movement could startle and
confuse you, or make you push a
pedal when you do not want to.
Adjust the driver's seat only when
the vehicle is not moving.
{WARNING
If either seatback is not locked, it
could move forward in a sudden
stop or crash. That could cause
injury to the person sitting there.
Always push and pull on the
seatbacks to be sure they are
locked.
On vehicles with seats that have
manual reclining seatbacks, the
lever used to operate them is
located on the outboard side of
the seat.
To recline the seatback:
1. Lift the recline lever.
2. Move the seatback to the desired position, then release
the lever to lock the seatback in
place.
3. Push and pull on the seatback to make sure it is locked.
Page 118 of 438
4-4 Storage
Roof Rack System
{WARNING
If something is carried on top of
the vehicle that is longer or
wider than the roof rack—like
paneling, plywood, or a
mattress —the wind can catch it
while the vehicle is being driven.
The item being carried could be
violently torn off, and this could
cause a collision, and damage
the vehicle. Never carry
something longer or wider than
the roof rack on top of the vehicle
unless using a GM Certified
accessory carrier. For vehicles with a roof rack, the
rack can be used to load items.
For roof racks that do not have
crossrails included, GM Certified
crossrails can be purchased as an
accessory. See your dealer/retailer
for additional information.
Notice:
Loading cargo on the
roof rack that weighs more than
91 kg (200 lbs) or hangs over the
rear or sides of the vehicle may
damage the vehicle. Load cargo
so that it rests evenly between
the crossrails, making sure to
fasten cargo securely. To prevent damage or loss of cargo
when driving, check to make sure
crossrails and cargo are securely
fastened. Loading cargo on the roof
rack will make the vehicle’
s center
of gravity higher. Avoid high speeds,
sudden starts, sharp turns, sudden
braking or abrupt maneuvers,
otherwise it may result in loss of
control. If driving for a long distance,
on rough roads, or at high speeds,
occasionally stop the vehicle to
make sure the cargo remains in its
place. Do not exceed the maximum
vehicle capacity when loading the
vehicle.
For more information on vehicle
capacity and loading, see Vehicle
Load Limits on page 9‑12.
Page 137 of 438
Instruments and Controls 5-19
If the check engine light comes on
and stays on, while the engine is
running, this indicates that there is
an OBD II problem and service is
required.
Malfunctions often are indicated by
the system before any problem is
apparent. Being aware of the light
can prevent more serious damage
to the vehicle. This system assists
the service technician in correctly
diagnosing any malfunction.
Notice:If the vehicle is
continually driven with this light
on, after a while, the emission
controls might not work as well,
the vehicle's fuel economy might
not be as good, and the engine
might not run as smoothly. This
could lead to costly repairs that
might not be covered by the
vehicle warranty. Notice:
Modifications made to the
engine, transmission, exhaust,
intake, or fuel system of the
vehicle or the replacement of the
original tires with other than
those of the same Tire
Performance Criteria (TPC) can
affect the vehicle's emission
controls and can cause this light
to come on. Modifications to
these systems could lead to
costly repairs not covered by the
vehicle warranty. This could also
result in a failure to pass a
required Emission Inspection/
Maintenance test. See
Accessories and Modifications
on
page 10‑3.
This light comes on during a
malfunction in one of two ways:
Light Flashing: A misfire condition
has been detected. A misfire
increases vehicle emissions and
could damage the emission control
system on the vehicle. Diagnosis
and service might be required. The following can prevent more
serious damage to the vehicle:
.Reduce vehicle speed.
.Avoid hard accelerations.
.Avoid steep uphill grades.
.If towing a trailer, reduce the
amount of cargo being hauled as
soon as it is possible.
If the light continues to flash, when
it is safe to do so, stop the vehicle.
Find a safe place to park the
vehicle. Turn the key off, wait at
least 10 seconds, and restart the
engine. If the light is still flashing,
follow the previous steps and see
your dealer/retailer for service as
soon as possible.
Page 140 of 438
5-22 Instruments and Controls
Antilock Brake System
(ABS) Warning Light
United StatesCanada
The ABS warning light comes on
briefly when the ignition key is
turned to ON/RUN. This is normal.
If the light does not come on then,
have it fixed so it will be ready to
warn you if there is a problem.
If the light stays on, turn the ignition
to LOCK/OFF. If the light comes on
while driving, stop as soon as
possible and turn the ignition off.
Then start the engine again to reset
the system. If the light still stays on,
or comes on again while driving, the
vehicle needs service. If the regular brake system warning light is not
on, there are still brakes, but no
antilock brakes. If the regular brake
system warning light is also on,
there are no antilock brakes and
there is a problem with the regular
brakes. See
Brake System Warning
Light on page 5‑21.Tow/Haul Mode Light
This light comes on when the Tow/
Haul mode has been activated.
For more information, see Tow/Haul
Mode on page 9‑25.
StabiliTrak®Indicator
Light
This light comes on briefly while
starting the engine. If it does not,
have the vehicle serviced by your
dealer/retailer. If the system is
working normally the indicator light
goes off.
If it stays on, or comes on while
driving, there could be a problem
with the StabiliTrak system and the
vehicle might need service. When
this warning light is on, the system
is off and will not limit wheel spin.
This light flashes when the
StabiliTrak system is active.
See StabiliTrak System
on
page 9‑28for more information.
Page 141 of 438
Instruments and Controls 5-23
Engine Coolant
Temperature Warning
Light
The engine coolant temperature
warning light comes on briefly when
the engine is started.
If it does not, have the vehicle
serviced by your dealer/retailer.
If the system is working normally the
indicator light then goes off.
If the light comes on and stays on
while driving, the vehicle may have
a problem with the cooling system.Stop the vehicle and turn off the
engine to avoid damage to the
engine. A warning chime sounds
when this light is on.
See
Engine Overheating
on
page 10‑18for more information.
Tire Pressure Light
For vehicles with a tire pressure
monitoring system, this light comes
on briefly when the engine is
started. It provides information
about tire pressures and the Tire
Pressure Monitoring System. When the Light is On Steady
This indicates that one or more of
the tires are significantly
underinflated.
A tire pressure message in the
Driver Information Center (DIC), can
accompany the light. See
Tire
Messages
on page 5‑37for more
information. Stop as soon as
possible, and inflate the tires to the
pressure value shown on the tire
loading information label. See Tire
Pressure
on page 10‑44for more
information.
When the Light Flashes First and
Then is On Steady
This indicates that there may be a
problem with the Tire Pressure
Monitor System. The light flashes
for about a minute and stays on
steady for the remainder of the
ignition cycle. This sequence
repeats with every ignition cycle.
See Tire Pressure Monitor
Operation
on page 10‑46for more
information.
Page 148 of 438
5-30 Instruments and Controls
The fuel range estimate is based on
an average of the vehicle's fuel
economy over recent driving history
and the amount of fuel remaining in
the fuel tank. This estimate will
change if driving conditions change.
For example, if driving in traffic and
making frequent stops, this display
may read one number, but if the
vehicle is driven on a freeway, the
number may change even though
the same amount of fuel is in the
fuel tank. This is because different
driving conditions produce different
fuel economies. Generally, freeway
driving produces better fuel
economy than city driving.
Fuel range cannot be reset.
AVG (Average) ECONOMY
Press the trip/fuel button until AVG
ECONOMY displays. This display
shows the approximate average
miles per gallon (mpg) or liters
per 100 kilometers (L/100 km).This number is calculated based on
the number of mpg (L/100 km)
recorded since the last time this
menu item was reset. To reset AVG
ECONOMY, press and hold the set/
reset button.
TIMER
Press the trip/fuel button until
TIMER displays. This display can be
used as a timer.
To start the timer, press the
set/reset button while TIMER is
displayed. The display will show the
amount of time that has passed
since the timer was last reset, not
including time the ignition is off.
Time will continue to be counted as
long as the ignition is on, even if
another display is being shown on
the DIC. The timer will record up to
99 hours, 59 minutes and
59 seconds (99:59:59) after which
the display will return to zero.
To stop the timer, press the set/reset
button briefly while TIMER is
displayed.To reset the timer to zero, press and
hold the set/reset button while
TIMER is displayed.
FUEL USED
Press the trip/fuel button until FUEL
USED displays. This display shows
the number of gallons (gal) or
liters (L) of fuel used since the last
reset of this menu item. To reset the
fuel used information, press and
hold the set/reset button while FUEL
USED is displayed.
AVG (Average) SPEED
Press the trip/fuel button until AVG
SPEED displays. This display
shows the average speed of the
vehicle in miles per hour (mph) or
kilometers per hour (km/h). This
average is calculated based on the
various vehicle speeds recorded
since the last reset of this value. To
reset the value to zero, press and
hold the set/reset button.
Blank Display
This display shows no information.
Page 150 of 438
5-32 Instruments and Controls
Brake System Messages
SERVICE BRAKE SYSTEM
This message displays along with
the brake system warning light if
there is a problem with the brake
system. SeeBrake System Warning
Light
on page 5‑21. If this message
appears, stop as soon as possible
and turn off the vehicle. Restart the
vehicle and check for the message
on the DIC display. If the message
is still displayed or appears again
when you begin driving, the brake
system needs service as soon as
possible. See your dealer/retailer.
Cruise Control Messages
CRUISE SET TO XXX
This message displays whenever
the cruise control is set. See Cruise
Control
on page 9‑30for more
information.
Door Ajar Messages
DRIVER DOOR OPEN
This message displays and a chime
sounds if the driver door is not fully
closed and the vehicle is shifted out
of P (Park). Stop and turn off the
vehicle, check the door for
obstructions, and close the door
again. Check to see if the message
still appears on the DIC.
HOOD OPEN
On some models, this message
displays and a chime sounds if the
hood is not fully closed. Stop and
turn off the vehicle, check the hood
for obstructions, and close the hood
again. Check to see if the message
still appears on the DIC.
LEFT REAR DOOR OPEN
This message displays and a chime
sounds if the driver side rear door is
not fully closed and the vehicle is
shifted out of P (Park). Stop and turn
off the vehicle, check the door for
obstructions, and close the door
again. Check to see if the message
still appears on the DIC.
LIFTGATE OPEN
This message displays and a chime
sounds if the liftgate is open while
the ignition is in ON/RUN. Turn off
the vehicle and check the liftgate.
Restart the vehicle and check for
the message on the DIC display.
PASSENGER DOOR OPEN
This message displays and a chime
sounds if the passenger door is not
fully closed and the vehicle is
shifted out of P (Park). Stop and turn
off the vehicle, check the door for
obstructions, and close the door
again. Check to see if the message
still appears on the DIC.
Page 154 of 438
5-36 Instruments and Controls
Press the set/reset button or the
trip odometer reset stem to
acknowledge this message and
clear it from the DIC display. For
more information seeUltrasonic
Parking Assist on page 9‑33.
SERVICE PARK ASSIST
If your vehicle has the Ultrasonic
Rear Parking Assist (URPA) system,
this message displays if there is a
problem with the URPA system. Do
not use this system to help you
park. See Ultrasonic Parking Assist
on page 9‑33for more information.
See your dealer/retailer for service.
Ride Control System
Messages
SERVICE STABILITRAK
This message displays if there is a
problem with the StabiliTrak®
system. If this message appears, try
to reset the system. Stop; turn off
the engine for at least 15 seconds;
then start the engine again. If this message still comes on, it means
there is a problem. See your dealer/
retailer for service. The vehicle is
safe to drive, however, you do not
have the benefit of StabiliTrak, so
reduce your speed and drive
accordingly.
SERVICE TRACTION
CONTROL
This message displays when there
is a problem with the Traction
Control System (TCS). When this
message is displayed, the system
will not limit wheel spin. Adjust your
driving accordingly. See your dealer/
retailer for service. See
StabiliTrak
System
on page 9‑28for more
information.
TRACTION CONTROL OFF
This message displays when the
Traction Control System (TCS) is
turned off. Adjust your driving
accordingly. See StabiliTrak System
on page 9‑28for more information.
This message clears itself after
10 seconds.
Airbag System Messages
SERVICE AIR BAG
This message displays if there is a
problem with the airbag system.
Have your dealer/retailer inspect the
system for problems. See Airbag
Readiness Light
on page 5‑16and
Airbag Systemon page 3‑29for
more information.
Anti-Theft Alarm System
Messages
SERVICE THEFT DETERRENT
SYSTEM
This message displays when there
is a problem with the theft-deterrent
system. The vehicle may or may not
restart so you may want to take the
vehicle to your dealer/retailer before
turning off the engine. See
Immobilizer Operation
on
page 2‑13for more information.