climate control BUICK ENCLAVE 2010 Owner's Manual
[x] Cancel search | Manufacturer: BUICK, Model Year: 2010, Model line: ENCLAVE, Model: BUICK ENCLAVE 2010Pages: 438, PDF Size: 2.47 MB
Page 1 of 438
2010 Buick Enclave Owner ManualM
In Brief. . . . . . . . . . . . . . . . . . . . . . . . 1-1
Instrument Panel . . . . . . . . . . . . . . 1-2
Initial Drive Information . . . . . . . . 1-3
Vehicle Features . . . . . . . . . . . . . 1-14
Performance and Maintenance . . . . . . . . . . . . . . . . 1-18
Keys, Doors and Windows . . . 2-1
Keys and Locks . . . . . . . . . . . . . . . 2-2
Doors . . . . . . . . . . . . . . . . . . . . . . . . . . 2-9
Vehicle Security . . . . . . . . . . . . . . 2-12
Exterior Mirrors . . . . . . . . . . . . . . . 2-15
Interior Mirrors . . . . . . . . . . . . . . . . 2-18
Windows . . . . . . . . . . . . . . . . . . . . . 2-18
Roof . . . . . . . . . . . . . . . . . . . . . . . . . . 2-21
Seats and Restraints . . . . . . . . . 3-1
Head Restraints . . . . . . . . . . . . . . . 3-2
Front Seats . . . . . . . . . . . . . . . . . . . . 3-3
Rear Seats . . . . . . . . . . . . . . . . . . . . 3-8
Safety Belts . . . . . . . . . . . . . . . . . . 3-13
Airbag System . . . . . . . . . . . . . . . . 3-29
Child Restraints . . . . . . . . . . . . . . 3-44 Storage
. . . . . . . . . . . . . . . . . . . . . . . 4-1
Storage Compartments . . . . . . . . 4-1
Additional Storage Features . . . 4-3
Roof Rack System . . . . . . . . . . . . . 4-4
Instruments and Controls . . . . 5-1
Controls . . . . . . . . . . . . . . . . . . . . . . . 5-2
Warning Lights, Gages, and
Indicators . . . . . . . . . . . . . . . . . . . 5-12
Information Displays . . . . . . . . . . 5-25
Vehicle Messages . . . . . . . . . . . . 5-31
Vehicle Personalization . . . . . . . 5-40
Universal Remote System . . . . 5-47
Lighting . . . . . . . . . . . . . . . . . . . . . . . 6-1
Exterior Lighting . . . . . . . . . . . . . . . 6-1
Interior Lighting . . . . . . . . . . . . . . . . 6-5
Lighting Features . . . . . . . . . . . . . . 6-6
Infotainment System . . . . . . . . . 7-1
Introduction . . . . . . . . . . . . . . . . . . . . 7-1
Radio . . . . . . . . . . . . . . . . . . . . . . . . . . 7-6
Audio Players . . . . . . . . . . . . . . . . 7-12
Rear Seat Infotainment . . . . . . . 7-34
Phone . . . . . . . . . . . . . . . . . . . . . . . . 7-44 Climate Controls
. . . . . . . . . . . . . 8-1
Climate Control Systems . . . . . . 8-1
Air Vents . . . . . . . . . . . . . . . . . . . . . . . 8-9
Driving and Operating . . . . . . . . 9-1
Driving Information . . . . . . . . . . . . . 9-2
Starting and Operating . . . . . . . 9-16
Engine Exhaust . . . . . . . . . . . . . . 9-22
Automatic Transmission . . . . . . 9-23
Drive Systems . . . . . . . . . . . . . . . . 9-26
Brakes . . . . . . . . . . . . . . . . . . . . . . . 9-26
Ride Control Systems . . . . . . . . 9-28
Cruise Control . . . . . . . . . . . . . . . . 9-30
Object Detection Systems . . . . 9-33
Fuel . . . . . . . . . . . . . . . . . . . . . . . . . . 9-39
Towing . . . . . . . . . . . . . . . . . . . . . . . 9-44
Conversions and Add-Ons . . . 9-55
Vehicle Care . . . . . . . . . . . . . . . . . 10-1
General Information . . . . . . . . . . 10-2
Vehicle Checks . . . . . . . . . . . . . . . 10-4
Headlamp Aiming . . . . . . . . . . . 10-28
Bulb Replacement . . . . . . . . . . 10-28
Electrical System . . . . . . . . . . . . 10-30
Page 7 of 438
In Brief 1-1
In Brief
Instrument Panel
Instrument Panel . . . . . . . . . . . . . . 1-2
Initial Drive Information
Initial Drive Information . . . . . . . . 1-3
Remote Keyless Entry (RKE)System . . . . . . . . . . . . . . . . . . . . . . 1-3
Remote Vehicle Start . . . . . . . . . 1-4
Door Locks . . . . . . . . . . . . . . . . . . . 1-5
Liftgate . . . . . . . . . . . . . . . . . . . . . . . . 1-5
Windows . . . . . . . . . . . . . . . . . . . . . . 1-6
Seat Adjustment . . . . . . . . . . . . . . 1-6
Second Row Seats . . . . . . . . . . . 1-7
Third Row Seats . . . . . . . . . . . . . . 1-7
Heated Seats . . . . . . . . . . . . . . . . . 1-7
Heated and Ventilated Seats . . . . . . . . . . . . . . . . . . . . . . . . 1-8
Head Restraint Adjustment . . . . 1-8
Safety Belt . . . . . . . . . . . . . . . . . . . . 1-8
Sensing System for Passenger Airbag . . . . . . . . . . . . . . . . . . . . . . . 1-9
Mirror Adjustment . . . . . . . . . . . . . 1-9
Steering Wheel Adjustment . . . . . . . . . . . . . . . . . 1-10
Interior Lighting . . . . . . . . . . . . . . 1-11 Exterior Lighting . . . . . . . . . . . . . 1-11
Windshield Wiper/Washer . . . . 1-12
Climate Controls . . . . . . . . . . . . . 1-13
Vehicle Features
Radio(s) . . . . . . . . . . . . . . . . . . . . . 1-14
Satellite Radio . . . . . . . . . . . . . . . 1-15
Portable Audio Devices . . . . . . 1-15
Bluetooth
®. . . . . . . . . . . . . . . . . . . 1-15
Steering Wheel Controls . . . . . 1-16
Navigation System . . . . . . . . . . . 1-16
Cruise Control . . . . . . . . . . . . . . . 1-17
Storage Compartments . . . . . . 1-17
Power Outlets . . . . . . . . . . . . . . . 1-18
Sunroof . . . . . . . . . . . . . . . . . . . . . . 1-18
Performance and Maintenance
StabiliTrak®. . . . . . . . . . . . . . . . . . 1-18
Tire Pressure Monitor . . . . . . . . 1-19
Tire Sealant and Compressor Kit . . . . . . . . . . . . . 1-19
Engine Oil Life System . . . . . . 1-19
Driving for Better Fuel Economy . . . . . . . . . . . . . . . . . . . 1-20
Roadside Assistance Program . . . . . . . . . . . . . . . . . . . . 1-20
OnStar
®. . . . . . . . . . . . . . . . . . . . . 1-21
Page 9 of 438
In Brief 1-3
A.Air Vents on page 8‑9.
B. Windshield Wiper/Washer
on
page 5‑5.
C. Instrument Cluster
on
page 5‑13.
D. Driver Information Center (DIC) Buttons. See Driver Information
Center (DIC) on page 5‑25.
E. Clock on page 5‑8.
F. AM-FM Radio
on page 7‑6.
Navigation/Radio System (If
Equipped). See Navigation
System manual.
G. Exterior Lamp Controls
on
page 6‑1.
H. Hood Release. See Hood
on
page 10‑4.
I. Instrument Panel Illumination
Control on page 6‑5.
J. Cruise Control on page 9‑30.
K. Steering Wheel Adjustment
on
page 5‑2. L.
Horn on page 5‑5.
M. Steering Wheel Controls
on
page 5‑3.
N. Hazard Warning Flashers
on
page 6‑4.
O. Dual Automatic Climate Control
System on page 8‑1.
P. Center Console Shift Lever. See “Console Shift Lever” under
Shifting Into Park on page 9‑20.
Q. Rear Window Wiper/Washer
on
page 5‑6.
R. Power Outlets on page 5‑10.
S. Heated Front Seats
on
page 3‑7.
T. Passenger Air Bag Status Indicator. See Passenger
Sensing System on page 3‑37.
U. Glove Box on page 4‑1.
Initial Drive
Information
This section provides a brief
overview about some of the
important features that may or may
not be on your specific vehicle.
For more detailed information, refer
to each of the features which can be
found later in this owner manual.
Remote Keyless Entry
(RKE) System
The RKE transmitter is used to
remotely lock and unlock the doors
from up to 60 m (195 feet) away
from the vehicle.
Page 10 of 438
1-4 In Brief
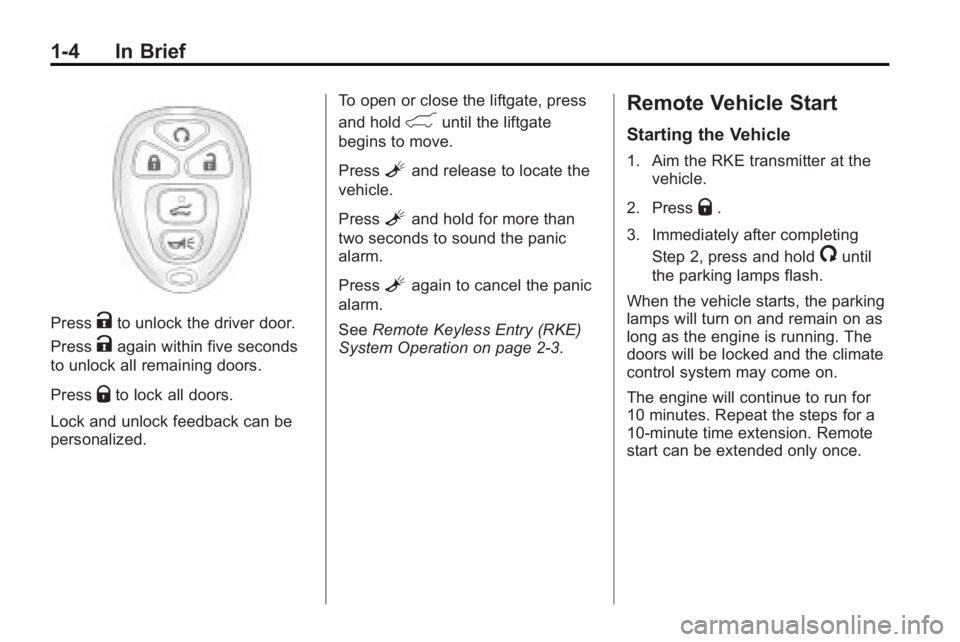
PressKto unlock the driver door.
Press
Kagain within five seconds
to unlock all remaining doors.
Press
Qto lock all doors.
Lock and unlock feedback can be
personalized. To open or close the liftgate, press
and hold
&until the liftgate
begins to move.
Press
Land release to locate the
vehicle.
Press
Land hold for more than
two seconds to sound the panic
alarm.
Press
Lagain to cancel the panic
alarm.
See Remote Keyless Entry (RKE)
System Operation on page 2‑3.
Remote Vehicle Start
Starting the Vehicle
1. Aim the RKE transmitter at the vehicle.
2. Press
Q.
3. Immediately after completing Step 2, press and hold
/until
the parking lamps flash.
When the vehicle starts, the parking
lamps will turn on and remain on as
long as the engine is running. The
doors will be locked and the climate
control system may come on.
The engine will continue to run for
10 minutes. Repeat the steps for a
10-minute time extension. Remote
start can be extended only once.
Page 19 of 438
In Brief 1-13
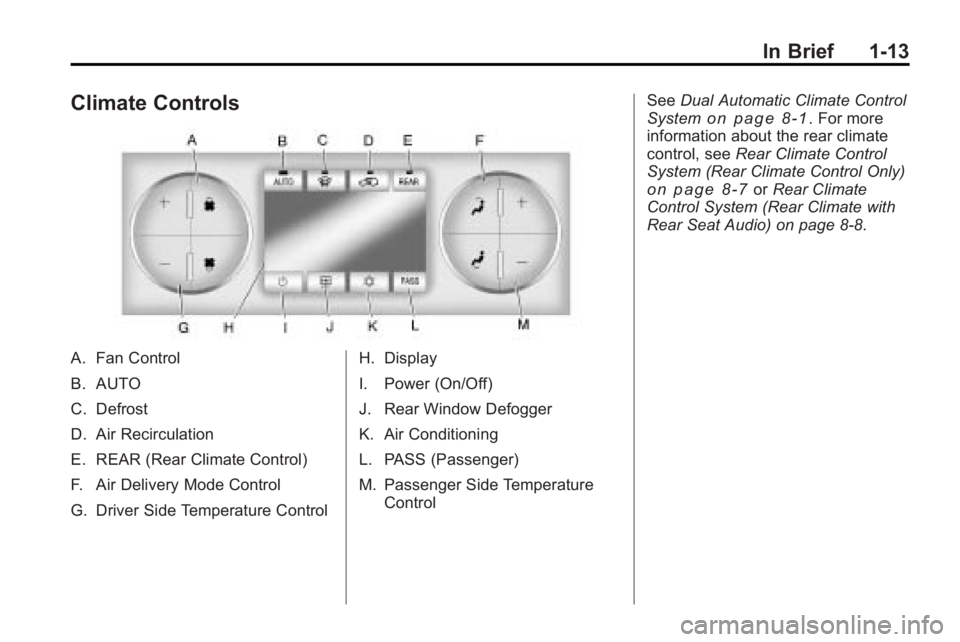
Climate Controls
A. Fan Control
B. AUTO
C. Defrost
D. Air Recirculation
E. REAR (Rear Climate Control)
F. Air Delivery Mode Control
G. Driver Side Temperature ControlH. Display
I. Power (On/Off)
J. Rear Window Defogger
K. Air Conditioning
L. PASS (Passenger)
M. Passenger Side Temperature
Control See
Dual Automatic Climate Control
System
on page 8‑1. For more
information about the rear climate
control, see Rear Climate Control
System (Rear Climate Control Only)
on page 8‑7or Rear Climate
Control System (Rear Climate with
Rear Seat Audio) on page 8‑8.
Page 24 of 438
1-18 In Brief
Power Outlets
The vehicle has three 12-volt
accessory power outlets which can
be used to plug in electrical
equipment, such as a cellular
telephone.
The power outlets are located:
.On the instrument panel below
the climate controls.
.At the rear of the center floor
console.
.In the rear cargo area.
To use the outlets, remove the
cover.
See Power Outlets on page 5‑10.
Sunroof
The ignition must be in ON/RUN or
ACC/ACCESSORY to operate the
sunroof and power sunshade. See
Retained Accessory Power (RAP)
on page 9‑17
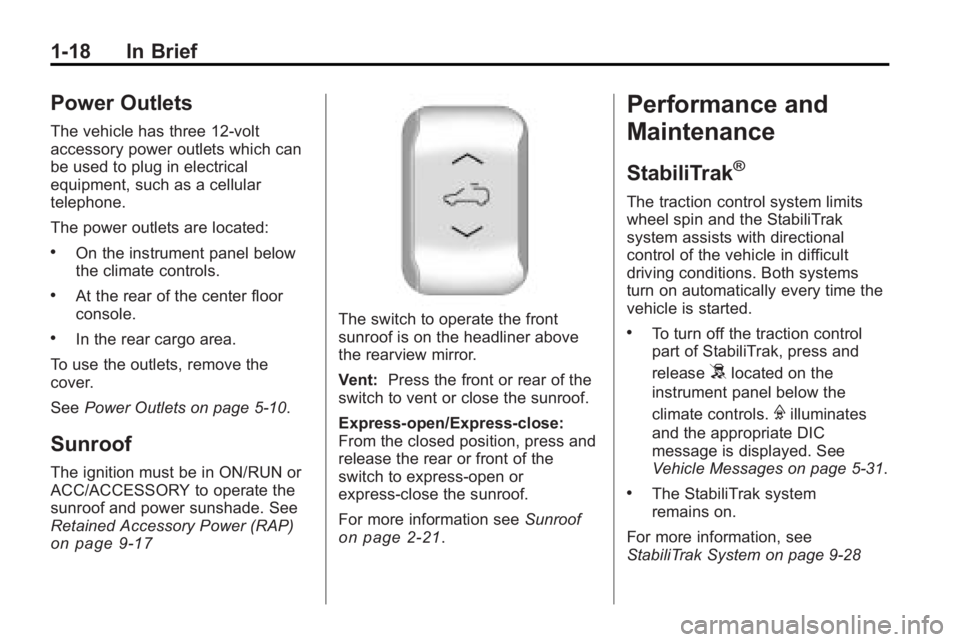
The switch to operate the front
sunroof is on the headliner above
the rearview mirror.
Vent: Press the front or rear of the
switch to vent or close the sunroof.
Express-open/Express-close:
From the closed position, press and
release the rear or front of the
switch to express-open or
express-close the sunroof.
For more information see Sunroof
on page 2‑21.
Performance and
Maintenance
StabiliTrak®
The traction control system limits
wheel spin and the StabiliTrak
system assists with directional
control of the vehicle in difficult
driving conditions. Both systems
turn on automatically every time the
vehicle is started.
.To turn off the traction control
part of StabiliTrak, press and
release
5located on the
instrument panel below the
climate controls.
Filluminates
and the appropriate DIC
message is displayed. See
Vehicle Messages on page 5‑31.
.The StabiliTrak system
remains on.
For more information, see
StabiliTrak System on page 9‑28
Page 33 of 438
Keys, Doors and Windows 2-5
3. Insert the new battery, positiveside facing down. Replace with a
CR2032 or equivalent battery.
4. Snap the transmitter back together.
Remote Vehicle Start
This vehicle may have a remote
starting feature that starts the
engine from outside of the vehicle.
/(Remote Start): This button is
located on the RKE transmitter if the
vehicle has remote start.
Laws in some communities may
restrict the use of remote starters.
For example, some laws may
require a person using the remote
start to have the vehicle in view
when doing so. Check local
regulations for any requirements on
remote starting of vehicles.
Do not use the remote start
feature if the vehicle is low on fuel.
The vehicle could run out of fuel. If the vehicle has the remote start
feature, the RKE transmitter
functions have an increased range
of operation. However, the range
may be less while the vehicle is
running.
There are other conditions which
can affect the performance of the
transmitter, see
Remote Keyless
Entry (RKE) System
on page 2‑2for additional information.
Starting the Engine Using
Remote Start
To start the vehicle:
1. Aim the RKE transmitter at the vehicle.
2. Press
Qon the RKE transmitter.
3. Immediately after completing Step 2, press and hold
/until
the parking lamps flash. If the
vehicle's lights can not be seen,
press and hold
/for at least
four seconds. When the vehicle starts the parking
lamps will turn on and remain on as
long as the engine is running.
The doors will be locked and the
climate control system will operate
automatically if the vehicle has the
automatic system, or at the same
setting as when the vehicle was last
turned off.
If the vehicle has an automatic
climate control system and heated
seats, the heated seats turn on
during colder outside temperatures
and shut off when the key is turned
to ON/RUN. See
Heated Front
Seats
on page 3‑7or Heated and
Ventilated Front Seatson
page 3‑8for more information.
The rear window defogger and
heated mirrors, if the vehicle has
them, turn on during colder outside
temperatures and turn off when the
key is turned to ON/RUN.
Page 37 of 438
Keys, Doors and Windows 2-9
Doors
Liftgate
Manual Liftgate Operation
{WARNING
Exhaust gases can enter the
vehicle if it is driven with the
liftgate, trunk/hatch open, or with
any objects that pass through the
seal between the body and the
trunk/hatch or liftgate. Engine
exhaust contains Carbon
Monoxide (CO) which cannot be
seen or smelled. It can cause
unconsciousness and even death.(Continued)
WARNING (Continued)
If the vehicle must be driven with
the liftgate, or trunk/hatch open:
.Close all of the windows.
.Fully open the air outlets on
or under the instrument
panel.
.Adjust the Climate Control
system to a setting that
brings in only outside air and
set the fan speed to the
highest setting. See Climate
Control System in the Index.
.If the vehicle is equipped with
a power liftgate, disable the
power liftgate function.
For more information about
carbon monoxide, see Engine
Exhaust on page 9‑22. To unlock the liftgate, use the
power door lock switch or press
the door unlock button on the
RKE transmitter twice. See
Remote
Keyless Entry (RKE) System
Operation on page 2‑3.
To open the liftgate, press the
touchpad under the liftgate handle.
The vehicle must be in P (Park) to
open the liftgate. To close the
liftgate, use the pull cup or pull strap
as an aid.
The liftgate will not open if the
battery is disconnected or has low
voltage. The liftgate will resume
operation when the battery is
reconnected and charged.
If the battery is properly connected
and has adequate voltage, and the
liftgate still will not function, the
vehicle should be taken to a
dealers/retailer for service.
Page 45 of 438
Keys, Doors and Windows 2-17
Resetting the Power Foldaway
Mirrors
Reset the power foldaway mirrors if:
.The mirrors are accidentally
obstructed while folding.
.They are accidentally manually
folded/unfolded.
.The mirrors vibrate at normal
driving speeds.
Fold and unfold the mirrors one time
using the mirror controls to reset
them to their normal position.
A popping noise may be heard
during the resetting of the power
foldaway mirrors. This sound is
normal after a manual folding
operation.
Automatic Dimming Feature
The driver outside mirror adjusts for
the glare of the headlamps behind
you. See Automatic Dimming
Rearview Mirror
on page 2‑18for
information on how to turn this
feature on.
Turn Signal Indicator
The vehicle may have a turn signal
indicator lamp that is built into the
mirror housing. The turn signal lamp
flashes with the use of the vehicle's
turn signal and hazard flashers.
Heated Mirrors
For vehicles with heated mirrors:
<(Rear Window Defogger):
Press to heat the mirrors.
See “Rear Window Defogger” under
Dual Automatic Climate Control
System
on page 8‑1for more
information.
Park Tilt Mirrors
If the vehicle has the memory
package, the outside mirrors have a
park tilt feature. This feature tilts the
outside mirrors to a preselected
position when the vehicle is in
R (Reverse). This allows the driver
to view the curb for parallel parking.
The passenger and/or driver mirror
returns to its original position when
the vehicle is shifted out of
R (Reverse), or the ignition is turned
off or to OFF/LOCK.
This feature can be turned on or off
through the Driver Information
Center (DIC). See Vehicle
Personalization
on page 5‑40for
more information.
Page 58 of 438
3-8 Seats and Restraints
Heated and Ventilated
Front Seats
{WARNING
If you cannot feel temperature
change or pain to the skin, the
seat heater may cause burns
even at low temperatures. To
reduce the risk of burns, people
with such a condition should use
care when using the seat heater,
especially for long periods of
time. Do not place anything on
the seat that insulates against
heat, such as a blanket, cushion,
cover or similar item. This may
cause the seat heater to
overheat. An overheated seat
heater may cause a burn or may
damage the seat.
On vehicles with the heated and
ventilated seat feature, the controls
are located on the front doors near
the door handle.
H(Ventilated Seat): Press to
ventilate the entire seat.
This symbol appears on the climate
control display to indicate that the
feature is on.
z(Heated Seat and Seatback):
Press to heat the entire seat.
This symbol appears on the climate
control display to indicate that the
feature is on.
For either feature press the button
once for the highest setting. With
each press of the switch, the seat
changes to the next lower setting,
and then the off setting. The lights
indicate three for the highest setting
and one for the lowest.
The heated and ventilated seats are
canceled after the ignition is turned
off. To use the heated and ventilated
seat feature after the vehicle is
started, you will need to press the
appropriate seat button again.
Rear Seats
A. Seat Adjustment Handle
B. Reclining Seatback Strap
C. Sliding Seat Lever