service schedule BUICK ENCLAVE 2010 Owner's Manual
[x] Cancel search | Manufacturer: BUICK, Model Year: 2010, Model line: ENCLAVE, Model: BUICK ENCLAVE 2010Pages: 438, PDF Size: 2.47 MB
Page 2 of 438
2010 Buick Enclave Owner ManualM
Wheels and Tires . . . . . . . . . . . 10-37
Jump Starting . . . . . . . . . . . . . . . 10-81
Towing . . . . . . . . . . . . . . . . . . . . . . 10-85
Appearance Care . . . . . . . . . . . 10-88
Service and Maintenance . . . 11-1
General Information . . . . . . . . . . 11-1
Scheduled Maintenance . . . . . . 11-2
Recommended Fluids, Lubricants, and Parts . . . . . . . 11-7
Maintenance Records . . . . . . . . 11-9
Technical Data . . . . . . . . . . . . . . . 12-1
Vehicle Identification . . . . . . . . . 12-1
Vehicle Data . . . . . . . . . . . . . . . . . . 12-2
Customer Information . . . . . . . 13-1
Customer Information . . . . . . . . 13-1
Reporting Safety Defects . . . . 13-13
Vehicle Data Recording and Privacy . . . . . . . . . . . . . . . . . . . . 13-15
Index . . . . . . . . . . . . . . . . . . . . . i-1
Page 26 of 438
1-20 In Brief
Driving for Better Fuel
Economy
Driving habits can affect fuel
mileage. Here are some driving tips
to get the best fuel economy
possible.
.Avoid fast starts and accelerate
smoothly.
.Brake gradually and avoid
abrupt stops.
.Avoid idling the engine for long
periods of time.
.When road and weather
conditions are appropriate, use
cruise control, if equipped.
.Always follow posted speed
limits or drive more slowly when
conditions require.
.Keep vehicle tires properly
inflated.
.Combine several trips into a
single trip.
.Replace the vehicle's tires with
the same TPC Spec number
molded into the tire's sidewall
near the size.
.Follow recommended scheduled
maintenance.
Roadside Assistance
Program
Roadside Assistance
U.S.:1-800-252-1112;
TTY Users: 1-888-889-2438;
Canada: 1-800-268-6800
As the owner of a new Buick, you
are automatically enrolled in the
Roadside Assistance program. This
program provides technically trained
advisors who are available 24 hours
a day, 365 days a year, minor repair
information or towing arrangements. Roadside Assistance and OnStar
If you have a current OnStar
subscription, press the OnStar
button and the current GPS location
will be sent to an OnStar Advisor
who will assess your problem,
contact Roadside Assistance, and
relay exact location to get you the
help you need.
Online Owner Center
The Online Owner Center is a
complimentary service that includes
online service reminders, vehicle
maintenance tips, online owner
manual, special privileges
and more.
Sign up today at:
www.gmownercenter.com/buick.
Page 93 of 438

Seats and Restraints 3-43
Airbag System Check
The airbag system does not need
regularly scheduled maintenance or
replacement. Make sure the airbag
readiness light is working. See
Airbag Readiness Light
on
page 5‑16for more information.
Notice: If an airbag covering is
damaged, opened, or broken, the
airbag may not work properly. Do
not open or break the airbag
coverings. If there are any
opened or broken airbag covers,
have the airbag covering and/or
airbag module replaced. For the
location of the airbag modules,
see What Makes an Airbag
Inflate?
on page 3‑34. See your
dealer/retailer for service.
Replacing Airbag System
Parts After a Crash
{WARNING
A crash can damage the airbag
systems in your vehicle.
A damaged airbag system may
not work properly and may
not protect you and your
passenger(s) in a crash, resulting
in serious injury or even death.
To help make sure your airbag
systems are working properly
after a crash, have them
inspected and any necessary
replacements made as soon as
possible. If an airbag inflates, you will need to
replace airbag system parts. See
your dealer/retailer for service.
If the airbag readiness light stays on
after the vehicle is started or comes
on when you are driving, the airbag
system may not work properly.
Have the vehicle serviced right
away. See
Airbag Readiness Light
on page 5‑16for more information.
Page 142 of 438

5-24 Instruments and Controls
Engine Oil Pressure Light
{WARNING
Do not keep driving if the oil
pressure is low. The engine can
become so hot that it catches fire.
Someone could be burned. Check
the oil as soon as possible and
have the vehicle serviced.
Notice: Lack of proper engine oil
maintenance can damage the
engine. The repairs would not be
covered by the vehicle warranty.
Always follow the maintenance
schedule in this manual for
changing engine oil.
The oil pressure light should come
on briefly as the engine is started.
If it does not come on have the
vehicle serviced by your dealer/
retailer.
If the light comes on and stays on, it
means that oil is not flowing through
the engine properly. The vehicle
could be low on oil and might have
some other system problem.
Security Light
This light flashes when the security
system is activated.
For more information, see Anti-Theft
Alarm System on page 2‑12.
High-Beam on Light
The high-beam on light comes on
when the high-beam headlamps are
in use.
See Headlamp High/Low-Beam
Changer
on page 6‑2for more
information.
Page 144 of 438
5-26 Instruments and Controls
The outside air temperature and
compass, if equipped, also display
on the DIC when viewing the trip
and fuel information. The outside air
temperature automatically appears
in the top right corner of the DIC
display. If there is a problem with
the system that controls the
temperature display, the numbers
will be replaced with dashes. If this
occurs, have the vehicle serviced.
The compass will be shown in the
bottom right corner of the DIC
display. SeeCompass
on
page 5‑6for more information.
The DIC has different displays
which can be accessed by pressing
the DIC buttons located on the
instrument panel.
The DIC displays trip, fuel, and
vehicle system information, and
warning messages if a system
problem is detected.
The DIC also allows some features
to be customized. See Vehicle
Personalization
on page 5‑40for
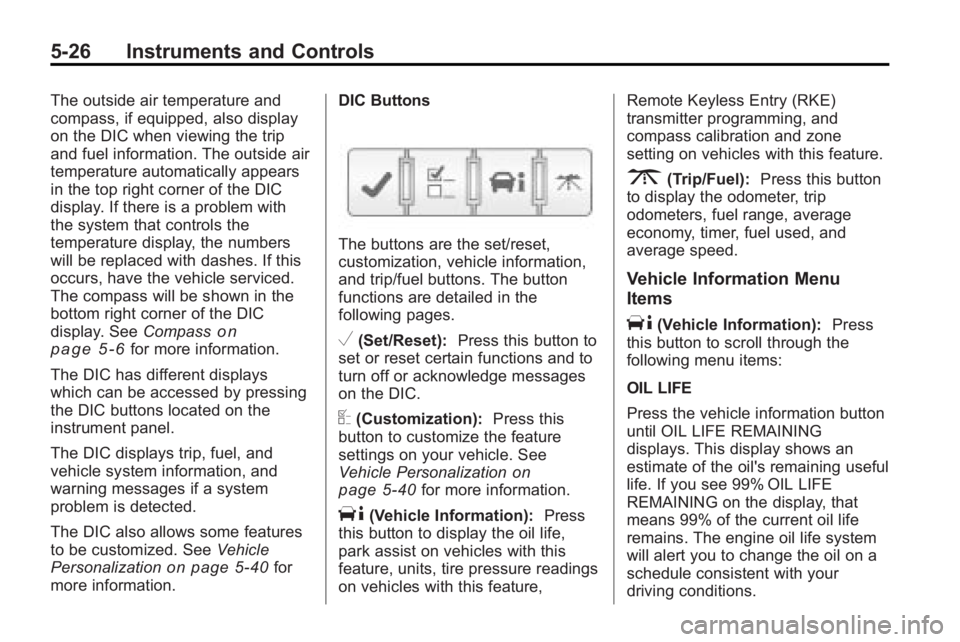
more information. DIC Buttons
The buttons are the set/reset,
customization, vehicle information,
and trip/fuel buttons. The button
functions are detailed in the
following pages.
V(Set/Reset):
Press this button to
set or reset certain functions and to
turn off or acknowledge messages
on the DIC.
U(Customization): Press this
button to customize the feature
settings on your vehicle. See
Vehicle Personalization
on
page 5‑40for more information.
T(Vehicle Information): Press
this button to display the oil life,
park assist on vehicles with this
feature, units, tire pressure readings
on vehicles with this feature, Remote Keyless Entry (RKE)
transmitter programming, and
compass calibration and zone
setting on vehicles with this feature.
3(Trip/Fuel):
Press this button
to display the odometer, trip
odometers, fuel range, average
economy, timer, fuel used, and
average speed.
Vehicle Information Menu
Items
T(Vehicle Information): Press
this button to scroll through the
following menu items:
OIL LIFE
Press the vehicle information button
until OIL LIFE REMAINING
displays. This display shows an
estimate of the oil's remaining useful
life. If you see 99% OIL LIFE
REMAINING on the display, that
means 99% of the current oil life
remains. The engine oil life system
will alert you to change the oil on a
schedule consistent with your
driving conditions.
Page 152 of 438
5-34 Instruments and Controls
Engine Oil Messages
CHANGE ENGINE OIL SOON
This message displays when the
engine oil needs to be changed.
When you change the engine oil, be
sure to reset the CHANGE ENGINE
OIL SOON message. SeeEngine
Oil Life System
on page 10‑10for
information on how to reset the
message. See Engine Oil
on
page 10‑8and Scheduled
Maintenanceon page 11‑2for
more information.
OIL PRESSURE LOW STOP
ENGINE
Notice: If you drive your vehicle
while the engine oil pressure is
low, severe engine damage
may occur. If a low oil pressure
warning appears on the
instrument panel cluster and/or
DIC, stop the vehicle as soon as possible. Do not drive the vehicle
until the cause of the low oil
pressure is corrected. See
Engine
Oil
on page 10‑8for more
information.
This message displays if low oil
pressure levels occur. Stop the
vehicle as soon as safely possible
and do not operate it until the cause
of the low oil pressure has been
corrected. Check the oil as soon as
possible and have your vehicle
serviced by your dealer/retailer.
See Engine Oil on page 10‑8.
Engine Power Messages
ENGINE POWER IS REDUCED
This message displays and a chime
sounds when the cooling system
temperature gets too hot and the
engine further enters the engine
coolant protection mode. See
Engine Overheating
on page 10‑18for further information. This message also displays when
the vehicle's engine power is
reduced. Reduced engine power
can affect the vehicle's ability to
accelerate. If this message is on,
but there is no reduction in
performance, proceed to your
destination. The performance may
be reduced the next time the vehicle
is driven. The vehicle may be driven
at a reduced speed while this
message is on, but acceleration and
speed may be reduced. Anytime
this message stays on, the vehicle
should be taken to your dealer/
retailer for service as soon as
possible.
Fuel System Messages
FUEL LEVEL LOW
This message displays and a chime
sounds if the fuel level is low. Refuel
as soon as possible. See
Fuel Gage
on page 5‑14andFuelon
page 9‑39for more information.
Page 292 of 438

9-50 Driving and Operating
Maintenance When Trailer
Towing
The vehicle needs service more
often when pulling a trailer. See this
manual's Maintenance Schedule or
Index for more information. Things
that are especially important in
trailer operation are automatic
transmission fluid, engine oil, axle
lubricant, belts, cooling system and
brake system. Inspect these before
and during the trip.
Check periodically to see that all
hitch nuts and bolts are tight.
Engine Cooling When Trailer
Towing
The cooling system may temporarily
overheat during severe operating
conditions. SeeEngine Overheating
on page 10‑18.
Trailer Towing
Three important considerations
have to do with weight:
.The weight of the trailer
.The weight of the trailer tongue
.The total weight on the vehicle's
tires
Weight of the Trailer
How heavy can a trailer safely be?
Speed, altitude, road grades,
outside temperature, special
equipment, and the amount of
tongue weight the vehicle can carry
must be considered. See “Weight of
the Trailer Tongue” later in this
section for more information.
Maximum trailer weight is calculated
assuming only the driver is in the
tow vehicle and it has all the
required trailering equipment.
The weight of additional optional
equipment, passengers and cargo in
the tow vehicle must be subtracted
from the maximum trailer weight.
Page 325 of 438

Vehicle Care 10-27
Park on a fairly steep hill, with the
vehicle facing downhill. Keeping
your foot on the regular brake, set
the parking brake.
.To check the parking brake's
holding ability: With the engine
running and the transmission in
N (Neutral), slowly remove foot
pressure from the regular brake
pedal. Do this until the vehicle is
held by the parking brake only.
.To check the P (Park)
mechanism's holding ability:
With the engine running, shift to
P (Park). Then release the
parking brake followed by the
regular brake.
Contact your dealer/retailer if
service is required.
Wiper Blade Replacement
Windshield wiper blades should be
inspected for wear or cracking. See
Scheduled Maintenance
on
page 11‑2for more information. Replacement blades come in
different types and are removed in
different ways. To replace the wiper
blade assembly:
1. Pull the windshield wiper arm
away from the windshield.
2. Press the button in the middle ofthe wiper arm connector and pull
the wiper blade away from the
arm connector.
3. Install the new wiper blade and make sure the wiper blade locks
into place. For the proper size and type see
Maintenance Replacement Parts
on
page 11‑8.
Backglass Wiper Blade
To replace the backglass wiper
blade:
1. Pull the wiper blade assembly away from the backglass.
The backglass wiper blade will
not lock in a vertical position so
care should be used when
pulling it away from the vehicle.
2. Rotate the wiper blade assembly, hold the wiper arm in
position, and push the blade
away from the wiper arm.
3. Replace the wiper blade.
4. Return the wiper arm and blade assembly to the rest position on
the glass.
Page 395 of 438

Service and Maintenance 11-1
Service and
Maintenance
General Information
General Information . . . . . . . . . . 11-1
Scheduled Maintenance
Scheduled Maintenance . . . . . 11-2
Recommended Fluids,
Lubricants, and Parts
Recommended Fluids andLubricants . . . . . . . . . . . . . . . . . . 11-7
Maintenance Replacement Parts . . . . . . . . . . . . . . . . . . . . . . . 11-8
Maintenance Records
Maintenance Records . . . . . . . . 11-9
General Information
Notice: Maintenance intervals,
checks, inspections,
recommended fluids, and
lubricants are necessary to keep
this vehicle in good working
condition. Damage caused by
failure to follow scheduled
maintenance might not be
covered by the vehicle warranty.
Proper vehicle maintenance helps to
keep the vehicle in good working
condition, improves fuel economy,
and reduces vehicle emissions for
better air quality. Because of all the different ways
people use vehicles, maintenance
needs vary. The vehicle might need
more frequent checks and services.
Please read the information under
Scheduled Maintenance. To keep
the vehicle in good condition, see
your dealer/retailer.
The maintenance schedule is for
vehicles that:
.carry passengers and cargo
within recommended limits on
the Tire and Loading Information
label. See
Vehicle Load Limits
on page 9‑12.
.are driven on reasonable road
surfaces within legal driving
limits.
.use the recommended fuel. See
Recommended Fuelon
page 9‑40.
Page 396 of 438
11-2 Service and Maintenance
{WARNING
Performing maintenance work can
be dangerous. Some jobs can
cause serious injury. Perform
maintenance work only if you
have the required know-how and
the proper tools and equipment.
If in doubt, see your dealer/
retailer to have a qualified
technician do the work. See
Doing Your Own Service Work
on
page 10‑4
.
At your General Motors dealer/
retailer, you can be certain that you
will receive the highest level of
service available. Your dealer/
retailer has specially trained service
technicians, uses genuine GM
replacement parts, as well as, up to
date tools and equipment to ensure
fast and accurate diagnostics. The proper replacement parts,
fluids, and lubricants to use are
listed in
Recommended Fluids and
Lubricants
on page 11‑7and
Maintenance Replacement Partson
page 11‑8. We recommend the use
of genuine parts from your dealer/
retailer.
Rotation of New Tires
To maintain ride, handling, and
performance of the vehicle, it is
important that the first rotation
service for new tires be performed
when they have 8 000 to 13 000 km
(5,000 to 8,000 miles). See Tire
Rotation on page 10‑50.
Scheduled
Maintenance
When the Change Engine Oil
Soon Message Displays
Change engine oil and filter.
See Engine Oilon page 10‑8.
An Emission Control Service.
When the Change Engine Oil Soon
message displays, service is
required for the vehicle as soon as
possible, within the next 1 000 km/
600 miles. If driving under the best
conditions, the engine oil life system
might not indicate the need for
vehicle service for more than a year.
The engine oil and filter must be
changed at least once a year and
the oil life system must be reset.