seats BUICK ENCLAVE 2016 Repair Manual
[x] Cancel search | Manufacturer: BUICK, Model Year: 2016, Model line: ENCLAVE, Model: BUICK ENCLAVE 2016Pages: 360, PDF Size: 5.04 MB
Page 95 of 360
 - 2016 - crc - 7/31/15
94 Seats and Restraints
7. Before placing a child in thechild restraint, make sure it is
securely held i")
Buick Enclave Owner Manual (GMNA-Localizing-U.S./Canada/Mexico-
9159225) - 2016 - crc - 7/31/15
94 Seats and Restraints
7. Before placing a child in thechild restraint, make sure it is
securely held in place. To
check, grasp the child restraint
at the safety belt path and
attempt to move it side to side
and back and forth. When the
child restraint is properly
installed, there should be no
more than 2.5 cm (1 in) of
movement.
If the airbag is off, the off indicator in
the passenger airbag status
indicator will come on and stay on
when the vehicle is started.
If a child restraint has been installed
and the on indicator is lit, see “If the
On Indicator Is Lit for a Child
Restraint” underPassenger Sensing
System 070 for more information.
To remove the child restraint,
unbuckle the vehicle safety belt and
let it return to the stowed position.
Page 106 of 360
 - 2016 - crc - 7/31/15
Instruments and Controls 105
To calibrate the compass, use the
following procedure:
Compass Calibration")
Buick Enclave Owner Manual (GMNA-Localizing-U.S./Canada/Mexico-
9159225) - 2016 - crc - 7/31/15
Instruments and Controls 105
To calibrate the compass, use the
following procedure:
Compass Calibration Procedure1. Before calibrating the compass, make sure the compass zone
is set to the variance zone in
which the vehicle is located.
See “Compass Variance (Zone)
Procedure” earlier in this
section.
Do not operate any switches
such as window, sunroof,
climate controls, seats, etc.
during the calibration
procedure.
2. Press the vehicle information button until PRESS
VTO
CALIBRATE COMPASS
displays.
3. Press the set/reset button to start the compass calibration.
4. The DIC will display CALIBRATING: DRIVE IN
CIRCLES. Drive the vehicle in
tight circles at less than 8 km/h
(5 mph) to complete the
calibration. The DIC will display
CALIBRATION COMPLETE for a few seconds when the
calibration is complete. The
DIC display will then return to
the previous menu.
Clock
Setting the Digital Clock
Press Settings on the Home Page,
then press the Set Time or Set Date
settings screen button to display the
different options for setting the time
and date.
Set Time:
.
Press the up or down arrows to
change the Hours, Minutes, AM,
PM, or the 24 hour setting on the
clock.
. Press and hold to quickly
increase or decrease the time
settings.
. Press OK to save the
adjustments.
. Press the Back or Cancel screen
button to cancel the
adjustments. Set Date:
.
Press the up or down arrows to
increase or decrease the Month,
Day, and Year settings.
. Press and hold to quickly
increase or decrease the date
settings.
. Press OK to save the
adjustments.
. Press the Back or Cancel screen
button to cancel the
adjustments.
Setting the Analog Clock
The analog clock is on the
instrument panel above the radio.
The clock is not connected with any
other vehicle system and runs by
itself. To adjust the time:
1. Press and hold the button directly above the clock to
quickly advance the time.
2. Press and release the button to increase the time by
one-minute intervals.
Page 139 of 360
 - 2016 - crc - 7/31/15
138 Instruments and Controls
automatically tilt down when the
vehicle is shifted into R (Reverse).
SeePa")
Buick Enclave Owner Manual (GMNA-Localizing-U.S./Canada/Mexico-
9159225) - 2016 - crc - 7/31/15
138 Instruments and Controls
automatically tilt down when the
vehicle is shifted into R (Reverse).
SeePark Tilt Mirrors 040.
Press the customization button until
PARK TILT MIRRORS appears on
the DIC display. Press the set/reset
button once to access the settings
for this feature. Then press the
customization button to scroll
through the following settings:
OFF (default) : Neither outside
mirror will be tilted down when the
vehicle is shifted into R (Reverse).
DRIVER MIRROR : The driver
outside mirror will be tilted down
when the vehicle is shifted into
R (Reverse).
PASSENGER MIRROR : The
passenger outside mirror will be
tilted down when the vehicle is
shifted into R (Reverse).
BOTH MIRRORS : The driver and
passenger outside mirrors will be
tilted down when the vehicle is
shifted into R (Reverse).
NO CHANGE : No change will be
made to this feature. The current
setting will remain. To select a setting, press the set/
reset button while the desired
setting is displayed on the DIC.
EASY EXIT SEAT
If your vehicle has this feature, it
allows you to select your preference
for the automatic easy exit seat
feature. See
Memory Seats 049.
Press the customization button until
EASY EXIT SEAT appears on the
DIC display. Press the set/reset
button once to access the settings
for this feature. Then press the
customization button to scroll
through the following settings:
OFF (default) : No automatic seat
exit recall will occur.
ON : The driver seat will move back
when the key is removed from the
ignition. The steering column will
also move up and forward on
vehicles with the power tilt and
telescopic steering wheel feature.
See Steering Wheel Adjustment
0 101.
The automatic easy exit seat
movement will only occur one time
after the key is removed from the ignition. If the automatic movement
has already occurred, and you put
the key back in the ignition and
remove it again, the seat and
steering column will stay in the
original exit position, unless a
memory recall took place prior to
removing the key again.
NO CHANGE :
No change will be
made to this feature. The current
setting will remain.
To select a setting, press the set/
reset button while the desired
setting is displayed on the DIC.
MEMORY SEAT RECALL
If your vehicle has this feature, it
allows you to select your preference
for the remote memory seat recall
feature. See Memory Seats 049.
Press the customization button until
MEMORY SEAT RECALL appears
on the DIC display. Press the set/
reset button once to access the
settings for this feature. Then press
the customization button to scroll
through the following settings:
OFF (default) : No remote memory
seat recall will occur.
Page 140 of 360
 - 2016 - crc - 7/31/15
Instruments and Controls 139
ON :The driver seat and outside
mirrors will automatically move to
the stor")
Buick Enclave Owner Manual (GMNA-Localizing-U.S./Canada/Mexico-
9159225) - 2016 - crc - 7/31/15
Instruments and Controls 139
ON :The driver seat and outside
mirrors will automatically move to
the stored driving position when the
unlock button on the Remote
Keyless Entry (RKE) transmitter is
pressed. The steering column will
also move on vehicles with the
power tilt and telescopic steering
wheel feature. See Steering Wheel
Adjustment 0101. See “Memory
Remote Recall” underMemory
Seats 049 for information on
matching transmitters to driver
positions.
NO CHANGE : No change will be
made to this feature. The current
setting will remain.
To select a setting, press the set/
reset button while the desired
setting is displayed on the DIC.
REMOTE START
If your vehicle has this feature, it
allows you to turn the remote start
off or on. The remote start feature
allows you to start the engine from
outside of the vehicle using the
Remote Keyless Entry (RKE)
transmitter. See Remote Vehicle
Start 030. Press the customization button until
REMOTE START appears on the
DIC display. Press the set/reset
button once to access the settings
for this feature. Then press the
customization button to scroll
through the following settings:
OFF :
The remote start feature will
be disabled.
ON (default) : The remote start
feature will be enabled.
NO CHANGE : No change will be
made to this feature. The current
setting will remain.
To select a setting, press the set/
reset button while the desired
setting is displayed on the DIC.
FACTORY SETTINGS
This feature allows you to set all of
the customization features back to
their factory default settings.
Press the customization button until
FACTORY SETTINGS appears on
the DIC display. Press the set/reset
button once to access the settings for this feature. Then press the
customization button to scroll
through the following settings:
RESTORE ALL (default) :
The
customization features will be set to
their factory default settings.
DO NOT RESTORE : The
customization features will not be
set to their factory default settings.
To select a setting, press the set/
reset button while the desired
setting is displayed on the DIC.
EXIT FEATURE SETTINGS
This feature allows you to exit the
feature settings menu.
Press the customization button until
FEATURE SETTINGS PRESS
V
TO EXIT appears in the DIC display.
Press the set/reset button once to
exit the menu.
If you do not exit, pressing the
customization button again will
return you to the beginning of the
feature settings menu.
Page 151 of 360
 - 2016 - crc - 7/31/15
150 Lighting
Battery Load
Management
The vehicle has Electric Power
Management (EPM) that estimates
the")
Buick Enclave Owner Manual (GMNA-Localizing-U.S./Canada/Mexico-
9159225) - 2016 - crc - 7/31/15
150 Lighting
Battery Load
Management
The vehicle has Electric Power
Management (EPM) that estimates
the battery's temperature and state
of charge. It then adjusts the voltage
for best performance and extended
life of the battery.
When the battery's state of charge
is low, the voltage is raised slightly
to quickly bring the charge back up.
When the state of charge is high,
the voltage is lowered slightly to
prevent overcharging. If the vehicle
has a voltmeter gauge or a voltage
display on the Driver Information
Center (DIC), you may see the
voltage move up or down. This is
normal. If there is a problem, an
alert will be displayed.
The battery can be discharged at
idle if the electrical loads are very
high. This is true for all vehicles.
This is because the generator
(alternator) may not be spinning fast
enough at idle to produce all of the
power needed for very high
electrical loads.A high electrical load occurs when
several of the following are on, such
as: headlamps, high beams, rear
window defogger, climate control fan
at high speed, heated seats, engine
cooling fans, trailer loads, and loads
plugged into accessory power
outlets.
EPM works to prevent excessive
discharge of the battery. It does this
by balancing the generator's output
and the vehicle's electrical needs.
It can increase engine idle speed to
generate more power whenever
needed. It can temporarily reduce
the power demands of some
accessories.
Normally, these actions occur in
steps or levels, without being
noticeable. In rare cases at the
highest levels of corrective action,
this action may be noticeable to the
driver. If so, a DIC battery voltage
and charging message displays, it is
recommended that the driver reduce
the electrical loads as much as
possible. See
Battery Voltage and
Charging Messages 0125
andDriver Information Center (DIC)
0 120.
Battery Power Protection
This feature helps prevent the
battery from being drained, if the
interior courtesy lamps or reading
lamps are accidentally left on. If any
of these lamps are left on, they
automatically turn off after
10 minutes, if the ignition is off. The
lamps will not come back on again
until one of the following occurs:
.
The ignition is turned on.
. The exterior lamps control is
turned off, then on again.
The headlamps will time out after
10 minutes, if they are manually
turned on while the ignition is on
or off.
Page 182 of 360
 - 2016 - crc - 7/31/15
Climate Controls 181
Rear Climate Control System
1. Fan Control
2. Temperature Control
3. Air Delivery M")
Buick Enclave Owner Manual (GMNA-Localizing-U.S./Canada/Mexico-
9159225) - 2016 - crc - 7/31/15
Climate Controls 181
Rear Climate Control System
1. Fan Control
2. Temperature Control
3. Air Delivery Mode Control
For vehicles with the rear climate
control system, the controls are
located on the rear of the center
console. The system can also be
controlled with the front controls.
Press the REAR button on the front
climate control system to control the
rear climate control system. The
REAR text displays when the rear
system is on. Sync Mode :
This mode matches
the rear climate control to the front
climate control settings. It comes on
when REAR is pressed.
Independent Mode : This mode
directs rear seating airflow
according to the settings of the rear
controls. It comes on when any rear
control is adjusted.
Fan Control : Turn clockwise or
counterclockwise to increase or
decrease the fan speed. Turn the
knob to
(to turn the fan off. Temperature Control :
Turn
clockwise or counterclockwise to
increase or decrease the airflow
temperature.
Air Delivery Mode Control : Turn
to the desired mode to change the
airflow direction.
H (Vent) : Air is directed through
the overhead outlets.
) (Bi-Level) : Air is directed
through the rear floor outlets, as
well as the overhead outlets.
6 (Floor) : Air is directed through
the floor outlets. The rear system
floor outlets are located under the
third row seats.
Page 183 of 360
 - 2016 - crc - 7/31/15
182 Climate Controls
Rear Climate Control System (with Rear Seat Audio)
1. Fan Control
2. Air Delivery M")
Buick Enclave Owner Manual (GMNA-Localizing-U.S./Canada/Mexico-
9159225) - 2016 - crc - 7/31/15
182 Climate Controls
Rear Climate Control System (with Rear Seat Audio)
1. Fan Control
2. Air Delivery Mode Control
3. Temperature Control
If equipped with the rear climate
control system, the controls are on
the rear of the center console.
Press the REAR button on the front
climate control system to control the
rear climate control system. The
system also turns on if any of the
rear controls, except
C, are
pressed. The display is activated
when the rear system is on. The system can also be turned off
by pressing
Cuntil the fan goes off.
Sync Mode : This mode matches
the rear climate control to the front
climate control settings. It comes on
when REAR is pressed.
Independent Mode : This mode
directs rear seating airflow
according to the settings of the rear
controls. It comes on when any rear
control is adjusted.
DandC(Fan Control) : Press the
fan up or down buttons to increase
or decrease the fan speed. Temperature Control :
Press + or
− to increase or decrease the air
temperature. The temperature
settings will display in
0-12 increments, going from the
coolest (0) to the warmest (12)
setting.
N(Air Delivery Mode Control) :
Press to manually change the
direction of the airflow. Repeatedly
press the button until the desired
mode appears on the display.
H(Vent) : Air is directed through
the overhead outlets.
)(Bi-Level) : Air is directed
through the rear floor outlets, as
well as the overhead outlets.
6(Floor) : Air is directed through
the floor outlets. The rear system
floor outlets are under the third row
seats.
Page 184 of 360
 - 2016 - crc - 7/31/15
Climate Controls 183
Air Vents
To adjust the center and side air
outlets on the instrument panel:
.Use t")
Buick Enclave Owner Manual (GMNA-Localizing-U.S./Canada/Mexico-
9159225) - 2016 - crc - 7/31/15
Climate Controls 183
Air Vents
To adjust the center and side air
outlets on the instrument panel:
.Use the slider switch in the
center of the outlet, to change
the direction of the airflow.
. Use the thumbwheel near the
outlet to control the amount of
airflow or to shut off the airflow.
There are also outlets overhead in
the rear passenger area: adjust as
needed.
Keep all outlets open whenever
possible for best system
performance.
Operation Tips
. Clear away any ice, snow,
or leaves from the air inlets at
the base of the windshield that
can block the flow of air into the
vehicle.
. Use of non-GM approved hood
deflectors can adversely affect
the performance of the system.
. Keep the path under all seats
clear of objects to help circulate
the air inside the vehicle more
effectively.
. If fogging reoccurs while in vent
or bi-level modes with mild
temperature throughout the
vehicle, turn on the air
conditioner to reduce windshield
fogging.
Maintenance
Passenger Compartment
Air Filter
The filter reduces the dust, pollen,
and other airborne irritants from
outside air and inside air when in
recirculation mode.
The filter should be replaced as part
of routine scheduled maintenance.
See Maintenance Schedule 0310.
To find out what type of replacement
filter to use, see Maintenance
Replacement Parts 0320.
1. Open the glove box.
Page 196 of 360
Buick Enclave Owner Manual (GMNA-Localizing-U.S./Canada/Mexico-
9159225) - 2016 - crc - 7/31/15
Driving and Operating 195
weight of the driver, passengers,
and cargo should never exceed
the vehicle's capacity weight.
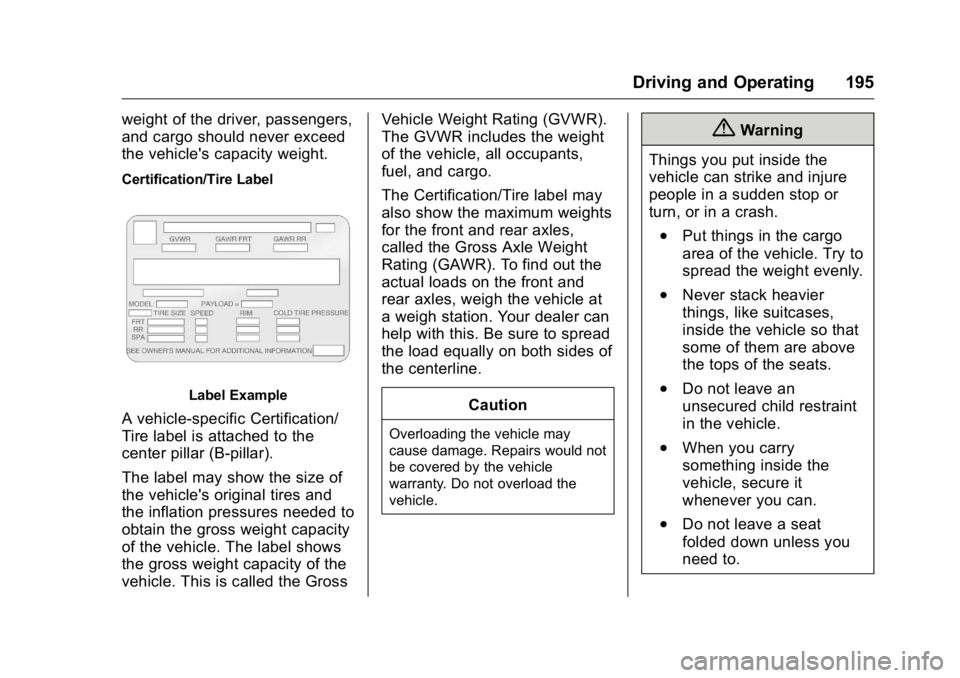
Certification/Tire Label
Label Example
A vehicle-specific Certification/
Tire label is attached to the
center pillar (B-pillar).
The label may show the size of
the vehicle's original tires and
the inflation pressures needed to
obtain the gross weight capacity
of the vehicle. The label shows
the gross weight capacity of the
vehicle. This is called the GrossVehicle Weight Rating (GVWR).
The GVWR includes the weight
of the vehicle, all occupants,
fuel, and cargo.
The Certification/Tire label may
also show the maximum weights
for the front and rear axles,
called the Gross Axle Weight
Rating (GAWR). To find out the
actual loads on the front and
rear axles, weigh the vehicle at
a weigh station. Your dealer can
help with this. Be sure to spread
the load equally on both sides of
the centerline.
CautionOverloading the vehicle may
cause damage. Repairs would not
be covered by the vehicle
warranty. Do not overload the
vehicle.
{Warning
Things you put inside the
vehicle can strike and injure
people in a sudden stop or
turn, or in a crash.
.Put things in the cargo
area of the vehicle. Try to
spread the weight evenly.
.Never stack heavier
things, like suitcases,
inside the vehicle so that
some of them are above
the tops of the seats.
.Do not leave an
unsecured child restraint
in the vehicle.
.When you carry
something inside the
vehicle, secure it
whenever you can.
.Do not leave a seat
folded down unless you
need to.
Page 263 of 360
 - 2016 - crc - 7/31/15
262 Vehicle Care
Fuse SideThe vehicle may not be equipped
with all of the fuses, relays, and
features sh")
Buick Enclave Owner Manual (GMNA-Localizing-U.S./Canada/Mexico-
9159225) - 2016 - crc - 7/31/15
262 Vehicle Care
Fuse SideThe vehicle may not be equipped
with all of the fuses, relays, and
features shown.
Fuses Usage
# GMC NON HID = Lo Beam
)GMC NON HID =
High Shutter
) )Chevy = Fog
Lamps
) ) )Buick China =
Rear Fog Lamp
AIRBAG Airbag
AMP AmplifierBCK
UP/STOP Back-up Lamp/
Stoplamp
BCM Body Control Module
CNSTR VENT Canister Vent
CTSY Courtesy Lamps
DR LCK Door Locks Fuses Usage
DRL/
LO BEAM Daytime Running
Lamps Relay/Low
Beam Headlamps
Relay
DSPLY Display
FRT WSW Front Windshield Washer
HTD/
COOL SEAT Heated/Cooling
Seats
HVAC Heating, Ventilation, and Air
Conditioning
INADV PWR INT LAMPS Inadvertent Power/
Interior Light Pipe
Lamps
INFOTMNT/ MSM Infotainment/
Memory Seat
Module
LT TRN SIG Driver Side Turn Signal