ECO mode BUICK ENCLAVE 2017 User Guide
[x] Cancel search | Manufacturer: BUICK, Model Year: 2017, Model line: ENCLAVE, Model: BUICK ENCLAVE 2017Pages: 366, PDF Size: 5 MB
Page 159 of 366

Buick Enclave Owner Manual (GMNA-Localizing-U.S./Canada/Mexico-
9955666) - 2017 - crc - 8/4/16
158 Infotainment System
Each of these three pages can be
customized to contain your choice
of up to eight per screen. They may
also be re-ordered on each screen
to taste.
FAV (Favorites) :Press to scroll
through the favorites banner on the
bottom of the screen. The favorites
banner stores your favorite radio
and SiriusXM stations (if equipped).
To store a favorite station, press and
hold the desired position on the
banner until a beep is heard.
!(Voice Recognition) : Press to
begin voice recognition. See
Bluetooth 0170.
Menu : Press to enter the Home
Page menu.
qPrevious : Press to go to the
previous Home Page.
Next
r: Press to go to the next
Home Page.
Home Page Features
Some features are disabled when
the vehicle is moving and some
icons may not be active. Now Playing :
Press to display the
active source page. The sources
available are AM, FM, XM (if
equipped), CD, USB, Bluetooth,
or AUX Input.
Settings : Press to display the
Settings menu. See Settings0177.
Tone : Press to display the Tone
Settings menu. The following may
display:
Tone Settings : Press to adjust the
tone settings. The following may
display:
. EQ: Press
oorpto adjust the
equalizer.
. Bass: Press + or −to adjust
the bass.
. Middle: Press + or −to adjust
the middle.
. Treble: Press + or −to adjust the
treble.
. Balance: Press L to hear more
sound from the left speakers or
R for more sound from the right
speakers. The middle position
balances the sound between the
left and right speakers. .
Fade: Press F for more sound
from the front speakers or R for
more sound from the rear
speakers. The middle position
balances the sound between the
front and rear speakers.
DSP Mode : Press
oorpto adjust
the DSP mode, if equipped.
Language
To change the language of the
screens, see Vehicle
Personalization 0136.
English or Metric Units
To change the screens from English
or metric, see Driver Information
Center (DIC) 0122.
Page 171 of 366
Buick Enclave Owner Manual (GMNA-Localizing-U.S./Canada/Mexico-
9955666) - 2017 - crc - 8/4/16
170 Infotainment System
Press and hold©or¨until the
display flashes to tune to an
individual station. The display stops
flashing after the buttons have not
been pressed for more than
two seconds. This function is
inactive, with some radios, if the
front seat passengers are listening
to the radio.
While listening to a disc, press
¨to
go to the next track or chapter on
the disc. Press
©to go back to the
start of the current track or chapter
(if more than 10 seconds have
played). This function is inactive,
with some radios, if the front seat
passengers are listening to the disc.
When a DVD video menu is being
displayed, press
©or¨to perform a
cursor up or down on the menu.
Hold
©or¨to perform a cursor left
or right on the menu. PROG (Program) :
Press to go to
the next preset radio station or
channel set on the main radio. This
function is inactive, with some
radios, if the front seat passengers
are listening to the radio.
When a CD or DVD audio disc is
playing, press PROG to go to the
beginning of the CD or DVD audio.
This function is inactive, with some
radios, if the front seat passengers
are listening to the disc.
When a disc is playing in the CD or
DVD changer, press PROG to
select the next disc if multiple discs
are loaded. This function is inactive,
with some radios, if the front seat
passengers are listening to the disc.
When a DVD video menu is being
displayed, press PROG to perform
the ENTER menu function.
Phone
Bluetooth
For vehicles equipped with
Bluetooth capability, the system can
interact with many cell phones,
allowing:
. Placement and receipt of calls in
a hands-free mode.
. Sharing of the cell phone’s
address book or contact list with
the vehicle.
To minimize driver distraction,
before driving, and with the vehicle
parked:
. Become familiar with the
features of the cell phone.
Organize the phone book and
contact lists clearly and delete
duplicate or rarely used entries.
If possible, program speed dial
or other shortcuts.
. Review the controls and
operation of the infotainment
system.
Page 180 of 366
Buick Enclave Owner Manual (GMNA-Localizing-U.S./Canada/Mexico-
9955666) - 2017 - crc - 8/4/16
Climate Controls 179
Climate Controls
Climate Control Systems
Dual Automatic ClimateControl System . . . . . . . . . . . . . 179
Rear Climate Control System . . . . . . . . . . . . . . . . . . . . . . 184
Rear Climate Control System (with Rear Seat Audio) . . . . . . 185
Air Vents
Air Vents . . . . . . . . . . . . . . . . . . . . . 186
Maintenance
Passenger Compartment AirFilter . . . . . . . . . . . . . . . . . . . . . . . . 186
Service . . . . . . . . . . . . . . . . . . . . . . . 187
Climate Control Systems
Dual Automatic Climate Control System
The heating, cooling, and ventilation in the vehicle can be controlled with this
system.
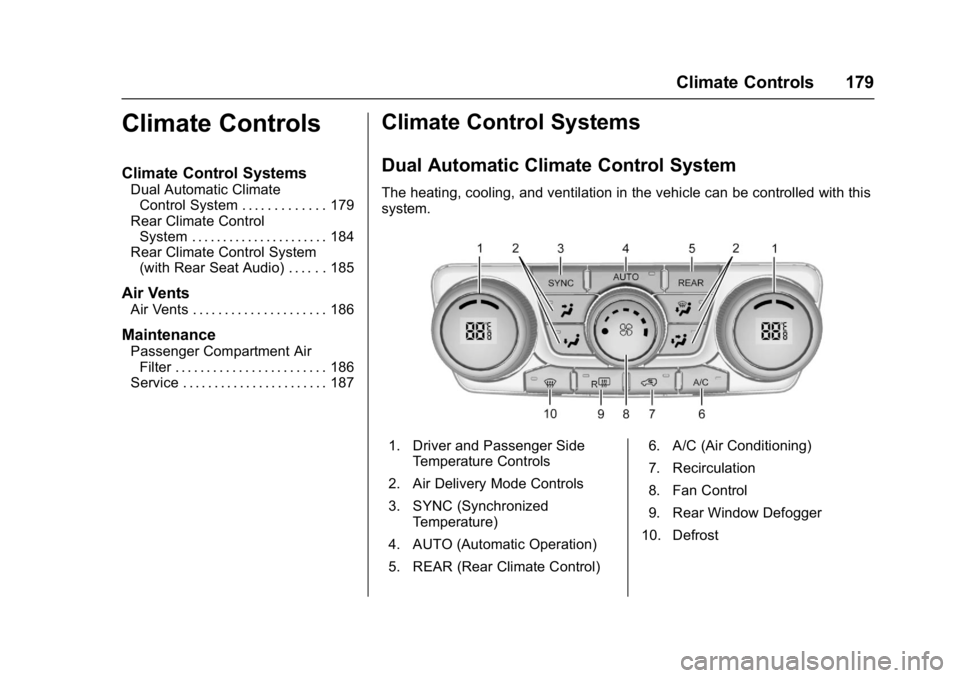
1. Driver and Passenger Side
Temperature Controls
2. Air Delivery Mode Controls
3. SYNC (Synchronized Temperature)
4. AUTO (Automatic Operation)
5. REAR (Rear Climate Control) 6. A/C (Air Conditioning)
7. Recirculation
8. Fan Control
9. Rear Window Defogger
10. Defrost
Page 182 of 366
Buick Enclave Owner Manual (GMNA-Localizing-U.S./Canada/Mexico-
9955666) - 2017 - crc - 8/4/16
Climate Controls 181
temperature. The driver side
temperature display will show the
temperature setting.
Passenger Side Temperature
Control :Turn clockwise or
counterclockwise to increase or
decrease the passenger side
temperature. The passenger side
display will show the temperature
setting.
SYNC : Press to set the passenger
temperature to match the driver
temperature setting.
Manual Operation
The air delivery mode or fan speed
can be manually adjusted.
9: Turn the knob clockwise or
counterclockwise to increase or
decrease the fan speed.
Turning the fan control knob while in
automatic control places the fan
speed under manual control.
The air delivery mode remains in
automatic control. The fan setting
displays momentarily and then no
longer displays. Air Delivery Modes :
Press
H,),
6, or-to change the direction of
the airflow in the vehicle. An
indicator light comes on in the
selected mode button. Pressing a
mode button while the system is off
changes the air delivery mode
without turning the system on.
Changing the air delivery mode
while in automatic control places the
system into manual control. The air
delivery mode button indicator
displays, and the AUTO button
indicator light turns off.
H: Air is directed to the instrument
panel outlets.
): Air is divided between the
instrument panel and floor outlets.
Some air is directed towards the
windshield and side window outlets.
Cooler air is directed to the upper
outlets and warmer air to the floor
outlets.
6: Air is directed to the floor
outlets, with some of the air directed
to the windshield, side window, and
second row floor outlets. In this
mode, the system uses outside air.
-: This mode clears the windows
of fog or moisture. Air is directed to
the windshield, floor outlets, and
side window vents. When this mode
is selected, the system turns off
recirculation and runs the air
conditioning compressor unless the
outside temperature is less than 4 °
C (40 °F). Do not drive the vehicle
until all the windows are clear.
0: Press to turn the defrost on or
off. This mode quickly clears the
windshield of fog or frost. Air is
directed to the windshield, side
window, and floor vents. In this
mode, outside air is pulled inside
the vehicle. The air conditioning
system runs automatically in this
setting, unless the outside
temperature is less than 4 °C (40
°F).
Do not drive the vehicle until all the
windows are clear.
Air Conditioning
A/C : Press to turn the air
conditioning on and off. An indicator
light comes on when A/C is on.
Page 189 of 366

Buick Enclave Owner Manual (GMNA-Localizing-U.S./Canada/Mexico-
9955666) - 2017 - crc - 8/4/16
188 Driving and Operating
Driving and
Operating
Driving Information
Distracted Driving . . . . . . . . . . . . 189
Defensive Driving . . . . . . . . . . . . . 189
Drunk Driving . . . . . . . . . . . . . . . . . 190
Control of a Vehicle . . . . . . . . . . . 190
Braking . . . . . . . . . . . . . . . . . . . . . . . 190
Steering . . . . . . . . . . . . . . . . . . . . . . 190
Off-Road Recovery . . . . . . . . . . . 191
Loss of Control . . . . . . . . . . . . . . . 191
Driving on Wet Roads . . . . . . . . 192
Hill and Mountain Roads . . . . . 193
Winter Driving . . . . . . . . . . . . . . . . 193
If the Vehicle Is Stuck . . . . . . . . 195
Vehicle Load Limits . . . . . . . . . . . 195
Starting and Operating
New Vehicle Break-In . . . . . . . . . 199
Ignition Positions . . . . . . . . . . . . . 199
Starting the Engine . . . . . . . . . . . 201
Engine Heater . . . . . . . . . . . . . . . . 202
Retained AccessoryPower (RAP) . . . . . . . . . . . . . . . . 203
Shifting Into Park . . . . . . . . . . . . . 204
Shifting out of Park . . . . . . . . . . . 205
Parking over Things That Burn . . . . . . . . . . . . . . . . . . . 205
Engine Exhaust
Engine Exhaust . . . . . . . . . . . . . . 206
Running the Vehicle WhileParked . . . . . . . . . . . . . . . . . . . . . . 206
Automatic Transmission
Automatic Transmission . . . . . . 207
Manual Mode . . . . . . . . . . . . . . . . . 208
Tow/Haul Mode . . . . . . . . . . . . . . . 209
Drive Systems
All-Wheel Drive . . . . . . . . . . . . . . . 210
Brakes
Antilock BrakeSystem (ABS) . . . . . . . . . . . . . . . 210
Parking Brake . . . . . . . . . . . . . . . . 211
Brake Assist . . . . . . . . . . . . . . . . . . 212
Hill Start Assist (HSA) . . . . . . . . 212
Ride Control Systems
Traction Control/Electronic Stability Control . . . . . . . . . . . . . 212
Cruise Control
Cruise Control . . . . . . . . . . . . . . . . 214
Driver Assistance Systems
Rear Vision Camera (RVC) . . . 216
Parking Assist . . . . . . . . . . . . . . . . 218
Forward Collision Alert (FCA)System . . . . . . . . . . . . . . . . . . . . . . 220 Side Blind Zone
Alert (SBZA) . . . . . . . . . . . . . . . . 221
Lane Departure Warning (LDW) . . . . . . . . . . . . . 223
Fuel
Fuel . . . . . . . . . . . . . . . . . . . . . . . . . . 225
California FuelRequirements . . . . . . . . . . . . . . . 225
Fuels in Foreign Countries . . . 226
Fuel Additives . . . . . . . . . . . . . . . . 226
Filling the Tank . . . . . . . . . . . . . . . 226
Filling a Portable Fuel Container . . . . . . . . . . . . . . . . . . . 227
Trailer Towing
General TowingInformation . . . . . . . . . . . . . . . . . . 228
Driving Characteristics and Towing Tips . . . . . . . . . . . . . . . . . 228
Trailer Towing . . . . . . . . . . . . . . . . 231
Towing Equipment . . . . . . . . . . . . 233
Conversions and Add-Ons
Add-On Electrical Equipment . . . . . . . . . . . . . . . . . . 235
Page 203 of 366
Buick Enclave Owner Manual (GMNA-Localizing-U.S./Canada/Mexico-
9955666) - 2017 - crc - 8/4/16
202 Driving and Operating
race the engine immediately
after starting it. Operate the
engine and transmission gently
to allow the oil to warm up and
lubricate all moving parts.
Caution
Cranking the engine for long
periods of time, by returning the
ignition to the START position
immediately after cranking has
ended, can overheat and damage
the cranking motor, and drain the
battery. Wait at least 15 seconds
between each try, to let the
cranking motor cool down.
2. If the engine does not start after five to 10 seconds,
especially in very cold weather
(below −18 °C or 0 °F), it could
be flooded with too much
gasoline. Try pushing the
accelerator pedal all the way to
the floor and holding it there as
you hold the key in START for
up to a maximum of
15 seconds. Wait at least
15 seconds between each try, to allow the cranking motor to
cool down. When the engine
starts, let go of the key and
accelerator. If the vehicle starts
briefly but then stops again,
repeat these steps. This clears
the extra gasoline from the
engine. Do not race the engine
immediately after starting it.
Operate the engine and
transmission gently until the oil
warms up and lubricates all
moving parts.
Engine Heater
The engine coolant heater can
provide easier starting and better
fuel economy during engine
warm-up in cold weather conditions
at or below 0 °F (−18 °C). Vehicles
with an engine coolant heater
should be plugged in at least four
hours before starting. Some models
may have an internal thermostat in
the cord which will prevent engine
coolant heater operation at
temperatures above 0 °F (−18 °C).
To Use the Engine Coolant
Heater
1. Turn off the engine.
2. Open the hood and unwrap the
electrical cord. The bundled
cord is located on the driver
side of the engine
compartment, between the
engine air cleaner and the
windshield washer fluid
reservoir. See Engine
Compartment Overview 0240.
Check the heater cord for
damage. If it is damaged, do
not use it. See your dealer for
a replacement. Inspect the
cord for damage yearly.
3. Plug the cord into a normal, grounded 110-volt AC outlet.
Page 209 of 366

Buick Enclave Owner Manual (GMNA-Localizing-U.S./Canada/Mexico-
9955666) - 2017 - crc - 8/4/16
208 Driving and Operating
{Warning
Shifting into a drive gear while the
engine is running at high speed is
dangerous. Unless your foot is
firmly on the brake pedal, the
vehicle could move very rapidly.
You could lose control and hit
people or objects. Do not shift
into a drive gear while the engine
is running at high speed.
Caution
Shifting out of P (Park) or
N (Neutral) with the engine
running at high speed may
damage the transmission. The
repairs would not be covered by
the vehicle warranty. Be sure the
engine is not running at high
speed when shifting the vehicle.D :
This position is for normal
driving. It provides the best fuel
economy. If you need more power
for passing, and you are:
. Going less than 56 km/h
(35 mph), push the accelerator
pedal about halfway down.
. Going about 56 km/h (35 mph) or
more, push the accelerator all
the way down.
Caution
If the vehicle does not shift gears,
the transmission could be
damaged. Have the vehicle
serviced right away.
If the vehicle is stopped on a hill,
with your foot off the brake pedal,
the vehicle may roll. This is normal
and is due to the torque converter
designed to improve fuel economy
and performance. Use the brake to
hold the vehicle on a hill. Do not use
the accelerator pedal.
L : This position gives you access
to gear ranges. This provides more
engine braking but lower fuel economy than D (Drive). You can
use it on very steep hills, or in deep
snow or mud. See
Manual
Mode 0208.
Manual Mode
Electronic Range Select
(ERS) Mode
ERS mode allows you to choose the
top-gear limit of the transmission
and the vehicle's speed while
driving downhill or towing a trailer.
The vehicle has an electronic shift
position indicator within the
instrument cluster. When using the
ERS mode a number will display
next to the L, indicating the current
gear that has been selected.
Page 229 of 366

Buick Enclave Owner Manual (GMNA-Localizing-U.S./Canada/Mexico-
9955666) - 2017 - crc - 8/4/16
228 Driving and Operating
Warning (Continued)
.Place the container on the
ground.
. Place the nozzle inside the
fill opening of the container
before dispensing fuel, and
keep it in contact with the fill
opening until filling is
complete.
. Fill the container no more
than 95% full to allow for
expansion.
. Do not smoke, light
matches, or use lighters
while pumping fuel.
. Avoid using cell phones or
other electronic devices.
Trailer Towing
General Towing
Information
Only use towing equipment that has
been designed for the vehicle.
Contact your dealer or trailering
dealer for assistance with preparing
the vehicle for towing a trailer. Read
the entire section before towing a
trailer.
For towing a disabled vehicle, see
Towing the Vehicle 0300. For
towing the vehicle behind another
vehicle such as a motor home, see
Recreational Vehicle Towing 0300.
Driving Characteristics
and Towing Tips
Driving with a Trailer
When towing a trailer:
.
Become familiar with the state
and local laws that apply
specifically to trailer towing. .
Do not tow a trailer during the
first 800 km (500 mi), to prevent
damage to the engine, axle or
other parts.
. Then, during the first 800 km
(500 mi) trailer towing, do not
drive over 80 km/h (50 mph) and
do not make starts at full throttle.
. The vehicle can tow in D (Drive)
but Manual Mode is
recommended. See Manual
Mode 0208. Use a lower gear if
the transmission shifts too often.
. Turn off Parking Assist when
towing.
{Warning
When towing a trailer, exhaust
gases may collect at the rear of
the vehicle and enter if the
liftgate, trunk/hatch, or rear-most
window is open.
When towing a trailer:
(Continued)
Page 235 of 366
Buick Enclave Owner Manual (GMNA-Localizing-U.S./Canada/Mexico-
9955666) - 2017 - crc - 8/4/16
234 Driving and Operating
When using a weight-distributing
hitch, the hitch must be adjusted so
that the distance (2) remains the
same both before and after coupling
the trailer to the tow vehicle.
Safety Chains
Always attach chains between the
vehicle and the trailer. Cross the
safety chains under the tongue of
the trailer to help prevent the tongue
from contacting the road if it
becomes separated from the hitch.
Always leave just enough slack so
the rig can turn. Never allow safety
chains to drag on the ground.
Trailer Brakes
A loaded trailer that weighs more
than 450 kg (1,000 lb) needs to have
its own brake system that is
adequate for the weight of the
trailer. Be sure to read and follow
the instructions for the trailer brakes
so they are installed, adjusted, and
maintained properly.Because the vehicle has antilock
brakes, do not try to tap into the
vehicle's hydraulic brake system.
If you do, both brake systems will
not work well, or at all.
Trailer Wiring Harness
Basic Trailer Wiring
The trailer wiring harness, with a
seven-pin connector, is located at
the rear of the vehicle and is tied to
the vehicle's frame. The harness
connector can be plugged into a
seven-pin universal heavy-duty
trailer connector available through
your dealer.
Use only a round, seven-wire
connector with flat blade terminals
meeting SAE J2863 specifications
for proper electrical connectivity.
The seven-wire harness contains
the following trailer circuits:
.
Yellow: Left Stop/Turn Signal
. Dark Green: Right Stop/Turn
Signal
. Brown: Taillamps
. Black: Ground .
Light Green: Back-up Lamps
. Red/Black: Battery Feed
. Dark Blue: Trailer Brake*
*The fuse for this circuit is installed
in the underhood electrical center,
but the wires are not connected.
They should be connected by your
dealer or a qualified service center.
If the back-up lamp circuit is not
functional, contact your dealer.
To help charge a remote
(non-vehicle) battery, press the Tow/
Haul Mode button at the end of the
shift lever. If the trailer is too light for
Tow/Haul Mode, turn on the
headlamps to help charge the
battery.
Electric Trailer Brake Control
Wiring Provisions
These wiring provisions for an
electric trailer brake controller are
included with the vehicle as part of
the trailer wiring package. The
instrument panel contains blunt cut
wires above the parking brake
Page 253 of 366
Buick Enclave Owner Manual (GMNA-Localizing-U.S./Canada/Mexico-
9955666) - 2017 - crc - 8/4/16
252 Vehicle Care
Caution
After driving in the overheated
engine protection operating
mode, the engine oil will be
severely degraded. Any repairs
performed before the engine is
cool may cause engine damage.
Allow the engine to cool before
attempting any repair. Repair the
cause of coolant loss, change the
oil, and reset the oil life system.
SeeEngine Oil 0241.
Power Steering Fluid
The power steering fluid reservoir is
under the engine cover on the
passenger side of the vehicle. See
Engine Compartment Overview
0240 for reservoir location.
When to Check Power Steering
Fluid
It is not necessary to regularly
check power steering fluid unless
you suspect there is a leak in the
system or you hear an unusual
noise. A fluid loss in this system
could indicate a problem. Have the
system inspected and repaired.
How to Check Power Steering
Fluid
To check the power steering fluid:
1. Turn the key off and let the engine compartment
cool down.
2. Remove the engine cover. See Engine Cover 0241.
3. Wipe the cap and the top of the reservoir clean.
4. Unscrew the cap and wipe the dipstick with a clean rag.
5. Replace the cap and completely tighten it.
6. Remove the cap again and look at the fluid level on the
dipstick. The fluid level should be
somewhere between the MAX and
MIN line on the dipstick in room
temperature. If the fluid is on or
below the MIN line, add fluid close
to the MAX line.
What to Use
To determine what kind of fluid to
use, see
Recommended Fluids and
Lubricants 0324. Always use the
proper fluid.
Caution
Use of the incorrect fluid may
damage the vehicle and the
damages may not be covered by
the vehicle warranty. Always use
the correct fluid listed in
Recommended Fluids and
Lubricants 0324.