Check BUICK ENCLAVE 2018 Owner's Manual
[x] Cancel search | Manufacturer: BUICK, Model Year: 2018, Model line: ENCLAVE, Model: BUICK ENCLAVE 2018Pages: 393, PDF Size: 5.68 MB
Page 8 of 393

Buick Enclave Owner Manual (GMNA-Localizing-U.S./Canada/Mexico-
10999311) - 2018 - crc - 11/20/17
In Brief 7
1.Air Vents 0182.
2. Turn Signal Lever. See Turn
and Lane-Change Signals
0 170.
IntelliBeam
®System Button (If
Equipped). See Exterior Lamp
Controls 0166.
3. Manual Mode 0215 (If
Equipped).
4. Instrument Cluster 0132.
Driver Information Center (DIC)
Display.
See Driver Information Center
(DIC) (Base Level) 0148 or
Driver Information Center (DIC)
(Uplevel) 0150.
5. Windshield Wiper/Washer
0124.
6. Traction Control/Electronic
Stability Control 0220.
All Wheel Drive Button (If
Equipped). See Driver Mode
Control 0222. Sport Mode Button (If
Equipped) or Tow/Haul Mode
Button (If Equipped). See
Driver Mode Control
0222.
7. Light Sensor. See Automatic
Headlamp System 0169.
8. Hazard Warning Flashers
0170.
Assistance Systems for
Parking or Backing 0235 (If
Equipped).
Lane Keep Assist (LKA) 0247
(If Equipped).
9. Infotainment 0175.
10. Dual Automatic Climate Control
System 0176.
Heated and Ventilated Front
Seats 068 (If Equipped).
11. Wireless Charging 0129 (If
Equipped).
12. Shift Lever. See Automatic
Transmission 0210.
13. ENGINE START/STOP Button. SeeIgnition Positions 0200.
14. Steering Wheel Controls 0123. 15.
Horn 0124.
16. Steering Wheel Adjustment
0123 (Out of View).
17. Cruise Control 0224.
Adaptive Cruise Control 0226
(If Equipped).
Heated Steering Wheel 0123
(If Equipped).
Forward Collision Alert (FCA)
System 0239 (If Equipped).
18. Hood Release. See Hood
0 266.
19. Data Link Connector (DLC) (Out of View). See Malfunction
Indicator Lamp (Check Engine
Light) 0140.
20. Exterior Lamp Controls 0166.
21. Instrument Panel Illumination
Control 0171.
22. Electric Parking Brake 0218.
Page 31 of 393
Buick Enclave Owner Manual (GMNA-Localizing-U.S./Canada/Mexico-
10999311) - 2018 - crc - 11/20/17
30 Keys, Doors, and Windows
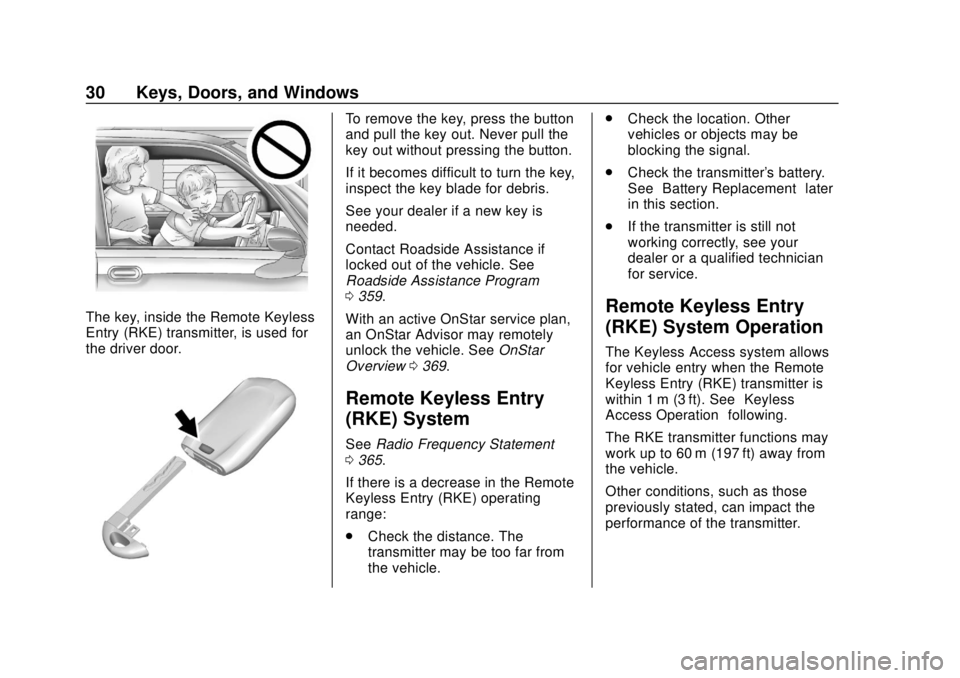
The key, inside the Remote Keyless
Entry (RKE) transmitter, is used for
the driver door.
To remove the key, press the button
and pull the key out. Never pull the
key out without pressing the button.
If it becomes difficult to turn the key,
inspect the key blade for debris.
See your dealer if a new key is
needed.
Contact Roadside Assistance if
locked out of the vehicle. See
Roadside Assistance Program
0359.
With an active OnStar service plan,
an OnStar Advisor may remotely
unlock the vehicle. See OnStar
Overview 0369.
Remote Keyless Entry
(RKE) System
See Radio Frequency Statement
0 365.
If there is a decrease in the Remote
Keyless Entry (RKE) operating
range:
. Check the distance. The
transmitter may be too far from
the vehicle. .
Check the location. Other
vehicles or objects may be
blocking the signal.
. Check the transmitter's battery.
See “Battery Replacement” later
in this section.
. If the transmitter is still not
working correctly, see your
dealer or a qualified technician
for service.
Remote Keyless Entry
(RKE) System Operation
The Keyless Access system allows
for vehicle entry when the Remote
Keyless Entry (RKE) transmitter is
within 1 m (3 ft). See “Keyless
Access Operation” following.
The RKE transmitter functions may
work up to 60 m (197 ft) away from
the vehicle.
Other conditions, such as those
previously stated, can impact the
performance of the transmitter.
Page 34 of 393
Buick Enclave Owner Manual (GMNA-Localizing-U.S./Canada/Mexico-
10999311) - 2018 - crc - 11/20/17
Keys, Doors, and Windows 33
transmitter inside the vehicle. Do
not leave the RKE transmitter in an
unattended vehicle.
To customize the doors to
automatically lock when exiting the
vehicle, see“Remote Lock, Unlock,
Start” under Vehicle Personalization
0 154.
Temporary Disable of Passive
Locking
Temporarily disable the passive
locking by pressing and holding
K
on the interior door switch with a
door open for at least four seconds,
or until three chimes are heard.
Passive locking will then remain
disabled until
Qon the interior door
is pressed, or until the vehicle is
turned on.
Remote Left in Vehicle Alert
When the vehicle is turned off and
an RKE transmitter is left in the
vehicle, the horn will chirp three
times after all doors are closed. To
turn on or off, see Vehicle
Personalization 0154. Remote No Longer in Vehicle Alert
If the vehicle is on with a door open,
and then all doors are closed, the
vehicle will check for RKE
transmitters inside. If an RKE
transmitter is not detected, the
Driver Information Center (DIC) will
display NO REMOTE DETECTED
and the horn will chirp three times.
This occurs only once each time the
vehicle is driven. To turn on or off,
see
Vehicle Personalization 0154.
Keyless Liftgate Opening
When the doors are locked, press
the touch pad on the liftgate handle
to open the liftgate if the RKE
transmitter is within 1 m (3 ft).
Programming Transmitters to
the Vehicle
Only RKE transmitters programmed
to the vehicle will work. If a
transmitter is lost or stolen, a
replacement can be purchased and
programmed through your dealer.
The vehicle can be reprogrammed
so that lost or stolen transmitters no
longer work. Any remaining transmitters will need to be
programmed. Each vehicle can
have up to eight transmitters
matched to it.
Programming with Recognized
Transmitters
A new transmitter can be
programmed to the vehicle when
there are two recognized
transmitters.
To program, the vehicle must be off
and all of the transmitters, both
currently recognized and new, must
be with you.
1. Place the two recognized transmitters in the cupholder.
2. Remove the key lock cylinder cap on the driver door handle.
See Door Locks 038. Insert
the vehicle key of the new
transmitter into the key lock
cylinder on the driver door
handle and turn the key,
counterclockwise, to the unlock
position five times within
10 seconds.
Page 37 of 393
Buick Enclave Owner Manual (GMNA-Localizing-U.S./Canada/Mexico-
10999311) - 2018 - crc - 11/20/17
36 Keys, Doors, and Windows
Battery Replacement
Replace the battery in the
transmitter soon if the REPLACE
BATTERY IN REMOTE KEY
message displays in the DIC.
Caution
When replacing the battery, do
not touch any of the circuitry on
the transmitter. Static from your
body could damage the
transmitter.
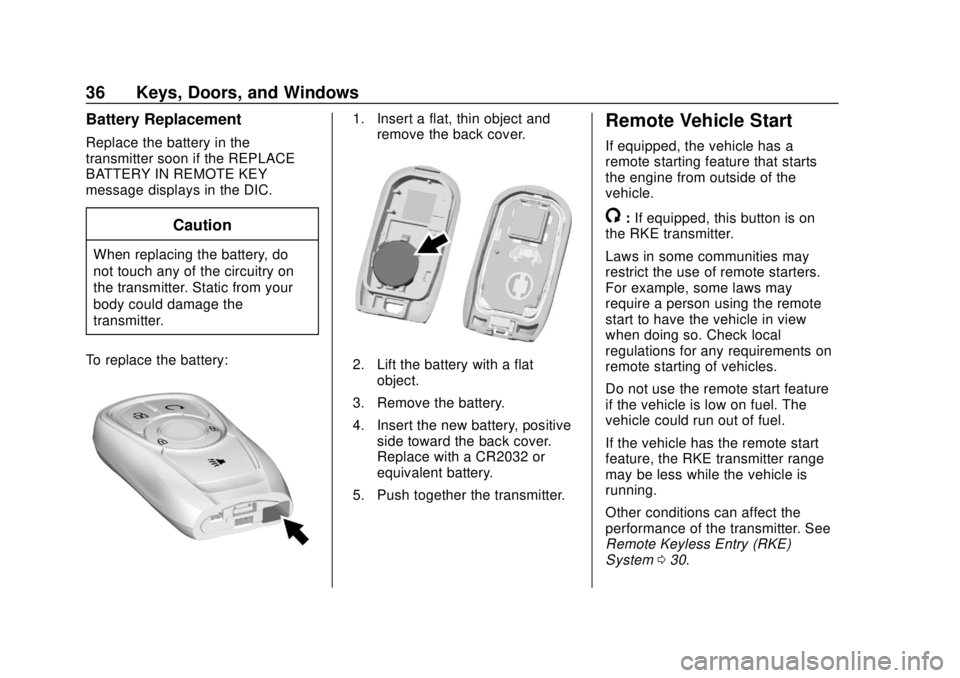
To replace the battery:
1. Insert a flat, thin object and remove the back cover.
2. Lift the battery with a flatobject.
3. Remove the battery.
4. Insert the new battery, positive side toward the back cover.
Replace with a CR2032 or
equivalent battery.
5. Push together the transmitter.
Remote Vehicle Start
If equipped, the vehicle has a
remote starting feature that starts
the engine from outside of the
vehicle.
/: If equipped, this button is on
the RKE transmitter.
Laws in some communities may
restrict the use of remote starters.
For example, some laws may
require a person using the remote
start to have the vehicle in view
when doing so. Check local
regulations for any requirements on
remote starting of vehicles.
Do not use the remote start feature
if the vehicle is low on fuel. The
vehicle could run out of fuel.
If the vehicle has the remote start
feature, the RKE transmitter range
may be less while the vehicle is
running.
Other conditions can affect the
performance of the transmitter. See
Remote Keyless Entry (RKE)
System 030.
Page 41 of 393
Buick Enclave Owner Manual (GMNA-Localizing-U.S./Canada/Mexico-
10999311) - 2018 - crc - 11/20/17
40 Keys, Doors, and Windows
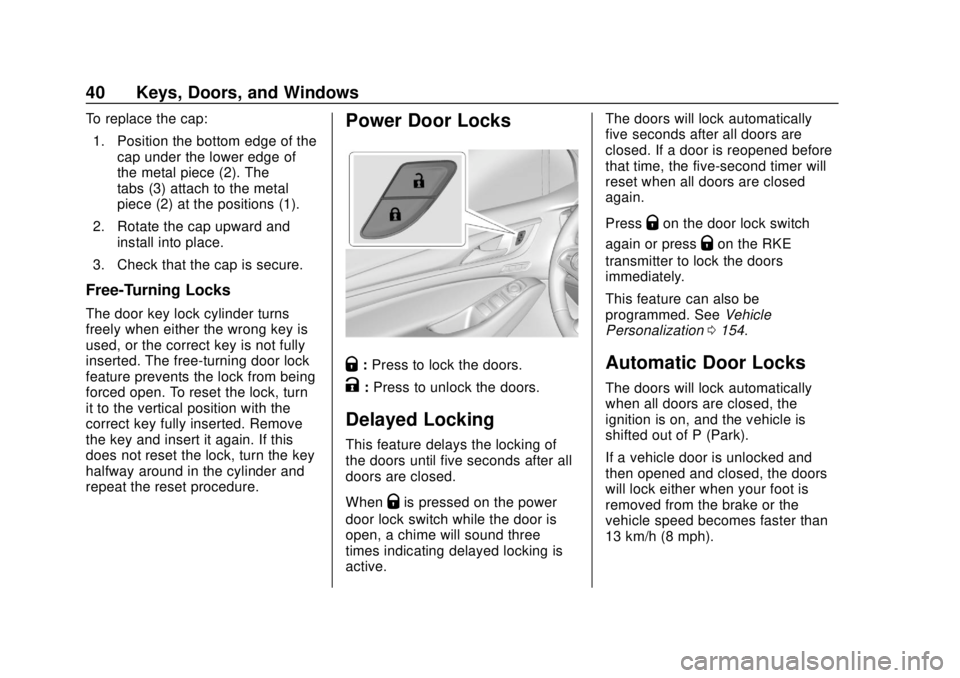
To replace the cap:1. Position the bottom edge of the cap under the lower edge of
the metal piece (2). The
tabs (3) attach to the metal
piece (2) at the positions (1).
2. Rotate the cap upward and install into place.
3. Check that the cap is secure.
Free-Turning Locks
The door key lock cylinder turns
freely when either the wrong key is
used, or the correct key is not fully
inserted. The free-turning door lock
feature prevents the lock from being
forced open. To reset the lock, turn
it to the vertical position with the
correct key fully inserted. Remove
the key and insert it again. If this
does not reset the lock, turn the key
halfway around in the cylinder and
repeat the reset procedure.
Power Door Locks
Q: Press to lock the doors.
K:Press to unlock the doors.
Delayed Locking
This feature delays the locking of
the doors until five seconds after all
doors are closed.
When
Qis pressed on the power
door lock switch while the door is
open, a chime will sound three
times indicating delayed locking is
active. The doors will lock automatically
five seconds after all doors are
closed. If a door is reopened before
that time, the five-second timer will
reset when all doors are closed
again.
Press
Qon the door lock switch
again or press
Qon the RKE
transmitter to lock the doors
immediately.
This feature can also be
programmed. See Vehicle
Personalization 0154.
Automatic Door Locks
The doors will lock automatically
when all doors are closed, the
ignition is on, and the vehicle is
shifted out of P (Park).
If a vehicle door is unlocked and
then opened and closed, the doors
will lock either when your foot is
removed from the brake or the
vehicle speed becomes faster than
13 km/h (8 mph).
Page 42 of 393

Buick Enclave Owner Manual (GMNA-Localizing-U.S./Canada/Mexico-
10999311) - 2018 - crc - 11/20/17
Keys, Doors, and Windows 41
To unlock the doors:
.Press
Kon the power door lock
switch.
. Shift into P (Park).
Automatic door locking cannot be
disabled. Automatic door unlocking
can be programmed. See Vehicle
Personalization 0154.
Lockout Protection
If the ignition is on or in ACC/
ACCESSORY and the power door
lock switch is pressed with the
driver door open, all the doors will
lock and only the driver door will
unlock.
If the vehicle is off and locking is
requested while a door is open,
when all doors are closed the
vehicle will check for RKE
transmitters inside. If an RKE
transmitter is detected and the
number of RKE transmitters inside
has not reduced, the driver door will
unlock and the horn will chirp three
times. Lockout Protection can be manually
overridden with the driver door open
by pressing and holding
Qon the
power door lock switch.
Unlocked Door Anti-Lockout
If Unlocked Door Anti-Lockout has
been turned on and the vehicle is
off, the driver door is open, and
locking is requested, all the doors
will lock and the driver door will
remain open. Press the button again
to lock the driver door. The
Unlocked Door Anti-Lockout feature
can be turned on or off. See Vehicle
Personalization 0154.
Safety Locks
The rear door safety locks prevent
passengers from opening the rear
doors from inside the vehicle.
Manual Safety Locks
If equipped, the safety lock is on the
inside edge of the rear doors. To
use the safety lock:
1. Move the lever down to the lock position.
2. Close the door.
3. Do the same for the other rear door.
To open a rear door when the safety
lock is on:
1. Unlock the door by activating the inside handle, by pressing
the power door lock switch,
Page 45 of 393
Buick Enclave Owner Manual (GMNA-Localizing-U.S./Canada/Mexico-
10999311) - 2018 - crc - 11/20/17
44 Keys, Doors, and Windows
.Presslon the bottom of the
liftgate to the left of the latch to
close.
Press any liftgate button or the
touch pad while the liftgate is
moving to stop it. Pressing again
restarts the operation in the reverse
direction. The touch pad on the
underside of the liftgate handle
cannot be used to close the liftgate.
Caution
Manually forcing the liftgate to
open or close during a power
cycle can damage the vehicle.
Allow the power cycle to
complete.
The power liftgate may be
temporarily disabled under extreme
low temperatures, or after repeated
power cycling over a short period of
time. If this occurs, the liftgate can
still be operated manually.
If the vehicle is shifted out of
P (Park) while the power function is
in progress, the liftgate will continue to completion. If the vehicle is
accelerated before the liftgate has
completed moving, the liftgate may
stop or reverse direction. Check for
DIC messages and make sure the
liftgate is closed and latched before
driving.
Falling Liftgate Detection
If the power liftgate automatically
closes after a power opening cycle,
it indicates that the system is
reacting to excess weight on the
liftgate or a possible support strut
failure. A repetitive chime will sound
while the falling liftgate detection
feature is operating. Remove any
excess weight. If the liftgate
continues to automatically close
after opening, see your dealer for
service before using the power
liftgate.
Interfering with the power liftgate
motion or manually closing the
liftgate too quickly after power
opening may resemble a support
strut failure. This could also activate
the falling liftgate detection feature.
Allow the liftgate to complete its
operation and wait a few seconds
before manually closing the liftgate.
Obstacle Detection Features
If the liftgate encounters an obstacle
during a power open or close cycle,
the liftgate will automatically reverse
direction and move a short distance
away from the obstacle. After
removing the obstruction, the power
liftgate operation can be used again.
If the liftgate encounters multiple
obstacles on the same power cycle,
the power function will deactivate.
After removing the obstructions,
manually close the liftgate which will
allow normal power operation
functions to resume.
If the vehicle is locked while the
liftgate is closing, and an obstacle is
encountered that prevents the
liftgate from completely closing, the
horn will sound as an alert that the
liftgate did not close.
Pinch sensors are on the side
edges of the liftgate. If an object is
caught between the liftgate and the
vehicle and presses against this
Page 52 of 393
Buick Enclave Owner Manual (GMNA-Localizing-U.S./Canada/Mexico-
10999311) - 2018 - crc - 11/20/17
Keys, Doors, and Windows 51
If the ignition mode will not change
with the other transmitter or with a
transmitter in the transmitter pocket,
your vehicle needs service. If the
ignition does change modes, the
first transmitter may be faulty. See
your dealer who can service the
theft-deterrent system and have a
new RKE transmitter programmed to
the vehicle.
It is possible for the immobilizer
system to learn new or replacement
RKE transmitters. Up to eight
transmitters can be programmed for
the vehicle. To program additional
transmitters, see“Programming
Transmitters to the Vehicle” under
Remote Keyless Entry (RKE)
System Operation 030.
Do not leave the transmitter or
device that disarms or deactivates
the theft-deterrent system in the
vehicle.Exterior Mirrors
Convex Mirrors
{Warning
A convex mirror can make things,
like other vehicles, look farther
away than they really are. If you
cut too sharply into the right lane,
you could hit a vehicle on the
right. Check the inside mirror or
glance over your shoulder before
changing lanes.
The passenger side mirror is convex
shaped. A convex mirror's surface is
curved so more can be seen from
the driver seat.
Power Mirrors
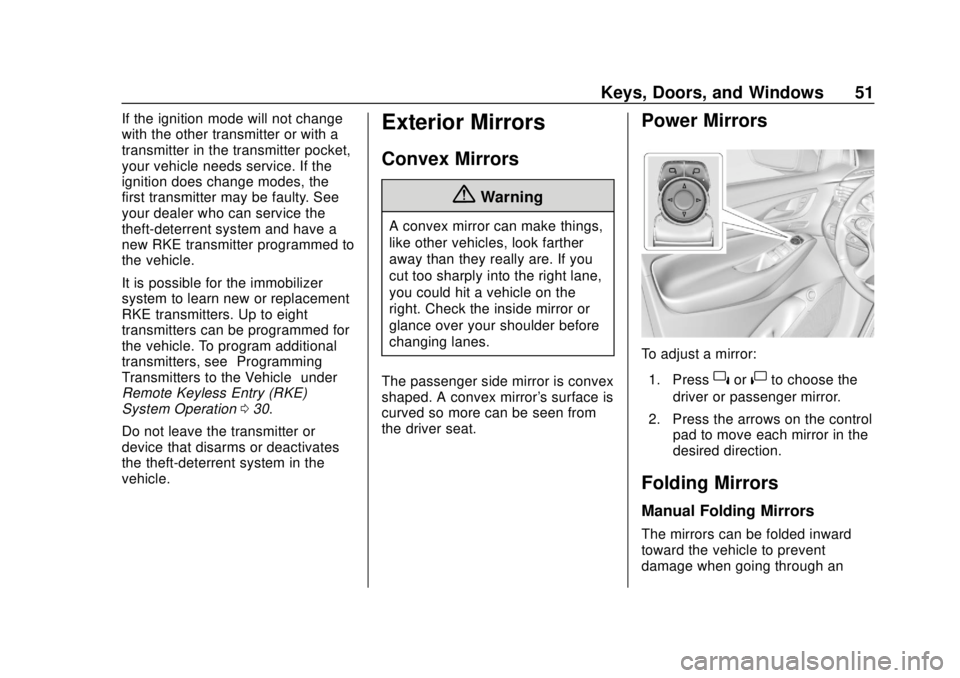
To adjust a mirror: 1. Press
}or|to choose the
driver or passenger mirror.
2. Press the arrows on the control pad to move each mirror in the
desired direction.
Folding Mirrors
Manual Folding Mirrors
The mirrors can be folded inward
toward the vehicle to prevent
damage when going through an
Page 55 of 393
Buick Enclave Owner Manual (GMNA-Localizing-U.S./Canada/Mexico-
10999311) - 2018 - crc - 11/20/17
54 Keys, Doors, and Windows
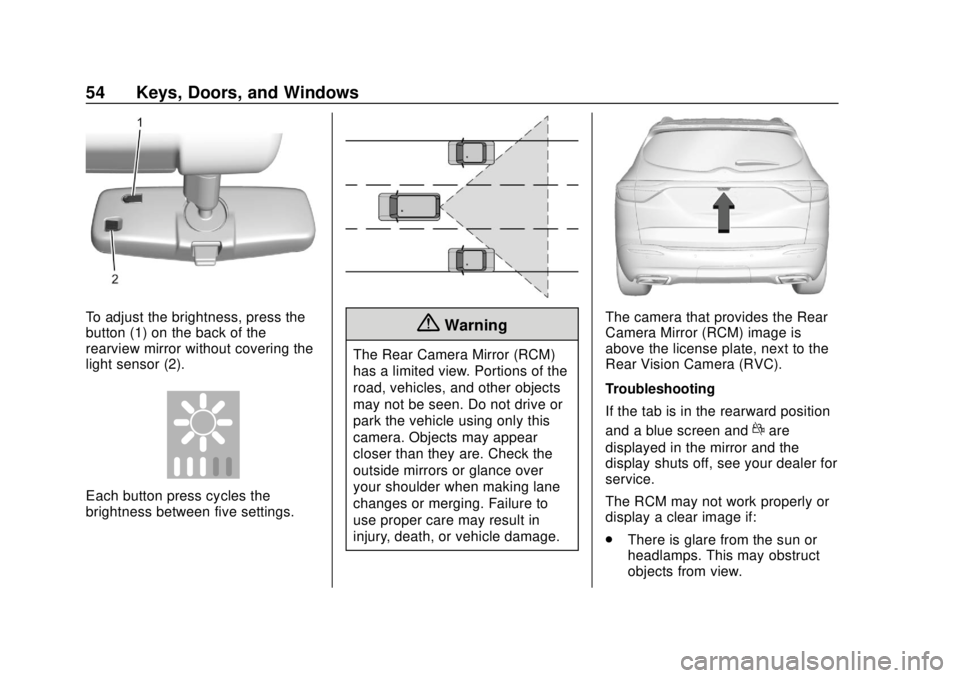
To adjust the brightness, press the
button (1) on the back of the
rearview mirror without covering the
light sensor (2).
Each button press cycles the
brightness between five settings.
{Warning
The Rear Camera Mirror (RCM)
has a limited view. Portions of the
road, vehicles, and other objects
may not be seen. Do not drive or
park the vehicle using only this
camera. Objects may appear
closer than they are. Check the
outside mirrors or glance over
your shoulder when making lane
changes or merging. Failure to
use proper care may result in
injury, death, or vehicle damage.
The camera that provides the Rear
Camera Mirror (RCM) image is
above the license plate, next to the
Rear Vision Camera (RVC).
Troubleshooting
If the tab is in the rearward position
and a blue screen and
dare
displayed in the mirror and the
display shuts off, see your dealer for
service.
The RCM may not work properly or
display a clear image if:
. There is glare from the sun or
headlamps. This may obstruct
objects from view.
Page 61 of 393
Buick Enclave Owner Manual (GMNA-Localizing-U.S./Canada/Mexico-
10999311) - 2018 - crc - 11/20/17
60 Seats and Restraints
Seats and
Restraints
Head Restraints
Head Restraints . . . . . . . . . . . . . . . 61
Front Seats
Power Seat Adjustment . . . . . . . . 63
Lumbar Adjustment . . . . . . . . . . . . 64
Reclining Seatbacks . . . . . . . . . . . 64
Memory Seats . . . . . . . . . . . . . . . . . 65
Heated and Ventilated FrontSeats . . . . . . . . . . . . . . . . . . . . . . . . . 68
Rear Seats
Rear Seats . . . . . . . . . . . . . . . . . . . . 70
Heated Rear Seats . . . . . . . . . . . . 72
Third Row Seats . . . . . . . . . . . . . . . 73
Seat Belts
Seat Belts . . . . . . . . . . . . . . . . . . . . . 75
How to Wear Seat BeltsProperly . . . . . . . . . . . . . . . . . . . . . . 76
Lap-Shoulder Belt . . . . . . . . . . . . . 77
Seat Belt Use During Pregnancy . . . . . . . . . . . . . . . . . . . . 81
Seat Belt Extender . . . . . . . . . . . . . 81
Safety System Check . . . . . . . . . . 82
Seat Belt Care . . . . . . . . . . . . . . . . . 82 Replacing Seat Belt System
Parts after a Crash . . . . . . . . . . . 82
Airbag System
Airbag System . . . . . . . . . . . . . . . . . 83
Where Are the Airbags? . . . . . . . 85
When Should an AirbagInflate? . . . . . . . . . . . . . . . . . . . . . . . 87
What Makes an Airbag Inflate? . . . . . . . . . . . . . . . . . . . . . . . 88
How Does an Airbag Restrain? . . . . . . . . . . . . . . . . . . . . . 88
What Will You See after an Airbag Inflates? . . . . . . . . . . . . . . 88
Passenger Sensing System . . . 90
Servicing the Airbag-Equipped Vehicle . . . . . . . . . . . . . . . . . . . . . . . 94
Adding Equipment to the Airbag-Equipped Vehicle . . . . . 94
Airbag System Check . . . . . . . . . . 95
Replacing Airbag System Parts after a Crash . . . . . . . . . . . . . . . . . 95
Child Restraints
Older Children . . . . . . . . . . . . . . . . . 96
Infants and Young Children . . . . 97
Child Restraint Systems . . . . . . 100
Where to Put the Restraint . . . 101
Lower Anchors and Tethers forChildren (LATCH System) . . . 103 Replacing LATCH System
Parts After a Crash . . . . . . . . . . 111
Securing Child Restraints (With the Seat Belt in the
Rear Seat) . . . . . . . . . . . . . . . . . . 111
Securing Child Restraints (With the Seat Belt in the
Front Seat) . . . . . . . . . . . . . . . . . . 113