instrument panel BUICK ENCORE 2013 Get To Know Guide
[x] Cancel search | Manufacturer: BUICK, Model Year: 2013, Model line: ENCORE, Model: BUICK ENCORE 2013Pages: 16, PDF Size: 1.68 MB
Page 2 of 16
2
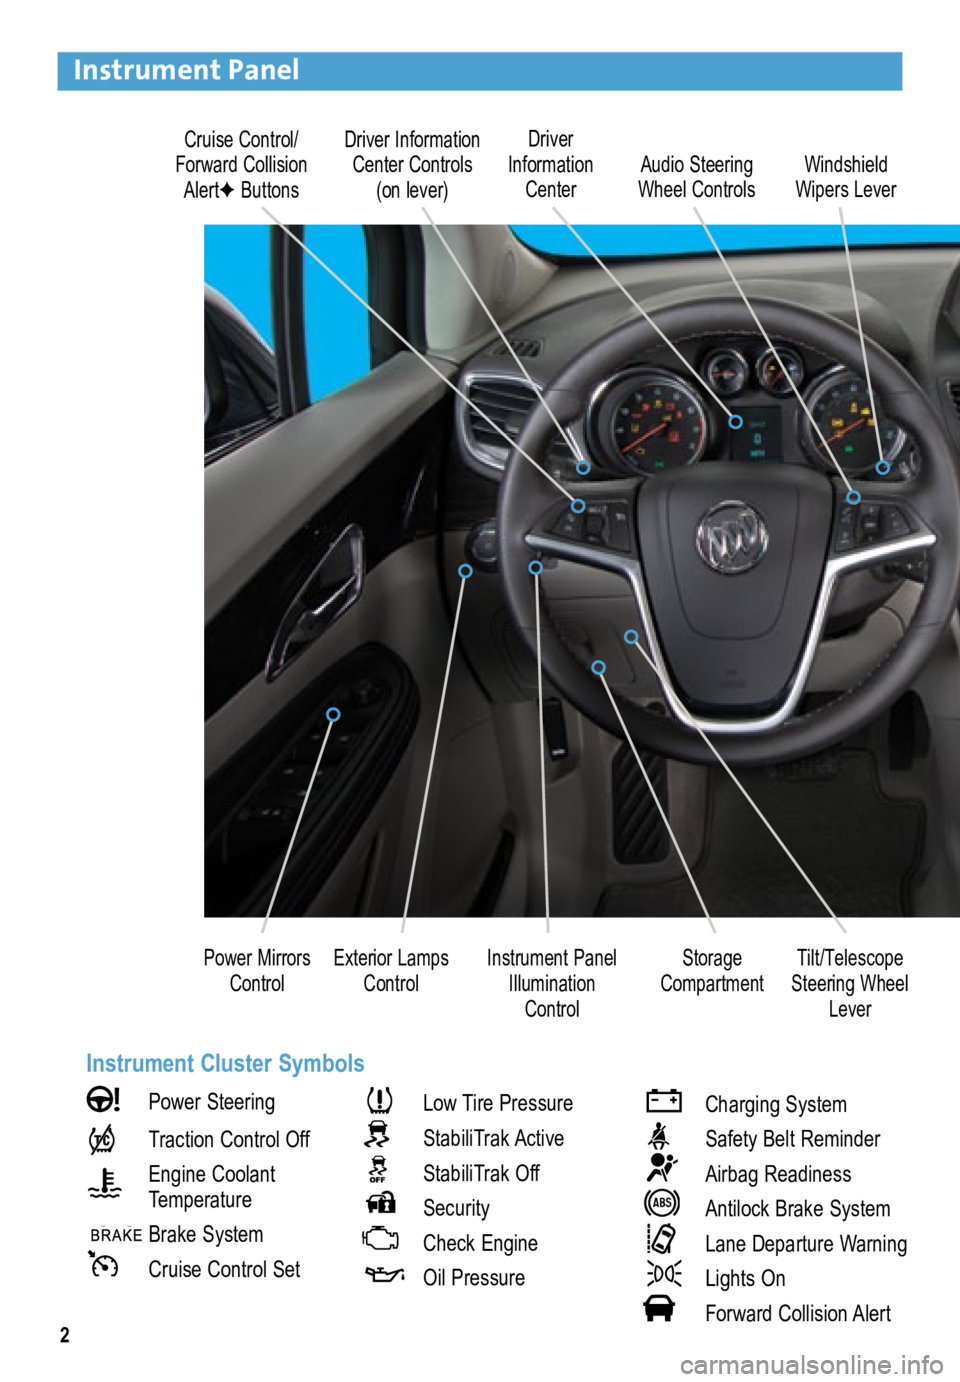
Driver Information Center Controls (on lever)
Cruise Control/
Forward Collision AlertF Buttons Driver
Information Center
Storage
Compartment
Instrument Panel
Illumination Control Audio Steering
Wheel Controls Windshield
Wipers Lever
Exterior Lamps Control
Power Mirrors
Control
Instrument Panel
Power Steering
Traction Control Off
Engine Coolant
Temperature
Brake System
Cruise Control Set
Low Tire Pressure
StabiliTrak Active
StabiliTrak Off
Security
Check Engine
Oil Pressure
Charging System
Safety Belt Reminder
Airbag Readiness
Antilock Brake System
Lane Departure Warning
Lights On
Forward Collision Alert
Tilt/Telescope
Steering Wheel Lever
Instrument Cluster Symbols
Page 6 of 16
6
Lighting
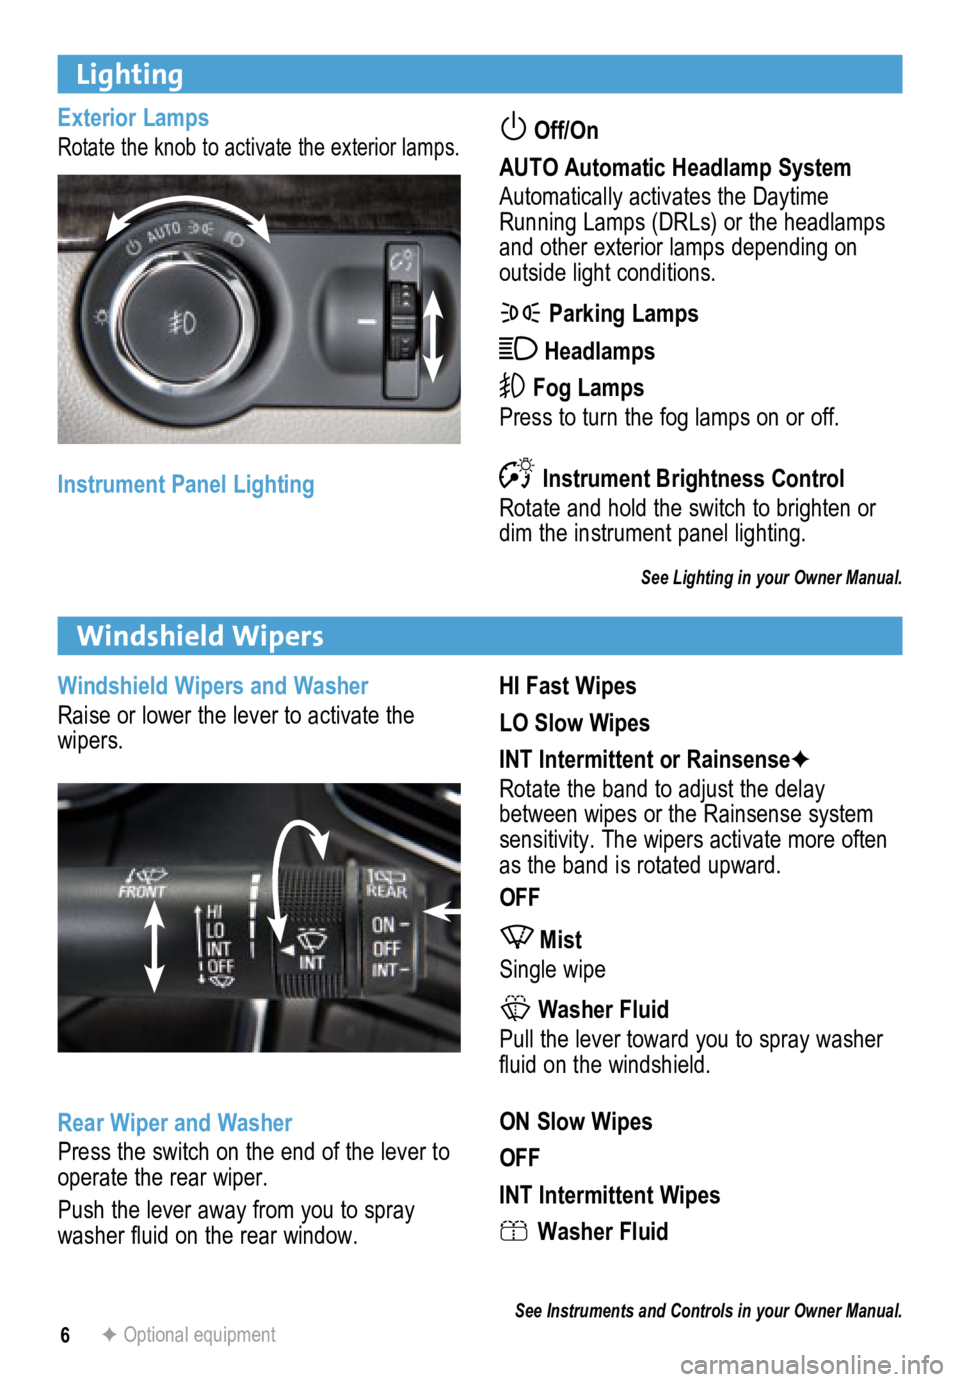
Exterior Lamps
Rotate the knob to activate the exterior lamps. Off/On
AUTO Automatic Headlamp System
Automatically activates the Daytime
Running Lamps (DRLs) or the headlamps
and other exterior lamps depending on
outside light conditions.
Parking Lamps
Headlamps
Fog Lamps
Press to turn the fog lamps on or off.
Instrument Brightness Control
Rotate and hold the switch to brighten or
dim the instrument panel lighting.
See Lighting in your Owner Manual.
Instrument Panel Lighting
HI Fast Wipes
LO Slow Wipes
INT Intermittent or RainsenseF
Rotate the band to adjust the delay
between wipes or the Rainsense system
sensitivity. The wipers activate more often
as the band is rotated upward.
OFF
Mist
Single wipe
Washer Fluid
Pull the lever toward you to spray washer
fluid on the windshield.
ON Slow Wipes
OFF
INT Intermittent Wipes
Washer Fluid
See Instruments and Controls in your Owner Manual.
Windshield Wipers
F Optional equipment
Windshield Wipers and Washer
Raise or lower the lever to activate the
wipers.
Rear Wiper and Washer
Press the switch on the end of the lever to
operate the rear wiper.
Push the lever away from you to spray
washer fluid on the rear window.
Page 9 of 16
9
Infotainment System
Refer to your Owner Manual for important safety information about using the infotainment system
while driving.
Setting the Time
1. Turn on the infotainment system.
2. Press the
Clock button.
3. Turn the MENU knob to highlight Set Time; press the knob to select it.
4. Turn the MENU knob to change the value; press the knob to confirm the set value.
5. Press the
BACK button to exit the menu.
Storing Favorite Stations
Radio stations from all bands (AM, FM or XMF) can be stored, in any order, on up to six
pages of favorites.
1. Tune in the desired radio station.
2. Press the FAV button to display page where the station is to be stored.
3. Press and hold one of the six numeric pushbuttons until a beep is heard.
4. Repeat the steps for each desired station.
Portable Audio Devices
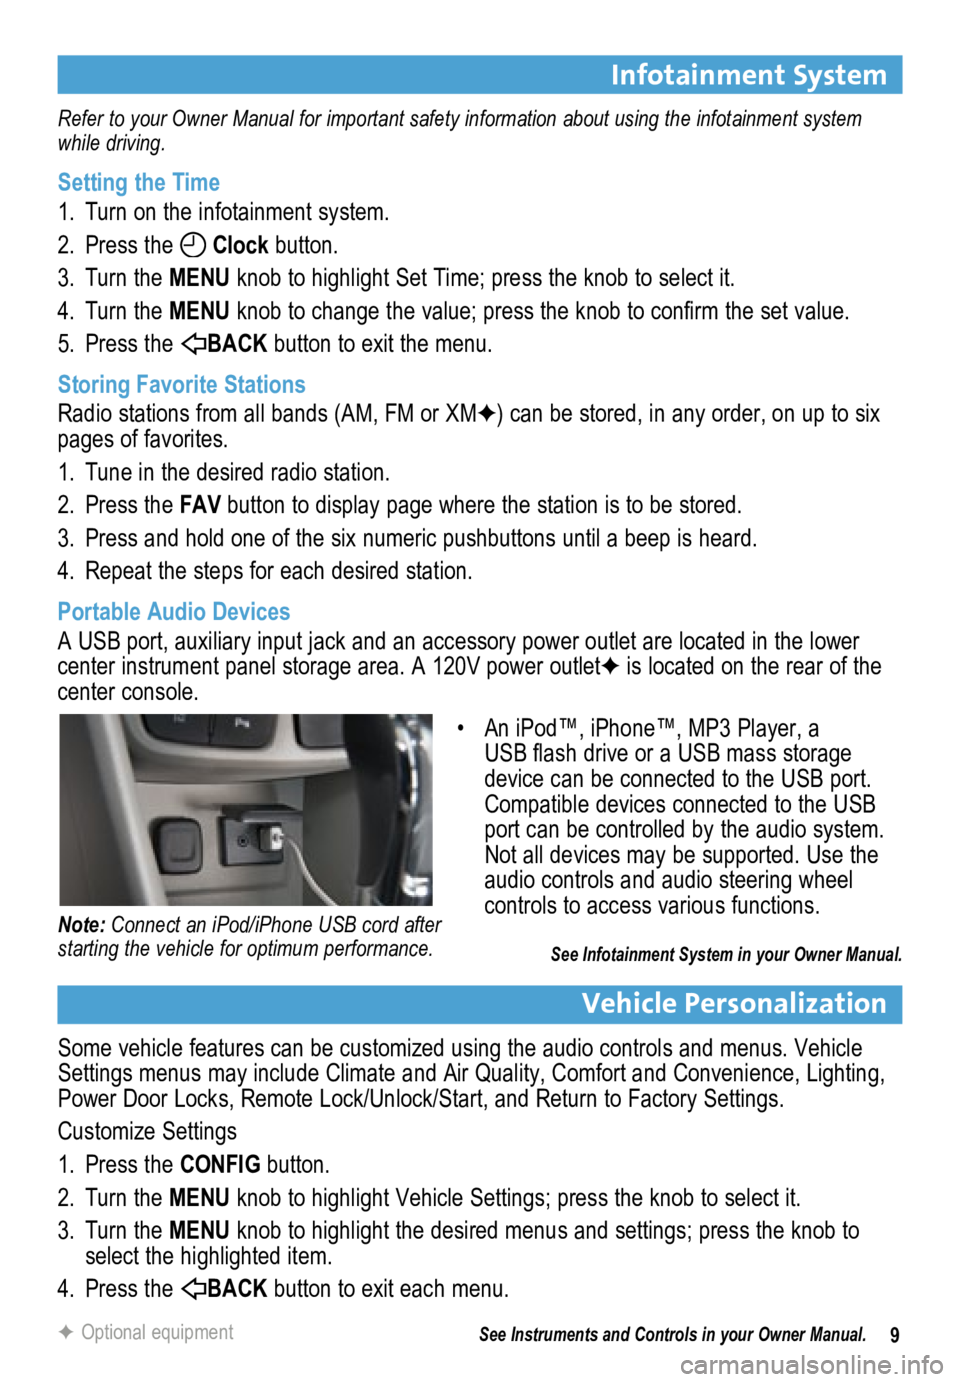
A USB port, auxiliary input jack and an accessory power outlet are located in the lower
center instrument panel storage area. A 120V power outletF is located on the rear of the
center console.
Vehicle Personalization
Some vehicle features can be customized using the audio controls and menus. Vehicle
Settings menus may include Climate and Air Quality, Comfort and Convenience, Lighting,
Power Door Locks, Remote Lock/Unlock/Start, and Return to Factory Settings.
Customize Settings
1. Press the CONFIG button.
2. Turn the MENU knob to highlight Vehicle Settings; press the knob to select it.
3. Turn the MENU knob to highlight the desired menus and settings; press the knob to
select the highlighted item.
4. Press the
BACK button to exit each menu.
See Instruments and Controls in your Owner Manual.
F Optional equipment
• An iPod™, iPhone™, MP3 Player, a
USB flash drive or a USB mass storage
device can be connected to the USB port.
Compatible devices connected to the USB
port can be controlled by the audio system.
Not all devices may be supported. Use the
audio controls and audio steering wheel
controls to access various functions.
See Infotainment System in your Owner Manual.
Note: Connect an iPod/iPhone USB cord after
starting the vehicle for optimum performance.
Page 13 of 16
13
Ultrasonic Parking AssistF
Rear Vision Camera
Lane Departure WarningF
When the vehicle is in Reverse, a view of the area behind the vehicle appears on the
infotainment screen.
To turn the system Off or On, press the CONFIG button on the infotainment system
to open the Configure menu and select Display > Rear Camera Options > Camera.
A checkmark indicates the system is On.
Note: The system may not display a clear image if dirt, snow or ice builds up on the camera lens.
Clean the camera, located above the license plate, with water and a soft cloth.
See Driving and Operating in your Owner Manual.
When crossing a detected lane marking without using a turn signal, a visual alert is
displayed on the instrument panel and audible beeps sound.
To turn the system Off or On, press the Lane Departure Warning button on the
lower center of the instrument panel.
Note: The system operates only at speeds greater than 35 mph. The visual alert and display turn off
at speeds below 35 mph.
See Driving and Operating in your Owner Manual.
F Optional equipment
Ultrasonic sensors in the front and rear bumpers help you avoid collidin\
g with objects when
parking. Detected objects are indicated by audible beeps, which become more frequent
as the vehicle gets closer to an object. When the distance is less than 12 in. (30cm),
the beeps are continuous. Both front and rear park assist operate when the vehicle is in
Reverse.
To turn the system Off or On, press the Parking Assist button on the lower center
of the instrument panel.
Note: The system operates only at speeds less than 5 mph. The system may not be available if dirt,
snow or ice builds up on the sensors. Keep the vehicle clean for proper operation.
See Driving and Operating in your Owner Manual.
Forward Collision AlertF
When the green symbol is
displayed on the instrument cluster, the system is tracking
the vehicle ahead. When approaching a vehicle directly ahead too quickly, a visual alert is
displayed on the Driver Information Center and audible beeps sound.
Press the Forward Collision Alert button on the steering wheel to select a follow
gap setting of Far, Medium, Near, or Off.
See Driving and Operating in your Owner Manual.
Page 14 of 16
14F Optional equipment
Automatic Transmission
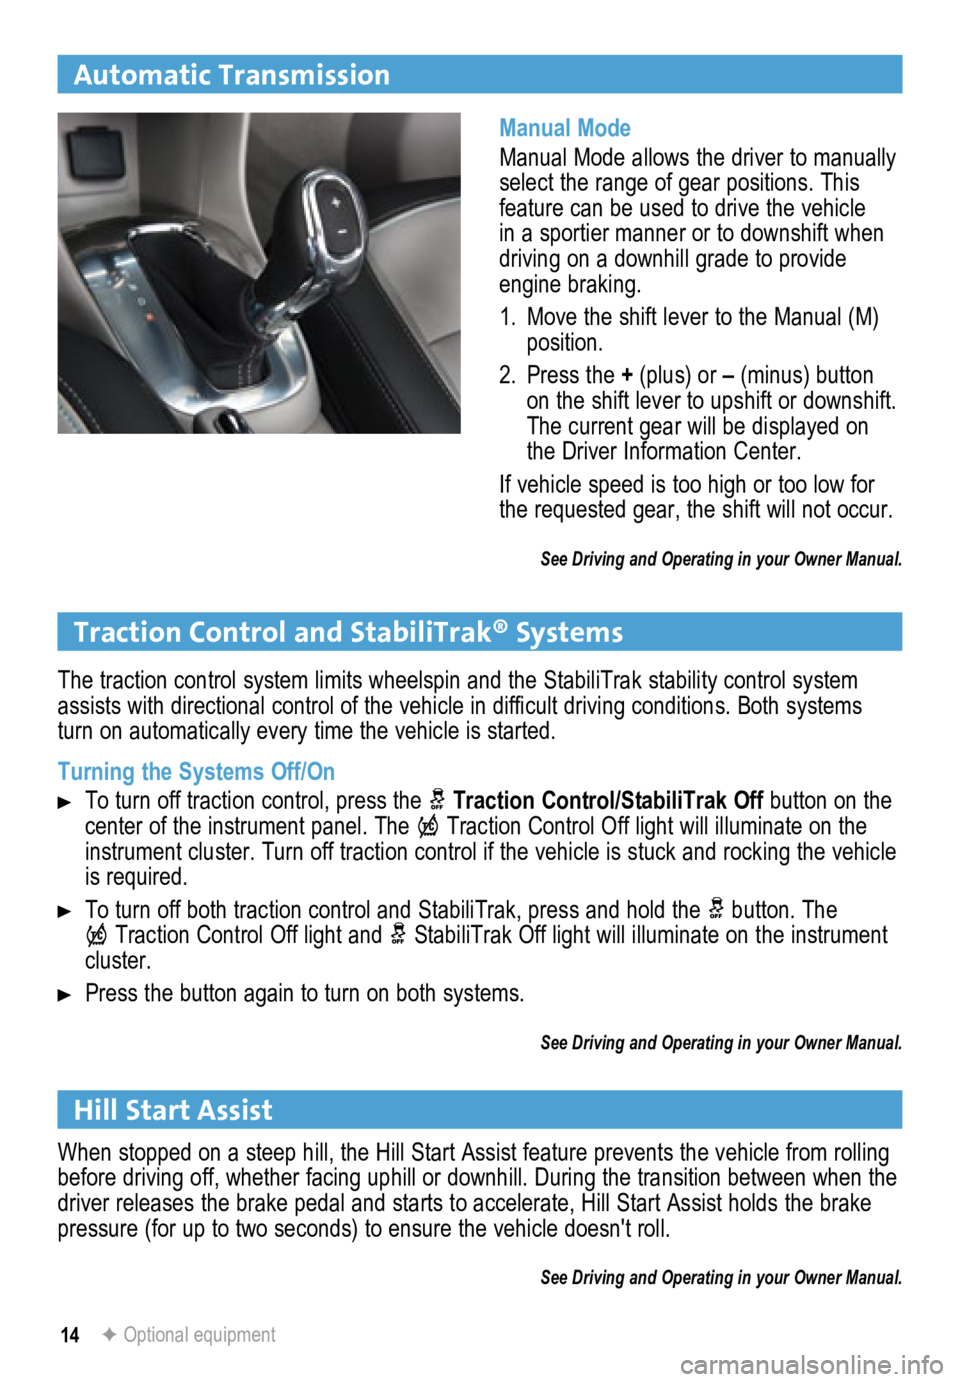
Manual Mode
Manual Mode allows the driver to manually
select the range of gear positions. This
feature can be used to drive the vehicle
in a sportier manner or to downshift when
driving on a downhill grade to provide
engine braking.
1. Move the shift lever to the Manual (M)
position.
2. Press the + (plus) or – (minus) button
on the shift lever to upshift or downshift.
The current gear will be displayed on
the Driver Information Center.
If vehicle speed is too high or too low for
the requested gear, the shift will not occur.
See Driving and Operating in your Owner Manual.
Traction Control and StabiliTrak® Systems
The traction control system limits wheelspin and the StabiliTrak stabili\
ty control system
assists with directional control of the vehicle in difficult driving conditions. Both systems
turn on automatically every time the vehicle is started.
Turning the Systems Off/On
To turn off traction control, press the Traction Control/StabiliTrak Off button on the
center of the instrument panel. The
Traction Control Off light will illuminate on the
instrument cluster. Turn off traction control if the vehicle is stuck an\
d rocking the vehicle
is required.
To turn off both traction control and StabiliTrak, press and hold the button. The
Traction Control Off light and StabiliTrak Off light will illuminate on the instrument
cluster.
Press the button again to turn on both systems.
See Driving and Operating in your Owner Manual.
Hill Start Assist
When stopped on a steep hill, the Hill Start Assist feature prevents the\
vehicle from rolling
before driving off, whether facing uphill or downhill. During the transi\
tion between when the
driver releases the brake pedal and starts to accelerate, Hill Start Assist holds the brake
pressure (for up to two seconds) to ensure the vehicle doesn't roll.
See Driving and Operating in your Owner Manual.