BUICK ENCORE 2017 Get To Know Guide
Manufacturer: BUICK, Model Year: 2017, Model line: ENCORE, Model: BUICK ENCORE 2017Pages: 16, PDF Size: 2.23 MB
Page 1 of 16
1
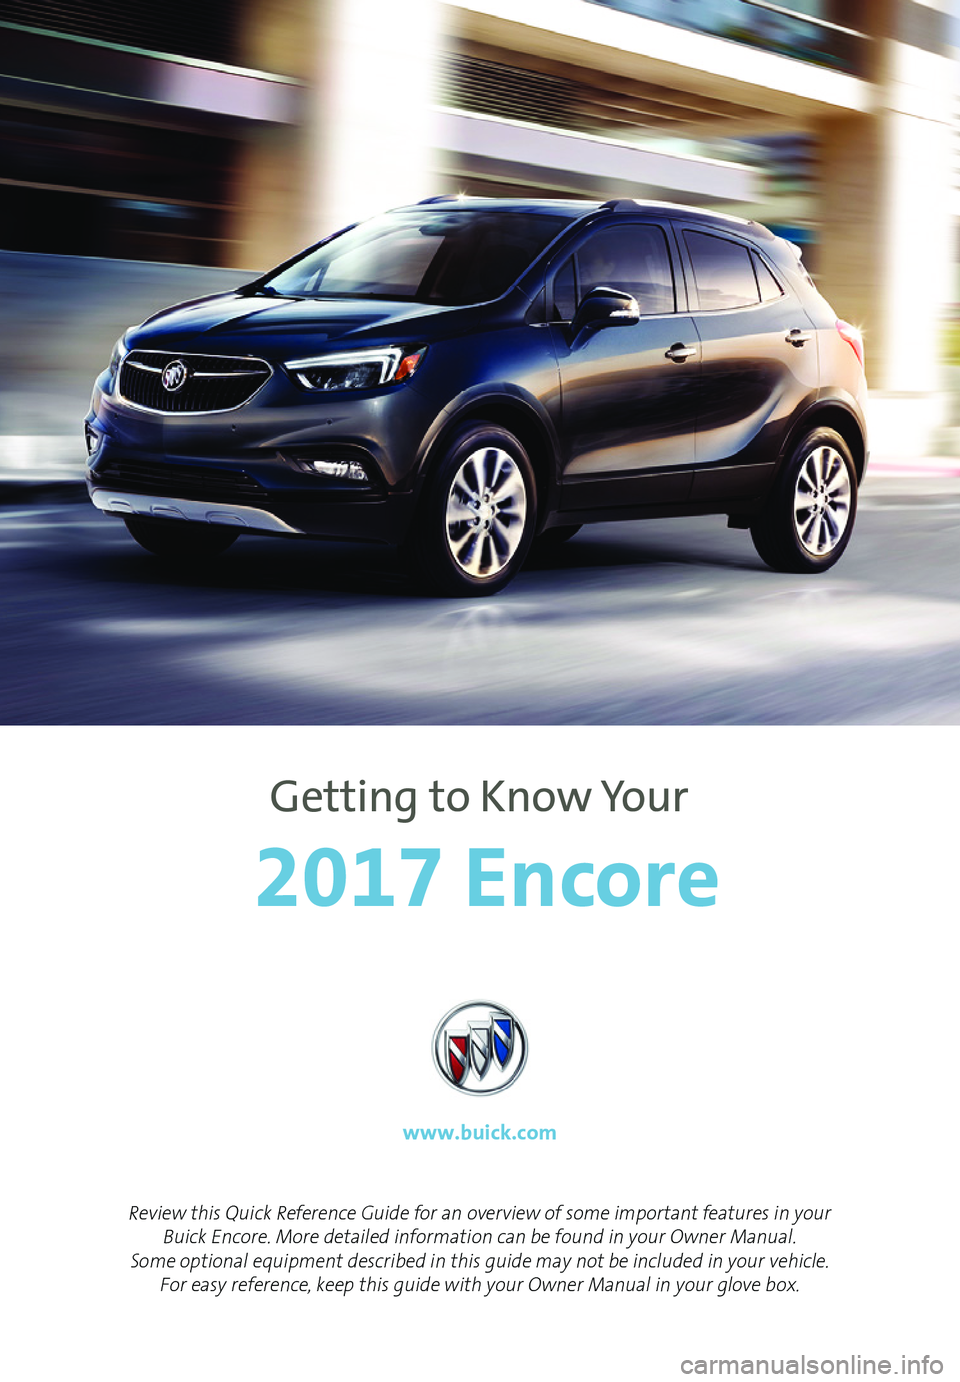
Review this Quick Reference Guide for an overview of some important features in your Buick Encore. More detailed information can be found in your Owner Manual. Some optional equipment described in this guide may not be included in your vehicle. For easy reference, keep this guide with your Owner Manual in your glove box.
www.buick.com
2017 Encore
Getting to Know Your
Page 2 of 16
2
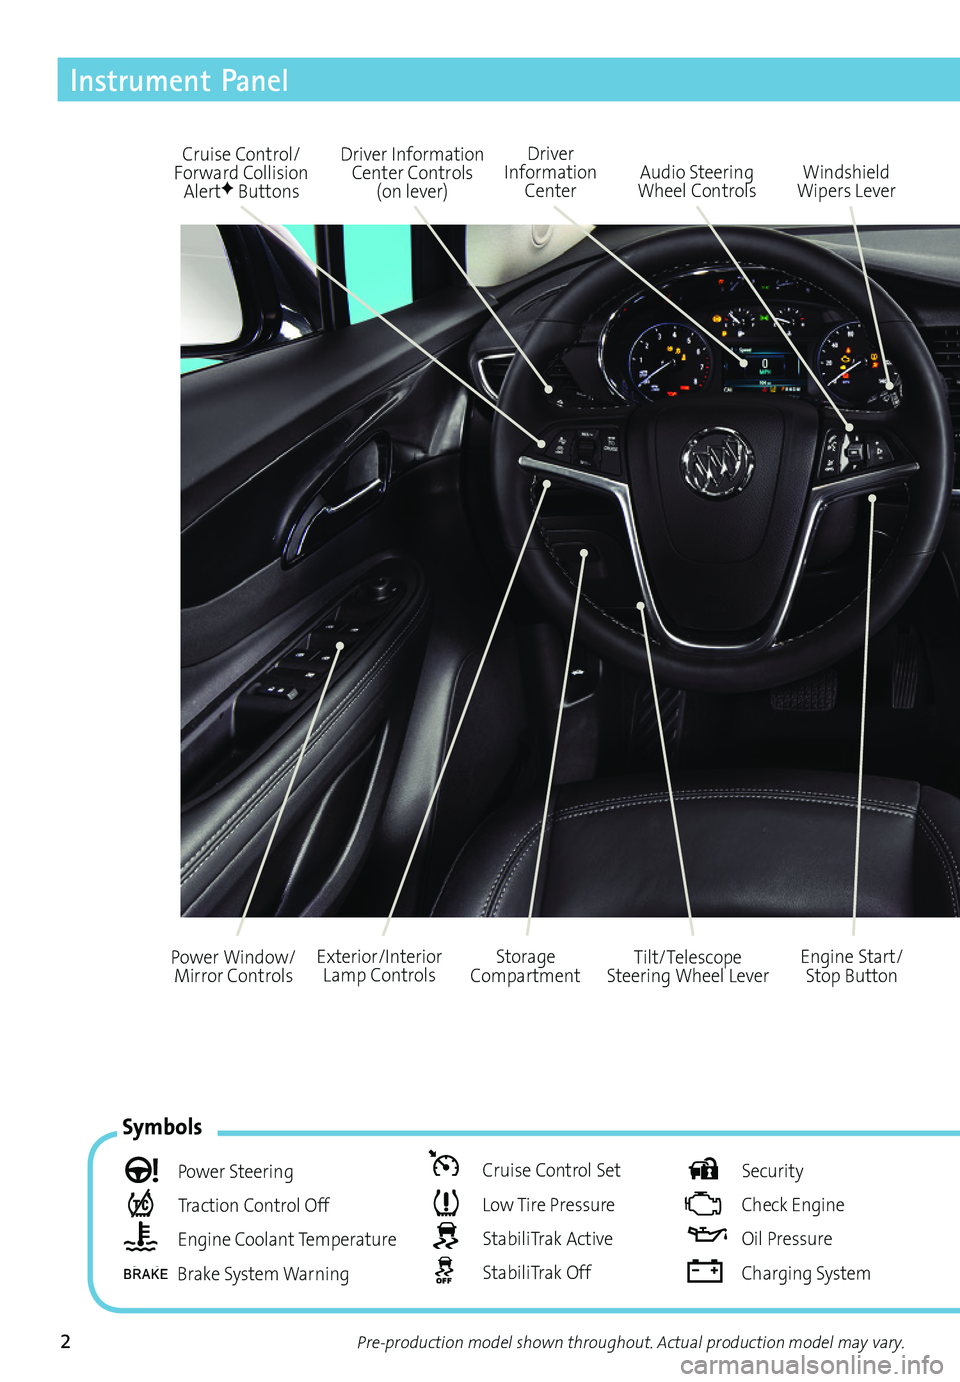
Driver Information Center Controls (on lever)
Cruise Control/Forward Collision AlertF Buttons
Driver Information Center
Storage CompartmentEngine Start/ Stop Button
Audio Steering Wheel ControlsWindshield Wipers Lever
Exterior/Interior Lamp ControlsPower Window/Mirror ControlsTilt/Telescope Steering Wheel Lever
Symbols
Power Steering
Traction Control Off
Engine Coolant Temperature
Brake System Warning
Cruise Control Set
Low Tire Pressure
StabiliTrak Active
StabiliTrak Off
Security
Check Engine
Oil Pressure
Charging System
Instrument Panel
Pre-production model shown throughout. Actual production model may vary.
Page 3 of 16
3
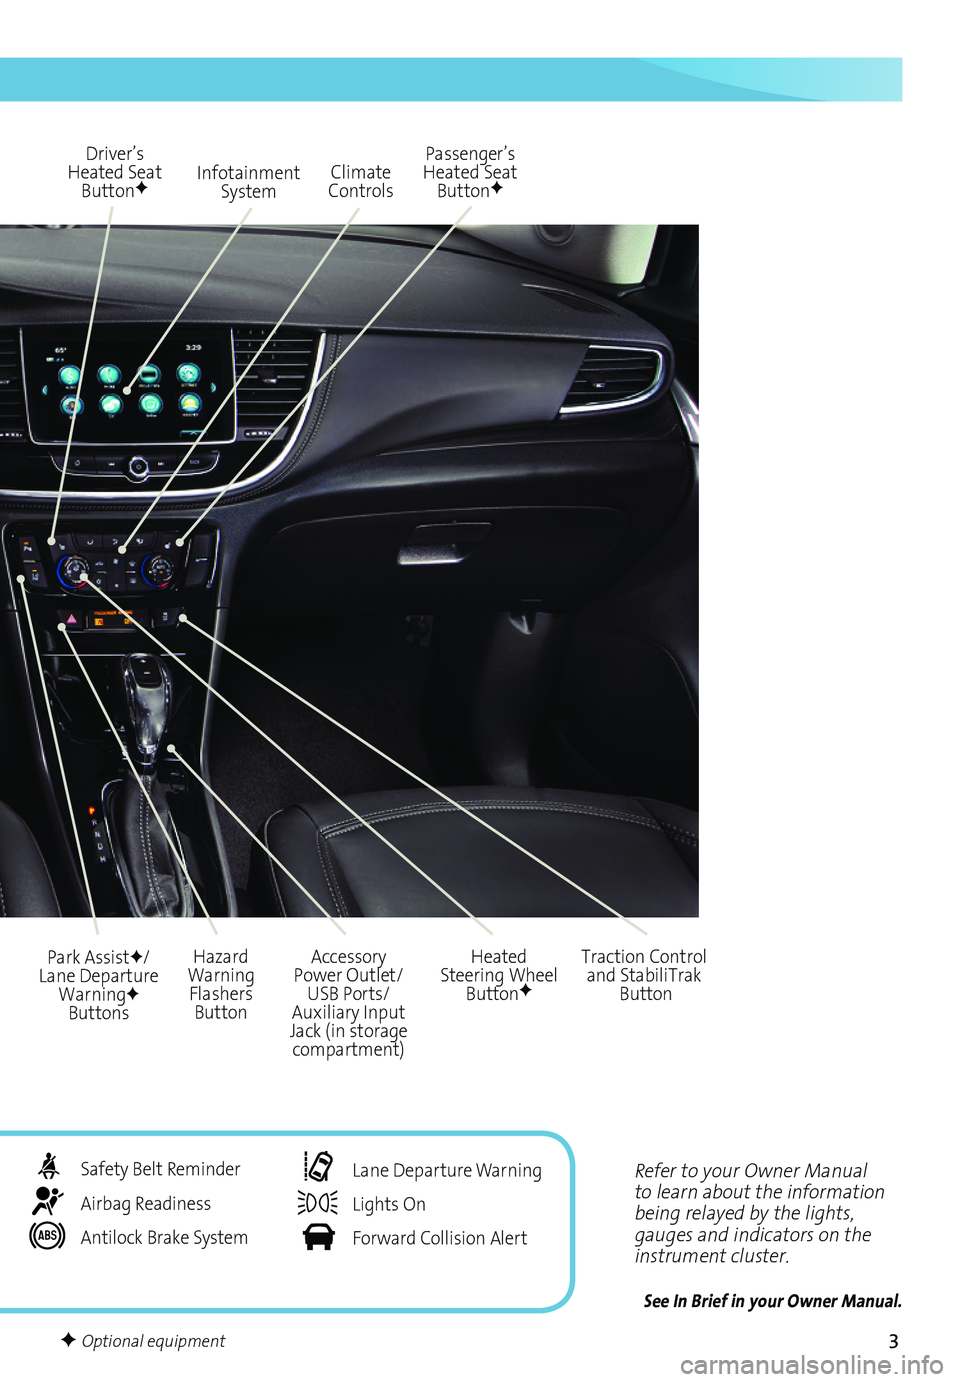
Refer to your Owner Manual to learn about the information being relayed by the lights, gauges and indicators on the instrument cluster.
See In Brief in your Owner Manual.
Infotainment System
Park AssistF/Lane Departure WarningF Buttons
Passenger’s Heated Seat ButtonF
Hazard Warning Flashers Button
Accessory Power Outlet/USB Ports/Auxiliary Input Jack (in storage compartment)
Driver’s Heated Seat ButtonF
Heated Steering Wheel ButtonF
Climate Controls
Traction Control and StabiliTrak Button
Safety Belt Reminder
Airbag Readiness
Antilock Brake System
Lane Departure Warning
Lights On
Forward Collision Alert
F Optional equipment
Page 4 of 16
4
Remote Vehicle StartF
With the vehicle parked, push down the lever on the left side of the steering column to adjust the steering wheel. The steering wheel can then be moved up or down and in or out. Pull up the lever to lock the steering wheel in place.
See Instruments and Controls in your Owner Manual.
F Optional equipment
Tilt/Telescope Steering Wheel
Keyless Open
Use Remote Vehicle Start to start the engine from outside the vehicle. During a remote start, the engine will run for 15 minutes.
Press and release the Lock button and then press and hold the Remote Start button untiltheturn signal lamps flash.Afterentering thevehicle, turnonthe ignition.
Press and hold the button until the parking lamps turn off to cancel a remote start.
Note: To change the remote start settings, go to Remote Lock, Unlock, Start in the Vehicle Settings menu.
See Keys, Doors and Windows in your Owner Manual.
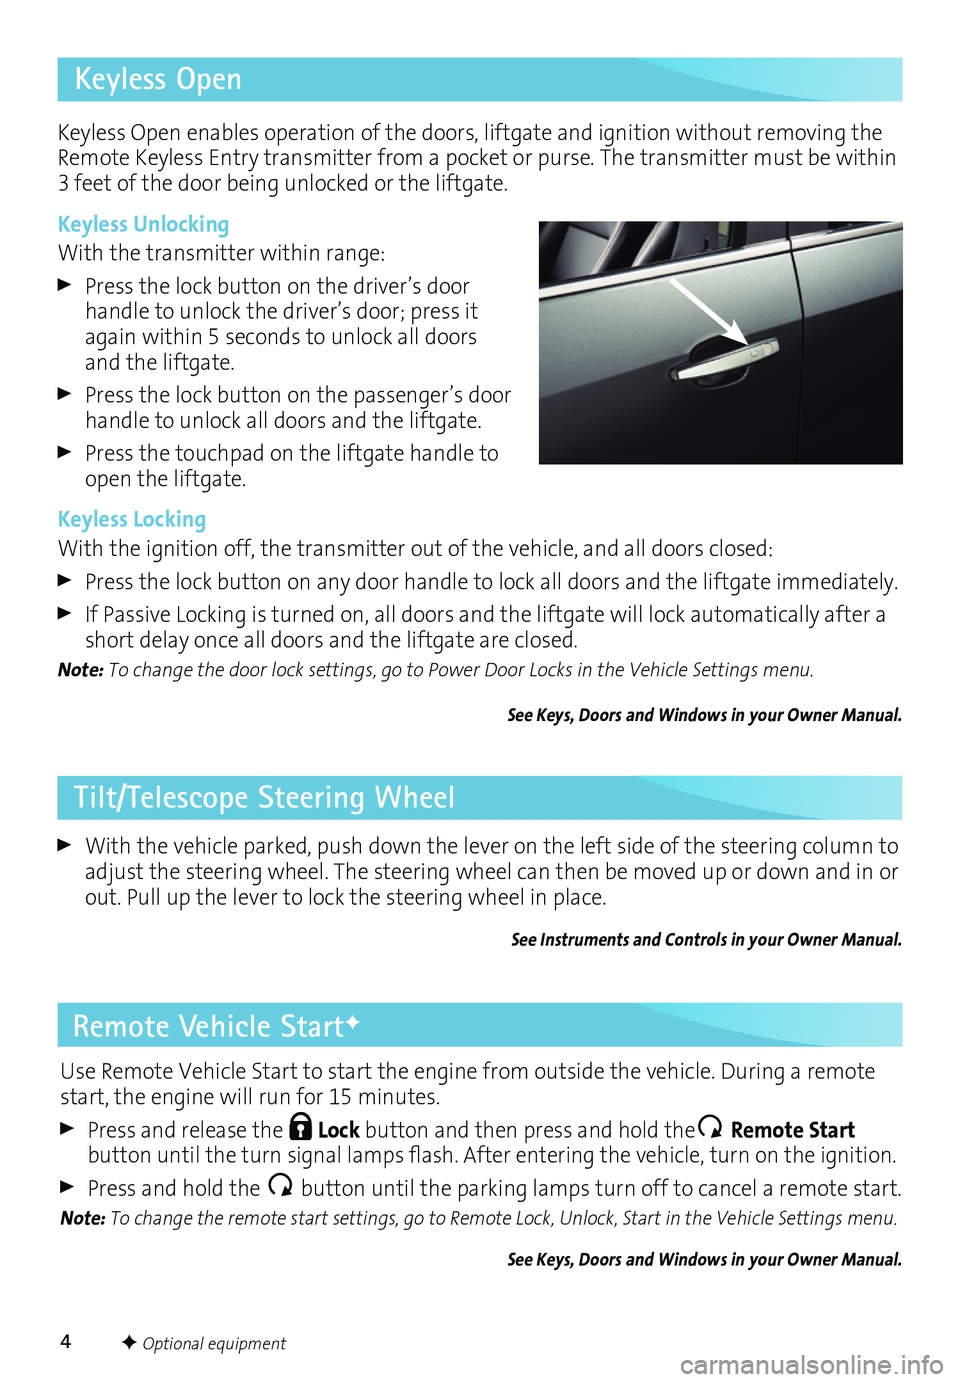
Keyless Open enables operation of the doors, liftgate and ignition without removing the Remote Keyless Entry transmitter from a pocket or purse. The transmitter must be within 3 feet of the door being unlocked or the liftgate.
Keyless Unlocking
With the transmitter within range:
Press the lock button on the driver’s door handle to unlock the driver’s door; press it again within 5 seconds to unlock all doors and the liftgate.
Press the lock button on the passenger’s door handle to unlock all doors and the liftgate.
Press the touchpad on the liftgate handle to open the liftgate.
Keyless Locking
With the ignition off, the transmitter out of the vehicle, and all doors closed:
Press the lock button on any door handle to lock all doors and the liftgate immediately.
If Passive Locking is turned on, all doors and the liftgate will lock automatically after a short delay once all doors and the liftgate are closed.
Note: To change the door lock settings, go to Power Door Locks in the Vehicle Settings menu.
See Keys, Doors and Windows in your Owner Manual.
Page 5 of 16
5
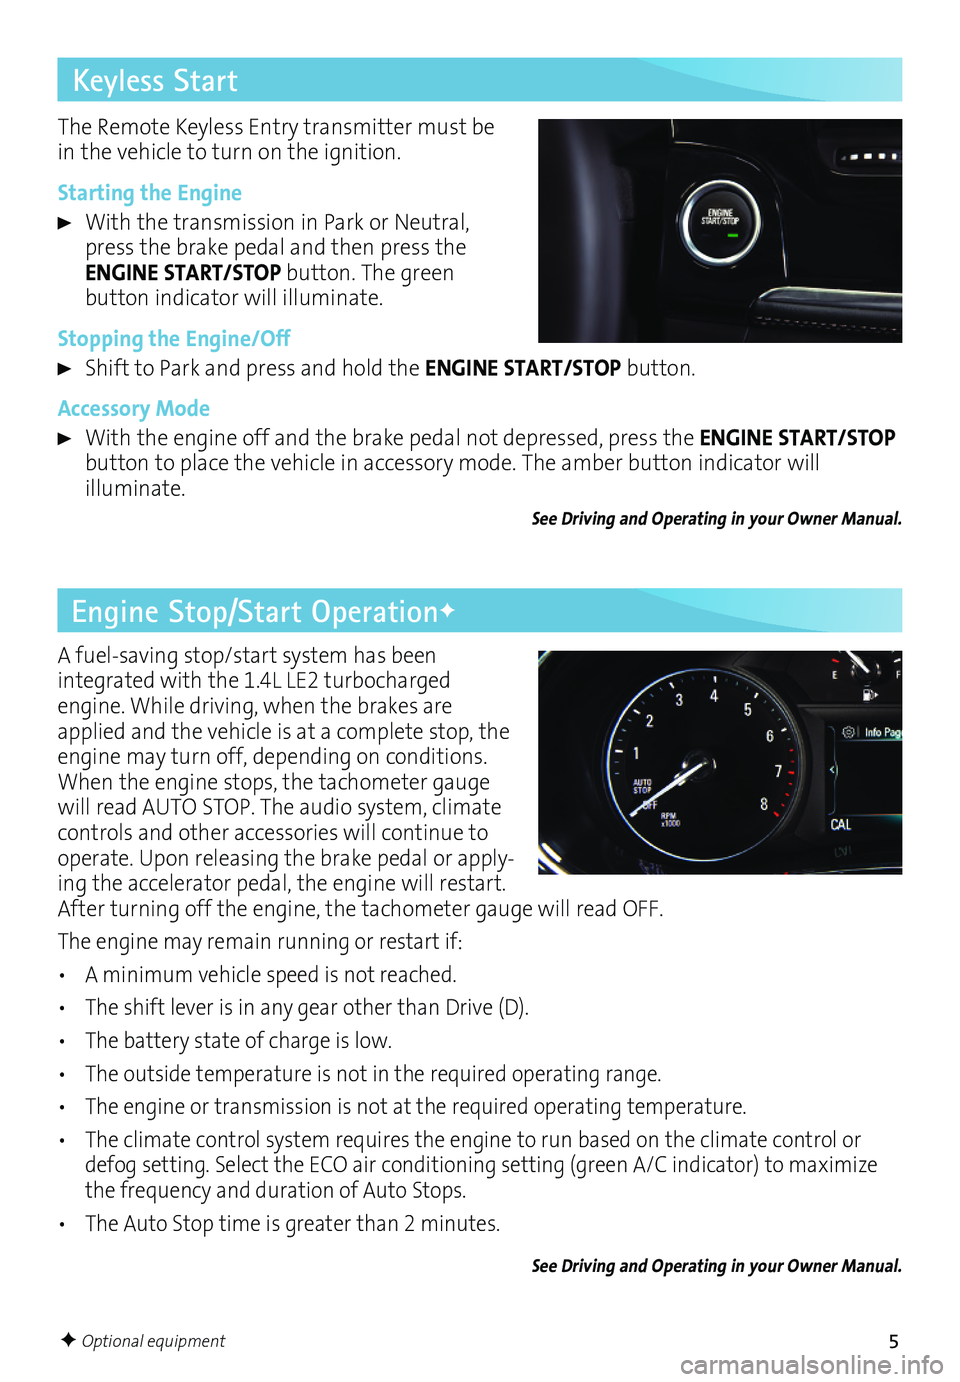
A fuel-saving stop/start system has been
integrated with the 1.4L LE2 turbocharged engine. While driving, when the brakes are applied and the vehicle is at a complete stop, the engine may turn off, depending on conditions. When the engine stops, the tachometer gauge will read AUTO STOP. The audio system, climate controls and other accessories will continue to operate. Upon releasing the brake pedal or apply-ing the accelerator pedal, the engine will restart. After turning off the engine, the tachometer gauge will read OFF.
The engine may remain running or restart if:
• A minimum vehicle speed is not reached.
• The shift lever is in any gear other than Drive (D).
• The battery state of charge is low.
• The outside temperature is not in the required operating range.
• The engine or transmission is not at the required operating temperature.
• The climate control system requires the engine to run based on the climate control or defog setting. Select the ECO air conditioning setting (green A/C indicator) to maximize the frequency and duration of Auto Stops.
• The Auto Stop time is greater than 2 minutes.
See Driving and Operating in your Owner Manual.
Engine Stop/Start OperationF
Keyless Start
The Remote Keyless Entry transmitter must be in the vehicle to turn on the ignition.
Starting the Engine
With the transmission in Park or Neutral, press the brake pedal and then press the ENGINE START/STOP button. The green
button indicator will illuminate.
Stopping the Engine/Off
Shift to Park and press and hold the ENGINE START/STOP button.
Accessory Mode
With the engine off and the brake pedal not depressed, press the ENGINE START/STOP button to place the vehicle in accessory mode. The amber button indicator will illuminate.
See Driving and Operating in your Owner Manual.
F Optional equipment
Page 6 of 16
6F Optional equipment
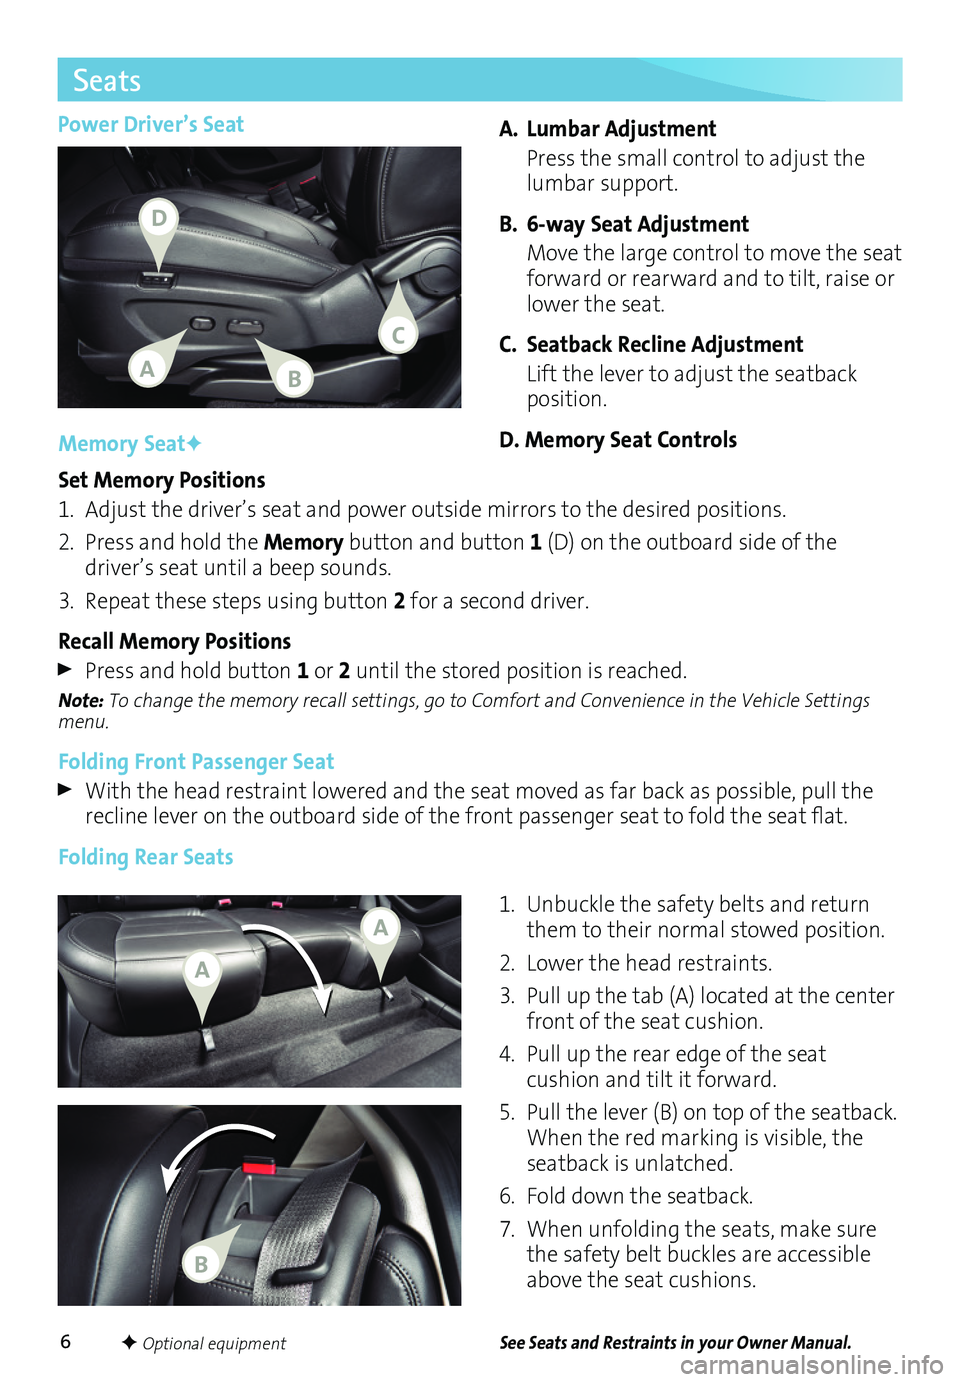
Power Driver’s SeatA. Lumbar Adjustment
Press the small control to adjust the lumbar support.
B. 6-way Seat Adjustment
Move the large control to move the seat forward or rearward and to tilt, raise or lower the seat.
C. Seatback Recline Adjustment
Lift the lever to adjust the seatback position.
D. Memory Seat Controls
Seats
See Seats and Restraints in your Owner Manual.
Memory SeatF
Set Memory Positions
1. Adjust the driver’s seat and power outside mirrors to the desired positions.
2. Press and hold the Memory button and button 1 (D) on the outboard side of the
driver’s seat until a beep sounds.
3. Repeat these steps using button 2 for a second driver.
Recall Memory Positions
Press and hold button 1 or 2 until the stored position is reached.
Note: To change the memory recall settings, go to Comfort and Convenience in the Vehicle Settings menu.
Folding Front Passenger Seat
With the head restraint lowered and the seat moved as far back as possible, pull the recline leveronthe outboard sideofthe front passenger seattofold theseat flat.
Folding Rear Seats
1. Unbuckle the safety belts and return them to their normal stowed position.
2. Lower the head restraints.
3. Pull up the tab (A) located at the center front of the seat cushion.
4. Pull up the rear edge of the seat
cushion and tilt it forward.
5. Pull the lever (B) on top of the
seatback. When the red marking is
visible, the seatback is unlatched.
6. Fold down the seatback.
7. When unfolding the seats, make sure the safety belt buckles are accessible above the seat cushions.
AB
D
C
A
A
B
Page 7 of 16
7
Driver Information Center
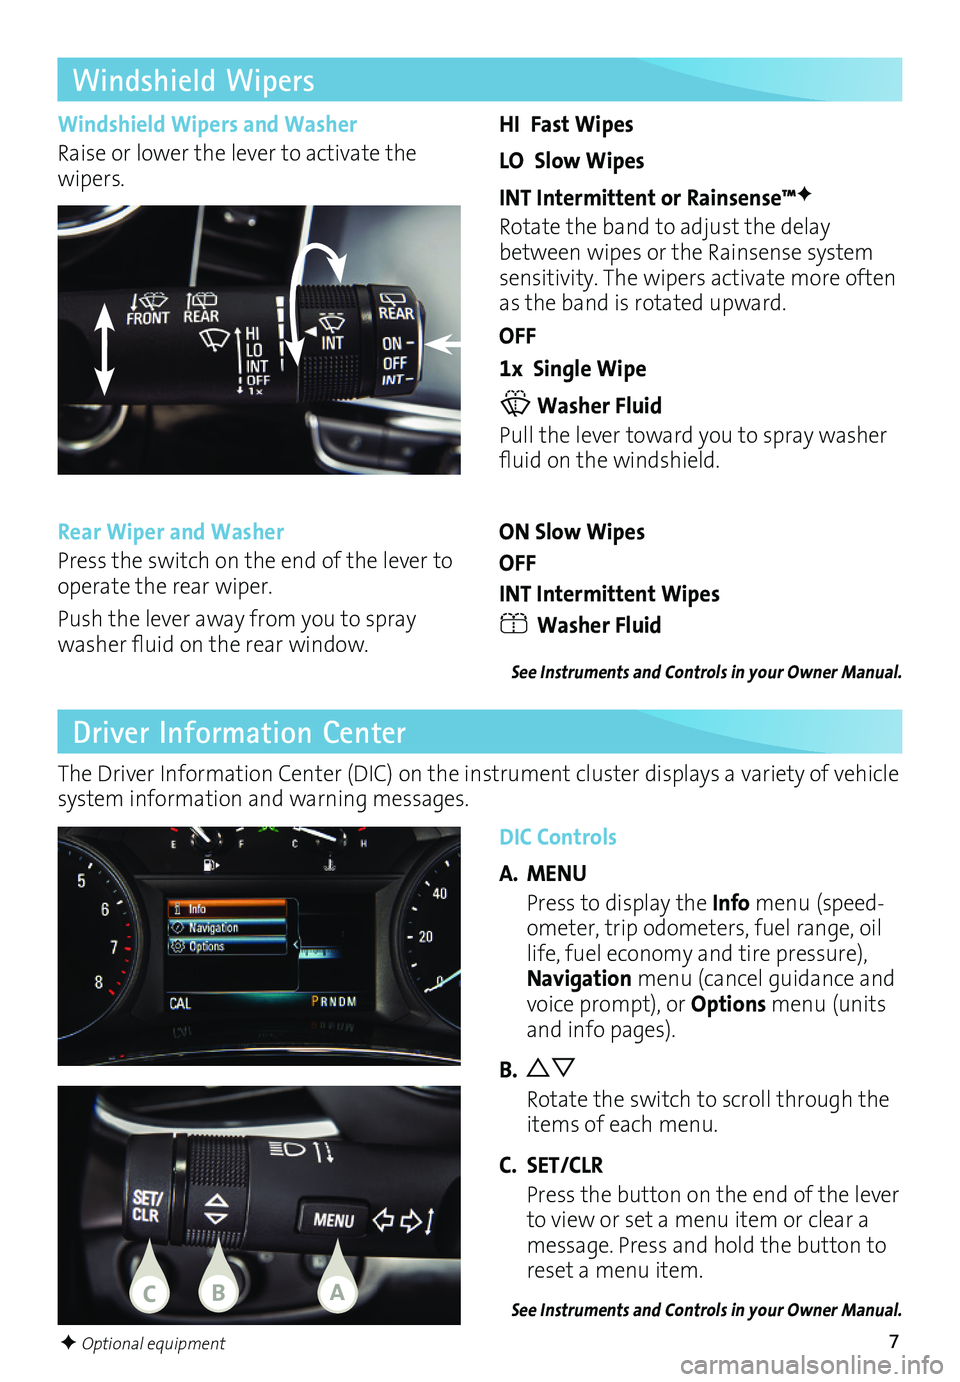
DIC Controls
A. MENU
Press to display the Info menu (speed-ometer, trip odometers, fuel range, oil life, fuel economy and tire pressure), Navigation menu (cancel guidance and voice prompt), or Options menu (units and info pages).
B.
Rotate the switch to scroll through the items of each menu.
C. SET/CLR
Press the button on the end of the lever to view or set a menu item or clear a message. Press and hold the button to reset a menu item.
The Driver Information Center (DIC) on the instrument cluster displays a variety of vehicle system information and warning messages.
See Instruments and Controls in your Owner Manual.
F Optional equipment
HI Fast Wipes
LO Slow Wipes
INT Intermittent or Rainsense™F
Rotate the band to adjust the delay between wipes or the Rainsense system sensitivity. The wipers activate more often as the band is rotated upward.
OFF
1x Single Wipe
Washer Fluid
Pull the lever toward you to spray washer fluid onthe windshield.
ON Slow Wipes
OFF
INT Intermittent Wipes
Washer Fluid
Windshield Wipers
Windshield Wipers and Washer
Raise or lower the lever to activate the wipers.
Rear Wiper and Washer
Press the switch on the end of the lever to operate the rear wiper.
Push the lever away from you to spray washer fluidonthe rear window.See Instruments and Controls in your Owner Manual.
CBA
Page 8 of 16
8
IntelliLink Infotainment System
Refer to your Owner Manual for important information about using the infotainment system while driving.
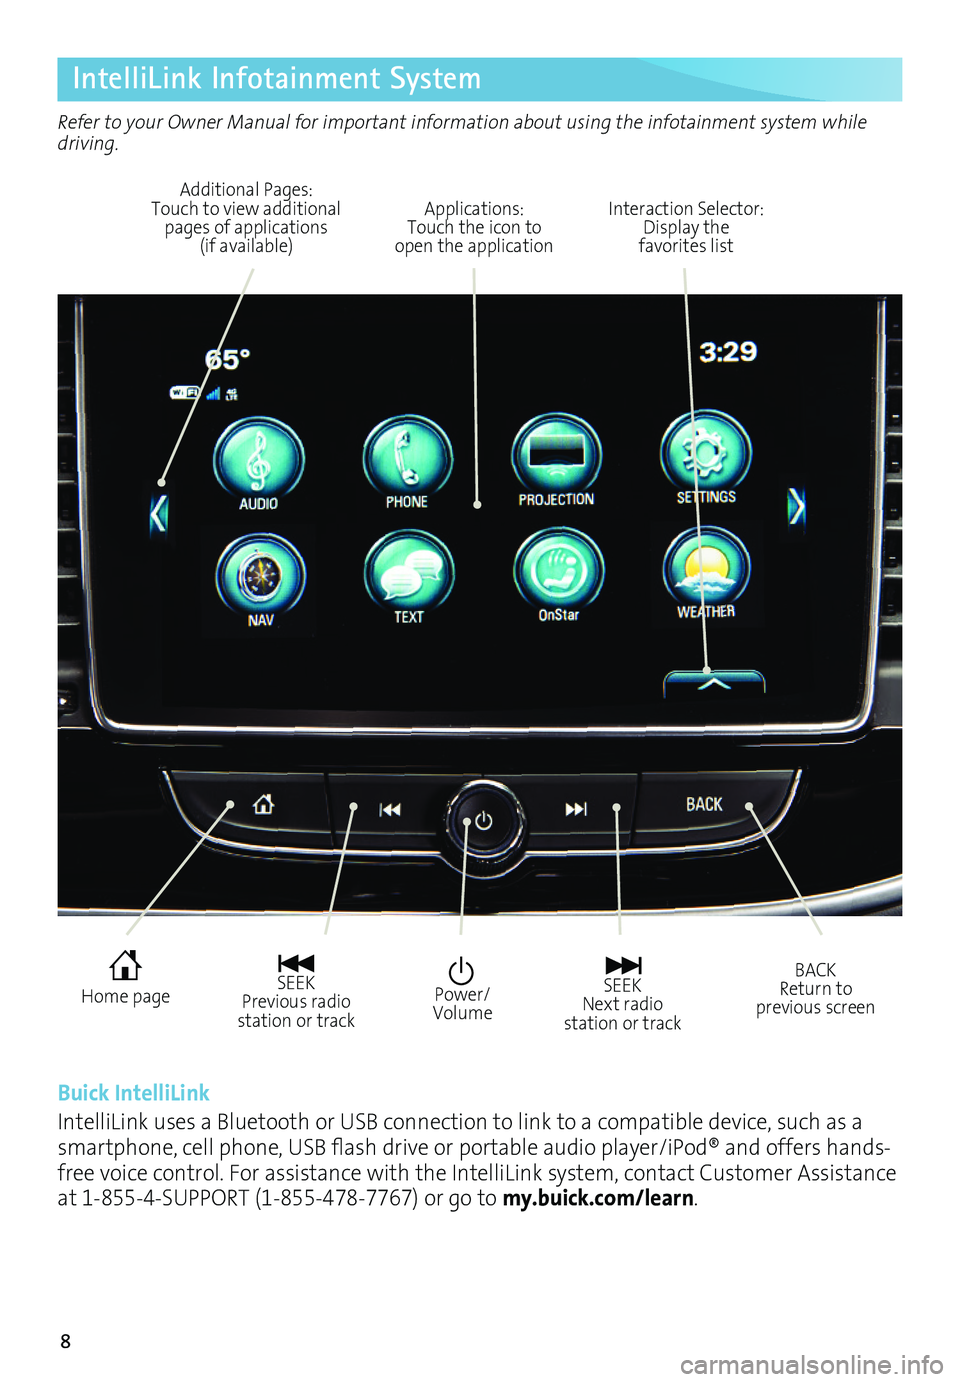
Power/Volume
Interaction Selector: Display the favorites list
Additional Pages: Touch to view additional pages of applications (if available)
Applications: Touch the icon to open the application
SEEK Previous radio station or track
SEEK Next radio station or track
BACK Return to previous screen
Home page
Buick IntelliLink
IntelliLink uses a Bluetooth or USB connection to link to a compatible device, such as a smartphone,cellphone, USBflash drive orportable audioplayer/iPod® andoffers hands-free voice control. For assistance with the IntelliLink system, contact Customer Assistance at 1-855-4-SUPPORT (1-855-478-7767) or go to my.buick.com/learn.
Page 9 of 16
9
See your Infotainment System Owner Manual.
F Optional equipment
IntelliLink Infotainment System
Storing Favorites
Radio stations from all bands (AM, FM or SiriusXMF), media (song, artist, etc.), phone
contacts and navigation destinationsF can be stored in any order on the favorites list.
1. Display the desired radio station, media favorite, contact or destination.
2. Touch the Interaction Selector at the bottom of the screen to display the favorite screen buttons.
3. Touch and hold one of the favorite screen buttons until a beep is heard.
4. Repeat the steps to store another favorite item.
Note: To change the number of favorites displayed, go to Radio in the Vehicle Settings menu.
Voice Pass-Thru
Voice Pass-Thru allows access to the voice recognition commands on a compatible cell phone; i.e. Siri or Voice Command. Visit my.buick.com/learn for more information.
To activate phone voice recognition, press and hold the Push to Talk button on the steering wheel for 2 seconds.
Natural Voice RecognitionF
Control the music source and make phone calls hands-free (after pairing your Bluetooth-enabled phone) using the natural voice recognition system.
1. Press the Push to Talk button on the steering wheel.
2. The radio will say “Command please,” followed by a beep.
3. After the beep, say what you want it to do using natural speech.
• Phone (using your paired phone) – Example command: “Call Amanda” or “Call 555-1212”
• Media Music Device Search (when connected to USB only) – Example command: “Play artist [name]” or “Play song [name]”
• Radio – Example command: “Tune FM 104.3” or “Tune XM Classic Vinyl”
• Help – Say “Help” for voice recognition assistance
Portable Audio Devices
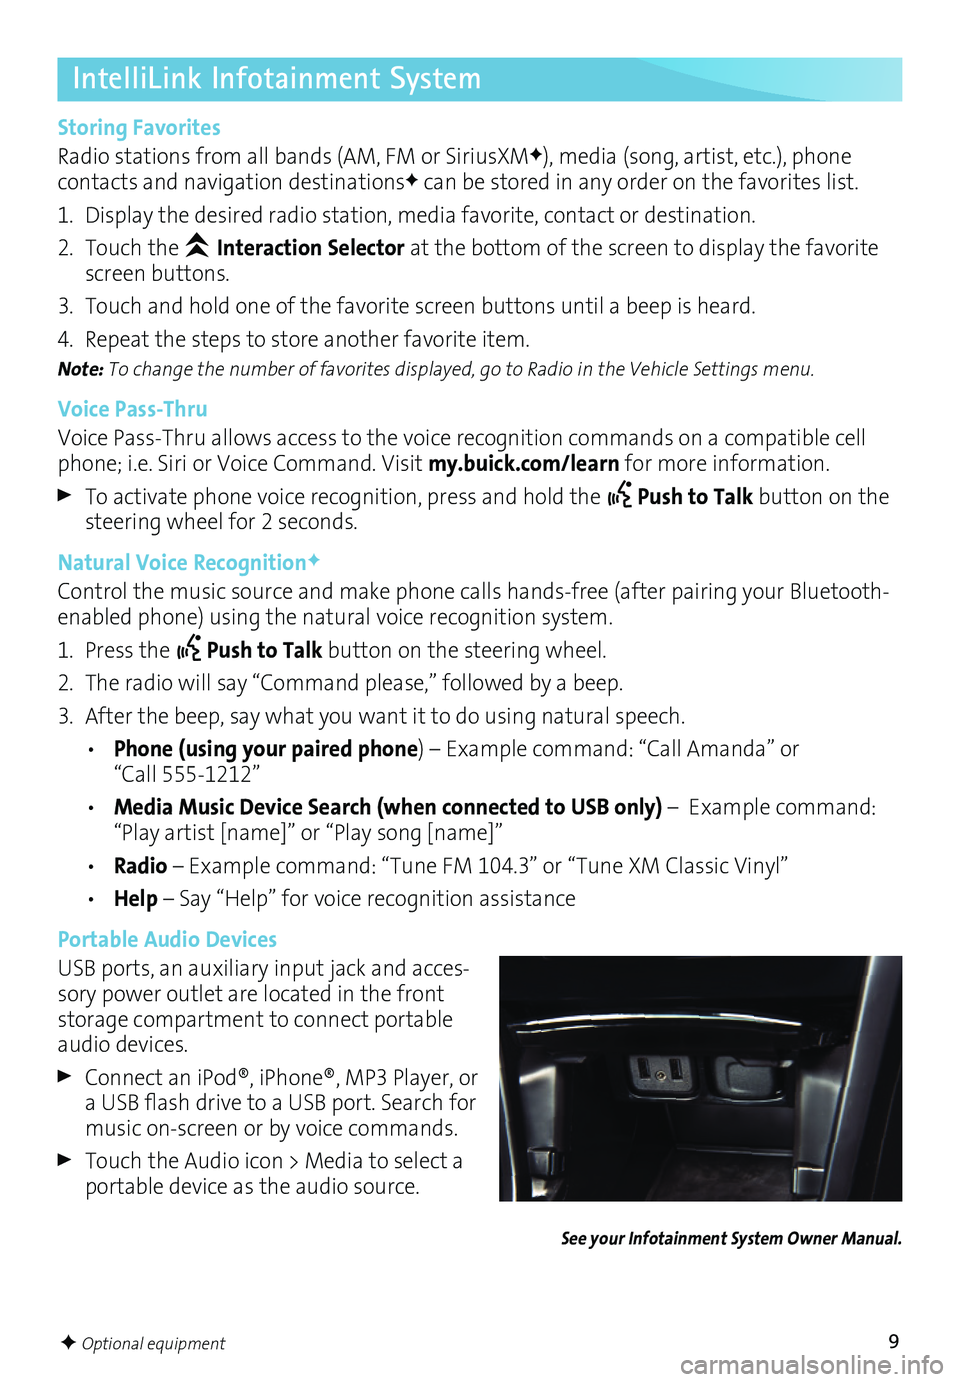
USB ports, an auxiliary input jack and acces-sory power outlet are located in the front storage compartment to connect portable audio devices.
Connect aniPod®, iPhone®, MP3Player, oraUSB flash drive toaUSB port. Search formusic on-screen or by voice commands.
Touch the Audio icon > Media to select a portable device as the audio source.
Page 10 of 16
10
Audio Steering Wheel Controls
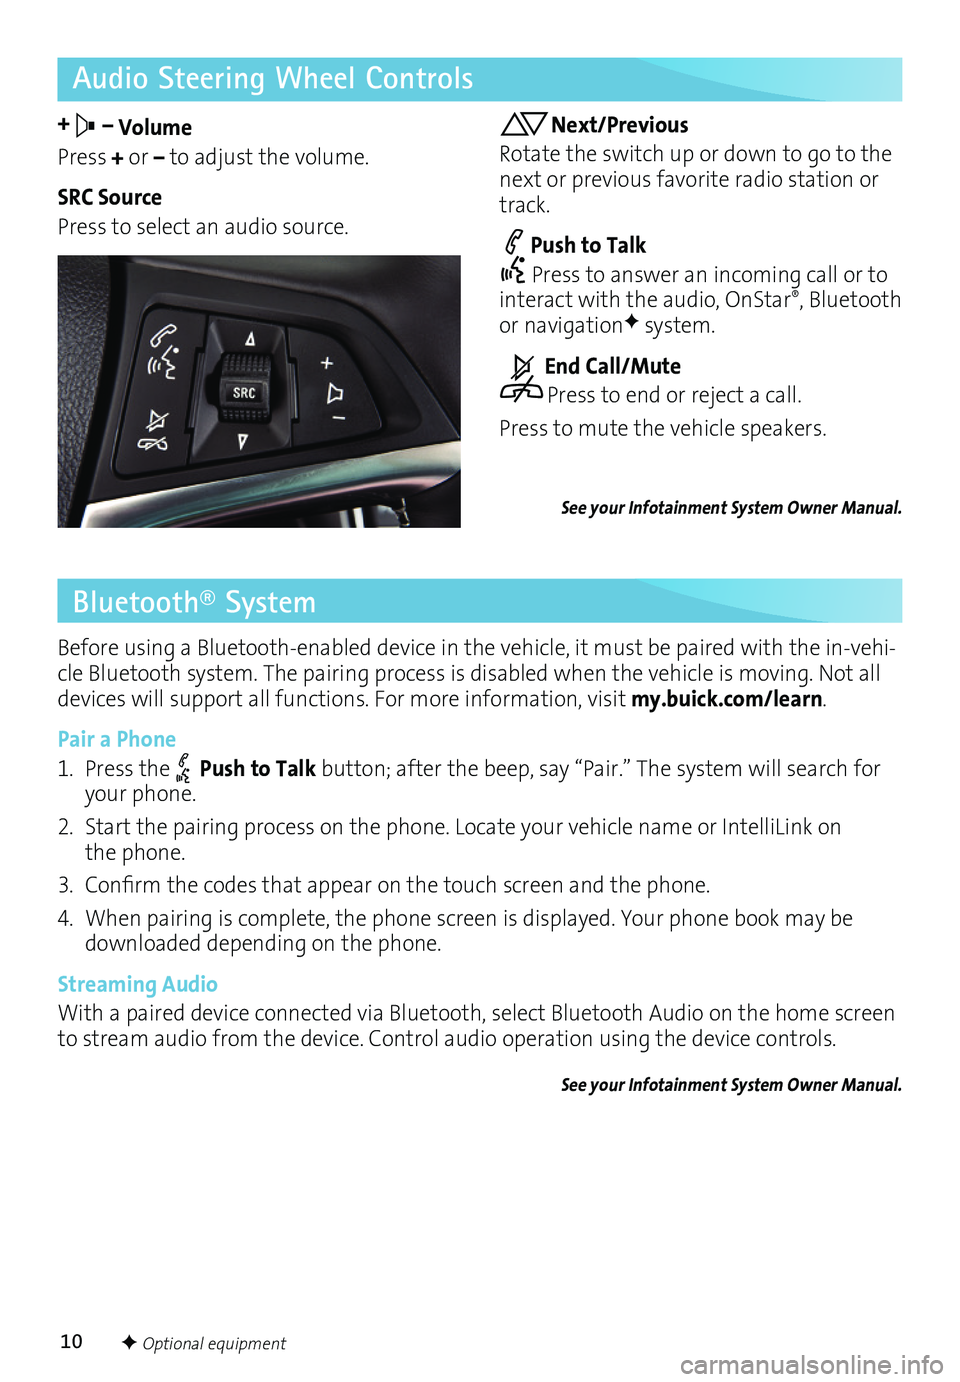
+ – Volume
Press + or – to adjust the volume.
SRC Source
Press to select an audio source.
Next/Previous
Rotate the switch up or down to go to the next or previous favorite radio station or track.
Push to Talk
Press to answer an incoming call or to interact with the audio, OnStar®, Bluetooth or navigationF system.
End Call/Mute
Press to end or reject a call.
Press to mute the vehicle speakers.
See your Infotainment System Owner Manual.
Bluetooth® System
Before using a Bluetooth-enabled device in the vehicle, it must be paired with the in-vehi-cle Bluetooth system. The pairing process is disabled when the vehicle is moving. Not all devices will support all functions. For more information, visit my.buick.com/learn.
Pair a Phone
1. Press the Push to Talk button; after the beep, say “Pair.” The system will search for your phone.
2. Start the pairing process on the phone. Locate your vehicle name or IntelliLink on the phone.
3.Confirm thecodes thatappear onthe touch screen andthephone.
4. When pairing is complete, the phone screen is displayed. Your phone book may be downloaded depending on the phone.
Streaming Audio
With a paired device connected via Bluetooth, select Bluetooth Audio on the home screen to stream audio from the device. Control audio operation using the device controls.
See your Infotainment System Owner Manual.
F Optional equipment