buttons BUICK ENCORE GX 2022 Owners Manual
[x] Cancel search | Manufacturer: BUICK, Model Year: 2022, Model line: ENCORE GX, Model: BUICK ENCORE GX 2022Pages: 376, PDF Size: 17.43 MB
Page 9 of 376
Buick Encore GX Owner Manual (GMNA-Localizing-U.S./Canada/Mexico-
15481080) - 2022 - CRC - 6/1/21
8 Keys, Doors, and Windows
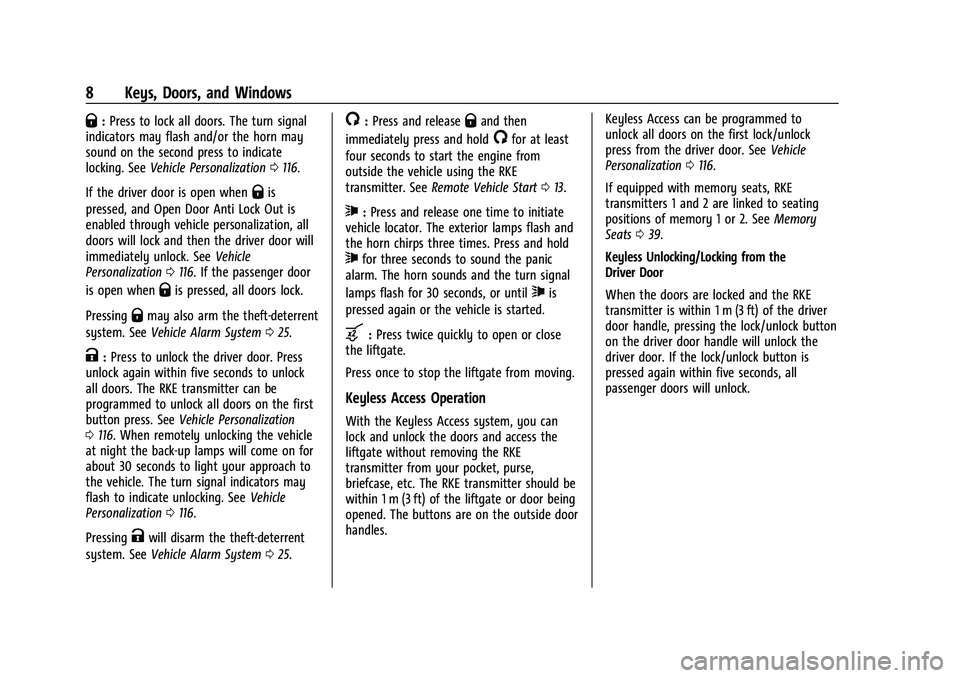
Q:Press to lock all doors. The turn signal
indicators may flash and/or the horn may
sound on the second press to indicate
locking. See Vehicle Personalization 0116.
If the driver door is open when
Qis
pressed, and Open Door Anti Lock Out is
enabled through vehicle personalization, all
doors will lock and then the driver door will
immediately unlock. See Vehicle
Personalization 0116. If the passenger door
is open when
Qis pressed, all doors lock.
Pressing
Qmay also arm the theft-deterrent
system. See Vehicle Alarm System 025.
K:Press to unlock the driver door. Press
unlock again within five seconds to unlock
all doors. The RKE transmitter can be
programmed to unlock all doors on the first
button press. See Vehicle Personalization
0 116. When remotely unlocking the vehicle
at night the back-up lamps will come on for
about 30 seconds to light your approach to
the vehicle. The turn signal indicators may
flash to indicate unlocking. See Vehicle
Personalization 0116.
Pressing
Kwill disarm the theft-deterrent
system. See Vehicle Alarm System 025.
/:Press and releaseQand then
immediately press and hold
/for at least
four seconds to start the engine from
outside the vehicle using the RKE
transmitter. See Remote Vehicle Start 013.
7:Press and release one time to initiate
vehicle locator. The exterior lamps flash and
the horn chirps three times. Press and hold
7for three seconds to sound the panic
alarm. The horn sounds and the turn signal
lamps flash for 30 seconds, or until
7is
pressed again or the vehicle is started.
b: Press twice quickly to open or close
the liftgate.
Press once to stop the liftgate from moving.
Keyless Access Operation
With the Keyless Access system, you can
lock and unlock the doors and access the
liftgate without removing the RKE
transmitter from your pocket, purse,
briefcase, etc. The RKE transmitter should be
within 1 m (3 ft) of the liftgate or door being
opened. The buttons are on the outside door
handles. Keyless Access can be programmed to
unlock all doors on the first lock/unlock
press from the driver door. See
Vehicle
Personalization 0116.
If equipped with memory seats, RKE
transmitters 1 and 2 are linked to seating
positions of memory 1 or 2. See Memory
Seats 039.
Keyless Unlocking/Locking from the
Driver Door
When the doors are locked and the RKE
transmitter is within 1 m (3 ft) of the driver
door handle, pressing the lock/unlock button
on the driver door handle will unlock the
driver door. If the lock/unlock button is
pressed again within five seconds, all
passenger doors will unlock.
Page 13 of 376
Buick Encore GX Owner Manual (GMNA-Localizing-U.S./Canada/Mexico-
15481080) - 2022 - CRC - 6/1/21
12 Keys, Doors, and Windows
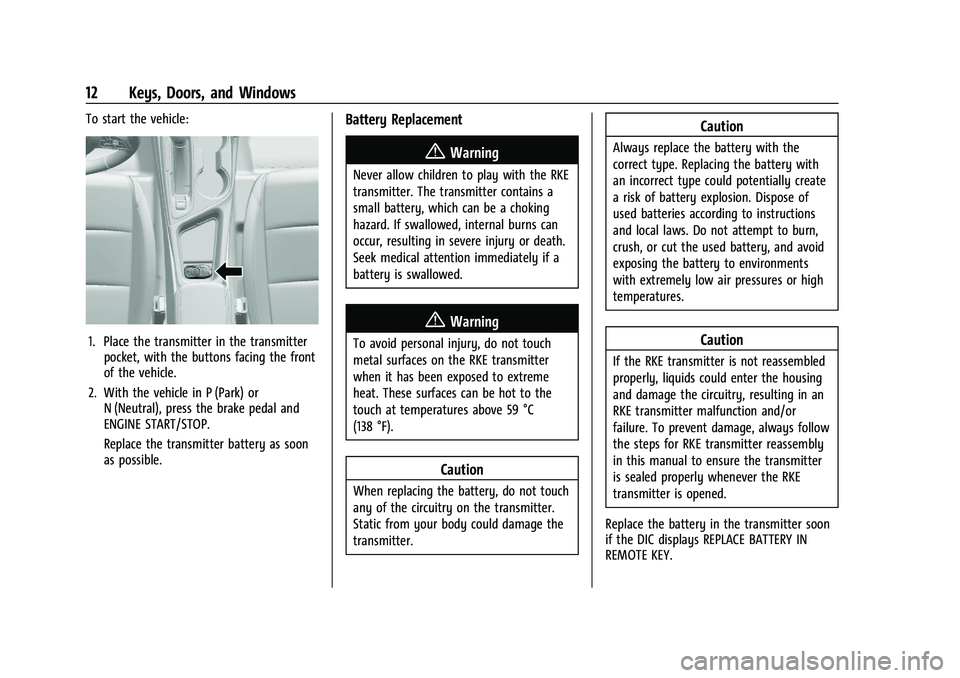
To start the vehicle:
1. Place the transmitter in the transmitterpocket, with the buttons facing the front
of the vehicle.
2. With the vehicle in P (Park) or N (Neutral), press the brake pedal and
ENGINE START/STOP.
Replace the transmitter battery as soon
as possible.
Battery Replacement
{Warning
Never allow children to play with the RKE
transmitter. The transmitter contains a
small battery, which can be a choking
hazard. If swallowed, internal burns can
occur, resulting in severe injury or death.
Seek medical attention immediately if a
battery is swallowed.
{Warning
To avoid personal injury, do not touch
metal surfaces on the RKE transmitter
when it has been exposed to extreme
heat. These surfaces can be hot to the
touch at temperatures above 59 °C
(138 °F).
Caution
When replacing the battery, do not touch
any of the circuitry on the transmitter.
Static from your body could damage the
transmitter.
Caution
Always replace the battery with the
correct type. Replacing the battery with
an incorrect type could potentially create
a risk of battery explosion. Dispose of
used batteries according to instructions
and local laws. Do not attempt to burn,
crush, or cut the used battery, and avoid
exposing the battery to environments
with extremely low air pressures or high
temperatures.
Caution
If the RKE transmitter is not reassembled
properly, liquids could enter the housing
and damage the circuitry, resulting in an
RKE transmitter malfunction and/or
failure. To prevent damage, always follow
the steps for RKE transmitter reassembly
in this manual to ensure the transmitter
is sealed properly whenever the RKE
transmitter is opened.
Replace the battery in the transmitter soon
if the DIC displays REPLACE BATTERY IN
REMOTE KEY.
Page 41 of 376
Buick Encore GX Owner Manual (GMNA-Localizing-U.S./Canada/Mexico-
15481080) - 2022 - CRC - 6/1/21
40 Seats and Restraints
not sound indicating memory position
were not saved. Repeat Steps 3 and 4 to
try again.
5. Repeat Steps 1–4 for the other RKE transmitter 1 or 2 using the other 1 or
2 memory button.
It is recommended to save the preferred
driving positions to both 1 and 2 if you are
the only driver.
To save the common exit seating position to
Bthat is used by all drivers for Manually
Recalling Seating Positions and Auto Seat
Exit Memory Recall features, repeat
Steps 1–4 using
B, the exit button.
Manually Recalling Seating Positions
Press and hold 1, 2, or
Bbutton until the
recall is complete, to recall the positions
previously saved to that button.
Manual Memory recall movement for 1, 2 or
Bbuttons may be initiated and will
complete to the saved memory position if
the vehicle is in or out of P (Park). Enable Automatic Recalls under Vehicle
Personalization Settings
.For Seat Entry Memory that begins
movement to the preferred driving
position of the 1 or 2 button when the
vehicle is turned on, select the Settings
menu, then Vehicle, then Seating Position,
then Seat Entry Memory, and then Select
ON or OFF. See
“Auto Seat Entry Memory
Recall” later in this section.
.For Seat Exit Memory that begins
movement to the preferred exit position
of the
Bbutton when the vehicle is
turned off and the driver door is open or
opened, select the Settings menu, then
Vehicle, then Seating Position, then Seat
Exit Memory, and then Select ON or OFF.
See “Auto Seat Exit Memory Recall” later
in this section.
.See Vehicle Personalization 0116 for
additional setting information.
Auto Seat Entry Memory Recall
Seat Entry Memory will automatically begin
movement to the seating positions of the 1
or 2 button corresponding to the driver’s
RKE Transmitter number 1 or 2 detected by
the vehicle when:
.The vehicle is turned ON.
.Seating positions have been previously
saved to the same 1 or 2 button. See
“Saving Seating Positions” previously in
this section.
.Seat Entry Memory is enabled. See
“Enable Automatic Recalls” under“Vehicle
Personalization Settings” previously in this
section.
.The shift lever is in P (Park).
Seat Entry Memory Recall will continue if
the vehicle is shifted out of P (Park) prior to
reaching the saved memory position.
If the saved memory seat position does not
automatically recall, verify the recall is
enabled. See “Enable Automatic Recalls”
under “Vehicle Personalization Settings”
previously in this section.
If the memory seat recalls to the wrong
position, the driver’s RKE transmitter number
1 or 2 may not match the memory button
number positions they were saved to. Try
the other RKE transmitter or try saving the
positions to the other 1 or 2 memory
button. See “Saving Seating Positions”
previously in this section.
Page 42 of 376
Buick Encore GX Owner Manual (GMNA-Localizing-U.S./Canada/Mexico-
15481080) - 2022 - CRC - 6/1/21
Seats and Restraints 41
Automatic Seat Entry Memory recalls are
only available for driver’s RKE Transmitter
numbers 1 and 2. RKE transmitters 3–8 will
not provide Seat Entry Memory recalls.
Auto Seat Exit Memory Recall
Seat Exit Memory will begin movement to
the seating position of the
B
button when:
.The vehicle is turned off and the driver
door is open or opened within a
short time.
.A seating position has been previously
been saved to the
Bmemory button.
See “Saving Seating Positions” previously
in this section
.Seat Exit Memory is enabled. See “Enable
Automatic Recalls” under“Vehicle
Personalization Settings” previously in this
section.
.The shift lever is in P (Park).
Seat Exit Memory recall will continue if the
vehicle is shifted out of P (Park) prior to
reaching the saved memory position.
Seat Exit Memory is not linked to the
driver’s RKE transmitter. The seating position
saved to
Bis used for all drivers. Cancel Memory Seating Recalls
.During any memory recall:
Press a power seat control
Press SET memory button
.During Manual memory recall:
Release 1, 2, or
Bmemory button
.During Auto Seat Entry Memory Recall:
Turn vehicle off
Press SET, 1, 2, or
Bmemory buttons
.During Auto Seat Exit Memory Recall:
Press SET, 1, 2, or
Bmemory buttons
Obstructions
If something has blocked the seat while
recalling a memory position, the recall may
stop. Remove the obstruction and try the
recall again. If the memory position still
does not recall, see your dealer.
Heated Front Seats
{Warning
If temperature change or pain to the skin
cannot be felt, the seat heater may cause
burns. To reduce the risk of burns, use
care when using the seat heater, (Continued)
Warning (Continued)
especially for long periods of time. Do
not place anything on the seat that
insulates against heat, such as a blanket,
cushion, cover, or similar item. This may
cause the seat heater to overheat. An
overheated seat heater may cause a burn
or may damage the seat.
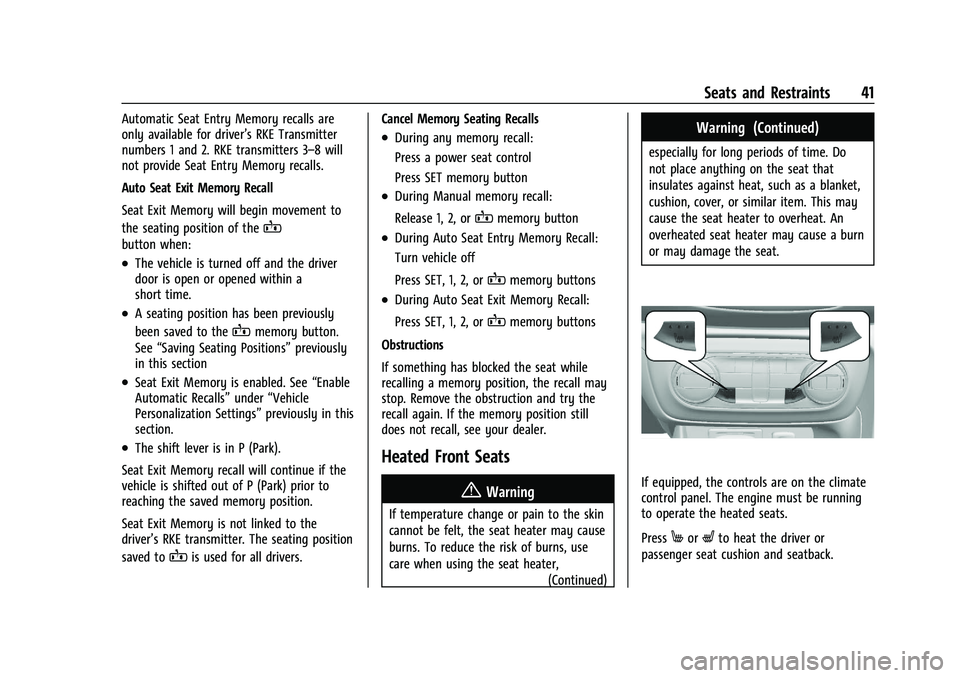
If equipped, the controls are on the climate
control panel. The engine must be running
to operate the heated seats.
Press
MorLto heat the driver or
passenger seat cushion and seatback.
Page 108 of 376

Buick Encore GX Owner Manual (GMNA-Localizing-U.S./Canada/Mexico-
15481080) - 2022 - CRC - 6/1/21
Instruments and Controls 107
Door Ajar Light
This light comes on when a door is open or
not securely latched. Before driving, check
that all doors are properly closed.
Information Displays
Driver Information Center (DIC)
(Base Level)
The DIC displays information about your
vehicle. It also displays warning messages if
a system problem is detected. SeeVehicle
Messages 0115. All messages appear in the
DIC display in the center of the instrument
cluster.
DIC Operation and Displays
Some of the displayed functions differ
between vehicle driving and standstill and
some functions are only active when the
vehicle is driving. See Vehicle Personalization
0 116.
Type 1
The DIC has different displays which can be
accessed by using the DIC buttons on the
turn signal lever.
DIC Buttons
1.
l: Press to set, or press and hold to
clear, the menu item displayed.
2.
m: Use the band to scroll through the
items in each menu.
3. SELECT : Press to access the cluster
applications. This button is also used to
return to or exit the last screen displayed on
the DIC.
Type 2
worx: Move thumbwheel up (w) or
down (
x) in a list.
oorp: Press to move between the
interactive display zones in the cluster.
Thumbwheel : Press to open a menu or
select a menu item. Press and hold to reset
values on certain screens.
Trip/Fuel Menu (TRIP) Items
Press SELECT on the turn signal lever until
the VEHICLE menu is displayed. Use
mor
thumbwheel up/down to scroll through the
Page 111 of 376
Buick Encore GX Owner Manual (GMNA-Localizing-U.S./Canada/Mexico-
15481080) - 2022 - CRC - 6/1/21
110 Instruments and Controls
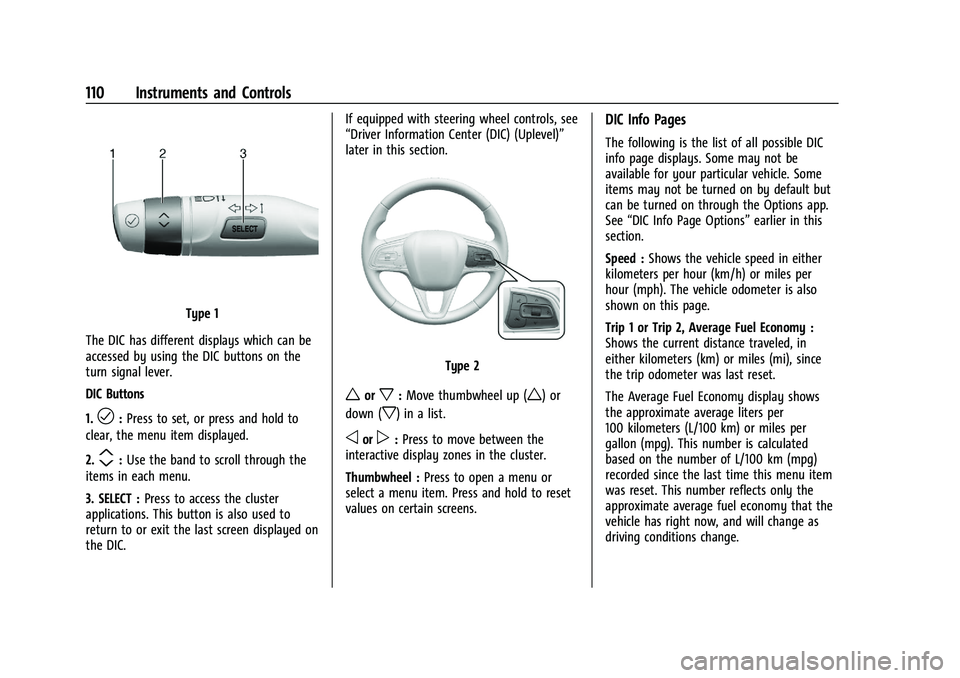
Type 1
The DIC has different displays which can be
accessed by using the DIC buttons on the
turn signal lever.
DIC Buttons
1.
l: Press to set, or press and hold to
clear, the menu item displayed.
2.
m: Use the band to scroll through the
items in each menu.
3. SELECT : Press to access the cluster
applications. This button is also used to
return to or exit the last screen displayed on
the DIC. If equipped with steering wheel controls, see
“Driver Information Center (DIC) (Uplevel)”
later in this section.
Type 2
worx:
Move thumbwheel up (w) or
down (
x) in a list.
oorp: Press to move between the
interactive display zones in the cluster.
Thumbwheel : Press to open a menu or
select a menu item. Press and hold to reset
values on certain screens.
DIC Info Pages
The following is the list of all possible DIC
info page displays. Some may not be
available for your particular vehicle. Some
items may not be turned on by default but
can be turned on through the Options app.
See “DIC Info Page Options” earlier in this
section.
Speed : Shows the vehicle speed in either
kilometers per hour (km/h) or miles per
hour (mph). The vehicle odometer is also
shown on this page.
Trip 1 or Trip 2, Average Fuel Economy :
Shows the current distance traveled, in
either kilometers (km) or miles (mi), since
the trip odometer was last reset.
The Average Fuel Economy display shows
the approximate average liters per
100 kilometers (L/100 km) or miles per
gallon (mpg). This number is calculated
based on the number of L/100 km (mpg)
recorded since the last time this menu item
was reset. This number reflects only the
approximate average fuel economy that the
vehicle has right now, and will change as
driving conditions change.
Page 121 of 376

Buick Encore GX Owner Manual (GMNA-Localizing-U.S./Canada/Mexico-
15481080) - 2022 - CRC - 6/1/21
120 Instruments and Controls
Seat Entry Memory
This feature automatically recalls the current
driver’s previously stored 1 or 2 button
positions when the ignition is changed from
off to on or ACC/ACCESSORY. SeeMemory
Seats 039.
Touch Off or On.
Seat Exit Memory
This feature automatically recalls the
previously stored exit button positions when
the ignition is changed from on or ACC/
ACCESSORY to off if the driver door is open
or opened. See Memory Seats039.
Touch Off or On.
Teen Driver
See Teen Driver 0170.
Valet Mode
This will lock the infotainment system and
steering wheel controls. It may also limit
access to vehicle storage locations,
if equipped.
To enable valet mode:
1. Enter a four-digit code on the keypad.
2. Touch Enter to go to the confirmation screen. 3. Re-enter the four-digit code.
Touch Lock or Unlock to lock or unlock the
system. Touch Back to go back to the
previous menu.
Universal Remote System
See Radio Frequency Statement 0353.
Universal Remote System
Programming
If equipped, these buttons are in the
overhead console.
This system can replace up to three remote
control transmitters used to activate devices
such as garage door openers, security systems, and home automation devices.
These instructions refer to a garage door
opener, but can be used for other devices.
Do not use the Universal Remote system
with any garage door opener that does not
have the stop and reverse feature. This
includes any garage door opener model
manufactured before April 1, 1982.
Read these instructions completely before
programming the Universal Remote system.
It may help to have another person assist
with the programming process.
Keep the original hand-held transmitter for
use in other vehicles as well as for future
programming. Erase the programming when
vehicle ownership is terminated. See
“Erasing Universal Remote System Buttons”
later in this section.
To program a garage door opener, park
outside directly in line with and facing the
garage door opener receiver. Clear all people
and objects near the garage door.
Make sure the hand-held transmitter has a
new battery for quick and accurate
transmission of the radio-frequency signal.
Page 122 of 376

Buick Encore GX Owner Manual (GMNA-Localizing-U.S./Canada/Mexico-
15481080) - 2022 - CRC - 6/1/21
Instruments and Controls 121
Programming the Universal Remote
System
For questions or programming help, see
www.homelink.com/gm or call
1-800-355-3515.
Programming involves time-sensitive actions,
and may time out causing the procedure to
be repeated.
To program up to three devices:1. Hold the end of the hand-held transmitter about 3 to 8 cm (1 to 3 in)
away from the Universal Remote system
buttons with the indicator light in view.
The hand-held transmitter was supplied
by the manufacturer of the garage door
opener receiver.
2. Press and release one of the three Universal Remote system buttons to be
programmed. Press and hold the
hand-held transmitter button. Do not
release the hand-held transmitter button
until the indicator light changes from a
slow to a rapid flash or continuous light.
Then release the hand-held transmitter
button. Some garage door openers may require
substitution of Step 2 with the procedure
under
“Radio Signals for Some Gate
Operators” later in this section.
3. Press and hold the newly programmed Universal Remote system button for
five seconds while watching the indicator
light and garage door activation.
.If the indicator light stays on
continuously or the garage door
moves when the button is pressed,
then programming is complete. There
is no need to complete Steps 4–6.
.If the indicator light does not come
on or the garage door does not
move, a second button press may be
required. For a second time, press
and hold the newly programmed
button for five seconds. If the
indicator light is continuously lit,
or the garage door moves,
programming is complete.
.If the indicator light flashes rapidly
and the garage door does not move,
continue with programming
Steps 4–6.
Learn or Smart Button
4. After completing Steps 1–3, locate the Learn or Smart button inside the garage
on the garage door opener receiver. The
name and color of the button may vary
by manufacturer.
5. Press and release the Learn or Smart button. Step 6 must be completed within
30 seconds of pressing this button.
6. Return to the vehicle and firmly press and hold the trained Universal Remote
system button for two seconds and
release. Repeat the “press/hold/release”
sequence up to three times to complete
the training process.
The Universal Remote system should now
activate the garage door.
Repeat the process for programming the
two remaining buttons.
Page 123 of 376

Buick Encore GX Owner Manual (GMNA-Localizing-U.S./Canada/Mexico-
15481080) - 2022 - CRC - 6/1/21
122 Instruments and Controls
Radio Signals for Some Gate Operators
For questions or programming help, see
www.homelink.com/gm or call
1-800-355-3515.
Some radio–frequency laws and gate
operators require transmitter signals to time
out or quit after several seconds of
transmission. This may not be long enough
for the Universal Remote system to pick up
the signal during programming.
If the programming did not work, replace
Step 2 under“Programming the Universal
Remote System” with the following:
Press and hold the Universal Remote system
button while pressing and releasing the
hand-held transmitter button every
two seconds until the signal has been
successfully accepted by the Universal
Remote system. The Universal Remote
system indicator light will flash slowly at
first and then change to a rapid flash or
continuous solid-light. Proceed with Step 3
under “Programming the Universal Remote
System” to complete.
Universal Remote System
Operation
Using the Universal Remote System
Press and hold the appropriate Universal
Remote system button for at least one-half
second. The indicator light will come on
while the signal is being transmitted.
Erasing Universal Remote System
Buttons
Erase all programmed buttons when vehicle
ownership is terminated.
To erase:
1. Press and hold the two outside buttons until the indicator light begins to flash.
This should take about 10 seconds.
2. Release both buttons.
Reprogramming a Single Universal
Remote System Button
To reprogram any of the system buttons: 1. Press and hold any one of the buttons. Do not release the button.
2. The indicator light will begin to flash after 20 seconds. Without releasing the
button, proceed with Step 1 under
“Programming the Universal Remote
System.”
Page 184 of 376

Buick Encore GX Owner Manual (GMNA-Localizing-U.S./Canada/Mexico-
15481080) - 2022 - CRC - 6/1/21
Climate Controls 183
The heating, cooling, and ventilation for the
vehicle can be controlled with this system.1. Temperature Control
2. Air Delivery Mode Controls
3. MAX Defrost
4. Rear Window Defogger
5. Fan Control
6. Driver and Passenger Heated Seats (If Equipped)
7. Recirculation
8. A/C (Air Conditioning)
]: Turn the knob clockwise or
counterclockwise to increase or decrease the
fan speed or turn the fan off.
Temperature Control : Turn the knob
clockwise or counterclockwise to increase or
decrease the temperature. Air Delivery Mode Controls :
Press
z,Y,
or
6to change the direction of the airflow.
The indicator light in the button will turn
on. Any combination of the three buttons
can be selected. The indicator light in the
button will turn on.
To change the current mode, select one or
more of the following:
z: Clears the windows of fog or moisture.
Air is directed to the windshield.
Y: Air is directed to the instrument panel
outlets.
6: Air is directed to the floor outlets.
0MAX : Air is directed to the windshield
and the fan runs at a higher speed. Fog or
frost is cleared from the windshield more
quickly. When the button is pressed again,
the system returns to the previous mode
setting.
For best results, clear all snow and ice from
the windshield before defrosting. A/C :
Press to turn the air conditioning
system on or off. If the climate control
system is turned off or the outside
temperature falls below freezing, the air
conditioner will not run.
@: Press to turn on recirculation. An
indicator light comes on. Air is recirculated
to quickly cool the inside of the vehicle or
to reduce the entry of outside air and odors.
Rear Window Defogger
K: Press to turn the rear window defogger
on or off. An indicator light on the button
comes on to show that the rear window
defogger is on.
The defogger can be turned off by turning
the ignition off or to ACC/ACCESSORY.
If the vehicle is equipped with heated
outside mirrors, they turn on when the rear
window defogger button is on and help to
clear fog or frost from the surface of the
mirror.
See Heated Mirrors 027.