battery replacement BUICK ENCORE GX 2024 Owners Manual
[x] Cancel search | Manufacturer: BUICK, Model Year: 2024, Model line: ENCORE GX, Model: BUICK ENCORE GX 2024Pages: 330, PDF Size: 6.72 MB
Page 11 of 330
Buick Encore GX Owner Manual (GMNA-Localizing-U.S./Canada/Mexico-
16897608) - 2024 - CRC - 1/23/23
10 Keys, Doors, and Windows
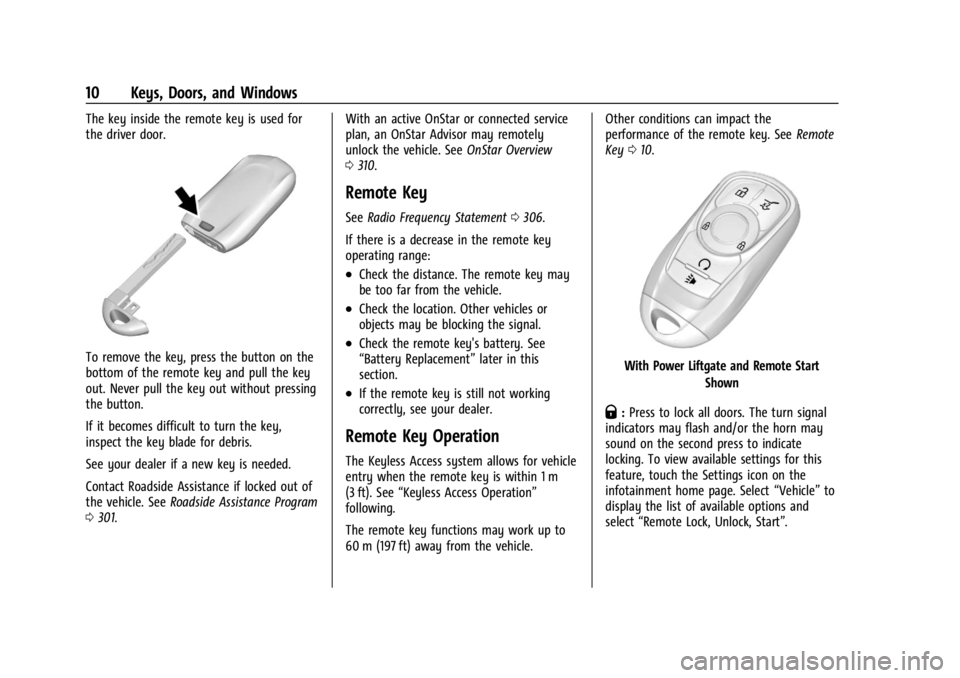
The key inside the remote key is used for
the driver door.
To remove the key, press the button on the
bottom of the remote key and pull the key
out. Never pull the key out without pressing
the button.
If it becomes difficult to turn the key,
inspect the key blade for debris.
See your dealer if a new key is needed.
Contact Roadside Assistance if locked out of
the vehicle. SeeRoadside Assistance Program
0 301. With an active OnStar or connected service
plan, an OnStar Advisor may remotely
unlock the vehicle. See
OnStar Overview
0 310.
Remote Key
See Radio Frequency Statement 0306.
If there is a decrease in the remote key
operating range:
.Check the distance. The remote key may
be too far from the vehicle.
.Check the location. Other vehicles or
objects may be blocking the signal.
.Check the remote key's battery. See
“Battery Replacement” later in this
section.
.If the remote key is still not working
correctly, see your dealer.
Remote Key Operation
The Keyless Access system allows for vehicle
entry when the remote key is within 1 m
(3 ft). See “Keyless Access Operation”
following.
The remote key functions may work up to
60 m (197 ft) away from the vehicle. Other conditions can impact the
performance of the remote key. See
Remote
Key 010.
With Power Liftgate and Remote Start
Shown
Q:Press to lock all doors. The turn signal
indicators may flash and/or the horn may
sound on the second press to indicate
locking. To view available settings for this
feature, touch the Settings icon on the
infotainment home page. Select “Vehicle”to
display the list of available options and
select “Remote Lock, Unlock, Start”.
Page 14 of 330
Buick Encore GX Owner Manual (GMNA-Localizing-U.S./Canada/Mexico-
16897608) - 2024 - CRC - 1/23/23
Keys, Doors, and Windows 13
Temporary Disable of Passive Locking
Temporarily disable passive locking by
pressing and holding
Kon the interior door
switch with a door open for at least
four seconds, or until three chimes are
heard. Passive locking will then remain
disabled until
Qon the interior door is
pressed, or until the vehicle is turned on.
Remote Left in Vehicle Alert
When the vehicle is turned off and an
remote key is left in the vehicle, the horn
will chirp three times after all doors are
closed. To view available settings for this
feature, touch the Settings icon on the
infotainment home page. Select “Vehicle”to
display the list of available options and
select “Remote Lock, Unlock, Start”.
Remote No Longer in Vehicle Alert
If the vehicle is on with a door open, and
then all doors are closed, the vehicle will
check for remote keys inside. If an remote
key is not detected, the Driver Information
Center (DIC) will display NO REMOTE
DETECTED and the horn will chirp three
times. This occurs only once each time the
vehicle is driven. Keyless Liftgate Opening
Press the touch pad on the liftgate handle
to open the liftgate if the remote key is
within 1 m (3 ft).
Key Access
To access a vehicle with a weak remote key
battery, see
Door Locks018.
Programming Remote Keys to the
Vehicle
Only remote keys programmed to the
vehicle will work. If a remote key is lost or
stolen, a replacement can be purchased and
programmed through your dealer. The
vehicle can be reprogrammed so that lost or
stolen remote keys no longer work. Each
vehicle can have up to eight remote keys
matched to it.
Programming with Recognized Remote Keys
A new remote key can be programmed to
the vehicle when there are two recognized
remote keys.
To program, the vehicle must be off and all
of the remote keys, both currently
recognized and new, must be with you.
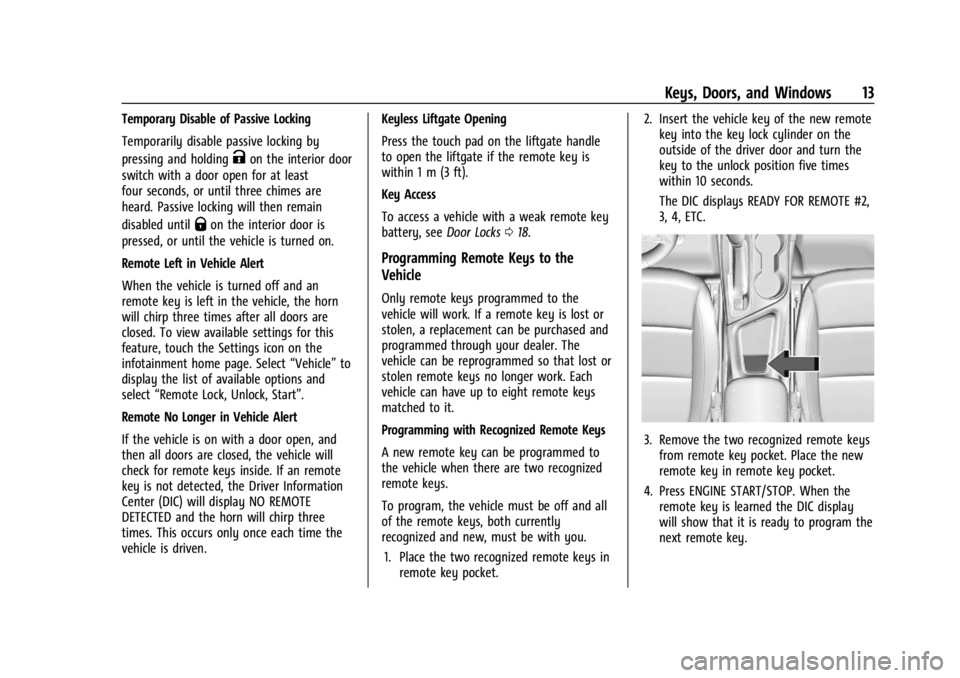
1. Place the two recognized remote keys in remote key pocket. 2. Insert the vehicle key of the new remote
key into the key lock cylinder on the
outside of the driver door and turn the
key to the unlock position five times
within 10 seconds.
The DIC displays READY FOR REMOTE #2,
3, 4, ETC.
3. Remove the two recognized remote keysfrom remote key pocket. Place the new
remote key in remote key pocket.
4. Press ENGINE START/STOP. When the remote key is learned the DIC display
will show that it is ready to program the
next remote key.
Page 16 of 330
Buick Encore GX Owner Manual (GMNA-Localizing-U.S./Canada/Mexico-
16897608) - 2024 - CRC - 1/23/23
Keys, Doors, and Windows 15
7. Put the key back into the remote key.
8. Replace the key lock cylinder cap. SeeDoor Locks 018.
Starting the Vehicle with a Low Remote
Key Battery
For improved vehicle security, the remote
key is equipped with a motion sensor. When
starting the vehicle, if the remote key has
been idle for a while, move the remote key
slightly and try starting the vehicle. When
starting the vehicle, if the remote key
battery is depleted or there is signal
interference, the DIC may display NO
REMOTE DETECTED, REPLACE BATTERY IN KEY,
or NO REMOTE DETECTED PLACE KEY IN KEY
POCKET THEN START YOUR VEHICLE, follow
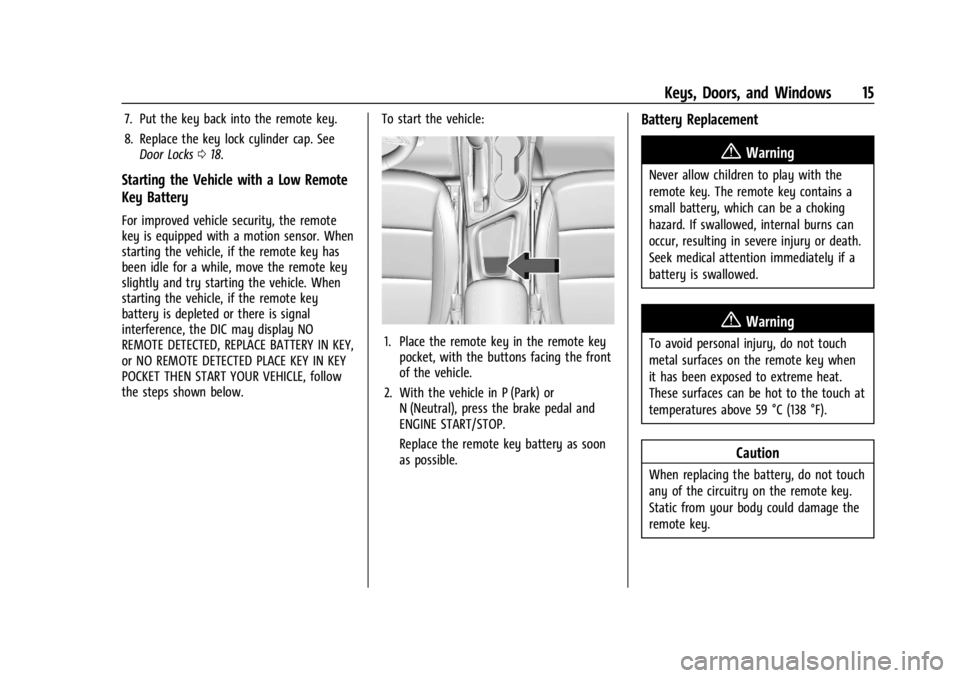
the steps shown below. To start the vehicle:
1. Place the remote key in the remote key
pocket, with the buttons facing the front
of the vehicle.
2. With the vehicle in P (Park) or N (Neutral), press the brake pedal and
ENGINE START/STOP.
Replace the remote key battery as soon
as possible.
Battery Replacement
{Warning
Never allow children to play with the
remote key. The remote key contains a
small battery, which can be a choking
hazard. If swallowed, internal burns can
occur, resulting in severe injury or death.
Seek medical attention immediately if a
battery is swallowed.
{Warning
To avoid personal injury, do not touch
metal surfaces on the remote key when
it has been exposed to extreme heat.
These surfaces can be hot to the touch at
temperatures above 59 °C (138 °F).
Caution
When replacing the battery, do not touch
any of the circuitry on the remote key.
Static from your body could damage the
remote key.
Page 113 of 330

Buick Encore GX Owner Manual (GMNA-Localizing-U.S./Canada/Mexico-
16897608) - 2024 - CRC - 1/23/23
112 Instruments and Controls
Show in Cluster. Reset the Brake Pad Life
after replacing the brake pads. SeeBrake
Pad Life System 0231.
Oil Life : Displays an estimate of the oil's
remaining useful life. If REMAINING OIL LIFE
99% is displayed, that means 99% of the
current oil life remains.
When the remaining oil life is low, the
CHANGE ENGINE OIL SOON message will
appear on the display. The oil should be
changed as soon as possible. See Engine Oil
0 221. In addition to the engine oil life
system monitoring the oil life, additional
maintenance is recommended. See
Maintenance Schedule 0286.
When selected, the following options may
be chosen in the dialog: Reset, and Show in
Cluster. The Oil Life must be reset after each
oil change. It will not reset itself. Do not
reset the Oil Life display accidentally at any
time other than when the oil has just been
changed. It cannot be reset accurately until
the next oil change. To reset, see Engine Oil
Life System 0223.
Engine Air Filter Life : Displays an estimate
of the engine air filter’s remaining useful life
and the state of the system. Engine Air
Filter Life 95% means 95% of the current air
filter life remains. Messages are displayed based on the engine air filter life and the
state of the system. When the REPLACE AT
NEXT OIL CHANGE message displays, the
engine air filter should be replaced at the
time of the next oil change. When the
REPLACE NOW message displays, the engine
air filter should be replaced as soon as
possible. The Air Filter Life display must be
reset after the engine air filter replacement.
To reset, see
Engine Air Filter Life System
0 224.
When selected, the following options may
be chosen in the dialog: Turn Off/On, Reset,
and Show in Cluster.
Gauge
Battery Voltage : Displays the current
battery voltage.
When selected, Show in Cluster may be
chosen in the dialog.
Coolant Temperature : Displays the
temperature of the coolant in either degrees
Celsius (°C) or degrees Fahrenheit (°F).
When selected, Show in Cluster may be
chosen in the dialog. Transmission Fluid Temperature :
Displays
the temperature of the automatic
transmission fluid in either degrees
Celsius (°C) or degrees Fahrenheit (°F).
When selected, Show in Cluster may be
chosen in the dialog.
Oil Pressure : Displays the engine oil
pressure in kPa (kilopascals) or psi (pounds
per square inch).
When selected, Show in Cluster may be
chosen in the dialog.
Oil Temperature : Displays the current oil
temperature in either degrees Celsius (°C) or
degrees Fahrenheit (°F).
When selected, Show in Cluster may be
chosen in the dialog.
Engine Hours : Displays the total number of
hours the engine has run.
When selected, Show in Cluster may be
chosen in the dialog.
Trip
Trip Information : Trip 1 or 2 displays the
current distance traveled, in either
kilometers (km) or miles (mi), since the trip
odometer was last reset.
Page 114 of 330
Buick Encore GX Owner Manual (GMNA-Localizing-U.S./Canada/Mexico-
16897608) - 2024 - CRC - 1/23/23
Instruments and Controls 113
Average Fuel Economy displays the
approximate average liters per
100 kilometers (L/100 km) or miles per
gallon (mpg). This number is calculated
based on the number of L/100 km (mpg)
recorded since the last time this menu item
was reset. This number reflects only the
current, approximate average fuel economy
and changes as driving conditions change.
To reset these values, touch reset on the
touchscreen display when the Trip
Information dialog is selected.
When selected, the following options may
be chosen in the dialog: Reset Trip 1, Reset
Trip 2, and Show in Cluster.
Fuel Economy :Displays average fuel
economy, the best fuel economy over the
selected distance, and a bar graph showing
instantaneous fuel economy. Values are
displayed in liters per 100 kilometers
(L/100 km) or miles per gallon (mpg). This
number reflects only the approximate fuel
economy and changes frequently as driving
conditions change. Only the best score can
be reset.
If the vehicle is equipped with an Active Fuel
Management indicator, the engine operating
mode may be shown in the bottom corner
of this display. When selected, the following options may
be chosen in the dialog: Change Distance,
Reset Best Score, and Add to Driver Display.
The distance for average fuel economy and
the best fuel economy can be changed to:
40 km (25 mi), 80 km (50 mi), and 725 km
(300 mi).
Vehicle Messages
Messages displayed on the DIC indicate the
status of the vehicle or some action that
may be needed to correct a condition.
Multiple messages may appear one after
another.
The messages that do not require
immediate action can be acknowledged and
cleared by pressing the thumbwheel. The
messages that require immediate action
cannot be cleared until that action is
performed.
All messages should be taken seriously;
clearing the message does not correct the
problem.
If a SERVICE message appears, see your
dealer.
Follow the instructions given in the
messages. The system displays messages
regarding the following topics:
.Service Messages
.Fluid Levels
.Vehicle Security
.Brakes
.Ride Control Systems
.Advanced Driver Assistance Systems
.Cruise Control
.Lighting and Bulb Replacement
.Wiper/Washer Systems
.Doors and Windows
.Seat Belts
.Airbag Systems
.Engine and Transmission
.Tire Pressure
.Battery
Engine Power Messages
ENGINE POWER IS REDUCED
This message displays when the vehicle's
propulsion power is reduced. A reduction in
propulsion power can affect the vehicle's
ability to accelerate. If this message is on,
but there is no observed reduction in
Page 163 of 330

Buick Encore GX Owner Manual (GMNA-Localizing-U.S./Canada/Mexico-
16897608) - 2024 - CRC - 1/23/23
162 Driving and Operating
Warning (Continued)
.Never stack heavier things, like
suitcases, inside the vehicle so
that some of them are above the
tops of the seats.
.Do not leave an unsecured child
restraint in the vehicle.
.Secure loose items in the vehicle.
.Do not leave a seat folded down
unless needed.
Starting and Operating
New Vehicle Break-In
Caution
The vehicle does not need an elaborate
break-in. But it will perform better in the
long run if you follow these guidelines:
.Do not drive at any one constant
speed, fast or slow, for the first
800 km (500 mi). Do not make
full-throttle starts. Avoid downshifting
to brake or slow the vehicle.
(Continued)
Caution (Continued)
.Avoid making hard stops for the first
300 km (200 mi) or so. During this
time the new brake linings are not yet
broken in. Hard stops with new linings
can mean premature wear and earlier
replacement. Follow this breaking-in
guideline every time you get new
brake linings.
.Do not tow a trailer during break-in.
SeeTrailer Towing 0208 for the
trailer towing capabilities of the
vehicle and more information.
Following break-in, engine speed and load
can be gradually increased.
On new vehicles, the various mechanical and
electrical systems experience a “break-in”
period during the first 6 400 km (4,000 mi)
of routine driving. As the vehicle is driven,
the mechanical systems adjust to provide
optimal fuel economy and transmission shift
performance.
Electrical systems will adapt and calibrate
during the break-in period. A one-time
occurrence of clicks and similar vehicle
noises is normal during this process. Normal driving charges the vehicle’s battery
to achieve the best operation of the vehicle,
including fuel economy and the Stop/Start
System. See
Stop/Start System 0165.
Ignition Positions
The vehicle has an electronic keyless ignition
with pushbutton start.
The remote key must be in the vehicle for
the system to operate. If the pushbutton
start is not working, the vehicle may be
near a strong radio antenna signal causing
interference to the Keyless Access system.
See Remote Key Operation 010.
Page 215 of 330
Buick Encore GX Owner Manual (GMNA-Localizing-U.S./Canada/Mexico-
16897608) - 2024 - CRC - 1/23/23
214 Vehicle Care
Vehicle Care
General Information
General Information . . . . . . . . . . . . . . . . . . . 215
California Perchlorate MaterialsRequirements . . . . . . . . . . . . . . . . . . . . . . . . 215
Accessories and Modifications . . . . . . . . . 215
Vehicle Checks
Doing Your Own Service Work . . . . . . . . . 215
Hood . . . . . . . . . . . . . . . . . . . . . . . . . . . . . . . . . . 216
Engine Compartment Overview . . . . . . . . 218
Engine Oil . . . . . . . . . . . . . . . . . . . . . . . . . . . . . 221
Engine Oil Life System . . . . . . . . . . . . . . . . . 223
Engine Air Filter Life System . . . . . . . . . . 224
Engine Air Cleaner/Filter . . . . . . . . . . . . . . . 224
Cooling System . . . . . . . . . . . . . . . . . . . . . . . 226
Engine Overheating . . . . . . . . . . . . . . . . . . . 229
Washer Fluid . . . . . . . . . . . . . . . . . . . . . . . . . . 230
Brakes . . . . . . . . . . . . . . . . . . . . . . . . . . . . . . . . . 231
Brake Pad Life System . . . . . . . . . . . . . . . . . 231
Brake Fluid . . . . . . . . . . . . . . . . . . . . . . . . . . . . 232
Battery - North America . . . . . . . . . . . . . . . 233
All-Wheel Drive . . . . . . . . . . . . . . . . . . . . . . . . 234
Automatic Transmission Shift Lock Control Function Check . . . . . . . . . . . . . . 235
Park Brake and P (Park) Mechanism Check . . . . . . . . . . . . . . . . . . . . . . . . . . . . . . . . 235
Wiper Blade Replacement . . . . . . . . . . . . . 235 Windshield Replacement . . . . . . . . . . . . . . 236
Gas Strut(s) . . . . . . . . . . . . . . . . . . . . . . . . . . . 236
Headlamp Aiming
Front Headlamp Aiming . . . . . . . . . . . . . . . 237
Bulb Replacement
Bulb Replacement . . . . . . . . . . . . . . . . . . . . . 237
Halogen Bulbs . . . . . . . . . . . . . . . . . . . . . . . . . 238
LED Lighting . . . . . . . . . . . . . . . . . . . . . . . . . . . 238
Taillamps, Turn Signal, Sidemarker,
Stoplamps, and Back-Up Lamps (Base
Level) . . . . . . . . . . . . . . . . . . . . . . . . . . . . . . . . 238
Taillamps, Turn Signal, Sidemarker, Stoplamps, and Back-Up Lamps
(Uplevel) . . . . . . . . . . . . . . . . . . . . . . . . . . . . . 241
Electrical System
Electrical System Overload . . . . . . . . . . . . . 241
Fuses and Circuit Breakers . . . . . . . . . . . . . 242
Engine Compartment Fuse Block . . . . . . 243
Instrument Panel Fuse Block . . . . . . . . . . . 245
Rear Compartment Fuse Block . . . . . . . . . 247
Wheels and Tires
Tires . . . . . . . . . . . . . . . . . . . . . . . . . . . . . . . . . . 248
All-Season Tires . . . . . . . . . . . . . . . . . . . . . . . 249
Winter Tires . . . . . . . . . . . . . . . . . . . . . . . . . . . 249
Tire Sidewall Labeling . . . . . . . . . . . . . . . . . 249
Tire Designations . . . . . . . . . . . . . . . . . . . . . . 251
Tire Terminology and Definitions . . . . . . 252
Tire Pressure . . . . . . . . . . . . . . . . . . . . . . . . . . 253 Tire Pressure for High-Speed
Operation . . . . . . . . . . . . . . . . . . . . . . . . . . . 254
Tire Pressure Monitor System . . . . . . . . . 255
Tire Pressure Monitor Operation . . . . . . . 255
Tire Inspection . . . . . . . . . . . . . . . . . . . . . . . . 259
Tire Rotation . . . . . . . . . . . . . . . . . . . . . . . . . . 259
When It Is Time for New Tires . . . . . . . . 260
Buying New Tires . . . . . . . . . . . . . . . . . . . . . . 261
Different Size Tires and Wheels . . . . . . . 262
Uniform Tire Quality Grading . . . . . . . . . 262
Wheel Alignment and Tire Balance . . . . 263
Wheel Replacement . . . . . . . . . . . . . . . . . . . 263
Tire Chains . . . . . . . . . . . . . . . . . . . . . . . . . . . . 264
If a Tire Goes Flat . . . . . . . . . . . . . . . . . . . . . 264
Tire Changing . . . . . . . . . . . . . . . . . . . . . . . . . 266
Compact Spare Tire . . . . . . . . . . . . . . . . . . . 270
Jump Starting
Jump Starting - North America . . . . . . . . 270
Towing the Vehicle
Transporting a Disabled Vehicle . . . . . . . 273
Recreational Vehicle Towing . . . . . . . . . . . 274
Appearance Care
Exterior Care . . . . . . . . . . . . . . . . . . . . . . . . . . . 277
Interior Care . . . . . . . . . . . . . . . . . . . . . . . . . . . 281
Floor Mats . . . . . . . . . . . . . . . . . . . . . . . . . . . . 284
Page 234 of 330
Buick Encore GX Owner Manual (GMNA-Localizing-U.S./Canada/Mexico-
16897608) - 2024 - CRC - 1/23/23
Vehicle Care 233
When the brake fluid falls to a low level,
the brake warning light comes on. SeeBrake
System Warning Light 0103.
Brake fluid absorbs water over time which
degrades the effectiveness of the brake fluid.
Replace brake fluid at the specified intervals
to prevent increased stopping distance. See
Maintenance Schedule 0286.
What to Add
Use only GM approved DOT 4 brake fluid
from a clean, sealed container. See
Recommended Fluids and Lubricants 0290.
{Warning
The wrong or contaminated brake fluid
could result in damage to the brake
system. This could result in the loss of
braking leading to a possible injury.
Always use the proper GM approved
brake fluid.
Caution
If brake fluid is spilled on the vehicle's
painted surfaces, the paint finish can be
damaged. Immediately wash off any
painted surface.
Battery - North America
The original equipment battery is
maintenance free. Do not remove the cap
and do not add fluid.
Refer to the replacement number shown on
the original battery label when a new
battery is needed. For replacement of the
battery, see your dealer.
Stop/Start System
If equipped, the Stop/Start system shuts off
the engine to help conserve fuel. See Stop/
Start System 0165. It has an Absorbed Glass
Mat (AGM) 12-volt battery. Installation of a
standard 12-volt battery will result in
reduced 12-volt battery life.
When using a 12-volt battery charger on the
12-volt AGM battery, some chargers have an
AGM battery setting on the charger.
If available, use the AGM setting on the
charger to limit charge voltage to 14.8 volts.
{Warning
WARNING: Battery posts, terminals and
related accessories can expose you to
chemicals including lead and lead
compounds, which are known to the (Continued)
Warning (Continued)
State of California to cause cancer and
birth defects or other reproductive harm.
Wash hands after handling. For more
information go to
www.P65Warnings.ca.gov.
See California Proposition 65 Warning 01.
Vehicle Storage
{Warning
Batteries have acid that can burn you and
gas that can explode. You can be badly
hurt if you are not careful. See Jump
Starting - North America 0270 for tips on
working around a battery without
getting hurt.
Infrequent Usage: Remove the black,
negative (−) cable from the battery to keep
the battery from running down.
Extended Storage: Remove the black,
negative (−) cable from the battery or use a
battery trickle charger.
Page 235 of 330

Buick Encore GX Owner Manual (GMNA-Localizing-U.S./Canada/Mexico-
16897608) - 2024 - CRC - 1/23/23
234 Vehicle Care
Negative Battery Cable Disconnection
{Warning
Before disconnecting the negative battery
cable, turn off all features, turn the
ignition off, and remove the key,
if equipped, from the vehicle. If this is
not done, you or others could be injured,
and the vehicle could be damaged.
Caution
If the battery is disconnected with the
ignition on or the vehicle in Retained
Accessory Power (RAP), the OnStar
back-up battery will be permanently
discharged and will need to be replaced.
1. Make sure the lamps, features, and accessories are turned off.
2. Turn the ignition off and remove the key, if equipped.3. Loosen the negative battery cable nut (1).
4. Remove the negative battery cable (2)from the battery.
Negative Battery Cable Reconnection
Caution
When reconnecting the battery:
.Use the original nut from the vehicle
to secure the negative battery cable.
Do not use a different nut. If you
need a replacement nut, see your
dealer.
(Continued)
Caution (Continued)
.Tighten the nut with a hand tool. Do
not use an impact wrench or power
tools to tighten the nut.
The vehicle could be damaged if these
guidelines are not followed.
Caution
Do not use paints, lubricants, or corrosion
inhibitors on the nut that secures the
negative battery cable to the vehicle. This
could damage the vehicle.
1. Install the negative battery cable (2) to the battery.
2. Install the negative battery cable nut (1) and tighten.
3. Turn the ignition on.
All-Wheel Drive
Transfer Case
Under normal driving conditions, transfer
case fluid does not require maintenance
unless there is a fluid leak or unusual noise.
If required, have the transfer case serviced
by your dealer.
Page 289 of 330
Buick Encore GX Owner Manual (GMNA-Localizing-U.S./Canada/Mexico-
16897608) - 2024 - CRC - 1/23/23
288 Service and Maintenance
* Footnote: Under extreme driving
conditions listed above, it may be
necessary to replace your spark plugs at
more frequent intervals. For further
assistance in determining the most
suitable service maintenance intervals for
your vehicle, please contact your
authorized GM Dealer.
Extreme service is for vehicles mainly
driven off-road in four-wheel drive or used
in farming, mining, forestry, or snow
plowing.
Additional Required Services—Severe
Service
Every 72 000 km (45,000 mi)
.Change automatic transmission fluid and
filter.
Every 120 000 km (75,000 mi)
.Change rear axle fluid, if equipped with
AWD. Do not directly power wash the
transfer case and/or front/rear axle
output seals. High pressure water can
overcome the seals and contaminate the
transfer case fluid. Contaminated fluid will
decrease the life of the transfer case
and/or axles and should be replaced.
Owner Checks and Services
Every Five Years
.Replace brake fluid every five years. See
Brake Fluid 0232.
Every Seven Years
.Replace Air Conditioning Desiccant every
seven years. The air conditioning system
requires maintenance every seven years.
This service requires replacement of the
desiccant to help the longevity and
efficient operation of the air conditioning
system. This service can be complex. See
your dealer.
Multi-Point Vehicle
Inspection (MPVI)
A Multi Point Vehicle Inspection (MPVI)
completed by a GM dealer technician is a
maintenance assessment of your vehicle.
The benefit of the MPVI is to identify and
inform the customer of service items that
require immediate attention and those that
may require attention in the future. The technician will perform the following
checks on your vehicle. For a complete list
of checks, inspections, and services, see your
dealer.
Some items may not apply to your vehicle
and/or region.
Diagnostics
.OnStar active, if equipped
.Service history/recall check
Engine Oil and Filter
.Engine oil
.Oil life monitor
‐
Reset oil life monitor
Exterior Lights
.Visual inspection
Windshield and Wipers
.Visual inspection
Battery
.Battery visual inspection
.Battery test results
.Battery cables and connections