washer fluid BUICK ENVISION 2021 Owner's Manual
[x] Cancel search | Manufacturer: BUICK, Model Year: 2021, Model line: ENVISION, Model: BUICK ENVISION 2021Pages: 360, PDF Size: 10.4 MB
Page 84 of 360

Buick E2UB-N Owner Manual (GMNA-Localizing-U.S./Canada/Mexico-
14583509) - 2021 - CRC - 1/8/21
Instruments and Controls 83
With the ignition on or in ACC/ACCESSORY,
move the windshield wiper lever to select
the wiper speed.
HI :Use for fast wipes.
LO : Use for slow wipes.
INT : Use for intermittent wipes or
Rainsense, if equipped and enabled. To
adjust wipe frequency, turn the band up for
more frequent wipes or down for less
frequent wipes. If Rainsense is enabled, see
“Rainsense” later in this section.
OFF : Use to turn the wipers off.
1x : For a single wipe, briefly move the
wiper lever down. For several wipes, hold
the wiper lever down. Clear snow and ice from the wiper blades
before using them. If frozen to the
windshield, carefully loosen or thaw them.
Damaged blades should be replaced. See
Wiper Blade Replacement
0269.
Heavy snow or ice can overload the wiper
motor.
{Warning
In freezing weather, do not use the
washer until the windshield is warmed.
Otherwise the washer fluid can form ice
on the windshield, blocking your vision.
{Warning
Before driving the vehicle, always clear
snow and ice from the hood, windshield,
washer nozzles, roof, and rear of the
vehicle, including all lamps and windows.
Reduced visibility from snow and ice
buildup could lead to a crash.
Wipe Parking
If the ignition is turned off while the wipers
are on LO, HI, or INT, they will
immediately stop. If the windshield wiper lever is then moved
to OFF before the driver door is opened or
within 10 minutes, the wipers will restart
and move to the base of the windshield.
If the ignition is turned off while the wipers
are performing wipes due to windshield
washing or Rainsense, the wipers continue
to run until they reach the base of the
windshield.
Rainsense
If equipped with Rainsense, a sensor located
near the top center of the windshield
detects the amount of water on the
windshield and automatically controls the
frequency of the windshield wiper.
When Rainsense is enabled, the normal
intermittent control operates as a sensitivity
control.
Keep this area of the windshield clear of
debris to allow for best system performance.
Page 85 of 360

Buick E2UB-N Owner Manual (GMNA-Localizing-U.S./Canada/Mexico-
14583509) - 2021 - CRC - 1/8/21
84 Instruments and Controls
AUTO :Move the windshield wiper lever to
AUTO. Turn the band on the wiper lever to
adjust the sensitivity.
.Turn the band up for more sensitivity to
moisture.
.Turn the band down for less sensitivity to
moisture.
.Move the windshield wiper lever out of
the AUTO position to deactivate
Rainsense.
Wiper Arm Assembly Protection
When using an automatic car wash, move
the windshield wiper lever to OFF. This
disables the automatic Rainsense windshield
wipers and/or manual windshield wipers. With Rainsense, if the transmission is in
N (Neutral) and the vehicle speed is very
slow, the wipers will automatically stop at
the base of the windshield.
The wiper operations return to normal when
the transmission is no longer in N (Neutral)
or the vehicle speed has increased.
Windshield Washer
f:
Pull the windshield wiper lever
toward you to spray windshield washer fluid
and activate the wipers. The wipers will
continue until the lever is released or the
maximum wash time is reached. When the
lever is released, additional wipes may occur
depending on how long the windshield
washer had been activated. See Washer
Fluid 0266 for information on filling the
windshield washer fluid reservoir.
Rear Window Wiper/Washer
The ignition must be on or in ACC/
ACCESSORY to operate the rear window
wiper/washer.
Rear Wiper without Rainsense Shown, with
Rainsense Similar
Turn the end of the windshield wiper lever
to operate the rear window wiper/washer.
OFF : Turns the system off.
INT : Intermittent wipes.
ON : Slow wipes.
1:Push the windshield wiper lever
forward to spray washer fluid on the rear
window. The lever automatically returns to
its original position when released.
Reverse Gear Wipes
If the rear wiper control is off, the rear
wiper will automatically operate
continuously when the shift lever is in
R (Reverse), and the front windshield wiper
is performing low or high speed wipes.
If the rear wiper control is off, the shift
Page 86 of 360
Buick E2UB-N Owner Manual (GMNA-Localizing-U.S./Canada/Mexico-
14583509) - 2021 - CRC - 1/8/21
Instruments and Controls 85
lever is in R (Reverse), and the front
windshield wiper is performing interval
wipes, then the rear wiper automatically
performs interval wipes.
This feature can be turned on or off.
The windshield washer reservoir is used for
the windshield and rear window. Check the
fluid level if either washer is not working.
SeeWasher Fluid 0266.
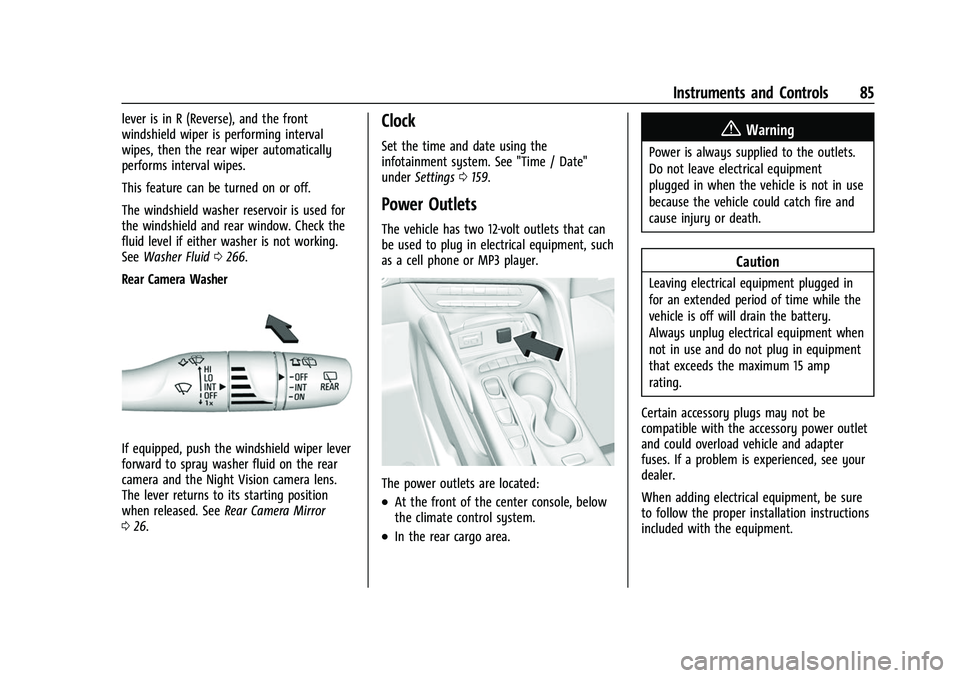
Rear Camera Washer
If equipped, push the windshield wiper lever
forward to spray washer fluid on the rear
camera and the Night Vision camera lens.
The lever returns to its starting position
when released. See Rear Camera Mirror
0 26.
Clock
Set the time and date using the
infotainment system. See "Time / Date"
under Settings 0159.
Power Outlets
The vehicle has two 12-volt outlets that can
be used to plug in electrical equipment, such
as a cell phone or MP3 player.
The power outlets are located:
.At the front of the center console, below
the climate control system.
.In the rear cargo area.
{Warning
Power is always supplied to the outlets.
Do not leave electrical equipment
plugged in when the vehicle is not in use
because the vehicle could catch fire and
cause injury or death.
Caution
Leaving electrical equipment plugged in
for an extended period of time while the
vehicle is off will drain the battery.
Always unplug electrical equipment when
not in use and do not plug in equipment
that exceeds the maximum 15 amp
rating.
Certain accessory plugs may not be
compatible with the accessory power outlet
and could overload vehicle and adapter
fuses. If a problem is experienced, see your
dealer.
When adding electrical equipment, be sure
to follow the proper installation instructions
included with the equipment.
Page 109 of 360
Buick E2UB-N Owner Manual (GMNA-Localizing-U.S./Canada/Mexico-
14583509) - 2021 - CRC - 1/8/21
108 Instruments and Controls
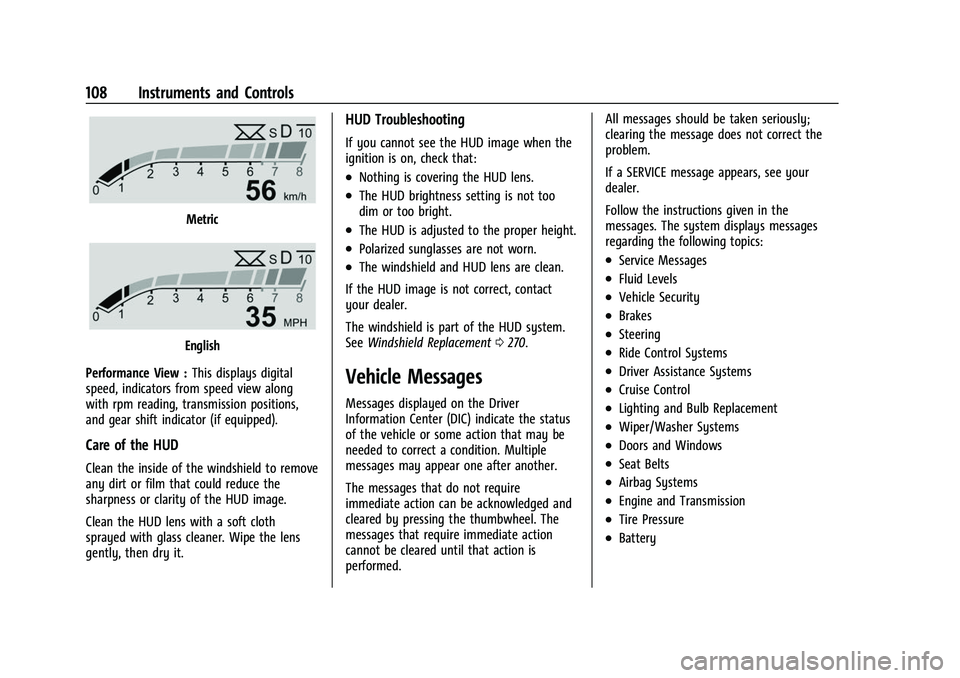
Metric
English
Performance View : This displays digital
speed, indicators from speed view along
with rpm reading, transmission positions,
and gear shift indicator (if equipped).
Care of the HUD
Clean the inside of the windshield to remove
any dirt or film that could reduce the
sharpness or clarity of the HUD image.
Clean the HUD lens with a soft cloth
sprayed with glass cleaner. Wipe the lens
gently, then dry it.
HUD Troubleshooting
If you cannot see the HUD image when the
ignition is on, check that:
.Nothing is covering the HUD lens.
.The HUD brightness setting is not too
dim or too bright.
.The HUD is adjusted to the proper height.
.Polarized sunglasses are not worn.
.The windshield and HUD lens are clean.
If the HUD image is not correct, contact
your dealer.
The windshield is part of the HUD system.
See Windshield Replacement 0270.
Vehicle Messages
Messages displayed on the Driver
Information Center (DIC) indicate the status
of the vehicle or some action that may be
needed to correct a condition. Multiple
messages may appear one after another.
The messages that do not require
immediate action can be acknowledged and
cleared by pressing the thumbwheel. The
messages that require immediate action
cannot be cleared until that action is
performed. All messages should be taken seriously;
clearing the message does not correct the
problem.
If a SERVICE message appears, see your
dealer.
Follow the instructions given in the
messages. The system displays messages
regarding the following topics:
.Service Messages
.Fluid Levels
.Vehicle Security
.Brakes
.Steering
.Ride Control Systems
.Driver Assistance Systems
.Cruise Control
.Lighting and Bulb Replacement
.Wiper/Washer Systems
.Doors and Windows
.Seat Belts
.Airbag Systems
.Engine and Transmission
.Tire Pressure
.Battery
Page 192 of 360
Buick E2UB-N Owner Manual (GMNA-Localizing-U.S./Canada/Mexico-
14583509) - 2021 - CRC - 1/8/21
Driving and Operating 191
.Ease your foot off the accelerator pedal
and steer the way you want the vehicle
to go. The vehicle may straighten out. Be
ready for a second skid if it occurs.
.Slow down and adjust your driving
according to weather conditions. Stopping
distance can be longer and vehicle control
can be affected when traction is reduced
by water, snow, ice, gravel, or other
material on the road. Learn to recognize
warning clues—such as enough water,
ice, or packed snow on the road to make
a mirrored surface —and slow down
when you have any doubt.
.Try to avoid sudden steering, acceleration,
or braking, including reducing vehicle
speed by shifting to a lower gear. Any
sudden changes could cause the tires to
slide.
Remember: Antilock brakes help avoid only
the braking skid.
Driving on Wet Roads
Rain and wet roads can reduce vehicle
traction and affect your ability to stop and
accelerate. Always drive slower in these
types of driving conditions and avoid driving
through large puddles and deep-standing or
flowing water.
{Warning
Wet brakes can cause crashes. They
might not work as well in a quick stop
and could cause pulling to one side. You
could lose control of the vehicle.
After driving through a large puddle of
water or a car/vehicle wash, lightly apply
the brake pedal until the brakes work
normally.
Flowing or rushing water creates strong
forces. Driving through flowing water
could cause the vehicle to be carried
away. If this happens, you and other
vehicle occupants could drown. Do not
ignore police warnings and be very
cautious about trying to drive through
flowing water.
Hydroplaning
Hydroplaning is dangerous. Water can build
up under the vehicle's tires so they actually
ride on the water. This can happen if the
road is wet enough and you are going fast
enough. When the vehicle is hydroplaning, it
has little or no contact with the road. There is no hard and fast rule about
hydroplaning. The best advice is to slow
down when the road is wet.
Other Rainy Weather Tips
Besides slowing down, other wet weather
driving tips include:
.Allow extra following distance.
.Pass with caution.
.Keep windshield wiping equipment in
good shape.
.Keep the windshield washer fluid reservoir
filled.
.Have good tires with proper tread depth.
See
Tires 0278.
.Turn off cruise control.
Hill and Mountain Roads
Driving on steep hills or through mountains
is different than driving on flat or rolling
terrain. Tips include:
.Keep the vehicle serviced and in good
shape.
.Check all fluid levels and brakes, tires,
cooling system, and transmission.
.Shift to a lower gear when going down
steep or long hills.
Page 254 of 360
Buick E2UB-N Owner Manual (GMNA-Localizing-U.S./Canada/Mexico-
14583509) - 2021 - CRC - 1/8/21
Vehicle Care 253
Vehicle Care
General Information
General Information . . . . . . . . . . . . . . . . . . . 254
California Proposition 65 Warning . . . . . 254
California Perchlorate MaterialsRequirements . . . . . . . . . . . . . . . . . . . . . . . . 254
Accessories and Modifications . . . . . . . . . 254
Vehicle Checks
Doing Your Own Service Work . . . . . . . . . 255
Hood . . . . . . . . . . . . . . . . . . . . . . . . . . . . . . . . . . 255
Engine Compartment Overview . . . . . . . . 257
Engine Oil . . . . . . . . . . . . . . . . . . . . . . . . . . . . . 258
Engine Oil Life System . . . . . . . . . . . . . . . . 260
Automatic Transmission Fluid . . . . . . . . . 260
Engine Air Filter Life System . . . . . . . . . . . 261
Engine Air Cleaner/Filter . . . . . . . . . . . . . . . 261
Cooling System . . . . . . . . . . . . . . . . . . . . . . . 262
Engine Overheating . . . . . . . . . . . . . . . . . . . 265
Washer Fluid . . . . . . . . . . . . . . . . . . . . . . . . . . 266
Brakes . . . . . . . . . . . . . . . . . . . . . . . . . . . . . . . . 266
Brake Fluid . . . . . . . . . . . . . . . . . . . . . . . . . . . . 267
Battery - North America . . . . . . . . . . . . . . . 268
All-Wheel Drive . . . . . . . . . . . . . . . . . . . . . . . 269
Park Brake and P (Park) Mechanism Check . . . . . . . . . . . . . . . . . . . . . . . . . . . . . . . 269
Wiper Blade Replacement . . . . . . . . . . . . . 269
Windshield Replacement . . . . . . . . . . . . . . 270
Gas Strut(s) . . . . . . . . . . . . . . . . . . . . . . . . . . . . 271
Headlamp Aiming
Front Headlamp Aiming . . . . . . . . . . . . . . . 272
Bulb Replacement
Bulb Replacement . . . . . . . . . . . . . . . . . . . . . 272
LED Lighting . . . . . . . . . . . . . . . . . . . . . . . . . . . 272
Electrical System
Electrical System Overload . . . . . . . . . . . . . 272
Fuses and Circuit Breakers . . . . . . . . . . . . . 273
Engine Compartment Fuse Block . . . . . . . 273
Instrument Panel Fuse Block . . . . . . . . . . 276
Wheels and Tires
Tires . . . . . . . . . . . . . . . . . . . . . . . . . . . . . . . . . . . 278
All-Season Tires . . . . . . . . . . . . . . . . . . . . . . . . 279
Winter Tires . . . . . . . . . . . . . . . . . . . . . . . . . . . 279
Tire Sidewall Labeling . . . . . . . . . . . . . . . . . 280
Tire Designations . . . . . . . . . . . . . . . . . . . . . . 281
Tire Terminology and Definitions . . . . . . 282
Tire Pressure . . . . . . . . . . . . . . . . . . . . . . . . . . 284
Tire Pressure for High-Speed Operation . . . . . . . . . . . . . . . . . . . . . . . . . . . 285
Tire Pressure Monitor System . . . . . . . . . 286
Tire Pressure Monitor Operation . . . . . . . 287
Tire Inspection . . . . . . . . . . . . . . . . . . . . . . . . 289
Tire Rotation . . . . . . . . . . . . . . . . . . . . . . . . . . 289
When It Is Time for New Tires . . . . . . . . 290
Buying New Tires . . . . . . . . . . . . . . . . . . . . . . 291
Different Size Tires and Wheels . . . . . . . 292
Uniform Tire Quality Grading . . . . . . . . . 293 Wheel Alignment and Tire Balance . . . . 294
Wheel Replacement . . . . . . . . . . . . . . . . . . . 294
Tire Chains . . . . . . . . . . . . . . . . . . . . . . . . . . . . 295
If a Tire Goes Flat . . . . . . . . . . . . . . . . . . . . . 295
Tire Changing . . . . . . . . . . . . . . . . . . . . . . . . . 296
Compact Spare Tire . . . . . . . . . . . . . . . . . . . . 301
Jump Starting
Jump Starting - North America . . . . . . . . 302
Towing the Vehicle
Towing the Vehicle . . . . . . . . . . . . . . . . . . . 304
Recreational Vehicle Towing . . . . . . . . . . . 304
Appearance Care
Exterior Care . . . . . . . . . . . . . . . . . . . . . . . . . . 305
Interior Care . . . . . . . . . . . . . . . . . . . . . . . . . . 309
Floor Mats . . . . . . . . . . . . . . . . . . . . . . . . . . . . . 311
Page 259 of 360
Buick E2UB-N Owner Manual (GMNA-Localizing-U.S./Canada/Mexico-
14583509) - 2021 - CRC - 1/8/21
258 Vehicle Care
1.Engine Air Cleaner/Filter 0261.
2. Engine Oil Fill Cap. See Engine Oil0258.
3. Engine Oil Dipstick. See Engine Oil0258.
4. Engine Cooling Fan (Out of View). See Cooling System 0262.
5. Brake Fluid Reservoir. See Brake Fluid
0 267.
6. Battery - North America 0268.
7. Engine Coolant Surge Tank and Pressure Cap. See Cooling System 0262.
8. Positive (+) Battery Terminal (Under Cover). See Jump Starting - North
America 0302.
9. Windshield Washer Fluid Reservoir. See Washer Fluid 0266.
10. Engine Compartment Fuse Block 0273.
11. Remote Negative (-) Battery Terminal. SeeJump Starting - North America 0302.
Engine Oil
To ensure proper engine performance and
long life, careful attention must be paid to
engine oil. Following these simple, but
important steps will help protect your
investment:
.Use engine oil approved to the proper
specification and of the proper viscosity
grade. See “Selecting the Right Engine
Oil” in this section.
.Check the engine oil level regularly and
maintain the proper oil level. See
“Checking Engine Oil” and“When to Add
Engine Oil” in this section.
.Change the engine oil at the appropriate
time. SeeEngine Oil Life System 0260.
.Always dispose of engine oil properly. See
“What to Do with Used Oil” in this
section.
Checking Engine Oil
Check the engine oil level regularly, every
650 km (400 mi), especially prior to a long
trip. The engine oil dipstick handle is a loop.
See Engine Compartment Overview 0257 for
the location.
{Warning
The engine oil dipstick handle may be
hot; it could burn you. Use a towel or
glove to touch the dipstick handle.
If a low oil Driver Information Center (DIC)
message displays, check the oil level. Follow these guidelines:
.To get an accurate reading, park the
vehicle on level ground. Check the engine
oil level after the engine has been off for
at least two hours. Checking the engine
oil level on steep grades or too soon after
engine shutoff can result in incorrect
readings. Accuracy improves when
checking a cold engine prior to starting.
Remove the dipstick and check the level.
.If unable to wait two hours, the engine
must be off for at least 15 minutes if the
engine is warm, or at least 30 minutes if
the engine is not warm. Pull out the
dipstick, wipe it with a clean paper towel
or cloth, then push it back in all the way.
Remove it again, keeping the tip down,
and check the level.
When to Add Engine Oil
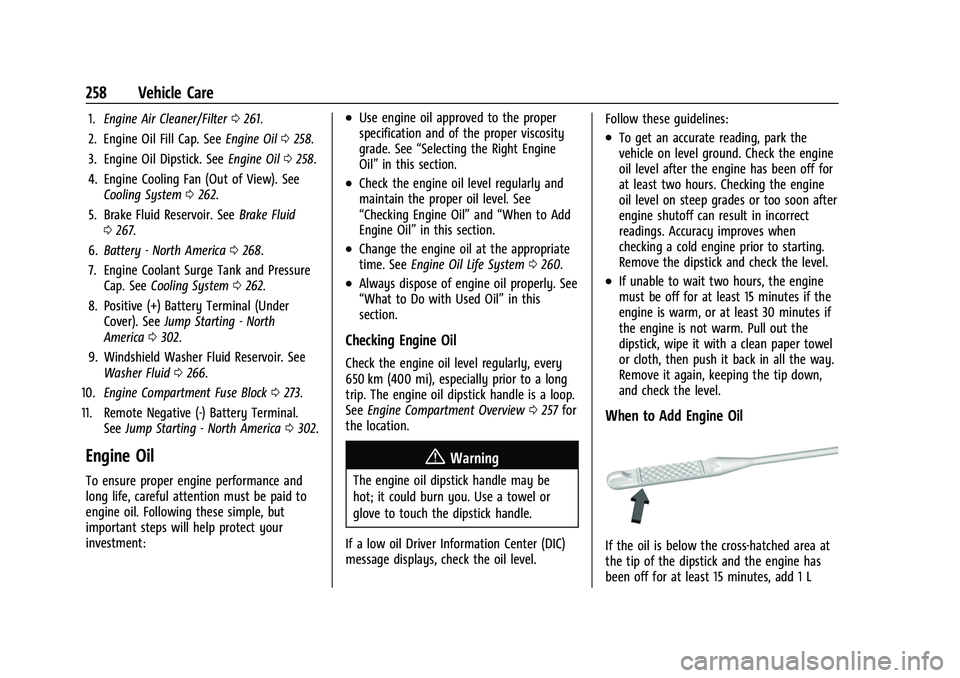
If the oil is below the cross-hatched area at
the tip of the dipstick and the engine has
been off for at least 15 minutes, add 1 L
Page 267 of 360

Buick E2UB-N Owner Manual (GMNA-Localizing-U.S./Canada/Mexico-
14583509) - 2021 - CRC - 1/8/21
266 Vehicle Care
2. Turn the heater on to the highesttemperature and to the highest fan
speed. Open the windows as necessary.
3. When it is safe to do so, pull off the road, shift to P (Park) or N (Neutral), and
let the engine idle.
If the engine coolant temperature gauge is
no longer in the overheated area or the
engine coolant temperature warning light no
longer displays, the vehicle can be driven.
Continue to drive the vehicle slowly for
about 10 minutes. Keep a safe distance from
the vehicle in front. If the warning does not
come back on, continue to drive normally
and have the cooling system checked for
proper fill and function.
If the warning continues, pull over, stop, and
park the vehicle right away.
If there is no sign of steam, idle the engine
for three minutes while parked. If the
warning is still displayed, turn off the
engine until it cools down.
Washer Fluid
What to Use
When windshield washer fluid is needed, be
sure to read the manufacturer's instructions
before use. If operating the vehicle in an area where the temperature may fall below
freezing, use a fluid that has sufficient
protection against freezing.
Adding Washer Fluid
The appropriate message will appear in the
Driver Information Center (DIC) when the
fluid level is low.
Open the cap with the washer symbol on it.
Add washer fluid until the tank is full. See
Engine Compartment Overview
0257 for
reservoir location.
Caution
.Do not use washer fluid that contains
any type of water repellent coating.
This can cause the wiper blades to
chatter or skip.
.Do not use engine coolant (antifreeze)
in the windshield washer. It can
damage the windshield washer system
and paint.
(Continued)
Caution (Continued)
.Do not mix water with ready-to-use
washer fluid. Water can cause the
solution to freeze and damage the
washer fluid tank and other parts of
the washer system.
.When using concentrated washer fluid,
follow the manufacturer instructions
for adding water.
.Fill the washer fluid tank only
three-quarters full when it is very cold.
This allows for fluid expansion if
freezing occurs, which could damage
the tank if it is completely full.
Brakes
Disc brake linings have built-in wear
indicators that make a high-pitched warning
sound when the brake linings are worn and
new linings are needed. The sound can come
and go or can be heard all the time when
the vehicle is moving, except when applying
the brake pedal firmly.
Page 306 of 360

Buick E2UB-N Owner Manual (GMNA-Localizing-U.S./Canada/Mexico-
14583509) - 2021 - CRC - 1/8/21
Vehicle Care 305
The vehicle was neither designed nor
intended to be towed with any of its wheels
on the ground. If the vehicle must be
towed, seeTowing the Vehicle 0304.
Appearance Care
Exterior Care
Locks
Locks are lubricated at the factory. Use a
de-icing agent only when absolutely
necessary, and have the locks greased after
using. See Recommended Fluids and
Lubricants 0322.
Washing the Vehicle
To preserve the vehicle's finish, wash it
often and out of direct sunlight.
Caution
Do not use petroleum-based, acidic,
or abrasive cleaning agents as they can
damage the vehicle's paint, metal,
or plastic parts. If damage occurs, it
would not be covered by the vehicle
warranty. Approved cleaning products can
be obtained from your dealer. Follow all
(Continued)
Caution (Continued)
manufacturer directions regarding correct
product usage, necessary safety
precautions, and appropriate disposal of
any vehicle care product.
Caution
Avoid using high-pressure washes closer
than 30 cm (12 in) to the surface of the
vehicle. Use of power washers exceeding
8 274 kPa (1,200 psi) can result in
damage or removal of paint and decals.
If using an automatic car wash, follow the
car wash instructions. The windshield wiper
and rear window wiper, if equipped, must
be off. Remove any accessories that may be
damaged or interfere with the car wash
equipment.
Rinse the vehicle well, before washing and
after, to remove all cleaning agents
completely. If they are allowed to dry on
the surface, they could stain.
Dry the finish with a soft, clean chamois or
an all-cotton towel to avoid surface
scratches and water spotting. Cleaning Underhood Components
Caution
Do not power wash any component
under the hood that has this
e
symbol.
This could cause damage that would not
be covered by the vehicle warranty.
Solvents or aggressive cleaners may harm
underhood components. The usages of these
chemicals should be avoided.
Recommend water only.
A pressure washer may be used, but care
must be utilized. The following criteria must
be followed:
.Water pressure must be kept below
14,000 KPa (2,000 PSI).
.Water temperature must be below 80 °C
(180 °F).
.Spray nozzle with a 40 degree wide angle
spray pattern or wider must be used.
.Nozzle must be kept at least 30 cm (1 ft)
away from all surfaces.
Page 307 of 360
Buick E2UB-N Owner Manual (GMNA-Localizing-U.S./Canada/Mexico-
14583509) - 2021 - CRC - 1/8/21
306 Vehicle Care
Finish Care
Application of aftermarket clearcoat sealant/
wax materials is not recommended.
If painted surfaces are damaged, see your
dealer to have the damage assessed and
repaired. Foreign materials such as calcium
chloride and other salts, ice melting agents,
road oil and tar, tree sap, bird droppings,
chemicals from industrial chimneys, etc., can
damage the vehicle's finish if they remain
on painted surfaces. Wash the vehicle as
soon as possible. If necessary, use
non-abrasive cleaners that are marked safe
for painted surfaces to remove foreign
matter.
Occasional hand waxing or mild polishing
should be done to remove residue from the
paint finish. See your dealer for approved
cleaning products.
Do not apply waxes or polishes to uncoated
plastic, vinyl, rubber, decals, simulated
wood, or flat paint as damage can occur.
Caution
Machine compounding or aggressive
polishing on a basecoat/clearcoat paint
finish may damage it. Use only
(Continued)
Caution (Continued)
non-abrasive waxes and polishes that are
made for a basecoat/clearcoat paint finish
on the vehicle.
To keep the paint finish looking new, keep
the vehicle garaged or covered whenever
possible.
Protecting Exterior Bright Metal Moldings
Caution
Failure to clean and protect the bright
metal moldings can result in a hazy
white finish or pitting. This damage
would not be covered by the vehicle
warranty.
The bright metal moldings on the vehicle
are aluminum or stainless steel. To prevent
damage always follow these cleaning
instructions:
.Be sure the molding is cool to the touch
before applying any cleaning solution.
.Use a cleaning solution approved for
aluminum or stainless steel. Some
cleaners are highly acidic or contain
alkaline substances and can damage the
moldings.
.Always dilute a concentrated cleaner
according to the manufacturer’s
instructions.
.Do not use chrome cleaners.
.Do not use cleaners that are not intended
for automotive use.
.Use a nonabrasive wax on the vehicle
after washing to protect and extend the
molding finish.
Cleaning Exterior Lamps/Lenses,
Emblems, Decals, and Stripes
Use only lukewarm or cold water, a soft
cloth, and a car washing soap to clean
exterior lamps, lenses, emblems, decals, and
stripes. Follow instructions under "Washing
the Vehicle" previously in this section.
Lamp covers are made of plastic, and some
have a UV protective coating. Do not clean
or wipe them when dry.
Do not use any of the following on lamp
covers:
.Abrasive or caustic agents.
.Washer fluids and other cleaning agents
in higher concentrations than suggested
by the manufacturer.
.Solvents, alcohols, fuels, or other harsh
cleaners.