display BUICK ENVISION 2023 User Guide
[x] Cancel search | Manufacturer: BUICK, Model Year: 2023, Model line: ENVISION, Model: BUICK ENVISION 2023Pages: 356, PDF Size: 7.42 MB
Page 39 of 356
Buick Envision Owner Manual (GMNA-Localizing-U.S./Canada/Mexico-
16060855) - 2023 - CRC - 2/9/22
38 Seats and Restraints
Lumbar Adjustment
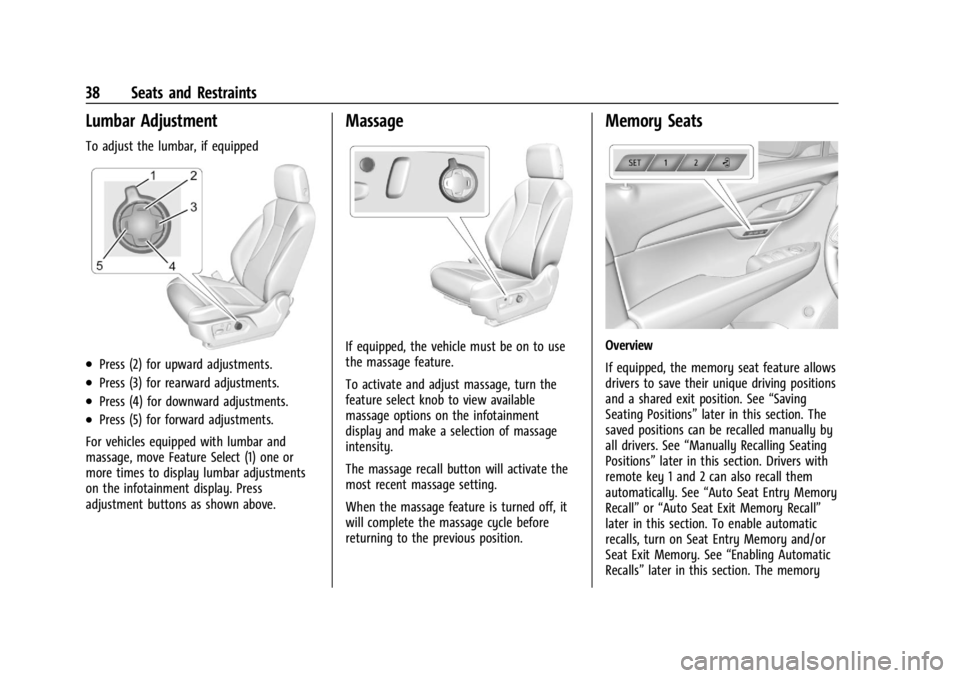
To adjust the lumbar, if equipped
.Press (2) for upward adjustments.
.Press (3) for rearward adjustments.
.Press (4) for downward adjustments.
.Press (5) for forward adjustments.
For vehicles equipped with lumbar and
massage, move Feature Select (1) one or
more times to display lumbar adjustments
on the infotainment display. Press
adjustment buttons as shown above.
Massage
If equipped, the vehicle must be on to use
the massage feature.
To activate and adjust massage, turn the
feature select knob to view available
massage options on the infotainment
display and make a selection of massage
intensity.
The massage recall button will activate the
most recent massage setting.
When the massage feature is turned off, it
will complete the massage cycle before
returning to the previous position.
Memory Seats
Overview
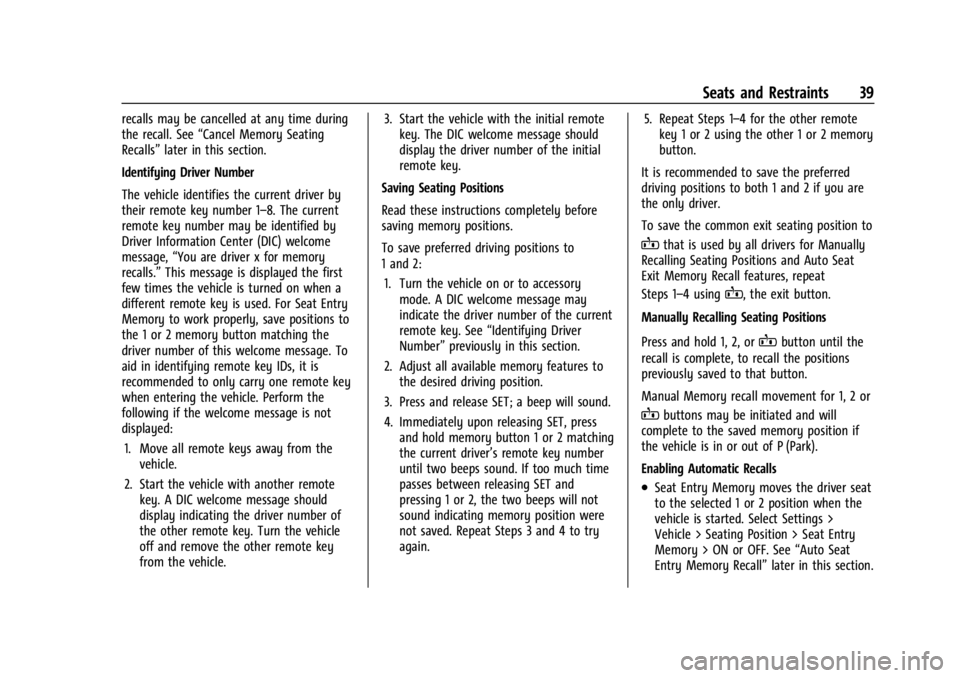
If equipped, the memory seat feature allows
drivers to save their unique driving positions
and a shared exit position. See “Saving
Seating Positions” later in this section. The
saved positions can be recalled manually by
all drivers. See “Manually Recalling Seating
Positions” later in this section. Drivers with
remote key 1 and 2 can also recall them
automatically. See “Auto Seat Entry Memory
Recall” or“Auto Seat Exit Memory Recall”
later in this section. To enable automatic
recalls, turn on Seat Entry Memory and/or
Seat Exit Memory. See “Enabling Automatic
Recalls” later in this section. The memory
Page 40 of 356
Buick Envision Owner Manual (GMNA-Localizing-U.S./Canada/Mexico-
16060855) - 2023 - CRC - 2/9/22
Seats and Restraints 39
recalls may be cancelled at any time during
the recall. See“Cancel Memory Seating
Recalls” later in this section.
Identifying Driver Number
The vehicle identifies the current driver by
their remote key number 1–8. The current
remote key number may be identified by
Driver Information Center (DIC) welcome
message, “You are driver x for memory
recalls.” This message is displayed the first
few times the vehicle is turned on when a
different remote key is used. For Seat Entry
Memory to work properly, save positions to
the 1 or 2 memory button matching the
driver number of this welcome message. To
aid in identifying remote key IDs, it is
recommended to only carry one remote key
when entering the vehicle. Perform the
following if the welcome message is not
displayed:
1. Move all remote keys away from the vehicle.
2. Start the vehicle with another remote key. A DIC welcome message should
display indicating the driver number of
the other remote key. Turn the vehicle
off and remove the other remote key
from the vehicle. 3. Start the vehicle with the initial remote
key. The DIC welcome message should
display the driver number of the initial
remote key.
Saving Seating Positions
Read these instructions completely before
saving memory positions.
To save preferred driving positions to
1 and 2: 1. Turn the vehicle on or to accessory mode. A DIC welcome message may
indicate the driver number of the current
remote key. See “Identifying Driver
Number” previously in this section.
2. Adjust all available memory features to the desired driving position.
3. Press and release SET; a beep will sound.
4. Immediately upon releasing SET, press and hold memory button 1 or 2 matching
the current driver’s remote key number
until two beeps sound. If too much time
passes between releasing SET and
pressing 1 or 2, the two beeps will not
sound indicating memory position were
not saved. Repeat Steps 3 and 4 to try
again. 5. Repeat Steps 1–4 for the other remote
key 1 or 2 using the other 1 or 2 memory
button.
It is recommended to save the preferred
driving positions to both 1 and 2 if you are
the only driver.
To save the common exit seating position to
Bthat is used by all drivers for Manually
Recalling Seating Positions and Auto Seat
Exit Memory Recall features, repeat
Steps 1–4 using
B, the exit button.
Manually Recalling Seating Positions
Press and hold 1, 2, or
Bbutton until the
recall is complete, to recall the positions
previously saved to that button.
Manual Memory recall movement for 1, 2 or
Bbuttons may be initiated and will
complete to the saved memory position if
the vehicle is in or out of P (Park).
Enabling Automatic Recalls
.Seat Entry Memory moves the driver seat
to the selected 1 or 2 position when the
vehicle is started. Select Settings >
Vehicle > Seating Position > Seat Entry
Memory > ON or OFF. See “Auto Seat
Entry Memory Recall” later in this section.
Page 43 of 356
Buick Envision Owner Manual (GMNA-Localizing-U.S./Canada/Mexico-
16060855) - 2023 - CRC - 2/9/22
42 Seats and Restraints
buttons on the center stack. Use the manual
heated and ventilated seat buttons on the
center stack to turn auto heated or
ventilated seats off. If the passenger seat is
unoccupied, the auto heated or ventilated
seats feature will not activate that seat.
If equipped with a heated steering wheel,
the auto heated steering wheel activation
will follow the heated seat auto activation
and the heated wheel indicator will follow
the state of the steering wheel heat.
To enable or disable auto heated or
ventilated seats, select Settings > Vehicle >
Climate and Air Quality > Auto Cooled or
Auto Heated Seats > ON or OFF.
Remote Start Heated and Ventilated Seats
During a remote start, the heated or
ventilated seats, if equipped, can be turned
on automatically. When it is cold outside,
the heated seats will turn on followed by
the heated steering wheel, if equipped.
When it is hot outside, the ventilated seats
turn on. The heated or ventilated seats are
canceled when the vehicle is turned on.
Press the heated or ventilated seat button
to use the heated or ventilated seats after
the vehicle is started.
The heated or ventilated seat indicator lights
may turn on during a remote start.The temperature performance of an
unoccupied seat may be reduced. This is
normal.
To enable or disable remote start heated or
ventilated seats, select Settings > Vehicle >
Remote Lock, Unlock, and Start > Remote
Start Auto Heat Seats or Remote Start Auto
Cool Seats > ON or OFF.
Rear Seats
Rear Seat Reminder
If equipped, the message REAR SEAT
REMINDER LOOK IN REAR SEAT displays
under certain conditions indicating there
may be an item or passenger in the rear
seat. Check before exiting the vehicle.
This feature will activate when a second row
door is opened while the vehicle is on or up
to 10 minutes before the vehicle is turned
on. There will be an alert when the vehicle
is turned off. The alert does not directly
detect objects in the rear seat; instead,
under certain conditions, it detects when a
rear door is opened and closed, indicating
that there may be something in the
rear seat.
The feature is active only once each time
the vehicle is turned on and off, and will
require reactivation by opening and closing
the second row doors. There may be an
alert even when there is nothing in the rear
seat; for example, if a child entered the
vehicle through the rear door and left the
vehicle without the vehicle being shut off.
The feature can be turned on or off. Select
Settings > Rear Seat Reminder > ON or OFF.
Folding the Seatback
Either side of the seatback can be folded for
more cargo space. Fold a seatback only
when the vehicle is not moving.
Caution
Folding a rear seat with the seat belts
still fastened may cause damage to the
seat or the seat belts. Always unbuckle
the seat belts and return them to their
normal stowed position before folding a
rear seat.
Page 45 of 356
Buick Envision Owner Manual (GMNA-Localizing-U.S./Canada/Mexico-
16060855) - 2023 - CRC - 2/9/22
44 Seats and Restraints
With the engine running, pressMorLto
heat the left or right outboard seat cushion.
On vehicles without rear climate controls, an
indicator light on the button will turn on
when the heated seat is on. On vehicles
with rear climate controls, an indicator on
the climate control display appears when
this feature is on.
On vehicles without rear climate controls
but equipped with heated rear seats, press
the button again to turn this feature off.
The light on the button will turn off. If the
heated seats are on for 30 minutes, they
may automatically turn off.
On vehicles with rear climate controls, this
feature turns on at the highest setting. With
each press of the button, the heated seat
changes to the next lower setting, and then
the off setting. Three lights indicate the
highest setting, and one light indicates the
lowest. If the heated seats are on high, the
level may automatically be lowered after
approximately 30 minutes.
Seat Belts
This section describes how to use seat belts
properly, and some things not to do.
{Warning
Do not let anyone ride where a seat belt
cannot be worn properly. In a crash,
if you or your passenger(s) are not
wearing seat belts, injuries can be much
worse than if you are wearing seat belts.
You can be seriously injured or killed by
hitting things inside the vehicle harder or
by being ejected from the vehicle. In
addition, anyone who is not buckled up
can strike other passengers in the vehicle.
It is extremely dangerous to ride in a
cargo area, inside or outside of a vehicle.
In a collision, passengers riding in these
areas are more likely to be seriously
injured or killed. Do not allow passengers
to ride in any area of the vehicle that is
not equipped with seats and seat belts.
Always wear a seat belt, and check that
all passenger(s) are restrained
properly too.
This vehicle has indicators as a reminder to
buckle the seat belts. See Seat Belt
Reminders 096.
Why Seat Belts Work
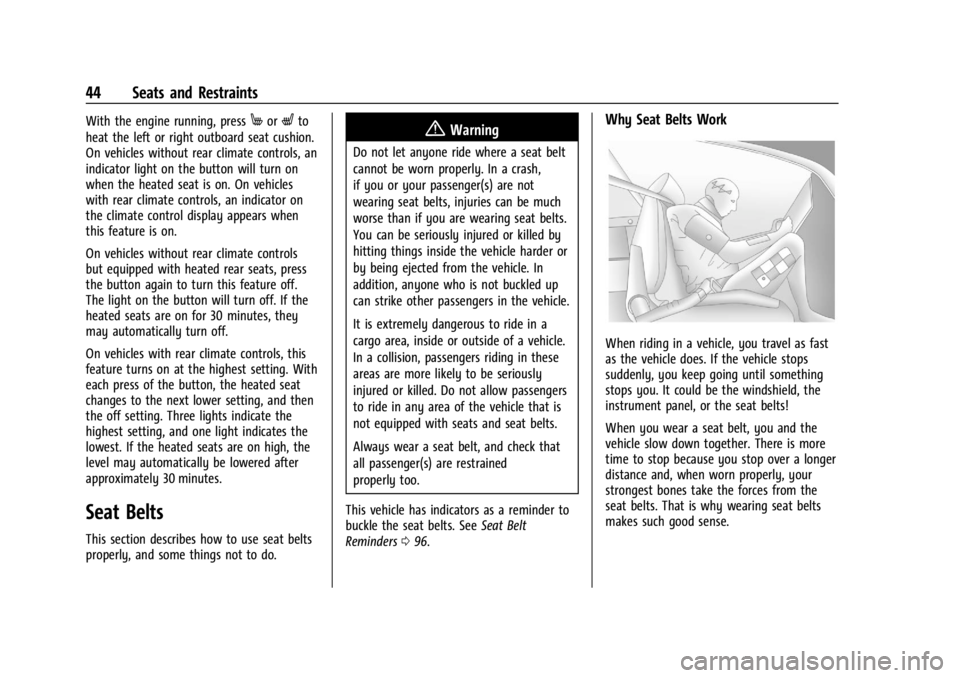
When riding in a vehicle, you travel as fast
as the vehicle does. If the vehicle stops
suddenly, you keep going until something
stops you. It could be the windshield, the
instrument panel, or the seat belts!
When you wear a seat belt, you and the
vehicle slow down together. There is more
time to stop because you stop over a longer
distance and, when worn properly, your
strongest bones take the forces from the
seat belts. That is why wearing seat belts
makes such good sense.
Page 46 of 356
Buick Envision Owner Manual (GMNA-Localizing-U.S./Canada/Mexico-
16060855) - 2023 - CRC - 2/9/22
Seats and Restraints 45
Questions and Answers About Seat Belts
Q: Will I be trapped in the vehicle after acrash if I am wearing a seat belt?
A: You could be— whether you are
wearing a seat belt or not. Your chance
of being conscious during and after a
crash, so you canunbuckle and get out,
is much greater if you are belted.
Q: If my vehicle has airbags, why should I have to wear seat belts?
A: Airbags are supplemental systems only.
They work withseat belts —not instead
of them. Whether or not an airbag is
provided, all occupants still have to
buckle up to get the most protection.
Also, in nearly all states and in all
Canadian provinces, the law requires
wearing seat belts.
Buckle To Drive
If equipped, this feature prevents the vehicle
from shifting out of P (Park) when the driver
seat belt is not buckled. The Buckle to Drive
feature must be turned ON in the
infotainment system to work. To turn the
Buckle to Drive feature on or off, select
Settings > Vehicle > Buckle to Drive. See
Teen Driver 0162, if equipped. If the vehicle is on and the brake pedal is
pressed with the vehicle in P (Park) but the
driver seat belt is not buckled, a message
displays in the Driver Information
Center (DIC) and the vehicle will be
prevented from shifting out of P (Park).
Buckle the driver seat belt to clear the
message and shift out of P (Park). Shifting
from P (Park) will be prevented once for
each time the vehicle is started.
For some fleet vehicles, the feature is
always ON and cannot be turned OFF in the
infotainment system. The vehicle will be
prevented from shifting from P (Park) each
time the driver attempts to do so while the
driver seat belt is not buckled. Turning the
vehicle off then on will not change this
condition.
On some models, Buckle to Drive may also
prevent shifting out of P (Park) if a front
passenger seat belt is unbuckled. A message
displays in the DIC. Buckle the front
passenger seat belt to shift out of P (Park).
This feature may not allow the vehicle to
shift out of P (Park) if an object, such as a
briefcase, handbag, grocery bag, laptop,
or other electronic device, is on the front
passenger seat. If this happens, remove the
object from the seat or buckle the seat belt
to shift out of P (Park).
If the driver, or on some vehicles, the
present front passenger remains unbuckled,
the DIC message will turn off after several
seconds and the vehicle can be shifted out
of P (Park). See
“Seat Belts”and“Child
Restraints” in the Index for information
about the importance of proper
restraint use.
If the driver seat belt or the front passenger
seat belt is unbuckled when driving, the seat
belt reminder chime and light(s) will come
on. See Seat Belt Reminders 096. This
feature may not function properly if the
airbag readiness light is on. See Airbag
Readiness Light 097.
How to Wear Seat Belts Properly
Follow these rules for everyone's protection.
There are additional things to know about
seat belts and children, including smaller
children and infants. If a child will be riding
in the vehicle, see Older Children061 or
Infants and Young Children 063. Review
and follow the rules for children in addition
to the following rules.
Page 85 of 356
Buick Envision Owner Manual (GMNA-Localizing-U.S./Canada/Mexico-
16060855) - 2023 - CRC - 2/9/22
84 Instruments and Controls
Instruments and Controls
Controls
Steering Wheel Adjustment . . . . . . . . . . . . 85
Heated Steering Wheel . . . . . . . . . . . . . . . . . 85
Horn . . . . . . . . . . . . . . . . . . . . . . . . . . . . . . . . . . . 85
Windshield Wiper/Washer . . . . . . . . . . . . . . 85
Rear Window Wiper/Washer . . . . . . . . . . . 87
Clock . . . . . . . . . . . . . . . . . . . . . . . . . . . . . . . . . . . 88
Power Outlets . . . . . . . . . . . . . . . . . . . . . . . . . . 88
Wireless Charging . . . . . . . . . . . . . . . . . . . . . . 89
Warning Lights, Gauges, and Indicators
Warning Lights, Gauges, andIndicators . . . . . . . . . . . . . . . . . . . . . . . . . . . . . 92
Instrument Cluster . . . . . . . . . . . . . . . . . . . . . 92
Speedometer . . . . . . . . . . . . . . . . . . . . . . . . . . . 95
Odometer . . . . . . . . . . . . . . . . . . . . . . . . . . . . . . 95
Trip Odometer . . . . . . . . . . . . . . . . . . . . . . . . . 95
Tachometer . . . . . . . . . . . . . . . . . . . . . . . . . . . . 95
Fuel Gauge . . . . . . . . . . . . . . . . . . . . . . . . . . . . . 95
Engine Coolant Temperature Gauge . . . . 96
Seat Belt Reminders . . . . . . . . . . . . . . . . . . . . 96
Airbag Readiness Light . . . . . . . . . . . . . . . . . 97
Passenger Airbag Status Indicator . . . . . . 97
Charging System Light . . . . . . . . . . . . . . . . . 98
Malfunction Indicator Lamp (Check Engine Light) . . . . . . . . . . . . . . . . . . . . . . . . . 98 Brake System Warning Light . . . . . . . . . . . 99
Electric Parking Brake Light . . . . . . . . . . . . 100
Service Electric Parking Brake Light . . . . 100
Antilock Brake System (ABS) Warning
Light . . . . . . . . . . . . . . . . . . . . . . . . . . . . . . . . 100
All-Wheel-Drive Light . . . . . . . . . . . . . . . . . . . 101
Hill Descent Control Light . . . . . . . . . . . . . . 101
Lane Keep Assist (LKA) Light . . . . . . . . . . . 101
Automatic Emergency Braking (AEB) Disabled Light . . . . . . . . . . . . . . . . . . . . . . . 102
Vehicle Ahead Indicator . . . . . . . . . . . . . . . 102
Pedestrian Ahead Indicator . . . . . . . . . . . . 102
Traction Off Light . . . . . . . . . . . . . . . . . . . . . . 102
StabiliTrak OFF Light . . . . . . . . . . . . . . . . . . . 102
Traction Control System (TCS)/ StabiliTrak Light . . . . . . . . . . . . . . . . . . . . . 103
Engine Coolant Temperature Warning Light . . . . . . . . . . . . . . . . . . . . . . . . . . . . . . . . . 103
Driver Mode Control Light . . . . . . . . . . . . . 103
Tire Pressure Light . . . . . . . . . . . . . . . . . . . . 104
Engine Oil Pressure Light . . . . . . . . . . . . . . 104
Low Fuel Warning Light . . . . . . . . . . . . . . . 105
Security Light . . . . . . . . . . . . . . . . . . . . . . . . . . 105
High-Beam On Light . . . . . . . . . . . . . . . . . . . 105
Lamps On Reminder . . . . . . . . . . . . . . . . . . . 106
Cruise Control Light . . . . . . . . . . . . . . . . . . . 106
Door Ajar Light . . . . . . . . . . . . . . . . . . . . . . . . 106
Information Displays
Driver Information Center (DIC) . . . . . . . 106
Head-Up Display (HUD) . . . . . . . . . . . . . . . . 109
Vehicle Messages
Vehicle Messages . . . . . . . . . . . . . . . . . . . . . . 111
Engine Power Messages . . . . . . . . . . . . . . . . 111
Vehicle Speed Messages . . . . . . . . . . . . . . . 112
Universal Remote System
Universal Remote System . . . . . . . . . . . . . . 112
Universal Remote System Programming . . . . . . . . . . . . . . . . . . . . . . . . . 112
Universal Remote System Operation . . . 114
Page 86 of 356
Buick Envision Owner Manual (GMNA-Localizing-U.S./Canada/Mexico-
16060855) - 2023 - CRC - 2/9/22
Instruments and Controls 85
Controls
Steering Wheel Adjustment
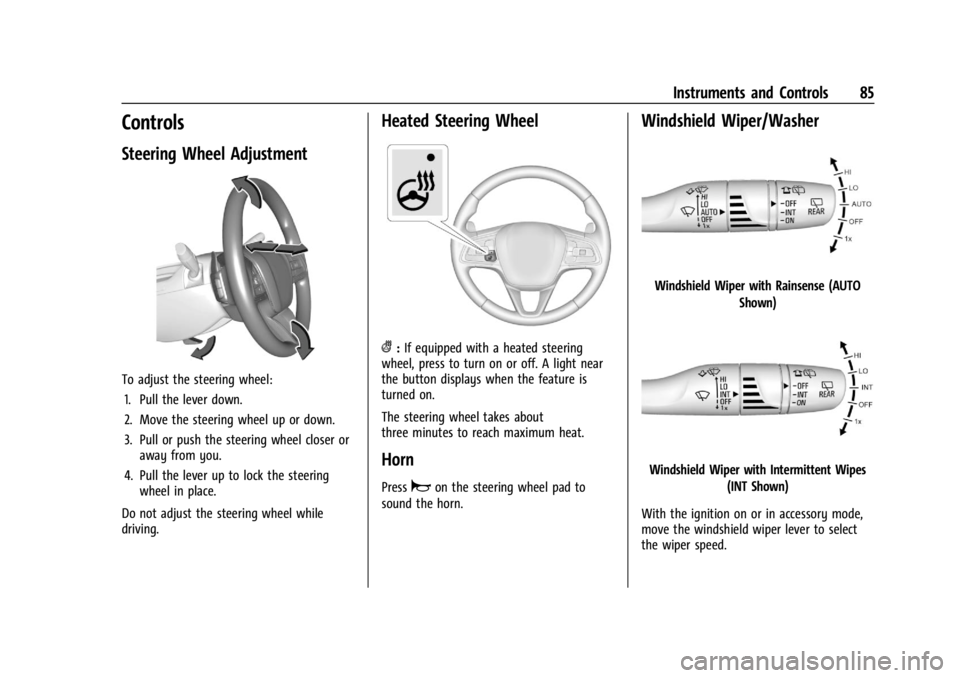
To adjust the steering wheel:1. Pull the lever down.
2. Move the steering wheel up or down.
3. Pull or push the steering wheel closer or away from you.
4. Pull the lever up to lock the steering wheel in place.
Do not adjust the steering wheel while
driving.
Heated Steering Wheel
(: If equipped with a heated steering
wheel, press to turn on or off. A light near
the button displays when the feature is
turned on.
The steering wheel takes about
three minutes to reach maximum heat.
Horn
Pressaon the steering wheel pad to
sound the horn.
Windshield Wiper/Washer
Windshield Wiper with Rainsense (AUTO
Shown)
Windshield Wiper with Intermittent Wipes(INT Shown)
With the ignition on or in accessory mode,
move the windshield wiper lever to select
the wiper speed.
Page 91 of 356
Buick Envision Owner Manual (GMNA-Localizing-U.S./Canada/Mexico-
16060855) - 2023 - CRC - 2/9/22
90 Instruments and Controls
The operating temperature is−40 °C (−40 °F)
to 85 °C (185 °F) for the charging system and
0 °C (32 °F) to 35 °C (95 °F) for the phone.
A charging stopped alert may be displayed
on the infotainment screen, if the wireless
charger or smartphone are outside of
normal operating temperature. Charging will
automatically resume when a normal
operating temperature is reached.
{Warning
Remove all objects from the charger
before charging your compatible
smartphone. Objects, such as coins, keys,
rings, paper clips, or cards, between the
smartphone and charger may become
very hot.
On the rare occasion that the charging
system does not detect an object, and
the object gets wedged between the
smartphone and charger, remove the
smartphone and allow the object to cool
before removing it from the charger, to
prevent burns.
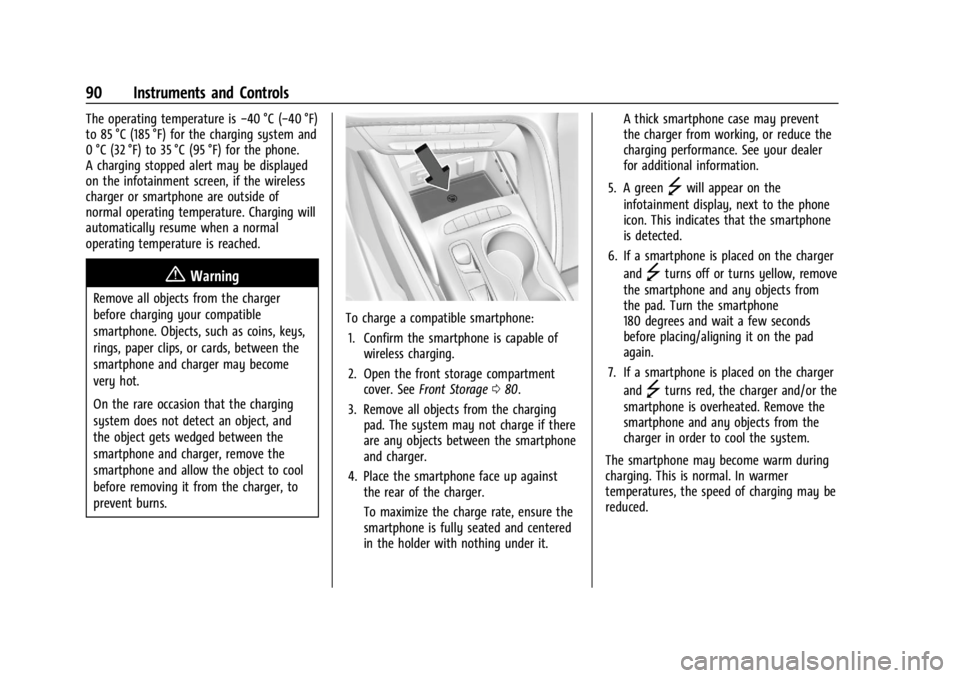
To charge a compatible smartphone:
1. Confirm the smartphone is capable of wireless charging.
2. Open the front storage compartment cover. See Front Storage 080.
3. Remove all objects from the charging pad. The system may not charge if there
are any objects between the smartphone
and charger.
4. Place the smartphone face up against the rear of the charger.
To maximize the charge rate, ensure the
smartphone is fully seated and centered
in the holder with nothing under it. A thick smartphone case may prevent
the charger from working, or reduce the
charging performance. See your dealer
for additional information.
5. A green
]will appear on the
infotainment display, next to the phone
icon. This indicates that the smartphone
is detected.
6. If a smartphone is placed on the charger and
]turns off or turns yellow, remove
the smartphone and any objects from
the pad. Turn the smartphone
180 degrees and wait a few seconds
before placing/aligning it on the pad
again.
7. If a smartphone is placed on the charger and
]turns red, the charger and/or the
smartphone is overheated. Remove the
smartphone and any objects from the
charger in order to cool the system.
The smartphone may become warm during
charging. This is normal. In warmer
temperatures, the speed of charging may be
reduced.
Page 94 of 356
Buick Envision Owner Manual (GMNA-Localizing-U.S./Canada/Mexico-
16060855) - 2023 - CRC - 2/9/22
Instruments and Controls 93
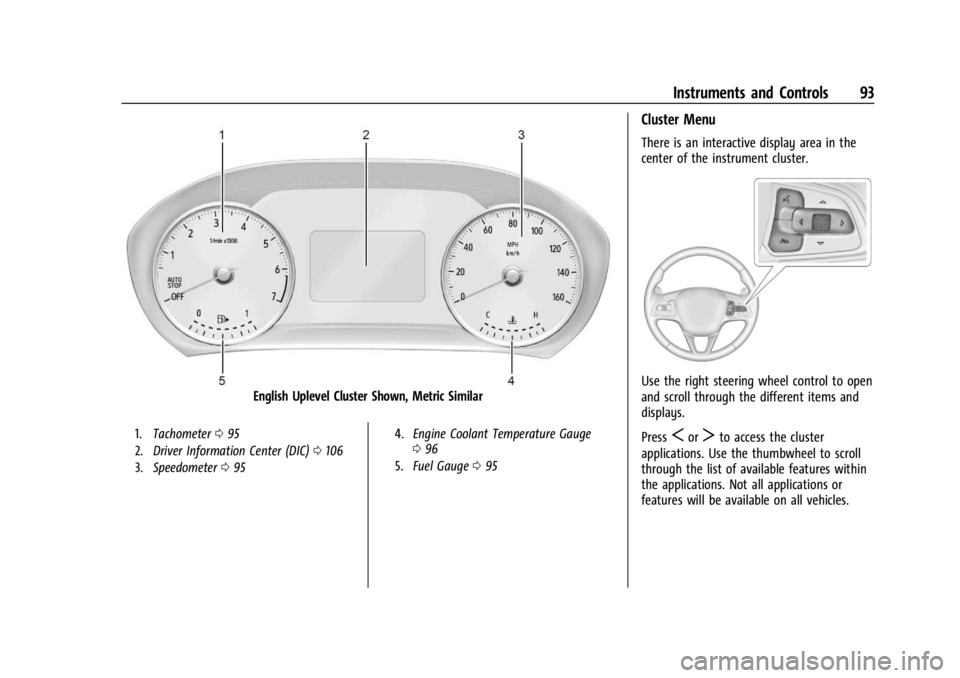
English Uplevel Cluster Shown, Metric Similar
1.Tachometer 095
2. Driver Information Center (DIC) 0106
3. Speedometer 095 4.
Engine Coolant Temperature Gauge
096
5. Fuel Gauge 095
Cluster Menu
There is an interactive display area in the
center of the instrument cluster.
Use the right steering wheel control to open
and scroll through the different items and
displays.
Press
SorTto access the cluster
applications. Use the thumbwheel to scroll
through the list of available features within
the applications. Not all applications or
features will be available on all vehicles.
Page 95 of 356
Buick Envision Owner Manual (GMNA-Localizing-U.S./Canada/Mexico-
16060855) - 2023 - CRC - 2/9/22
94 Instruments and Controls
.Home Page
.Info App. This is where the selected Driver
Information Center (DIC) displays can be
viewed. SeeDriver Information Center
(DIC) 0106.
.Audio
.Navigation
.Phone
.Options
Home
Information Displayed here can be
customized from the Options menu. See
“Options” below.
Speedometer : Displays how fast the vehicle
is moving in either kilometers per hour
(km/h) or miles per hour (mph).
Speed Sign : Shows sign information, which
comes from a roadway database in the
onboard navigation system, if equipped.
Time : Displays the current time.
Temperature : Displays the current outside
air temperature.
Active Safety : If equipped, displays
information for Lane Keep Assist (LKA) and
Forward Collision Alert (FCA). Fuel Range :
Displays the approximate
distance the vehicle can be driven without
refueling. The fuel range estimate is based
on an average of the vehicle’s fuel economy
over recent driving history and the amount
of fuel remaining in the fuel tank. The Fuel
Range cannot be reset.
Audio
In the Audio menu browse for music, select
from the favorites, or change the audio
source. Use the thumbwheel to change the
station or go to the next or previous track.
Navigation
If there is an active route, press the
thumbwheel to cancel or resume route
guidance, or turn the voice prompts on
or off.
Phone
In the Phone menu, if there is no active
phone call, view recent calls, or scroll
through contacts. If there is an active call,
mute the phone or switch to handset
operation. Options
Use the thumbwheel to scroll through items
in the Options menu.
Head-up Display (HUD) (Uplevel) :
If equipped, this feature allows for adjusting
the angle of the HUD image and changing
or turning off the Speed Limit Sign.
HUD Rotation (Uplevel): Press the
thumbwheel while Adjust Rotation is
highlighted to enter Adjust Mode. Scroll to
adjust the angle of the HUD display. Press
the thumbwheel to confirm and save the
setting. This feature may only be available
in P (Park).
Speed Sign: If equipped, press the
thumbwheel while Speed Sign is highlighted
to turn it on or off.
Units :
Choose English, Imperial, or metric
units by pressing the thumbwheel while the
desired item is highlighted.
Info Page Options : Press the thumbwheel
to select the items to be displayed in the
Info app. See Driver Information Center (DIC)
0 106.