Dic BUICK LACROSSE 2007 Owner's Guide
[x] Cancel search | Manufacturer: BUICK, Model Year: 2007, Model line: LACROSSE, Model: BUICK LACROSSE 2007Pages: 512
Page 139 of 512
6. Locate in the garage, the garage door opener
receiver (motor-head unit). Locate the “Learn”
or “Smart” button. This can usually be
found where the hanging antenna wire is
attached to the motor-head unit.
7. Firmly press and release the “Learn” or
“Smart” button. The name and color of
the button may vary by manufacturer.
You will have 30 seconds to start Step 8.
8. Return to the vehicle. Firmly press and hold
the programmed Universal Home Remote
button for two seconds, then release it.
Immediately press and hold the same button
a second time for two seconds, then
release it. Immediately, press and hold the
same button a third time for two seconds,
then release.
The Universal Home Remote should now
activate your rolling-code equipped device.
To program the remaining two Universal Home
Remote buttons, begin with Step 2 of
“Programming Universal Home Remote.” You do
not want to repeat Step 1, as this will erase
all previous programming from the Universal Home
Remote buttons.Gate Operator and Canadian
Programming
Canadian radio-frequency laws require transmitter
signals to time out or quit after several seconds
of transmission. This may not be long enough
for Universal Home Remote to pick up the signal
during programming. Similarly, some U.S. gate
operators are manufactured to time out in
the same manner.
If you live in Canada, or you are having difficulty
programming a gate operator or garage door
opener by using the “Programming Universal
Home Remote” procedures, regardless of where
you live, replace Step 3 under “Programming
Universal Home Remote” with the following:
Continue to press and hold the Universal Home
Remote button while you press and release every
two seconds (cycle) the hand-held transmitter
button until the frequency signal has been
successfully accepted by the Universal Home
Remote. The Universal Home Remote indicator
light will ash slowly at rst and then rapidly.
Proceed with Step 4 under “Programming
Universal Home Remote” to complete.
139
Page 140 of 512
Using Universal Home Remote
Press and hold the appropriate Universal Home
Remote button for at least half of a second.
The indicator light will come on while the signal is
being transmitted.
Erasing Universal Home Remote
Buttons
To erase programming from the three Universal
Home Remote buttons do the following:
1. Press and hold down the two outside buttons
until the indicator light begins to ash, after
20 seconds. Do not hold the two outside
buttons for longer than 30 seconds.
2. Release both buttons.
The Universal Home Remote is now in the training
(learning) mode and can be programmed at any
time beginning with Step 2 under “Programming
Universal Home Remote” shown earlier in
this section.
Individual buttons cannot be erased, but they can
be reprogrammed. See “Reprogramming a
Single Universal Home Remote Button” following
this section.
Reprogramming a Single Universal
Home Remote Button
To program a device to Universal Home Remote
using a Universal Home Remote button
previously trained, follow these steps:
1. Press and hold the desired Universal Home
Remote button. Do not release the button.
2. The indicator light will begin to ash after
20 seconds. While still holding the Universal
Home Remote button, proceed with Step
2 under “Programming Universal Home
Remote” shown earlier in this section.
For additional information on Universal Home
Remote, seeCustomer Assistance Offices
on page 482.
140
Page 145 of 512
Instrument Panel Overview........................ 148
Hazard Warning Flashers.......................... 150
Other Warning Devices............................. 150
Horn.......................................................... 150
Tilt Wheel.................................................. 151
Turn Signal/Multifunction Lever.................. 152
Turn and Lane-Change Signals................. 152
Headlamp High/Low-Beam Changer.......... 153
Flash-to-Pass............................................ 153
Windshield Wipers..................................... 153
Windshield Washer.................................... 154
Cruise Control........................................... 154
Exterior Lamps.......................................... 158
Daytime Running Lamps (DRL)/
Automatic Headlamp System.................. 159
Fog Lamps................................................ 160
Exterior Lighting Battery Saver.................. 160
Interior Lamps........................................... 161
Instrument Panel Brightness...................... 161
Courtesy Lamps........................................ 161
Entry Lighting............................................ 161
Delayed Entry Lighting.............................. 162
Theater Dimming....................................... 162
Delayed Exit Lighting................................. 162Perimeter Lighting..................................... 163
Overhead Console Reading Lamps........... 163
Rear Assist Handle Reading Lamps.......... 163
Electric Power Management...................... 163
Battery Run-Down Protection..................... 164
Ultrasonic Rear Parking Assist (URPA)...... 164
Accessory Power Outlet(s)........................ 167
Ashtray(s) and Cigarette Lighter................ 168
Climate Controls......................................... 168
Climate Control System............................. 168
Dual Automatic Climate Control System.... 172
Outlet Adjustment...................................... 177
Passenger Compartment Air Filter............. 178
Warning Lights, Gages, and Indicators..... 179
Instrument Panel Cluster........................... 180
Speedometer and Odometer...................... 181
Tachometer............................................... 181
Safety Belt Reminder Light........................ 181
Passenger Safety Belt Reminder Light....... 182
Airbag Readiness Light............................. 182
Passenger Airbag Status Indicator............. 183
Charging System Light.............................. 185
Brake System Warning Light..................... 186
Section 3 Instrument Panel
145
Page 146 of 512
Anti-Lock Brake System Warning Light...... 187
Traction Control System (TCS)
Warning Light........................................ 187
Engine Coolant Temperature
Warning Light........................................ 188
Engine Coolant Temperature Gage............ 189
Low Coolant Warning Light....................... 189
Tire Pressure Light.................................... 190
Malfunction Indicator Lamp........................ 190
Oil Pressure Light..................................... 194
Change Engine Oil Light........................... 195
Security Light............................................ 195
Cruise Control Light.................................. 195
Reduced Engine Power Light.................... 196
Highbeam On Light................................... 196
Headlamps Suggested Light...................... 196
Low Washer Fluid Warning Light............... 197
Door Ajar Light.......................................... 197
Trunk Ajar Light........................................ 197
Service Vehicle Soon Light........................ 197
Fuel Gage................................................. 198
Low Fuel Warning Light............................ 198
Check Gas Cap Light................................ 199Driver Information Center (DIC)................... 199
DIC Operation and Displays...................... 200
DIC Compass (Uplevel Only)..................... 206
DIC Warnings and Messages.................... 208
DIC Vehicle Personalization....................... 229
Audio System(s)......................................... 238
Setting the Time........................................ 239
Radio with CD (Base)............................... 240
Radio with CD (Uplevel)............................ 245
Radio with CD (MP3)................................ 252
Radio with Six-Disc CD............................. 260
Using an MP3........................................... 272
XM Radio Messages................................. 278
Theft-Deterrent Feature............................. 280
Audio Steering Wheel Controls.................. 280
Radio Reception........................................ 281
Care of Your CDs..................................... 282
Care of the CD Player.............................. 282
Backglass Antenna.................................... 283
XM™ Satellite Radio Antenna System....... 284
Chime Level Adjustment............................ 284
Section 3 Instrument Panel
146
Page 149 of 512
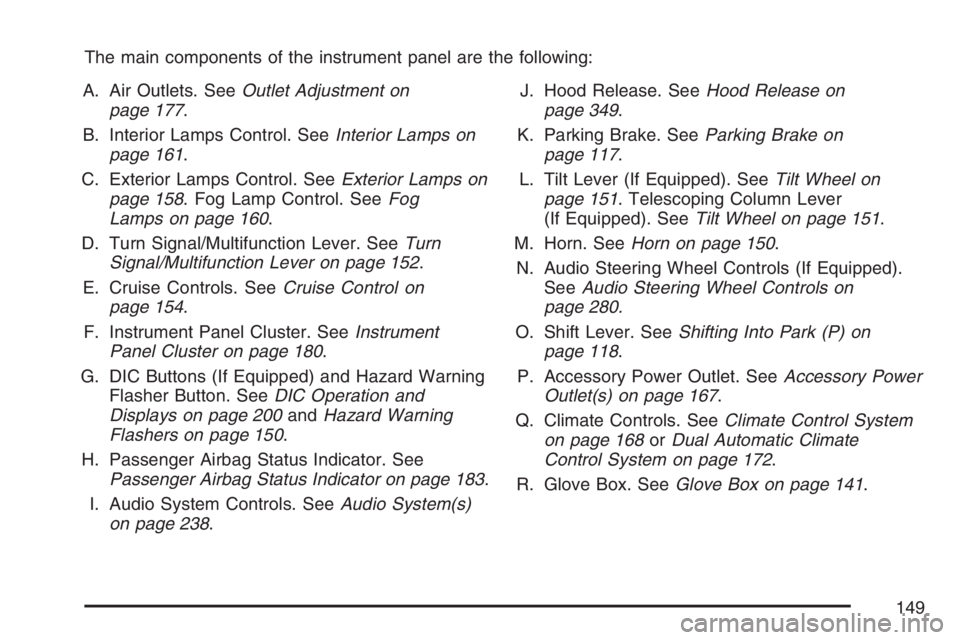
The main components of the instrument panel are the following:
A. Air Outlets. SeeOutlet Adjustment on
page 177.
B. Interior Lamps Control. SeeInterior Lamps on
page 161.
C. Exterior Lamps Control. SeeExterior Lamps on
page 158. Fog Lamp Control. SeeFog
Lamps on page 160.
D. Turn Signal/Multifunction Lever. SeeTurn
Signal/Multifunction Lever on page 152.
E. Cruise Controls. SeeCruise Control on
page 154.
F. Instrument Panel Cluster. SeeInstrument
Panel Cluster on page 180.
G. DIC Buttons (If Equipped) and Hazard Warning
Flasher Button. SeeDIC Operation and
Displays on page 200andHazard Warning
Flashers on page 150.
H. Passenger Airbag Status Indicator. See
Passenger Airbag Status Indicator on page 183.
I. Audio System Controls. SeeAudio System(s)
on page 238.J. Hood Release. SeeHood Release on
page 349.
K. Parking Brake. SeeParking Brake on
page 117.
L. Tilt Lever (If Equipped). SeeTilt Wheel on
page 151. Telescoping Column Lever
(If Equipped). SeeTilt Wheel on page 151.
M. Horn. SeeHorn on page 150.
N. Audio Steering Wheel Controls (If Equipped).
SeeAudio Steering Wheel Controls on
page 280.
O. Shift Lever. SeeShifting Into Park (P) on
page 118.
P. Accessory Power Outlet. SeeAccessory Power
Outlet(s) on page 167.
Q. Climate Controls. SeeClimate Control System
on page 168orDual Automatic Climate
Control System on page 172.
R. Glove Box. SeeGlove Box on page 141.
149
Page 152 of 512
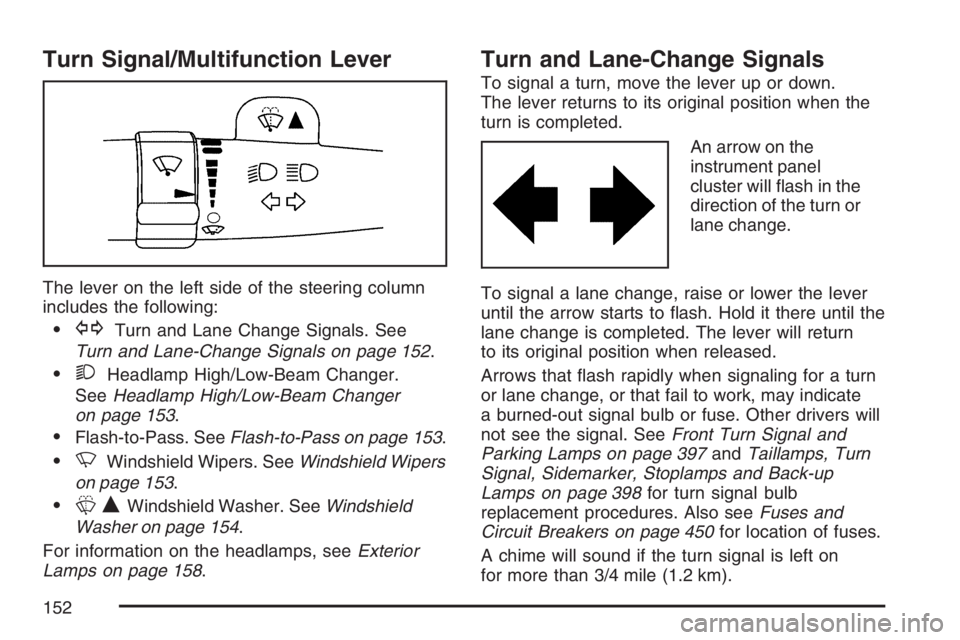
Turn Signal/Multifunction Lever
The lever on the left side of the steering column
includes the following:
GTurn and Lane Change Signals. See
Turn and Lane-Change Signals on page 152.
2Headlamp High/Low-Beam Changer.
SeeHeadlamp High/Low-Beam Changer
on page 153.
Flash-to-Pass. SeeFlash-to-Pass on page 153.
NWindshield Wipers. SeeWindshield Wipers
on page 153.
LQWindshield Washer. SeeWindshield
Washer on page 154.
For information on the headlamps, seeExterior
Lamps on page 158.
Turn and Lane-Change Signals
To signal a turn, move the lever up or down.
The lever returns to its original position when the
turn is completed.
An arrow on the
instrument panel
cluster will ash in the
direction of the turn or
lane change.
To signal a lane change, raise or lower the lever
until the arrow starts to ash. Hold it there until the
lane change is completed. The lever will return
to its original position when released.
Arrows that ash rapidly when signaling for a turn
or lane change, or that fail to work, may indicate
a burned-out signal bulb or fuse. Other drivers will
not see the signal. SeeFront Turn Signal and
Parking Lamps on page 397andTaillamps, Turn
Signal, Sidemarker, Stoplamps and Back-up
Lamps on page 398for turn signal bulb
replacement procedures. Also seeFuses and
Circuit Breakers on page 450for location of fuses.
A chime will sound if the turn signal is left on
for more than 3/4 mile (1.2 km).
152
Page 155 of 512
{CAUTION:
Cruise control can be dangerous where
you cannot drive safely at a steady speed.
So, do not use your cruise control on
winding roads or in heavy traffic.
Cruise control can be dangerous on
slippery roads. On such roads, fast
changes in tire traction can cause
excessive wheel slip, and you could lose
control. Do not use cruise control on
slippery roads.
If your vehicle is in cruise control when the
Traction Control System (TCS), if your vehicle
has this feature, begins to limit wheel spin,
the cruise control will automatically disengage.
SeeTraction Control System (TCS) on page 294.
When road conditions allow you to safely use
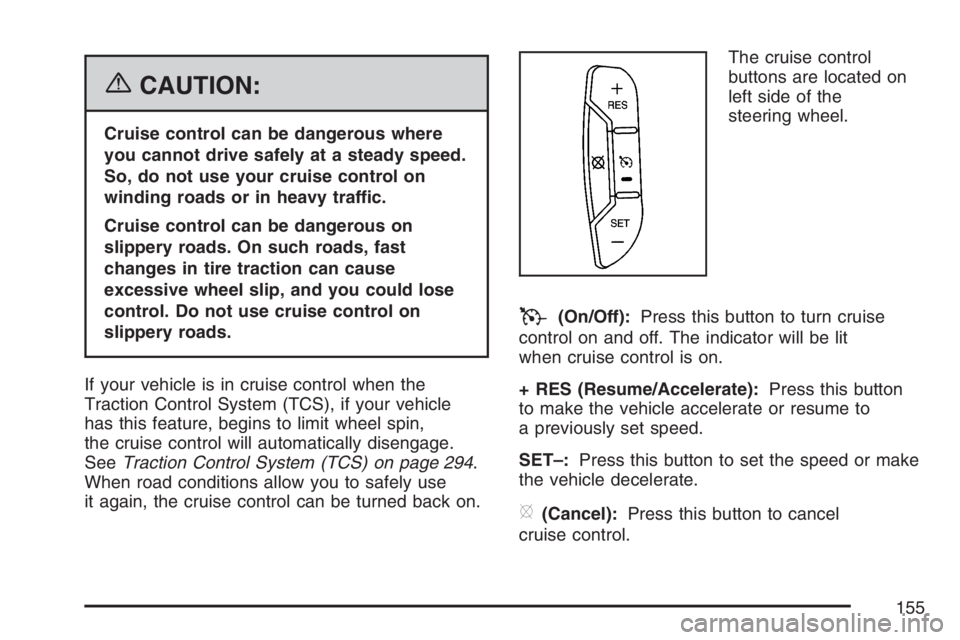
it again, the cruise control can be turned back on.The cruise control
buttons are located on
left side of the
steering wheel.
T(On/Off):Press this button to turn cruise
control on and off. The indicator will be lit
when cruise control is on.
+ RES (Resume/Accelerate):Press this button
to make the vehicle accelerate or resume to
a previously set speed.
SET–:Press this button to set the speed or make
the vehicle decelerate.
[(Cancel):Press this button to cancel
cruise control.
155
Page 162 of 512
Entry lighting includes a feature called theater
dimming. With theater dimming, the lamps do not
turn off at the end of the delay time. Instead, they
slowly dim after the delay time and then turn off.
The courtesy lamps turn off when the ignition key
is turned to RUN or START. They will come
on again when a door is opened.
Delayed Entry Lighting
Delayed entry lighting lights the vehicle’s interior
for a period of time after all the doors have
been closed.
After all the doors have been closed, the delayed
entry lighting feature will continue to work until
one of the following occurs:
The ignition is in RUN.
The doors are locked.
25 seconds has passed.
If during the illumination period a door is opened,
the timed illumination period will be canceled
and the interior lamps will remain on.
Theater Dimming
This feature allows for a three to ve-second fade
out of the courtesy lamps instead of immediate
turn off.
Delayed Exit Lighting
This feature can be programmed either on or off
using the Driver Information Center. SeeDIC
Vehicle Personalization on page 229under INT
(Interior) LIGHTS KEYS REMOVED. When
activated, this feature illuminates the interior for a
period of time after the ignition key is removed
from the ignition.
The ignition must be off and the interior lamp
control must be in the door position for delayed
exit lighting to work. When the ignition key is
removed, interior illumination will activate
and remain on until one of the following occurs:
The ignition is in RUN.
The power door locks are activated.
25 seconds has passed.
If during the illumination period a door is opened,
the timed illumination period will be canceled
and the interior lamps will remain on.
162
Page 163 of 512
Perimeter Lighting
Perimeter lighting provides a period of exterior
vehicle lighting. Perimeter lighting activates when
the key is removed from the ignition or the vehicle is
unlocked using the Remote Keyless Entry (RKE)
transmitter. The amount of time the exterior lamps
will remain on can be programmed using the Driver
Information Center (DIC). See “EXIT LIGHT
DELAY” underDIC Vehicle Personalization on
page 229for additional information.
Overhead Console Reading Lamps
Your vehicle may have reading lamps located
on the overhead console. Press the lens to turn
them on and off.
Rear Assist Handle Reading Lamps
Your vehicle may have reading lamps located
near the rear assist handles. Press the lens to turn
them on and off.
Electric Power Management
The vehicle has Electric Power Management (EPM)
that estimates the battery’s temperature and state
of charge. It then adjusts the voltage for best
performance and extended life of the battery.
When the battery’s state of charge is low, the
voltage is raised slightly to quickly put the charge
back in. When the state of charge is high, the
voltage is lowered slightly to prevent overcharging.
If the vehicle has a voltmeter gage or voltage
display on the Driver Information Center (DIC), you
may see the voltage move up or down. This is
normal. If there is a problem, an alert will be
displayed.
The battery can be discharged at idle if the
electrical loads are very high. This is true for all
vehicles. This is because the generator (alternator)
may not be spinning fast enough at idle to
produce all the power that is needed for very high
electrical loads.
163
Page 164 of 512
A high electrical load occurs when several of the
following loads are on: headlamps, high beams,
fog lamps, rear window defogger, climate
control fan at high speed, heated seats, engine
cooling fans, trailer loads, and loads plugged into
accessory power outlets.
EPM works to prevent excessive discharge of the
battery. It does this by balancing the generator’s
output and the vehicle’s electrical needs. It
can increase engine idle speed to generate more
power, whenever needed. It can temporarily
reduce the power demands of some accessories.
Normally, these actions occur in steps or levels,
without being noticeable. In rare cases at the
highest levels of corrective action, this action may
be noticeable to the driver. If so, the Driver
Information Center (DIC) message might display
Battery Saver Active. If this message is displayed,
it is recommended that the driver reduce the
electrical loads as much as possible. See
DIC Warnings and Messages on page 208.Battery Run-Down Protection
This helps prevent the vehicle’s battery from
draining in case the interior courtesy lamps,
reading lamps, trunk lamp, underhood lamp, glove
box lamps, or sun visor vanity lamps, if equipped,
are accidently left on. If any of these lamps
are left on while the ignition is off, they will
automatically turn off after 10 minutes. The lamps
will not come back on again until one of the
following occurs:
The ignition is turned on.
The interior lamps control is turned off, then to
door or on.
Ultrasonic Rear Parking
Assist (URPA)
Your vehicle may be equipped with Ultrasonic Rear
Parking Assist (URPA). URPA is designed to help
you park while in REVERSE (R) and operates only
at speeds less than 3 mph (5 km/h). URPA can help
you avoid colliding with objects such as parked
vehicles. The system can detect objects 5 feet
(1.5 m) behind your vehicle and tell you how close
those objects are to your rear bumper.
164