battery BUICK LACROSSE 2009 Get To Know Guide
[x] Cancel search | Manufacturer: BUICK, Model Year: 2009, Model line: LACROSSE, Model: BUICK LACROSSE 2009Pages: 20, PDF Size: 0.81 MB
Page 3 of 20

3
BDFGHIKLM
UT
E
O
NA
RSVQ
J
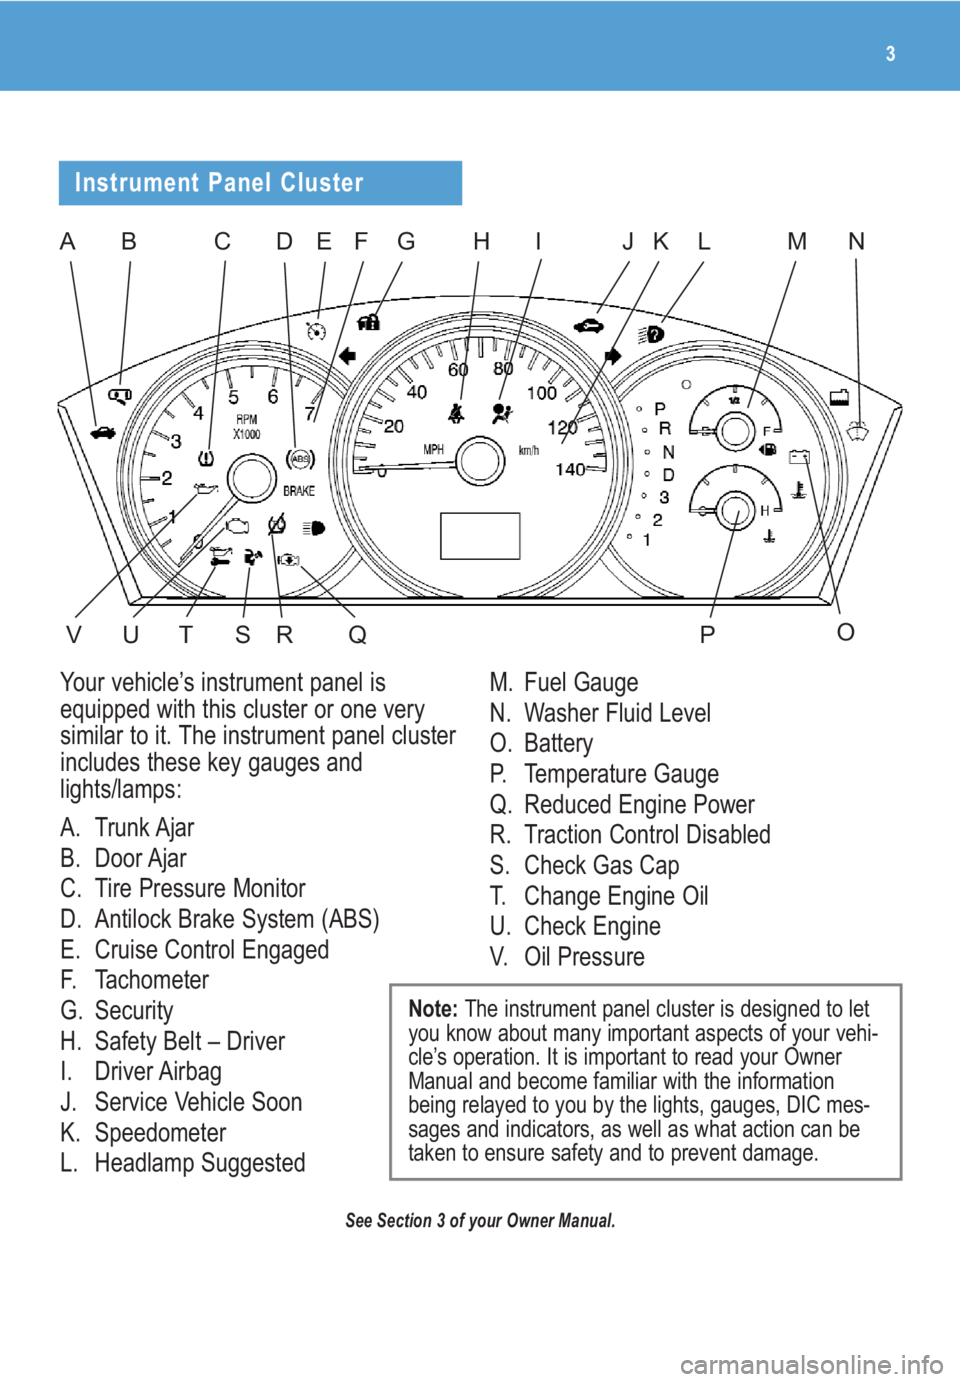
Your vehicle’s instrument panel is
equipped with this cluster or one very
similar to it. The instrument panel cluster
includes these key gauges and
lights/lamps:
A. Trunk Ajar
B. Door Ajar
C. Tire Pressure Monitor
D. Antilock Brake System (ABS)
E. Cruise Control Engaged
F. Tachometer
G. Security
H. Safety Belt – Driver
I. Driver Airbag
J. Service Vehicle Soon
K. Speedometer
L. Headlamp SuggestedM. Fuel Gauge
N. Washer Fluid Level
O. Battery
P. Temperature Gauge
Q. Reduced Engine Power
R. Traction Control Disabled
S. Check Gas Cap
T. Change Engine Oil
U. Check Engine
V. Oil Pressure
Note: The instrument panel cluster is designed to let
you know about many important aspects of your vehi-
cle’s operation. It is important to read your Owner
Manual and become familiar with the information
being relayed to you by the lights, gauges, DIC mes-
sages and indicators, as well as what action can be
taken to ensure safety and to prevent damage.
C
Instrument Panel Cluster
See Section 3 of your Owner Manual.
P
Page 5 of 20

5
E/M (English/Metric):On the base DIC,
press to choose English or Metric units.
On uplevel DICs, press the (Option)
button until UNITS appears. Press the
(Set/Reset) button to choose English
or Metric units.
(Set/Reset)(if equipped): Press to
set/reset certain functions and to turn
off/acknowledge DIC messages.
(Gauges)(if equipped): Press to
display battery and oil life.
(Fuel)(if equipped): Press to display
fuel range and average economy.
(Option) (if equipped): Press to dis-
play English/Metric units, language,
personalization, compass zone and
compass calibration.
Personalizing the DIC (if equipped)
Uplevel DICs can memorize selected
personalized settings for up to two
drivers. (Some features are limited to a
single setting.)
1. Place the vehicle in Park (P) and turn
on the ignition.
2. Press the (Option) button until
PERSONAL PROGRAM is
displayed.
3. Press the (Set/Reset) button
to display instructions.
4. Press the button to display
programmable features.
5. Press the button to change the
setting of each feature.Your ignition key identifies you to the
vehicle.Two keys can be programmed
for certain features that correspond to
each driver. To personalize a key:
1. From the Personal Program menu,
press the (Option) button until
PERSONALIZE KEY is displayed.
2. Press the (Set/Reset) button until
YES is displayed.
3. Press the button.
Personalization Features include:
Delayed Locking— Delays locking
of the vehicle doors for up to five
seconds after the last door is closed.
Two chimes will sound when the power
door lock switch or the Lock button on
the Remote Keyless Entry transmitter
is pressed when a door is open. To
program:
1. From the Personal Program menu,
press the (Option) button until
DELAYED LOCKING is displayed.
2. Press the (Set/Reset) button until
ON or OFF appears.
3. Press the button to select it.
The ignition key must be removed for
the feature to work after programming.
Key Fob Feedback— Choose from Off
(no feedback), Lights (exterior lights
flash) or Lights and Horn when you
press the Remote Keyless Entry trans-
mitter (key fob) Lock button. To program:
1. From the Personal Program menu,
press the (Option) button until
FOB LOCK FEEDBACK is displayed.
2. Press the (Set/Reset) button until
the desired setting is displayed.
3. Press the button to save the
setting.
Page 19 of 20

Acoustic Laminate Glass
Special windshield and front door win-
dow glass composition reduces wind
and road noise. If replacement is neces-
sary, see your dealer or specify acoustic
laminateglass from the supplier. Failure
to do so can result in added wind and
outside noise in the cabin.
Automatic Transaxle Shift Lock
If the battery fails and it is necessary
to move the vehicle, the Automatic
Transaxle Shift Lock can be disabled to
allow the transaxle to be shifted out of
Park. Turn the ignition key to ACC posi-
tion, and shift the transaxle into Neutral.
With the car in Neutral, the vehicle can
be pushed out of a confined area.
See Sections 2 and 5 of your Owner Manual.
Resetting the Oil Life System
The Oil Life System calculates engine oil
life based on vehicle use and displays
CHANGE OIL SOON in the Driver
Information Center (DIC) when it’s nec-
essary to change your engine oil and fil-
ter. The Oil Life System should be reset
to 100% only following an oil change.
To reset the Oil Life System:
1. Turn on the ignition, with the engine
off.
2. Press the (Option) button until
the DIC displays ENGINE OIL
MONITOR.
3. Press the (Set/Reset) button. The
next screen indicates the system has
been reset.
4. Turn off the ignition.
See Section 5 of your Owner Manual.
19