low beam BUICK LACROSSE 2011 User Guide
[x] Cancel search | Manufacturer: BUICK, Model Year: 2011, Model line: LACROSSE, Model: BUICK LACROSSE 2011Pages: 462, PDF Size: 5.73 MB
Page 343 of 462
Black plate (31,1)Buick LaCrosse Owner Manual - 2011
Vehicle Care 10-31
.The vehicle should be placed so
it is perpendicular to the wall or
other flat surface.
.The vehicle should not have any
snow, ice, or mud on it.
.The vehicle should be fully
assembled and all other work
stopped while headlamp aiming
is being performed.
.The vehicle should be normally
loaded with a full tank of fuel and
one person or 75 kg (160 lbs)
sitting in the driver seat.
.Tires should be properly inflated.
Headlamp aiming is done with the
vehicle's low-beam headlamps.
The high-beam headlamps will be
correctly aimed if the low-beam
headlamps are aimed properly. To adjust the vertical aim:
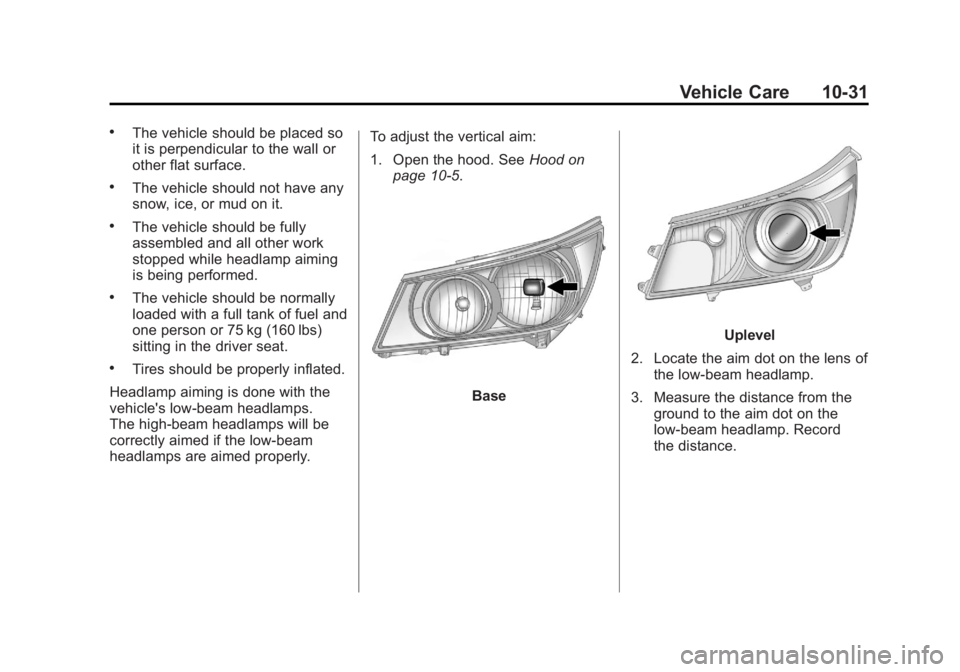
1. Open the hood. See
Hood on
page 10‑5.
Base
Uplevel
2. Locate the aim dot on the lens of the low‐beam headlamp.
3. Measure the distance from the ground to the aim dot on the
low‐beam headlamp. Record
the distance.
Page 344 of 462
Black plate (32,1)Buick LaCrosse Owner Manual - 2011
10-32 Vehicle Care
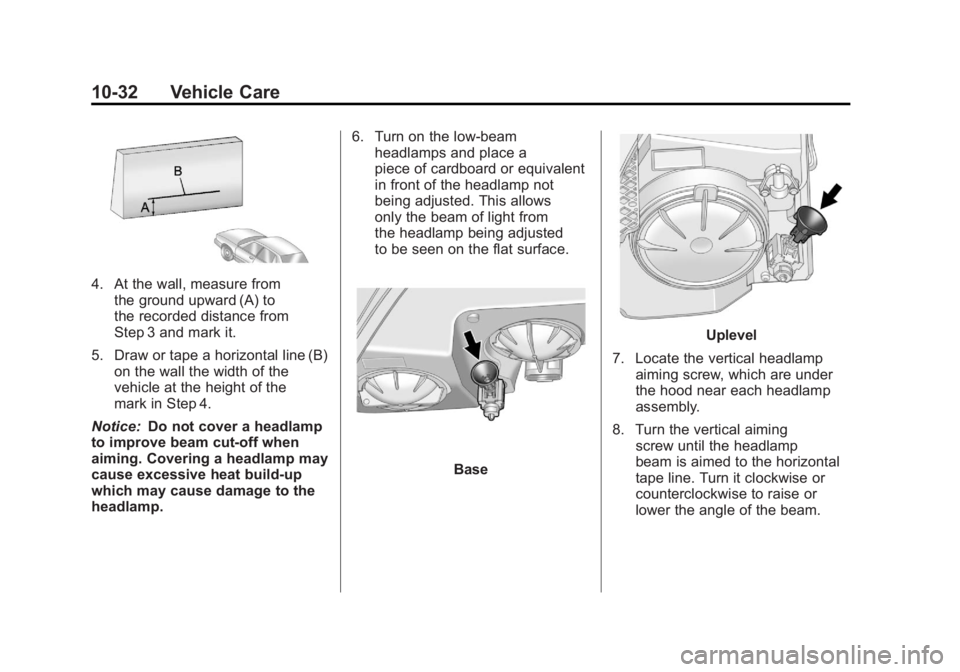
4. At the wall, measure fromthe ground upward (A) to
the recorded distance from
Step 3 and mark it.
5. Draw or tape a horizontal line (B) on the wall the width of the
vehicle at the height of the
mark in Step 4.
Notice: Do not cover a headlamp
to improve beam cut-off when
aiming. Covering a headlamp may
cause excessive heat build-up
which may cause damage to the
headlamp. 6. Turn on the low-beam
headlamps and place a
piece of cardboard or equivalent
in front of the headlamp not
being adjusted. This allows
only the beam of light from
the headlamp being adjusted
to be seen on the flat surface.
Base
Uplevel
7. Locate the vertical headlamp aiming screw, which are under
the hood near each headlamp
assembly.
8. Turn the vertical aiming screw until the headlamp
beam is aimed to the horizontal
tape line. Turn it clockwise or
counterclockwise to raise or
lower the angle of the beam.
Page 345 of 462
Black plate (33,1)Buick LaCrosse Owner Manual - 2011
Vehicle Care 10-33
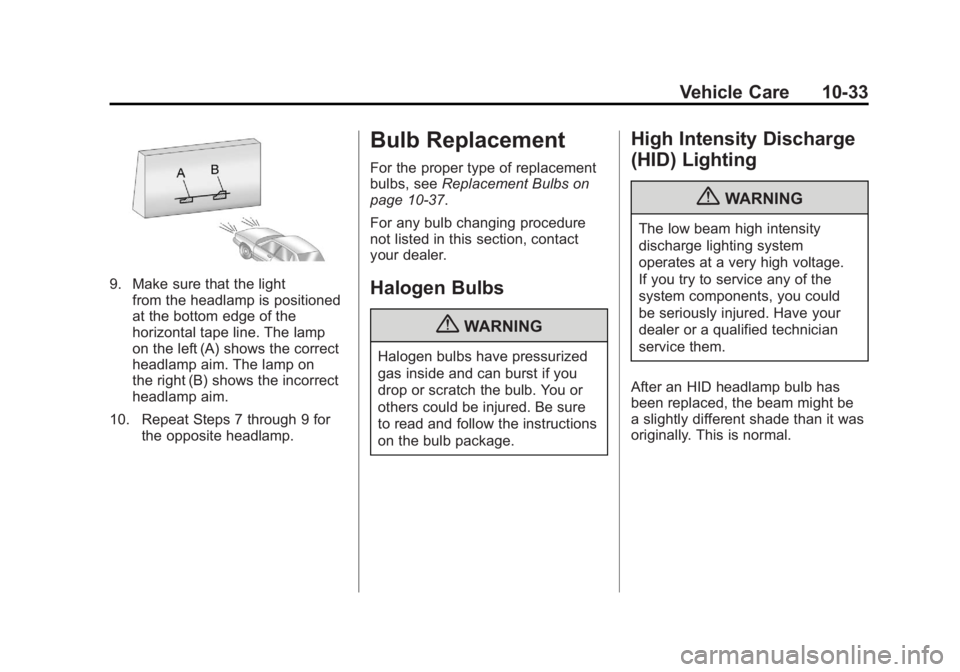
9. Make sure that the lightfrom the headlamp is positioned
at the bottom edge of the
horizontal tape line. The lamp
on the left (A) shows the correct
headlamp aim. The lamp on
the right (B) shows the incorrect
headlamp aim.
10. Repeat Steps 7 through 9 for the opposite headlamp.
Bulb Replacement
For the proper type of replacement
bulbs, see Replacement Bulbs on
page 10‑37.
For any bulb changing procedure
not listed in this section, contact
your dealer.
Halogen Bulbs
{WARNING
Halogen bulbs have pressurized
gas inside and can burst if you
drop or scratch the bulb. You or
others could be injured. Be sure
to read and follow the instructions
on the bulb package.
High Intensity Discharge
(HID) Lighting
{WARNING
The low beam high intensity
discharge lighting system
operates at a very high voltage.
If you try to service any of the
system components, you could
be seriously injured. Have your
dealer or a qualified technician
service them.
After an HID headlamp bulb has
been replaced, the beam might be
a slightly different shade than it was
originally. This is normal.
Page 346 of 462
Black plate (34,1)Buick LaCrosse Owner Manual - 2011
10-34 Vehicle Care
Headlamps, Front Turn
Signal and Parking
Lamps
Base Headlamp Assembly
The base model vehicle has a
halogen high-beam headlamp,
a low-beam/Daytime Running
Lamp (DRL) headlamp, and a
turn signal/parking lamp on the
headlamp assembly.
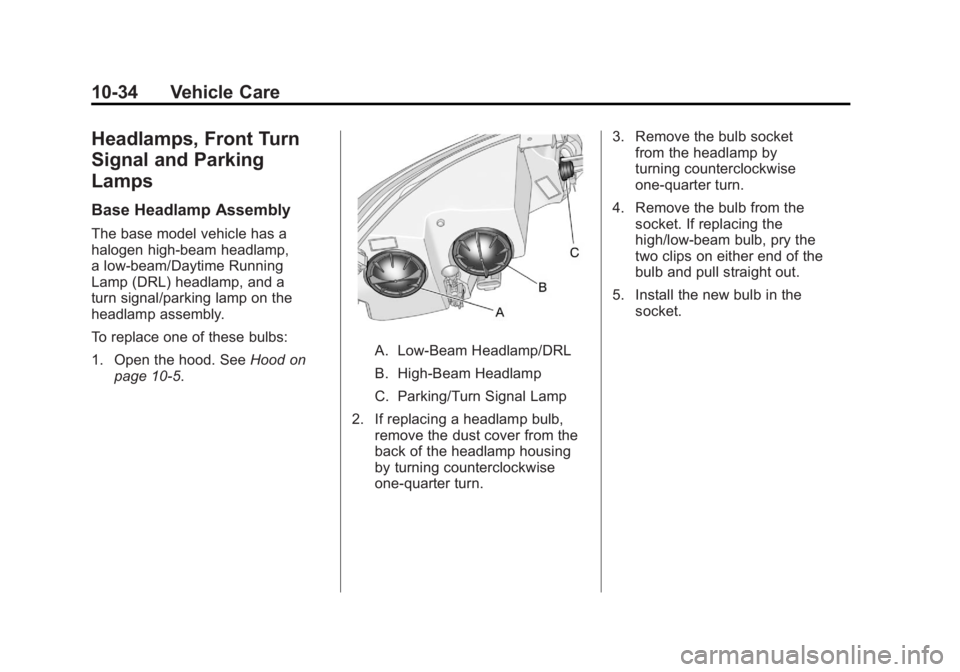
To replace one of these bulbs:
1. Open the hood. SeeHood on
page 10‑5.
A. Low-Beam Headlamp/DRL
B. High-Beam Headlamp
C. Parking/Turn Signal Lamp
2. If replacing a headlamp bulb, remove the dust cover from the
back of the headlamp housing
by turning counterclockwise
one‐quarter turn. 3. Remove the bulb socket
from the headlamp by
turning counterclockwise
one‐quarter turn.
4. Remove the bulb from the socket. If replacing the
high/low‐beam bulb, pry the
two clips on either end of the
bulb and pull straight out.
5. Install the new bulb in the socket.
Page 347 of 462
Black plate (35,1)Buick LaCrosse Owner Manual - 2011
Vehicle Care 10-35
6. Install the bulb socket by turningclockwise one‐quarter turn.
7. If a headlamp bulb was replaced, install the dust cover
in the back of the headlamp
housing by turning clockwise
one‐quarter turn.
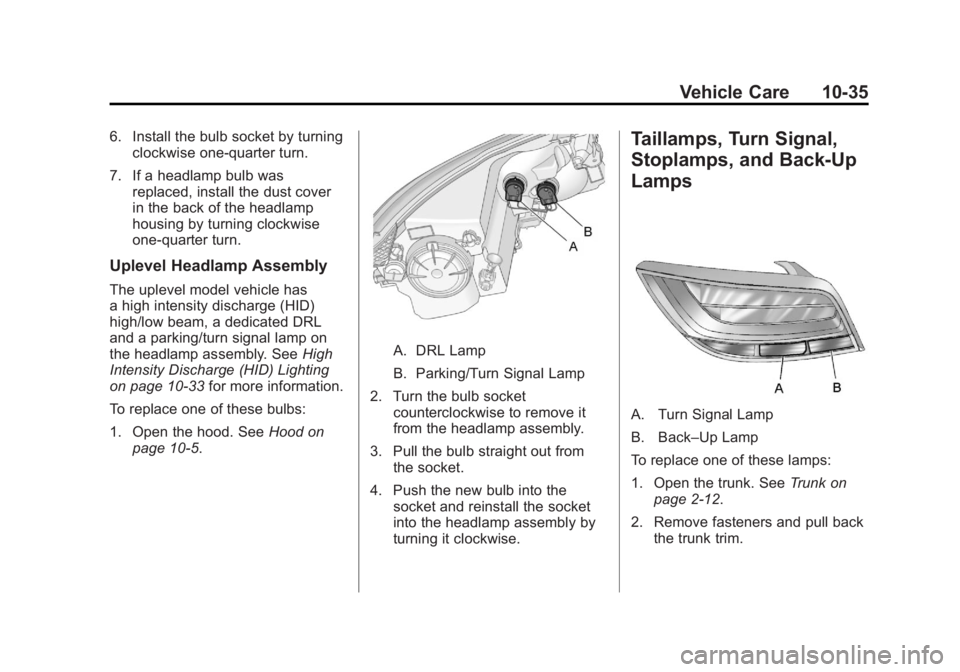
Uplevel Headlamp Assembly
The uplevel model vehicle has
a high intensity discharge (HID)
high/low beam, a dedicated DRL
and a parking/turn signal lamp on
the headlamp assembly. See High
Intensity Discharge (HID) Lighting
on page 10‑33 for more information.
To replace one of these bulbs:
1. Open the hood. See Hood on
page 10‑5.
A. DRL Lamp
B. Parking/Turn Signal Lamp
2. Turn the bulb socket counterclockwise to remove it
from the headlamp assembly.
3. Pull the bulb straight out from the socket.
4. Push the new bulb into the socket and reinstall the socket
into the headlamp assembly by
turning it clockwise.
Taillamps, Turn Signal,
Stoplamps, and Back-Up
Lamps
A. Turn Signal Lamp
B. Back–Up Lamp
To replace one of these lamps:
1. Open the trunk. See Trunk on
page 2‑12.
2. Remove fasteners and pull back the trunk trim.
Page 349 of 462
Black plate (37,1)Buick LaCrosse Owner Manual - 2011
Vehicle Care 10-37
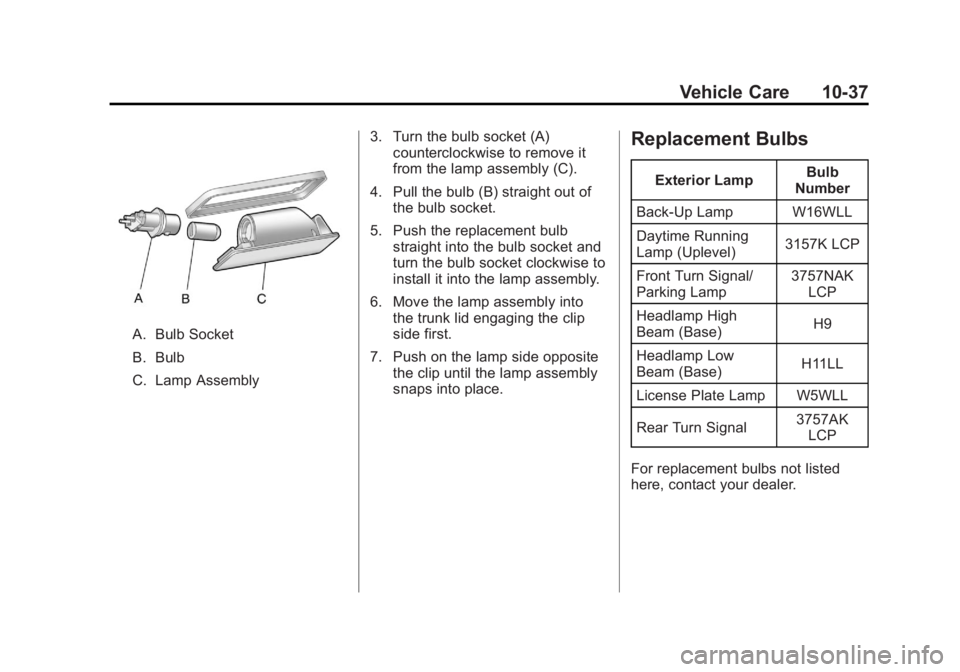
A. Bulb Socket
B. Bulb
C. Lamp Assembly3. Turn the bulb socket (A)
counterclockwise to remove it
from the lamp assembly (C).
4. Pull the bulb (B) straight out of the bulb socket.
5. Push the replacement bulb straight into the bulb socket and
turn the bulb socket clockwise to
install it into the lamp assembly.
6. Move the lamp assembly into the trunk lid engaging the clip
side first.
7. Push on the lamp side opposite the clip until the lamp assembly
snaps into place.
Replacement Bulbs
Exterior Lamp Bulb
Number
Back-Up Lamp W16WLL
Daytime Running
Lamp (Uplevel) 3157K LCP
Front Turn Signal/
Parking Lamp 3757NAK
LCP
Headlamp High
Beam (Base) H9
Headlamp Low
Beam (Base) H11LL
License Plate Lamp W5WLL
Rear Turn Signal 3757AK
LCP
For replacement bulbs not listed
here, contact your dealer.
Page 354 of 462
Black plate (42,1)Buick LaCrosse Owner Manual - 2011
10-42 Vehicle Care
Mini Relays Usage7 Engine Control
Module
9 Cooling Fan
13 Cooling Fan
15 Run/Crank
17 Rear Window
Defogger
Micro
Relays Usage
2 Starter
4 Wiper Speed
5 Wiper Control
10 Cooling Fan
14 Headlamp
Low BeamInstrument Panel Fuse
Block
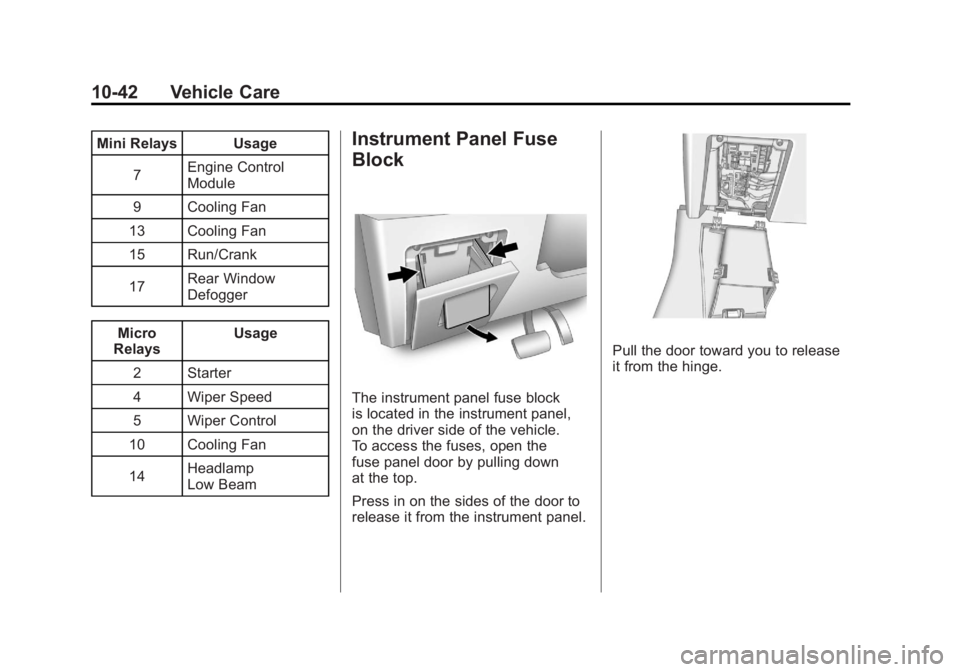
The instrument panel fuse block
is located in the instrument panel,
on the driver side of the vehicle.
To access the fuses, open the
fuse panel door by pulling down
at the top.
Press in on the sides of the door to
release it from the instrument panel.
Pull the door toward you to release
it from the hinge.
Page 454 of 462
Black plate (6,1)Buick LaCrosse Owner Manual - 2011
i-6 INDEX
Fuel (cont.)Gauge . . . . . . . . . . . . . . . . . . . . . . . . 5-11
Low Fuel Warning Light . . . . . . . 5-24
Recommended . . . . . . . . . . . . . . . 9-50
Requirements, California . . . . . 9-51
System Messages . . . . . . . . . . . . 5-36
Fuel Economy Driving . . . . . . . . . . . . . . . . . . . . . . . . 1-23
Fuses
Engine CompartmentFuse Block . . . . . . . . . . . . . . . . 10-39
Fuses and Circuit Breakers . . . . . . . . . . . . . . . . . . 10-39
Instrument Panel Fuse
Block . . . . . . . . . . . . . . . . . . . . . . 10-42
Rear Compartment Fuse Block . . . . . . . . . . . . . . . . . . . . . . 10-44G
Garage Door Opener . . . . . . . . . . 5-45Programming . . . . . . . . . . . . . . . . . 5-45
Gasoline Specifications . . . . . . . . . . . . . . . . . 9-51
Gauges Engine Coolant
Temperature . . . . . . . . . . . . . . . . 5-13
Fuel . . . . . . . . . . . . . . . . . . . . . . . . . . 5-11
Odometer . . . . . . . . . . . . . . . . . . . . . 5-11
Speedometer . . . . . . . . . . . . . . . . . 5-11
Tachometer . . . . . . . . . . . . . . . . . . . 5-11
Warning Lights and Indicators . . . . . . . . . . . . . . . . . . . . 5-9
General Information Service and Maintenance . . . . . 11-1
Towing . . . . . . . . . . . . . . . . . . . . . . . . 9-55
Vehicle Care . . . . . . . . . . . . . . . . . . 10-2
Glove Box . . . . . . . . . . . . . . . . . . . . . . 4-1
GM Mobility Reimbursement Program . . . . . . . . . . . . . . . . . . . . . . 13-8
H
Halogen Bulbs . . . . . . . . . . . . . . . . 10-33
Hazard Warning Flashers . . . . . . . 6-4
Head Restraints . . . . . . . . . . . . . . . . 3-2
Head Up Display . . . . . . . . . . . . . . 5-29
HeadlampsAdaptive Forward
Lighting (AFL) . . . . . . . . . . . . . . . . 6-4
Aiming . . . . . . . . . . . . . . . . . . . . . . 10-30
Automatic . . . . . . . . . . . . . . . . . . . . . . 6-3
Bulb Replacement . . . . . . . . . . 10-33
Daytime Running Lamps (DRL) . . . . . . . . . . . . . . . . . 6-3
Flash-to-Pass . . . . . . . . . . . . . . . . . . 6-2
High Intensity Discharge (HID) Lighting . . . . . . . . . . . . . 10-33
High-Beam On Light . . . . . . . . . . 5-24
High/Low Beam Changer . . . . . . 6-2
Heated Steering Wheel . . . . . . . . . . . . . . . . 5-3
Page 456 of 462
Black plate (8,1)Buick LaCrosse Owner Manual - 2011
i-8 INDEX
LATCH SystemReplacing Parts After a
Crash . . . . . . . . . . . . . . . . . . . . . . . 3-61
LATCH, Lower Anchors and Tethers for Children . . . . . . . . . . 3-52
Light Electronic Stability Control
(ESC)/Traction Control
System (TCS) Indicator
Warning . . . . . . . . . . . . . . . . . . . . . 5-22
Lighting
Adaptive Forward . . . . . . . . . . . . . . 6-4
Entry . . . . . . . . . . . . . . . . . . . . . . . . . . 6-6
Exit . . . . . . . . . . . . . . . . . . . . . . . . . . . . 6-6
Illumination Control . . . . . . . . . . . . 6-5
Lights
Airbag Readiness . . . . . . . . . . . . . 5-14
Antilock Brake System(ABS) Warning . . . . . . . . . . . . . . 5-21
Brake System Warning . . . . . . . 5-19
Charging System . . . . . . . . . . . . . 5-16
Cruise Control . . . . . . . . . . . . . . . . 5-25
Electric Parking Brake . . . . . . . . 5-20
Engine Oil Pressure . . . . . . . . . . 5-23 Lights (cont.)
Flash-to-Pass . . . . . . . . . . . . . . . . . . 6-2
Front Fog Lamps . . . . . . . . . . . . . 5-25
High-Beam On . . . . . . . . . . . . . . . . 5-24
High/Low Beam Changer . . . . . . 6-2
Low Fuel Warning . . . . . . . . . . . . 5-24
Safety Belt Reminders . . . . . . . . 5-14
Security . . . . . . . . . . . . . . . . . . . . . . 5-24
Taillamp Indicator . . . . . . . . . . . . . 5-25
Tire Pressure . . . . . . . . . . . . . . . . . 5-23
Traction Off . . . . . . . . . . . . . . . . . . . 5-21
Limited-Slip Differential . . . . . . . . 9-38
Locks Delayed Locking . . . . . . . . . . . . . . 2-12
Door . . . . . . . . . . . . . . . . . . . . . . . . . . 2-10
Power Door . . . . . . . . . . . . . . . . . . . 2-11
Safety . . . . . . . . . . . . . . . . . . . . . . . . 2-12
Loss of Control . . . . . . . . . . . . . . . . . 9-6
Low Fuel Warning Light . . . . . . . . 5-24
Lower Anchors and
Tethers for Children
(LATCH System) . . . . . . . . . . . . . 3-52
Lumbar Adjustment . . . . . . . . . . . . . 3-7
Front Seats . . . . . . . . . . . . . . . . . . . . 3-7M
MaintenanceRecords . . . . . . . . . . . . . . . . . . . . .11-10
Maintenance Schedule Recommended Fluids andLubricants . . . . . . . . . . . . . . . . . . . 11-7
Scheduled Maintenance . . . . . . 11-2
Malfunction Indicator Lamp . . . . 5-17
Manual Mode . . . . . . . . . . . . . . . . . . 9-30
Mass Storage Media (MEM) . . . 7-27
Memory Features . . . . . . . . . . . . . . . 1-7
Messages Anti-Theft Alarm System . . . . . . 5-38
Battery Voltage andCharging . . . . . . . . . . . . . . . . . . . . 5-33
Brake System . . . . . . . . . . . . . . . . 5-33
Compass . . . . . . . . . . . . . . . . . . . . . 5-34
Door Ajar . . . . . . . . . . . . . . . . . . . . . 5-34
Engine Cooling System . . . . . . . 5-35
Engine Oil . . . . . . . . . . . . . . . . . . . . 5-35
Engine Power . . . . . . . . . . . . . . . . 5-36
Fuel System . . . . . . . . . . . . . . . . . . 5-36
Key and Lock . . . . . . . . . . . . . . . . . 5-36