mirror BUICK LACROSSE 2018 Get To Know Guide
[x] Cancel search | Manufacturer: BUICK, Model Year: 2018, Model line: LACROSSE, Model: BUICK LACROSSE 2018Pages: 16, PDF Size: 2.29 MB
Page 2 of 16
2
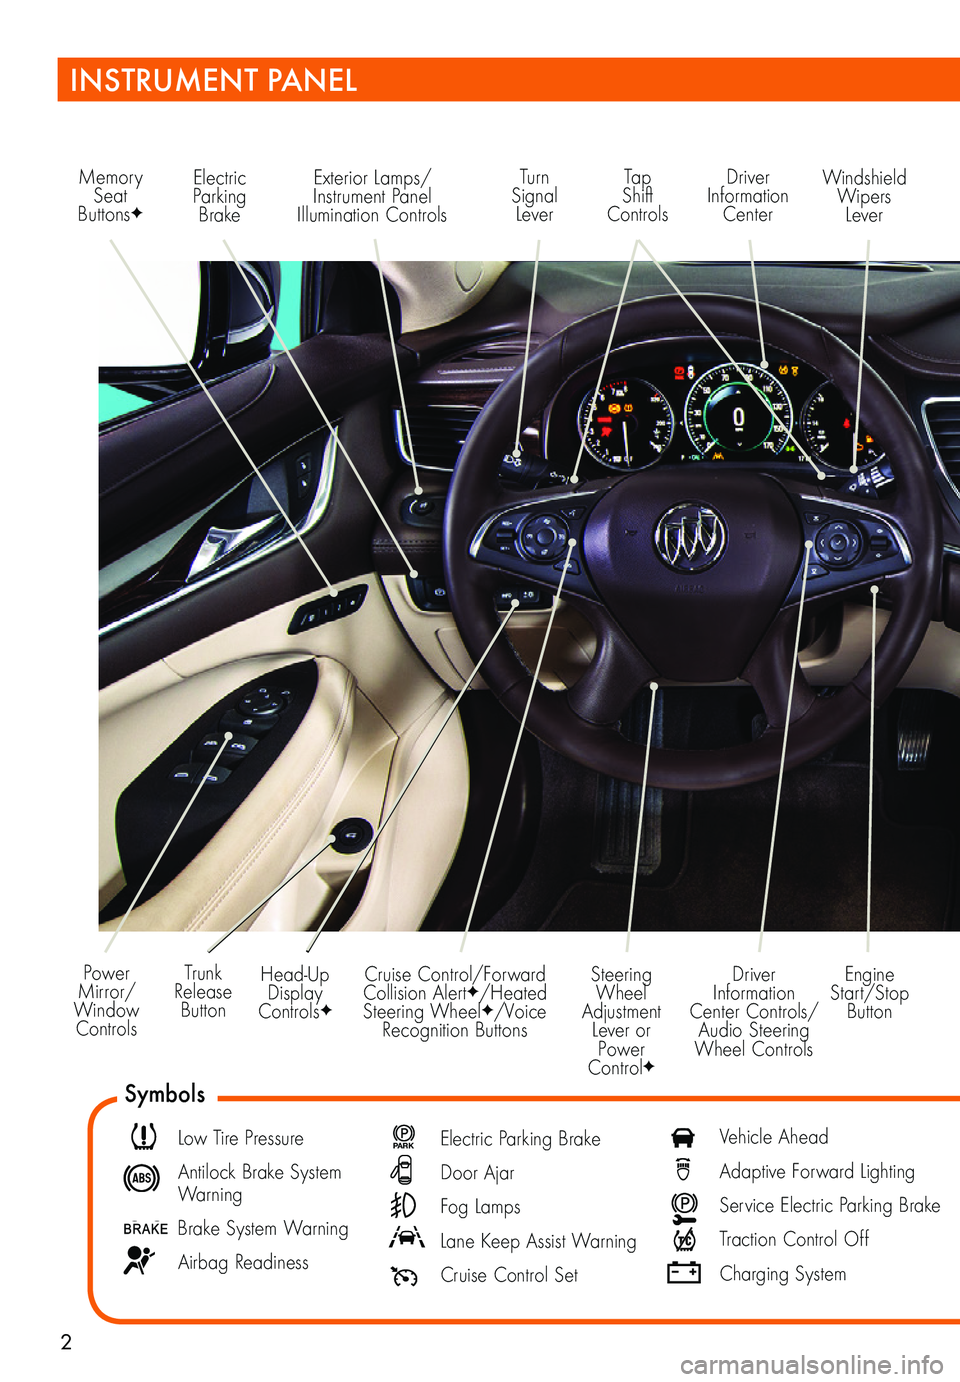
Power Mirror/ Window Controls
Memory Seat ButtonsF
Exterior Lamps/Instrument Panel Illumination Controls
Engine Start/Stop Button
Driver Information Center Controls/ Audio Steering Wheel Controls
Windshield Wipers Lever
Driver Information Center
Tap Shift Controls
Turn Signal Lever
Electric Parking Brake
Head-Up Display ControlsF
Trunk Release Button
Steering Wheel Adjustment Lever or Power ControlF
Cruise Control/Forward Collision AlertF/Heated Steering WheelF/Voice Recognition Buttons
INSTRUMENT PANEL
Symbols
Low Tire Pressure
Antilock Brake System Warning
Brake System Warning
Airbag Readiness
P ARK Electric Parking Brake
Door Ajar
Fog Lamps
Lane Keep Assist Warning
Cruise Control Set
Vehicle Ahead
Adaptive Forward Lighting
Service Electric Parking Brake
Traction Control Off
Charging System
Page 8 of 16
8F Optional equipment
FRONT SEATS
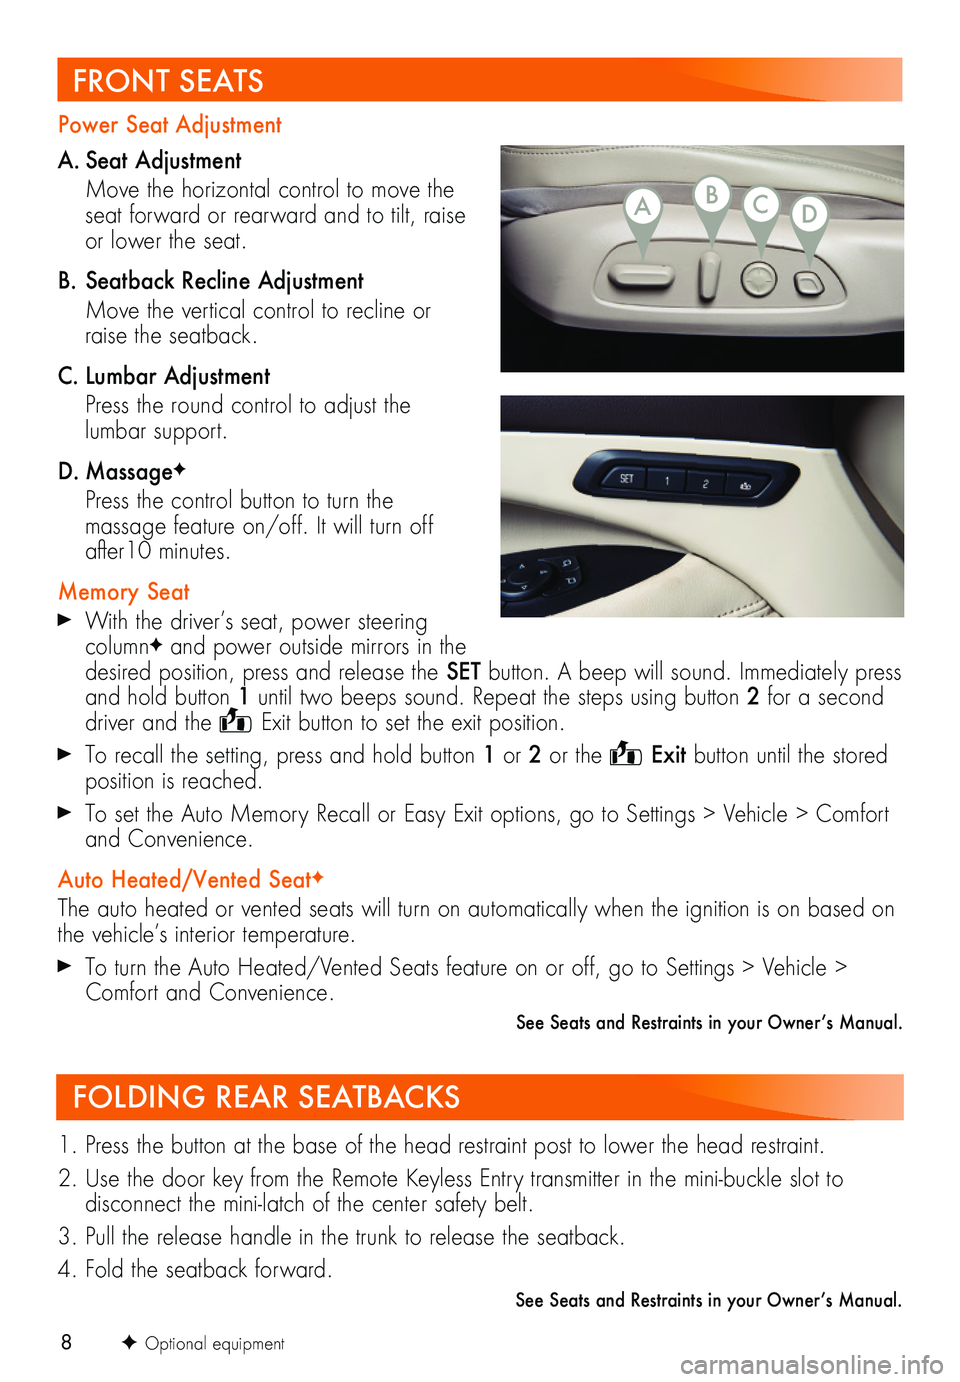
Power Seat Adjustment
A. Seat Adjustment
Move the horizontal control to move the seat forward or rearward and to tilt, raise or lower the seat.
B. Seatback Recline Adjustment
Move the vertical control to recline or raise the seatback.
C. Lumbar Adjustment
Press the round control to adjust the lumbar support.
D. MassageF
Press the control button to turn the
massage feature on/off. It will turn off after10 minutes.
Memory Seat
With the driver’s seat, power steering columnF and power outside mirrors in the desired position, press and release the SET button. A beep will sound. Immediately press and hold button 1 until two beeps sound. Repeat the steps using button 2 for a second driver and the Exit button to set the exit position.
To recall the setting, press and hold button 1 or 2 or the Exit button until the stored position is reached.
To set the Auto Memory Recall or Easy Exit options, go to Settings > Vehicle > Comfort and Convenience.
Auto Heated/Vented SeatF
The auto heated or vented seats will turn on automatically when the ignition is on based on the vehicle’s interior temperature.
To turn the Auto Heated/Vented Seats feature on or off, go to Settings > Vehicle > Comfort and Convenience.
See Seats and Restraints in your Owner’s Manual.
FOLDING REAR SEATBACKS
1. Press the button at the base of the head restraint post to lower the head restraint.
2. Use the door key from the Remote Keyless Entry transmitter in the mini-buckle slot to
disconnect the mini-latch of the center safety belt.
3. Pull the release handle in the trunk to release the seatback.
4. Fold the seatback forward.
See Seats and Restraints in your Owner’s Manual.
ABCD
Page 9 of 16
9
SUNROOFF
The sunroof and sunshade controls are located on the overhead console.
Press the Front Sunshade switch to open or close the front sunshade.
Press the Rear Sunshade switch to open or close the rear sunshade.
Press the rear of the Sunroof switch to express-open the sunroof. Press the front of the switch to express-close the sunroof.
See Keys, Doors and Windows in your Owner’s Manual.
AUTOMATIC CLIMATE CONTROLS
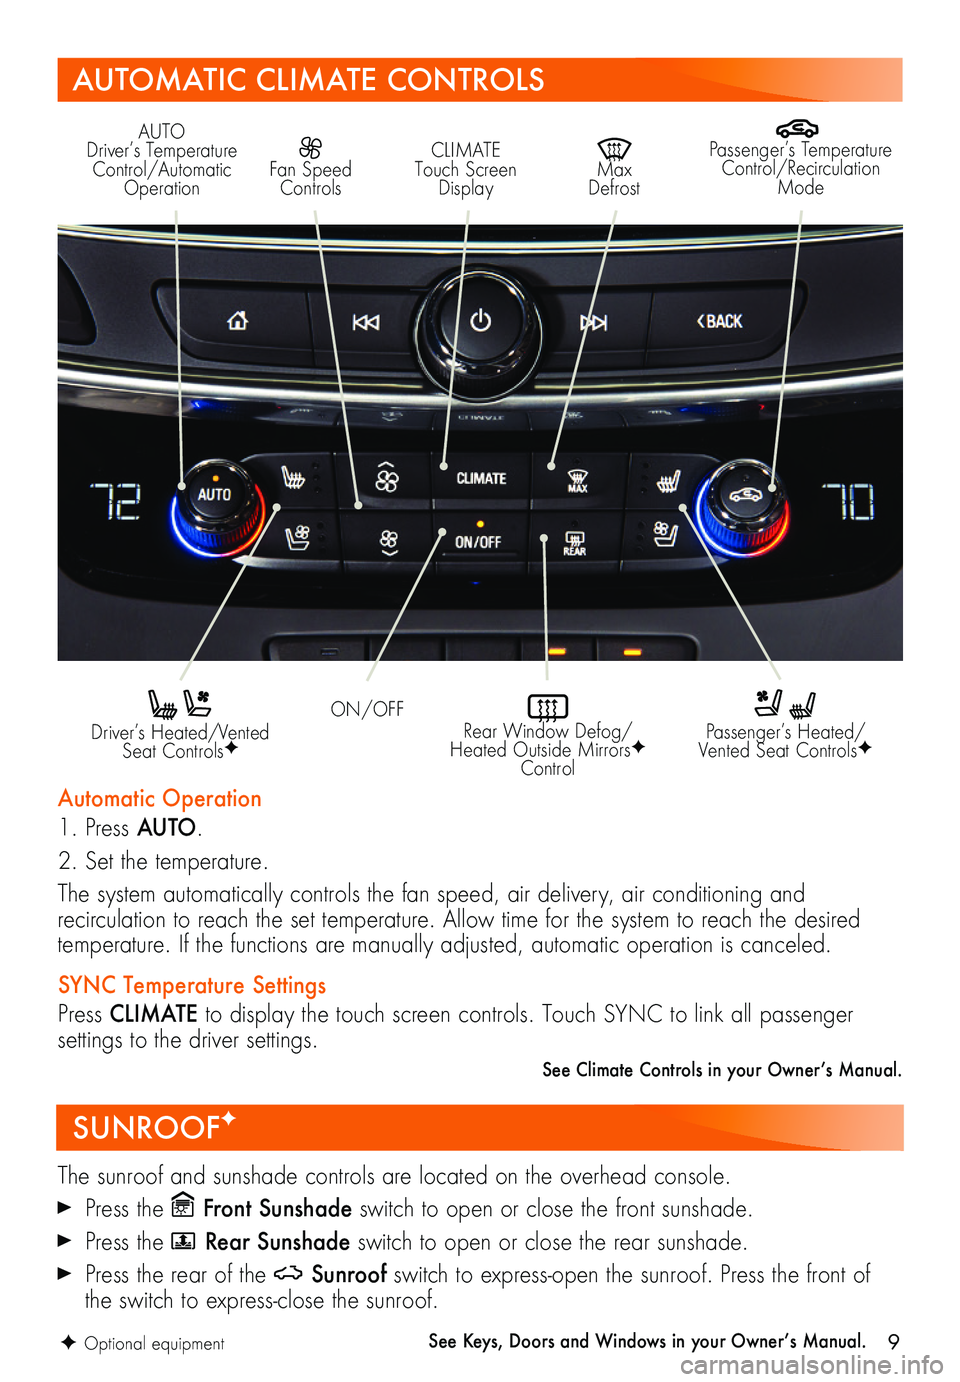
Driver’s Heated/Vented Seat ControlsF
Automatic Operation
1. Press AUTO.
2. Set the temperature.
The system automatically controls the fan speed, air delivery, air conditioning and
recirculation to reach the set temperature. Allow time for the system to reach the desired
temperature. If the functions are manually adjusted, automatic operation is canceled.
SYNC Temperature Settings
Press CLIMATE to display the touch screen controls. Touch SYNC to link all passenger
settings to the driver settings.
See Climate Controls in your Owner’s Manual.
Passenger’s Heated/Vented Seat ControlsF
ON/OFF
AUTO Driver’s Temperature Control/Automatic Operation
CLIMATE Touch Screen Display
Max Defrost
Passenger’s Temperature Control/Recirculation Mode
Fan Speed Controls
Rear Window Defog/Heated Outside MirrorsF Control
F Optional equipment
Page 12 of 16
12
APPLE CARPLAY™ AND ANDROID AUTO™
BLUETOOTH® SYSTEM
ONSTAR® WITH 4G LTE AND WI-FI®
Apple CarPlay or Android Auto capability may be available through a compatible smart-phone. If available, a Projection icon will appear on the home page of the infotainment display.
1. No app is required for Apple CarPlay. Download the Android Auto app to your phone from the Google Play Store.
2. Connect your compatible phone by plugging the phone USB cable into a USB data port. Use your device’s factory-provided USB cable. Aftermarket cables may not work.
3. The Projection icon will change to Apple CarPlay or Android Auto, depending on the phone. Apple CarPlay or Android Auto may launch automatically upon USB connection. If not, touch the Apple CarPlay or Android Auto icon on the home page.
For more information on using Apple CarPlay or Android Auto, call 1-855-4-SUPPORT (1-855-478-7767) or visit my.buick.com/learn.
See your Infotainment System Manual.
Refer to your Owner's Manual for important information about using the Bluetooth system while driving.
Before using a Bluetooth-enabled device in the vehicle, it must be paired with the in- vehicle Bluetooth system. The pairing process is disabled when the vehicle is moving. Not all
devices will support all functions. Visit my.buick.com/learn for more information.
Pair a Phone
1. To use voice recognition, press the Push to Talk button on the steering wheel; after the beep, say “Pair Phone.” To use the touch screen, select the Phone icon > Phones > Pair Device.
2. Start the pairing process on the phone. From your phone’s Bluetooth settings, select the name shown on the infotainment screen.
3. Confirm the codes that appear on the touch screen and the phone.
4. When pairing is complete, the phone screen is displayed. Your phone book may be downloaded depending on the phone.
See your Infotainment System Manual.
With OnStar 4G LTE and Wi-Fi, up to seven devices (smartphones, tablets and laptops) can be connected to high-speed internet through the vehicle’s built-in Wi-Fi hotspot.
To retrieve the SSID and password for the hotspot, press the OnStar Voice Command button on the overhead console or rearview mirror, wait for the prompt, and then say “Wi-Fi settings.” The information will be displayed on the screen.
For assistance, press the blue OnStar button or call 1-888-4-ONSTAR (1-888-466-7827).
Note: See onstar.com for a detailed instruction guide, vehicle availability and system limitations.
See your Infotainment System Manual.
Page 14 of 16
14
DRIVER ASSISTANCE SYSTEMSF
Safety Alert Seat — The driver’s seat pulses — left side, right side or simultaneously — to alert the driver of the direction of potential hazards.
Seat pulsing alerts or audible alerts may be selected. To change the alert settings, go to Settings > Vehicle > Collision/Detection Systems > Alert Type.
Lane Change Alert with Side Blind Zone Alert — While driving, the system displays a warning symbol on the left or right side mirror when a vehicle is detected in that side blind zone area or rapidly approaching that area. The warning symbol flashes if a turn
signal is activated when a vehicle has been detected on the same side.
To turn the systems on or off, go to Settings > Vehicle > Collision/Detection Systems > Lane Change Alert.
Forward Collision Alert — The Vehicle Ahead indicator is green on the instrument
cluster when a vehicle is detected and is amber when following a vehicle ahead too closely. When approaching a vehicle directly ahead too rapidly, a red alert flashes on the windshield and the Safety Alert Seat pulses or beeps sound (if selected).
Press the Collision Alert button on the steering wheel to set the alert timing to Far, Medium, or Near.
Forward Automatic Braking — The brakes may be applied automatically in potential colli-sion situations to help reduce damage or help avoid collisions with vehicles directly ahead.
To set the Forward Collision Alert and Forward Automatic Braking systems to Alert and Brake, Alert, or Off, go to Settings > Vehicle > Collision/Detection Systems > Forward Collision System.
Traction Control and StabiliTrak Systems — The traction control system limits wheelspin and the StabiliTrak® stability control system assists with directional control of the vehicle in difficult driving conditions. Both systems turn on automatically every time the vehicle is
started. Turn off traction control if the vehicle is stuck and rocking the vehicle is required.
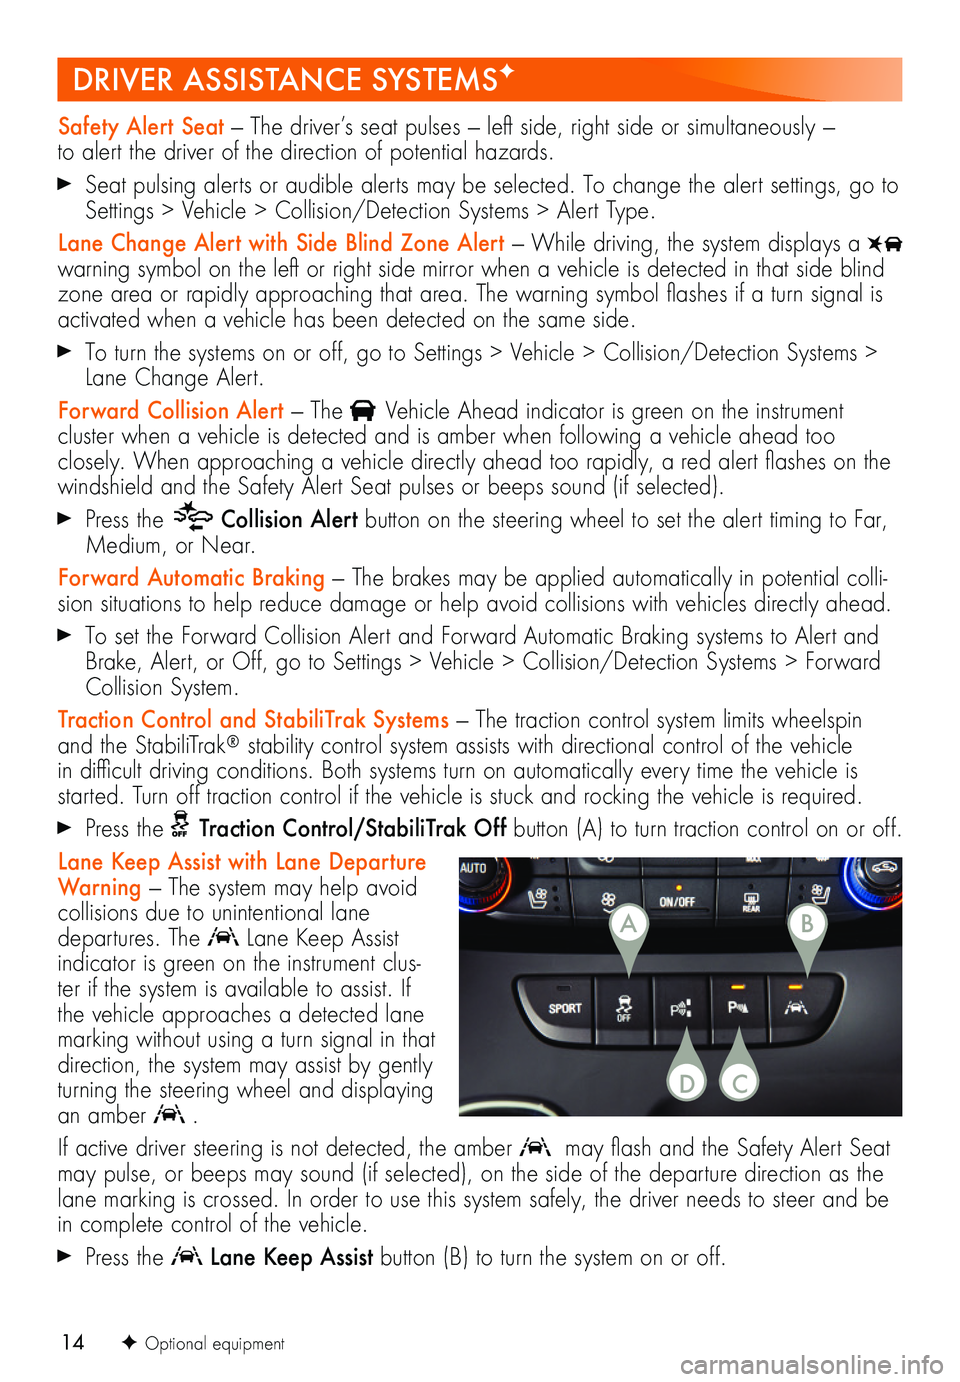
Press the Traction Control/StabiliTrak Off button (A) to turn traction control on or off.
Lane Keep Assist with Lane Departure Warning — The system may help avoid
collisions due to unintentional lane departures. The Lane Keep Assist indicator is green on the instrument clus-ter if the system is available to assist. If the vehicle approaches a detected lane marking without using a turn signal in that direction, the system may assist by gently turning the steering wheel and displaying an amber .
If active driver steering is not detected, the amber may flash and the Safety Alert Seat may pulse, or beeps may sound (if selected), on the side of the departure direction as the lane marking is crossed. In order to use this system safely, the driver needs to steer and be in complete control of the vehicle.
Press the Lane Keep Assist button (B) to turn the system on or off.
F Optional equipment
AB
CD