start stop button BUICK LESABRE 2003 Owner's Manual
[x] Cancel search | Manufacturer: BUICK, Model Year: 2003, Model line: LESABRE, Model: BUICK LESABRE 2003Pages: 380, PDF Size: 2.75 MB
Page 80 of 380
Theft-Deterrent Systems
Vehicle theft is big business, especially in some cities.
Although your vehicle has a number of theft-deterrent
features, we know that nothing we put on it can make it
impossible to steal.
Content Theft-Deterrent
Your vehicle may have a
content theft-deterrent
alarm system. With
this system, the
SECURITY light will ¯ash
as you open the door
(if your ignition is off).
This light reminds you to activate the content
theft-deterrent system when leaving your vehicle.
To activate the system, do the following:
1. Open the door.
2. Lock the door with the power door lock switch or
with the remote keyless entry transmitter. The
SECURITY light should come on and stay on.
3. Close all doors. The SECURITY light should go off
after about 30 seconds. The alarm is not armed
until the SECURITY light goes off.If a door is opened without the key or remote keyless
entry transmitter, the alarm will go off. Your vehicle's
lamps will ¯ash and the horn will sound for 30 seconds.
The lamps and horn will then turn off to save
battery power.
Remember, the content theft-deterrent system won't
activate if you lock the doors with a key or use the
manual door lock. It activates only if you use a power
door lock switch with a door open, or with the remote
keyless entry transmitter. You should also remember
that you can start your vehicle with the correct ignition
key if the alarm has been set off.
Here's how to avoid setting off the alarm by accident:
·If you don't want to activate the theft-deterrent
system, the vehicle should be locked with the door
key
afterthe doors are closed.
·Always unlock a door with a key, or use the remote
keyless entry transmitter. Unlocking a door any
other way will set off the alarm.
If you set off the alarm by accident, unlock the driver's
door with your key. You can also turn off the alarm
by pressing the unlock button on the remote keyless
entry transmitter. The alarm won't stop if you try
to unlock a door any other way.
2-18
Page 107 of 380
2. Adjust the driver's seat and lumbar position to a
safe and comfortable driving position. Adjust both
outside mirrors to suit you. See
Outside Power
Mirrors on page 2-35.
3. Press and hold the MEMORY button (1 or 2)
corresponding with your DRIVER # displayed on the
DIC for longer than three seconds. You will hear
two beeps con®rming that the seat and mirror
positions have been entered into memory.
To set the seat and mirror positions for a second driver,
follow the previous steps, but start by pressing the
unlock button on the transmitter that displays the other
DRIVER # on the DIC. Be sure to use the MEMORY
button which corresponds to the DRIVER # identi®ed by
the second transmitter.
To recall your memory positions, your vehicle must be
in PARK (P). Push and release the MEMORY button
corresponding to the desired driving position. The seat
and mirrors will move to the position previously
stored for the identi®ed driver. You will hear one beep.
To store the exit position for an easy exit, use the
following procedure:
1. First identify the DRIVER # by pressing the
MEMORY button 1 or 2 or by pressing the unlock
button on the transmitter.
2. Adjust the driver's seat to the desired exit position.3. Press and hold the EXIT button for longer than
three seconds. You will hear two beeps con®rming
that the seat exit position has been entered into
memory.
To set the exit position for a second driver, follow the
previous steps, but start by pressing the unlock
button on the transmitter that displays the other
DRIVER # on the DIC. Be sure to use the MEMORY
button which corresponds to the DRIVER # identi®ed by
the other transmitter.
To recall the exit position, your vehicle must be in
PARK (P). Push and release the EXIT button and the
seat will move to the exit position previously stored
for the current identi®ed driver. You will hear one beep.
If an exit position has not been stored for the current
identi®ed driver, the seat will move all the way back.
To stop recall movement of the seat at any time, press
the driver's power seat control located on the outboard
side of the front seat.
Mirrors and lumbar positions will not be stored or
recalled for the exit position.
If you would like your stored driving or exit position to
be recalled when unlocking your vehicle with the
transmitter, see
DIC Vehicle Personalization on
page 3-50.
2-45
Page 155 of 380
FUEL INFO (Information):Press this button to display
fuel information.
Press the FUEL INFO button until the display shows
FUEL ECONOMY AVERAGE. Average fuel economy is
viewed as a long term approximation of your overall
driving conditions. To learn the average fuel economy
from a new starting point, press the RESET button while
the average fuel economy is displayed in the DIC.
Press the FUEL INFO button until the display shows
FUEL ECONOMY INST. Instantaneous fuel economy
varies with your driving conditions, such as acceleration,
braking and the grade of the road being traveled. The
RESET button does not function in this mode.
Press the FUEL INFO button until the display shows
FUEL RANGE. The fuel range will calculate the
remaining distance you can drive without refueling. This
calculation is based on the average fuel economy for
the last 25 miles (40.25 km) driven, and the fuel
remaining in the fuel tank. The RESET button does not
function in this mode.
GAGE INFO (Information):Use this button to display
oil pressure, oil life, coolant temperature, tire pressure
and battery information.Press the GAGE INFO button until OIL PRESSURE
appears in the display. If there are no problems detected
with the oil pressure, the display will show OIL
PRESSURE NORMAL. If a low oil pressure condition is
detected, the display will show OIL PRESSURE
LOW. If you see the OIL PRESSURE LOW message,
your vehicle could be low on oil or the oil is not
going through the engine properly. See your dealer for
service.
Press the GAGE INFO button until COOLANT TEMP
appears in the display. If there are no problems detected
with the temperature, COOLANT TEMP NORMAL will
appear in the display. If the temperature is too high,
COOLANT TEMP HOT will appear in the display. If you
see the COOLANT TEMP HOT message, the engine
is overheated. You should pull off the road, stop
your vehicle and turn off your engine as soon as
possible. This manual explains what to do. See
Engine
Overheating on page 5-26.
Press the GAGE INFO button until the display shows
BATTERY STATE. If the voltage is normal the display
will show BATTERY STATE NORMAL. If the voltage
drops below 10.5 volts, the display will show BATTERY
STATE LOW. If the voltage is above 16.2 volts, the
display will show BATTERY STATE HIGH. If the display
shows the high or low message, you need to have
your battery and charging system checked.
3-47
Page 157 of 380
DIC Warnings and Messages
Other messages or warnings may appear in the DIC
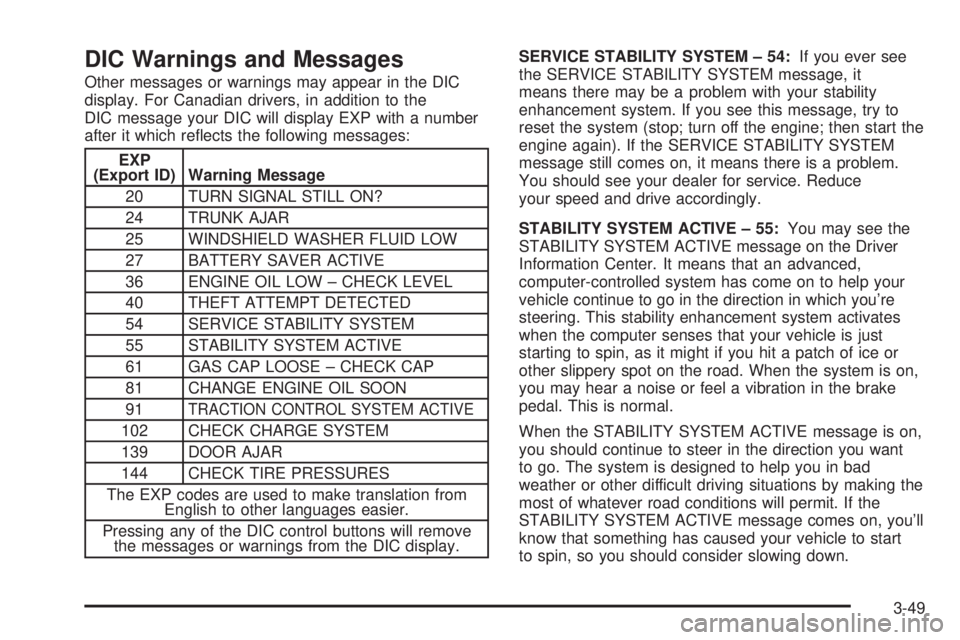
display. For Canadian drivers, in addition to the
DIC message your DIC will display EXP with a number
after it which re¯ects the following messages:
EXP
(Export ID) Warning Message
20 TURN SIGNAL STILL ON?
24 TRUNK AJAR
25 WINDSHIELD WASHER FLUID LOW
27 BATTERY SAVER ACTIVE
36 ENGINE OIL LOW ± CHECK LEVEL
40 THEFT ATTEMPT DETECTED
54 SERVICE STABILITY SYSTEM
55 STABILITY SYSTEM ACTIVE
61 GAS CAP LOOSE ± CHECK CAP
81 CHANGE ENGINE OIL SOON
91
TRACTION CONTROL SYSTEM ACTIVE
102 CHECK CHARGE SYSTEM
139 DOOR AJAR
144 CHECK TIRE PRESSURES
The EXP codes are used to make translation from
English to other languages easier.
Pressing any of the DIC control buttons will remove
the messages or warnings from the DIC display.SERVICE STABILITY SYSTEM ± 54:If you ever see
the SERVICE STABILITY SYSTEM message, it
means there may be a problem with your stability
enhancement system. If you see this message, try to
reset the system (stop; turn off the engine; then start the
engine again). If the SERVICE STABILITY SYSTEM
message still comes on, it means there is a problem.
You should see your dealer for service. Reduce
your speed and drive accordingly.
STABILITY SYSTEM ACTIVE ± 55:You may see the
STABILITY SYSTEM ACTIVE message on the Driver
Information Center. It means that an advanced,
computer-controlled system has come on to help your
vehicle continue to go in the direction in which you're
steering. This stability enhancement system activates
when the computer senses that your vehicle is just
starting to spin, as it might if you hit a patch of ice or
other slippery spot on the road. When the system is on,
you may hear a noise or feel a vibration in the brake
pedal. This is normal.
When the STABILITY SYSTEM ACTIVE message is on,
you should continue to steer in the direction you want
to go. The system is designed to help you in bad
weather or other difficult driving situations by making the
most of whatever road conditions will permit. If the
STABILITY SYSTEM ACTIVE message comes on, you'll
know that something has caused your vehicle to start
to spin, so you should consider slowing down.
3-49
Page 168 of 380
If the whole message is not displayed, parts of it will
appear every three seconds. To scroll through the
message at your own speed, press the INFO button
repeatedly. A new group of words will appear on
the display with each press. Once the complete
message has been displayed, INFO will disappear from
the display until another new message is received.
The old message can be displayed by pressing
the INFO button until a new message is received or a
different station is tuned to.
TRAF (Traffic):If TRAF appears on the display, the
tuned station broadcasts traffic announcements
and when a traffic announcement comes on the tuned
radio station you will hear it.
If the current tuned station does not broadcast traffic
announcements, press this button and the radio
will seek to a station that does. When the radio ®nds a
station that broadcasts traffic announcements, it will
stop and TRAF will be displayed. When a traffic
announcement comes on the tuned radio station you
will hear it. If no station is found, NO TRAFFIC will
appear on the display.
If TRAF is on the display you can press the TRAF
button to turn of the traffic announcements.
Your radio will play the traffic announcement even if the
volume is muted or interrupt the play of a CD if the
last tuned station broadcasts traffic announcements.Radio Messages
CAL (CALIBRATE):Your audio system has been
calibrated for your vehicle from the factory. If this
message appears on the display it means that your
radio has not been con®gured properly for your vehicle
and must be returned to the dealership for service.
Playing a Compact Disc
Insert a disc partway into the slot, label side up. The
player will pull it in. The disc should begin playing. If you
want to insert a CD while the ignition or the radio is
off, ®rst press the eject button or DISP.
If you turn off the ignition or radio with a disc in the
player, it will stay in the player. When you turn on the
ignition or system, the disc will start playing where
it stopped, if it was the last selected audio source.
The integral CD player can play the smaller 8 cm single
discs with an adapter ring. Full-size compact discs
and the smaller discs are loaded in the same manner.
If playing a CD-R the sound quality may be reduced due
to CD-R quality, the method of recording, the quality
of the music that has been recorded, and the way the
CD-R has been handled. You may experience an
increase in skipping, difficulty in ®nding tracks, and/or
difficulty in loading and ejecting. If these problems occur
try a known good CD.
3-60
Page 169 of 380
Do not add paper labels to discs, they could get caught
in the CD player.
Do not play 3 inch discs without a standard
adapter disc.
If an error appears on the display, see ªCompact Disc
Errorsº later in this section.
1
s(Reverse):Press and hold this pushbutton to
quickly reverse within a track. Release is it to play the
passage. You will hear sound at a reduced level.
2
\(Forward):Press and hold this pushbutton to
quickly advance within a track. Release it to play
the passage. You will hear sound at a reduced level.
4 RDM (Random):Press this pushbutton to hear
the tracks in random, rather than sequential, order.
Press RDM again to turn off random play.
DISP (Display):Press this button to see which track is
playing. Press it again within ®ve seconds to see
how long it has been playing. To change what is
normally shown on the display (track or elapsed time),
press this button until you see the display you want, then
hold the button until the display ¯ashes.
©SEEK¨:Press the left arrow to go to the start of
the current track if more than eight seconds have
played. If you hold the button or press it more than once,
the player will continue moving back through the disc.
Press the right arrow to go to the next track. If you hold
the button or press it more than once, the player will
continue moving forward through the disc.
To scan CD tracks, press and hold one of the SEEK
arrows for two seconds until SCAN appears on the
display. You will hear a beep. The disc will go to the next
track, play for a few seconds, then go on to the next
track. The sound will mute and SCAN and the track
number will appear on the display while scanning. The
disc will only scan forward. Press one of the SEEK
arrows again to stop scanning.
BAND:Press this button to listen to the radio when a
CD is playing.
CD:Press this button to change to playing a CD when
listening to the radio.
Z(Eject):Press this button to eject a CD.
3-61
Page 178 of 380
Playing a Cassette Tape
The longer side with the tape visible should face to the
right. If the ignition and the radio are on, the tape
can be inserted and will begin playing. If you hear
nothing or hear a garbled sound, the tape may not be in
squarely. Press the eject button to remove the tape
and start over.
While the tape is playing, use the VOLUME and AUDIO
controls just as you do for the radio. The display will
show an arrow to show which side of the tape is playing.
If you want to insert a tape while the ignition or radio
is off, ®rst press the eject button or DISP. Cassette tape
adapter kits for portable compact disc players will
work in your cassette tape player.
Your tape bias is set automatically.
If an error appears on the display, see ªCassette Tape
Messagesº later in this section.
1
s(Reverse):Press this pushbutton to reverse the
tape rapidly. The radio will play while the tape reverses.
Press it again to return to playing speed.
2
\(Forward):Press this pushbutton to advance
quickly to another part of the tape. The radio will play
while the tape advances. Press this pushbutton again to
return to playing speed.6 SIDE:Press this pushbutton to play the other side of
the tape.
©SEEK¨:Your tape must have at least three
seconds of silence between each selection for seek to
work. Press the left or the right arrow to go to the
previous or to the next selection on the tape. SEEK and
a negative or positive number will be displayed.
Pressing the left or right arrow multiple times will
increase the number of selections to be searched up to
-5 or +5. If -5 or +5 is shown on the display the
cassette tape player will fast forward or rewind through
the four selections and stop at the ®fth selection.
To scan cassette tape selections, press and hold one of
the SEEK arrows for two seconds until SCN appears
on the display. You will hear a beep. The tape will go to
the next selection, play for a few seconds, then go on
to the next selection. The cassette tape will only
scan forward. Press one of the SEEK arrows again to
stop scanning.
BAND:Press this button to listen to the radio when a
cassette tape or CD is playing.
CD TAPE:Press this button to play a cassette tape or
a CD when listening to the radio.
Z(Eject):Press this button to eject a tape.
3-70
Page 179 of 380
Cassette Tape Messages
If an error message appears while trying to play a
cassette tape, it could be for one of the following
reasons:
·TIGHT TAPE:The tape is tight and the player can't
turn the tape hubs. Remove the tape. Hold the tape
with the open end down and try to turn the right
hub counterclockwise with a pencil. Turn the tape
over and repeat. If the hubs do not turn easily, your
tape may be damaged and should not be used in
the player. Try a new tape to make sure your player
is working properly.
·BROKEN TAPE:The tape is broken. Try a
new tape.
CLEAN PLAYER:If this message appears on the
display, the cassette tape player needs to be cleaned. It
will still play tapes, but you should clean it as soon as
possible to prevent damage to the tapes and player. See
Care of Your Cassette Tape Player on page 3-79.
If any error occurs repeatedly or if an error can not be
corrected, contact your dealership. If your radio displays
an error number, write it down and provide it to your
dealership when reporting the problem.
CD Adapter Kits
It is possible to use a portable CD player adapter kit
with your cassette tape player after activating the bypass
feature on your tape player.
To activate the bypass feature, use the following steps:
1. Turn the ignition on.
2. Turn the radio off.
3. Insert the adapter into the cassette slot.
4. Press and hold the CD TAPE button until READY is
displayed.
The override feature will remain active until the eject
button is pressed.
Playing a Compact Disc
Insert a disc partway into the slot, label side up. The
player will pull it in. The disc should begin playing. If you
want to insert a CD while the ignition or the radio is
off, ®rst press the eject button or DISP.
If you turn off the ignition or radio with a disc in the
player, it will stay in the player. When you turn on the
ignition or system, the disc will start playing where
it stopped, if it was the last selected audio source.
3-71
Page 180 of 380
The integral CD player can play the smaller 8 cm single
discs with an adapter ring. Full-size compact discs
and the smaller discs are loaded in the same manner.
If playing a CD-R the sound quality may be reduced due
to CD-R quality, the method of recording, the quality
of the music that has been recorded, and the way the
CD-R has been handled. You may experience an
increase in skipping, difficulty in ®nding tracks, and/or
difficulty in loading and ejecting. If these problems occur
try a known good CD.
Do not add paper labels to discs, they could get caught
in the CD player.
Do not play 3 inch discs without a standard adapter disc.
If an error appears on the display, see ªCompact
Disc Errorsº later in this section.
1
s(Reverse):Press and hold this pushbutton to
quickly reverse within a track. You will hear sound.
2
\(Forward):Press and hold this pushbutton
to quickly advance within a track. You will hear sound.
4 RDM (Random):Press this pushbutton to hear
the tracks in random, rather than sequential, order.
Press RDM again to turn off random play.
DISP (Display):Press this button to see which track is
playing. Press it again within ®ve seconds to see
how long it has been playing. To change the default onthe display (track or elapsed time), press this button
until you see the display you want, then hold the button
until the display ¯ashes. The selected display will
now be the default.
©SEEK¨:Press the left SEEK arrow to go to the
start of the current track if more than eight seconds have
played. If you hold the button or press it more than
once, the player will continue moving back through the
disc.
Press the right SEEK arrow to go to the next track. If
you hold the button or press it more than once, the
player will continue moving forward through the disc.
To scan CD tracks, press and hold one of the
SEEK arrows for two seconds until SCAN appears on
the display. You will hear a beep. The disc will go to the
next track, play for a few seconds, then go on to the
next track. The disc will only scan forward. Press one of
the SEEK arrows again to stop scanning.
BAND:Press this button to listen to the radio when a
cassette tape or CD is playing.
CD TAPE:Press this button to change to playing a
cassette tape or a CD when listening to the radio.
Z(Eject):Press this button to eject a CD.
3-72
Page 184 of 380
4 RDM (Random):Press this pushbutton to enter the
random play mode. RAND will appear on the display.
While in this mode, tracks and discs will be played
in random, rather than sequential, order. Press
this pushbutton again to turn off the random feature and
return to normal operation.
6 SIDE:Press this pushbutton to select the next disc in
the magazine. Each time you press SIDE, the disc
number on the radio display will go to that of the next
available CD.
DISP (Display):Press this button to see how long the
current track has been playing. Press this button
again to display the disc and track number. To change
what is normally shown on the display (track or
elapsed time), press this button until you see the display
you want, then hold this button until the display
¯ashes and a chime is heard. While elapsed time is
showing, CD TIME will appear on the display.
©SEEK¨:Press the left arrow while playing a CD
to go back to the start of the current track if more
than eight seconds have played. If you press it more
than once, the player will continue moving backward
through the disc.
Press the right arrow and it will go to the next track on
the disc. If you press it more than once, the player
will continue moving forward through the disc.When you press the left SEEK arrow for two seconds
you will hear a beep. The disc will play the ®rst few
seconds of each track on each disc. DISC SCAN will
appear on the display. Press the left SEEK arrow again
to stop scanning.
BAND:Press this button to return to listening to the
radio while a CD is playing.
CD or CD TAPE:Press this button to play a CD if you
have a magazine loaded in the changer when listening
to the radio. You can also press this button to switch
between a cassette tape, CD or the CD changer
if all three are loaded.
Compact Disc Errors
E (Error):If this message and a number appear on the
display, an error has occurred.
If the error occurred while trying to play a CD in the
compact disc player or changer, the following conditions
may have caused the error:
·E30:You're driving on a very rough road. When the
road becomes smoother, the disc should play.
·E30:The disc is dirty, scratched, wet or upside
down.
·E30:The air is very humid. If so, wait about an
hour and try again.
3-76