replacement BUICK LESABRE 2004 User Guide
[x] Cancel search | Manufacturer: BUICK, Model Year: 2004, Model line: LESABRE, Model: BUICK LESABRE 2004Pages: 392, PDF Size: 4.3 MB
Page 239 of 392
Service............................................................5-3
Doing Your Own Service Work.........................5-3
Adding Equipment to the Outside of Your
Vehicle......................................................5-4
Fuel................................................................5-4
Gasoline Octane............................................5-4
Gasoline Specications....................................5-5
California Fuel...............................................5-5
Additives.......................................................5-6
Fuels in Foreign Countries...............................5-6
Filling Your Tank............................................5-7
Filling a Portable Fuel Container.......................5-9
Checking Things Under the Hood....................5-10
Hood Release..............................................5-11
Engine Compartment Overview.......................5-12
Engine Oil...................................................5-13
Engine Air Cleaner/Filter................................5-18
Automatic Transaxle Fluid..............................5-21
Engine Coolant.............................................5-23
Radiator Pressure Cap..................................5-26
Engine Overheating.......................................5-26
Cooling System............................................5-28
Power Steering Fluid.....................................5-35Windshield Washer Fluid................................5-36
Brakes........................................................5-37
Battery........................................................5-40
Jump Starting...............................................5-42
Headlamp Aiming...........................................5-47
Headlamp Horizontal Aiming...........................5-49
Headlamp Vertical Aiming..............................5-50
Bulb Replacement..........................................5-52
Halogen Bulbs..............................................5-52
Headlamps..................................................5-52
Front Turn Signal Lamps...............................5-53
Taillamps, Turn Signal, and Stoplamps............5-54
Taillamps and Back-Up Lamps.......................5-55
Replacement Bulbs.......................................5-56
Windshield Wiper Blade Replacement..............5-57
Tires..............................................................5-58
Ination - Tire Pressure.................................5-65
Check Tire Pressure System..........................5-66
Tire Inspection and Rotation...........................5-67
When It Is Time for New Tires.......................5-68
Buying New Tires.........................................5-69
Uniform Tire Quality Grading..........................5-70
Wheel Alignment and Tire Balance..................5-71
Section 5 Service and Appearance Care
5-1
Page 240 of 392
Wheel Replacement......................................5-71
Tire Chains..................................................5-72
If a Tire Goes Flat........................................5-73
Changing a Flat Tire.....................................5-74
Compact Spare Tire......................................5-83
Appearance Care............................................5-83
Cleaning the Inside of Your Vehicle.................5-84
Care of Safety Belts......................................5-86
Weatherstrips...............................................5-87
Cleaning the Outside of Your Vehicle..............5-87
Sheet Metal Damage.....................................5-89
Finish Damage.............................................5-89
Underbody Maintenance................................5-89
Chemical Paint Spotting.................................5-89
Vehicle Care/Appearance Materials..................5-90Vehicle Identication......................................5-91
Vehicle Identication Number (VIN).................5-91
Service Parts Identication Label.....................5-91
Electrical System............................................5-91
Add-On Electrical Equipment..........................5-91
Power Windows and Other Power Options.......5-92
Fuses and Circuit Breakers............................5-92
Removing the Rear Seat Cushion...................5-95
Capacities and Specications..........................5-99
Normal Maintenance Replacement Parts.........5-100
Section 5 Service and Appearance Care
5-2
Page 241 of 392
Service
Your dealer knows your vehicle best and wants you to
be happy with it. We hope you will go to your dealer
for all your service needs. You will get genuine GM parts
and GM-trained and supported service people.
We hope you will want to keep your GM vehicle all GM.
Genuine GM parts have one of these marks:
Doing Your Own Service Work
If you want to do some of your own service work, you
will want to use the proper service manual. It tells
you much more about how to service your vehicle than
this manual can. To order the proper service manual,
seeService Publications Ordering Information on
page 7-11.
Your vehicle has an air bag system. Before attempting
to do your own service work, seeServicing Your Air
Bag-Equipped Vehicle on page 1-56.
You should keep a record with all parts receipts and list
the mileage and the date of any service work you
perform. SeePart E: Maintenance Record on page 6-24.
{CAUTION:
You can be injured and your vehicle could be
damaged if you try to do service work on a
vehicle without knowing enough about it.
Be sure you have sufficient knowledge,
experience, the proper replacement parts
and tools before you attempt any vehicle
maintenance task.
CAUTION: (Continued)
5-3
Page 278 of 392
Replacing Brake System Parts
The braking system on a vehicle is complex. Its many
parts have to be of top quality and work well together if
the vehicle is to have really good braking. Your
vehicle was designed and tested with top-quality GM
brake parts. When you replace parts of your braking
system — for example, when your brake linings
wear down and you need new ones put in — be sure
you get new approved GM replacement parts. If you do
not, your brakes may no longer work properly. For
example, if someone puts in brake linings that are wrong
for your vehicle, the balance between your front and
rear brakes can change — for the worse. The braking
performance you have come to expect can change
in many other ways if someone puts in the wrong
replacement brake parts.
Battery
Your new vehicle comes with a maintenance free
ACDelco®battery. When it is time for a new battery, get
one that has the replacement number shown on the
original battery’s label. We recommend an
ACDelco
®battery.Warning:Battery posts, terminals and related
accessories contain lead and lead compounds,
chemicals known to the State of California to cause
cancer and reproductive harm. Wash hands after
handling.
The battery is located under the rear seat cushion. To
access the battery, seeRemoving the Rear Seat
Cushion on page 5-95. You do not need to access the
battery to jump start your vehicle. SeeJump Starting
on page 5-42.
{CAUTION:
A battery that is not properly vented can let
sulfuric acid fumes into the area under the rear
seat cushion. These fumes can damage your
rear seat safety belt systems. You may not be
able to see this damage, and the safety belts
might not provide the protection needed in a
crash. If a replacement battery is ever needed,
it must be vented in the same manner as the
original battery. Always make sure that the
vent hose is properly reattached before
reinstalling the seat cushion.
5-40
Page 290 of 392
Bulb Replacement
For the type of bulb to use, seeReplacement Bulbs on
page 5-56.
For any bulb changing procedure not listed in this
section, contact your dealer.
Halogen Bulbs
{CAUTION:
Halogen bulbs have pressurized gas inside
and can burst if you drop or scratch the bulb.
You or others could be injured. Be sure to read
and follow the instructions on the bulb
package.
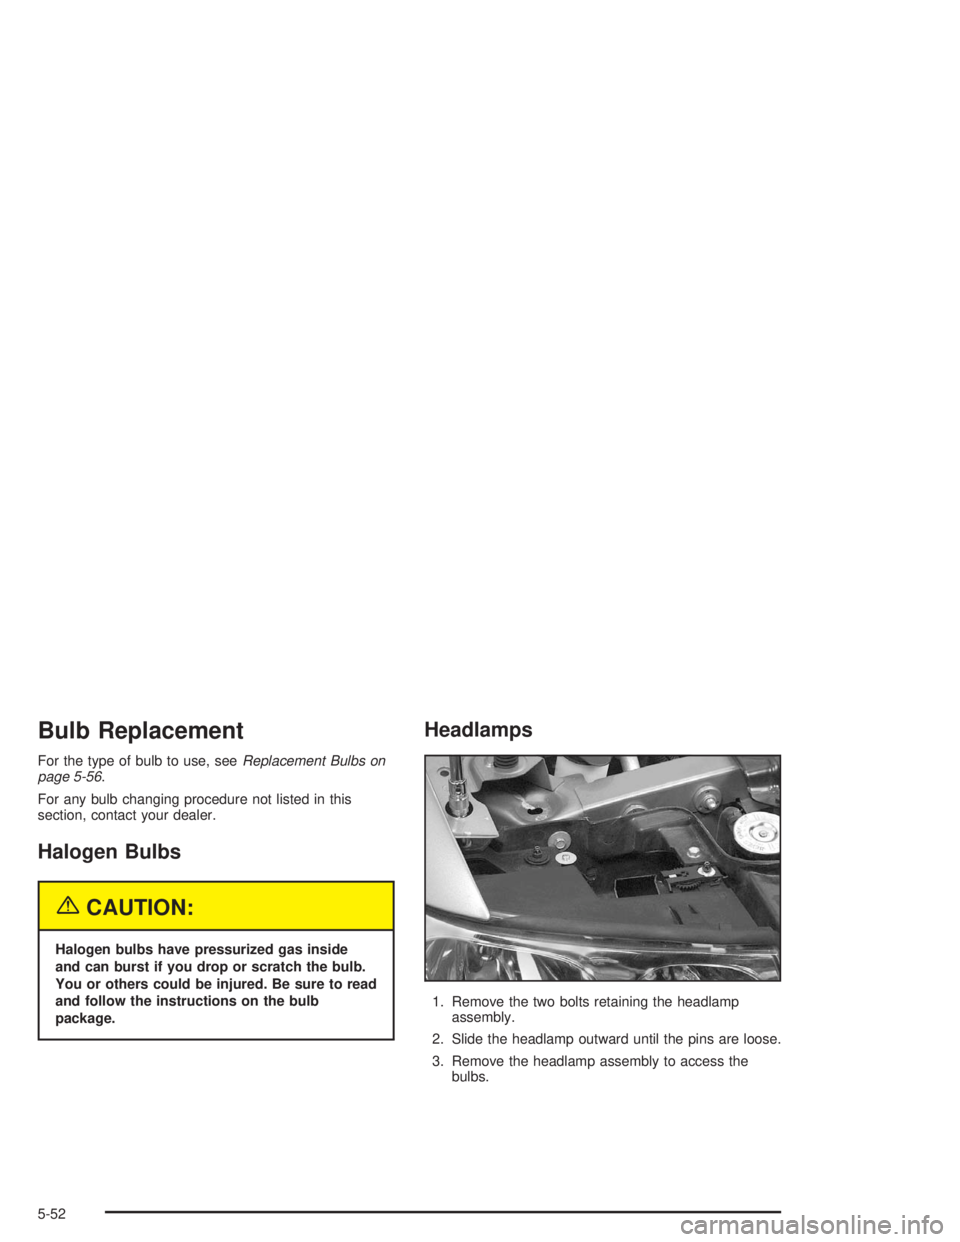
Headlamps
1. Remove the two bolts retaining the headlamp
assembly.
2. Slide the headlamp outward until the pins are loose.
3. Remove the headlamp assembly to access the
bulbs.
5-52
Page 294 of 392
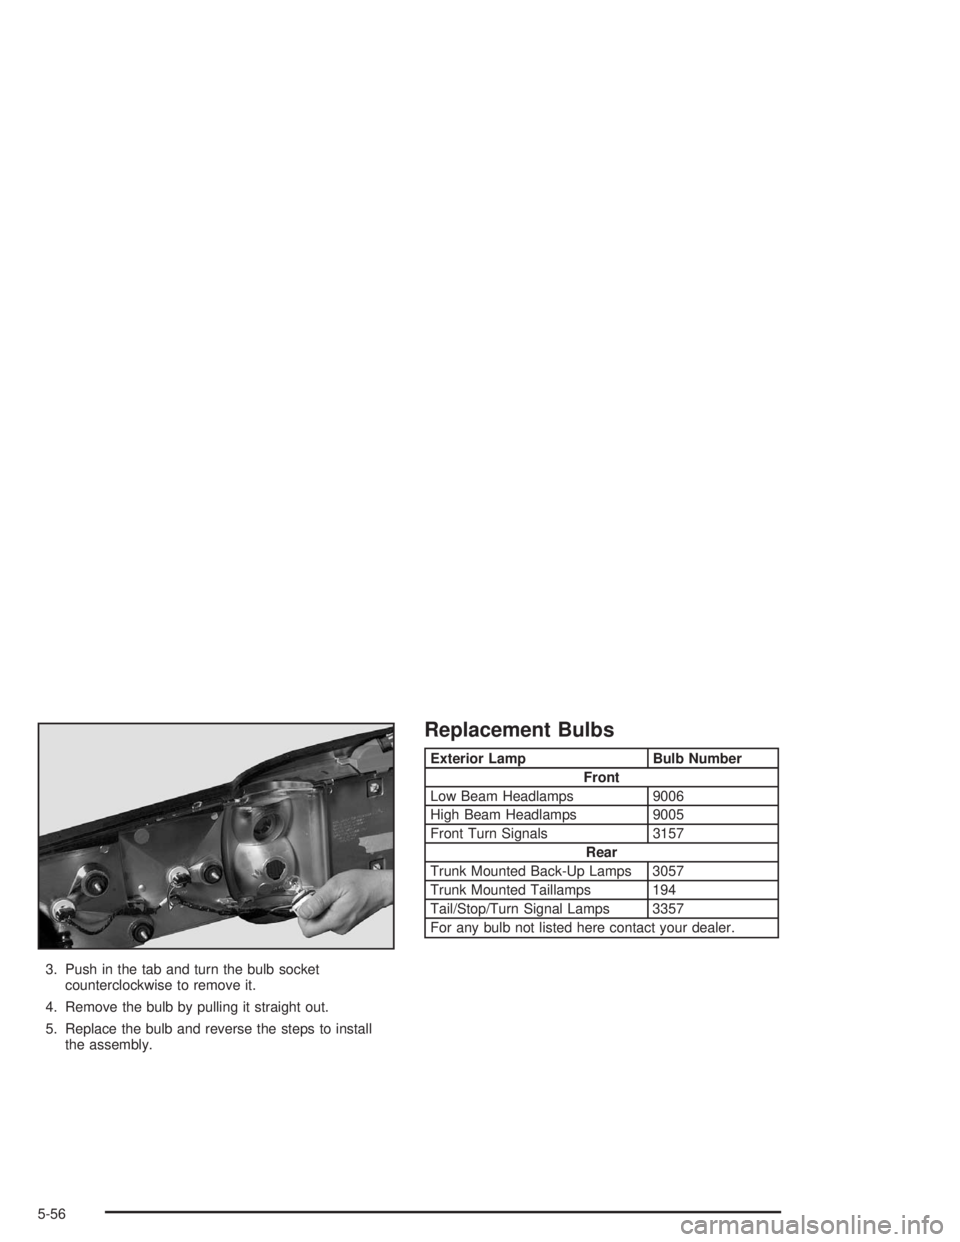
3. Push in the tab and turn the bulb socket
counterclockwise to remove it.
4. Remove the bulb by pulling it straight out.
5. Replace the bulb and reverse the steps to install
the assembly.
Replacement Bulbs
Exterior Lamp Bulb Number
Front
Low Beam Headlamps 9006
High Beam Headlamps 9005
Front Turn Signals 3157
Rear
Trunk Mounted Back-Up Lamps 3057
Trunk Mounted Taillamps 194
Tail/Stop/Turn Signal Lamps 3357
For any bulb not listed here contact your dealer.
5-56
Page 295 of 392
Windshield Wiper Blade
Replacement
Windshield wiper blades should be inspected at least
twice a year for wear or cracking. See “Wiper Blade
Check” underPart B: Owner Checks and Services on
page 6-17for more information.
Replacement blades come in different types and are
removed in different ways.
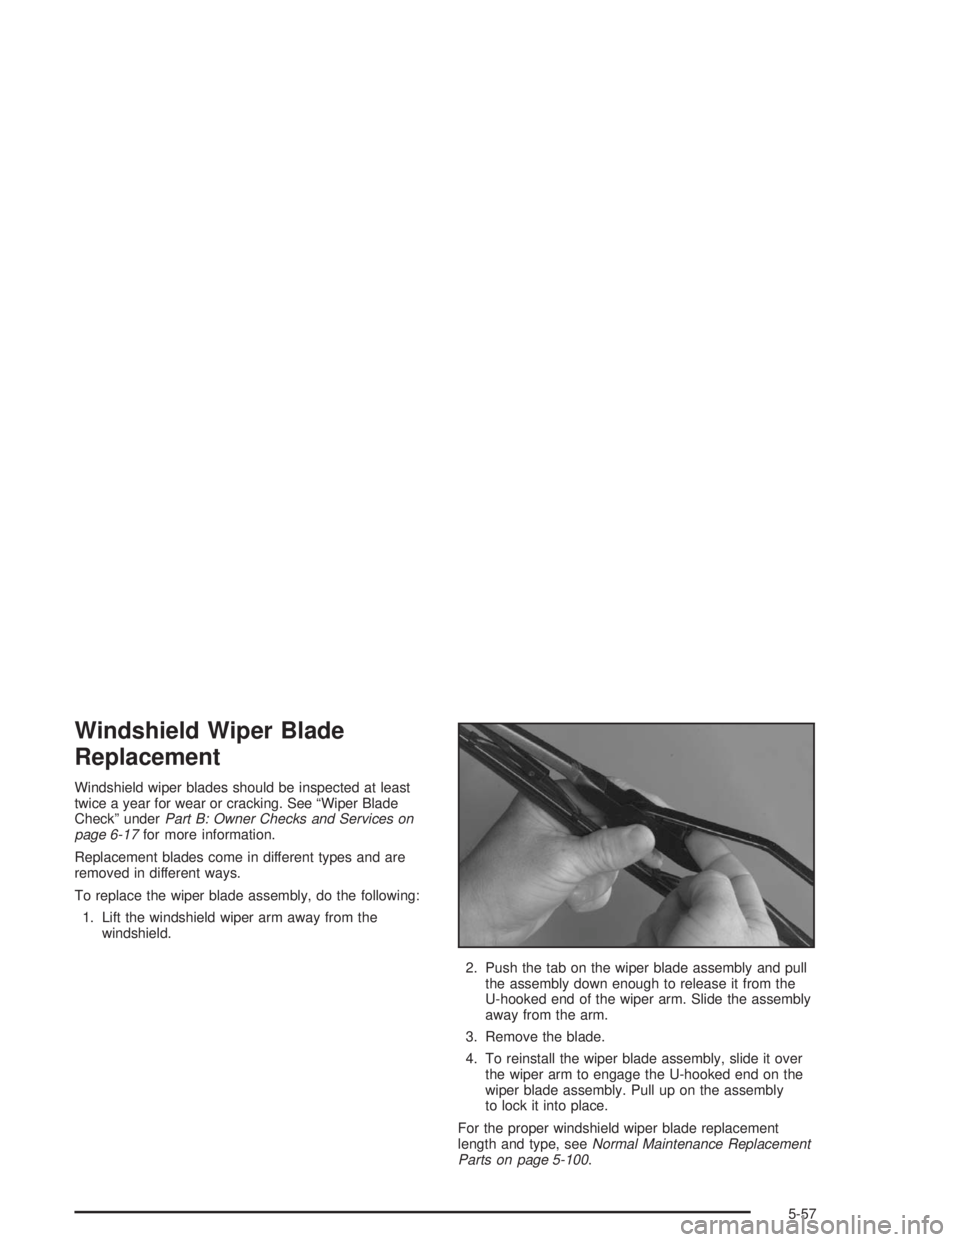
To replace the wiper blade assembly, do the following:
1. Lift the windshield wiper arm away from the
windshield.
2. Push the tab on the wiper blade assembly and pull
the assembly down enough to release it from the
U-hooked end of the wiper arm. Slide the assembly
away from the arm.
3. Remove the blade.
4. To reinstall the wiper blade assembly, slide it over
the wiper arm to engage the U-hooked end on the
wiper blade assembly. Pull up on the assembly
to lock it into place.
For the proper windshield wiper blade replacement
length and type, seeNormal Maintenance Replacement
Parts on page 5-100.
5-57
Page 305 of 392
To reset (calibrate) the system:
1. Turn the ignition switch to RUN.
2. Press the GAGE INFO button on the DIC until TIRE
PRESSURE appears on the display.
3. Press and hold the DIC RESET button for about
ve seconds. After ve seconds, the display will
show TIRE PRESSURE RESET. If TIRE
PRESSURE RESET does not appear in the display
after about ve seconds repeat the procedure. If
it does not work after two tries, see your dealer for
service. After you release the DIC RESET button,
TIRE PRESSURE NORMAL will appear in the
display.
The system completes the calibration process during
driving. Calibration time can take 45 to 90 minutes,
depending on your driving habits. After the system
has been calibrated, the system will alert the driver
that a tire is low, up to a maximum speed of 65 mph
(105 km/h).Tire Inspection and Rotation
Tires should be rotated every 5,000 to 8,000 miles
(8 000 to 13 000 km).
Any time you notice unusual wear rotate your tires as
soon as possible and check wheel alignment. Also
check for damaged tires or wheels. SeeWhen It Is Time
for New Tires on page 5-68andWheel Replacement
on page 5-71for more information.
The purpose of regular rotation is to achieve more
uniform wear for all tires on the vehicle. The rst rotation
is the most important. SeePart A: Scheduled
Maintenance Services on page 6-4, for scheduled
rotation intervals.
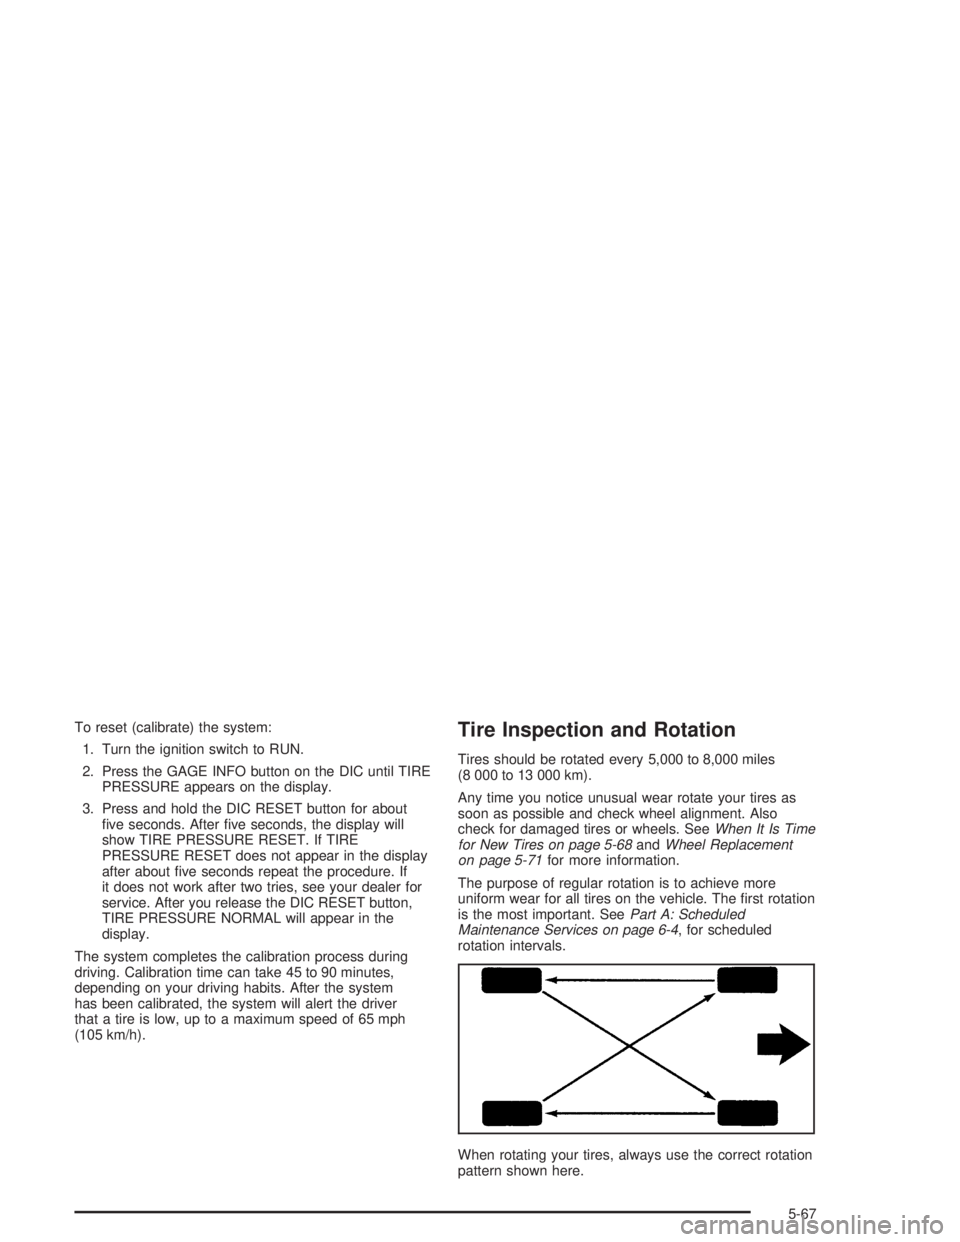
When rotating your tires, always use the correct rotation
pattern shown here.
5-67
Page 309 of 392
Temperature – A, B, C
The temperature grades are A (the highest), B, and C,
representing the tire’s resistance to the generation
of heat and its ability to dissipate heat when tested
under controlled conditions on a specied indoor
laboratory test wheel. Sustained high temperature can
cause the material of the tire to degenerate and
reduce tire life, and excessive temperature can lead to
sudden tire failure. The grade C corresponds to a
level of performance which all passenger car tires must
meet under the Federal Motor Vehicle Safety Standard
No. 109. Grades B and A represent higher levels of
performance on the laboratory test wheel than the
minimum required by law.
Warning: The temperature grade for this tire is
established for a tire that is properly inated and not
overloaded. Excessive speed, underination, or
excessive loading, either separately or in combination,
can cause heat buildup and possible tire failure.
Wheel Alignment and Tire Balance
The wheels on your vehicle were aligned and balanced
carefully at the factory to give you the longest tire life
and best overall performance.
Scheduled wheel alignment and wheel balancing are
not needed. However, if you notice unusual tire wear or
your vehicle pulling one way or the other, the alignment
may need to be reset. If you notice your vehicle
vibrating when driving on a smooth road, your wheels
may need to be rebalanced.
Wheel Replacement
Replace any wheel that is bent, cracked or badly rusted
or corroded. If wheel nuts keep coming loose, the
wheel, wheel bolts and wheel nuts should be replaced.
If the wheel leaks air, replace it (except some
aluminum wheels, which can sometimes be repaired).
See your dealer if any of these conditions exist.
Your dealer will know the kind of wheel you need.
Each new wheel should have the same load-carrying
capacity, diameter, width, offset and be mounted
the same way as the one it replaces.
5-71
Page 310 of 392
If you need to replace any of your wheels, wheel bolts
or wheel nuts, replace them only with new GM
original equipment parts. This way, you will be sure to
have the right wheel, wheel bolts and wheel nuts
for your vehicle.
{CAUTION:
Using the wrong replacement wheels, wheel
bolts or wheel nuts on your vehicle can be
dangerous. It could affect the braking and
handling of your vehicle, make your tires lose
air and make you lose control. You could have
a collision in which you or others could be
injured. Always use the correct wheel, wheel
bolts and wheel nuts for replacement.
Notice:The wrong wheel can also cause problems
with bearing life, brake cooling, speedometer or
odometer calibration, headlamp aim, bumper height,
vehicle ground clearance and tire or tire chain
clearance to the body and chassis.
SeeChanging a Flat Tire on page 5-74for more
information.
Used Replacement Wheels
{CAUTION:
Putting a used wheel on your vehicle is
dangerous. You can’t know how it’s been used
or how far it’s been driven. It could fail
suddenly and cause a crash. If you have to
replace a wheel, use a new GM original
equipment wheel.
Tire Chains
Notice:Use tire chains only where legal and only
when you must. Use only SAE Class “S” type chains
that are the proper size for your tires. Install them
on the front tires and tighten them as tightly as
possible with the ends securely fastened. Drive
slowly and follow the chain manufacturer’s
instructions. If you can hear the chains contacting
your vehicle, stop and retighten them. If the contact
continues, slow down until it stops. Driving too
fast or spinning the wheels with chains on will
damage your vehicle.
5-72