set clock BUICK LUCERNE 2006 Owner's Manual
[x] Cancel search | Manufacturer: BUICK, Model Year: 2006, Model line: LUCERNE, Model: BUICK LUCERNE 2006Pages: 416, PDF Size: 2.6 MB
Page 147 of 416
Climate Controls
Climate Control System
With this system you can control the heating, cooling,
and ventilation for your vehicle.
If your vehicle has the remote start feature and it is
activated, the climate control system will automatically
cool the vehicle if the temperature is greater than
90°F (32°C) and heat the vehicle if the temperature is
below 37°F (3°C). If the temperature is between
37°F (3°C) and 90°F (32°C), the last control setting
selected when the engine was running will be used.
Normal operation and the last setting of the climate
control system will return after the ignition key is turned
to the C (RUN) position. SeeRemote Keyless Entry
System Operation on page 2-6for more information.
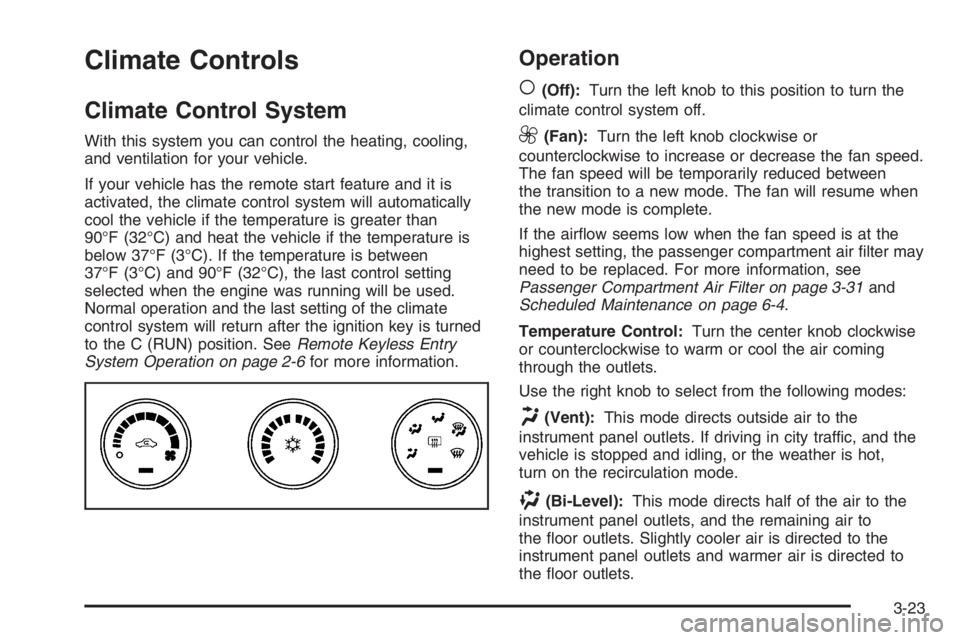
Operation
(
(Off):Turn the left knob to this position to turn the
climate control system off.
9(Fan):Turn the left knob clockwise or
counterclockwise to increase or decrease the fan speed.
The fan speed will be temporarily reduced between
the transition to a new mode. The fan will resume when
the new mode is complete.
If the air�ow seems low when the fan speed is at the
highest setting, the passenger compartment air �lter may
need to be replaced. For more information, see
Passenger Compartment Air Filter on page 3-31and
Scheduled Maintenance on page 6-4.
Temperature Control:Turn the center knob clockwise
or counterclockwise to warm or cool the air coming
through the outlets.
Use the right knob to select from the following modes:
H(Vent):This mode directs outside air to the
instrument panel outlets. If driving in city traffic, and the
vehicle is stopped and idling, or the weather is hot,
turn on the recirculation mode.
)(Bi-Level):This mode directs half of the air to the
instrument panel outlets, and the remaining air to
the �oor outlets. Slightly cooler air is directed to the
instrument panel outlets and warmer air is directed to
the �oor outlets.
3-23
Page 151 of 416
After your vehicle is started, the display will show the
interior temperature settings.
When the ENG/MET (English/metric) button on the
Driver Information Center (DIC) is pressed, the display
will show readings in Fahrenheit or Celsius. Use the
ENG/MET button to toggle between them.
AUTO
#(Automatic Air Conditioning):If the
AUTO position is selected on the fan or mode control,
the system will automatically control the air conditioning
compressor. The A/C compressor will run automatically
even at cool outside temperatures in order to
dehumidify the air. The A/C indicator light will be lit
when the system is operating automatically, even
at near freezing outside temperatures. Press the
A/C button on the fan control to turn off the A/C.
For improved window clearing performance in defog or
defrost modes, the A/C compressor will run
automatically in damp cool conditions.
h(Auto Recirculation):If the AUTO position is
selected on either the fan or mode control, the system
will automatically control the air inlet to supply fresh
outside air or recirculate the interior air to cool the car
faster. The indicator light on the recirculation button
will light whenever the system switches to recirculation.
You may force outside air by pressing the button
when the light is lit. The next time AUTO fan or mode is
selected, the air inlet will reset back to AUTO operation.
Manual Operation
9(Fan):Turn the left knob either to the left or right to
adjust the fan speed. Turning this control completely
counterclockwise will turn on the automatic fan operation.
If the air�ow seems low when the fan speed is at the
highest setting, the passenger compartment air �lter
may need to be replaced. For more information, see
Passenger Compartment Air Filter on page 3-31and
Scheduled Maintenance on page 6-4.
9(Off):Turn the left control to this position to turn the
entire climate control system off.
To change the current mode, select one of the following
positions using the right control:
F(Vent):Turn the control to this mode to direct air to
the instrument panel outlets.
*(Bi-Level):Turn the control to this mode to direct
approximately half of the air to the instrument panel
outlets and most of the remaining air to the �oor outlets.
In automatic operation, cooler air is directed to the
upper outlets and warmer air to the �oor outlets.
3-27
Page 199 of 416
Added sound equipment may interfere with the
operation of your vehicle’s engine, radio, or other
systems, and even damage them. Your vehicle’s
systems may interfere with the operation of sound
equipment that has been added.
Notice:The chime signals related to safety belts,
parking brake, and other functions of your vehicle
operate through the radio/entertainment system.
If that equipment is replaced or additional equipment
is added to your vehicle, the chimes may not
work. Make sure that replacement or additional
equipment is compatible with your vehicle before
installing it. SeeAccessories and Modifications
on page 5-3.
Your vehicle has a feature called Retained Accessory
Power (RAP). With RAP, the audio system can be
played even after the ignition is turned off. SeeRetained
Accessory Power (RAP) on page 2-22for more
information.Setting the Time
(Without Date Display)
If your vehicle has a base AM/FM radio with a single
CD player and preset buttons numbered one through
six, the radio will have a clock button for setting the time.
You can set the time by following these steps:
1. Press the clock button until the hour numbers begin
�ashing on the display. Press the clock button a
second time and the minute numbers will begin
�ashing on the display.
2. While either the hour or the minute numbers are
�ashing, rotate the tune knob clockwise or
counterclockwise to increase or decrease the time.
Instead of using the tune knob, you can also
press the SEEK, FWD, or REV buttons to adjust
the time.
3. Press the clock button again until the clock
display stops �ashing to set the currently
displayed time; otherwise, the �ashing will stop
after �ve seconds and the current time displayed
will be automatically set.
3-75
Page 200 of 416
Setting the Time
(With Date Display)
If your vehicle has a radio with a single CD player,
the radio will have a clock button for setting the time and
date. Press the clock button and the HR, MIN, MM,
DD, YYYY (hour, minute, month, day, and year)
will appear on the display. Press the pushbutton located
under any one of the labels that you want to change.
Every time the pushbutton is pressed again, the time or
the date if selected, will increase by one. Another
way to increase the time or date, is to press the right
SEEK arrow or FWD button. To decrease, press the left
SEEK arrow or REV button. You can also rotate the
tune knob to adjust the selected setting.If your vehicle has a radio with a six-disc CD player,
the radio will have a MENU button instead of the clock
button to set the time and date. Press the MENU
button. Once the clock option is displayed, press the
pushbutton located under that label. The HR, MIN, MM,
DD, YYYY will appear on the display. To change the
time or date, follow the instructions given earlier in
this section.
To change the time default setting from 12 hour to
24 hour or to change the date default setting from
month/day/year to day/month/year, press the clock
button and then the pushbutton located under the
forward arrow label. Once the time 12H and 24H, and
the date MM/DD/YYYY (month, day, and year) and
DD/MM/YYYY (day, month, and year) are displayed,
press the pushbutton located under the desired option.
Press the clock or MENU button again to apply the
selected default, or let the screen time out.
3-76
Page 201 of 416
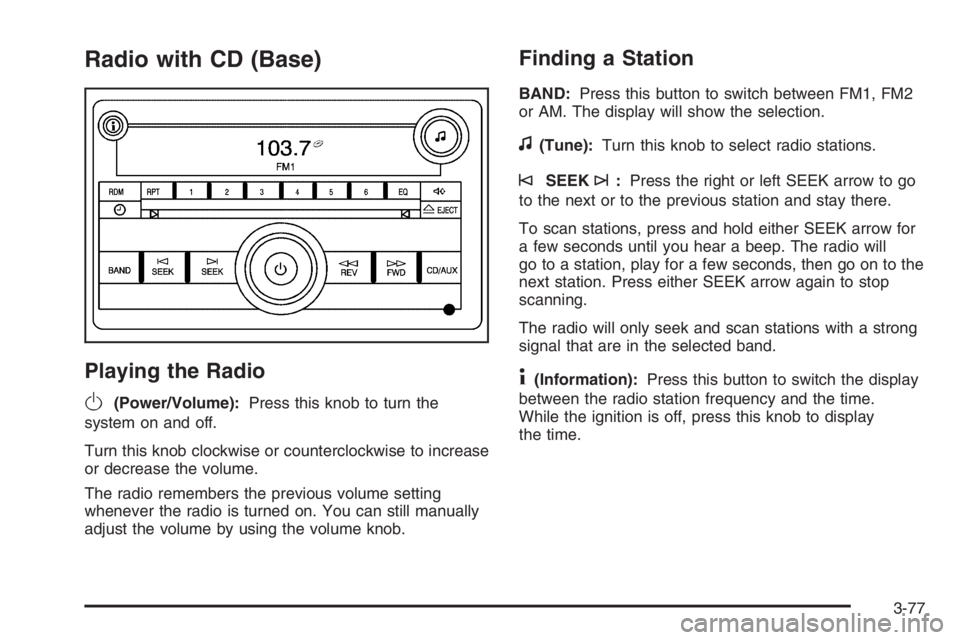
Radio with CD (Base)
Playing the Radio
O
(Power/Volume):Press this knob to turn the
system on and off.
Turn this knob clockwise or counterclockwise to increase
or decrease the volume.
The radio remembers the previous volume setting
whenever the radio is turned on. You can still manually
adjust the volume by using the volume knob.
Finding a Station
BAND:Press this button to switch between FM1, FM2
or AM. The display will show the selection.
f(Tune):Turn this knob to select radio stations.
©SEEK¨:Press the right or left SEEK arrow to go
to the next or to the previous station and stay there.
To scan stations, press and hold either SEEK arrow for
a few seconds until you hear a beep. The radio will
go to a station, play for a few seconds, then go on to the
next station. Press either SEEK arrow again to stop
scanning.
The radio will only seek and scan stations with a strong
signal that are in the selected band.
4(Information):Press this button to switch the display
between the radio station frequency and the time.
While the ignition is off, press this knob to display
the time.
3-77
Page 202 of 416
Setting Preset Stations
Up to 18 stations (six FM1, six FM2, and six AM), can
be programmed on the six numbered pushbuttons,
by performing the following steps:
1. Turn the radio on.
2. Press BAND to select FM1, FM2, or AM.
3. Tune in the desired station.
4. Press and hold one of the six numbered
pushbuttons for three seconds until you hear a
beep. Whenever that pushbutton is pressed
and released, the station that was set will return.
5. Repeat the Steps 2-4 for each pushbutton.
Setting the Tone (Bass/Treble)
BASS/TREB (Bass/Treble):To adjust the bass or
treble, press the tune knob or the BASS/TREBLE
pushbutton until the desired tone control label appears
on the display. Turn the tune knob clockwise or
counterclockwise to increase or decrease the setting.
You can also adjust the setting by pressing either
the SEEK, FWD, or REV buttons. The display will show
the current bass or treble level. If a station’s frequency
is weak, or if there is static, decrease the treble.EQ (Equalization):Press this button to select preset
equalization settings.
To return to the manual mode, press the EQ button until
Manual appears on the display or start to manually
adjust the bass or treble by pressing the tune knob.
Adjusting the Speakers (Balance/Fade)
`
BAL/FADE (Balance/Fade):To adjust the
balance or fade, press this button or the tune knob until
the desired speaker control label appears on the
display. Turn the tune knob clockwise or
counterclockwise to adjust the setting. You can also
adjust the setting by pressing either the SEEK, FWD, or
REV buttons.
Radio Messages
Calibration Error:The audio system has been
calibrated for your vehicle from the factory. If Calibration
Error appears on the display, it means that the radio
has not been con�gured properly for your vehicle and it
must be returned to your dealer for service.
Loc:This message is displayed while the THEFTLOCK
®
system has locked up the radio. Take the vehicle to your
dealer for service.
If any error occurs repeatedly or if an error cannot be
corrected, contact your dealer.
3-78
Page 205 of 416
CD Messages
CHECK DISC:If this message appears on the display
and/or the CD comes out, it could be for one of the
following reasons:
It is very hot. When the temperature returns to
normal, the CD should play.
You are driving on a very rough road. When the
road becomes smoother, the CD should play.
The CD is dirty, scratched, wet, or upside down.
The air is very humid. If so, wait about an hour and
try again.
There may have been a problem while burning
the CD-R.
The label may be caught in the CD player.
If the CD is not playing correctly, for any other reason,
try a known good CD.
If any error occurs repeatedly or if an error cannot be
corrected, contact your dealer. If the radio displays
an error message, write it down and provide it to your
dealer while reporting the problem.
Using the Auxiliary Input Jack
Your radio system has an auxiliary input jack located on
the lower right side of the faceplate. This is not an audio
output; do not plug the headphone set into the front
auxiliary input jack. You can however, connect an
external audio device such as an iPod, laptop computer,
MP3 player, CD changer, or cassette tape player, etc.
to the auxiliary input jack for use as another source for
audio listening.
To use a portable audio player, connect a 3.5 mm
(1/8 inch) cable to the radio’s front auxiliary input jack.
When a device is connected, press the radio CD/AUX
button to begin playing audio from the device over the
car speakers.
O(Power/Volume):Turn this knob clockwise or
counterclockwise to increase or decrease the volume
of the portable player. You may need to do additional
volume adjustments from the portable device if the
volume does not go loud or soft enough.
BAND:Press this button to listen to the radio while a
portable audio device is playing. The portable audio device
will continue playing, so you may want to stop it or turn it off.
CD/AUX (CD/Auxiliary):Press this button to play a CD
while a portable audio device is playing. Press this button
again and the system will begin playing audio from the
connected portable audio player. If a portable audio
player is not connected, “no input device found” will be
displayed.
3-81
Page 207 of 416
Playing the Radio
O
(Power/Volume):Press this knob to turn the
system on and off.
Turn this knob clockwise or counterclockwise to increase
or decrease the volume.
Speed Compensated Volume (SCV):The radio has
Speed Compensated Volume (SCV). When SCV is
on, the radio volume automatically adjusts to
compensate for road and wind noise as you speed up
or slow down while driving. That way, the volume
level should sound about the same as you drive.
To activate SCV:
1. Set the radio volume to the desired level.
2. Press the MENU button to display the radio
setup menu.
3. Press the pushbutton under the AUTO VOLUM
label on the radio display.
4. Press the pushbutton under the desired Speed
Compensated Volume setting (OFF, Low, Med,
or High) to select the level of radio volume
compensation. The display will time out after
approximately 10 seconds. Each higher setting
allows for more radio volume compensation at
faster vehicle speeds.
Finding a Station
BAND:Press this button to switch between AM, FM, or
XM™ (if equipped). The display will show the selection.
f(Tune):Turn this knob to select radio stations.
©SEEK¨:Press the right or left SEEK arrow to go
to the next or to the previous station and stay there.
To scan stations, press and hold either SEEK arrow for a
few seconds until you hear a beep. The radio will go to a
station, play for a few seconds, then go on to the next
station. Press either SEEK arrow again to stop scanning.
The radio will only seek and scan stations with a strong
signal that are in the selected band.
4(Information) (XM™ Satellite Radio Service, MP3,
and RDS Features):Press the information button to
display additional text information related to the current
FM-RDS or XM™ station, or MP3 song. A choice of
additional information such as: Channel, Song, Artist, and
CAT may appear. Continue pressing the information
button to highlight the desired label, or press the
pushbutton positioned under any one of the labels and
the information about that label will be displayed.
While information is not available, No Info will appear on
the display.
3-83
Page 209 of 416
Setting the Tone (Bass/Treble)
BASS/MID/TREB (Bass, Midrange, or Treble):
To adjust bass, midrange, or treble, press the tune knob
until the tone control labels appear on the display.
Continue pressing to highlight the desired label, or press
the pushbutton positioned under the desired label.
Turn the tune knob clockwise or counterclockwise to
adjust the highlighted setting. You can also adjust
the highlighted setting by pressing either the SEEK,
FWD or REV button until the desired levels are obtained.
If a station’s frequency is weak, or if there is static,
decrease the treble.
To quickly adjust bass, midrange, or treble to the middle
position, press the pushbutton positioned under the
BASS, MID, or TREB label for more than two seconds.
You will hear a beep and the level will be adjusted
to the middle position.
To quickly adjust all tone and speaker controls to the
middle position, press the tune knob for more than
two seconds until you hear a beep.
EQ (Equalization):Press this button to select preset
equalization settings.
To return to the manual mode, press the EQ button until
Manual appears on the display or start to manually adjust
the bass, midrange, or treble by pressing the tune knob.
Adjusting the Speakers (Balance/Fade)
BAL/FADE (Balance/Fade):To adjust balance or
fade, press the tune knob until the speaker control labels
appear on the display. Continue pressing to highlight
the desired label, or press the pushbutton positioned
under the desired label. Turn the tune knob clockwise
or counterclockwise to adjust the highlighted setting.
You can also adjust the highlighted setting by pressing
either the SEEK, FWD, or REV button until the
desired levels are obtained.
To quickly adjust balance or fade to the middle position,
press the pushbutton positioned under the BAL or
FADE label for more than two seconds. You will hear
a beep and the level will be adjusted to the middle
position.
To quickly adjust all speaker and tone controls to the
middle position, press the tune knob for more than
two seconds until you hear a beep.
3-85
Page 222 of 416
Using the Auxiliary Input Jack
Your radio system has an auxiliary input jack located on
the lower right side of the faceplate. This is not an audio
output; do not plug the headphone set into the front
auxiliary input jack. You can however, connect an
external audio device such as an iPod, laptop computer,
MP3 player, CD changer, or cassette tape player, etc.
to the auxiliary input jack for use as another source for
audio listening.
To use a portable audio player, connect a 3.5 mm
(1/8 inch) cable to the radio’s front auxiliary input jack.
When a device is connected, press the radio CD/AUX
button to begin playing audio from the device over the
car speakers.
O(Power/Volume):Turn this knob clockwise or
counterclockwise to increase or decrease the volume of
the portable player. You may need to do additional
volume adjustments from the portable device if
the volume does not go loud or soft enough.
BAND:Press this button to listen to the radio while a
portable audio device is playing. The portable audio device
will continue playing, so you may want to stop it or turn it off.
CD/AUX (CD/Auxiliary):Press this button to play a CD
while a portable audio device is playing. Press this button
again and the system will begin playing audio from the
connected portable audio player. If a portable audio player
is not connected, “no input device found” will be displayed.
Navigation/Radio System
Your vehicle may have a navigation radio system.
The navigation system has built-in features intended to
minimize driver distraction. Technology alone, no
matter how advanced, can never replace your own
judgment. See the navigation system manual for some
tips to help you reduce distractions while driving.
Theft-Deterrent Feature
THEFTLOCK®is designed to discourage theft of your
vehicle’s radio. It works by using a secret code to
disable all radio functions whenever battery power is
removed and the radio is placed in a different vehicle.
This feature requires no user input to be activated.
The radio is automatically armed when it is put into the
vehicle for the �rst time.
If THEFTLOCK
®is activated, the radio will not operate
if stolen. The radio will display LOCKED. If this occurs,
the radio will need to be returned to your GM dealer.
3-98