Key lock BUICK LUCERNE 2010 Owner's Guide
[x] Cancel search | Manufacturer: BUICK, Model Year: 2010, Model line: LUCERNE, Model: BUICK LUCERNE 2010Pages: 474
Page 228 of 474

To select a setting, press the set/reset button while the
desired setting is displayed on the DIC.
REMOTE DOOR UNLOCK
This feature allows you to select the type of feedback
you will receive when unlocking the vehicle with the
Remote Keyless Entry (RKE) transmitter. You will not
receive feedback when unlocking the vehicle with the
RKE transmitter if the doors are open. SeeRemote
Keyless Entry (RKE) System Operation
on page 3‑4for more information.
Press the customization button until REMOTE DOOR
UNLOCK appears on the DIC display. Press the set/
reset button once to access the settings for this feature.
Then press the customization button to scroll through
the following settings:
LIGHTS OFF: The exterior lamps will not flash when
you press the unlock button on the RKE transmitter.
LIGHTS ON (default): The exterior lamps will flash
when you press the unlock button on the RKE
transmitter.
NO CHANGE: No change will be made to this feature.
The current setting will remain.
To select a setting, press the set/reset button while the
desired setting is displayed on the DIC.
DELAY DOOR LOCK
This feature allows you to select whether or not the
locking of the vehicle's doors will be delayed. When
locking the doors with the power door lock switch and a
door is open, this feature will delay locking the doors
until five seconds after the last door is closed. You will
hear three chimes to signal that the delayed locking
feature is in use. The key must be out of the ignition for
this feature to work. You can temporarily override
delayed locking by pressing the power door lock switch
twice or the lock button on the RKE transmitter twice.
See Delayed Locking
on page 3‑10for more
information.
Press the customization button until DELAY DOOR
LOCK appears on the DIC display. Press the set/reset
button once to access the settings for this feature. Then
press the customization button to scroll through the
following settings:
OFF: There will be no delayed locking of the vehicle's
doors.
ON (default): The doors will not lock until five seconds
after the last door is closed.
NO CHANGE: No change will be made to this feature.
The current setting will remain.
To select a setting, press the set/reset button while the
desired setting is displayed on the DIC.
4-68
Page 229 of 474

EXIT LIGHTING
This feature allows you to select the amount of time you
want the exterior lamps to remain on when it is dark
enough outside. This happens after the key is turned
from ON/RUN to LOCK/OFF.
Press the customization button until EXIT LIGHTING
appears on the DIC display. Press the set/reset button
once to access the settings for this feature. Then press
the customization button to scroll through the following
settings:
OFF:The exterior lamps will not turn on.
30 SECONDS (default): The exterior lamps will stay on
for 30 seconds.
1 MINUTE: The exterior lamps will stay on for
one minute.
2 MINUTES: The exterior lamps will stay on for
two minutes.
NO CHANGE: No change will be made to this feature.
The current setting will remain.
To select a setting, press the set/reset button while the
desired setting is displayed on the DIC.
APPROACH LIGHTING
This feature allows you to select whether or not to have
the exterior lights turn on briefly during low light periods
after unlocking the vehicle using the Remote Keyless
Entry (RKE) transmitter.
Press the customization button until APPROACH
LIGHTING appears on the DIC display. Press the set/
reset button once to access the settings for this feature.
Then press the customization button to scroll through
the following settings:
OFF: The exterior lights will not turn on when you
unlock the vehicle with the RKE transmitter.
ON (default): If it is dark enough outside, the exterior
lights will turn on briefly when you unlock the vehicle
with the RKE transmitter.
The lights will remain on for 20 seconds or until the lock
button on the RKE transmitter is pressed, or the vehicle
is no longer off. See Remote Keyless Entry (RKE)
System Operation
on page 3‑4for more information.
NO CHANGE: No change will be made to this feature.
The current setting will remain.
To select a setting, press the set/reset button while the
desired setting is displayed on the DIC.
4-69
Page 232 of 474

TELESCOPE ONLY:The steering column telescope
feature will recall.
SEAT/TILT: The driver's seat and the steering wheel tilt
feature will recall.
SEAT/TELESCOPE: The driver's seat and the steering
column telescope feature will recall.
TILT/TELESCOPE: The steering wheel tilt and steering
column telescope features will recall.
ALL (default): The driver's seat and the steering wheel
tilt and steering column telescope features will recall,
if your vehicle has this option.
NO CHANGE: No change will be made to this feature.
The current setting will remain.
To select a setting, press the set/reset button while the
desired setting is displayed on the DIC.MEMORY SEAT RECALL
If your vehicle has this feature, it allows you to select
your preference for the remote memory seat recall
feature. See Memory Seat and Mirrors
on page 2‑7for more information.
Press the customization button until MEMORY SEAT
RECALL appears on the DIC display. Press the set/
reset button once to access the settings for this feature.
Then press the customization button to scroll through
the following settings:
OFF (default): No remote memory seat recall will
occur.
ON: The driver's seat and outside mirrors will
automatically move to the stored driving position when
the unlock button on the Remote Keyless Entry (RKE)
transmitter is pressed. The steering column will also
move on vehicles with the power tilt and telescopic
steering feature. See Power Tilt Wheel and Telescopic
Steering Column
on page 4‑4for more information.
See “Relearn Remote Key” underDIC Operation and
Displays
on page 4‑47for more information on
matching transmitters to driver ID numbers.
NO CHANGE: No change will be made to this feature.
The current setting will remain.
To select a setting, press the set/reset button while the
desired setting is displayed on the DIC.
4-72
Page 235 of 474

Setting the Clock
Single CD (MP3) Player
To set the time and date:1. Turn the ignition key to ACC/ACCESSORY or ON/RUN. Press
Oto turn the radio on.
2. Press
Hand the HR, MIN, MM, DD, YYYY
(hour, minute, month, day, and year) displays.
3. Press the softkey located below any one of the tabs that you want to change.
4. To increase the time or date, do one of the following:
.Press the softkey located below the
selected tab.
.Press¨SEEK, or\FWD.
.Turnfclockwise.
5. To decrease the time or date, do one of the following:
.Press©SEEK orsREV.
.Turnfcounterclockwise. The date does not automatically display. To see the
date press
Hwhile the radio is on. The date with
display times out after a few seconds and goes back to
the normal radio and time display.
To change the time default setting from 12 hour to
24 hour or to change the date default setting from
month/day/year to day/month/year:
1. Press
Hand then the softkey located below the
forward arrow label. Once the time 12H and 24H,
and the date MM/DD/YYYY (month, day, and year)
and DD/MM/YYYY (day, month, and year) displays.
2. Press the softkey located below the desired option.
3. Press
Hagain to apply the selected default, or let
the screen time out.
4-75
Page 236 of 474

Six-Disc CD (MP3) Player
To set the time and date:1. Turn the ignition key to ACC/ACCESSORY or ON/ RUN. Press
Oto turn the radio on.
2. Press MENU.
3. Press the softkey below the
Htab. The HR, MIN,
MM, DD, YYYY displays.
4. Press the softkey below any one of the tabs you want to change.
5. To increase the time or date, do one of the following:
.Press the softkey located below the
selected tab.
.Press¨SEEK, or\FWD.
.Turnfclockwise.
6. To decrease the time or date, do one of the following:
.Press©SEEK orsREV.
.Turnfcounterclockwise. The date does not automatically display. To see the
date press MENU and then softkey below the
Htab
while the radio is on. The date with display times out
after a few seconds and goes back to the normal radio
and time display.
To change the time default setting from 12 hour to
24 hour or to change the date default setting from
month/day/year to day/month/year:
1. Press MENU, and then the softkey below the
Htab. The HR, MIN, MM, DD, YYYY
displays.
2. Press the softkey below the forward arrow tab. The time 12H and 24H, and the date MM/DD/YYYY
(month, day, and year) and DD/MM/YYYY (day,
month, and year) displays.
3. Press the softkey located below the desired option.
4. Press MENU again to apply the selected default, or let the screen time out.
4-76
Page 253 of 474
XM Theftlocked:The XM receiver in the vehicle could
have previously been in another vehicle. For security
purposes, XM receivers cannot be swapped between
vehicles. If this message is received after having the
vehicle serviced, check with your dealer.
XM Radio ID: If tuned to channel 0, this message
alternates with the XM™ Radio 8 digit radio ID label.
This label is needed to activate the service.
Unknown: If this message is received when tuned to
channel 0, there could be a receiver fault. Consult with
your dealer.
Check Antenna: If this message does not clear within
a short period of time, the receiver or antenna could
have a fault. Consult with your dealer.
Check XM Receivr: If this message does not clear
within a short period of time, the receiver could have a
fault. Consult with your dealer.
XM Not Available: If this message does not clear
within a short period of time, the receiver could have a
fault. Consult with your dealer.Navigation/Radio System
For vehicles with a navigation radio system, see the
separate Navigation System manual.
Bluetooth®
Vehicles with a Bluetooth system can use a Bluetooth
capable cell phone with a Hands Free Profile to make
and receive phone calls. The system can be used while
the key is in ON/RUN or ACC/ACCESSORY position.
The range of the Bluetooth system can be up to 9.1 m
(30 ft). Not all phones support all functions, and not all
phones are guaranteed to work with the in-vehicle
Bluetooth system. See www.gm.com/bluetooth for more
information on compatible phones.
Voice Recognition
The Bluetooth system uses voice recognition to
interpret voice commands to dial phone numbers
and name tags.
Noise: Keep interior noise levels to a minimum. The
system may not recognize voice commands if there is
too much background noise.
When to Speak: A short tone sounds after the system
responds indicating when it is waiting for a voice
command. Wait until the tone and then speak.
How to Speak: Speak clearly in a calm and natural
voice.
4-93
Page 372 of 474

TPMS Sensor Matching Process
Each TPMS sensor has a unique identification code.
Any time you rotate your vehicle's tires or replace one
or more of the TPMS sensors, the identification codes
will need to be matched to the new tire/wheel position.
The sensors are matched to the tire/wheel positions in
the following order: driver side front tire, passenger side
front tire, passenger side rear tire, and driver side rear
tire using a TPMS diagnostic tool. See your dealer/
retailer for service.
The TPMS sensors can also be matched to each tire/
wheel position by increasing or decreasing the tire's air
pressure. If increasing the tire's air pressure, do not
exceed the maximum inflation pressure indicated on the
tire's sidewall.
To decrease air-pressure out of a tire you can use the
pointed end of the valve cap, a pencil-style air pressure
gauge, or a key.
You have two minutes to match the first tire/wheel
position, and five minutes overall to match all four tire/
wheel positions. If it takes longer than two minutes, to
match the first tire and wheel, or more than five minutes
to match all four tire and wheel positions the matching
process stops and you need to start over.The TPMS sensor matching process is outlined below:
1. Set the parking brake.
2. Turn the ignition switch to ON/RUN with the engine off.
3. Press the Remote Keyless Entry (RKE) transmitter's lock and unlock buttons at the same
time for approximately five seconds. The horn
sounds twice to signal the receiver is in relearn
mode and TIRE LEARNING ACTIVE message
displays on the DIC screen.
4. Start with the driver side front tire.
5. Remove the valve cap from the valve cap stem. Activate the TPMS sensor by increasing or
decreasing the tire's air pressure for five seconds,
or until a horn chirp sounds. The horn chirp, which
may take up to 30 seconds to sound, confirms that
the sensor identification code has been matched to
this tire and wheel position.
6. Proceed to the passenger side front tire, and repeat the procedure in Step 5.
6-70
Page 418 of 474
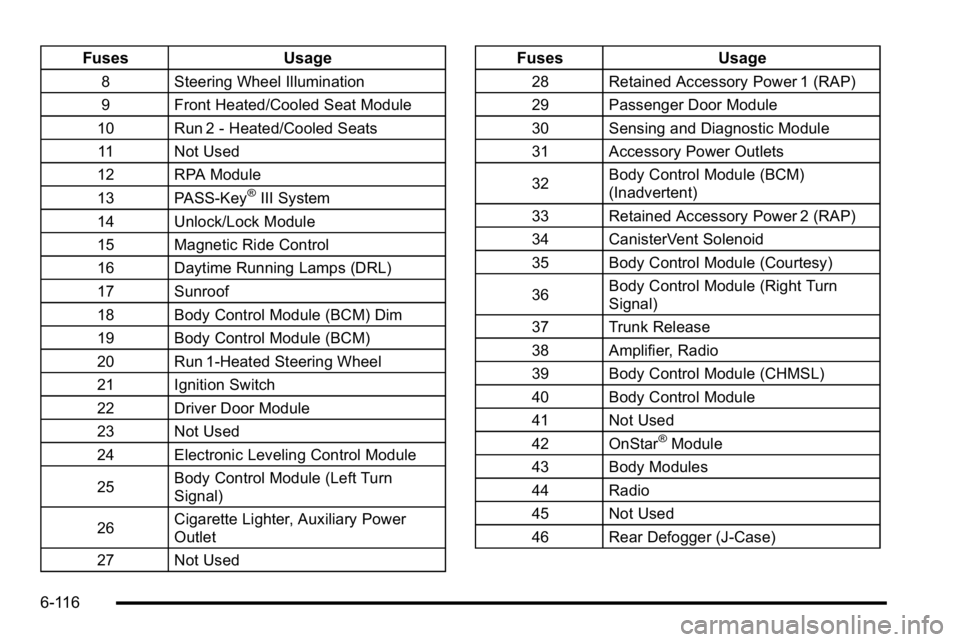
FusesUsage
8 Steering Wheel Illumination
9 Front Heated/Cooled Seat Module
10 Run 2 - Heated/Cooled Seats 11 Not Used
12 RPA Module
13 PASS-Key
®III System
14 Unlock/Lock Module
15 Magnetic Ride Control
16 Daytime Running Lamps (DRL)
17 Sunroof
18 Body Control Module (BCM) Dim
19 Body Control Module (BCM)
20 Run 1-Heated Steering Wheel
21 Ignition Switch
22 Driver Door Module
23 Not Used
24 Electronic Leveling Control Module
25 Body Control Module (Left Turn
Signal)
26 Cigarette Lighter, Auxiliary Power
Outlet
27 Not Used
Fuses Usage
28 Retained Accessory Power 1 (RAP)
29 Passenger Door Module
30 Sensing and Diagnostic Module
31 Accessory Power Outlets
32Body Control Module (BCM)
(Inadvertent)
33 Retained Accessory Power 2 (RAP)
34 CanisterVent Solenoid
35 Body Control Module (Courtesy)
36 Body Control Module (Right Turn
Signal)
37 Trunk Release
38 Amplifier, Radio
39 Body Control Module (CHMSL)
40 Body Control Module
41 Not Used
42 OnStar
®Module
43 Body Modules
44 Radio
45 Not Used
46 Rear Defogger (J-Case)
6-116
Page 426 of 474
.Fluids visual leak check (or every 12 months,
whichever occurs first). A leak in any system must
be repaired and the fluid level checked.
.Engine air cleaner filter inspection (vehicles driven
in dusty conditions only). SeeEngine Air Cleaner/
Filter on page 6‑21.
.Brake system inspection (or every 12 months,
whichever occurs first).
Maintenance II
.Perform all services described in Maintenance I.
.Steering and suspension inspection. Visual
inspection for damaged, loose, or missing parts or
signs of wear.
.Engine cooling system inspection. Visual
inspection of hoses, pipes, fittings, and clamps
and replacement, if needed.
.Windshield wiper blade inspection for wear,
cracking, or contamination and windshield and
wiper blade cleaning, if contaminated. See
Windshield and Wiper Blades
on page 6‑106. Worn
or damaged wiper blade replacement. See
Windshield Wiper Blade Replacement
on
page 6‑55.
.Body hinges and latches, key lock cylinders, and
rear compartment, hood, glove box door, and
console door hinges and latches lubrication. See
Recommended Fluids and Lubricants
on
page 7‑9. More frequent lubrication may be
required when vehicle is exposed to a corrosive
environment. Applying silicone grease on
weatherstrips with a clean cloth makes them last
longer, seal better, and not stick or squeak.
.Restraint system component check. See Checking
the Restraint Systems on page 2‑74.
.Engine air cleaner filter inspection. See Engine Air
Cleaner/Filter on page 6‑21.
.Passenger compartment air filter replacement
(or every 12 months, whichever occurs first). More
frequent replacement may be required if vehicle is
driven regularly under dusty conditions.
7-4
Page 431 of 474

Ignition Transmission Lock Check
While parked, and with the parking brake set, try to turn
the ignition to LOCK/OFF in each shift lever position.
.The ignition should turn to LOCK/OFF only when
the shift lever is in P (Park).
.The ignition key should come out only in
LOCK/OFF.
Contact your dealer if service is required.
Parking Brake and Automatic
Transmission P (Park) Mechanism
Check
{WARNING:
When you are doing this check, the vehicle could
begin to move. You or others could be injured and
property could be damaged. Make sure there is
room in front of the vehicle in case it begins to
roll. Be ready to apply the regular brake at once
should the vehicle begin to move. Park on a fairly steep hill, with the vehicle facing
downhill. Keeping your foot on the regular brake, set the
parking brake.
.To check the parking brake's holding ability:
With the engine running and the transmission in
N (Neutral), slowly remove foot pressure from the
regular brake pedal. Do this until the vehicle is held
by the parking brake only.
.To check the P (Park) mechanism's holding ability:
With the engine running, shift to P (Park). Then
release the parking brake followed by the regular
brake.
Contact your dealer if service is required.
Recommended Fluids and
Lubricants
Fluids and lubricants identified below by name, part
number, or specification can be obtained from your
dealer.
Usage Fluid/Lubricant
Engine Oil Engine oil which meets GM Standard
GM6094M and displays the American
Petroleum Institute Certified for
Gasoline Engines starburst symbol.
To determine the proper viscosity for
your vehicle's engine, see
Engine Oil
on page 6‑17.
7-9