AC Heat BUICK LUCERNE 2011 Workshop Manual
[x] Cancel search | Manufacturer: BUICK, Model Year: 2011, Model line: LUCERNE, Model: BUICK LUCERNE 2011Pages: 450, PDF Size: 3.63 MB
Page 343 of 450
Black plate (57,1)Buick Lucerne Owner Manual - 2011
Tires
Your new vehicle comes with high-quality tires
made by a leading tire manufacturer. If you ever
have questions about your tire warranty and
where to obtain service, see your vehicle
Warranty booklet for details. For additional
information refer to the tire manufacturer.
{WARNING:
.Poorly maintained and improperly used tires
are dangerous.
.Overloading your tires can cause overheating
as a result of too much flexing. You could
have a blowout and a serious accident. See
Loading the Vehicle on page 5‑18.
.Under inflated tires pose the same danger as
overloaded tires. The resulting crash could
cause serious injury. Check all tires frequently
to maintain the recommended pressure. Tire
pressure should be checked when your tires
are cold.(Continued)
WARNING: (Continued)
.Over inflated tires are more likely to be
cut, punctured, or broken by a sudden
impact—such as when you hit a pothole.
Keep tires at the recommended pressure.
.Worn or old tires can cause a crash. If your
tread is badly worn, replace them.
.Replace any tires that have been damaged by
impacts with potholes, curbs, etc.
.Improperly repaired tires can cause a crash.
Only your dealer or an authorized tire service
center should repair, replace, dismount, and
mount the tires.
.Do not spin the tires in excess of 55 km/h
(35 mph) on slippery surfaces such as snow,
mud, ice, etc. Excessive spinning may cause
the tires to explode.
6-57
Page 347 of 450
Black plate (61,1)Buick Lucerne Owner Manual - 2011
(C) Aspect Ratio:A two‐digit number that
indicates the tire height‐to‐width measurements.
For example, if the tire size aspect ratio is 60, as
shown in item C of the illustration, it would mean
that the tire's sidewall is 60 percent as high as it
is wide.
(D) Construction Code
:A letter code is used to
indicate the type of ply construction in the tire.
The letter R means radial ply construction; the
letter D means diagonal or bias ply construction;
and the letter B means belted‐bias ply
construction.
(E) Rim Diameter
:Diameter of the wheel in
inches.
(F) Service Description
:These characters
represent the load index and speed rating of the
tire. The load index represents the load carrying
capacity a tire is certified to carry. The speed
rating is the maximum speed a tire is certified to
carry a load.
Tire Terminology and Definitions
Air Pressure:The amount of air inside the tire
pressing outward on each square inch of the tire.
Air pressure is expressed in pounds per square
inch (psi) or kilopascal (kPa). Accessory Weight
:This means the combined
weight of optional accessories. Some examples of
optional accessories are, automatic transmission,
power steering, power brakes, power windows,
power seats, and air conditioning.
Aspect Ratio
:The relationship of a tire's height to
its width.
Belt
:A rubber coated layer of cords that is
located between the plies and the tread. Cords
may be made from steel or other reinforcing
materials.
Bead
:The tire bead contains steel wires wrapped
by steel cords that hold the tire onto the rim.
Bias Ply Tire
:A pneumatic tire in which the plies
are laid at alternate angles less than 90 degrees
to the centerline of the tread.
Cold Tire Pressure
:The amount of air pressure
in a tire, measured in pounds per square inch (psi)
or kilopascals (kPa) before a tire has built up heat
from driving. See Inflation - Tire Pressure
on
page 6‑64
.
Curb Weight
:The weight of a motor vehicle with
standard and optional equipment including the
maximum capacity of fuel, oil, and coolant, but
without passengers and cargo.
6-61
Page 350 of 450
Black plate (64,1)Buick Lucerne Owner Manual - 2011
Inflation - Tire Pressure
Tires need the correct amount of air pressure to
operate effectively.
Notice:Neither tire underinflation nor
overinflation is good. Underinflated tires,
or tires that do not have enough air, can
result in:
.Tire overloading and over-heating which
could lead to a blowout.
.Premature or irregular wear.
.Poor handling.
.Reduced fuel economy.
Overinflated tires, or tires that have too much
air, can result in:
.Unusual wear.
.Poor handling.
.Rough ride.
.Needless damage from road hazards. A vehicle specific Tire and Loading Information
label is attached to your vehicle. This label shows
your vehicle's original equipment tires and the
correct inflation pressures for your tires when they
are cold. The recommended cold tire inflation
pressure, shown on the label, is the minimum
amount of air pressure needed to support your
vehicle's maximum load carrying capacity.
For additional information regarding how much
weight your vehicle can carry, and an example
of the Tire and Loading Information label, see
Loading the Vehicle
on page 5‑18. How you load
your vehicle affects vehicle handling and ride
comfort. Never load your vehicle with more weight
than it was designed to carry.
When to Check
Check your tires once a month or more. Do not
forget to check the compact spare tire, it should
be at 60 psi (420 kPa). For additional information
regarding the compact spare tire, see Compact
Spare Tire
on page 6‑97.
6-64
Page 351 of 450
Black plate (65,1)Buick Lucerne Owner Manual - 2011
How to Check
Use a good quality pocket-type gauge to check
tire pressure. You cannot tell if your tires are
properly inflated simply by looking at them. Radial
tires may look properly inflated even when they
are under‐inflated. Check the tire's inflation
pressure when the tires are cold. Cold means
your vehicle has been sitting for at least three
hours or driven no more than 1 mile (1.6 km).
Remove the valve cap from the tire valve stem.
Press the tire gauge firmly onto the valve to get
a pressure measurement. If the cold tire inflation
pressure matches the recommended pressure on
the Tire and Loading Information label, no further
adjustment is necessary. If the inflation pressure
is low, add air until you reach the recommended
amount.
If you overfill the tire, release air by pushing on
the metal stem in the center of the tire valve.
Re‐check the tire pressure with the tire gauge.
Be sure to put the valve caps back on the valve
stems. They help prevent leaks by keeping out dirt
and moisture.
Tire Pressure Monitor System
The Tire Pressure Monitor System (TPMS) uses radio
and sensor technology to check tire pressure levels.
The TPMS sensors monitor the air pressure in your
vehicle's tires and transmit tire pressure readings to a
receiver located in the vehicle.
Each tire, including the spare (if provided), should be
checked monthly when cold and inflated to the inflation
pressure recommended by the vehicle manufacturer
on the vehicle placard or tire inflation pressure label.
(If your vehicle has tires of a different size than the size
indicated on the vehicle placard or tire inflation pressure
label, you should determine the proper tire inflation
pressure for those tires.)
As an added safety feature, your vehicle has been
equipped with a tire pressure monitoring system
(TPMS) that illuminates a low tire pressure telltale when
one or more of your tires is significantly under‐inflated.
Accordingly, when the low tire pressure telltale
illuminates, you should stop and check your tires
as soon as possible, and inflate them to the proper
pressure. Driving on a significantly under‐inflated tire
causes the tire to overheat and can lead to tire failure.
Under‐inflation also reduces fuel efficiency and tire
tread life, and may affect the vehicle's handling and
stopping ability.
6-65
Page 362 of 450
Black plate (76,1)Buick Lucerne Owner Manual - 2011
Traction–AA, A, B, C
The traction grades, from highest to lowest,
are AA, A, B, and C. Those grades represent
the tire's ability to stop on wet pavement as
measured under controlled conditions on
specified government test surfaces of asphalt
and concrete. A tire marked C may have poor
traction performance. Warning: The traction grade
assigned to this tire is based on straight-ahead
braking traction tests, and does not include
acceleration, cornering, hydroplaning, or peak
traction characteristics.
Temperature –A, B, C
The temperature grades are A (the highest), B,
and C, representing the tire's resistance to the
generation of heat and its ability to dissipate heat
when tested under controlled conditions on a
specified indoor laboratory test wheel. Sustained
high temperature can cause the material of the
tire to degenerate and reduce tire life, and
excessive temperature can lead to sudden tire
failure. The grade C corresponds to a level of
performance which all passenger car tires must
meet under the Federal Motor Safety Standard
No. 109. Grades B and A represent higher levels
of performance on the laboratory test wheel than the minimum required by law. Warning: The
temperature grade for this tire is established for a
tire that is properly inflated and not overloaded.
Excessive speed, underinflation, or excessive
loading, either separately or in combination, can
cause heat buildup and possible tire failure.
Wheel Alignment and Tire Balance
The tires and wheels on your vehicle were aligned
and balanced carefully at the factory to give you
the longest tire life and best overall performance.
Adjustments to wheel alignment and tire balancing will
not be necessary on a regular basis. However, if you
notice unusual tire wear or your vehicle pulling to
one side or the other, the alignment might need to be
checked. If you notice your vehicle vibrating when
driving on a smooth road, the tires and wheels might
need to be rebalanced. See your dealer for proper
diagnosis.
Wheel Replacement
Replace any wheel that is bent, cracked, or badly
rusted or corroded. If wheel nuts keep coming loose,
the wheel, wheel bolts, and wheel nuts should be
replaced. If the wheel leaks air, replace it (except some
aluminum wheels, which can sometimes be repaired).
See your dealer if any of these conditions exist.
6-76
Page 368 of 450
Black plate (82,1)Buick Lucerne Owner Manual - 2011
Using the Tire Sealant and Compressor
Kit to Temporarily Seal and Inflate a
Punctured Tire
Follow the directions closely for correct sealant usage.
When using the tire sealant and compressor kit
during cold temperatures, warm the kit in a heated
environment for five minutes. This will help to inflate the
tire faster.
If a tire goes flat, avoid further tire and wheel damage
by driving slowly to a level place. Turn on the hazard
warning flashers. SeeHazard Warning Flashers
on
page 4‑3. See
If a Tire Goes Flat
on page 6‑78for other
important safety warnings.
Do not remove any objects that have penetrated
the tire.
Always do a safety check first. See If a Tire Goes Flat
on page 6‑78. Do not remove any objects that have
penetrated the tire.
1. Remove the tire sealant and compressor kit from its storage location. See Tire Sealant and
Compressor Kit Storage on page 6‑87.
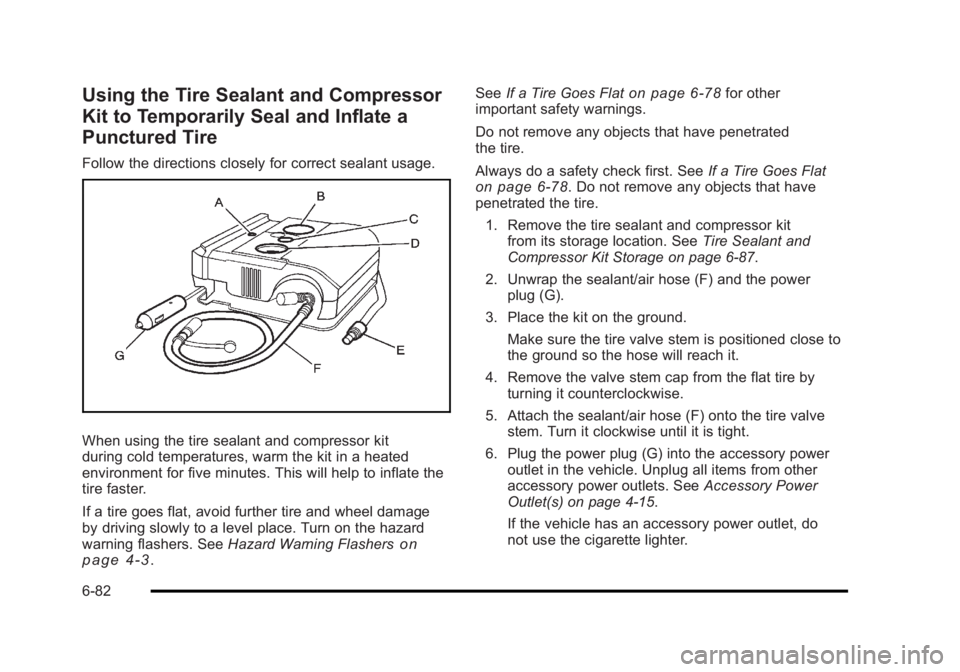
2. Unwrap the sealant/air hose (F) and the power plug (G).
3. Place the kit on the ground.
Make sure the tire valve stem is positioned close to
the ground so the hose will reach it.
4. Remove the valve stem cap from the flat tire by turning it counterclockwise.
5. Attach the sealant/air hose (F) onto the tire valve stem. Turn it clockwise until it is tight.
6. Plug the power plug (G) into the accessory power outlet in the vehicle. Unplug all items from other
accessory power outlets. See Accessory Power
Outlet(s) on page 4‑15.
If the vehicle has an accessory power outlet, do
not use the cigarette lighter.
6-82
Page 384 of 450
Black plate (98,1)Buick Lucerne Owner Manual - 2011
After installing the compact spare on the vehicle, stop
as soon as possible and make sure the spare tire is
correctly inflated. The compact spare is made to
perform well at speeds up to 65 mph (105 km/h) for
distances up to 3,000 miles (5 000 km), so you can
finish your trip and have the full-size tire repaired or
replaced at your convenience. Of course, it is best
to replace the spare with a full-size tire as soon as
possible. The spare tire will last longer and be in good
shape in case it is needed again.
Notice:When the compact spare is installed, do not
take the vehicle through an automatic car wash with
guide rails. The compact spare can get caught on
the rails which can damage the tire, wheel and other
parts of the vehicle.
Do not use the compact spare on other vehicles.
Do not mix the compact spare tire or wheel with other
wheels or tires. They will not fit. Keep the spare tire and
its wheel together.
Notice: Tire chains will not fit the compact spare.
Using them can damage the vehicle and can
damage the chains too. Do not use tire chains on
the compact spare.Appearance Care
Interior Cleaning
The interior will continue to look its best if it is cleaned
often. Although not always visible, dust and dirt can
accumulate on the upholstery. Dirt can damage
carpet, fabric, leather, and plastic surfaces. Regular
vacuuming is recommended to remove particles from
the upholstery. It is important to keep the upholstery
from becoming and remaining heavily soiled. Soils
should be removed as quickly as possible. The interior
may experience extremes of heat that could cause
stains to set rapidly.
Lighter colored interiors may require more frequent
cleaning. Use care because newspapers and garments
that transfer color to home furnishings may also transfer
color to the interior.
When cleaning the interior, only use cleaners
specifically designed for the surfaces being cleaned.
Permanent damage may result from using cleaners
on surfaces for which they were not intended. Use
glass cleaner only on glass. Remove any accidental
over-spray from other surfaces immediately. To prevent
over-spray, apply cleaner directly to the cleaning cloth.
6-98
Page 386 of 450
Black plate (100,1)Buick Lucerne Owner Manual - 2011
To clean:1. Saturate a lint-free, clean white cloth with water or club soda.
2. Wring the cloth to remove excess moisture.
3. Start on the outside edge of the soil and gently rub toward the center. Continue cleaning, using a clean
area of the cloth each time it becomes soiled.
4. Continue to gently rub the soiled area until the cleaning cloth remains clean.
5. If the soil is not completely removed, use a mild soap solution and repeat the cleaning process that
was used with plain water.
If any of the soil remains, a commercial fabric cleaner
or spot lifter may be necessary. When a commercial
upholstery cleaner or spot lifter is to be used, test a
small hidden area for colorfastness first. If the locally
cleaned area gives any impression that a ring formation
may result, clean the entire surface.
After the cleaning process has been completed, a paper
towel can be used to blot excess moisture from the
fabric or carpet.Leather
Leather, and lighter colored leather in particular, will
need more frequent cleaning to prevent the buildup of
dust, dirt, and colors transferred from other items so
that these do not become permanent stains.
To remove dust, a soft cloth dampened with water can
be used. If a more thorough cleaning is necessary, a
soft cloth dampened with a mild soap solution can be
used. Your dealer has a GM approved leather cleaner
available that provides superior cleaning performance
when used regularly on finished automotive leathers.
Allow the leather to dry naturally. Do not use heat,
steam, spot lifters or spot removers, or shoe polish on
leather. Many commercial leather cleaners and coatings
that are sold to preserve and protect leather may
permanently change the appearance and feel of the
leather and are not recommended. Do not use silicone
or wax-based products, or those containing organic
solvents to clean the vehicle's interior because they
can alter the appearance by increasing the gloss in a
non-uniform manner.
6-100
Page 389 of 450
Black plate (103,1)Buick Lucerne Owner Manual - 2011
Foreign materials such as calcium chloride and other
salts, ice melting agents, road oil and tar, tree sap, bird
droppings, chemicals from industrial chimneys, etc., can
damage the vehicle's finish if they remain on painted
surfaces. Wash the vehicle as soon as possible.
If necessary, use non-abrasive cleaners that are
marked safe for painted surfaces to remove foreign
matter.
Exterior painted surfaces are subject to aging, weather
and chemical fallout that can take their toll over a period
of years. To help keep the paint finish looking new, keep
the vehicle garaged or covered whenever possible.
Protecting Exterior Bright Metal Parts
Bright metal parts should be cleaned regularly to keep
their luster. Washing with water is all that is usually
needed. However, chrome polish may be used on
chrome or stainless steel trim, if necessary.
Use special care with aluminum trim. To avoid
damaging protective trim, never use auto or
chrome polish, steam or caustic soap to clean
aluminum. A coating of wax, rubbed to high polish,
is recommended for all bright metal parts.
Windshield and Wiper Blades
Clean the outside of the windshield with glass cleaner.
Clean the rubber blades using a lint free cloth or paper
towel soaked with windshield washer fluid or a mild
detergent. Wash the windshield thoroughly when
cleaning the blades. Bugs, road grime, sap, and a
buildup of vehicle wash/wax treatments may cause
wiper streaking. Replace the wiper blades if they are
worn or damaged.
Wipers can be damaged by:
.Extreme dusty conditions
.Sand and salt
.Heat and sun
.Snow and ice, without proper removal
6-103
Page 400 of 450
Black plate (114,1)Buick Lucerne Owner Manual - 2011
Fuses Usage
8 Steering Wheel Illumination
9 Front Heated/Cooled Seat Module
10 Run 2 - Heated/Cooled Seats 11 Not Used
12 RPA Module
13 PASS-Key
®III System
14 Unlock/Lock Module
15 Magnetic Ride Control
16 Daytime Running Lamps (DRL)
17 Sunroof
18 Body Control Module (BCM) Dim
19 Body Control Module (BCM)
20 Run 1-Heated Steering Wheel
21 Ignition Switch
22 Driver Door Module
23 Not Used
24 Electronic Leveling Control Module
25 Body Control Module (Left Turn
Signal)
26 Cigarette Lighter, Auxiliary Power
Outlet
27 Not Used
Fuses Usage
28 Retained Accessory Power 1 (RAP)
29 Passenger Door Module
30 Sensing and Diagnostic Module
31 Accessory Power Outlets
32 Body Control Module (BCM)
(Inadvertent)
33 Retained Accessory Power 2 (RAP)
34 CanisterVent Solenoid
35 Body Control Module (Courtesy)
36 Body Control Module (Right Turn
Signal)
37 Trunk Release
38 Amplifier, Radio
39 Body Control Module (CHMSL)
40 Body Control Module
41 Not Used
42 OnStar
®Module
43 Body Modules
44 Radio
45 Not Used
46 Rear Defogger (J-Case)
6-114