instrument panel BUICK PARK AVENUE 2003 Owner's Manual
[x] Cancel search | Manufacturer: BUICK, Model Year: 2003, Model line: PARK AVENUE, Model: BUICK PARK AVENUE 2003Pages: 372, PDF Size: 2.8 MB
Page 1 of 372
Seats and Restraint Systems........................... 1-1
Front Seats
............................................... 1-2
Safety Belts
.............................................. 1-6
Child Restraints
.......................................1-27
Air Bag Systems
......................................1-48
Restraint System Check
............................1-56
Features and Controls..................................... 2-1
Keys
........................................................ 2-3
Doors and Locks
....................................... 2-9
Windows
.................................................2-15
Theft-Deterrent Systems
............................2-17
Starting and Operating Your Vehicle
...........2-21
Mirrors
....................................................2-33
OnStar
žSystem
......................................2-37
HomeLinkžTransmitter
.............................2-39
Storage Areas
.........................................2-42
Sunroof
..................................................2-45
Vehicle Personalization
.............................2-46
Instrument Panel............................................. 3-1
Instrument Panel Overview
.......................... 3-2
Climate Controls
......................................3-22
Warning Lights, Gages and Indicators
.........3-29
Driver Information Center (DIC)
..................3-43
Audio System(s)
.......................................3-51Driving Your Vehicle....................................... 4-1
Your Driving, the Road, and Your Vehicle
..... 4-2
Towing
...................................................4-29
Service and Appearance Care.......................... 5-1
Service
..................................................... 5-3
Fuel
......................................................... 5-4
Checking Things Under the Hood
...............5-10
Headlamp Aiming
.....................................5-47
Bulb Replacement
....................................5-49
Windshield Wiper Blade Replacement
.........5-58
Tires
......................................................5-59
Appearance Care
.....................................5-78
Vehicle Identi®cation
.................................5-86
Electrical System
......................................5-86
Capacities and Speci®cations
.....................5-96
Normal Maintenance Replacement Parts
......5-97
Maintenance Schedule..................................... 6-1
Maintenance Schedule
................................ 6-2
Customer Assistance Information.................... 7-1
Customer Assistance Information
.................. 7-2
Reporting Safety Defects
............................ 7-8
Index................................................................ 1
2003 Buick Park Avenue Owner ManualM
Page 4 of 372
Vehicle Damage Warnings
Also, in this book you will ®nd these notices:
Notice:These mean there is something that could
damage your vehicle.
A notice will tell you about something that can damage
your vehicle. Many times, this damage would not be
covered by your warranty, and it could be costly. But the
notice will tell you what to do to help avoid the
damage.
When you read other manuals, you might see
CAUTION and NOTICE warnings in different colors or in
different words.
You'll also see warning labels on your vehicle. They use
the same words, CAUTION or NOTICE.
Vehicle Symbols
Your vehicle has components and labels that use
symbols instead of text. Symbols, used on your vehicle,
are shown along with the text describing the operation
or information relating to a speci®c component, control,
message, gage or indicator.
If you need help ®guring out a speci®c name of a
component, gage or indicator, reference the
following topics:
·Seats and Restraint Systems in Section 1
·Features and Controls in Section 2
·Instrument Panel Overview in Section 3
·Climate Controls in Section 3
·Warning Lights, Gages and Indicators in Section 3
·Audio System(s) in Section 3
·Engine Compartment Overview in Section 5
iv
Page 9 of 372
Power Lumbar
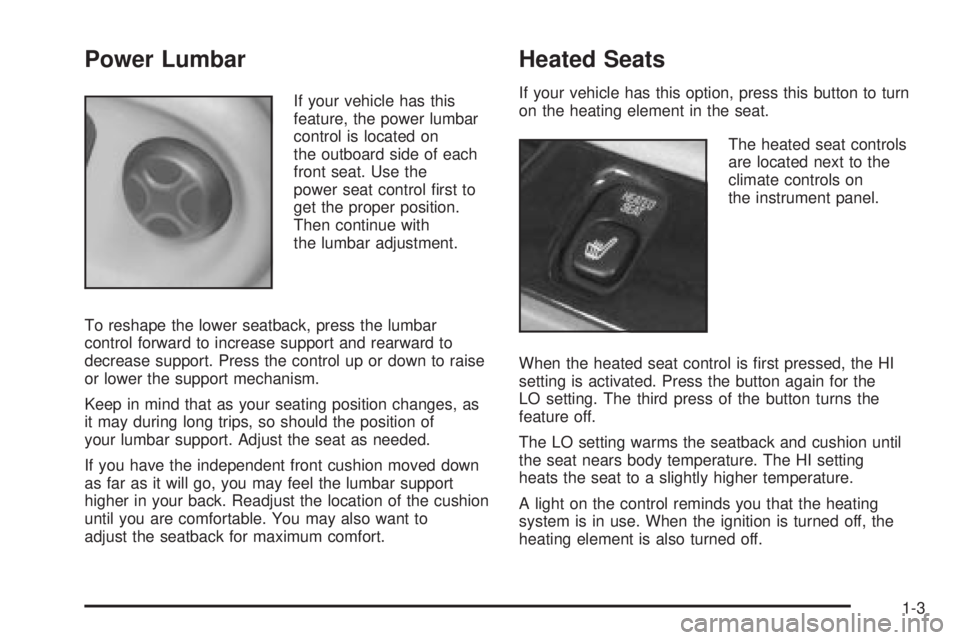
If your vehicle has this
feature, the power lumbar
control is located on
the outboard side of each
front seat. Use the
power seat control ®rst to
get the proper position.
Then continue with
the lumbar adjustment.
To reshape the lower seatback, press the lumbar
control forward to increase support and rearward to
decrease support. Press the control up or down to raise
or lower the support mechanism.
Keep in mind that as your seating position changes, as
it may during long trips, so should the position of
your lumbar support. Adjust the seat as needed.
If you have the independent front cushion moved down
as far as it will go, you may feel the lumbar support
higher in your back. Readjust the location of the cushion
until you are comfortable. You may also want to
adjust the seatback for maximum comfort.
Heated Seats
If your vehicle has this option, press this button to turn
on the heating element in the seat.
The heated seat controls
are located next to the
climate controls on
the instrument panel.
When the heated seat control is ®rst pressed, the HI
setting is activated. Press the button again for the
LO setting. The third press of the button turns the
feature off.
The LO setting warms the seatback and cushion until
the seat nears body temperature. The HI setting
heats the seat to a slightly higher temperature.
A light on the control reminds you that the heating
system is in use. When the ignition is turned off, the
heating element is also turned off.
1-3
Page 15 of 372
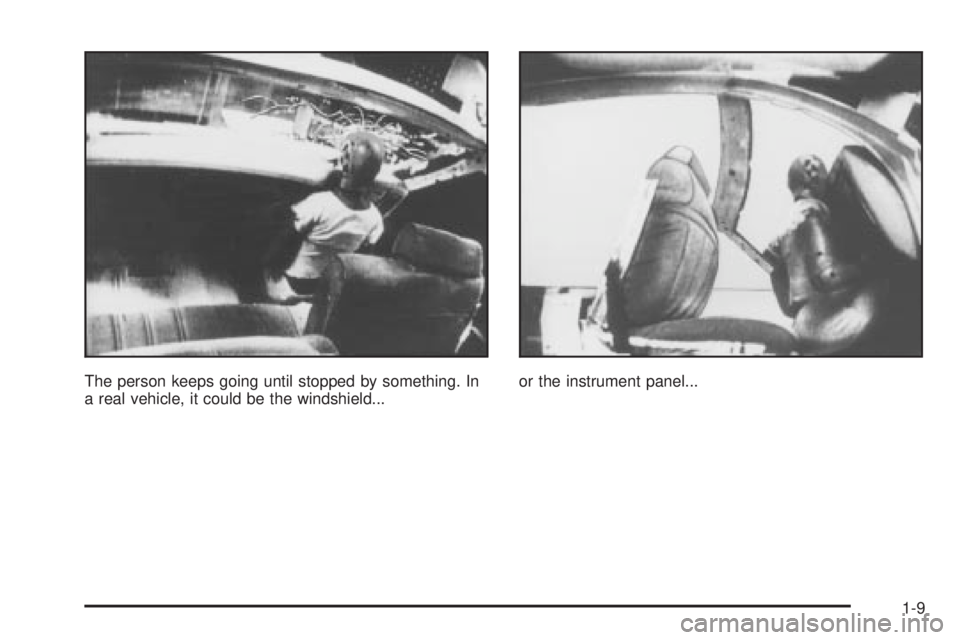
The person keeps going until stopped by something. In
a real vehicle, it could be the windshield...or the instrument panel...
1-9
Page 56 of 372
{CAUTION:
Both frontal and side impact air bags in¯ate
with great force, faster than the blink of an eye.
If you're too close to an in¯ating air bag, as you
would be if you were leaning forward, it could
seriously injure you. Safety belts help keep you
in position for air bag in¯ation before and
during a crash. Always wear your safety belt,
even with frontal air bags. The driver should sit
as far back as possible while still maintaining
control of the vehicle. Front occupants should
not lean on or sleep against the door.
{CAUTION:
Anyone who is up against, or very close to,
any air bag when it in¯ates can be seriously
injured or killed. Air bags plus lap-shoulder
belts offer the best protection for adults, but
CAUTION: (Continued)
CAUTION: (Continued)
not for young children and infants. Neither the
vehicle's safety belt system nor its air bag
system is designed for them. Young children
and infants need the protection that a child
restraint system can provide. Always secure
children properly in your vehicle. To read how,
see the part of this manual called ªOlder
Childrenº or ªInfants and Young Children.º
There is an air bag
readiness light on the
instrument panel, which
shows AIR BAG.
The system checks the air bag electrical system for
malfunctions. The light tells you if there is an electrical
problem. See
Air Bag Readiness Light on page 3-33for more information.
1-50
Page 57 of 372
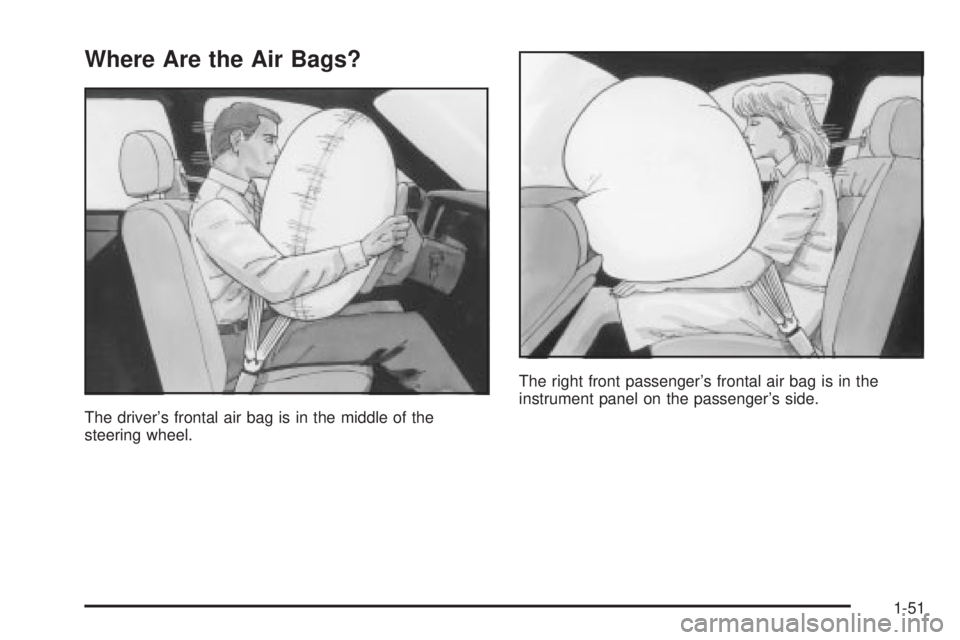
Where Are the Air Bags?
The driver's frontal air bag is in the middle of the
steering wheel.The right front passenger's frontal air bag is in the
instrument panel on the passenger's side.
1-51
Page 60 of 372
What Makes an Air Bag In¯ate?
In an impact of sufficient severity, the air bag sensing
system detects that the vehicle is in a crash. For
both frontal and side impact air bags, the sensing
system triggers a release of gas from the in¯ator, which
in¯ates the air bag. The in¯ator, the air bag and
related hardware are all part of the air bag modules
inside the steering wheel, the instrument panel, and the
side of the front seatbacks closest to the door.
How Does an Air Bag Restrain?
In moderate to severe frontal or near frontal collisions,
even belted occupants can contact the steering wheel or
the instrument panel. In moderate to severe side
collisions, even belted occupants can contact the inside
of the vehicle. The air bag supplements the protection
provided by safety belts. Air bags distribute the force of
the impact more evenly over the occupant's upper
body, stopping the occupant more gradually. But the
frontal air bags would not help you in many types
of collisions, including rollovers, rear impacts, and many
side impacts, primarily because an occupant's motion
is not toward the air bag. Side impact air bags would not
help you in many types of collisions, including frontal
or near frontal collisions, rollovers, and rear impacts,
primarily because an occupant's motion is not towardthose air bags. Air bags should never be regarded as
anything more than a supplement to safety belts,
and then only in moderate to severe frontal or
near-frontal collisions for the driver's and right front
passenger's frontal air bags, and only in moderate to
severe side collisions for the driver's and right front
passenger's side impact air bag.
What Will You See After an Air Bag
In¯ates?
After the air bag in¯ates, it quickly de¯ates, so quickly
that some people may not even realize the air bag
in¯ated. Some components of the air bag module will be
hot for a short time. These components include the
steering wheel hub for the driver's frontal air bag and the
instrument panel for the right front passenger's frontal
air bag. For vehicles with side impact air bags, the side
of the seatback closest to the driver's and/or right
front passenger's door will be hot. The parts of the bag
that come into contact with you may be warm, but
not too hot to touch. There will be some smoke and dust
coming from the vents in the de¯ated air bags. Air
bag in¯ation doesn't prevent the driver from seeing or
being able to steer the vehicle, nor does it stop
people from leaving the vehicle.
1-54
Page 61 of 372
{CAUTION:
When an air bag in¯ates, there is dust in the
air. This dust could cause breathing problems
for people with a history of asthma or other
breathing trouble. To avoid this, everyone in
the vehicle should get out as soon as it is safe
to do so. If you have breathing problems but
can't get out of the vehicle after an air bag
in¯ates, then get fresh air by opening a
window or a door. If you experience breathing
problems following an air bag deployment, you
should seek medical attention.
In many crashes severe enough to in¯ate an air bag,
windshields are broken by vehicle deformation.
Additional windshield breakage may also occur from the
right front passenger air bag.
·Air bags are designed to in¯ate only once. After an
air bag in¯ates, you'll need some new parts for
your air bag system. If you don't get them, the air
bag system won't be there to help protect you
in another crash. A new system will include air bagmodules and possibly other parts. The service
manual for your vehicle covers the need to replace
other parts.
·Your vehicle is equipped with a crash sensing and
diagnostic module, which records information
about the frontal air bag system. The module
records information about the readiness of the
system, when the system commands air bag
in¯ation and driver's safety belt usage at
deployment. The module also records speed,
engine rpm, brake and throttle data.
·Let only quali®ed technicians work on your air bag
systems. Improper service can mean that an air
bag system won't work properly. See your dealer for
service.
Notice:If you damage the covering for the driver's
or the right front passenger's air bag, or the air
bag covering on the driver's and right front
passenger's seatback, the bag may not work
properly. You may have to replace the air bag
module in the steering wheel, both the air bag
module and the instrument panel for the right front
passenger's air bag, or both the air bag module
and seatback for the driver's and right front
passenger's side impact air bag. Do not open or
break the air bag coverings.
1-55
Page 77 of 372
If you don't cancel the security lock feature, adults or
older children who ride in the rear seat won't be able to
open the rear door from the inside. You should let
adults and older children know how these security locks
work, and how to cancel the locks.
To cancel the rear door lock, do the following:
1. Unlock and open the door from the outside.
2. Move the lever all the way to the unlock symbol.
3. Do the same for the other rear door.
The rear door locks will now work normally.
Lockout Protection
The power door locks will not work if the key is left in
the ignition and the driver's door is open. You can
override this feature by holding the power door lock
switch on the driver's door for more than three seconds.
Leaving Your Vehicle
If you are leaving the vehicle, take the keys, open the
door and set the locks from the inside, then get out and
close the door.
Trunk
{CAUTION:
It can be dangerous to drive with the trunk lid
open because carbon monoxide (CO) gas can
come into your vehicle. You can't see or smell
CO. It can cause unconsciousness and even
death. If you must drive with the trunk lid open
or if electrical wiring or other cable
connections must pass through the seal
between the body and the trunk lid:
·Make sure all other windows are shut.·Turn the fan on your heating or cooling
system to its highest speed and select the
control setting that will force outside air
into your vehicle. See ªClimate Control
Systemº in the Index.
·If you have air outlets on or under the
instrument panel, open them all the way.
See ªEngine Exhaustº in the Index.
Trunk Lock Release
To unlock the trunk from the outside, insert the master
key and turn it.
2-13
Page 86 of 372
Notice:If your key seems stuck in LOCK and you
can't turn it, be sure you are using the correct key; if
so, is it all the way in? If it is, then turn the steering
wheel left and right while you turn the key hard.
Turn the key only with your hand. Using a tool
to force it could break the key or the ignition switch.
If none of these works, then your vehicle needs
service.
C (OFF):This position lets you turn off the engine but
still turn the steering wheel. It doesn't lock the
steering wheel like LOCK and it doesn't send any power
to the accessories. The instrument panel cluster will
remain powered in OFF to illuminate the gear shift
indicator. The cluster will also activate the parking brake
light when the parking brake is set. Use OFF if you
must have your vehicle in motion while the engine is not
running.
D (RUN):This is the position that the switch returns to
after you start your engine and release the ignition
key. This is the position for driving. Even when
the engine is not running, you can use RUN to operate
your electrical accessories and to display some
instrument panel warning lights.
E (START):This position starts your engine. When the
engine starts, release the ignition key. The switch
will return to RUN for normal driving.Key Reminder Warning
If you leave your key in the ignition, with the engine off,
you will hear a warning chime when you open the
driver's door.
Retained Accessory Power (RAP)
After you turn the ignition off and remove the key, you
will still have power to such accessories as the
radio, sunroof (option) and power windows for up to
10 minutes. Power is stopped if you open a door.
Starting Your Engine
Move your shift lever to PARK (P) or NEUTRAL (N).
Your engine won't start in any other position ± that's a
safety feature. To restart when you're already moving,
use NEUTRAL (N) only.
Notice:Don't try to shift to PARK (P) if your
vehicle is moving. If you do, you could damage the
transaxle. Shift to PARK (P) only when your
vehicle is stopped.
1. With your foot off the accelerator pedal, turn your
ignition key to START. When the engine starts, let
go of the key. The idle speed will go down as
your engine gets warm.
2-22