ECO mode BUICK PARK AVENUE 2004 Owner's Manual
[x] Cancel search | Manufacturer: BUICK, Model Year: 2004, Model line: PARK AVENUE, Model: BUICK PARK AVENUE 2004Pages: 410, PDF Size: 4.45 MB
Page 77 of 410

Central Door Unlocking System
If your vehicle has a theft-deterrent system, all doors
will unlock if the key is held in the outside key cylinder
unlock position for more than two seconds. The
doors will also unlock if the key is turned to the unlock
position twice in three seconds.
Power Door Locks
With power door locks, you
can lock or unlock all
doors on your vehicle
using either the driver’s or
the front passenger’s
power door lock switch.
Door Ajar Reminder
If your vehicle is equipped with the Driver Information
Center (DIC), and a door is not fully closed, the DIC will
display a DOOR AJAR message. SeeDriver Information
Center (DIC) on page 3-47.
Delayed Locking
This feature lets the driver delay the actual locking of
the doors. When the power door lock switch or the
remote keyless entry transmitter lock button is pressed
with the key removed from the ignition and the
driver’s door open, a chime will sound three times to
signal that the lock delay mode is active. When all doors
have been closed, the doors will lock automatically
after �ve seconds. If any door is opened before this, the
�ve-second timer will reset itself once all the doors
have been closed again.
Pressing the door lock switch or the remote keyless
entry lock button a second time will override this feature.
2-11
Page 103 of 410
Automatic Dimming Rearview
Mirror with Compass
Your vehicle may have an automatic dimming rearview
mirror with a compass. Your vehicle’s mirror may
also contain OnStar
®controls. SeeOnStar®System on
page 2-41for more information.
The mirror also includes an eight-point compass display
in the upper right corner of the mirror face.
When cleaning the mirror, use a paper towel or similar
material dampened with glass cleaner. Do not spray
glass cleaner directly on the mirror as that may cause
the liquid cleaner to enter the mirror housing.
Mirror Operation
MIRROR:Press this button to turn on the automatic
dimming feature. Press it again to turn off the automatic
dimming feature.
O(On/Off):For mirrors equipped with OnStar®
controls, press and hold this button for several seconds
to turn on the automatic dimming feature. Press and
hold it again to turn the automatic dimming feature off.
The green indicator light will come on when this
feature is active. The automatic dimming feature will be
active each time the vehicle is started.
Compass Operation
COMPASS:Press this button once to turn the compass
on or off.
O(On/Off):For mirrors equipped with OnStar®controls,
press this button once to turn the compass on or off.
When the ignition and the compass feature are on, the
compass will show two character boxes for about
two seconds. After two seconds, the mirror will display
the compass heading.
Compass Calibration
When on, the compass automatically calibrates as the
vehicle is driven. If, after two seconds, the display
does not show a compass heading (N for North,
for example), there may be a strong magnetic �eld
interfering with the compass. Such interference may be
caused by a magnetic antenna mount, magnetic
note pad holder or a similar magnetic item. If the letter
C should ever appear in the compass window, the
compass may need calibration.
The mirror can be calibrated by driving the vehicle in
circles at 5 mph (8 km/h) or less until the display reads
a direction.
Mirrors equipped with OnStar
®controls can be placed
in calibration mode by pressing and holding the
on/off button untilaCisshown in the compass display.
2-37
Page 112 of 410
Using HomeLink®
Press and hold the appropriate HomeLink®button for
at least half of a second. The indicator light will come on
while the signal is being transmitted.
Erasing HomeLink®Buttons
To erase programming from the three buttons do the
following:
1. Press and hold down the two outside buttons until
the indicator light begins to �ash, after 20 seconds.
2. Release both buttons. Do not hold for longer than
30 seconds.
HomeLink
®is now in the train (learning) mode and can
be programmed at any time beginning with Step 2
under “Programming HomeLink
®.”
Individual buttons can not be erased, but they can be
reprogrammed. See “Reprogramming a Single
HomeLink
®Button” next.
Reprogramming a Single HomeLink®
Button
To program a device to HomeLink®using a HomeLink®
button previously trained, follow these steps:
1. Press and hold the desired HomeLink
®button.
Do not release the button.
2. The indicator light will begin to �ash after
20 seconds. While still holding the HomeLink
®
button, proceed with Step 2 under “Programming
HomeLink®.”
Resetting Defaults
To reset HomeLink®to default settings do the following:
1. Hold down the two outside buttons for about
20 seconds until the indicator light begins to �ash.
2. Continue to hold both buttons until the HomeLink
®
indicator light turns off.
3. Release both buttons.
For questions or comments, contact HomeLink
®at
1-800-355-3515, or on the internet at
www.homelink.com.
2-46
Page 143 of 410
Manual Operation
Pressing the FAN or AIR FLOW buttons cancels
automatic operation and places the system in manual
mode. Press the AUTO button to return to automatic
operation.
TEMP (Temperature):To manually adjust the
temperature inside the vehicle, push the TEMP arrow.
Push the TEMP up arrow for warmer temperature
settings and the TEMP down arrow for cooler
temperature settings. The setting will be shown on the
display. The display will return to the outside temperature
after a few seconds.
9FAN:Pressing the FAN button will display and hold
the current fan speed while in manual mode. If you want
the fan to run at a lower speed, push the down arrow on
the FAN button. If you want to increase the fan speed,
push the up arrow on the FAN button. The fan indicators
will also be shown on the display.
If the air�ow seems low when the fan is at the highest
setting, the passenger compartment air �lter may need
to be replaced. For more information, seePassenger
Compartment Air Filter on page 3-30.AIR FLOW:Pressing the AIR FLOW button will display
and hold the current setting while in manual mode.
Use the up and down arrows on the AIR FLOW button
to cycle through the available modes.
WINDSHIELD-FLOOR:This mode directs most of
the air�ow to the windshield with some air�ow to
the outboard outlets (for the side windows) and the
�oor outlets.
MID:This mode directs air�ow through the
instrument panel outlets.
FLOOR-MID:This mode directs air�ow through
both the �oor and the instrument panel outlets.
There is also a small amount of air directed to
the windshield and the outboard outlets (for the
side windows).
FLOOR:This mode directs most of the air�ow to
the �oor outlets with some directed to the outboard
outlets (for the side windows) and the windshield.
OFF:Press the OFF button once to turn off the
passenger climate control, if it has been activated.
Pressing the OFF button a second time will turn off the
main system. The outside temperature will be shown
on the display when the system is off.
3-25
Page 144 of 410
VENT:Pressing the VENT button allows outside air to
�ow through your vehicle without the air conditioning
compressor working. To turn off the VENT selection,
push the VENT button again.
Selecting the VENT and AUTO buttons at the same
time allows the system to control the air�ow
automatically without using the air conditioning
compressor or the recirculation mode.
RECIRC (Recirculation):Press this button to limit the
amount of outside air coming into the vehicle. It can be
used to prevent outside air and odors from entering your
vehicle or to help heat or cool the air inside your vehicle
more quickly. Press this button to turn the recirculation
mode on or off. When the button is pressed, an indicator
light will come on. The recirculation mode cannot be used
with the FRONT defrost or VENT mode.
On hot days, open the windows to let hot air escape; then
close them. This helps to reduce the time it takes for your
vehicle to cool down. It also helps the system to operate
more efficiently.
For quick cool down on hot days, press the AUTO button
and the system will automatically enter recirculation
mode and the temperature will be at the full cold position
for maximum cooling.Using these settings together for long periods of time may
cause the air inside of your vehicle to become too dry.
To prevent this from happening, after the air in your
vehicle has cooled, turn the recirculation mode off.
The air conditioning system removes moisture from the
air, so you may sometimes notice a small amount of
water dripping underneath your vehicle while idling or
after turning off the engine. This is normal.
Sensors
The solar sensor on your vehicle monitors the solar
radiation and the air inside of your vehicle, then uses the
information to maintain the selected temperature by
initiating needed adjustments to the temperature, the fan
speed and the air delivery system. The system may
also supply cooler air to the side of the vehicle facing the
sun. The recirculation mode will also be activated, as
necessary. Do not cover the solar sensor located in the
center of the instrument panel, near the windshield,
or the system will not work properly.
3-26
Page 165 of 410
Driver Information Center (DIC)
Your vehicle may be equipped with a Driver Information
Center (DIC). The DIC will display information about
how your vehicle is functioning, as well as warning
messages if a system problem is detected.
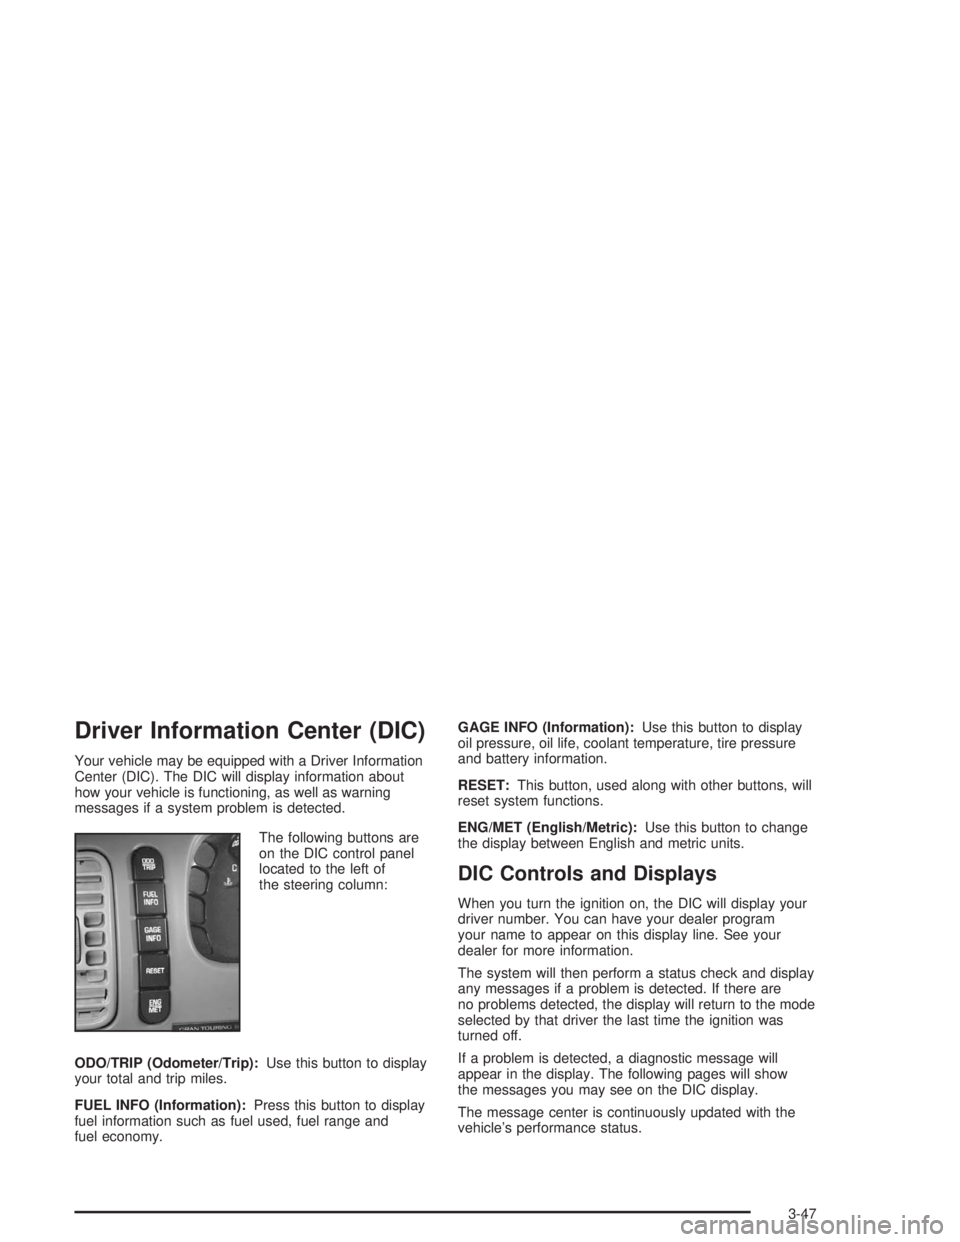
The following buttons are
on the DIC control panel
located to the left of
the steering column:
ODO/TRIP (Odometer/Trip):Use this button to display
your total and trip miles.
FUEL INFO (Information):Press this button to display
fuel information such as fuel used, fuel range and
fuel economy.GAGE INFO (Information):Use this button to display
oil pressure, oil life, coolant temperature, tire pressure
and battery information.
RESET:This button, used along with other buttons, will
reset system functions.
ENG/MET (English/Metric):Use this button to change
the display between English and metric units.
DIC Controls and Displays
When you turn the ignition on, the DIC will display your
driver number. You can have your dealer program
your name to appear on this display line. See your
dealer for more information.
The system will then perform a status check and display
any messages if a problem is detected. If there are
no problems detected, the display will return to the mode
selected by that driver the last time the ignition was
turned off.
If a problem is detected, a diagnostic message will
appear in the display. The following pages will show
the messages you may see on the DIC display.
The message center is continuously updated with the
vehicle’s performance status.
3-47
Page 166 of 410
ODO/TRIP (Odometer/Trip)
When this button is pressed, the display will show the
total mileage, and TRIP 1 or TRIP 2 miles. TRIP 1 and
TRIP 2 will display the miles traveled since the last reset.
To reset the trip odometer, press the ODO/TRIP button
until the trip miles are shown in the DIC display, then
press the RESET button. The trip odometer will now
accumulate miles until the next reset.
FUEL INFO (Information)
Fuel Used:Press the FUEL INFO button until the
display shows FUEL USED. This display will show you
how much fuel has been used since the last reset.
To learn how much fuel is used from a new starting
point, press the RESET button while the fuel used
is displayed in the DIC.
Fuel Range:Press the FUEL INFO button until the
display shows FUEL RANGE. The fuel range will
calculate the remaining distance you can drive without
refueling. This calculation is based on the average
fuel economy for the last 25 miles (40.25 km) driven,
and the fuel remaining in the fuel tank. The RESET
button does not function in this mode.Instantaneous Fuel Economy:Press the FUEL INFO
button until the display shows FUEL ECONOMY
INST. Instantaneous fuel economy varies with your
driving conditions, such as acceleration, braking and the
grade of the road being traveled. The RESET button
does not function in this mode.
Average Fuel Economy:Press the FUEL INFO button
until the display shows FUEL ECONOMY AVERAGE.
Average fuel economy is viewed as a long term
approximation of your overall driving conditions.
To learn the average fuel economy from a new starting
point, press the RESET button while the average
fuel economy is displayed in the DIC.
GAGE INFO (Information)
Coolant Temperature:Press the GAGE INFO button
until COOLANT TEMP appears in the display. If there are
no problems detected with the temperature, COOLANT
TEMP NORMAL will appear in the display. If the
temperature is too high, COOLANT TEMP HOT will
appear in the display. If you see the COOLANT TEMP
HOT message, your engine is overheated. You should
pull off the road, stop your vehicle and turn off your
engine as soon as possible. This manual explains what to
do. SeeEngine Overheating on page 5-28.
3-48
Page 170 of 410
If you unlock the vehicle using your door key instead of
your transmitter, the DIC will not identify the driver
and will recall the information from the last transmitter
used or the last driver using one of the MEMORY
buttons. If this happens and you were not the last driver
of the vehicle, press your correct driver number on
the appropriate MEMORY button or press the unlock
button on your transmitter.
The DIC can be used to program the following personal
choice features available with your vehicle:
Outside Curb View Assist Mirror
Programmable Automatic Door Locks
Delayed Locking
Security Feedback
Perimeter Lighting
Memory Seat Recall
Window Lock OutSee the following steps for personalization programming
instructions.
1. Turn the ignition on and keep the transaxle in
PARK (P).
2. Inform the DIC which driver you are by pressing the
unlock button on your transmitter or the appropriate
MEMORY button.
3. Press and hold the ENG/MET button for �ve
seconds. WELCOME TO BUICK OPTION
FEATURE will appear in the display.
The next display will be your driver number and the
message ARMREST BUTTON CHANGES
DRIVER #. Follow the instructions in the display.
You are now in the selection mode and the DIC is
ready to program your personal choices in memory.
The selections you make for the personal choice
features will be saved after the display reads
FEATURE OPTION SELECTION DONE.
Each feature that can be personalized will appear in
the display. Once you have made a selection for
a feature, the DIC will move on to the next personal
choice feature.
3-52
Page 171 of 410
4. Scroll through the following messages and feature
options:
PARALLEL PARK – OFF/ON
AUTO DOOR LOCKS – OFF/ON
UNLOCK IN PARK – OFF/ON
WHICH DOORS – ALL/DRIVER
DELAYED LOCKING – OFF/ON
LOCK FEEDBACK – OFF/ON
LOCK FEEDBACK – LIGHTS/LIGHTS + HORN
UNLOCK FEEDBACK – OFF/LIGHTS
PERIMETER LIGHTS – OFF/ON
SEAT RECALL – OFF/ON
RECALL POSITION – MEMORY/EXIT
WINDOW LOCKOUT – ALL PASS/REAR
If you would like to exit the selection mode without
moving through each of the personal choice features,
simply press a different button on the DIC or turn off the
ignition. However, personal choices you made may
not be retained.If you happen to move past a selection you would like
to make a personal choice for, press the unlock
button on your transmitter or press the appropriate
MEMORY button. This will return you to the beginning
of the option feature programming mode.
A description of each feature programmable through the
DIC follows.
Outside Curb View Assist Mirror
The outside curb view assist mirror, which tilts the
passenger mirror while the vehicle is in REVERSE (R),
can be made active or inactive through the DIC.
When PARALLEL PARK-OFF-ON appears on the
display, use the ENG/MET button to toggle the arrow
between OFF and ON. When you have made your
choice, press the RESET button to record your
selection. For more information on this feature, see
Outside Curb View Assist Mirror on page 2-40.
3-53
Page 172 of 410
Programmable Automatic Door Locks
The automatic door lock modes, when shifting in and out
of PARK (P), can be changed through the DIC. You can
change these modes using different selections from the
following DIC displays:
AUTO DOOR LOCKS – OFF/ON
UNLOCK IN PARK – OFF/ON
If you choose OFF for AUTO DOOR LOCKS, your door
locks will operate normally with no automatic feature.
If you choose ON for AUTO DOOR LOCKS, and ON for
UNLOCK IN PARK, your doors will lock every time
you shift out of PARK (P), and the doors will unlock
every time you stop and shift into PARK (P).
If you choose ON for AUTO DOOR LOCKS, and OFF for
UNLOCK IN PARK, your door locks will lock every time
you shift out of PARK (P), and there will be no automatic
door unlock when shifting back into PARK (P).
When you choose ON for UNLOCK in PARK, the DIC
will display WHICH DOORS-ALL/DRIVER. You have the
choice of unlocking all doors, or just the driver’s door.To change modes, do the following:
1. Move the arrow on the display between ON and
OFF by pressing the ENG/MET button.
2. Once you have made your selection, press the
RESET button and your choice will be retained
in memory.
SeeProgrammable Automatic Door Locks on page 2-12
for more information about this feature.
Delayed Locking
The delayed locking feature, which delays the actual
locking of the vehicle, can be made active or inactive
through the DIC. When DELAYED LOCKING-OFF-ON
appears on the display, use the ENG/MET button to
toggle the arrow between OFF and ON. When you have
made your choice, press the RESET button to record
your selection.
For more information on this feature, seeDelayed
Locking on page 2-11.
3-54