set time on display BUICK RAINIER 2005 Owner's Guide
[x] Cancel search | Manufacturer: BUICK, Model Year: 2005, Model line: RAINIER, Model: BUICK RAINIER 2005Pages: 452, PDF Size: 2.6 MB
Page 233 of 452
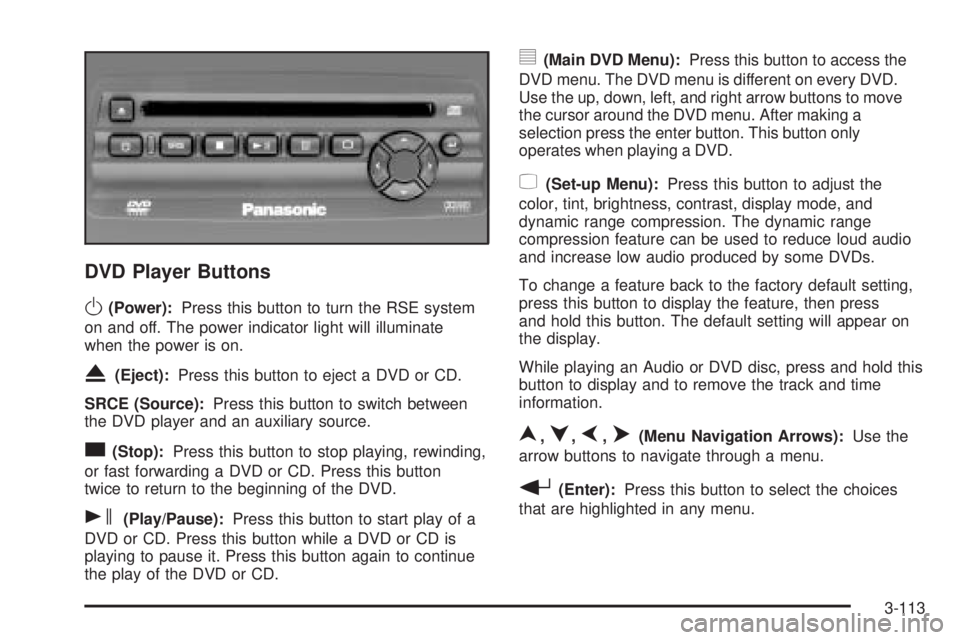
DVD Player Buttons
O(Power):Press this button to turn the RSE system
on and off. The power indicator light will illuminate
when the power is on.
X(Eject):Press this button to eject a DVD or CD.
SRCE (Source):Press this button to switch between
the DVD player and an auxiliary source.
c(Stop):Press this button to stop playing, rewinding,
or fast forwarding a DVD or CD. Press this button
twice to return to the beginning of the DVD.
s(Play/Pause):Press this button to start play of a
DVD or CD. Press this button while a DVD or CD is
playing to pause it. Press this button again to continue
the play of the DVD or CD.
y(Main DVD Menu):Press this button to access the
DVD menu. The DVD menu is different on every DVD.
Use the up, down, left, and right arrow buttons to move
the cursor around the DVD menu. After making a
selection press the enter button. This button only
operates when playing a DVD.
z(Set-up Menu):Press this button to adjust the
color, tint, brightness, contrast, display mode, and
dynamic range compression. The dynamic range
compression feature can be used to reduce loud audio
and increase low audio produced by some DVDs.
To change a feature back to the factory default setting,
press this button to display the feature, then press
and hold this button. The default setting will appear on
the display.
While playing an Audio or DVD disc, press and hold this
button to display and to remove the track and time
information.
n,q,p,o(Menu Navigation Arrows):Use the
arrow buttons to navigate through a menu.
r(Enter):Press this button to select the choices
that are highlighted in any menu.
3-113
Page 237 of 452
Battery Replacement
To change the batteries, do the following:
1. Remove the battery compartment door located on
the bottom of the remote control.
2. Replace the two AA batteries in the compartment.
Make sure that they are installed correctly, using
the diagram on the inside of the battery
compartment.
3. Close the battery door securely.
If the remote control is to be stored for a long period of
time, remove the batteries and keep them in a cool,
dry place.
Problem Recommended Action
No power. The ignition might not be
in on or accessory. The
parental control button
might have been turned
on. The power indicator
light will �ash.
Disc will not play. The system might be off.
The parental control
button might have been
turned on. The power
indicator light will �ash.
The system might be in
auxiliary mode. The disc
is upside down or is
not compatible.
Problem Recommended Action
The picture does not �ll the
screen. There are black
borders on the top and
bottom or on both sides or
it looks stretched out.Check the display
mode settings in the
display menu.
The disc was ejected, but
it was pulled back into the
DVD player.The disc is being stored in
the DVD player. Press the
eject button again to eject
the disc.
In auxiliary mode, the
picture moves or scrolls.Check the auxiliary input
connections at both
devices. Change the Video
Format to PAL or NTSC.
See “Stereo RCA Jacks”
previously for how to
change the video format.
The language in the audio
or on the screen is wrong.Check the audio or
language selection in the
main DVD menu.
The remote control does
not work.Check to make sure there
is no obstruction between
the remote control and the
transmitter window. Check
the batteries to make sure
they are not dead or
installed incorrectly. The
parental control button
might have been turned
on. The power indicator
light will �ash.
3-117
Page 243 of 452
Care of Your Cassette Tape Player
A tape player that is not cleaned regularly can cause
reduced sound quality, ruined cassettes, or a damaged
mechanism. Cassette tapes should be stored in their
cases away from contaminants, direct sunlight, and
extreme heat. If they are not, they may not operate
properly or may cause failure of the tape player.
The tape player should be cleaned regularly after every
50 hours of use. The radio may display CLEAN to
indicate that the tape player has been used for
50 hours without resetting the tape clean timer. If this
message appears on the display, the cassette tape
player needs to be cleaned. It will still play tapes, but it
should be cleaned as soon as possible to prevent
damage to the tapes and player. If there is a reduction in
sound quality, try a known good cassette to see if the
tape or the tape player is at fault. If this other cassette has
no improvement in sound quality, clean the tape player.
For best results, use a scrubbing action, non-abrasive
cleaning cassette with pads which scrub the tape
head as the hubs of the cleaner cassette turn. The
recommended cleaning cassette is available through
your dealer.The broken tape detection feature of the cassette tape
player may identify the cleaning cassette as a
damaged tape, in error. To prevent the cleaning cassette
from being ejected, use the following steps:
1. Turn the ignition on.
2. Turn the radio off.
3. Press and hold the TAPE CD button for �ve
seconds. READY will appear on the display and a
cassette symbol will �ash for �ve seconds.
4. Insert the scrubbing action cleaning cassette.
5. Eject the cleaning cassette after the manufacturer’s
recommended cleaning time.
After the cleaning cassette is ejected, the broken
tape detection feature will be active again.
A non-scrubbing action, wet-type cleaner which uses a
cassette with a fabric belt to clean the tape head
can be used. This type of cleaning cassette will not
eject on its own. A non-scrubbing action cleaner may not
clean as thoroughly as the scrubbing type cleaner.
The use of a non-scrubbing action, dry-type cleaning
cassette is not recommended.
After the player is cleaned, press and hold the EJT
button for �ve seconds to reset the CLEAN indicator.
The radio will display CLEANED to show the indicator
was reset.
3-123
Page 244 of 452
Cassettes are subject to wear and the sound quality may
degrade over time. Always make sure the cassette tape
is in good condition before the tape player is serviced.
Care of Your CDs and DVDs
Handle discs carefully. Store them in their original cases
or other protective cases and away from direct sunlight
and dust. If the surface of a disc is soiled, dampen
a clean, soft cloth in a mild, neutral detergent solution
and clean it, wiping from the center to the edge.
Be sure never to touch the side without writing when
handling discs. Pick up discs by grasping the outer
edges or the edge of the hole and the outer edge.
Care of Your CD and DVD Player
The use of CD lens cleaners for CDs is not advised, due
to the risk of contaminating the lens of the CD optics
with lubricants internal to the CD mechanism.
Fixed Mast Antenna
The �xed mast antenna can withstand most car washes
without being damaged. If the mast should ever
become slightly bent, straighten it out by hand. If the
mast is badly bent, replace it.Check occasionally to make sure the mast is still
tightened to the fender. If tightening is required, tighten
by hand, then with a wrench one quarter turn.
XM™ Satellite Radio Antenna
System
The XM™ Satellite Radio antenna is located on the roof
of your vehicle. Keep this antenna clear of snow and ice
build up for clear radio reception.
The performance of the XM™ system may be affected if
the sunroof is open.
Loading items onto the roof of your vehicle can interfere
with the performance of the XM™ system. Make sure that
the XM™ satellite antenna is not obstructed.
Chime Level Adjustment
The radio is the vehicle’s chime producer. To change the
volume level, press and hold pushbutton 6 with the
ignition on and the radio power off. The chime volume
level will change from the normal level to loud, and LOUD
will appear on the radio display. To change back to the
default or normal setting, press and hold pushbutton 6
again. The chime level will change from the loud level to
normal, and NORMAL will appear on the radio display.
Removing the radio and not replacing it with a factory
radio or chime will disable vehicle chimes.
3-124
Page 448 of 452
Q
Questions and Answers About Safety Belts.........1-11
R
Radiator Pressure Cap....................................5-27
Radios..........................................................3-56
Care of Your Cassette Tape Player...............3-123
Care of Your CD and DVD Player................3-124
Care of Your CDs and DVDs.......................3-124
Navigation/Radio System.............................3-119
Radio with Cassette and CD.........................3-81
Radio with CD....................................3-57, 3-67
Radio with Six-Disc CD................................3-95
Rear Seat Audio........................................3-120
Setting the Time..........................................3-56
Theft-Deterrent..........................................3-121
Understanding Reception............................3-122
Rainsense™ Wipers.......................................... 3-9
Reading Lamps..............................................3-17
Rear Axle......................................................5-46
Locking........................................................ 4-9
Rear Climate Control System............................3-24
Rear Door Security Locks................................2-12
Rear Floor Storage Lid....................................2-48
Rear Safety Belt Comfort Guides......................1-23
Rear Seat Audio (RSA)..................................3-120Rear Seat Entertainment System.....................3-109
Rear Seat Operation......................................... 1-5
Rear Seat Passengers, Safety Belts..................1-20
Rearview Mirror with Compass..........................2-30
Rearview Mirror with Compass
and Temperature.................................2-35, 3-28
Rearview Mirror with OnStar®...........................2-30
Rearview Mirror with OnStar®and Compass.......2-33
Rearview Mirror with OnStar®, Compass, and
Temperature Display....................................2-37
Rearview Mirrors.............................................2-30
Reclining Seatbacks, Power............................... 1-4
Recommended Fluids and Lubricants.................6-12
Recreational Vehicle Towing.............................4-50
Reduced Engine Power Light............................3-40
Remote Keyless Entry System............................ 2-4
Remote Keyless Entry System, Operation............ 2-5
Removing the Flat Tire and Installing the
Spare Tire..................................................5-72
Removing the Spare Tire and Tools...................5-70
Replacement Bulbs.........................................5-50
Reporting Safety Defects
Canadian Government..................................7-10
General Motors...........................................7-11
United States Government............................7-10
Restraint System Check
Checking Your Restraint Systems...................1-61
Replacing Restraint System Parts
After a Crash..........................................1-62
10