park assist BUICK RAINIER 2006 Owner's Manual
[x] Cancel search | Manufacturer: BUICK, Model Year: 2006, Model line: RAINIER, Model: BUICK RAINIER 2006Pages: 470, PDF Size: 2.72 MB
Page 110 of 470

If you reach the mirror’s end of the travel position in any
direction, the mirror will enter a ratcheting mode. This
action is harmless. It is a warning that the mirror can go
no further. To stop this action, back the mirror up by
moving the control in the opposite direction.
Fold the mirror in manually before entering a car wash.
To do this, pull the mirror in toward the vehicle. Push
the mirror back out when �nished.
Outside Curb View Assist Mirror
If the vehicle has this feature, the passenger’s outside
mirror will adjust to a preset tilt position while the vehicle
is in REVERSE (R) gear. Curb view assist may be
useful when you are parallel parking. The mirror
will return to normal position when the vehicle is shifted
out of REVERSE (R) gear. Automatic mirror movement
in either direction will follow a short delay.
You may be able to turn this feature on or off through
the Driver Information Center (DIC). SeeDIC Vehicle
Customization on page 3-52.
Outside Convex Mirror
{CAUTION:
A convex mirror can make things (like other
vehicles) look farther away than they really are.
If you cut too sharply into the right or left lane,
you could hit a vehicle. Check your inside
mirror or glance over your shoulder before
changing lanes.
The passenger’s outside mirror is convex. A convex
mirror’s surface is curved so more can be seen from the
driver’s seat.
Outside Heated Mirrors
If the vehicle has this feature, when the rear window
defogger is turned on, the driver’s and passenger’s
outside rearview mirrors also heat to help clear them of
ice, snow, and condensation. SeeDual Automatic
Climate Control System on page 3-19for more
information.
2-40
Page 114 of 470

Keep the original hand-held transmitter for use in other
vehicles as well as for future Universal Home Remote
programming. It is also recommended that upon the
sale of the vehicle, the programmed Universal Home
Remote buttons should be erased for security purposes.
See “Erasing Universal Home Remote Buttons” later
in this section or, for assistance, seeCustomer
Assistance Offices on page 7-4.
Be sure that people and objects are clear of the garage
door or gate operator you are programming. When
programming a garage door, it is advised to park outside
of the garage.
It is recommended that a new battery be installed in
your hand-held transmitter for quicker and more
accurate transmission of the radio-frequency signal.
Programming Universal Home Remote
Follow these steps to program up to three channels:
1. Press and hold down the two outside Universal
Home Remote buttons, releasing only when the
Universal Home Remote indicator light begins
to �ash, after 20 seconds. Do not hold down the
buttons for longer than 30 seconds and do not
repeat this step to program a second and/or third
hand-held transmitter to the remaining two Universal
Home Remote buttons.
2. Position the end of your hand-held transmitter
about 1 to 3 inches (3 to 8 cm) away from the
Universal Home Remote buttons while keeping the
indicator light in view.3. Simultaneously press and hold both the desired
Universal Home Remote button and the hand-held
transmitter button. Do not release the buttons
until Step 4 has been completed.
Some entry gates and garage door openers may
require you to substitute Step 3 with the procedure
noted in “Gate Operator and Canadian
Programming” later in this section.
4. The indicator light will �ash slowly at �rst and then
rapidly after Universal Home Remote successfully
receives the frequency signal from the hand-held
transmitter. Release both buttons.
5. Press and hold the newly-trained Universal Home
Remote button and observe the indicator light.
If the indicator light stays on constantly,
programming is complete and your device should
activate when the Universal Home Remote button is
pressed and released.
To program the remaining two Universal Home
Remote buttons, begin with Step 2 under
“Programming Universal Home Remote.” Do not
repeat Step 1 as this will erase all of the
programmed channels.
If the indicator light blinks rapidly for two seconds
and then turns to a constant light, continue with
Steps 6 through 8 following to complete the
programming of a rolling-code equipped device,
most commonly, a garage door opener.
2-44
Page 178 of 470

Curb View
Press the customization button until CURB VIEW: OFF
appears in the display. To select your preference for
curb view, press the select button while CURB VIEW:
OFF is displayed on the DIC. Pressing the select button
will scroll through the following choices:
CURB VIEW: OFF (default):The passenger’s outside
mirror will not be tilted down when the vehicle is
shifted into REVERSE (R).
CURB VIEW: PASSENGER:The passenger’s outside
mirror will be tilted down when the vehicle is shifted
into REVERSE (R).
When the vehicle is placed in PARK (P) or in any
forward gear, the mirror will return to the normal driving
position, following a short delay.
Choose one of the available options and press the
customization button while it is displayed on the DIC to
select it and move on to the next feature. For more
information on tilt mirror in reverse, seeOutside Curb
View Assist Mirror on page 2-40.
Alarm Warning
Press the customization button until ALARM WARNING:
BOTH appears in the display. To select your preference
for alarm warning, press the select button while
ALARM WARNING: BOTH is displayed on the DIC.
Pressing the select button will scroll through the
following choices:
ALARM WARNING: BOTH (default):The headlamps
will �ash and the horn will chirp when the alarm is
active.
ALARM WARNING: HORN:The horn will chirp when
the alarm is active.
ALARM WARNING: LAMPS:The headlamps will �ash
when the alarm is active.
ALARM WARNING: OFF:There will be no alarm
warning on activation.
Choose one of the available options and press the
customization button while your choice is displayed on
the DIC to select it and move on to the next feature.
For more information on alarm warning type, see
Content Theft-Deterrent on page 2-15.
3-56
Page 387 of 470

{CAUTION:
Changing a tire can be dangerous. The vehicle
can slip off the jack and roll over or fall on you
or other people. You and they could be badly
injured or even killed. Find a level place to
change your tire. To help prevent the vehicle
from moving:
1. Set the parking brake �rmly.
2. Put the shift lever in PARK (P).
3. Turn off the engine and do not restart
while the vehicle is raised.
4. Do not allow passengers to remain in
the vehicle.
To be even more certain the vehicle will not
move, you should put blocks at the front and
rear of the tire farthest away from the one
being changed. That would be the tire, on the
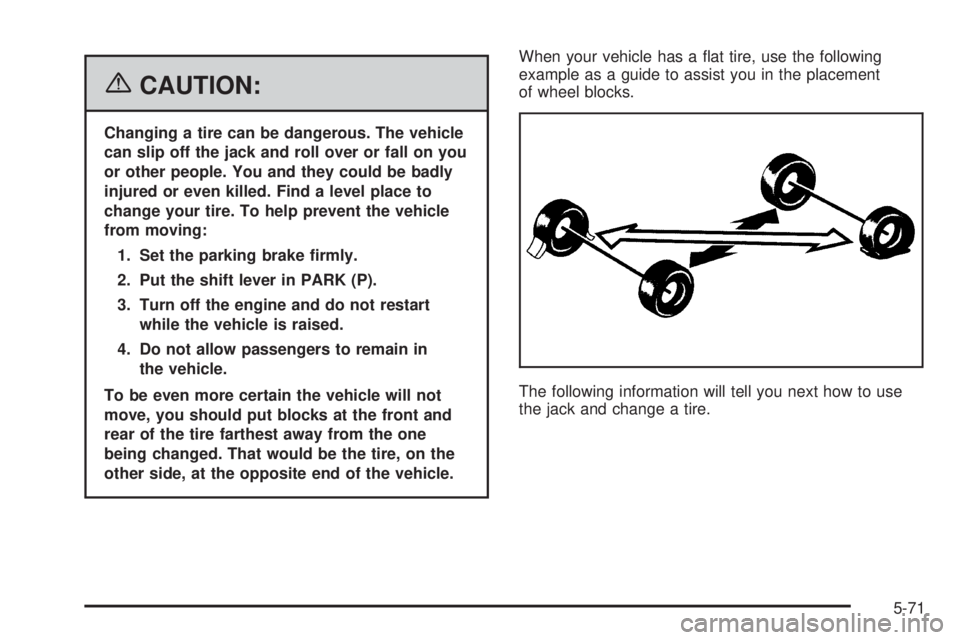
other side, at the opposite end of the vehicle.When your vehicle has a �at tire, use the following
example as a guide to assist you in the placement
of wheel blocks.
The following information will tell you next how to use
the jack and change a tire.
5-71
Page 454 of 470

Reporting Safety Defects to the
Canadian Government
If you live in Canada, and you believe that your vehicle
has a safety defect, you should immediately notify
Transport Canada, in addition to notifying General
Motors of Canada Limited. You may call them at
1-800-333-0510 or write to:
Transport Canada
Place de Ville Tower C
330 Sparks Street
Ottawa, Ontario K1A 0N5
Reporting Safety Defects to
General Motors
In addition to notifying NHTSA (or Transport Canada)
in a situation like this, we certainly hope you will
notify us.
Please call us at 1-800-521-7300, or write:
Buick Customer Assistance Center
P.O. Box 33136
Detroit, MI 48232-5136In Canada, please call us at 1-800-263-3777 (English)
or 1-800-263-7854 (French). Or, write:
General Motors of Canada Limited
Customer Communication Centre, 163-005
1908 Colonel Sam Drive
Oshawa, Ontario L1H 8P7
Service Publications Ordering
Information
Service Manuals
Service Manuals have the diagnosis and repair
information on engines, transmission, axle suspension,
brakes, electrical, steering, body, etc.
Transmission, Transaxle, Transfer
Case Unit Repair Manual
This manual provides information on unit repair service
procedures, adjustments, and speci�cations for GM
transmissions, transaxles, and transfer cases.
7-14
Page 465 of 470

O
Odometer......................................................3-27
Odometer, Trip...............................................3-27
Off-Road Driving.............................................4-18
Off-Road Recovery..........................................4-15
Oil
Engine.......................................................5-15
Pressure Gage............................................3-38
Oil, Engine Oil Life System..............................5-18
Older Children, Restraints................................1-26
Online Owner Center........................................ 7-3
OnStar
®System, see OnStar®Manual...............2-41
Other Warning Devices...................................... 3-6
Outlet Adjustment............................................3-23
Outside
Convex Mirror.............................................2-40
Curb View Assist Mirror................................2-40
Heated Mirrors............................................2-40
Power Mirror...............................................2-39
Overhead Console..........................................2-47
Owner Checks and Services.............................. 6-9
Owners, Canadian............................................... ii
P
Park (P)
Shifting Into................................................2-25
Shifting Out of............................................2-26
Parking
Brake........................................................2-24
Over Things That Burn.................................2-27
Passenger Airbag Status Indicator.....................3-30
Passenger Sensing System..............................1-56
Passing.........................................................4-16
Passlock
®......................................................2-17
Power
Accessory Outlet(s)......................................3-18
Door Locks.................................................. 2-8
Electrical System.........................................5-95
Lumbar Controls........................................... 1-3
Reclining Seatbacks...................................... 1-4
Reduced Engine Light..................................3-40
Retained Accessory (RAP)............................2-18
Seat............................................................ 1-2
Steering Fluid.............................................5-34
Windows....................................................2-14
Pretensioners, Safety Belt................................1-25
Programmable Automatic Door Locks.................. 2-9
9
Page 467 of 470

Reporting Safety Defects
Canadian Government..................................7-14
General Motors...........................................7-14
United States Government............................7-13
Restraint System Check
Checking the Restraint Systems....................1-62
Replacing Restraint System Parts
After a Crash..........................................1-62
Retained Accessory Power (RAP)......................2-18
Right Front Passenger Position, Safety Belts......1-20
Roadside
Assistance Program....................................... 7-6
Rocking Your Vehicle to Get it Out....................4-44
Running the Engine While Parked.....................2-28
S
Safety Belt
Passenger Reminder Light............................3-28
Pretensioners..............................................1-25
Reminder Light............................................3-28
Safety Belts
Care of......................................................5-88
Driver Position............................................1-13
How to Wear Safety Belts Properly................1-13
Questions and Answers About Safety Belts.....1-12
Rear Safety Belt Comfort Guides...................1-23Safety Belts (cont.)
Rear Seat Passengers.................................1-20
Right Front Passenger Position......................1-20
Safety Belt Extender....................................1-25
Safety Belt Use During Pregnancy.................1-19
Safety Belts Are for Everyone......................... 1-8
Safety Warnings and Symbols.............................. iii
Scheduled Maintenance..................................... 6-4
Seats
Head Restraints............................................ 1-5
Heated Seats............................................... 1-3
Memory.....................................................2-51
Power Lumbar.............................................. 1-3
Power Reclining Seatbacks............................. 1-4
Power Seats................................................. 1-2
Rear Seat Operation...................................... 1-6
Secondary Latch System.................................5-80
Securing a Child Restraint
Center Rear Seat Position............................1-44
Rear Outside Seat Position...........................1-42
Right Front Seat Position..............................1-44
Security Light.................................................3-39
Service........................................................... 5-3
Accessories and Modi�cations......................... 5-3
Adding Equipment to the Outside of
Your Vehicle.............................................. 5-5
All-Wheel-Drive Light....................................3-41
11