spare tire BUICK RAINIER 2006 Owner's Manual
[x] Cancel search | Manufacturer: BUICK, Model Year: 2006, Model line: RAINIER, Model: BUICK RAINIER 2006Pages: 470, PDF Size: 2.72 MB
Page 270 of 470
Off-Road Driving
This off-road guide is for vehicles that have all-wheel
drive. If your vehicle does not have all-wheel drive, you
should not drive off-road unless you are on a level,
solid surface.
Many of the same design features that help make your
vehicle responsive on paved roads during poor weather
conditions — features like all-wheel drive — help make it
much better suited for off-road use. Its higher ground
clearance also helps your vehicle step over some off-road
obstacles. But your vehicle does not have features like
special underbody shielding and a transfer case low gear
range, things that are usually thought necessary for
extended or severe off-road service.
Also, seeBraking on page 4-6.
Off-road driving can be great fun. But it does have
some de�nite hazards. The greatest of these is
the terrain itself.
“Off-roading” means you have left the North American
road system behind. Traffic lanes are not marked.
Curves are not banked. There are no road signs.
Surfaces can be slippery, rough, uphill, or downhill.
In short, you have gone right back to nature.
Off-road driving involves some new skills. And that is why
it is very important that you read this guide. You will �nd
many driving tips and suggestions. These will help make
your off-road driving safer and more enjoyable.
Before You Go Off-Roading
There are some things to do before you go out. For
example, be sure to have all necessary maintenance and
service work done. Check to make sure all underbody
shields, if equipped, are properly attached. Is there
enough fuel? Is the spare tire fully in�ated? Are the �uid
levels up where they should be? What are the local laws
that apply to off-roading where you will be driving? If you
do not know, you should check with law enforcement
people in the area. Will you be on someone’s private
land? If so, be sure to get the necessary permission.
Loading Your Vehicle for Off-Road
Driving
There are some important things to remember about
how to load your vehicle.
The heaviest things should be on the load �oor and
forward of your rear axle. Put heavier items as far
forward as you can.
Be sure the load is secured properly, so driving on
the off-road terrain does not toss things around.
4-18
Page 318 of 470
Tire Inspection and Rotation...........................5-60
When It Is Time for New Tires.......................5-61
Buying New Tires.........................................5-62
Different Size Tires and Wheels......................5-63
Uniform Tire Quality Grading..........................5-64
Wheel Alignment and Tire Balance..................5-65
Wheel Replacement......................................5-66
Tire Chains..................................................5-67
Accessory In�ator.........................................5-68
If a Tire Goes Flat........................................5-69
Changing a Flat Tire.....................................5-70
Removing the Spare Tire and Tools................5-72
Removing the Flat Tire and Installing
the Spare Tire..........................................5-74
Secondary Latch System...............................5-80
Storing a Flat or Spare Tire and Tools............5-82
Spare Tire...................................................5-85
Appearance Care............................................5-85
Cleaning the Inside of Your Vehicle.................5-85
Fabric/Carpet...............................................5-87
Leather.......................................................5-87
Instrument Panel, Vinyl, and Other
Plastic Surfaces........................................5-88
Care of Safety Belts......................................5-88Washing Your Vehicle...................................5-88
Cleaning Exterior Lamps/Lenses.....................5-89
Finish Care..................................................5-89
Windshield, Backglass, and Wiper Blades.........5-90
Aluminum Wheels.........................................5-90
Tires...........................................................5-91
Sheet Metal Damage.....................................5-91
Finish Damage.............................................5-92
Underbody Maintenance................................5-92
Chemical Paint Spotting.................................5-92
Vehicle Care/Appearance Materials..................5-93
Vehicle Identi�cation......................................5-94
Vehicle Identi�cation Number (VIN).................5-94
Service Parts Identi�cation Label.....................5-94
Electrical System............................................5-94
Add-On Electrical Equipment..........................5-94
Headlamps..................................................5-95
Windshield Wiper Fuses................................5-95
Power Windows and Other Power Options.......5-95
Fuses and Circuit Breakers............................5-95
Engine Compartment Fuse Block....................5-96
Rear Underseat Fuse Block..........................5-102
Capacities and Speci�cations........................5-105
Section 5 Service and Appearance Care
5-2
Page 375 of 470
A Tire and Loading Information label is attached to
the vehicle’s center pillar (B-pillar), below the driver’s
door latch. This label shows your vehicle’s original
equipment tires and the correct in�ation pressures for
your tires when they are cold. The recommended
cold tire in�ation pressure, shown on the label, is the
minimum amount of air pressure needed to support
your vehicle’s maximum load carrying capacity.
For additional information regarding how much weight
your vehicle can carry, and an example of the tire
and loading information label, seeLoading Your Vehicle
on page 4-45. How you load your vehicle affects
vehicle handling and ride comfort, never load your
vehicle with more weight than it was designed to carry.
When to Check
Check your tires once a month or more.
Also, check the tire pressure of the spare tire.
How to Check
Use a good quality pocket-type gage to check tire
pressure. You cannot tell if your tires are properly
in�ated simply by looking at them. Radial tires may
look properly in�ated even when they’re underin�ated.
Check the tire’s in�ation pressure when the tires
are cold. Cold means your vehicle has been sitting
for at least three hours or driven no more than
1 mile (1.6 km).
Remove the valve cap from the tire valve stem. Press
the tire gage �rmly onto the valve to get a pressure
measurement. If the cold tire in�ation pressure matches
the recommended pressure on the tire and loading
information label, no further adjustment is necessary.
If the pressure is low, add air until you reach the
recommended amount.
If you over�ll the tire, release air by pushing on the
metal stem in the center of the tire valve. Recheck
the tire pressure with the tire gage.
Be sure to put the valve caps back on the valve stems.
They help prevent leaks by keeping out dirt and
moisture.
5-59
Page 376 of 470
Tire Inspection and Rotation
Tires should be rotated every 5,000 to 8,000 miles
(8 000 to 13 000 km).
Any time you notice unusual wear, rotate your tires
as soon as possible and check wheel alignment. Also
check for damaged tires or wheels. SeeWhen It Is Time
for New Tires on page 5-61andWheel Replacement
on page 5-66for more information.
Make sure the spare tire is stored securely. Push, pull,
and then try to rotate or turn the tire. If it moves, use the
wheel wrench to tighten the cable. For information on
storing or removing the spare tire, seeChanging a Flat
Tire on page 5-70.
The purpose of regular rotation is to achieve more
uniform wear for all tires on the vehicle. The �rst rotation
is the most important. SeeScheduled Maintenance
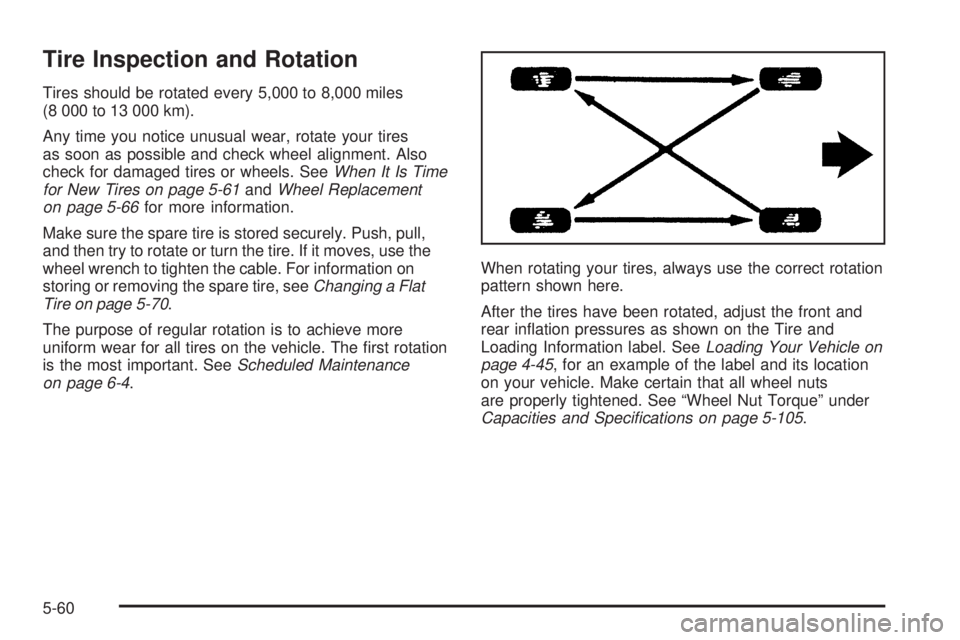
on page 6-4.When rotating your tires, always use the correct rotation
pattern shown here.
After the tires have been rotated, adjust the front and
rear in�ation pressures as shown on the Tire and
Loading Information label. SeeLoading Your Vehicle on
page 4-45, for an example of the label and its location
on your vehicle. Make certain that all wheel nuts
are properly tightened. See “Wheel Nut Torque” under
Capacities and Speci�cations on page 5-105.
5-60
Page 380 of 470
Uniform Tire Quality Grading
Quality grades can be found where applicable on the
tire sidewall between tread shoulder and maximum
section width. For example:
Treadwear 200 Traction AA Temperature A
The following information relates to the system
developed by the United States National Highway
Traffic Safety Administration, which grades tires by
treadwear, traction and temperature performance.
(This applies only to vehicles sold in the United States.)
The grades are molded on the sidewalls of most
passenger car tires. The Uniform Tire Quality Grading
system does not apply to deep tread, winter-type
snow tires, space-saver or temporary use spare tires,
tires with nominal rim diameters of 10 to 12 inches
(25 to 30 cm), or to some limited-production tires.
While the tires available on General Motors passenger
cars and light trucks may vary with respect to these
grades, they must also conform to federal safety
requirements and additional General Motors Tire
Performance Criteria (TPC) standards.
Treadwear
The treadwear grade is a comparative rating based on
the wear rate of the tire when tested under controlled
conditions on a speci�ed government test course.
For example, a tire graded 150 would wear one and
a half (1.5) times as well on the government course as
a tire graded 100. The relative performance of tires
depends upon the actual conditions of their use,
however, and may depart signi�cantly from the norm
due to variations in driving habits, service practices
and differences in road characteristics and climate.
Traction – AA, A, B, C
The traction grades, from highest to lowest, are AA, A,
B, and C. Those grades represent the tire’s ability
to stop on wet pavement as measured under controlled
conditions on speci�ed government test surfaces of
asphalt and concrete. A tire marked C may have poor
traction performance. Warning: The traction grade
assigned to this tire is based on straight-ahead braking
traction tests, and does not include acceleration,
cornering, hydroplaning, or peak traction characteristics.
5-64
Page 388 of 470
Removing the Spare Tire and Tools
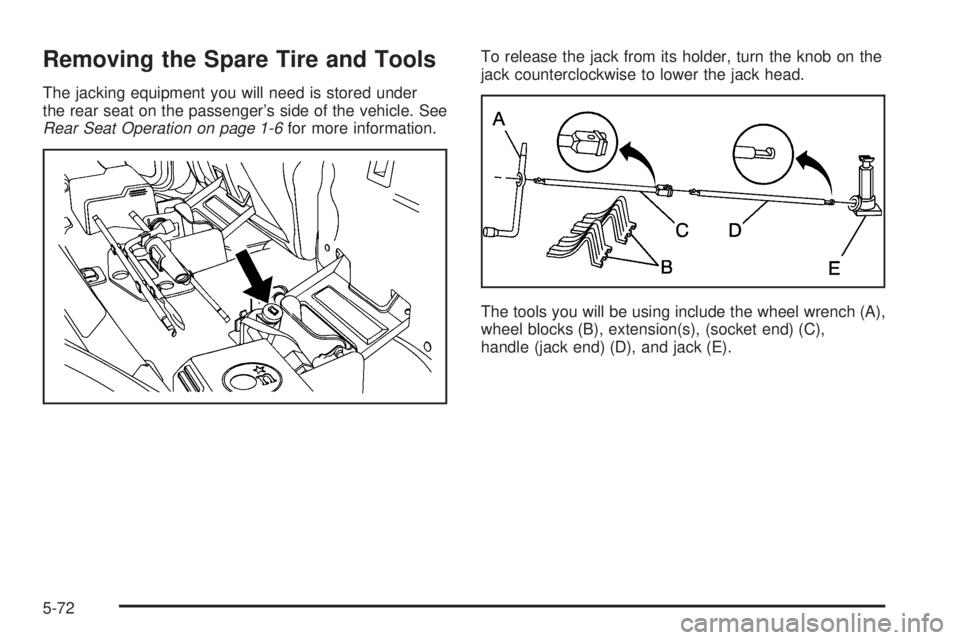
The jacking equipment you will need is stored under
the rear seat on the passenger’s side of the vehicle. See
Rear Seat Operation on page 1-6for more information.To release the jack from its holder, turn the knob on the
jack counterclockwise to lower the jack head.
The tools you will be using include the wheel wrench (A),
wheel blocks (B), extension(s), (socket end) (C),
handle (jack end) (D), and jack (E).
5-72
Page 389 of 470
The following instructions explain how to remove
the underbody-mounted spare located underneath
your vehicle.
Notice:If you remove or restow a tire from/to
the storage position under the vehicle when it is
supported by a jack, you could damage the tire
and/or your vehicle. Always remove or restow a
tire when the vehicle is on the ground.
1. Open the liftgate. SeeLiftgate/Liftglass on
page 2-12for more information.
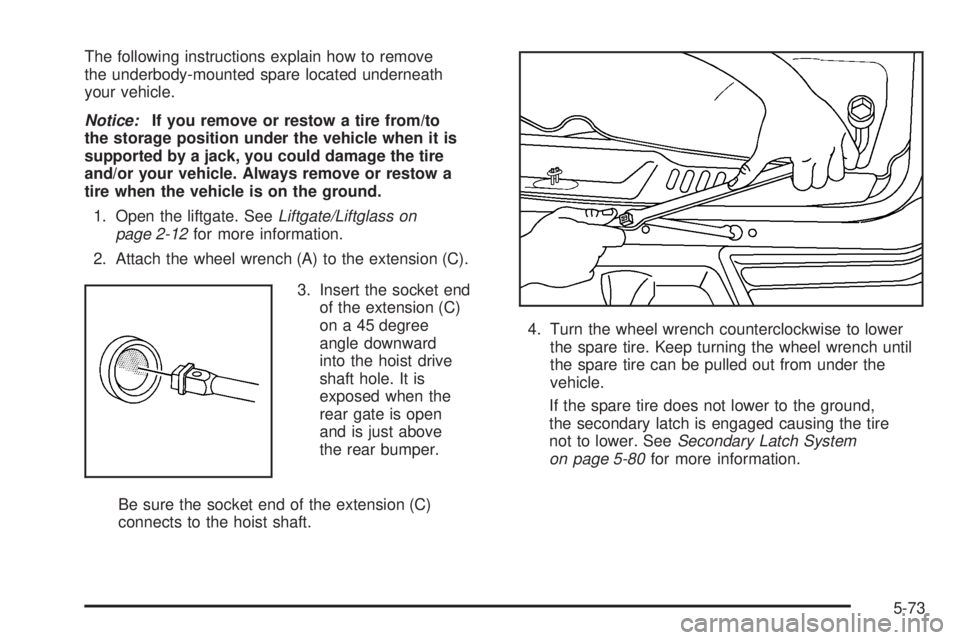
2. Attach the wheel wrench (A) to the extension (C).
3. Insert the socket end
of the extension (C)
on a 45 degree
angle downward
into the hoist drive
shaft hole. It is
exposed when the
rear gate is open
and is just above
the rear bumper.
Be sure the socket end of the extension (C)
connects to the hoist shaft.4. Turn the wheel wrench counterclockwise to lower
the spare tire. Keep turning the wheel wrench until
the spare tire can be pulled out from under the
vehicle.
If the spare tire does not lower to the ground,
the secondary latch is engaged causing the tire
not to lower. SeeSecondary Latch System
on page 5-80for more information.
5-73
Page 390 of 470
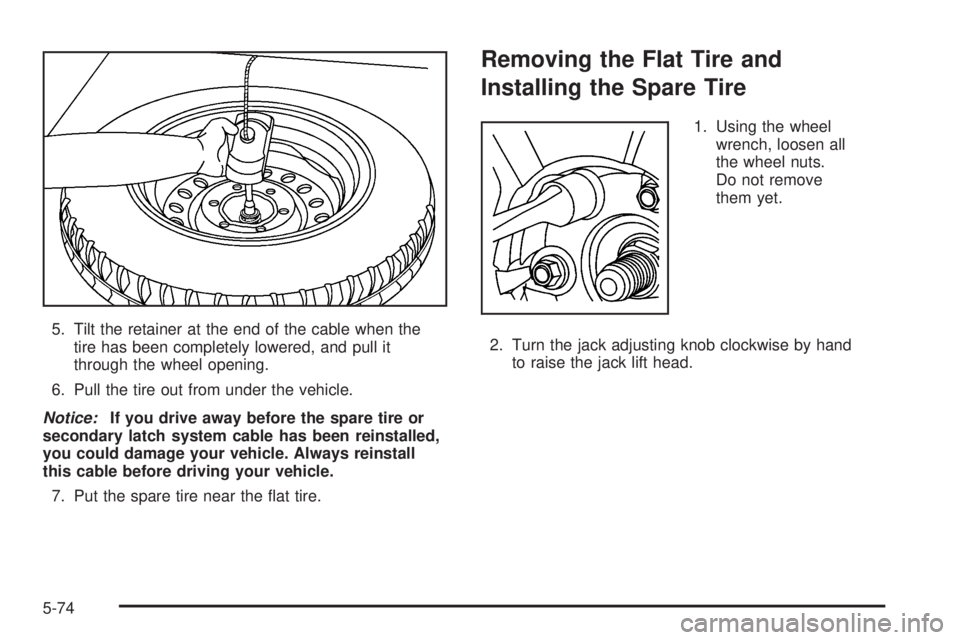
5. Tilt the retainer at the end of the cable when the
tire has been completely lowered, and pull it
through the wheel opening.
6. Pull the tire out from under the vehicle.
Notice:If you drive away before the spare tire or
secondary latch system cable has been reinstalled,
you could damage your vehicle. Always reinstall
this cable before driving your vehicle.
7. Put the spare tire near the �at tire.
Removing the Flat Tire and
Installing the Spare Tire
1. Using the wheel
wrench, loosen all
the wheel nuts.
Do not remove
them yet.
2. Turn the jack adjusting knob clockwise by hand
to raise the jack lift head.
5-74
Page 392 of 470
{CAUTION:
Raising your vehicle with the jack improperly
positioned can damage the vehicle and even
make the vehicle fall. To help avoid personal
injury and vehicle damage, be sure to �t the
jack lift head into the proper location before
raising the vehicle.
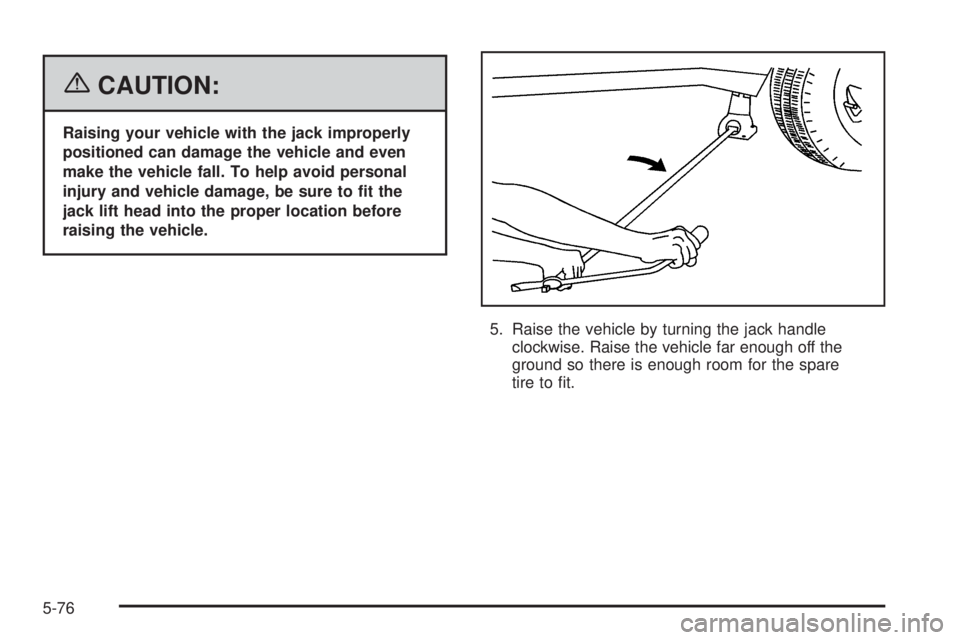
5. Raise the vehicle by turning the jack handle
clockwise. Raise the vehicle far enough off the
ground so there is enough room for the spare
tire to �t.
5-76
Page 393 of 470
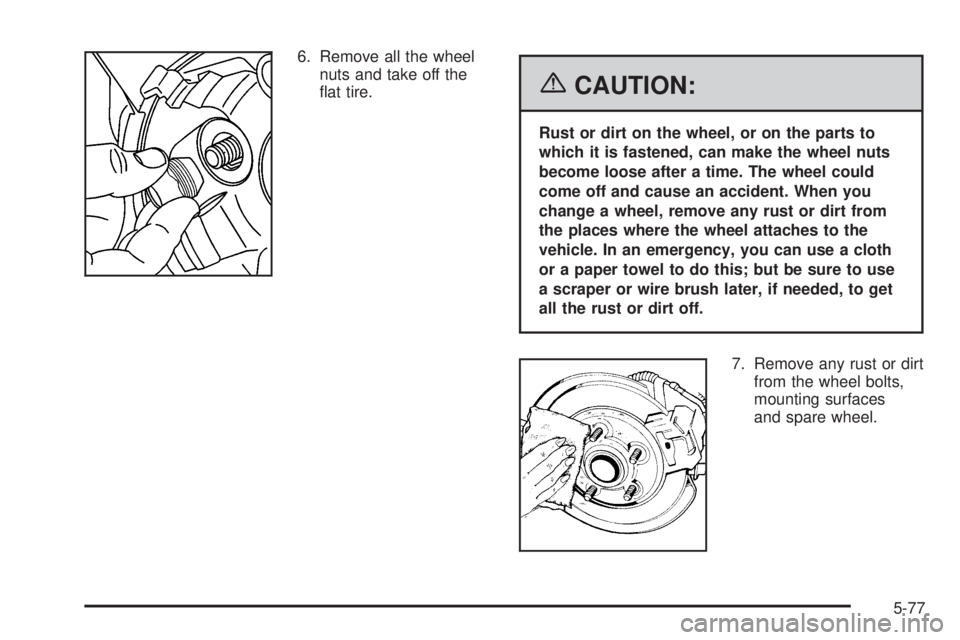
6. Remove all the wheel
nuts and take off the
�at tire.
{CAUTION:
Rust or dirt on the wheel, or on the parts to
which it is fastened, can make the wheel nuts
become loose after a time. The wheel could
come off and cause an accident. When you
change a wheel, remove any rust or dirt from
the places where the wheel attaches to the
vehicle. In an emergency, you can use a cloth
or a paper towel to do this; but be sure to use
a scraper or wire brush later, if needed, to get
all the rust or dirt off.
7. Remove any rust or dirt
from the wheel bolts,
mounting surfaces
and spare wheel.
5-77