fold seats BUICK RANDEZVOUS 2004 Owner's Manual
[x] Cancel search | Manufacturer: BUICK, Model Year: 2004, Model line: RANDEZVOUS, Model: BUICK RANDEZVOUS 2004Pages: 486, PDF Size: 3.18 MB
Page 15 of 486

Rear Seats
Rear Seat Operation
The rear seats in your vehicle have seat operating
features to adjust, fold, remove and reinstall the seats.
By using the seat operating procedures, in the
correct order, you can easily remove the seats from
your vehicle.
When you put the seats back in the vehicle, be sure to
follow the label on the back of the seat for proper location.
Split Bench Seats
If your vehicle has the split bench seat, the seatbacks
can be folded forward or reclined individually and
the sections can be �ipped forward or removed
individually.
Folding or Reclining the Seatbacks
{CAUTION:
If the seatback isn’t locked, it could move
forward in a sudden stop or crash. That could
cause injury to the person sitting there. Always
press rearward on the seatback to be sure it is
locked.
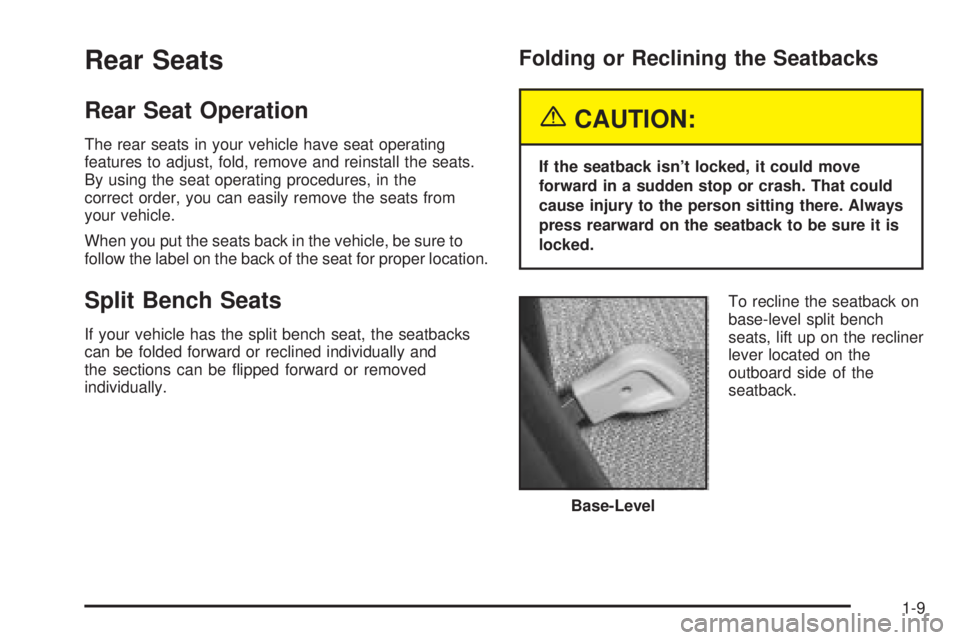
To recline the seatback on
base-level split bench
seats, lift up on the recliner
lever located on the
outboard side of the
seatback.
Base-Level
1-9
Page 16 of 486

To recline the seatback on
up-level split bench seats,
push forward on the
recliner lever located on
the outboard side of
the seatback.
Move the seatback to the desired position.
It is easier to raise or lower the seatback if you lean
forward and take the weight off the seatback.
The seatbacks on each section also fold forward to put
items behind the seats.
Lift up or push forward on the recliner lever and fold the
seatback forward. The seatback will lock into place
when you push it back to the upright position.
After raising a seatback to an upright position, push and
pull on the seatback to check that it is locked upright.Removing the Split Bench Seat
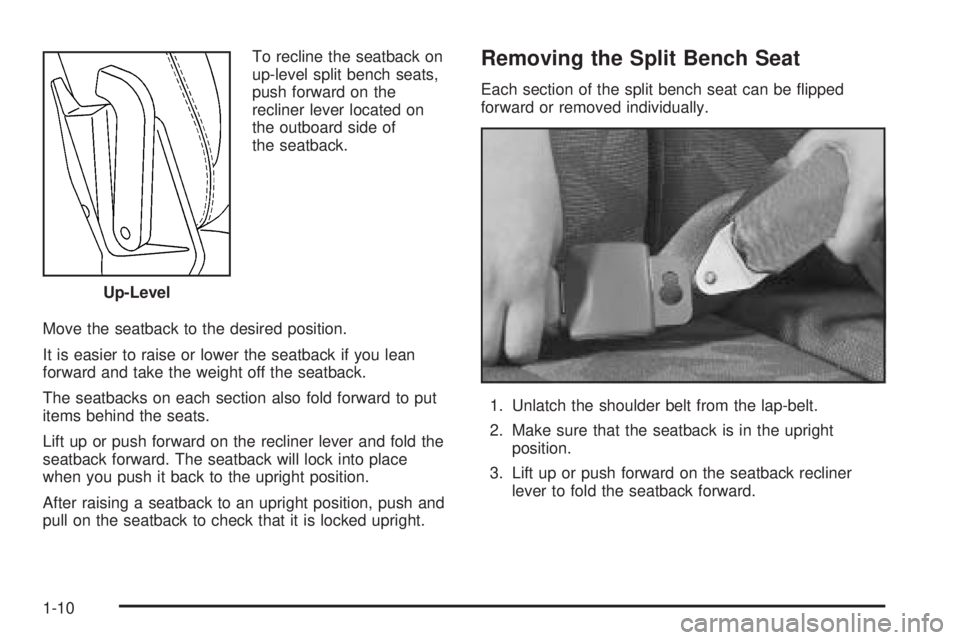
Each section of the split bench seat can be �ipped
forward or removed individually.
1. Unlatch the shoulder belt from the lap-belt.
2. Make sure that the seatback is in the upright
position.
3. Lift up or push forward on the seatback recliner
lever to fold the seatback forward. Up-Level
1-10
Page 129 of 486

Storage Areas
Glove Box
If the glove box has a lock, put your key into the lock
and turn the key counterclockwise. To open the
glovebox, pull the latch release.
The glove box door has a detent to prevent the door
from lowering too far. Open the glove box until the door
is partway open, then pull the door down if you need
it fully opened.
To close the glove box, the door must be pushed up
past the detent. To lock the glovebox, put your key into
the lock and turn the key clockwise.
Cupholder(s)
There are two cupholders located in the �oor console.
The cupholders have liners that remove for larger
beverage items. Remove the liners by lifting them out.
Your vehicle has cupholders located in the rear seat
armrests if it has a split folding rear seat. If your vehicle
has captain’s chairs, there are cupholders on the
sides of the seats. If your vehicle has a stowable seat,
there are cupholders in the center of the seat.
Cell Phone Storage Area
Your vehicle has a cell phone storage compartment
located on the �oor console storage closest to the
driver’s seat. Lift the lid to use the storage compartment.
The compartment has an accessory power outlet for
charging the cell phone.
Overhead Console
If your vehicle has an overhead console it may contain
compartments for storage and sunglasses and
HomeLink
®Transmitter buttons.
If your vehicle has the OnStar
®System, the OnStar®
buttons will replace the storage compartment. See
OnStar®System on page 2-33for more information.
If your vehicle has a sunroof, the mini console contains
the HomeLink
®Transmitter buttons and the OnStar®
buttons.
Storage Compartment
To open the storage compartment, located at the front
of the overhead console, press the release latch
forward. Then pull the compartment down to the full
open position.
2-39
Page 313 of 486

Never exceed the GVWR for your vehicle or the GAWR
for either the front or rear axle.
{CAUTION:
Do not load your vehicle any heavier than the
GVWR, or either the maximum front or rear
GAWR. If you do, parts on your vehicle can
break, and it can change the way your vehicle
handles. These could cause you to lose
control and crash. Also, overloading can
shorten the life of your vehicle.
Notice:Loading objects that weigh over 400 lbs
(181 kg) onto the sliding rear convenience tray may
cause damage. Repairs would not be covered by
your warranty. Do not load heavy objects on
the sliding rear convenience tray.If you put things inside your vehicle – like suitcases,
tools, packages, or anything else – they will go as fast
as the vehicle goes. If you have to stop or turn
quickly, or if there is a crash, they will keep going.{CAUTION:
Things you put inside your vehicle can strike
and injure people in a sudden stop or turn, or
in a crash.
Put things in the cargo area of your
vehicle. Try to spread the weight evenly.
Never stack heavier things, like suitcases,
inside the vehicle so that some of them
are above the tops of the seats.
Don’t leave an unsecured child restraint in
your vehicle.
When you carry something inside the
vehicle, secure it whenever you can.
Don’t leave a seat folded down unless you
need to.
4-41
Page 445 of 486

Maintenance Footnotes
†The U.S. Environmental Protection Agency or the
California Air Resources Board has determined that the
failure to perform this maintenance item will not nullify
the emission warranty or limit recall liability prior to
the completion of the vehicle’s useful life. We, however,
urge that all recommended maintenance services be
performed at the indicated intervals and the
maintenance be recorded.
(a)Visually inspect brake lines and hoses for proper
hook-up, binding, leaks, cracks, cha�ng, etc. Inspect
disc brake pads for wear and rotors for surface
condition. Inspect other brake parts, including calipers,
parking brake, etc. Check parking brake adjustment.
(b)Visually inspect front and rear suspension and
steering system for damaged, loose or missing part or
signs of wear. Inspect power steering lines and
hoses for proper hook-up, binding, leaks, cracks,
cha�ng, etc.
(c)Visually inspect hoses and have them replaced if they
are cracked, swollen or deteriorated. Inspect all pipes,
�ttings and clamps; replace with genuine GM parts as
needed. To help ensure proper operation, a pressure test
of the cooling system and pressure cap and cleaning the
outside of the radiator and air conditioning condenser is
recommended at least once a year.(d)Visually inspect wiper blades for wear or cracking.
Replace blade inserts that appear worn or damaged
or that streak or miss areas of the windshield.
(e)Make sure the safety belt reminder light and all your
belts, buckles, latch plates, retractors and anchorages
are working properly. Look for any other loose or
damaged safety belt system parts. If you see anything
that might keep a safety belt system from doing its
job, have it repaired. Have any torn or frayed safety belts
replaced. Also look for any opened or broken air bag
coverings, and have them repaired or replaced. (The air
bag system does not need regular maintenance.)
(f)Lubricate all key lock cylinders, hood latch
assemblies, secondary latches, pivots, spring anchor
and release pawl, hood and door hinges, rear folding
seats and liftgate hinges. More frequent lubrication may
be required when exposed to a corrosive environment.
Applying silicone grease on weatherstrips with a
clean cloth will make them last longer, seal better and
not stick or squeak.
(g)Check system for interference or binding and for
damaged or missing parts. Replace parts as needed.
Replace any components that have high effort or
excessive wear. Do not lubricate accelerator or cruise
control cables.
6-7